Search

How to Use Smart Filters in Adobe Photoshop

  • Thread starter KristinaW
  • Start date
KristinaW

KristinaW

Member
Joined
May 7, 2021
Messages
127
Reaction Score
0
Points
18
  • #1
When I think of applying filters to images in Adobe Photoshop, my skin crawls. I don’t like the idea of it at all. I remember all the occasions when I used one of them towards the beginning of whatever it was that I was working on and then when I changed my mind later on down the road and wanted to get rid of it. Simple situation, you say. Not so simple, I say. Can you go back and change a filter once it’s applied? No. You can’t. You’re stuck with it.

Why Smart Filters are Important in Adobe Photoshop​

Above is the post I would have written years ago if someone has asked me to talk about filters in our favorite image editing application (Photoshop). Today, things are different. Today, we have something called Smart Filters at our disposal. What are Smart Filters? Well, let’s read what Adobe has to say about them:

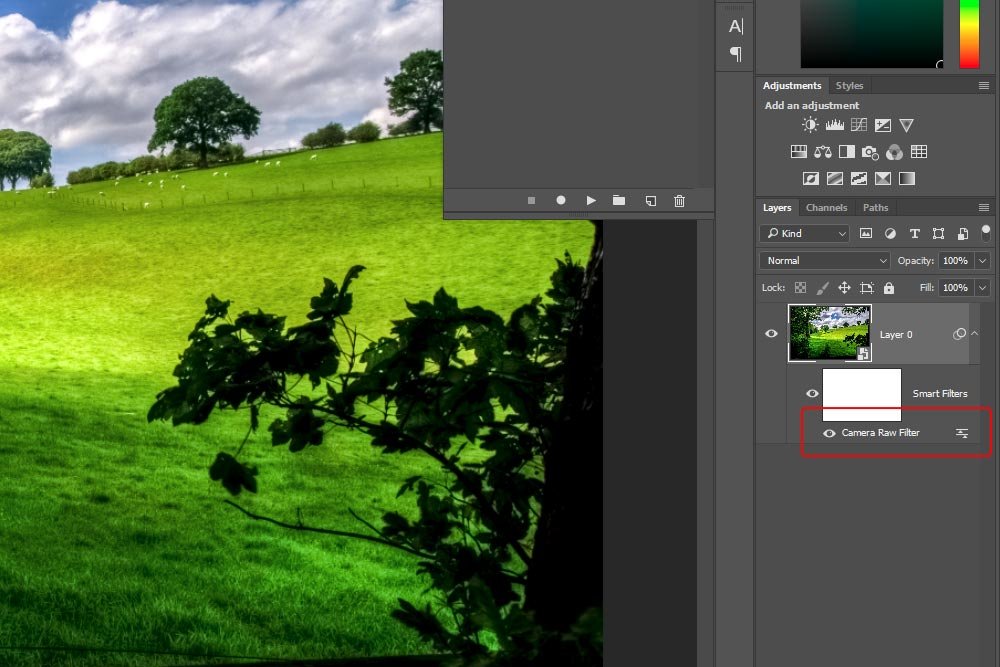
Any filter applied to a Smart Object is a Smart Filter. Smart Filters appear in the Layers panel below the Smart Object layer to which they are applied. Because you can adjust, remove, or hide Smart Filters, they are nondestructive.

If you’re a Photoshop user and a fan of filters, Smart Filters are like a present on Christmas morning. These things are awesome.

In today’s post, I’m going to quickly run through a demo project that will show you exactly how to transform a regular layer into a Smart Object. Then, I’ll demonstrate how to apply a Smart Filter to that layer, which will enable us to edit the filter if we want to change it. It will also allow us to completely delete the filter, leaving the original layer intact. Hopefully, by the end of this post, you’ll have a good idea about how to separate layers and filters, while keeping all your edits non-destructive.

Original Photo​

I found a really great photo for this post. Since I’m going to be using one of the Noise filters, I think it’ll offer a classic look.

smart-filters-photoshop.jpg

Converting Layer to Smart Object​

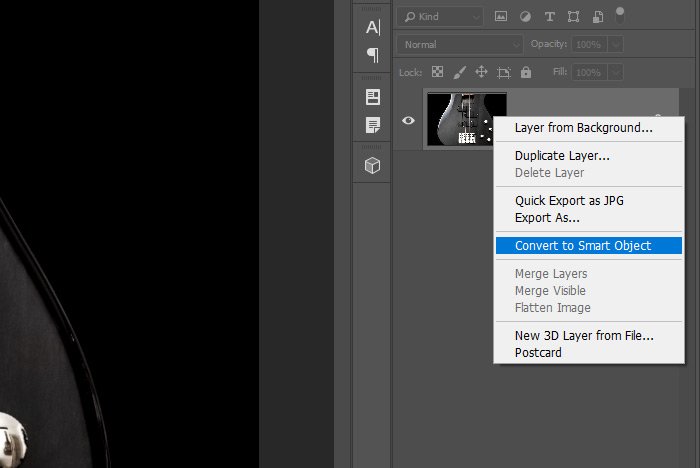
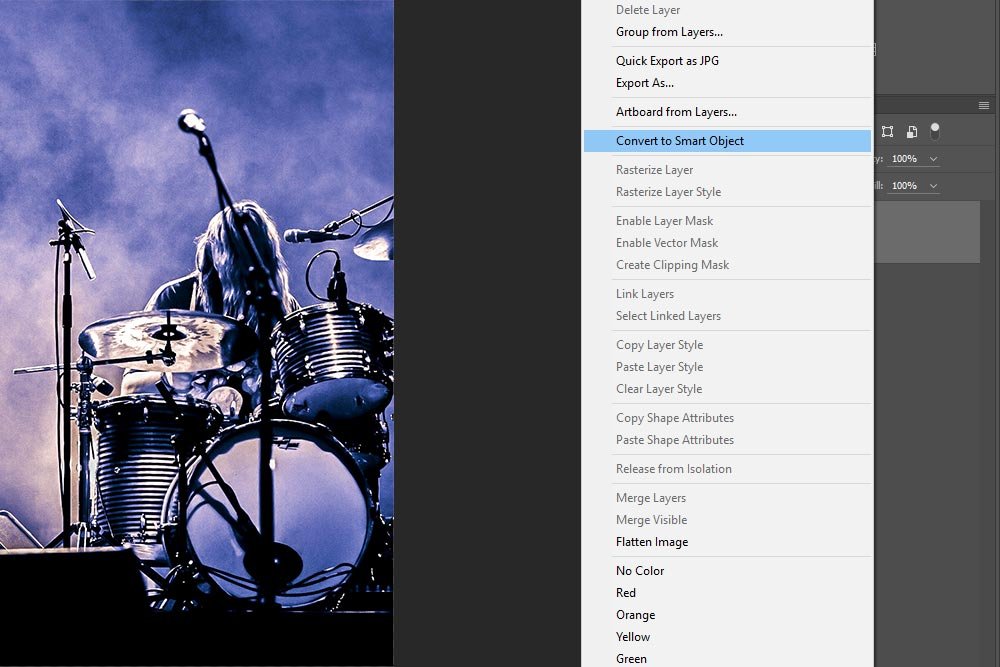
To add a Smart Filter, the layer first needs to be converted to a Smart Object. The fastest way to do this is to right-click on the layer in question and select the Convert to Smart Object option.

convert-smart-object.jpg

Remember, to do this, you need to right click on the empty layer area, not the layer thumbnail.

Once the layer becomes a Smart Object, a small icon will appear in the lower right corner of the layer thumbnail. When that icon is rolled over, a small popup appears that says Smart Object Thumbnail.
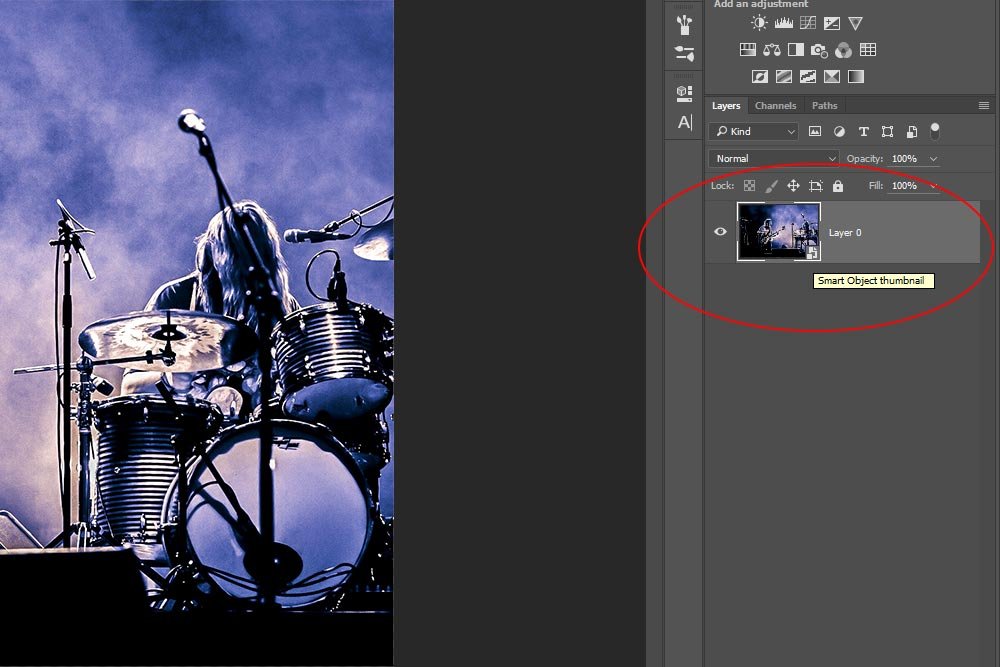
smart-object-icon.jpg

If you aren’t familiar with Smart Objects and their benefits, please take a quick peek at my previous post where I covered the topic:

What are Smart Objects in Adobe Photoshop?

Applying a Filter​

FYI – Any filter we apply now that we’re dealing with a Smart Object will automatically attach itself to the layer as a Smart Filter. There’s no additional steps beyond simply applying the filter.

With that in mind, I’ll go ahead and head up to the Filter > Noise menu item and select Dust & Scratches. My goal is to give the photo a badass weird look. Not too much – just enough to make someone look twice.
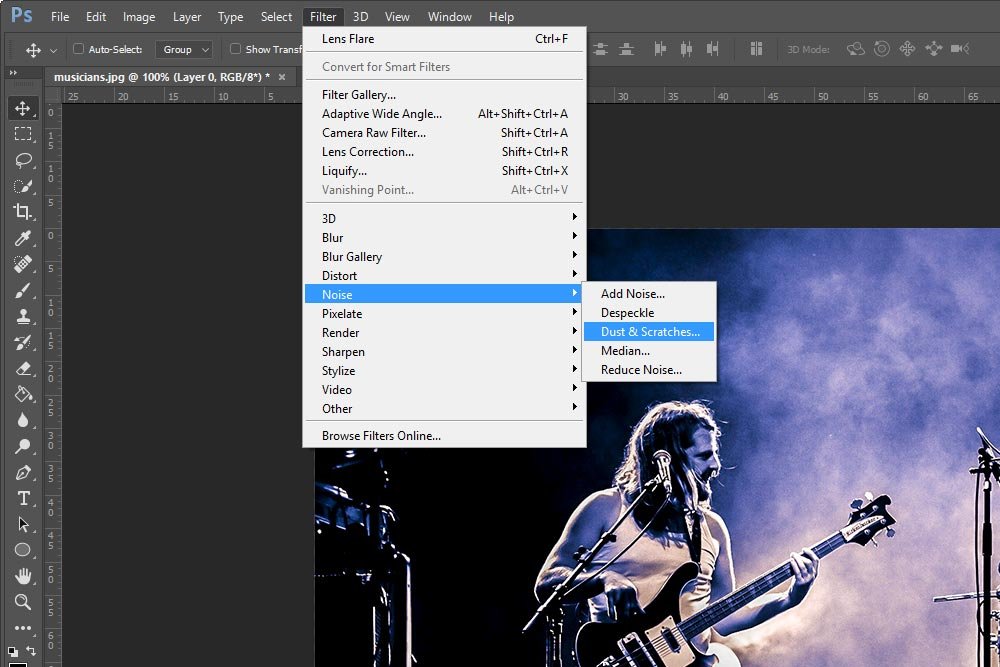
filter-noise-dust-scratches.jpg

After I make this selection, the Dust & Scratches dialog box will appear. Inside, I’ll move the Radius slider to 7 pixels and the Threshold slider to 120 levels.
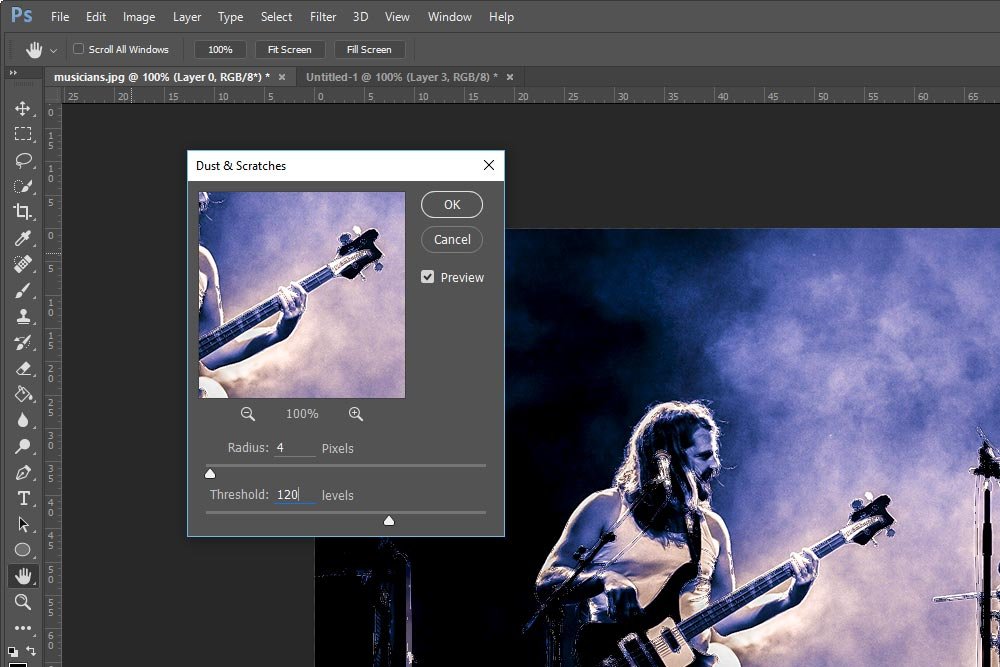
dust-scratches-dialog.jpg

When finished, I’ll click OK and my focus will turn to the Layers panel.
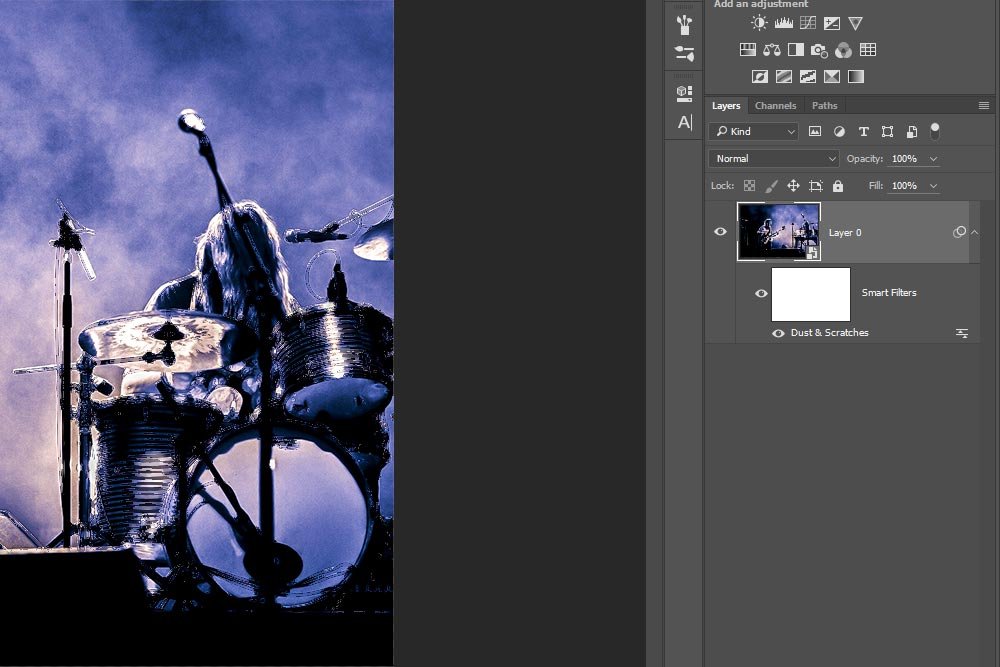
smart-filters-layers.jpg

From the screenshot above, you can see that we now have a filter applied and it’s considered “Smart.” And in case you’re interested in what the resulting photo looks like, here it is below.

photo-smart-filter.jpg

Smart Options​

You may be scratching your head wondering why we went through all the trouble of making the Smart Object and then having the filter that’s applied to the layer a Smart Filter. Well, here’s why – we now have options. Many good options. All of which we didn’t have before.

Deleting: To delete the filter, simply click the Smart Filters layer and drag it down to the trash can icon at the bottom of the Layers panel.

Hiding: To hide a Smart Filter, click the small “eye” icon that’s located to the left of the filter name in the Layers panel.

Blending: To attach a blending mode to the filter, click the small icon that’s located at the right of the specific filter name in the Layers panel.

Editing: To edit the initial filter through its dialog box, double-click the name of the filter in the Layers panel.

Masking: To use the Smart Filter as a mask, all you need to do is select the white filter mask thumbnail in the Smart Filters layer and then paint with white or black.

Properties: To edit the mask properties, double-click on the mask thumbnail and push the adjust the settings in the resulting Properties panel.

Talk about non-destructive flexibility. I’m not sure this can be beat. When the developers at Adobe heard about the issues surrounding permanent and destructive filters in Photoshop, they sure responded in a positive way.

I hope I explained some of the value of using Smart Filters. If you have any comments or questions, please leave them in the comment section below. Thanks!
 
KristinaW

KristinaW

Member
Joined
May 7, 2021
Messages
127
Reaction Score
0
Points
18
  • #2

Combining a Smart Filter with a Camera Raw Action in Adobe Photoshop​

When editing photos, I usually launch an image into Adobe Camera Raw from Bridge, edit it as much as I deem appropriate and then move it into Photoshop to finish things up. I actually have a Preset that I use quite often in Camera Raw for most of my food photography. After I apply the Preset and tweak the photo a bit to customize it, I’ll launch it into Photoshop, which will automatically close down Camera Raw.

This has proven to be a fairly efficient workflow. The issue that has arisen, though, is that I’m finding myself not always absolutely happy with the product I move from Camera Raw into Photoshop. Because of this, I’m forced to start all over again. Again, I’ll launch the image from Bridge into Camera Raw, edit the image using the Preset I made, tweak the photo a little differently this time and finally, transfer the edited image to Photoshop. If I’m not happy again, I’ll need to repeat this process one more time or until I get it right.

A few days ago, I wondered if I could open an image into Photoshop from the get-go and turn the photo layer into an eternally editable Smart Object. From there, I can take advantage of the Camera Raw Filter and perform my usual Preset edits that way, right inside of Camera Raw. When finished, I would close Camera Raw and have the edited file sitting there inside of Photoshop, where it was. If I needed to re-edit, I could simply do so from Photoshop.

I’m happy to report that this process works wonderfully. And because it works so well, I’ve decided to lay out exactly what I did here. So, if you’re interested in making an already efficient workflow even more efficient, read on below. This one is especially good because I’ll throw in a concept from one of my previous posts that will make the entire process lightening fast.

Previous Posts You Should Read​

In the post below, I’ll be using some ideas I’ve written about in previous posts. While you’re welcome to breeze through what I share below, it would probably be most helpful if you review what I link to below. Whatever you would like to do is fine, just know that all the resources you’ll need are right here.

How to Save Tool Presets in Adobe Camera Raw

What are Smart Objects in Adobe Photoshop?

Using Camera Raw as a Filter Inside Adobe Photoshop

How to Create Actions with Camera Raw Inside Adobe Photoshop

Demo Photo​

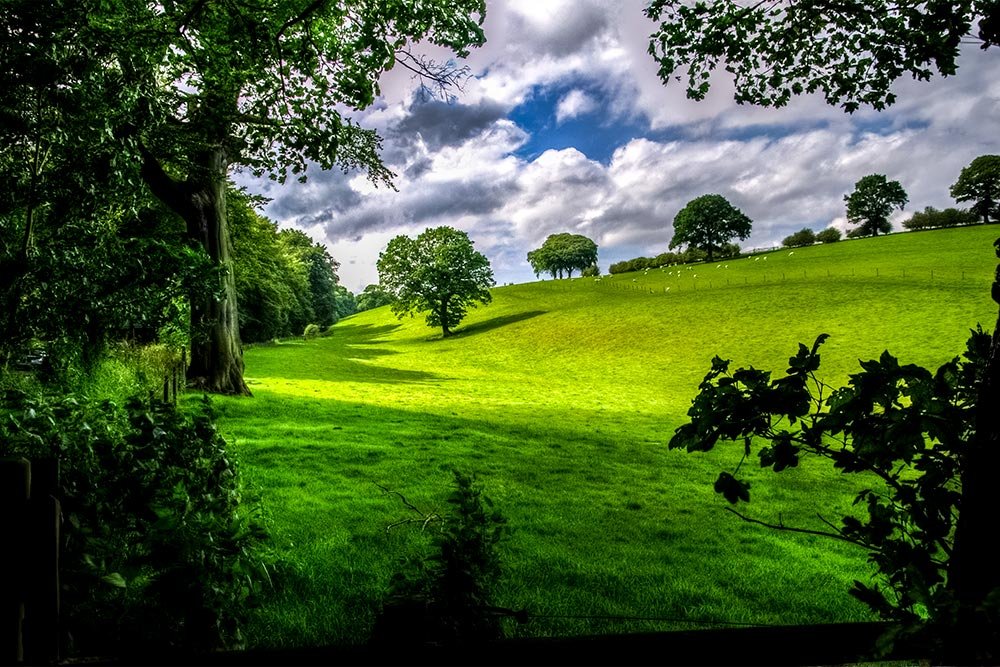
For this post, I’ll be using the image below. What you’re looking at is what I’d like the photo to eventually look like. The original is much more dull as you’ll quickly discover in the next section.

demo-field-photo.jpg

Creating a Smart Filter​

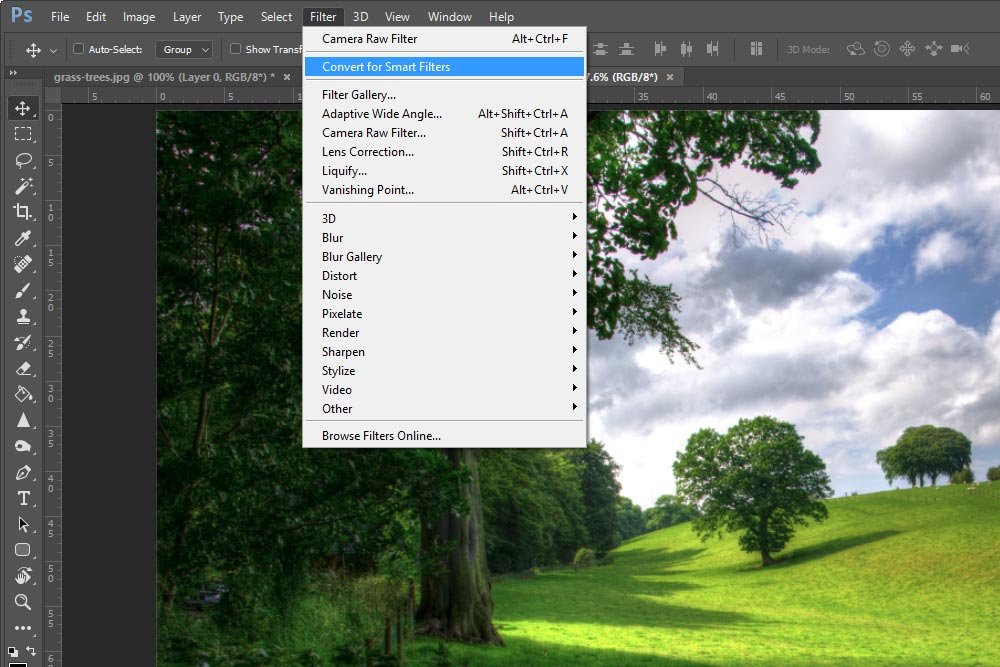
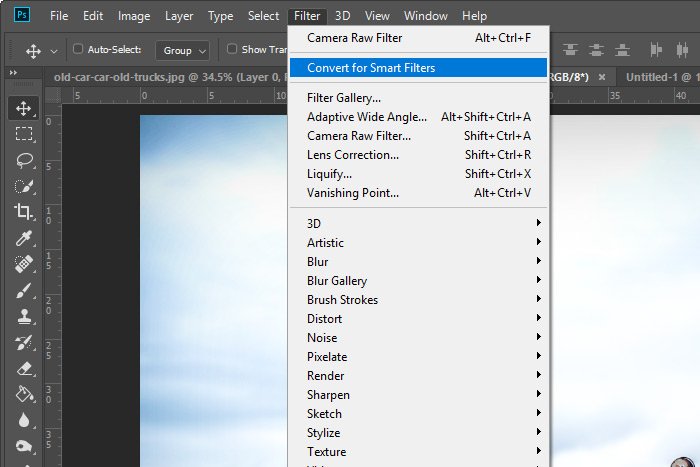
After opening the photo into Adobe Photoshop, I’ll head straight to the Filter > Convert For Smart Filters menu item and click.

filter-convert-for-smart-filters.jpg

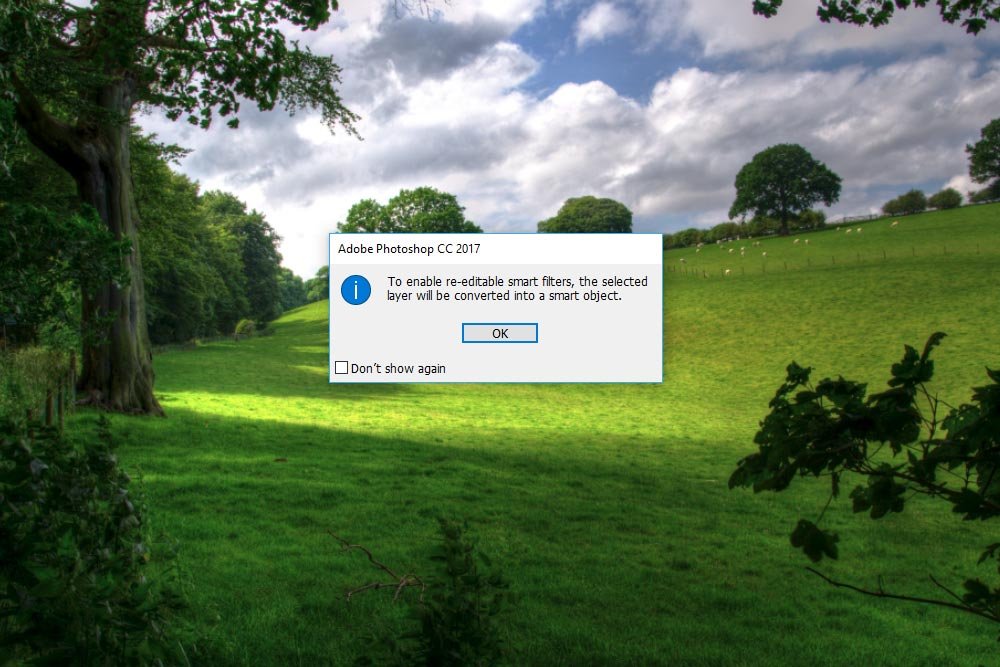
When I do this, a small warning box will appear, telling me that my action will turn the layer into a Smart Object.

smart-filters-dialog.jpg

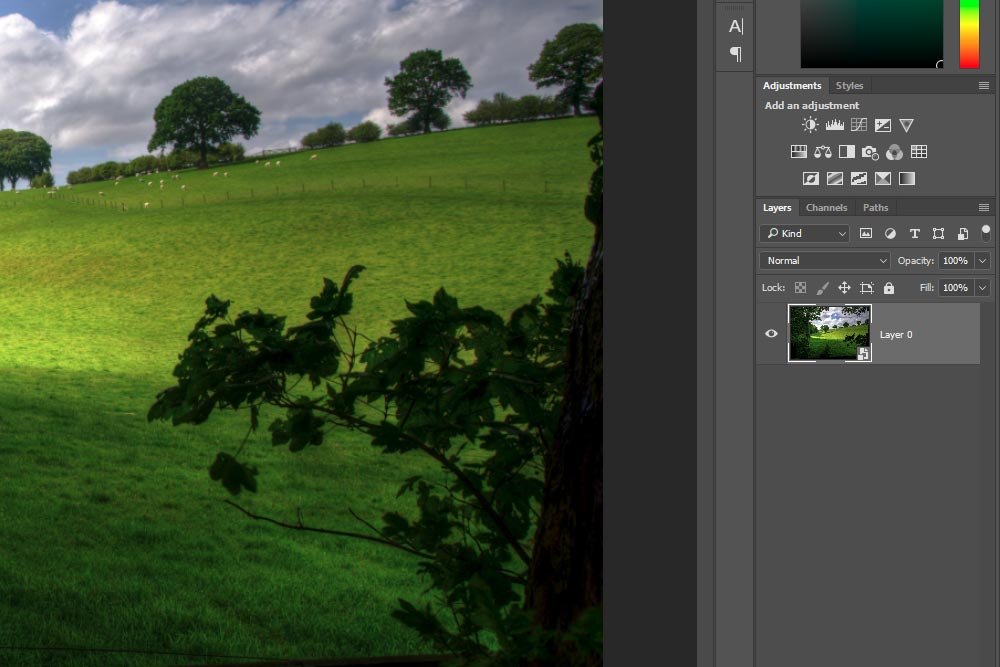
Once I click OK, I’ll see a small box appear in the lower right side of the layer thumbnail in the Layers panel.

smart-object-indicator.jpg

At this point, you may be asking yourself what the difference between a Smart Object and a Smart Filter is. Well, any filter applied to a Smart Object is a Smart Filter. So, when you create a Smart Filter, all you’re doing is creating a Smart Object that you’ll apply a filter to. Ask me why Adobe broke this task up like this as opposed to simply telling us to create a Smart Object and then apply a filter to it and I’ll tell you that I have absolutely no idea.

Anyway, now that the layer has been converted over, I can go ahead with the remaining steps of this project.

Creating an Action​

By now, you should know how to create an action in Photoshop. If you don’t, I have a post that will explain everything in very simple to follow detail. You can view that post here.

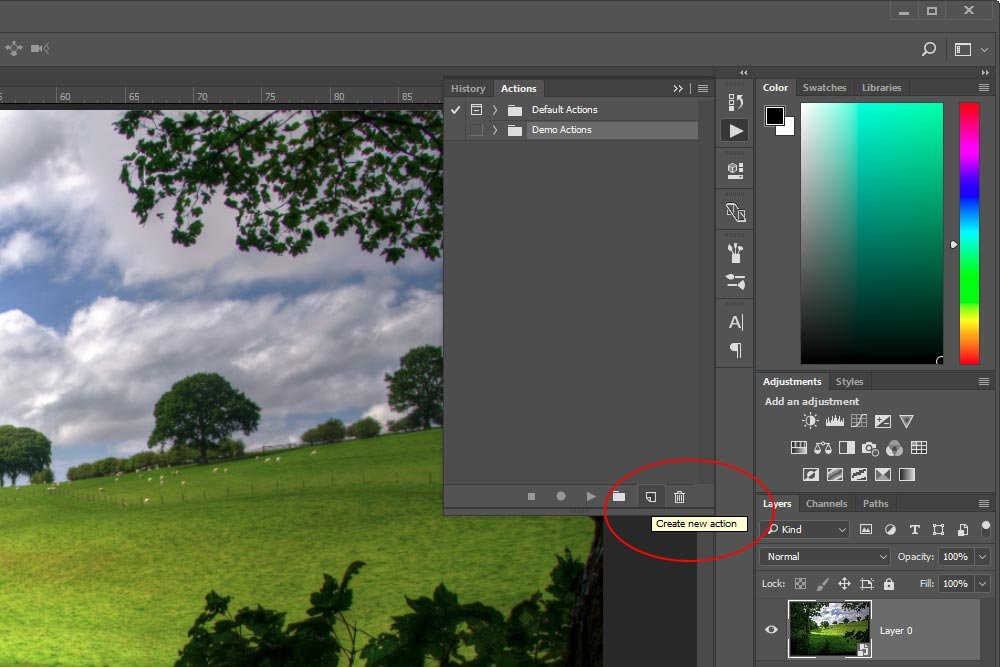
I’ll head up to the Actions panel and, after selecting the freshly created Demo Actions folder, will click the Create New Action icon.

create-new-action-icon.jpg

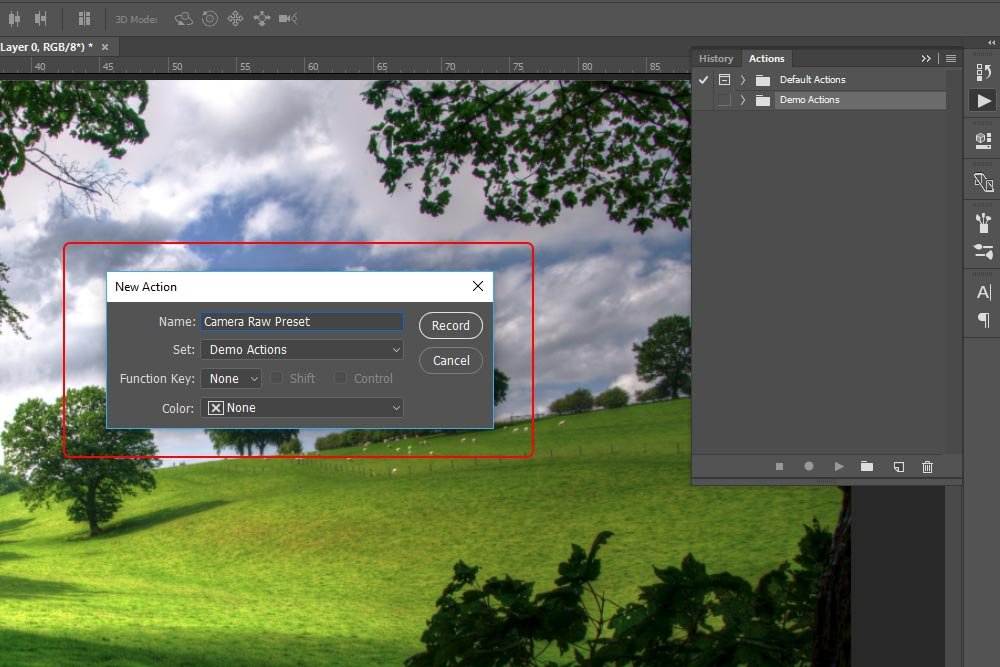
Immediately, the New Action dialog will appear, giving me the opportunity to name the action I’d like to make. In this case, I’ll call it Camera Raw Preset because that’s all I’ll be using with this task.

new-action-dialog.jpg

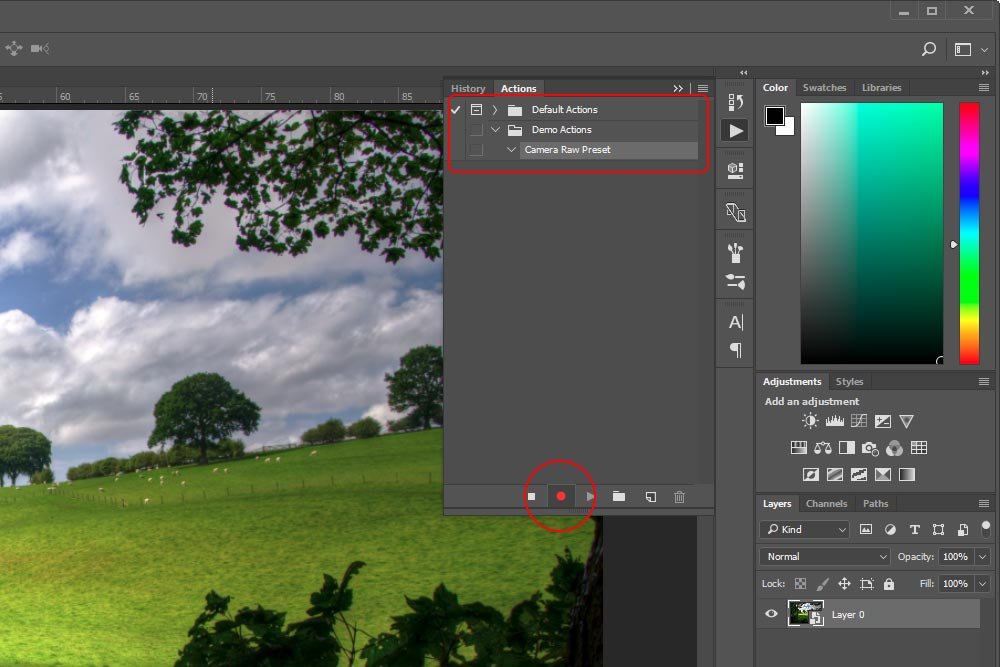
After I name the action and click Record, a small red circle will appear at the bottom of the Actions panel. That means my action is being recorded. Also, I’ll see the beginnings of the new action appear in the Demo Actions folder (set) in the Actions panel. I’ve outlined all this in red in the below screenshot.

action-record-indicator.jpg

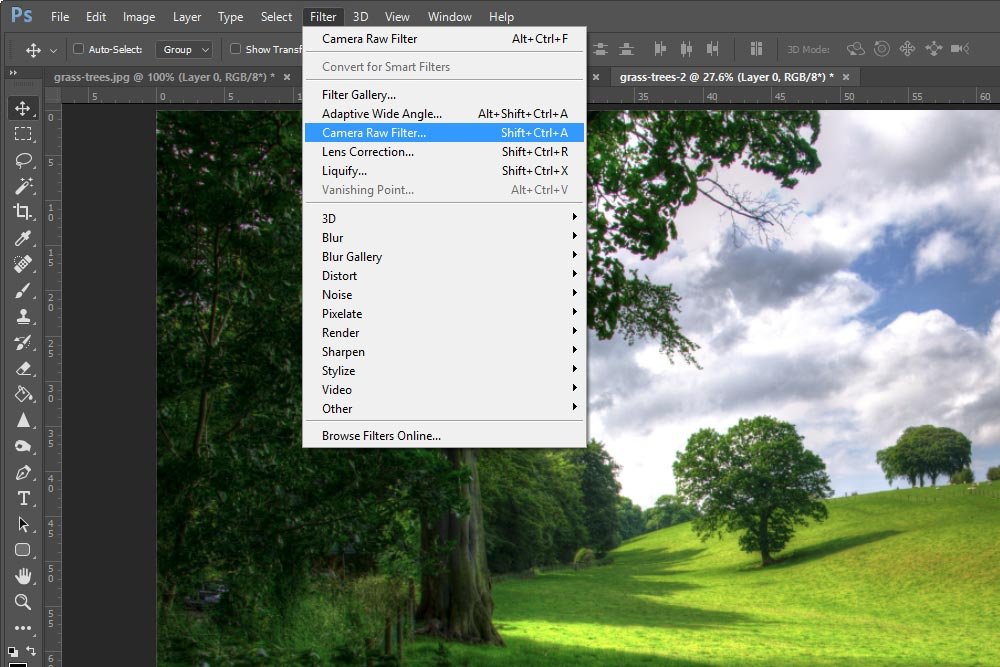
From here, I can head up to the Filter > Camera Raw Filter menu item and click.

camera-raw-filter-menu-item.jpg

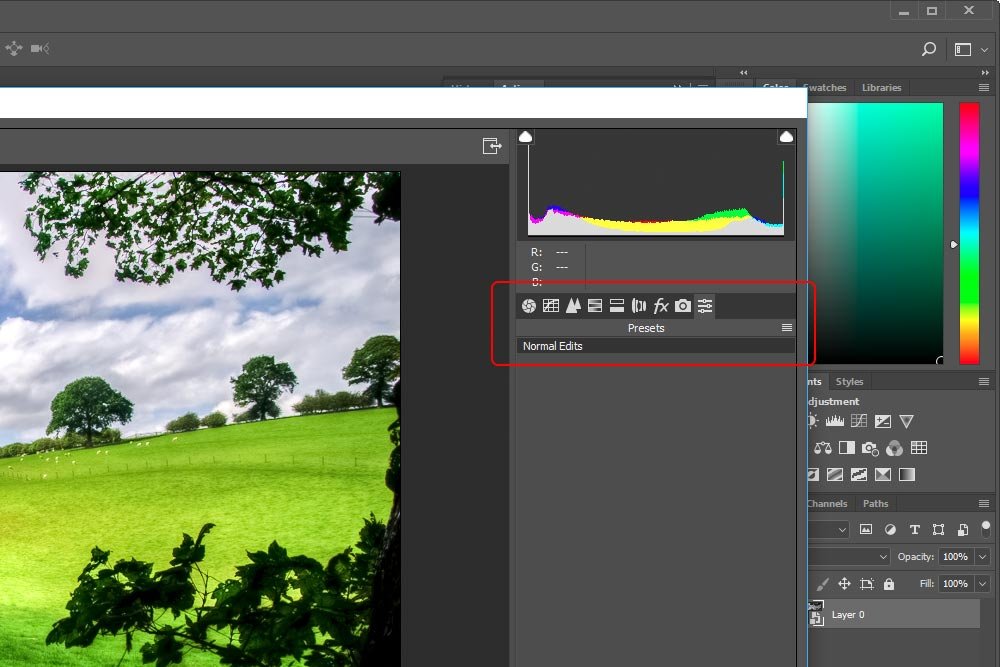
This will open Camera Raw right inside Photoshop. I’ll head straight to the Presets panel and click on my preset to activate it.

camera-raw-preset-panel.jpg

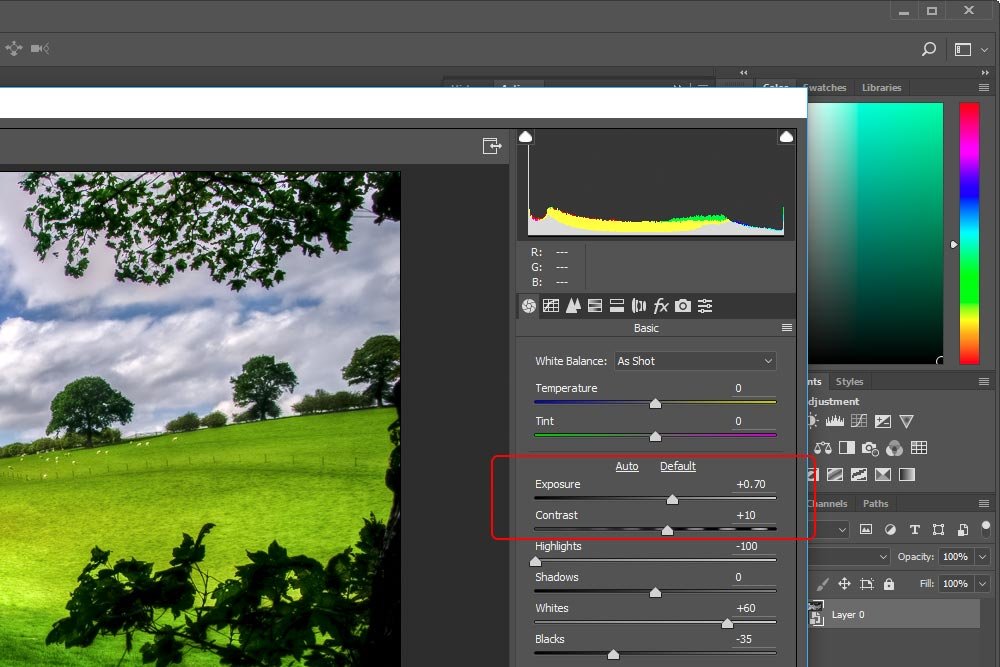
Then, since I think the Exposure setting is too strong, I’ll head to the Basic panel and push that slider to the left just a bit.

basic-panel-exposure.jpg

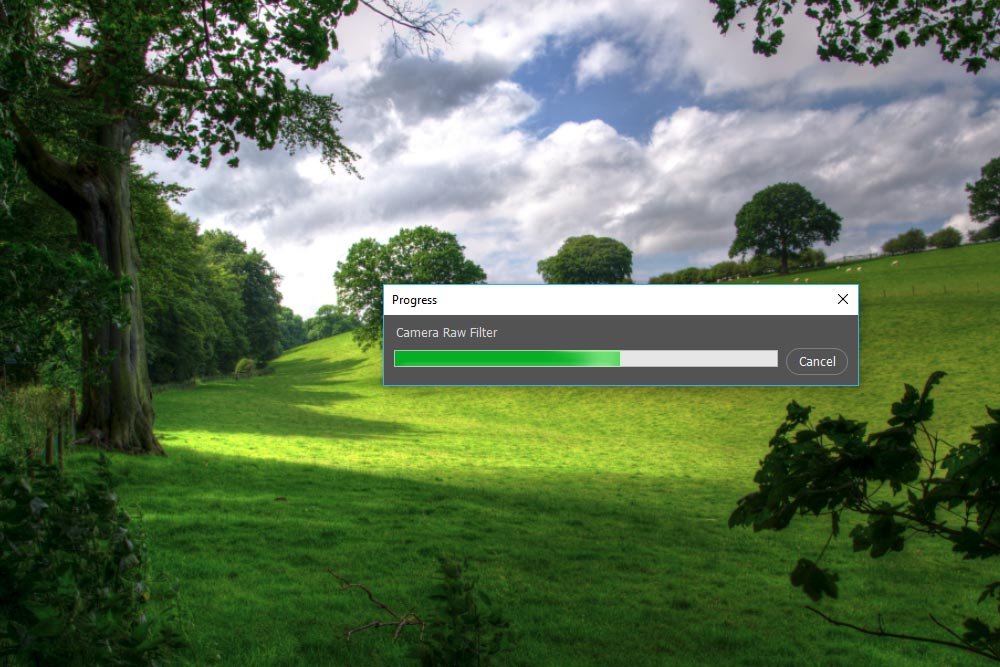
Finally, when I’m happy with the image, I’ll click the OK button down at the bottom right, which will cause Camera Raw to close out and me to return to Photoshop. In between that, I’ll see a status bar telling me the progress of the filter.

camera-raw-filter-progress-dialog.jpg

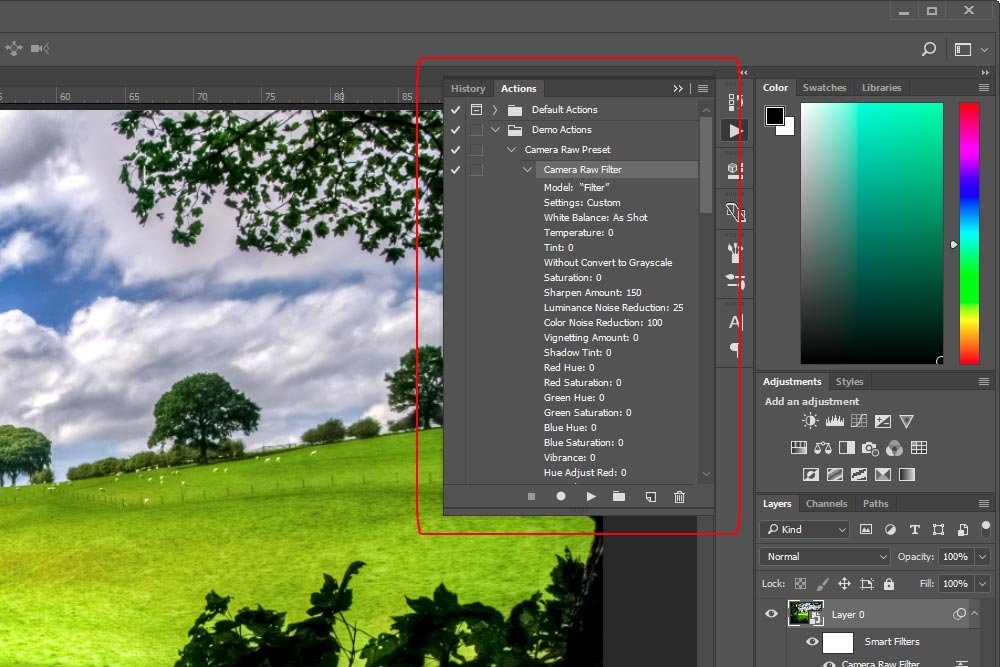
At last, I’ll click the Stop button at the bottom of the Action panel in Photoshop to create the action. At this point, I should see the action and Camera Raw Filter step in the panel.

new-action-steps.jpg

If you look at the screenshot above, you’ll see that I clicked the small arrow to the left of the Camera Raw Filter step. Doing that exposed all the data that was transferred over to Photoshop from Camera Raw. This isn’t too critical, but I did want to show you that you can expand the action steps for a closer look.

The Benefit of Smart Filters​

Okay, I just went over a heck of a lot of stuff. It sort of looked like the same steps from my previous post. There is, however, one huge difference between this post and the last one and it’s this; let’s say that I don’t like the output from Camera Raw. If I wanted to go back to Camera Raw to make a change, whether it be large or small, all I would need to do is to double click on the Camera Raw Filter text that sits directly under the Smart Filters object in the Layers panel.

camera-raw-filter-smart-filter.jpg

If I did that, Camera Raw would open back up and I would be able to see all of the edits I made previously. I could make any additional changes I saw fit and then I could click OK again. Those changes would then be applied to the image sitting inside Photoshop. I could do this a million times if I wanted to because of the mere fact that I created a Smart Object, which is completely editable, to begin with. It’s like magic. And that was the purpose of this tutorial.

If you have any questions or concerns regarding this post, please leave them in the comment section below. As always, thanks for reading!
 
KristinaW

KristinaW

Member
Joined
May 7, 2021
Messages
127
Reaction Score
0
Points
18
  • #3

The Idea Behind Smart Filter Masks & Blending Modes in Adobe Photoshop​

I’d like to take a quick break from all the demonstrations I’ve been recently working through on this website and get back to an area that might need more explaining. I talk a lot about Smart Filters throughout many of my posts and I realized the other day that not everyone knows exactly what these things are. I thought I’d discuss it for just a few moments, in an effort to clarify any misunderstanding.

In today’s post, I’d like to briefly explain how both Smart Filter blending modes and masks work inside of Adobe Photoshop. I’ll first set up a Smart Filter and then I’ll apply a blending mode it it, explaining the effect it has on the filter itself. Then, I’ll work a bit with the mask that comes with every Smart Filter in an effort to show you how powerful and helpful they can be. They’re definitely worth taking advantage of. This will be a very easy to understand post. I won’t include any curve balls and it’s my hope, that by the end of reading what I have to write, you’ll have a better understanding of the topics I discuss. Perhaps you’ll even begin using some of the techniques in your own projects.

The Demo Photo​

I’ll be using a photo of an old broken down truck for this post. I wanted to find something that had an isolated object in it and I thought this was pretty good. It’ll be easy to work with and to explain as I’m going.

old-truck.jpg

Converting For Smart Filters​

Okay, I already have the image opened up in Adobe Photoshop. I have just one layer in the Layers panel. It’s the image layer and it’s also considered the background layer. If I were to head up to the Filter menu and apply a filter as things currently are, the filter would be applied, but it would permanently alter that layer. If I changed my mind later and wanted to remove the filter after doing a bunch of other work, I wouldn’t be able to. I’d have to scrap the entire file and start over. A long time ago, Adobe realized that this was a horrible environment to work in, so they decided to offer something called Smart Objects. These are sort of overlays that allow us to alter images and apply filters in a non-destructive manner. Smart Objects give us recourse and allow us to change things long after they’ve been applied.

Think of a Smart Object as a piece of clear plastic wrap that sits on top of any layer. If you color the layer itself with magic marker, you just permanently altered the layer. If you color the clear plastic wrap that sits on top of the layer, you haven’t changed the layer at all. You can always toss the plastic wrap and put a new one down.

To change my regular layer to a Smart Object, I’ll head up to the Filter > Convert For Smart Filters menu item and click. All this does is convert the original layer into a Smart Object.

convert-for-smart-filters.jpg

Applying a Filter​

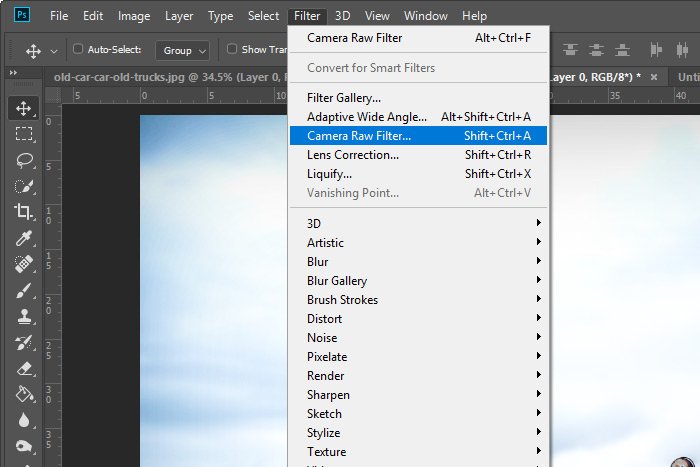
For this section, I’m going to apply a filter to the image layer. It makes no difference what filter I apply for this demonstration, but I will try to choose one that stands out. With that in mind, I’ll head back up to the Filter menu, but this time, I’ll select Camera Raw Filter.

camera-raw-filter.jpg

Once I do that, I’ll head into Camera Raw, make a few changes and then, when I’m finished, I’ll click the OK button to get back into Photoshop. Just yesterday, I updated Camera Raw and I discovered a bunch of new presets installed by default. For this demonstration, I simply clicked into the Presets tab and from there, I chose B&W Split Tone. Here’s the result.

b-w-split-tone.jpg

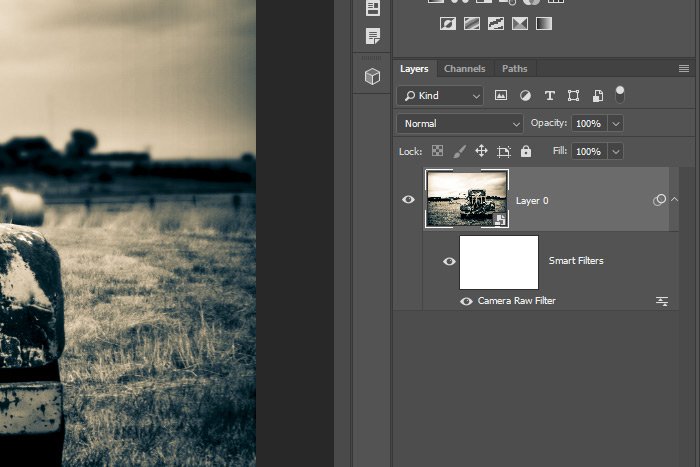
Let’s also take a look at the Layers panel to see what’s going on.

layers-panel.jpg

An Explanation​

I’d like to use this section to pick apart the Layers panel. That’s where all the good stuff is.


The top layer in the Layers panel is the Smart Object. That used to be the background layer, but I converted it into the object by using the menu and process I described above.

The next layer down, with the big white box in it is the Smart Filters layer. The big white box is a mask, which I’ll talk about later. You can treat this layer as sort of a shell that holds all the Smart Filters. I only applied one filter in this case, but if I were to apply more, they’d all be listed below this shell layer.

The third layer down is what I just referred to. This is the first (and only, in this case) filter that’s been applied. If I wanted to edit this filter, all I would need to do is double-click on this layer and Camera Raw would open back up. This is what they mean when they say “non-destructive” editing. I didn’t destroy (permanently alter) the file at all by applying this filter since I did it smartly.

If you’ll take a look to the right portion of this third layer, you’ll see a small icon. This is what I’ll be talking about next.

Applying a Smart Filter Blending Mode​

As you may already be aware, you can easily apply a blending mode to any layer in the Layers panel in Photoshop. I’ve written about this topic numerous times on this website, so if you’re interested, please give the site a search up top. What you may not know is that you can also apply a blending mode to just the filter that was applied. So if I applied a really insane filter that completely changed the look of the photo, I could go ahead and change up that filter another dozen or so times. Each blending mode has a different effect on whatever it’s applied to.

To change the blending mode of a Smart Filter, all you need to do is double-click that small icon that sits to the right in the filter layer. In this case, it’s the third layer down; the one that says Camera Raw Filter.

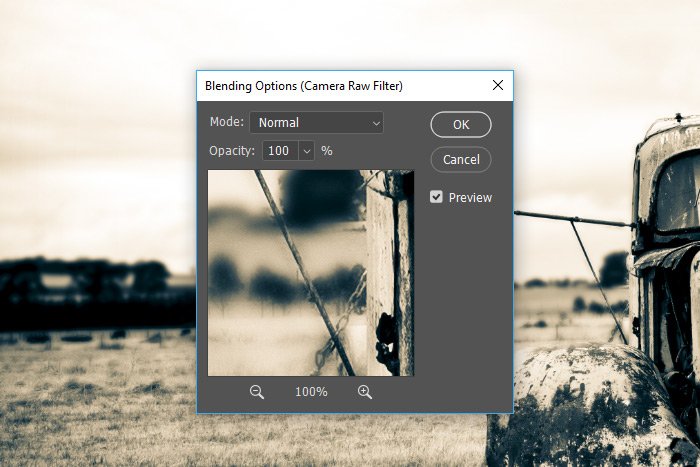
Once I click that icon, I’ll see the Blending Options dialog box appear.

blending-options-dialog.jpg

If you look inside this box, you’ll see a Mode drop-down. This is where all the blending modes are held. You can choose any one. I’ll go ahead and select Saturation down at the bottom, because it doesn’t change the look of the filter too much. Here’s the result of this selection.

saturation.jpg

You may have also noticed the Opacity slider in the dialog box that was just open. That slider affects the Smart Filter as a whole, not just the blending mode. If I were to push that slider to the left so the opacity was at 0%, none of the filter would be applied to the image, no matter the blending mode. For this demonstration, I’ll leave the opacity set to 100%.

Working With the Smart Filters Mask​

For this final section, I’m going to move up one layer in the Layers panel so I can work with the Smart Filters mask. Basically, this mask applies to only the Smart Filters, not the layer itself. And to go one step further, the mask is applied to all Smart Filters that happen to be currently active in the file, not just any particular one. So keep that in mind. Also, I’ve written tons on this website about masking in Photoshop, so again, if you’re interested in the topic, please do a site search up top.

Basically, working with masks that belong to Smart Filters is the same as working with regular layer masks. Use the Brush Tool with the color white to reveal an area and the same tool with the color black to hide an area. So in my case, the Smart Filter is covering all of the original photo. Let’s say that I wanted the full, unfiltered truck to show through. How could I make that happen? Well, all I would need to do is color the truck with the color black to hide that part of the filter. Of course, I’d have to make sure I click on the big white filter mask thumbnail in the Layers panel to activate it first. I’ll go ahead and do that now. I’l click on the white mask thumbnail and then I’ll use the Brush Tool to paint the truck black as best as possible.

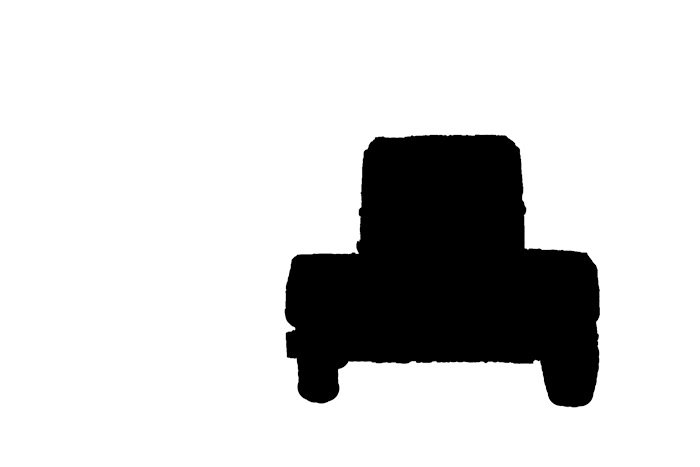
Let’s first take a look at what I colored black in the mask. To do this, I’ll hold down the Alt key on my keyboard and click once on the mask thumbnail in the Layers panel. This will enlarge the thumbnail so it looks like a mask overlay.

mask0thumbnial.jpg

Anything that’s white in the mask will show the filter and anything that’s black will hide it. Now, let’s see the result of the truck showing through the filter.

final-image.jpg

Does that make sense? I hope so. I first changed the image layer into a Smart Object. Then, I applied a filter to the layer, which was considered a Smart Filter because it was being applied to the Smart Object. After that, I changed the blend mode of the filter and finally, I wiped away some of where the filter was applied by painting part of the filter mask black.

——

I truly hope I helped you understand Smart Filters, filter blending modes and filter masks in Adobe Photoshop in this post. Did you hate it? Please tell me. Did you love it? Please tell me that too. If you wouldn’t mind, leave your feedback down in the comment section below. Thanks for reading!
 
KristinaW

KristinaW

Member
Joined
May 7, 2021
Messages
127
Reaction Score
0
Points
18
  • #4

The Anatomy of a Smart Filter in Adobe Photoshop​

Smart Objects and Smart Filters have become an enormous part of working inside of Adobe Photoshop. I’ve discussed both of these features in many posts on this website, but I’ve yet to give an overview of what each of these are. What I’m referring to here is how these features are presented in the application. The anatomy of them. What they look like and what parts make up the whole.

In today’s post, I’d like to focus on what parts make up a Smart Filter in Adobe Photoshop. I’d like to do this so I have a post to refer back to if I discuss the topic in the future. I could write something like, “If you’re not familiar with Smart Filters, please take a look at this post.” And then link to the page you’re on. I think that’s a pretty good idea.

I’m not going to go into the intricacies of every last detail here, but what I will do is cover how to create a Smart Filter and how to manage one of them once it’s been created. I’ll talk about a Smart Filter’s operation and what the different aspects of it controls. This isn’t a difficult topic to understand and it’s actually quite rewarding, so I hope you’ll continue reading on below.

Today’s Demo Image​

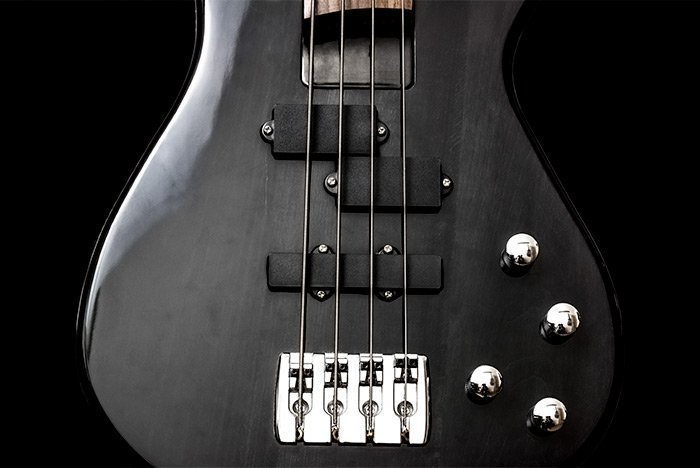
I could use any photo for today’s post. It really doesn’t matter what it looks like because I’m only going to be applying a filter to it. Since this is the case, I chose something that appeals to me. Something that just looks good.

cool-guitar.jpg

How’s that? I do love my guitars, you know.

What is a Smart Filter​

Smart Filters are easy to explain. Basically, they’re any filter that’s been applied to a Smart Object. Okay, that’s great, but what’s a Smart Object? You can think of a Smart Object as an envelope you slide a layer into that will shield the actual layer from any change that’s made to it. In this case, that change would be the application of a filter. The way things use to be was that when a filter was applied to a layer, it permanently affected that layer. You had to be really sure you loved that filter as you were applying it, because once you did, you were stuck with it. I can remember working in Photoshop years ago not liking this aspect of things at all. For some strange reason, I had a tendency to change my mind after I applied pretty much anything. The way I would work around this deficiency was to duplicate layers a lot. I’d set up a few of the same layer and then apply variations of filters to them that way. I’d just choose the one I liked best and run with it. I’d delete the rest. The problem with that approach was that if I ever wanted to go back into the file to edit the filter, I couldn’t. It was like it was seared into the layer. This is what we in the photo editing world call, destructive editing. Once it’s there, it’s there.

Once a Smart Object is in place, you can apply, with a few exceptions, any filter you want to that layer. The current exceptions are Lens Blur, Trees, Flame Picture Frame, Extract, Liquify, Pattern Maker and Vanishing Point. Of course, this may change in the future, so you’ll need to check back for an update.

Now, I do want to tell you that a Smart Filter is actually bigger and grander than a simple Smart Object. It’s got more pieces and I’ll talk about all of them below.

How to Apply a Smart Filter​

There are a few different ways to create and apply a Smart Filter. Two I’ve covered before on this website and one I have yet to discuss. It’s that last one that is so cool.

Okay, first, you can simply convert your layer into a Smart Object by right-clicking on the layer and then choosing Convert to Smart Object from the menu that appears.

convert-smart-object.jpg

Once the layer is converted, you can head up to the Filter menu and do what you want. This is the easiest way to go about getting things set up.

The next method is for you to first click on the layer in question to select it and then go up to the Filter > Convert for Smart Filters menu item and click. That will basically just turn the layer into a Smart Object again. Both of the options I just covered are virtually identical. After this, you’ll need to go back into the Filter menu and choose a filter to apply. This is the same step as the one I just explained above.

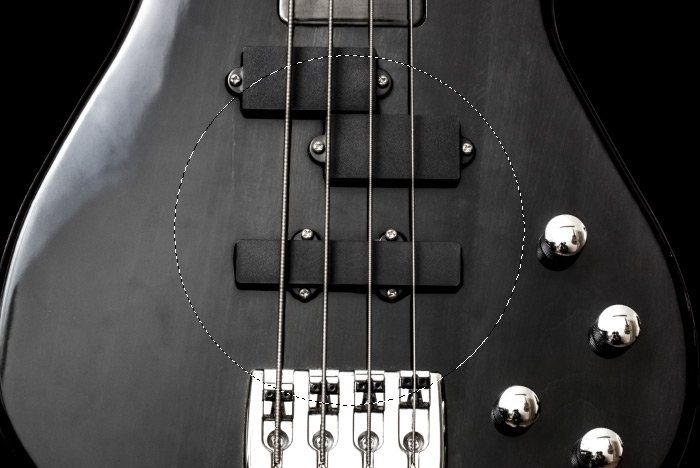
The last method is pretty neat. Did you know that you don’t have to apply a Smart Filter to an entire layer? If you wanted to, you could convert the layer to a Smart Object and then make a selection in that layer with one of the selection tools. As an example, I’ll go ahead and draw a circle at the center of this image with the Elliptical Marquee Tool.

selection.jpg

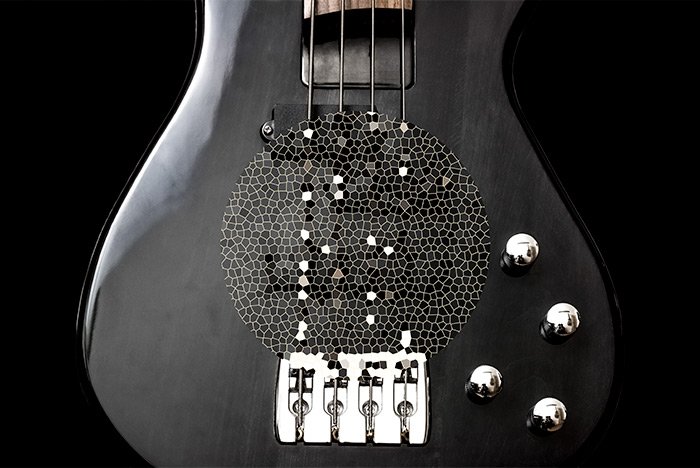
Next, I’ll visit the Filter > Texture > Stained Glass menu item from up top and push a few sliders around. When I’m happy with what I see in the preview window, I’ll click on the OK button. Check this out.

stained-glass-filter.jpg

Do you see what happened there? The filter wasn’t applied to the entire layer. It was only applied to the part where I draw the selection.

The Smart Filter Itself​

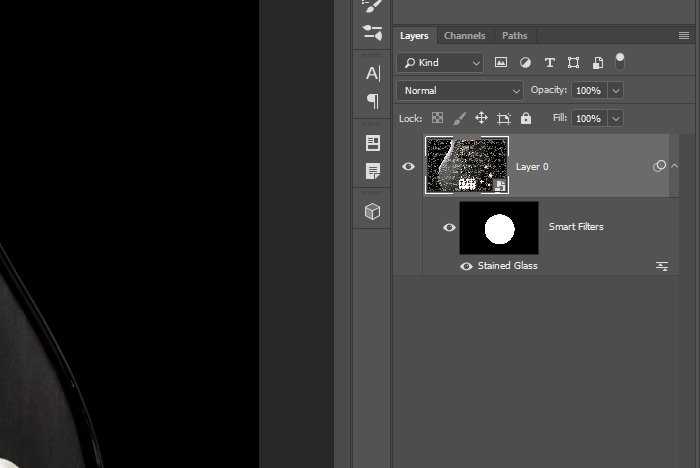
Let’s now take a look at what happened to the layer in the Layers panel. I already created a Smart Object and then a Smart Filter. Remember, I couldn’t have created that Smart Filter without first converting the layer to a Smart Object. Here’s the layer and the filter.

layers.jpg

If you look at the top image layer closely, you can see a small square icon in the lower right corner of the thumbnail. This is the Smart Object indicator, so whenever you see one of these, you should know that the layer has been converted to a Smart Object.

At the right of the top image layer is a small icon that’s shaped like two rings. If I roll over these rings, a tip will pop up that says, Indicates Filter Effects. You’re probably wondering why this indicator is there if the Smart Filter layer (that we’ll get to in a second) is directly below and plainly visible. Well, the reason the rings indicator is there is because we can use the arrow that sits directly to the right of it to collapse the layer and hide the filters. So really, they’re not always this visible and they’re not as obvious. There’s got to be some way to see that a layer has a Smart Filter applied to it.

Moving on. I’ll now jump down a spot and discuss the layer that has a big white circle in the middle of its thumbnail. If you read the name of the layer, it says Smart Filters. This layer has a two-fold purpose. First, it’s sort of like another container layer that houses all the filters that are applied to it. It also contains a mask. I’ll talk about the filters first.

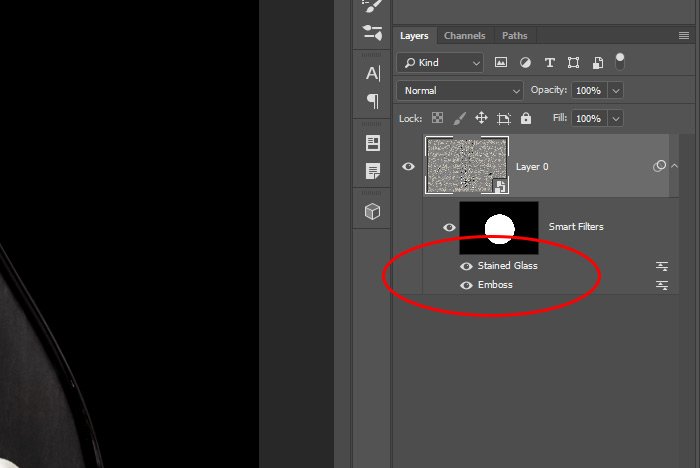
This is the layer that puts the “Smart” in Smart Filters. This is what makes the application of a filter non-destructive when applied in conjunction with a Smart Object. It has some other uses too, but I’d like to focus on these right now. There is one important aspect of the name of this layer. It’s plural. It says Smart Filters, with an s. This means that more than one filter can be applied to a layer and each of those filters would be stacked on top of each other, right below the layer that contains the mask thumbnail. Here, I’ll show you. I’ll go ahead and apply another filter, just to show you what it would look like.

multiple-filters.jpg

As you can see, there are two layers stacked on top of each other inside of that red outline. They are in a specific order right now, but if I clicked and dragged either one of them up or down, I could easily reorder them to mix up the look of the effect. Order matters in these cases. Also, both of these filters are in the Smart Filter container, so if I hid the visibility of the Smart Filter layer (the one with the circle in it) by clicking on the little eye icon, both of these filter effects would disappear and the image would return to normal. If I wanted to only hide one effect at a time, I could click just the eye icon for that specific effect.

The mask in the Smart Filters layer is very important. It acts like any other mask in that it can show or hide a filter effect. The mask can be edited either before the filter is applied, as I did in my example above, or after the filter’s been applied. As with any other mask, white reveals and black conceals. So if I wanted to somehow adjust this mask, I could use the Brush Tool, the Paint Bucket Tool or one of the selection tools to alter the black and white aspects of it.

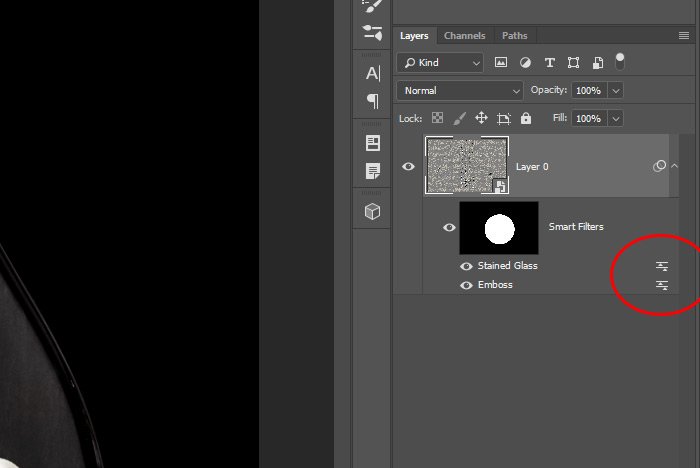
Finally, we have the last icon I’d like to discuss in this post. If I head over to the right part of each filter layer, I’ll see an icon that looks like it’s got two horizontal lines in it.

blend-modes.jpg

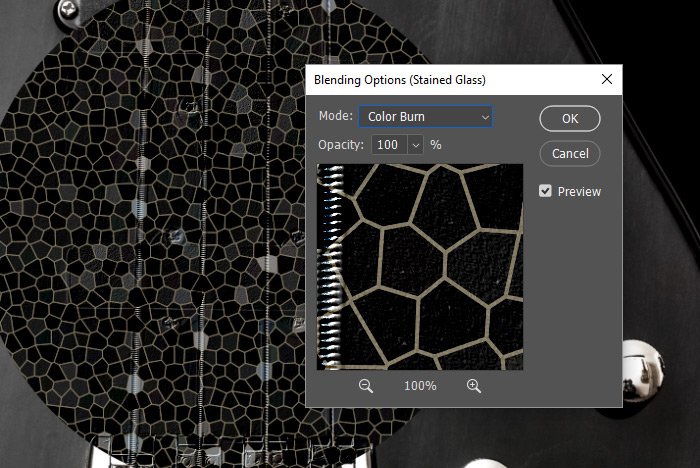
If I double click on one or both of these icons, the Blending Options dialog will appear, where I’ll have the ability to alter the blend mode for each individual filter effect. This is so powerful I can’t stand it.

blending-options-dialog.jpg

The Power of Smart Filters​

Smart Filters aren’t just protective containers that allow us to apply a filter that doesn’t permanently alter a layer. They’re quite powerful as well and they can do many wonderful things.

For example, if I were to create or import a new layer that I wanted the Smart Filter I created earlier applied to, all I’d need to do is convert the new layer to a Smart Object and then click and drag/drop either just one filter or the entire Smart Filter group to that new layer. To copy a Smart Filter to another layer, I’d hold down the Alt key (Option on Mac) and then drag and drop.

The real and non-destructive beauty of Smart Filters is revealed when it comes to editing filters that have already been applied. This is just so simple to do. To edit a Smart Filter, all that needs to be done is to double-click on that filter in the Layers panel. When that’s done, the filter’s edit box will pop up. The filter can be edited and then closed out and that edit will be applied. It’s that simple. And what’s even more beautiful is that the blending mode options can be changed at any times as well. Simply double-click on those icons for the same result.

To delete a Smart Filter group or just one filter that sits inside a group, click on what you’d like to delete and then drag it down to the trash can located at the bottom of the Layers panel.

Inverting, Feathering & Opacity​

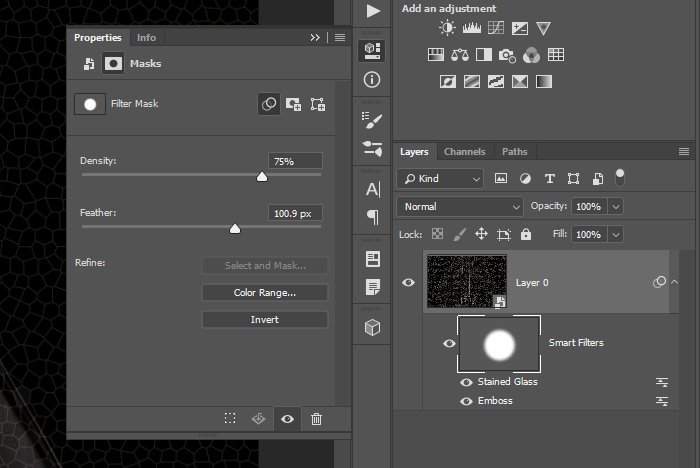
The final Smart Filter features I’d like to discuss in this post have to do with what happens when you double-click on the Smart Filter mask icon in the Layers panel. I’ll do that right now.

properties-panel.jpg

As you can see, a Mask Properties panel appeared. Inside of this panel are a few sliders and buttons. The first one I’ll cover is called Density. This slider basically controls the opacity of the mask. If it’s in full force, meaning pushed all the way to the right, the mask itself will have full strength. If it’s pushed to the left a bit or all the way, the mask will start to fade away, revealing more and more of the filter that’s been applied, outside the mask.

The next slider is called Feather. What this slider does is soften the edges of the mask, so they appear to blend into the area around it. Push this slider to the left for less of a feather effect and to the right for more of one.

Finally, if you’d like to alter the mask in such a way as to make it appear opposite of it’s current state, you can click the Invert button. Doing this will simply invert the current look.

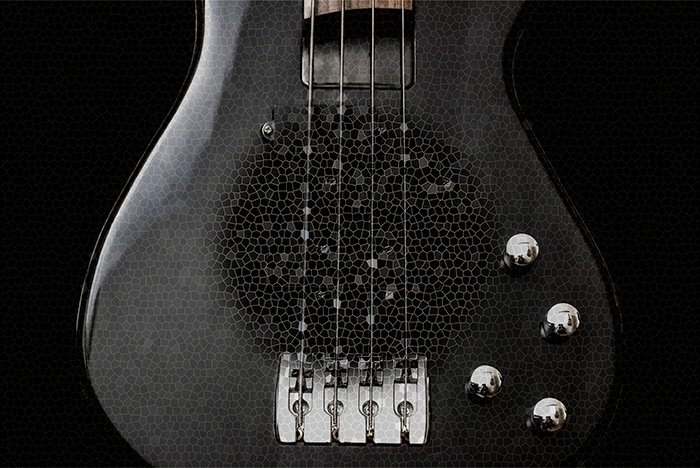
I messed with both of the sliders in this panel and this is my result.

mask-filters.jpg

Don’t ask me what it’s supposed to look like. I’m not really focused on making things look good right now. My fingers are getting tired from all this typing.

I know there’s a lot of information in this post and believe me, there’s more that has to do with this area of Adobe Photoshop. My goal with writing this was to whittle things down for a more understandable presentation. I hope I achieved that goal. If you have any questions regarding this post, please leave them for me in the comment section below. Thanks so much for reading!
 
Top