WendyMay
Member
- Joined
- May 11, 2021
- Messages
- 142
- Reaction Score
- 0
- Points
- 21
- #1
I can tell you this with confidence. When editing a photo in either Adobe Lightroom or Camera Raw, I’ve never not used at least one of the primary brightness or darkness sliders in the Basic panel. The sliders I’m referring to are Highlights, Shadows, Whites and Blacks. I’m not sure how many times I’ve used these programs, but these areas are the ones I adjust almost every single time.
While this is all well and good, there’s a small issue that arises when dealing with these areas of an image. The issue is called “clipping.” As any of these sliders are pushed one way or the other, things can go too far, causing either pure white or pure black. I’ve actually talked about this issue a lot on this website. To review my previous posts on this topic, please visit the page below.
Using the Histogram Clipping Warnings in Adobe Camera Raw
Working With Clipping Indicators in Adobe Lightroom
Now, just to fill you in, the clipping indicators in both Camera Raw and Lightroom act the same way. They both offer warning colors that are plainly visible if you’ve either gone too far with your edits or if the image was flawed straight out of the camera. I’ve said this a lot in the past – Camera Raw and Lightroom are very similar in many respects.
Since I’ve already covered most of what I have to say about the clipping indicators in both applications, I’d like to go one step further in today’s post. Today, I’d like to show you a really cool trick I use in Adobe Lightroom that deals with photos that don’t respond well to removing the clipping indicators from a photo without screwing up other aspects of it. It’s a fast and easy trick that I think you’ll enjoy.
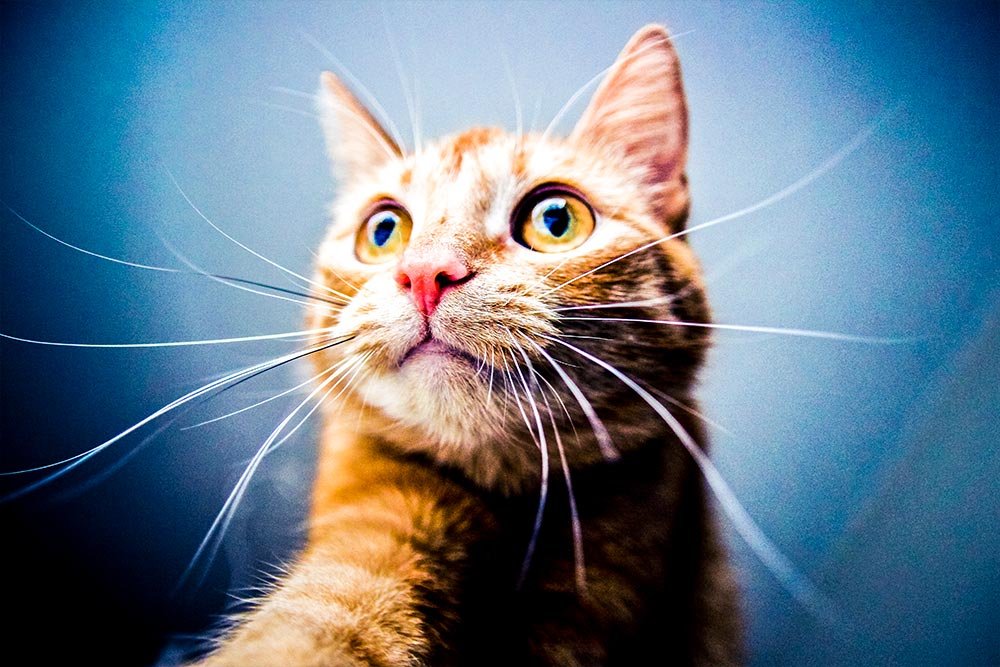
Let’s see what happens when I explore the photo further.
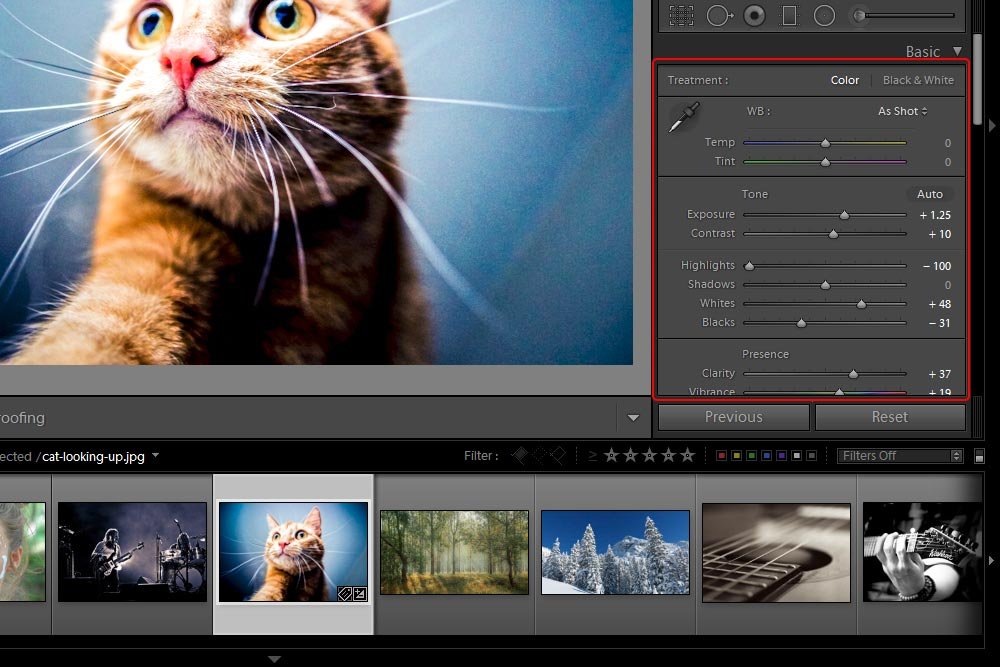
As you can see if you look at the sliders, I haven’t done anything drastic. On my computer screen, I think things look pretty good. On a normal day, I’d say I was finished. Today though, I’d like to turn on the clipping indicators to see if anything is out of whack.
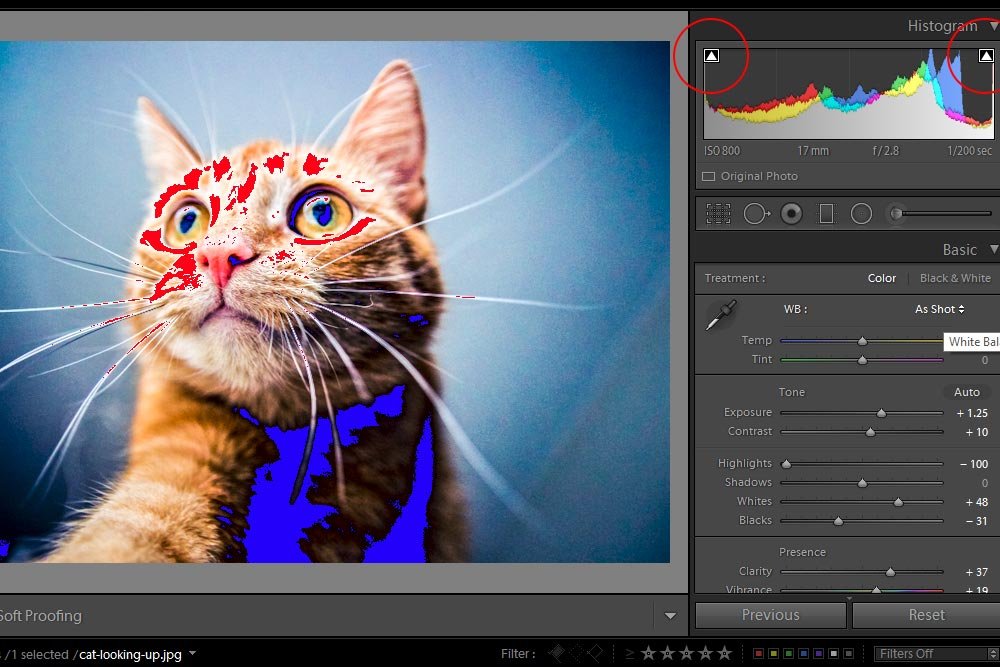
Umm…yeah. I think there’s something going on that I didn’t notice before. Apparently, I’ve got some areas of pure black and some of pure white. By the way, I circled the clipping indicator controls in the above screenshot. Just click the small triangles inside the circles to turn these on and off. If you’d like to use a keyboard shortcut instead, you can simply press the J key. That controls both indicators at the same time.
By the way, it’s quite common to have clipping issues when using images for the web. They’re not that noticeable. It’s when you go to print them that things look weird. Large blotches of white or black are much more visible on paper.
Anyway, let me introduce you to the tip I want to share today.
The Tone Curve represents all the tones of your image. The bottom axis of the Tone Curve is the Tone axis: the line starts with Shadows at the left-most end and ends with Highlights in the right-most end. In the middle you have Midtones, which are then further split into darker Midtones, called Darks in Lightroom, and brighter Midtones, called Lights. In other words, going left to right, the curve starts with Shadows, Darks, Lights and ends with Highlights.
In the right column, if I collapse the Basic panel, I’ll find the Tone Curve panel. To open that panel, I’ll click the respective triangle that sits to the right of the panel title.
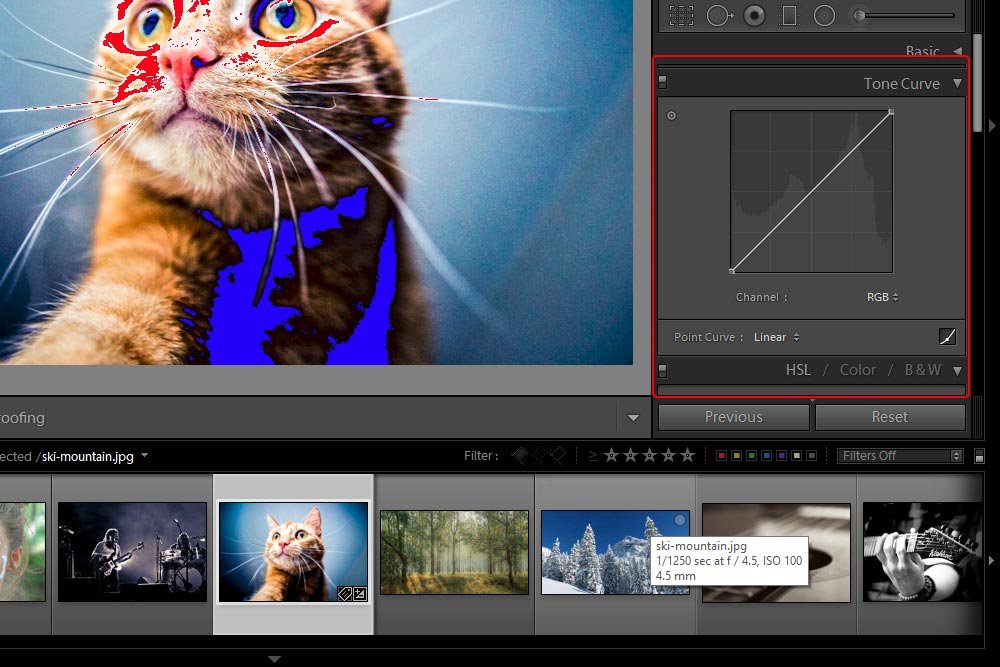
The really cool thing about using this Tone Curve is that not much in the way of changes are needed to make a fairly large difference. The trick is, you need to be sure to push things the correct direction.
For instance, I’ll go ahead and grab the lower left curve handle and slide it in about 15%. Let’s see what happens to the Shadow (blue) clipping indicator when I do this.
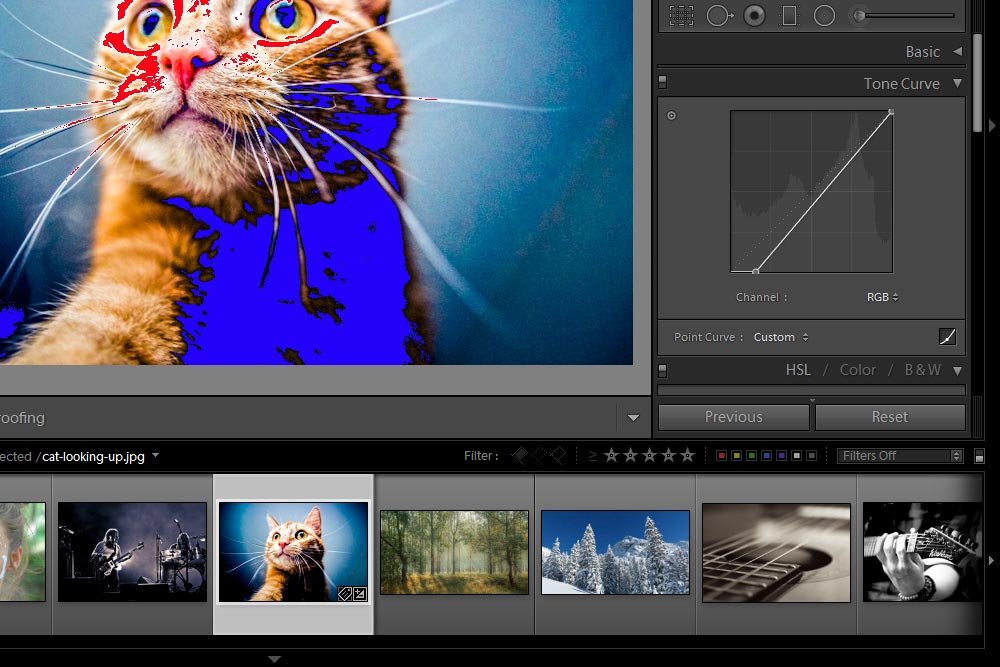
Wow. I just made things a lot worse. I’ll reverse what I did there and instead, I’ll push that same handle up the left side a hair. I’ll do this until I don’t see the blue overlay anymore.
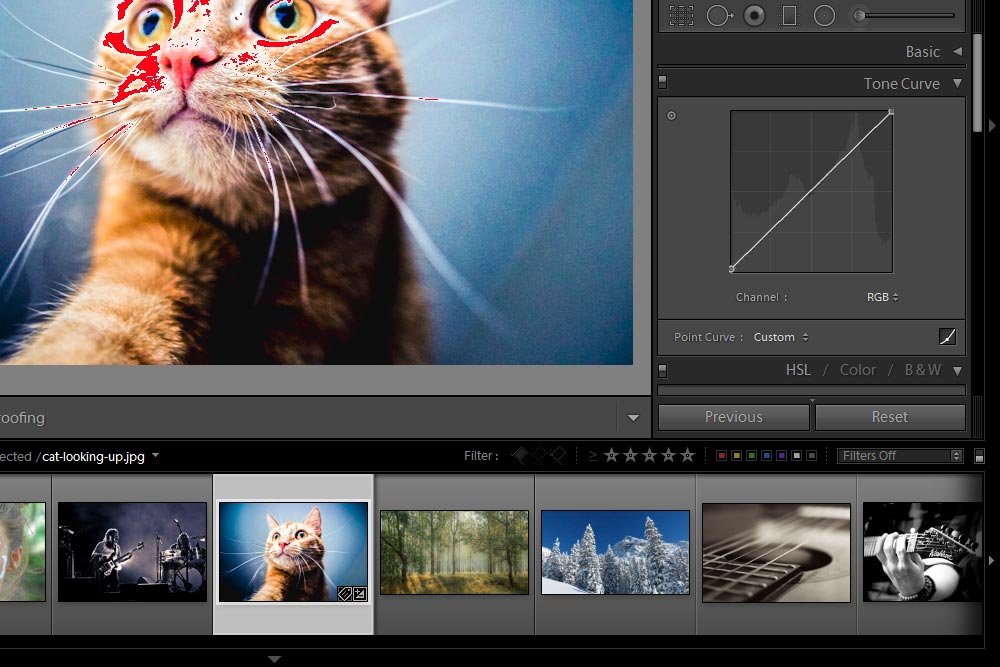
Now that’s impressive. I merely went up the side wall 2% and all the blue clipping overlay disappeared. That sure beats messing with sliders in the Basic panel.
Next, I’ll grab the opposite corner’s handle and move it to the left about 15%. Let’s see what happens to the Highlight (red) clipping indicator when I do this.
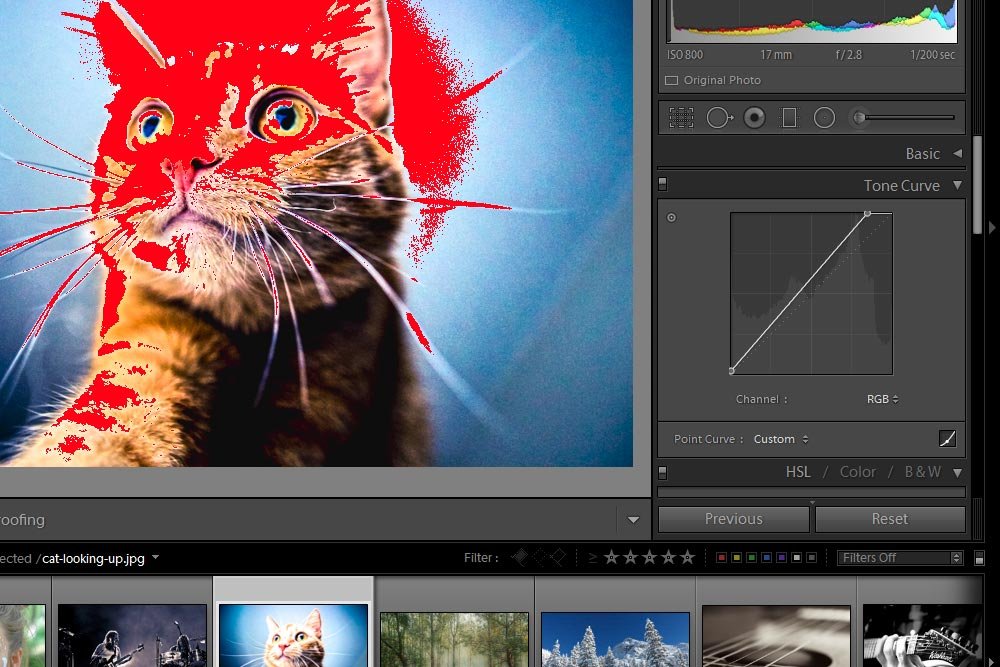
Yeah, that’s not good at all. I definitely don’t want that. To fix this, I’ll do what I did to the shadow side. I’ll push the corner handle down the right side a bit instead.
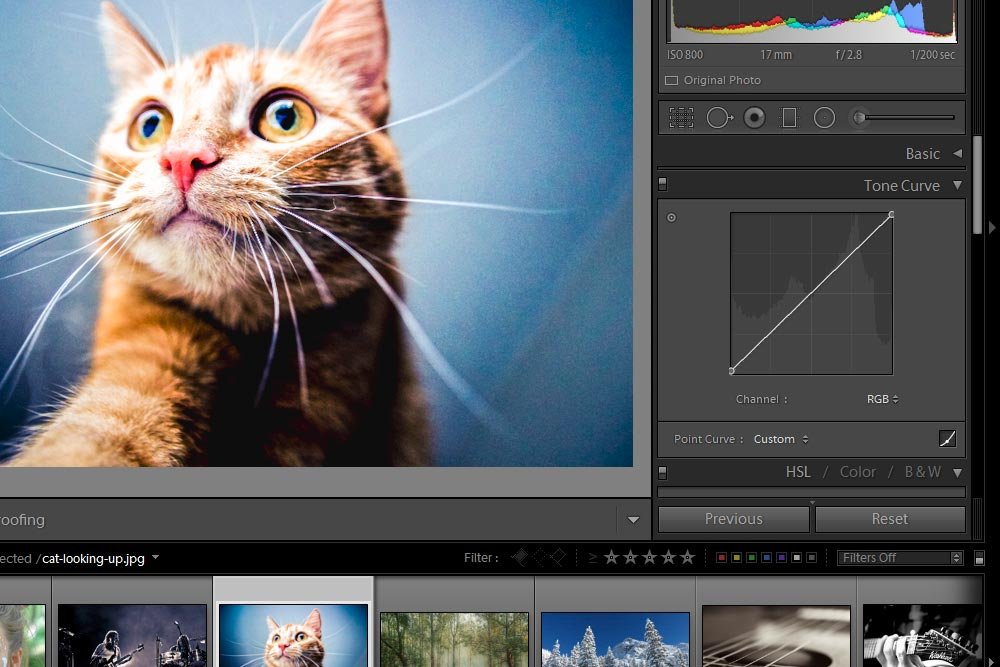
Again, I didn’t have to move the handle much at all. Less than 1% to be exact. With just that small move, all the red is gone. That’s powerful.
Now, if I wanted to, I could head back into the Basic panel to further edit the photo. I now know that I can fix any clipping that occurs by using the Tone Curve tool, so I have some additional liberty to do as I wish. Powerful indeed, especially if I was using a RAW image that was taken with a camera that offers a wide dynamic range.
The Tone Curve tool in both Lightroom and Camera Raw easily removes any pure black or pure white from a photo. That’s why it’s such a powerful solution when attempting to resolve clipping situations. Give this tool a try the next time you’re in either of these applications. They both work the same way.
Once you do that, you’ll have the same view as I had here and you’ll be able to see what you can do with your photograph.
If you have any questions or concerns regarding this post, please leave them in the comment section below. I’m always here to help. Thanks for reading!
COMMENT: Thanks for the great info on clipping and how to control it. What I am getting when I print in black and white are blues in deep shadows.
I have been using the NIK collection along with Photoshop for a number of years. I print on an Epson 3880 which has four black ink cartridges. Recently I have been doing more B&W and although an image looks great on my monitor, when printed it is printing blue in the deep shadows. There is clipping in those areas. I have searched the web looking for information on this problem and what I find is discussion on blue, purple, magenta, or green casts. The term casts implies to me that people are talking about color casts on the image overall and not just specific to the shadows.
My monitor is calibrated with X-rite i1 and color prints print fine. I use color management. I have printed on Epson Exhibition Fiber paper and an HP Advanced Pro glossy that I have an Epson profile for. In my recent B&Ws I have been shooting HDRs, processing them through ACR, NIK HDR Efex and then NIK Silver Efex and Photoshop (CS4). I have not saved images in grayscale but wouldn’t NIK Silver Efex strip the color out of the image? Any ideas if the blue is due to the shadows being clipped or….??
While this is all well and good, there’s a small issue that arises when dealing with these areas of an image. The issue is called “clipping.” As any of these sliders are pushed one way or the other, things can go too far, causing either pure white or pure black. I’ve actually talked about this issue a lot on this website. To review my previous posts on this topic, please visit the page below.
Using the Histogram Clipping Warnings in Adobe Camera Raw
Working With Clipping Indicators in Adobe Lightroom
Now, just to fill you in, the clipping indicators in both Camera Raw and Lightroom act the same way. They both offer warning colors that are plainly visible if you’ve either gone too far with your edits or if the image was flawed straight out of the camera. I’ve said this a lot in the past – Camera Raw and Lightroom are very similar in many respects.
Since I’ve already covered most of what I have to say about the clipping indicators in both applications, I’d like to go one step further in today’s post. Today, I’d like to show you a really cool trick I use in Adobe Lightroom that deals with photos that don’t respond well to removing the clipping indicators from a photo without screwing up other aspects of it. It’s a fast and easy trick that I think you’ll enjoy.
Original Image
I’ll use a photo of a beautiful cat for today’s post. I’ve already gone ahead and have completed my usual adjustments to the photo and I’d say it looks really good.
Let’s see what happens when I explore the photo further.
Turning On the Clipping Indicators
So far, I’ve make some changes in the Basic panel of Lightroom. There’s nothing out of the ordinary here. Take a look at the panel below.
As you can see if you look at the sliders, I haven’t done anything drastic. On my computer screen, I think things look pretty good. On a normal day, I’d say I was finished. Today though, I’d like to turn on the clipping indicators to see if anything is out of whack.

Umm…yeah. I think there’s something going on that I didn’t notice before. Apparently, I’ve got some areas of pure black and some of pure white. By the way, I circled the clipping indicator controls in the above screenshot. Just click the small triangles inside the circles to turn these on and off. If you’d like to use a keyboard shortcut instead, you can simply press the J key. That controls both indicators at the same time.
By the way, it’s quite common to have clipping issues when using images for the web. They’re not that noticeable. It’s when you go to print them that things look weird. Large blotches of white or black are much more visible on paper.
Controlling Clipping
If you’ve ever edited a photo, only to see that you’ve got some clipping issues, you probably know that it isn’t the easiest thing to cure. Sure, you can push some sliders back and forth in an effort to remove the red and blue, but what happens to the actual photo when you do this? Your changes begin to come undone, that’s what. Also, you’ll notice that moving one slider often isn’t enough. You’ll need to move a few, but when you do this, you may lose track of what you’ve done. Personally, I get all sorts of confused when I start touching too many things in these programs. It gets especially bad when I think I have something set perfectly and when I have to back off some areas. That’s not why I’m in the application. I’m in there to make photos look good, not mild.Anyway, let me introduce you to the tip I want to share today.
Introducing Tone Curve
I’ll give you some background on what Tone Curve is.The Tone Curve represents all the tones of your image. The bottom axis of the Tone Curve is the Tone axis: the line starts with Shadows at the left-most end and ends with Highlights in the right-most end. In the middle you have Midtones, which are then further split into darker Midtones, called Darks in Lightroom, and brighter Midtones, called Lights. In other words, going left to right, the curve starts with Shadows, Darks, Lights and ends with Highlights.
In the right column, if I collapse the Basic panel, I’ll find the Tone Curve panel. To open that panel, I’ll click the respective triangle that sits to the right of the panel title.

The really cool thing about using this Tone Curve is that not much in the way of changes are needed to make a fairly large difference. The trick is, you need to be sure to push things the correct direction.
For instance, I’ll go ahead and grab the lower left curve handle and slide it in about 15%. Let’s see what happens to the Shadow (blue) clipping indicator when I do this.

Wow. I just made things a lot worse. I’ll reverse what I did there and instead, I’ll push that same handle up the left side a hair. I’ll do this until I don’t see the blue overlay anymore.

Now that’s impressive. I merely went up the side wall 2% and all the blue clipping overlay disappeared. That sure beats messing with sliders in the Basic panel.
Next, I’ll grab the opposite corner’s handle and move it to the left about 15%. Let’s see what happens to the Highlight (red) clipping indicator when I do this.

Yeah, that’s not good at all. I definitely don’t want that. To fix this, I’ll do what I did to the shadow side. I’ll push the corner handle down the right side a bit instead.

Again, I didn’t have to move the handle much at all. Less than 1% to be exact. With just that small move, all the red is gone. That’s powerful.
Now, if I wanted to, I could head back into the Basic panel to further edit the photo. I now know that I can fix any clipping that occurs by using the Tone Curve tool, so I have some additional liberty to do as I wish. Powerful indeed, especially if I was using a RAW image that was taken with a camera that offers a wide dynamic range.
The Tone Curve tool in both Lightroom and Camera Raw easily removes any pure black or pure white from a photo. That’s why it’s such a powerful solution when attempting to resolve clipping situations. Give this tool a try the next time you’re in either of these applications. They both work the same way.
Point Curve
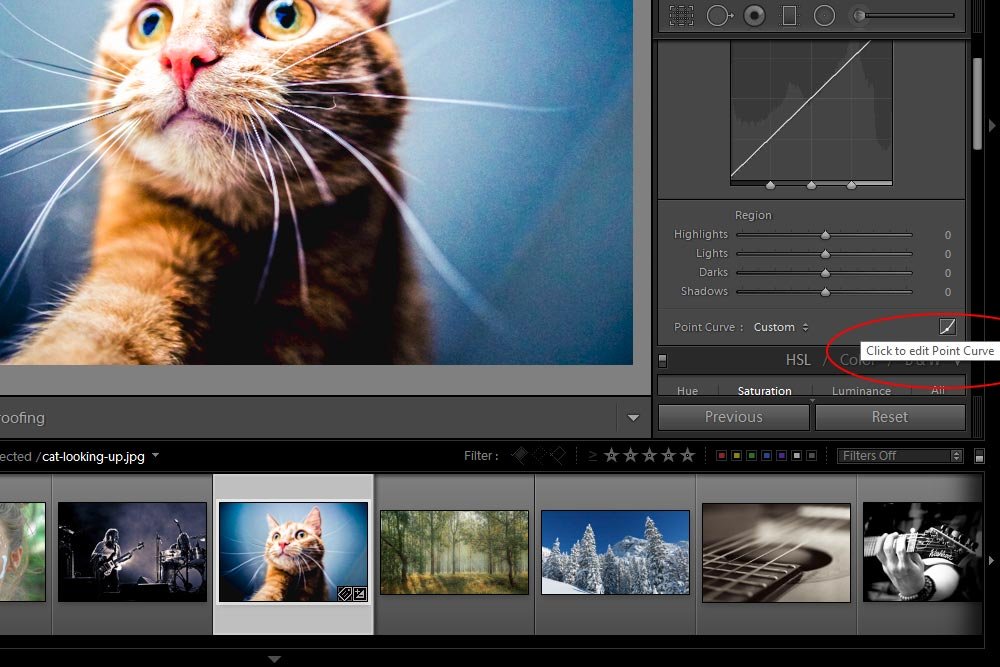
I’d like to mention one last thing before I end this post. If you do decide to experiment in the Tone Curve panel in Adobe Lightroom, you may see a different panel than the one I showed here. Basically, there are a few different views. The one you want is Point Curve and the way to get there is to click on the small box that sits in the lower right corner of the panel.
Once you do that, you’ll have the same view as I had here and you’ll be able to see what you can do with your photograph.
If you have any questions or concerns regarding this post, please leave them in the comment section below. I’m always here to help. Thanks for reading!
COMMENT: Thanks for the great info on clipping and how to control it. What I am getting when I print in black and white are blues in deep shadows.
I have been using the NIK collection along with Photoshop for a number of years. I print on an Epson 3880 which has four black ink cartridges. Recently I have been doing more B&W and although an image looks great on my monitor, when printed it is printing blue in the deep shadows. There is clipping in those areas. I have searched the web looking for information on this problem and what I find is discussion on blue, purple, magenta, or green casts. The term casts implies to me that people are talking about color casts on the image overall and not just specific to the shadows.
My monitor is calibrated with X-rite i1 and color prints print fine. I use color management. I have printed on Epson Exhibition Fiber paper and an HP Advanced Pro glossy that I have an Epson profile for. In my recent B&Ws I have been shooting HDRs, processing them through ACR, NIK HDR Efex and then NIK Silver Efex and Photoshop (CS4). I have not saved images in grayscale but wouldn’t NIK Silver Efex strip the color out of the image? Any ideas if the blue is due to the shadows being clipped or….??
