15Katey
Member
- Joined
- May 10, 2021
- Messages
- 130
- Reaction Score
- 0
- Points
- 23
- #1
Have you ever noticed the weird thing that happens when you take a photo of someone? For some strange reason, they never look as good as they do in real life. I know there’s a lot that goes into the reasoning behind this and that some of it is caused by different types of lenses, but by and large, lighting plays a huge role in causing the problem. If you were to hold a light over your head and have someone take a picture of you, it would look wildly different than if you held a light under your chin. Same person, different lighting. One looks good and the other looks like a passport photo. Terrible.
Oftentimes, the biggest issue with photographs and portraits of people are shadows under the eyes. Whether it’s caused by wrinkles or simply by the shape of someone’s face, it can be unflattering. Add to the wrinkle or shape of someone’s face, some odd lighting angle and you’ve got yourself a recipe for disaster. Luckily, I’ve got a really fast and easy trick to share today that can help bring whoever is being photographed back to their original glory.
In today’s post, I’ll be using the Spot Removal tool in Adobe Lightroom to do a bit of editing on a girl’s face. While I’ve already covered how to use the Spot Removal tool on this site before, I think it’s beneficial to cover a strategy for different specific situations. Sometimes it’s the hair, other times it’s the shadows. No matter what, there’s a trick to deal with each and every case.
Using the Spot Removal Tool in Adobe Lightroom
Removing Straight Lines with the Spot Removal Tool in Adobe Lightroom
How to Visualize Spots in Adobe Lightroom
Tips for Clearing Complexion in Adobe Lightroom

This is a mild case. I’ve edited photos where there was such black lines under the eyes, it was incredible. Those are the best to work on because the results are stunning. This will be a good demo though. You’ll see how good things can look with just a little bit of effort.
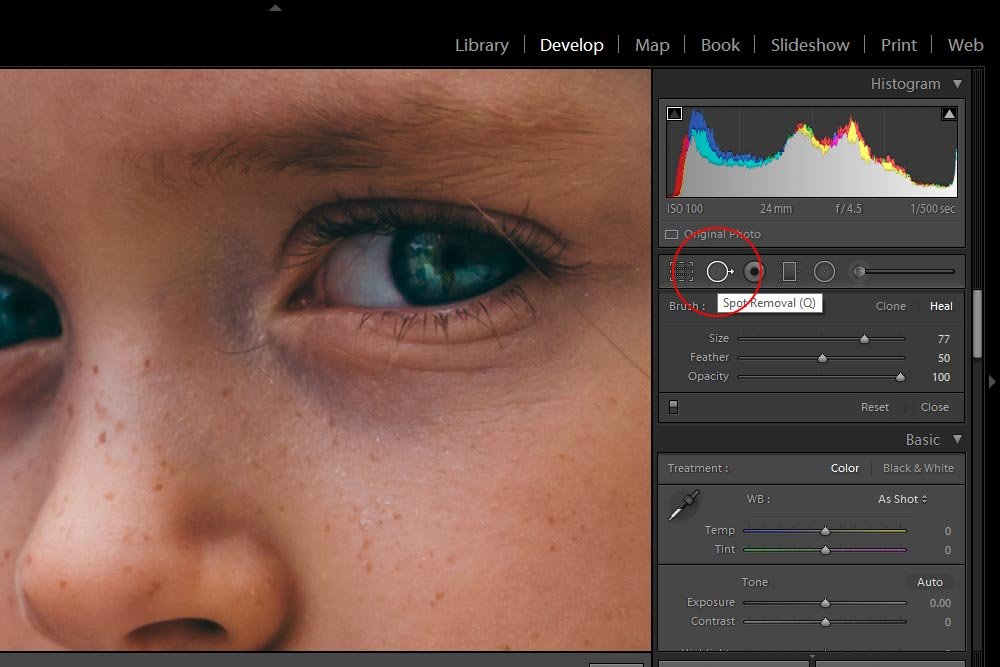
I’ve also gone ahead and enlarged the view by clicking Ctrl++ on my keyboard. This will give me the room to do a bit of drawing.
I’ll first center one of the eyes I’d like to work on. In this case, it’s the girl’s left eye. Next, I’ll size the Spot Removal tool so it’s appropriate to the shadow I’ll be drawing over. I may need to resize as I go because the area between the nose and the eye is much tighter then the area below the eye. To resize on the fly, I’ll press the [ and ] keys on my keyboard.
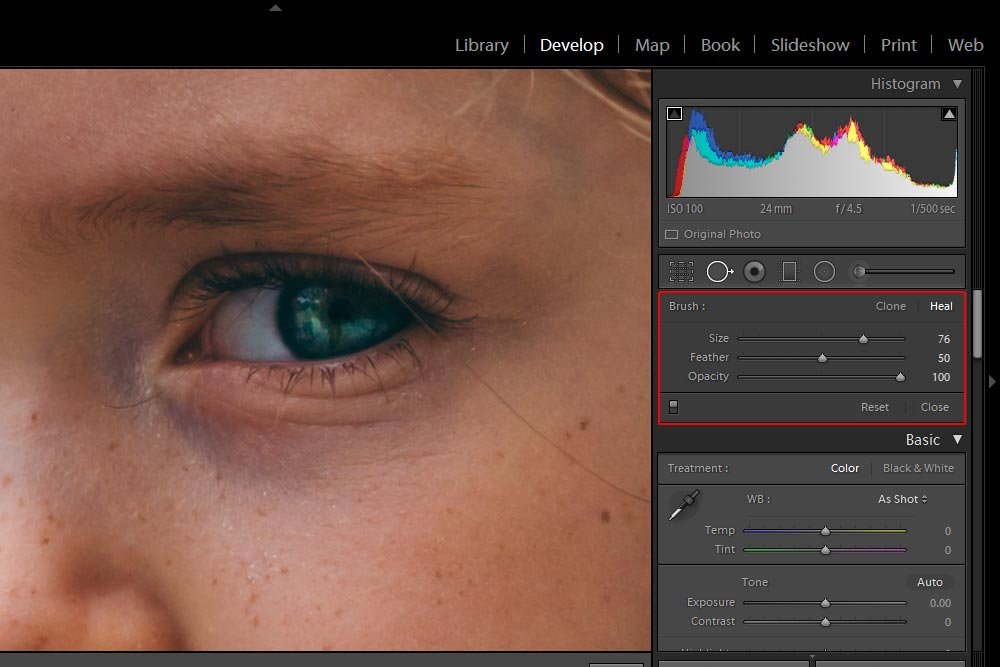
The reason I want to set the Opacity to 100 right now is so I can visualize the coverage that I’ve made. I’ll talk more about this aspect later on. Also, I want some feathering of the edges – that’s for sure. Without that, things can look strange very quickly.
Now that I’m all set, I can draw over the shadow area.
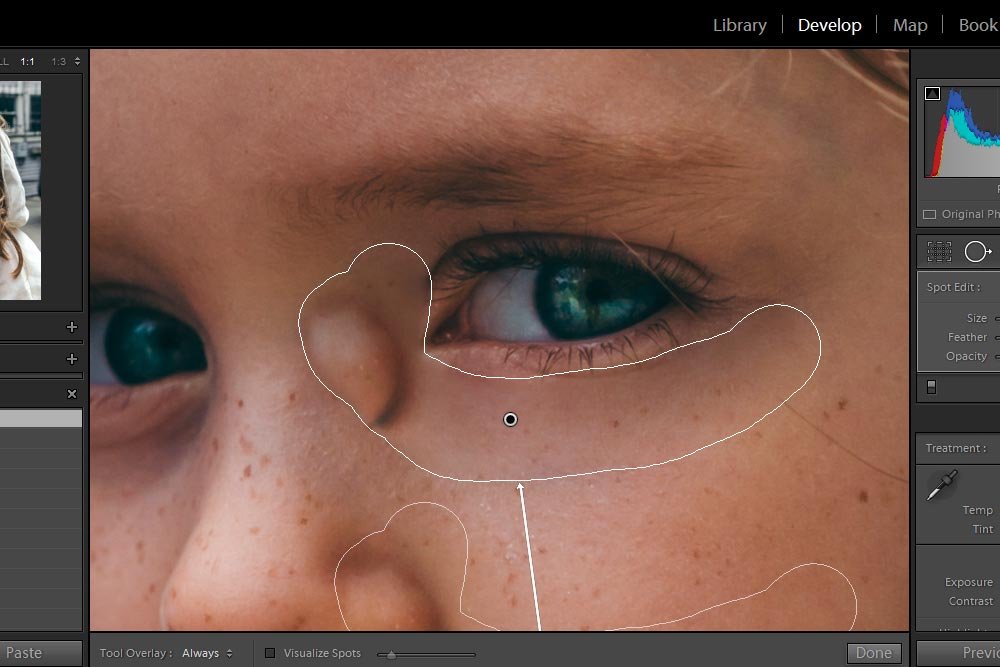
As you can see, I’ve drawn over the shadow area. The problem is, when Lightroom tried to replace the area I drew over, it chose somewhat of a weird replacement. To deal with this, I’ll click inside the replacement area and drag it to somewhere on the girl’s face that’s nice and neutral.
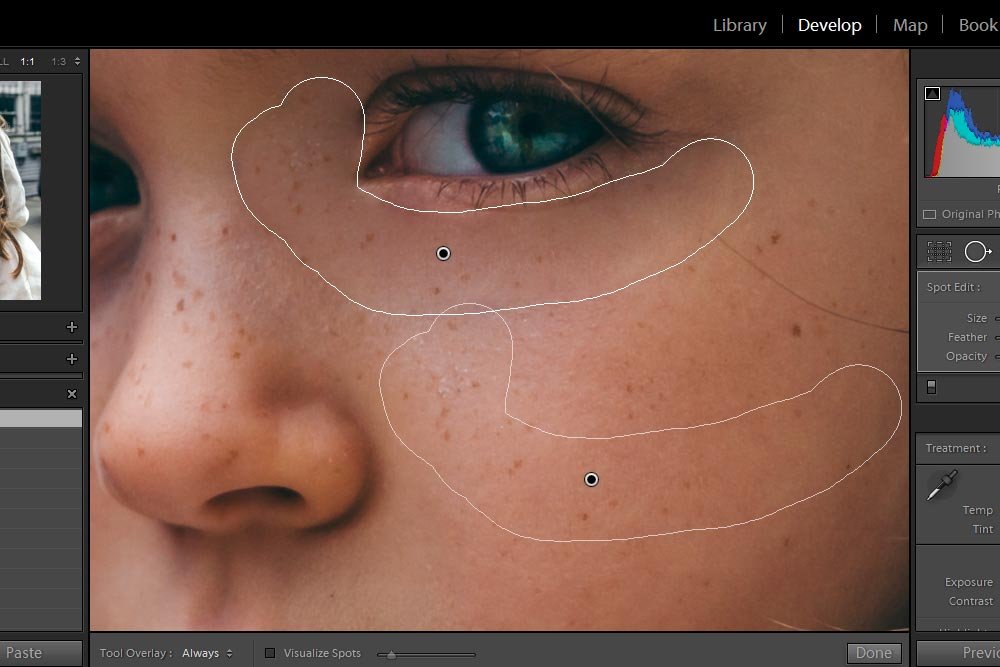
There. That’s much better.
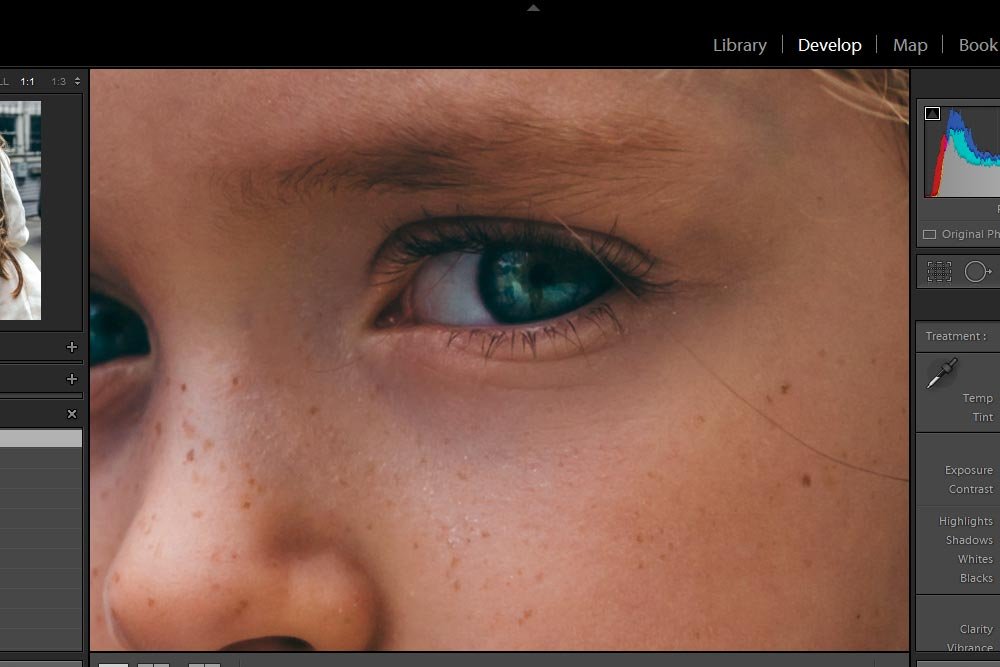
If I saw anything wrong of if I needed to adjust the Opacity slider again, I could fix things in a flash.
Let’s take a quick look at a before and after shot for this one eye.
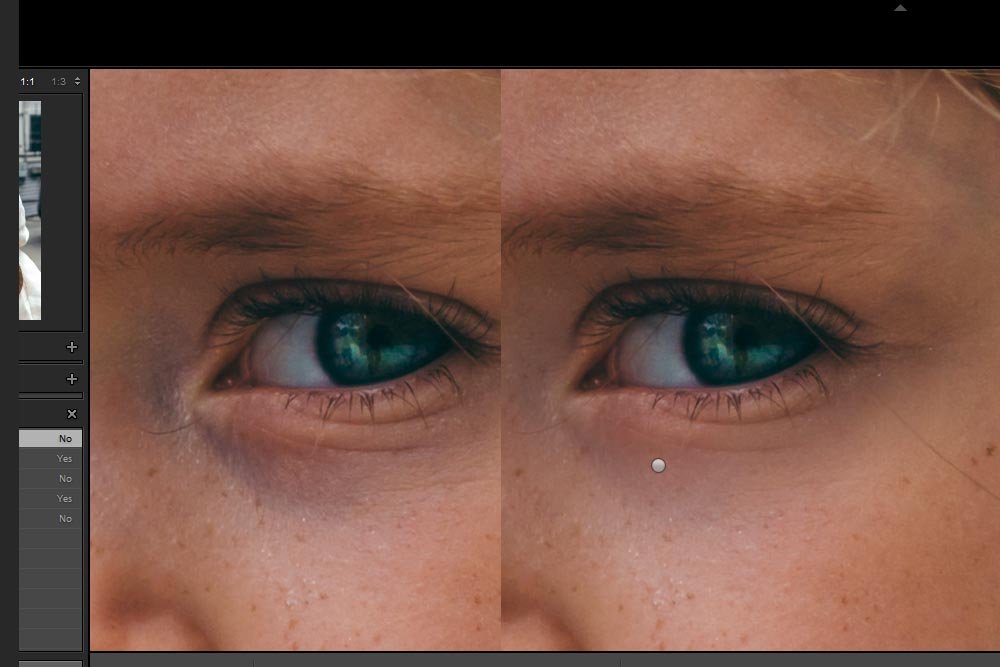
That looks really good. I played around with adjusting the opacity some more and it seems that 50 was a good choice.
Now I’ll go ahead and do exactly the same thing for he other eye.
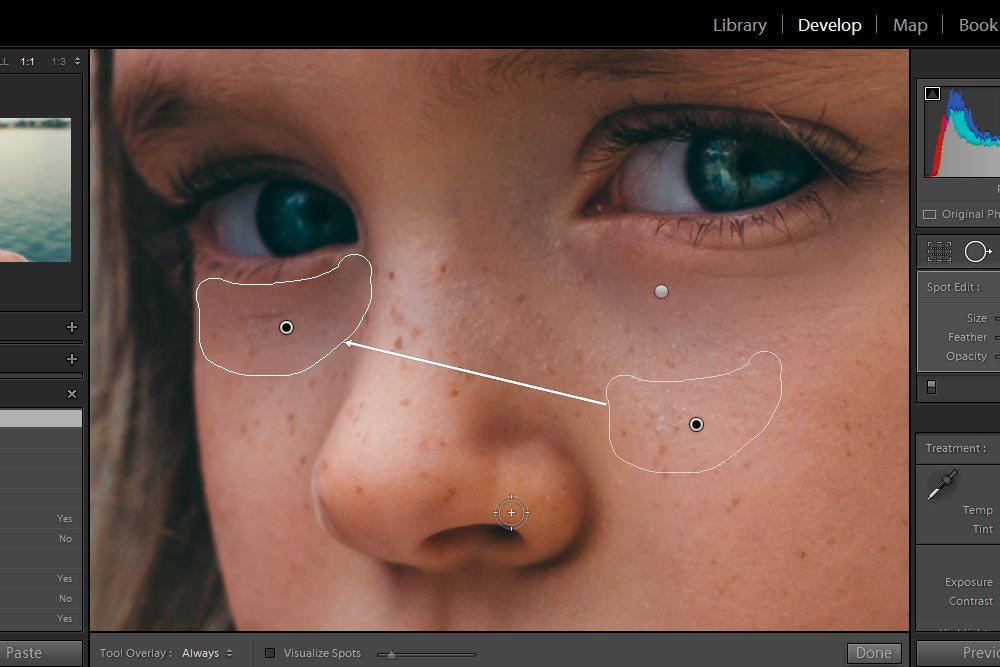
As you can see from the screenshot above, I dragged the replacement over to the other side of the face. You may have already guessed that it doesn’t matter where on the face I drag it, as long as it’s smooth and of a similar skin tone. That’s what really matters. Now, for this side of the face, I’ll increase the opacity to 75. On this side, the shadow needed more masking, so it took more coverage. Let’s now look at a before and after shot of the entire face.
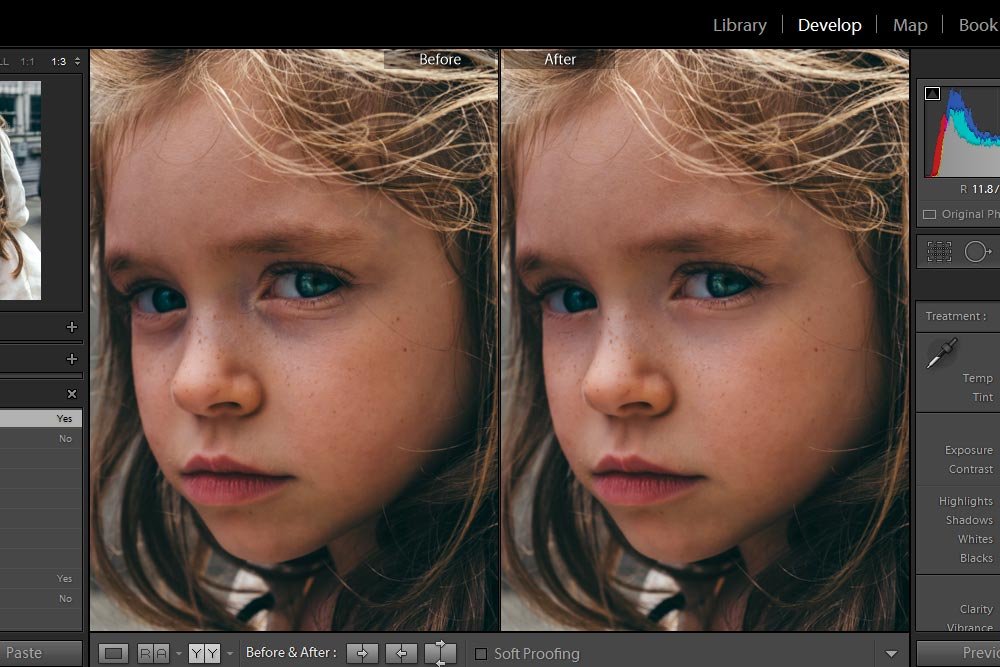
I have to tell you, this is so cool. It’s projects like this that have such an impact.
——
Really, that’s it. There isn’t much more to it than that when it comes to removing dark lines or shadows from under someone’s eyes in Adobe Lightroom. And what’s even cooler is that the exact same instructions apply to Adobe Camera Raw. So, it you’re into using the application, like I am, just follow these same instructions. What you need to concern yourself with the most is the opacity thing. Once you get that down, making an edited photo look natural will be easy.
If you have any questions or concerns regarding this post, please let me know in the comment section below. Thanks for reading!
Oftentimes, the biggest issue with photographs and portraits of people are shadows under the eyes. Whether it’s caused by wrinkles or simply by the shape of someone’s face, it can be unflattering. Add to the wrinkle or shape of someone’s face, some odd lighting angle and you’ve got yourself a recipe for disaster. Luckily, I’ve got a really fast and easy trick to share today that can help bring whoever is being photographed back to their original glory.
In today’s post, I’ll be using the Spot Removal tool in Adobe Lightroom to do a bit of editing on a girl’s face. While I’ve already covered how to use the Spot Removal tool on this site before, I think it’s beneficial to cover a strategy for different specific situations. Sometimes it’s the hair, other times it’s the shadows. No matter what, there’s a trick to deal with each and every case.
Using the Spot Removal Tool in Adobe Lightroom
Removing Straight Lines with the Spot Removal Tool in Adobe Lightroom
How to Visualize Spots in Adobe Lightroom
Tips for Clearing Complexion in Adobe Lightroom
Original Photo
I love these kinds of posts. These are the ones where you can see a real difference in the before and after shots. While the original photo is already really great and it has captured a “look,” I think removing some of the shadowing under the girl’s eyes would make her look a lot better. Trust me – everyone does this. Whether it be wedding shoots, engagement shoots, family portraits – whatever. They’re all touched up and getting rid of unflattering shadows is the first thing to go.
This is a mild case. I’ve edited photos where there was such black lines under the eyes, it was incredible. Those are the best to work on because the results are stunning. This will be a good demo though. You’ll see how good things can look with just a little bit of effort.
Drawing With the Spot Removal Tool
Since I’ve already covered so much about how to set up a photo for editing, I thought I’d jump right into using the Spot Removal tool. So, since I’m already in the Develop module in Lightroom, I’ll simply click on the tool to select it.
I’ve also gone ahead and enlarged the view by clicking Ctrl++ on my keyboard. This will give me the room to do a bit of drawing.
I’ll first center one of the eyes I’d like to work on. In this case, it’s the girl’s left eye. Next, I’ll size the Spot Removal tool so it’s appropriate to the shadow I’ll be drawing over. I may need to resize as I go because the area between the nose and the eye is much tighter then the area below the eye. To resize on the fly, I’ll press the [ and ] keys on my keyboard.

The reason I want to set the Opacity to 100 right now is so I can visualize the coverage that I’ve made. I’ll talk more about this aspect later on. Also, I want some feathering of the edges – that’s for sure. Without that, things can look strange very quickly.
Now that I’m all set, I can draw over the shadow area.

As you can see, I’ve drawn over the shadow area. The problem is, when Lightroom tried to replace the area I drew over, it chose somewhat of a weird replacement. To deal with this, I’ll click inside the replacement area and drag it to somewhere on the girl’s face that’s nice and neutral.

There. That’s much better.
Reducing the Opacity
Now, one of the things many editors forget to do, or perhaps don’t know they need to do, is to reduce the opacity of the replacement area. Sometimes, removing 100% of a shadow makes the person look worse then they did when they had the shadow. So, in this case, to make the girl look as natural as possible, I’ll push the Opacity slider to the left until I hit a value of 50. That will allow just a bit of the original shadow to show through and will hide any attempt at correction. Let’s take a look at this eye after it’s been edited.
If I saw anything wrong of if I needed to adjust the Opacity slider again, I could fix things in a flash.
Let’s take a quick look at a before and after shot for this one eye.

That looks really good. I played around with adjusting the opacity some more and it seems that 50 was a good choice.
Now I’ll go ahead and do exactly the same thing for he other eye.

As you can see from the screenshot above, I dragged the replacement over to the other side of the face. You may have already guessed that it doesn’t matter where on the face I drag it, as long as it’s smooth and of a similar skin tone. That’s what really matters. Now, for this side of the face, I’ll increase the opacity to 75. On this side, the shadow needed more masking, so it took more coverage. Let’s now look at a before and after shot of the entire face.

I have to tell you, this is so cool. It’s projects like this that have such an impact.
——
Really, that’s it. There isn’t much more to it than that when it comes to removing dark lines or shadows from under someone’s eyes in Adobe Lightroom. And what’s even cooler is that the exact same instructions apply to Adobe Camera Raw. So, it you’re into using the application, like I am, just follow these same instructions. What you need to concern yourself with the most is the opacity thing. Once you get that down, making an edited photo look natural will be easy.
If you have any questions or concerns regarding this post, please let me know in the comment section below. Thanks for reading!
