EmeraldHike
Member
- Joined
- May 10, 2021
- Messages
- 133
- Reaction Score
- 0
- Points
- 21
- #1
Over the past few years, I’ve written a few posts that talk about how to use the various enhancement tools in both Adobe Camera Raw and Adobe Lightroom. The tools I’m referring to are called the Radial Filter Tool, Graduated Filter Tool and the Adjustment Brush. To view some of these older posts regarding Camera Raw, please click through the links below.
Enhancing Photos with Graduated Filters in Adobe Camera Raw
How To Use Multiple Graduated Filters in Adobe Camera Raw
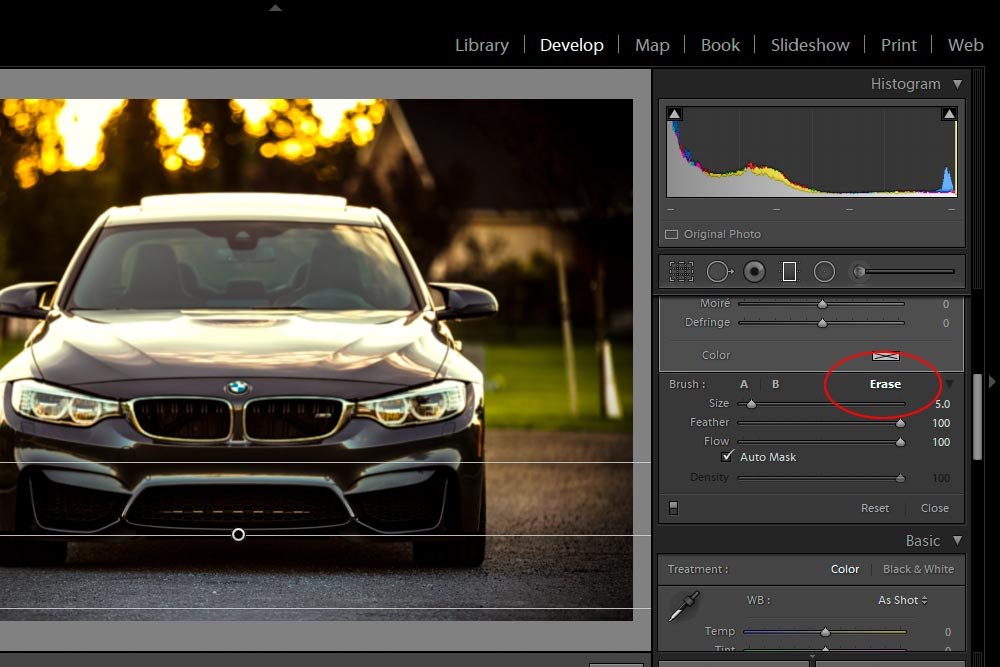
Using the Graduated Filter Brush Tool to Erase in Adobe Camera Raw
As I’ve mentioned previously, the engine that runs Camera Raw also runs Lightroom, which makes it really easy to jump back and forth between the two programs without having to do all that much homework and learning.
In today’s post, I’d like to move away from Camera Raw for a moment and talk about a very similar tool that exists in Adobe Lightroom. Like Camera Raw, this tool is called the Graduated Filter. And again, just like in Camera Raw, the tool basically works the same way.
As I did in my previous posts, in this post, I’ll walk through a quick project that outlines exactly how to find the controls for this tool and what they do. I’ll use two graduated filters to make the demo image look a heck of a lot better than it does right now. I’ll show you the sliders that belong to this tool and I’ll adjust them so you can clearly see what they do.
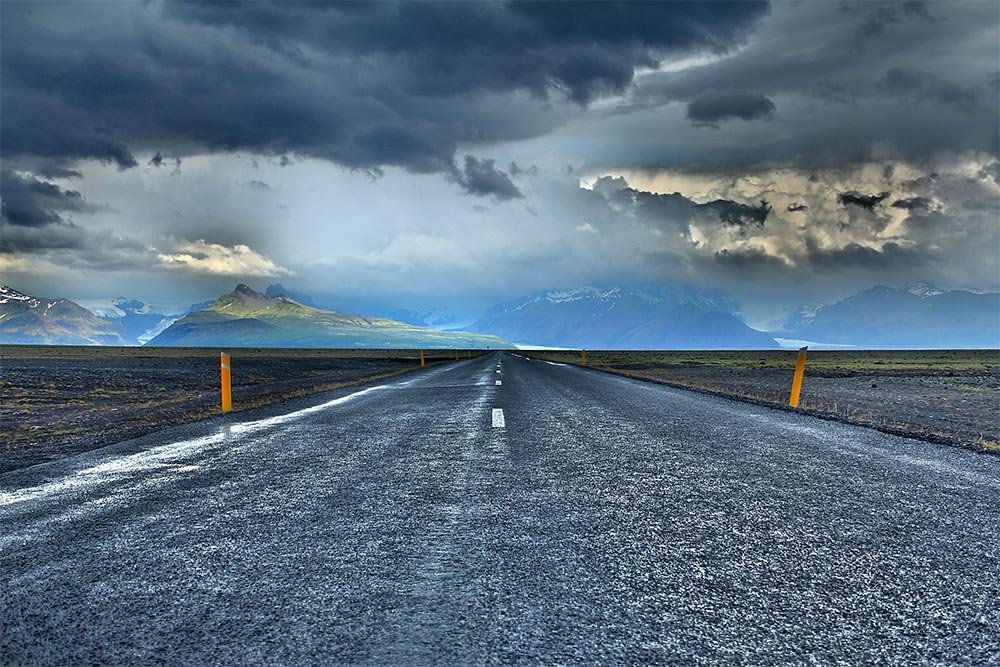
The reason I feel the Graduated Filter tool would be perfect for this photo is because there’s a clear division between two areas in the image. Also, the horizon line is flat, which makes life a lot easier. My goal for this photo is to warm up the bottom portion of it and add depth to the top portion. This should be no problem for the Graduated Filter tool.
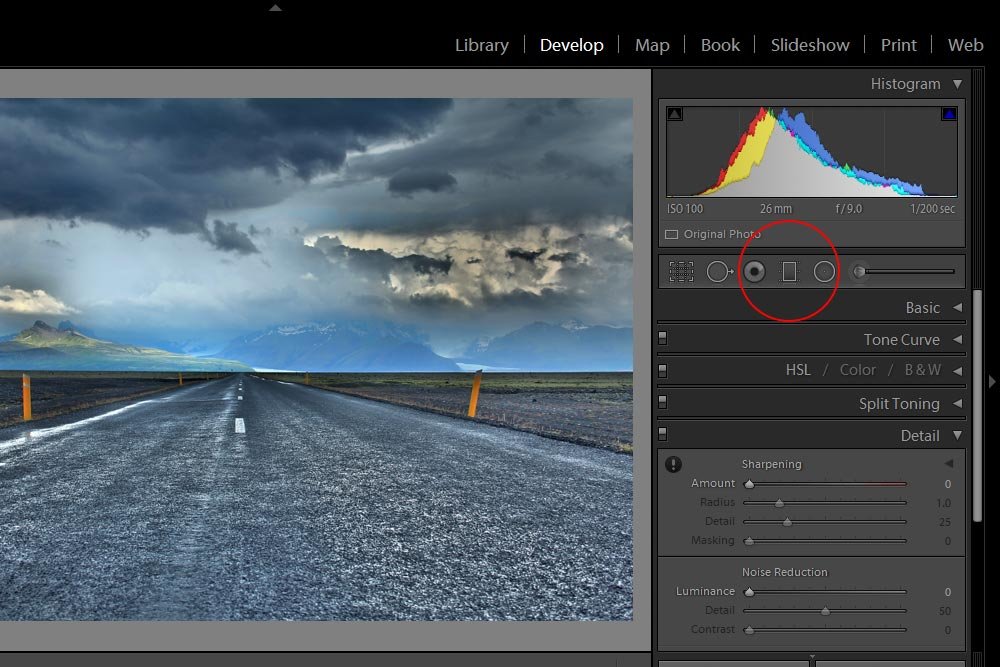
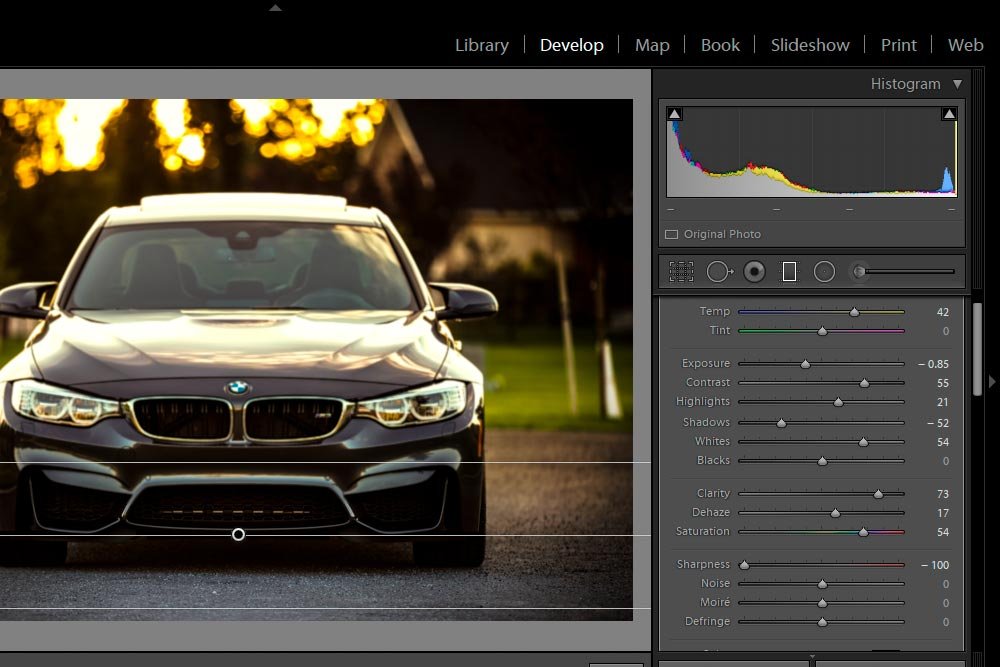
If I click on the Graduated Filter tool icon, a new panel with a bunch of sliders appears directly below it.
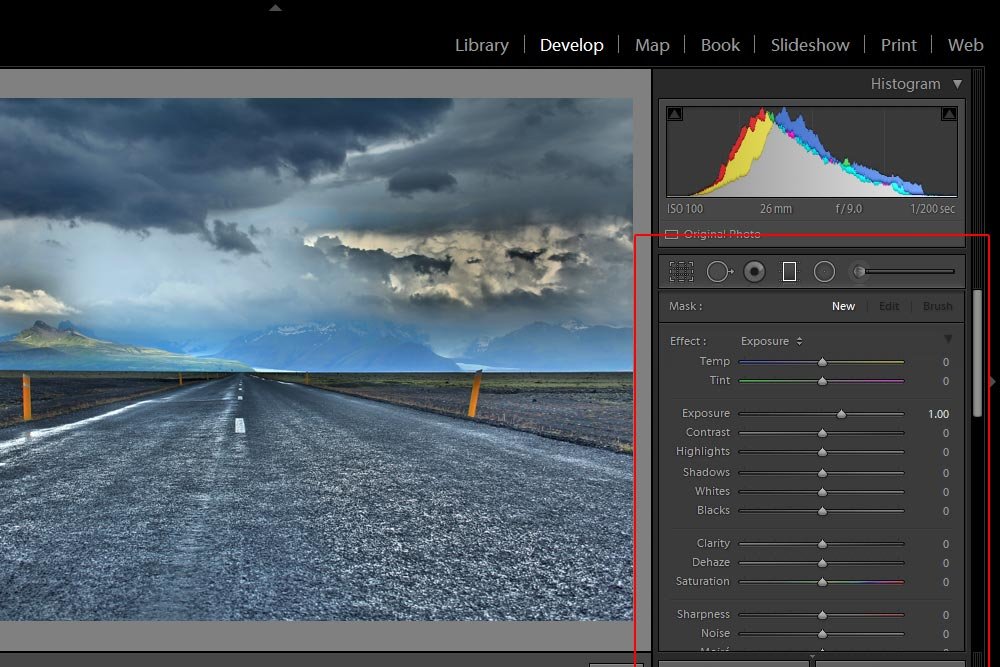
As you can see, the sliders look very familiar. Most all of them can be found in other panels in Lightroom. The sliders in the top area can be located right in the Basic panel itself.
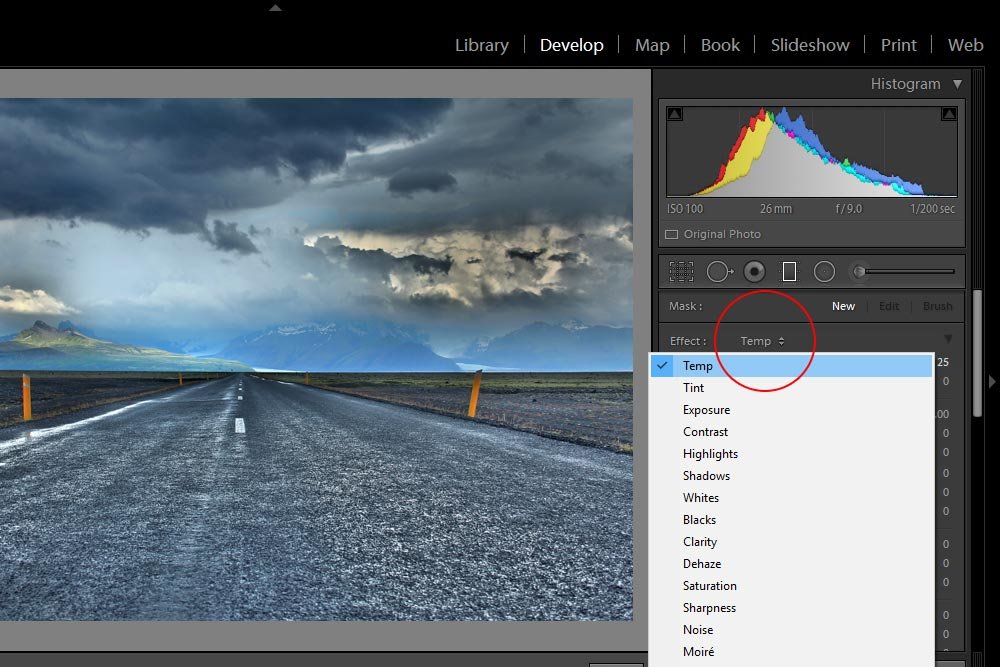
This menu shows all the sliders. All I need to do is click on Temperature and everything, except for the Temperature slider, will reset to its default position. Again, choose a slider you’re likely to move anyway to save time.
To affect the bottom portion of the photo, I’ll click the “+” shaped mouse pointer upward.
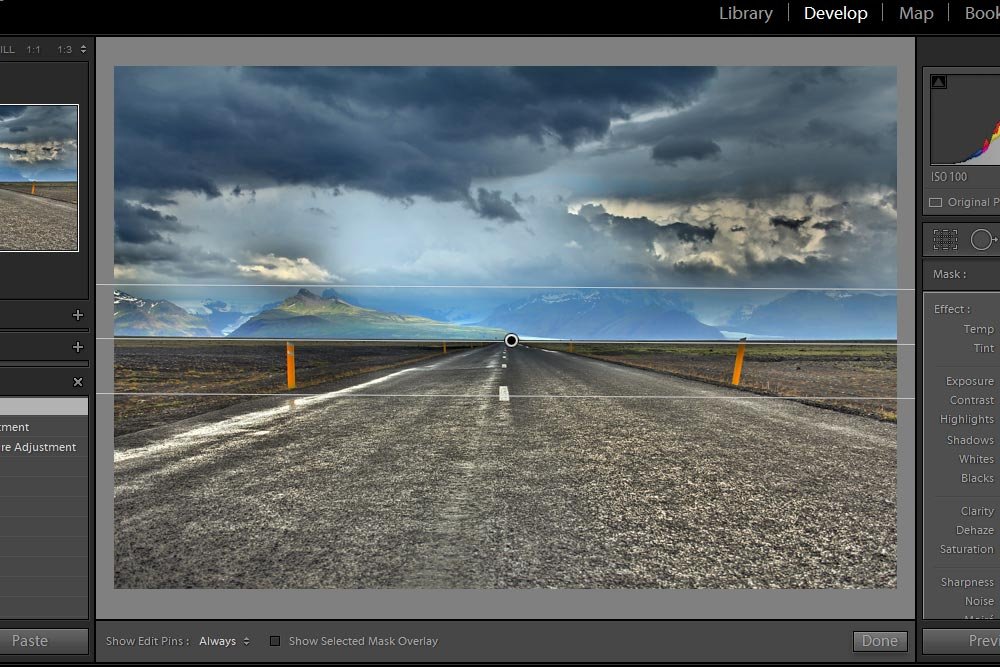
To move the filter, I could click on the circle that’s at the center of the lines and drag anywhere I want. To change the angle of the filter, I could move my mouse over to the left or to the right and wait for my mouse pointer to turn into a double-arrow curved pointer. Then, I could click and drag up or down. To show a mask overlay of the area affected by the filter, I could hover my mouse over the center circle of the filter and wait until the overlay appears. Either that, or I could simply check the Show Selected Mask Overlay box below the image.
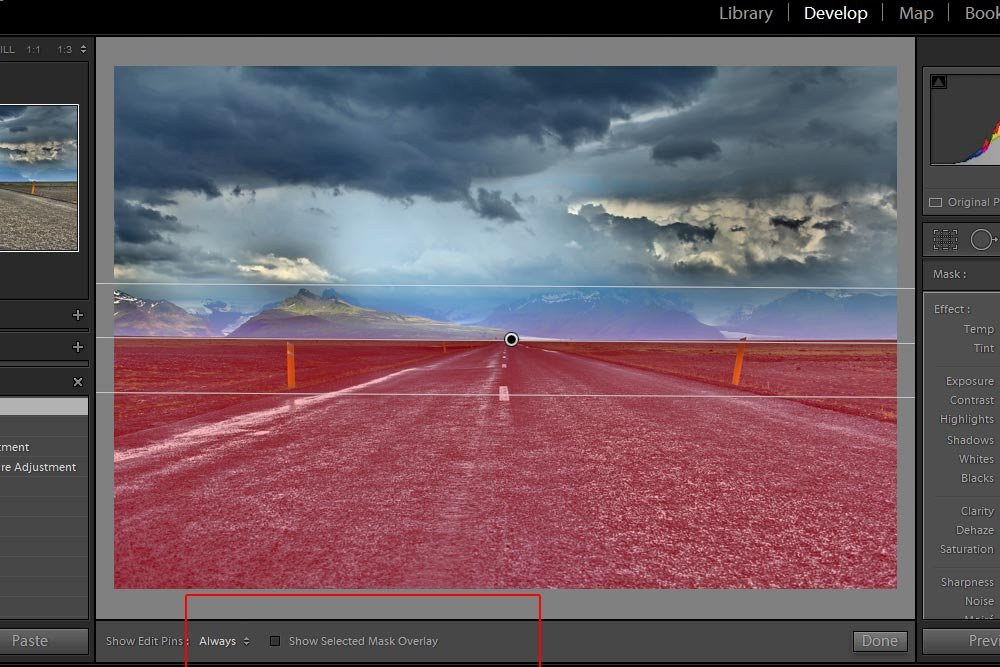
The mask overlay is useful if you forget which side of the filter is making the change. It’s also helpful if you’re working with multiple filters and you need to quickly identify one of them for whatever reason.
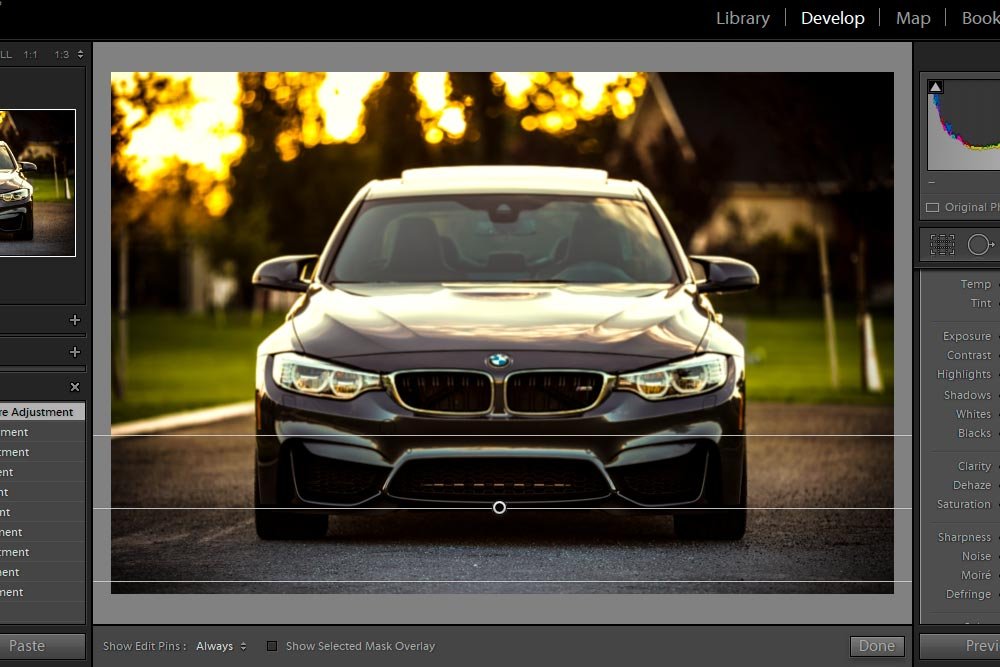
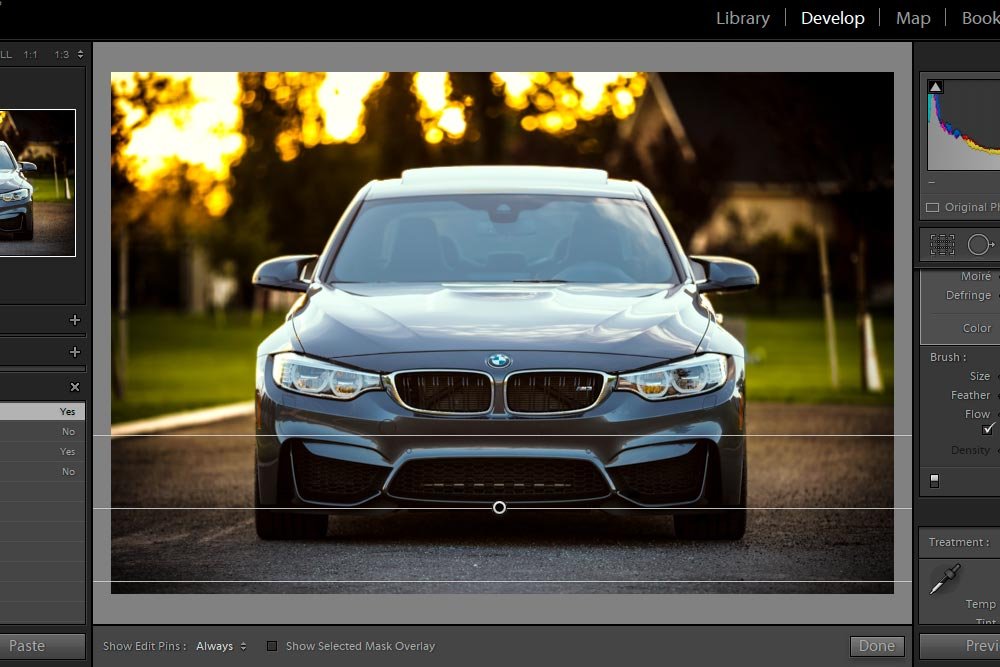
I want to show you something. I’m going to click and drag one of the outer lines either up or down. That’s going to expand the area between both of them and the center line. Then, keeping the overlay mask showing, I’ll move the entire filter upward a bit so you can see what’s going on.
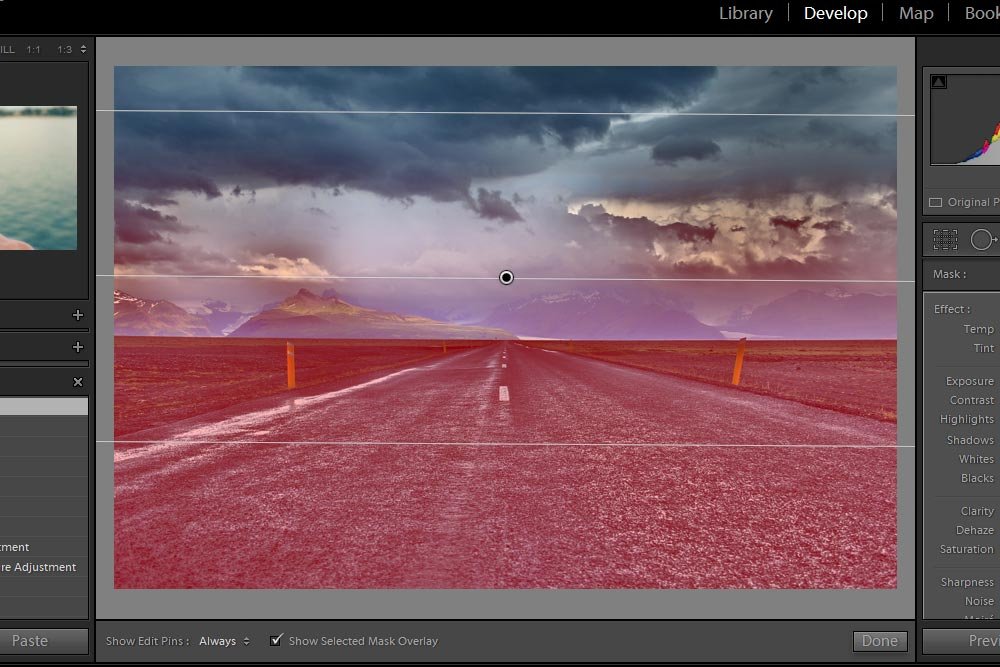
As you can see from the screenshot above, the red is indicating the area affected by the filter. Below the bottom-most line, there is solid red. Above the top-most line, there’s no red. In between the top and bottom lines is a gradient. That’s the area where the change fades out. To shrink the gradient and make any change you make more abrupt, keep the top and bottom lines close together. To make any change you make smooth and not that noticeable, keep them far apart.
Okay, now that I have the filter set up (I moved it back to the center and shrunk the lines a bit), I can go ahead and push some sliders around. It’s not important to go over exactly which ones, because I’ve talked about all that before. I just want to show you the results. You can experiment with the sliders in your application as much as you want.
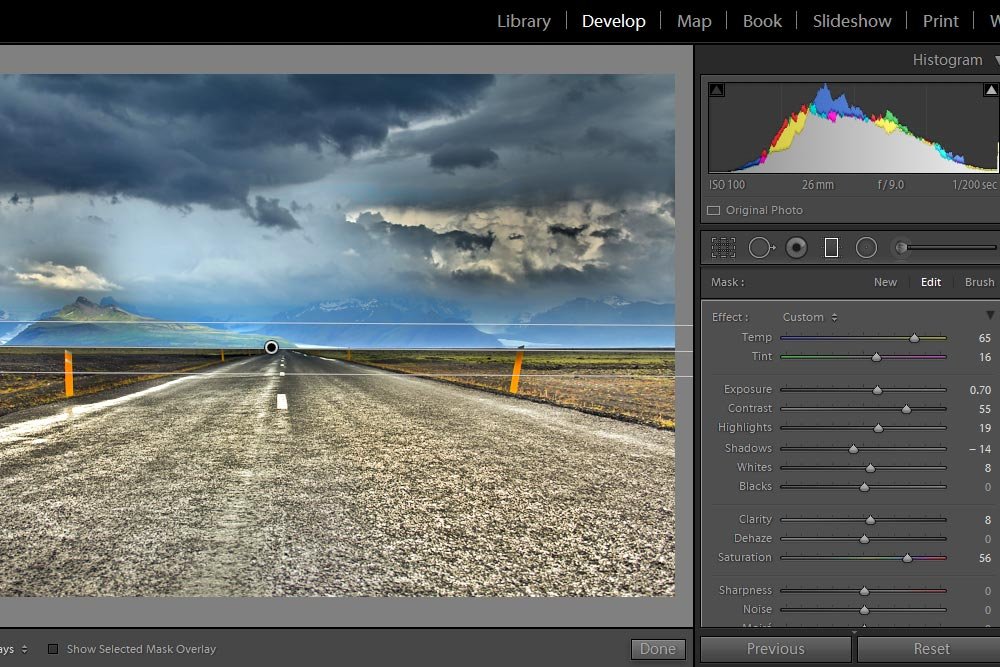
That’s looking pretty good. You can definitely tell that I added color to the bottom portion of the photo to make it look more realistic.
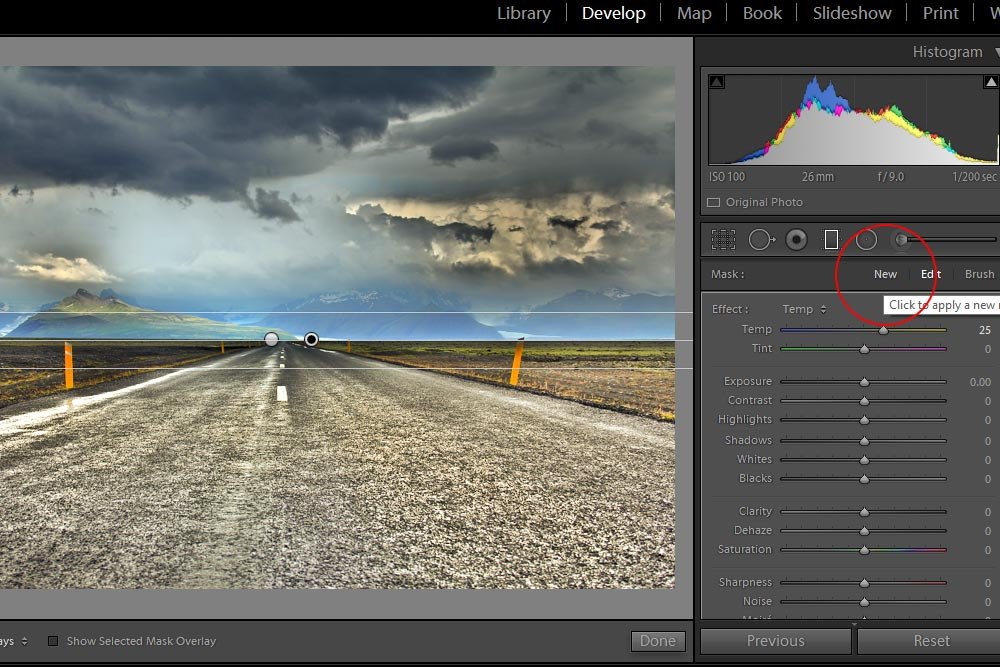
As you can see from the above screenshot, I’ve got two pins, which means there are two filter areas. I’ll now go ahead and adjust the second area by pushing the sliders around.
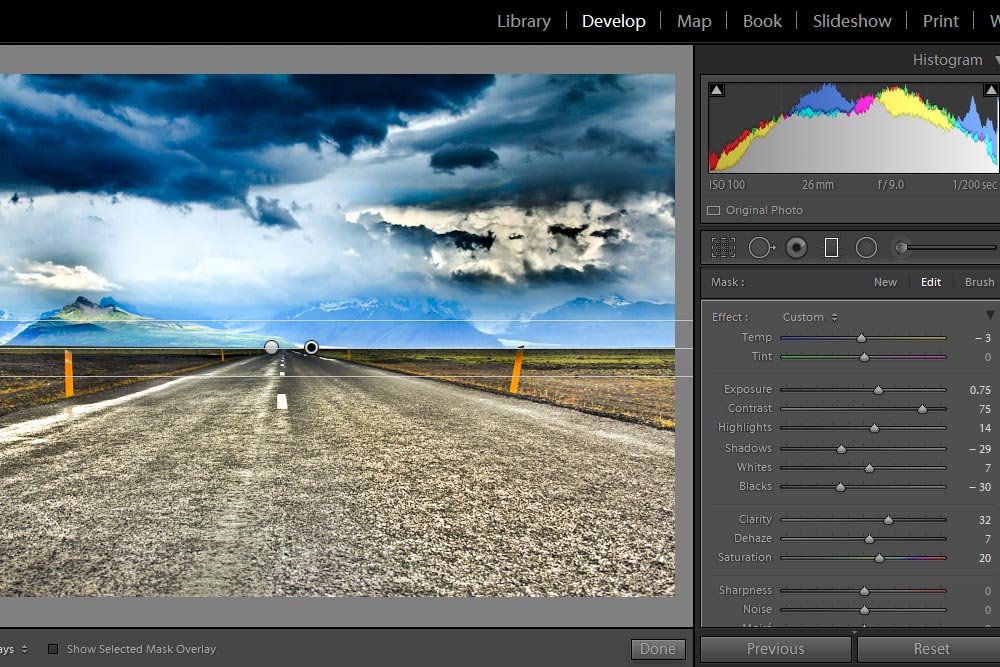
Wow, that’s pretty crazy. I really edited that one so it pops. I’m not sure I would keep it like that in real life, but it certainly looks cool.
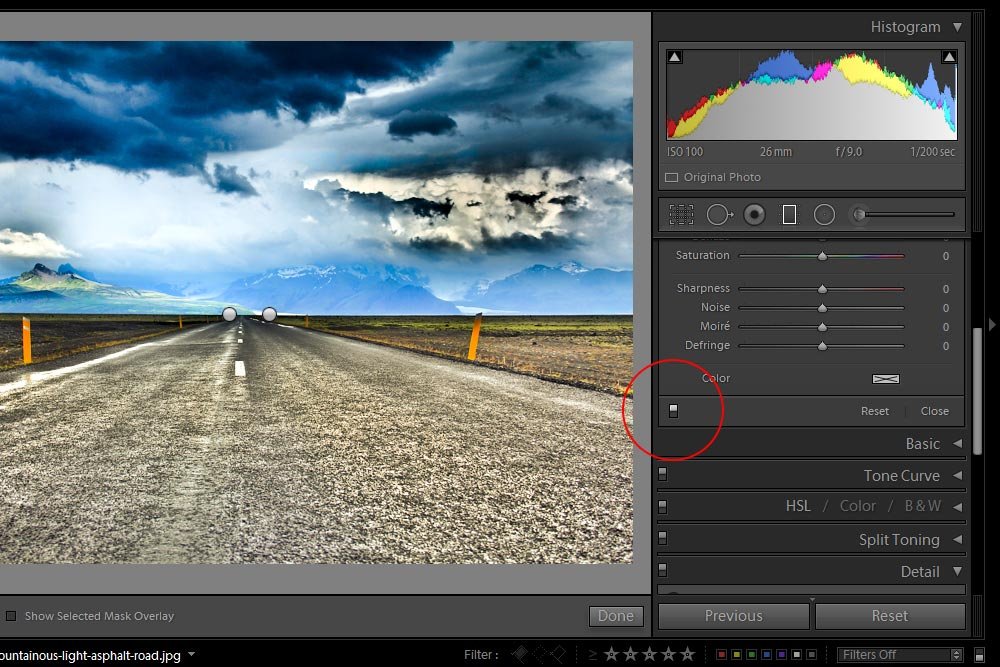
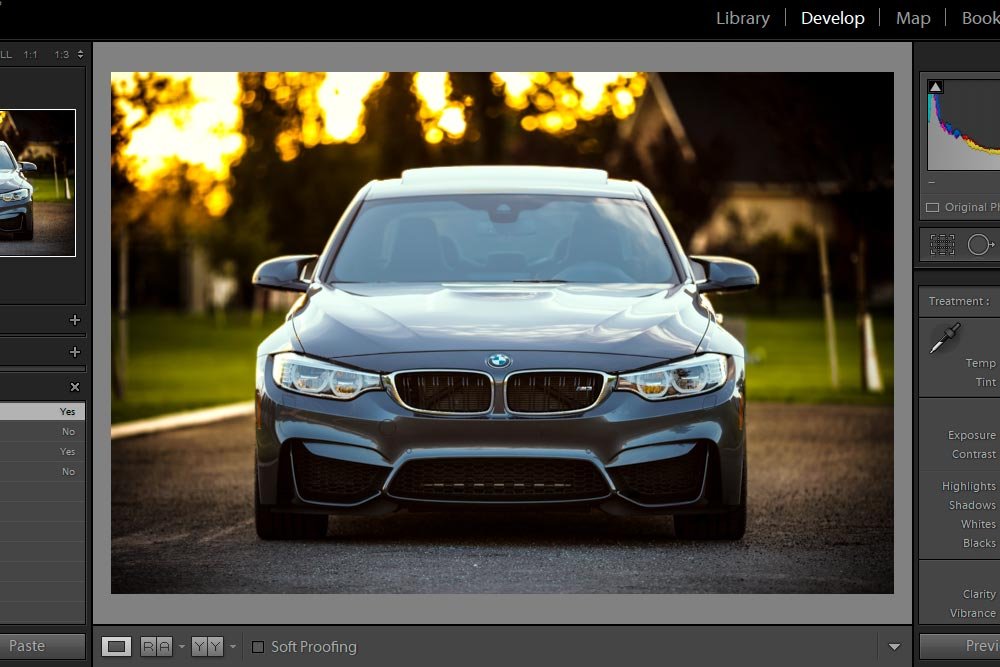
Clicking this switch will turn the filter on and off. Let’s take a quick look at the before and after versions of this photo. I put this together in Photoshop.
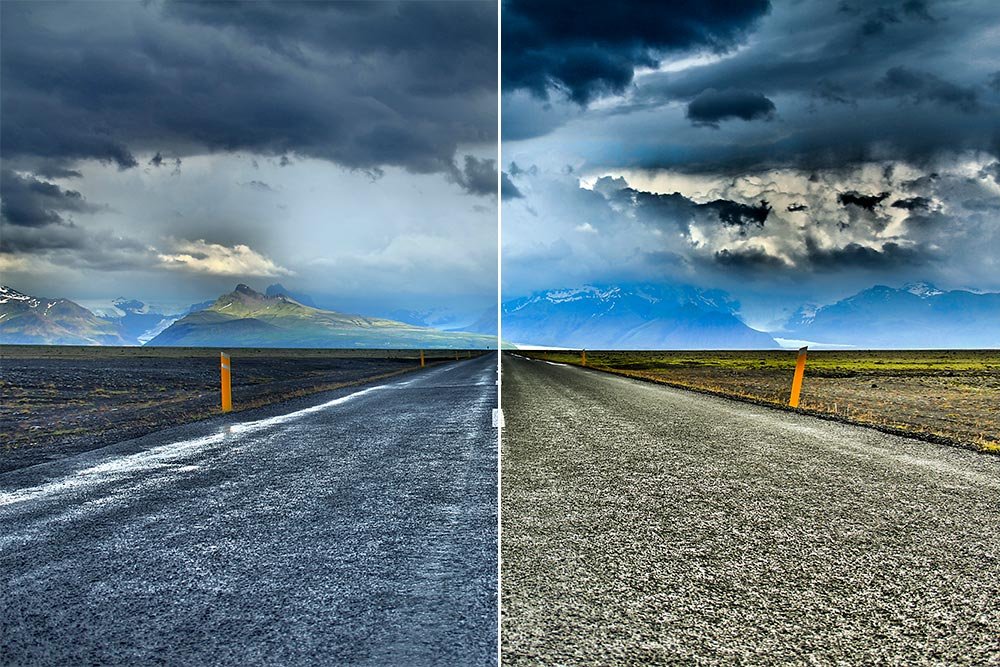
That looks great.
——
See? Wasn’t that easy? I hope I clearly explained how to use the Graduated Filter in Adobe Lightroom. If you have any questions or concerns, please let me know in the comment section below. Thanks for reading!
Enhancing Photos with Graduated Filters in Adobe Camera Raw
How To Use Multiple Graduated Filters in Adobe Camera Raw
Using the Graduated Filter Brush Tool to Erase in Adobe Camera Raw
As I’ve mentioned previously, the engine that runs Camera Raw also runs Lightroom, which makes it really easy to jump back and forth between the two programs without having to do all that much homework and learning.
In today’s post, I’d like to move away from Camera Raw for a moment and talk about a very similar tool that exists in Adobe Lightroom. Like Camera Raw, this tool is called the Graduated Filter. And again, just like in Camera Raw, the tool basically works the same way.
As I did in my previous posts, in this post, I’ll walk through a quick project that outlines exactly how to find the controls for this tool and what they do. I’ll use two graduated filters to make the demo image look a heck of a lot better than it does right now. I’ll show you the sliders that belong to this tool and I’ll adjust them so you can clearly see what they do.
Original Photograph
If you take a look at the photo below, you’ll see that’s it’s somewhat one dimensional. There seems to be a blueish color cast over the entire image and the clouds, while having the potential to show depth, are sort of flat. Let’s just say that there’s a lot of room for improvement in this photo.
The reason I feel the Graduated Filter tool would be perfect for this photo is because there’s a clear division between two areas in the image. Also, the horizon line is flat, which makes life a lot easier. My goal for this photo is to warm up the bottom portion of it and add depth to the top portion. This should be no problem for the Graduated Filter tool.
Where To Find the Graduated Filter in Lightroom
I’ve already launched Lightroom and I’m currently in the Develop module. Right below the histogram and above the Basic panel, you can find a horizontal toolbar. Inside of that toolbar lies the Graduated Filter tool. I’ve circled it in red below.
If I click on the Graduated Filter tool icon, a new panel with a bunch of sliders appears directly below it.

As you can see, the sliders look very familiar. Most all of them can be found in other panels in Lightroom. The sliders in the top area can be located right in the Basic panel itself.
What Does the Graduated Filter Do?
The answer to this question is simple. In the most basic sense, the Graduated Filter tool and those like it allow us to apply modifications and edits to an image in only select locations. In the case of this tool, we can cover large areas of a photo while simultaneously adjusting the Exposure, Contrast, Clarity and more. It’s a great tool to have around.Resetting the Sliders
Before I even get into making any adjustments, I need to make sure the sliders are zeroed out. While the first use may already have the sliders set to no values, upon working in Lightroom for a while, you’ll begin to notice that after you want to set up a new filter area, the sliders keep a memory of what you did to the last area. Instead of pushing each and every slider back to its zero position, it’s much easier to choose the primary change of the area you’d like to edit. In my case, I know I want to add some temperature to the lower part of the photo. So, to reset all the sliders and nudge the Temperature slider to the right a bit, I’ll click on the Effect menu pull-down.
This menu shows all the sliders. All I need to do is click on Temperature and everything, except for the Temperature slider, will reset to its default position. Again, choose a slider you’re likely to move anyway to save time.
Applying a Graduated Filter
In this section, I’ll show you how easily you can apply a graduated filter. All it takes is a click and drag.To affect the bottom portion of the photo, I’ll click the “+” shaped mouse pointer upward.

To move the filter, I could click on the circle that’s at the center of the lines and drag anywhere I want. To change the angle of the filter, I could move my mouse over to the left or to the right and wait for my mouse pointer to turn into a double-arrow curved pointer. Then, I could click and drag up or down. To show a mask overlay of the area affected by the filter, I could hover my mouse over the center circle of the filter and wait until the overlay appears. Either that, or I could simply check the Show Selected Mask Overlay box below the image.

The mask overlay is useful if you forget which side of the filter is making the change. It’s also helpful if you’re working with multiple filters and you need to quickly identify one of them for whatever reason.
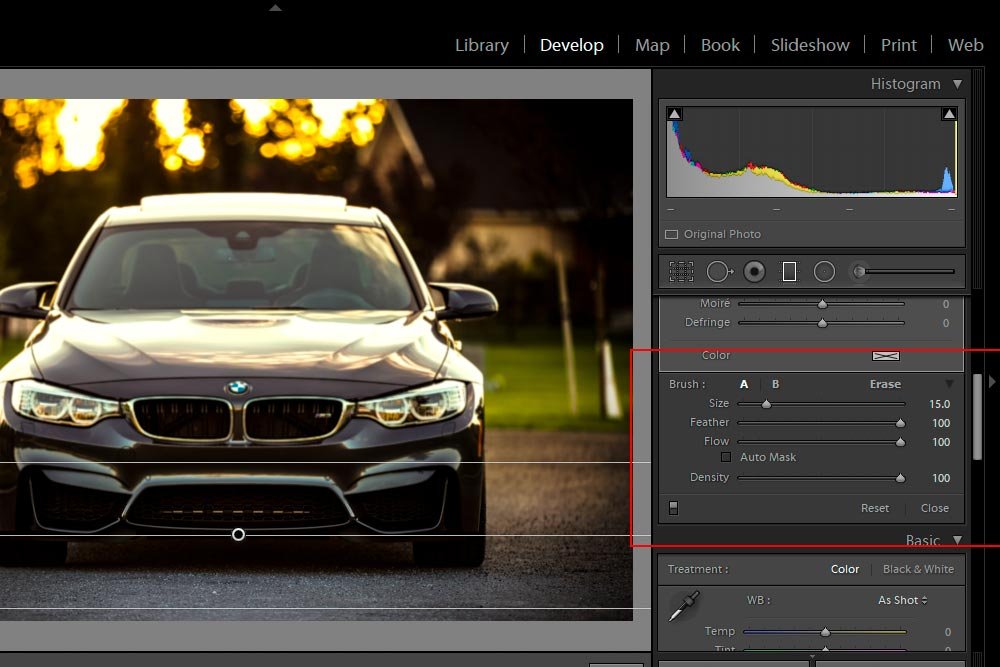
I want to show you something. I’m going to click and drag one of the outer lines either up or down. That’s going to expand the area between both of them and the center line. Then, keeping the overlay mask showing, I’ll move the entire filter upward a bit so you can see what’s going on.

As you can see from the screenshot above, the red is indicating the area affected by the filter. Below the bottom-most line, there is solid red. Above the top-most line, there’s no red. In between the top and bottom lines is a gradient. That’s the area where the change fades out. To shrink the gradient and make any change you make more abrupt, keep the top and bottom lines close together. To make any change you make smooth and not that noticeable, keep them far apart.
Okay, now that I have the filter set up (I moved it back to the center and shrunk the lines a bit), I can go ahead and push some sliders around. It’s not important to go over exactly which ones, because I’ve talked about all that before. I just want to show you the results. You can experiment with the sliders in your application as much as you want.

That’s looking pretty good. You can definitely tell that I added color to the bottom portion of the photo to make it look more realistic.
How To Add More Than One Graduated Filter in Lightroom
Now I’m going to add another filter to the mix. To do this, I’ll head over to the panel on the right and click the word New. Doing this will deactivate the previous filter by removing the lines and keeping the pin, but turning it gray. Then, I’ll have the chance to click and drag downward to apply the new filter. I’ll do all the things I previously did to make my adjustments. One word of warning though. When creating a new filter, be sure to offset it to the side a bit. You don’t want to stack your pins on top of each other. That can become confusing – fast.
As you can see from the above screenshot, I’ve got two pins, which means there are two filter areas. I’ll now go ahead and adjust the second area by pushing the sliders around.

Wow, that’s pretty crazy. I really edited that one so it pops. I’m not sure I would keep it like that in real life, but it certainly looks cool.
How To See the Before & After Versions
After a while, editors can become blind to many of their changes. It helps to see the before and after versions of the photo while working. Doing this in Lightroom is easy. To view the before and after shots, scroll down a bit in the Graduated Filter panel until you see a small switch.
Clicking this switch will turn the filter on and off. Let’s take a quick look at the before and after versions of this photo. I put this together in Photoshop.

That looks great.
Deleting a Graduated Filter
One last thing before I end this post. Sometimes, an editor may want to abandon a graduated filter all together, for whatever reason. To delete a filter, all you need to do is to activate it by clicking on its pin and then press Delete on your keyboard. That should do it.——
See? Wasn’t that easy? I hope I clearly explained how to use the Graduated Filter in Adobe Lightroom. If you have any questions or concerns, please let me know in the comment section below. Thanks for reading!


