Cameron
Member
- Joined
- May 10, 2021
- Messages
- 108
- Reaction Score
- 3
- Points
- 23
- #1
How to set up and operate auto focus on today’s DSLR cameras remains a mystery for many budding photographers around the world. If you’ve ever struggled with all the various settings and little white and green boxes these camera’s have to offer, let me tell you that you’re not alone. I swear, I was just getting the hang of focusing with my old Canon Rebel T3i when I upgraded to the Canon T7i. Now, I’ve got white boxes and face tracking brackets all over the place. I don’t know what to do with any of them. It seems as though the more Canon tries to simplify my life, the more complicated it becomes.
Here’s what I want. I want one button to focus on something that’s in the middle of either my viewfinder or the Live View screen. Then, after I have that object in focus, I don’t want anything to change. I don’t need any extra help after that. I don’t need facial recognition software with moving targets and all that. All I need is the ability to focus on something and for that object to stay in focus.
After that, I need another button to press to actually take the photo. If I want to focus on an object at the center of the screen and then move the camera a few inches over in any direction so the once focused on object is off to the side, I don’t want the camera to start thinking for me and to refocus on another object. For instance, if I want to take advantage of the rule of thirds and focus on something in my scene and then move to the left slightly so that object is off to the side, I don’t want to lose that focus. Is that too much to ask for? I think not. The best part is, there’s an option out there for people who are just like me. It’s called back button auto focus and it’s a wonderful thing.

Don’t get me wrong. I don’t mind having the shutter button meter the scene and take the photo, but I’d like to separate out the auto focusing part so I could do that myself.
Let’s pretend that your child is standing in your front yard smiling at you. You want to take a photo of her, so you focus directly on her face. She is standing still and there’s a beautiful flower garden right next to her. Because you’d like both the garden and your child in the photo, you shift your camera slightly so your child is off to the side, but still the primary subject of the photo. Out of the box, when you focus on your child’s face and then move the camera over so your child is off to the side, after metering the new scene, the camera will refocus on whatever is in front of it. I know there have been many advancements made when it comes to all different type of options for this type of situation, but they can get complicated when you’re trying to move fast. The ideal situation would be for you to focus on your child’s face and then have the option to point the camera at anything in the world, re-meter and have that original focus locked in. That’s what back button auto focus is all about. It locks the original focus in, so you can get creative with your camera. All that will be left is the metering of the scene and the taking of the photo.
Back button auto focus uses the Canon camera’s Custom Function menu item to reassign what the AE Lock button does. The AE Lock button is located at the top right portion of the rear of the camera and for many photographers, it isn’t used all that much. By the way, the AE Lock selects and locks in the camera’s exposure settings. Since it’s not too popular, it’s often reassigned to do the job of auto focusing.
Once the task of focusing has been handed off to the AE Lock button, the shutter button will no longer focus at all. It will only meter and take the photo. If you want to focus the camera, you’ll need to press the AE Lock button on the rear of the camera, which will take some getting used to. Let me tell you though, professional photographers all over the world swear by it, so it must truly help out.

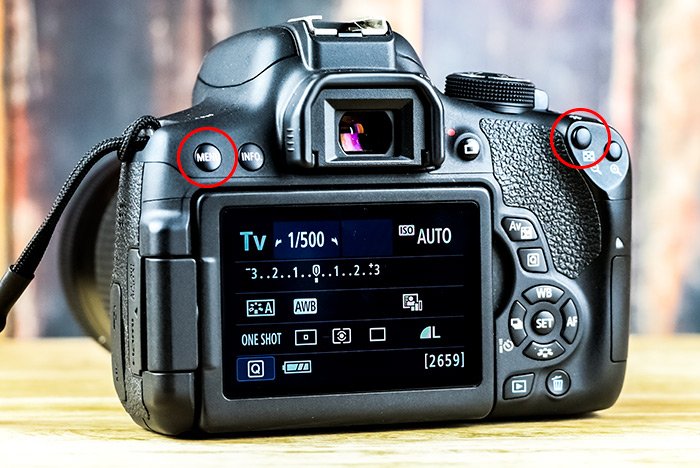
In the above image, I circled both the MENU button and the AE Lock button in red.
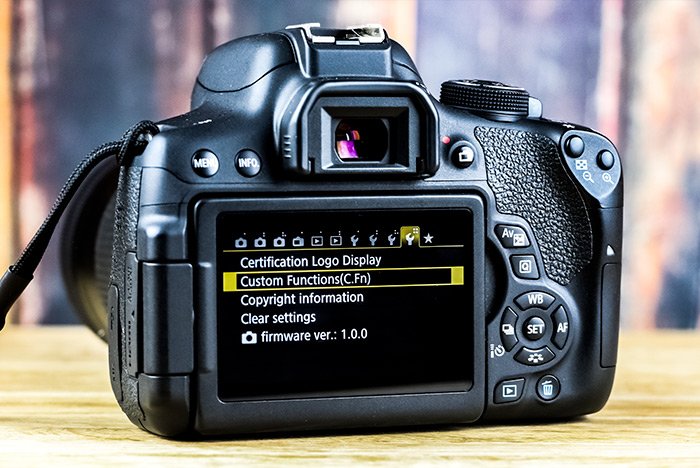
Then, press the left or right arrow on the back of the camera until you reach the Custom Functions (C.Fn) menu item.

Next, to access that menu area, press the SET button that sits at the center of the arrow buttons. You should see a whole bunch of options. For the Canon Rebel T7i, the options you’re looking for are located at the number 12. For the T4i, T5i, T6i and T6s, the options are located at number 6 and 10. You’ll need to scroll to find there this is. Simply press the left or right arrow buttons again to reach those areas.

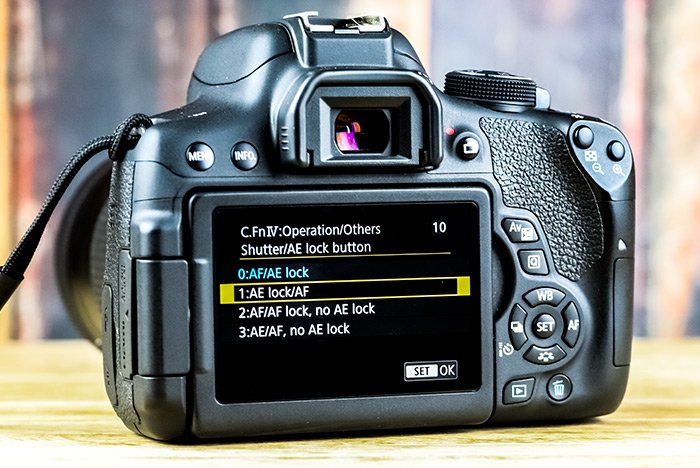
Finally, to change the auto focus button from the shutter button to the AE Lock button, select the 1: AE Lock/AF option, which is option number 2. Press SET to accept the change and then exit out of the menu and begin shooting your photos.
And that’s it! Now you can do all your focusing with the rear button and leave the metering and the actual shutter to the shutter button.
I hope I clearly explained the benefits of back button auto focus as well as how to go about setting your camera to make use of this option. If you have any questions regarding this post, please let me know in the comment section down below. Also, you may ask any question you wish on the photography discussion board at any time. Thanks for reading!
COMMENT: Thank you. Your directions on setting up rear button for the Rebel7i were perfect.
Here’s what I want. I want one button to focus on something that’s in the middle of either my viewfinder or the Live View screen. Then, after I have that object in focus, I don’t want anything to change. I don’t need any extra help after that. I don’t need facial recognition software with moving targets and all that. All I need is the ability to focus on something and for that object to stay in focus.
After that, I need another button to press to actually take the photo. If I want to focus on an object at the center of the screen and then move the camera a few inches over in any direction so the once focused on object is off to the side, I don’t want the camera to start thinking for me and to refocus on another object. For instance, if I want to take advantage of the rule of thirds and focus on something in my scene and then move to the left slightly so that object is off to the side, I don’t want to lose that focus. Is that too much to ask for? I think not. The best part is, there’s an option out there for people who are just like me. It’s called back button auto focus and it’s a wonderful thing.

What the Shutter Button Does
When you buy a camera, take it out of the box and start shooting with it, you’ll find that the shutter button does many things. First of all, if you point the camera at something and press the shutter button down half way, you’ll notice that the camera is metered and whatever it is you’re pointing at is focused on. And when I say “metered,” I mean that the camera takes notice of the surrounding lighting and scene and sets the aperture, shutter speed, ISO value and white balance. After all that is done, if you continue pressing the shutter button all the way, the photo is taken. If you think about it, that’s a lot to ask of one button. It sort of makes me nervous. It’s like asking a car to start, drive itself and park, all by pressing the gas peddle. In my world, I like to have a bit more control over things.Don’t get me wrong. I don’t mind having the shutter button meter the scene and take the photo, but I’d like to separate out the auto focusing part so I could do that myself.
Reframing with Back Button Auto Focus
If you aren’t aware, I’ll tell you that most cameras have a method for removing the focusing feature from the shutter button and assigning that command to a different button. I’ll explain how to go about doing this for Canon Rebel DSLR cameras below, but let me first give you the reason setting your camera up like this is so important. It’s all about reframing.Let’s pretend that your child is standing in your front yard smiling at you. You want to take a photo of her, so you focus directly on her face. She is standing still and there’s a beautiful flower garden right next to her. Because you’d like both the garden and your child in the photo, you shift your camera slightly so your child is off to the side, but still the primary subject of the photo. Out of the box, when you focus on your child’s face and then move the camera over so your child is off to the side, after metering the new scene, the camera will refocus on whatever is in front of it. I know there have been many advancements made when it comes to all different type of options for this type of situation, but they can get complicated when you’re trying to move fast. The ideal situation would be for you to focus on your child’s face and then have the option to point the camera at anything in the world, re-meter and have that original focus locked in. That’s what back button auto focus is all about. It locks the original focus in, so you can get creative with your camera. All that will be left is the metering of the scene and the taking of the photo.
Back button auto focus uses the Canon camera’s Custom Function menu item to reassign what the AE Lock button does. The AE Lock button is located at the top right portion of the rear of the camera and for many photographers, it isn’t used all that much. By the way, the AE Lock selects and locks in the camera’s exposure settings. Since it’s not too popular, it’s often reassigned to do the job of auto focusing.
Once the task of focusing has been handed off to the AE Lock button, the shutter button will no longer focus at all. It will only meter and take the photo. If you want to focus the camera, you’ll need to press the AE Lock button on the rear of the camera, which will take some getting used to. Let me tell you though, professional photographers all over the world swear by it, so it must truly help out.
Setting Back Button Auto Focus
Changing this setting is a breeze. All that needs to be done is to have one small menu item changed. To start, turn your camera on and press the MENU button on the back of it.
In the above image, I circled both the MENU button and the AE Lock button in red.
Then, press the left or right arrow on the back of the camera until you reach the Custom Functions (C.Fn) menu item.

Next, to access that menu area, press the SET button that sits at the center of the arrow buttons. You should see a whole bunch of options. For the Canon Rebel T7i, the options you’re looking for are located at the number 12. For the T4i, T5i, T6i and T6s, the options are located at number 6 and 10. You’ll need to scroll to find there this is. Simply press the left or right arrow buttons again to reach those areas.

Finally, to change the auto focus button from the shutter button to the AE Lock button, select the 1: AE Lock/AF option, which is option number 2. Press SET to accept the change and then exit out of the menu and begin shooting your photos.
And that’s it! Now you can do all your focusing with the rear button and leave the metering and the actual shutter to the shutter button.
I hope I clearly explained the benefits of back button auto focus as well as how to go about setting your camera to make use of this option. If you have any questions regarding this post, please let me know in the comment section down below. Also, you may ask any question you wish on the photography discussion board at any time. Thanks for reading!
COMMENT: Thank you. Your directions on setting up rear button for the Rebel7i were perfect.
