CaptainDan
Member
- Joined
- May 9, 2021
- Messages
- 113
- Reaction Score
- 0
- Points
- 16
- #1
Not many people know what dynamic range is when it comes to their cameras. It’s not until they get involved with photography for a number of years that they learn why certain cameras cost thousands of dollars more than others. When they read reviews on Amazon, they consume all sorts of information about features, look and feel, types of lenses they can use and so much more. Very little discussion is given to how exactly the camera they might be interested in actually captures the photo. It’s a shame really. So much money is spent every year on cameras that end up not being what the buyer wanted.
So, what exactly is dynamic range? Let me try to explain it as simply as I can. Dynamic range is the difference between the darkest and lightest areas of a photo. Dynamic range doesn’t only apply to photography. I want you to know that. But for our purposes and for the purposes of this post, this is the only area we’ll cover.
I’ve been thinking a lot about this topic lately because I’m in the market for a new camera. My T3i has a dynamic range that’s not so hot, according to today’s standards. And the more I use it, the more I feel like I’m not getting what I want out of it. As I mentioned above, cameras with dynamic ranges on the more narrow side might not be noticed all too readily by newer photographers, but for someone who’s more experienced, details in the shadows and highlights become very important.
To sum it up, dynamic range is one area of photography that’s often overlooked, but is absolutely critical to be aware of. It’s what the high-end photographers pay attention to and it’s what makes or breaks a photograph. Narrow dynamic ranges can kill an otherwise beautiful piece of art. Wide dynamic ranges can take a so-so photo and make it exponentially more interesting.
In today’s post, I’m going to demonstrate how you can adjust the range between shadows and highlights in Adobe Photoshop when using an adjustment layer. The adjustment layer I’ll be focusing on is called Levels. Levels allows for the adjustment of a histogram that expresses a photograph’s luminance. The histogram luminance values range from pure black to pure white on one axis and the relative quantity of light for that luminance on another axis. In simple terms, it’s a more scientific and graphical picture of your picture. Don’t worry, this will all become very clear below.
For my demonstration, I’ll be using a photo of a city street. I’ll apply the Levels adjustment layer to the photo and then adjust, or narrow, the range until it suits my needs. After that, I’ll make a selection and for that selection, I’ll create another adjustment layer of the same type. I’ll change the selection range in an effort to show you that adjustment layers aren’t only meant to apply to entire photos, but pieces, or objects, inside a photo as well.
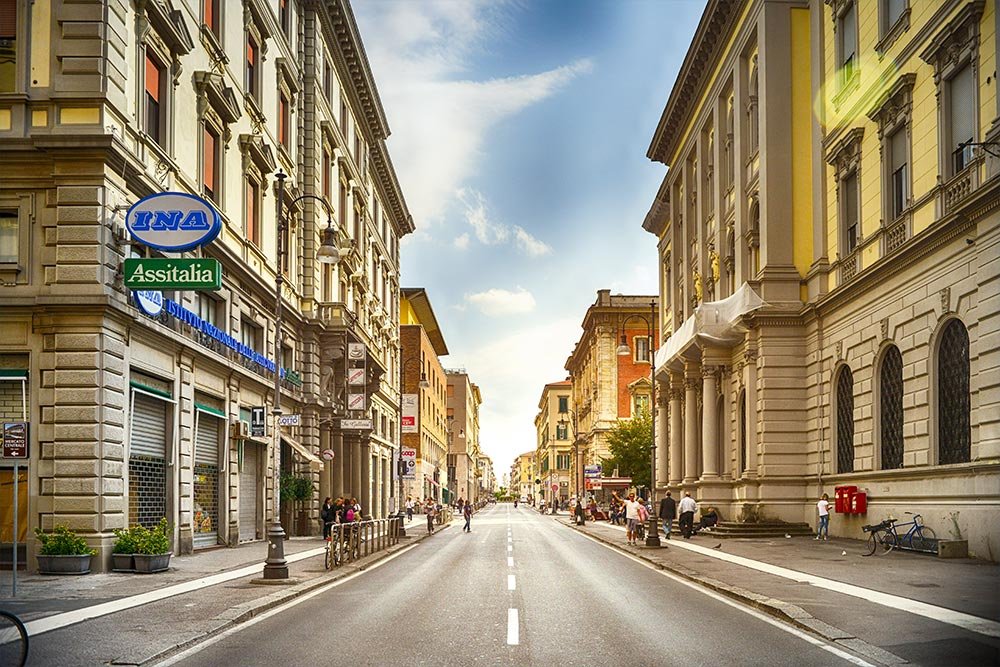
My goal is to narrow the range between darks and lights using the Levels adjustment layer. This will add contrast. Also, I’d like to bring more focus to the blacktop on the street, so that it stands out from its surroundings. I’ll use another adjustment layer for that.
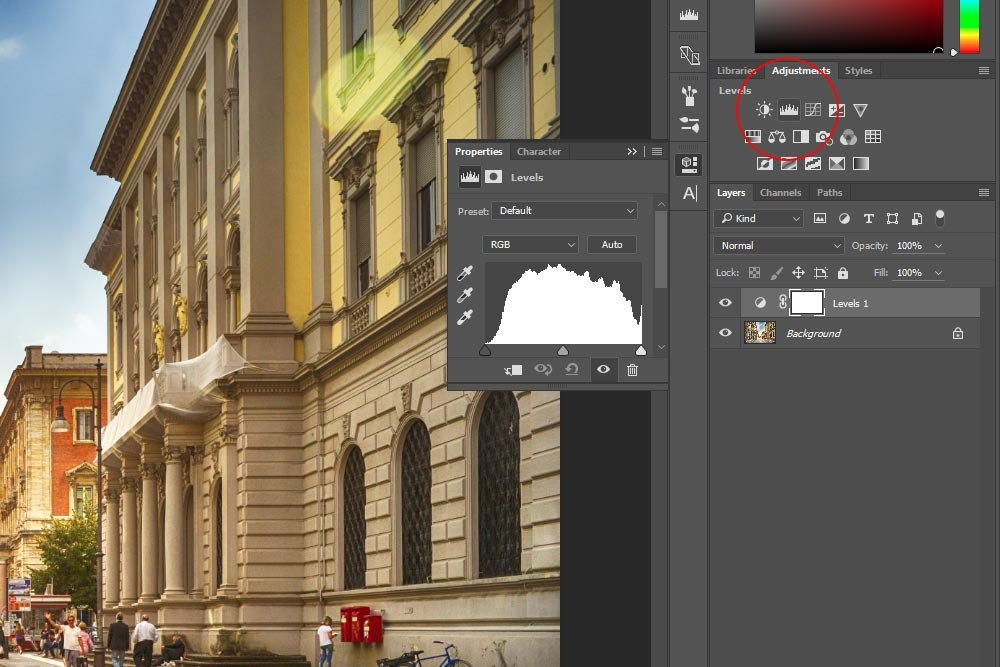
If you look at the screenshot above, you’ll see that after I clicked the Levels icon, a few things happened. First, a new adjustment layer was added to the Layers panel. Second, the Levels Properties panel appeared to the left of the Layers panel. It’s inside this Properties panel that I’ll complete most of my work.
In this post, I’m going to focus primarily on the histogram itself, along with the three sliders located directly below the graph. These sliders are, from left to right, the black point slider, the midtone slider and the white point slider. Initially, each of these sliders is located in their default positions. Black has an RGB value of 0, white has an RGB value of 255 and the midtones have an RGB value of 1. You’ll see these default settings each time you create a new Levels adjustment layer.
The image I’m using isn’t terrible. While I do think it’s a bit washed out, I really don’t need to aggressively push the sliders. All I’m going to do is to move the black slider to the right a hair and then move the midtone slider to the right a hair as well. This will add the contrast I’m after.
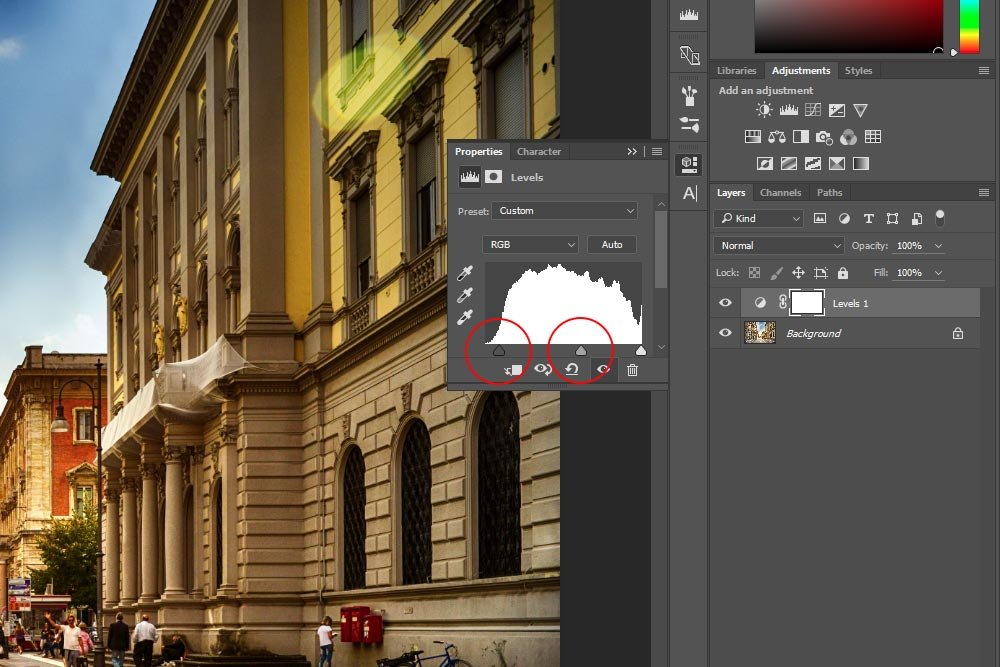
Take a look at the photo below. You can definitely tell that I’ve reduced the original bland look. It looks pretty good.
I feel that the road in the photo I’m working on is too light. I’d like it to have some punch and for it to be darker. To accomplish this edit, I’ll use the Polygonal Lasso Tool and outline the road. This will create the marching ants and create a selection.
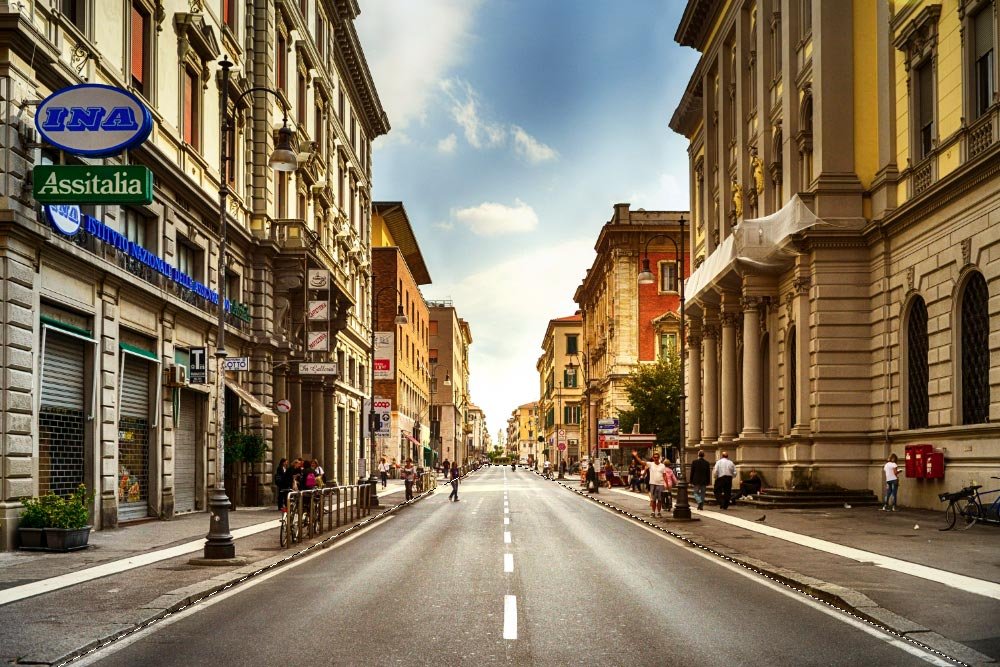
From here, I’ll go back to the Adjustments panel and click the Levels icon again. This will create a new adjustment layer and will pop out the Properties box that will include a histogram just for the selected area. Let’s take a look at that.
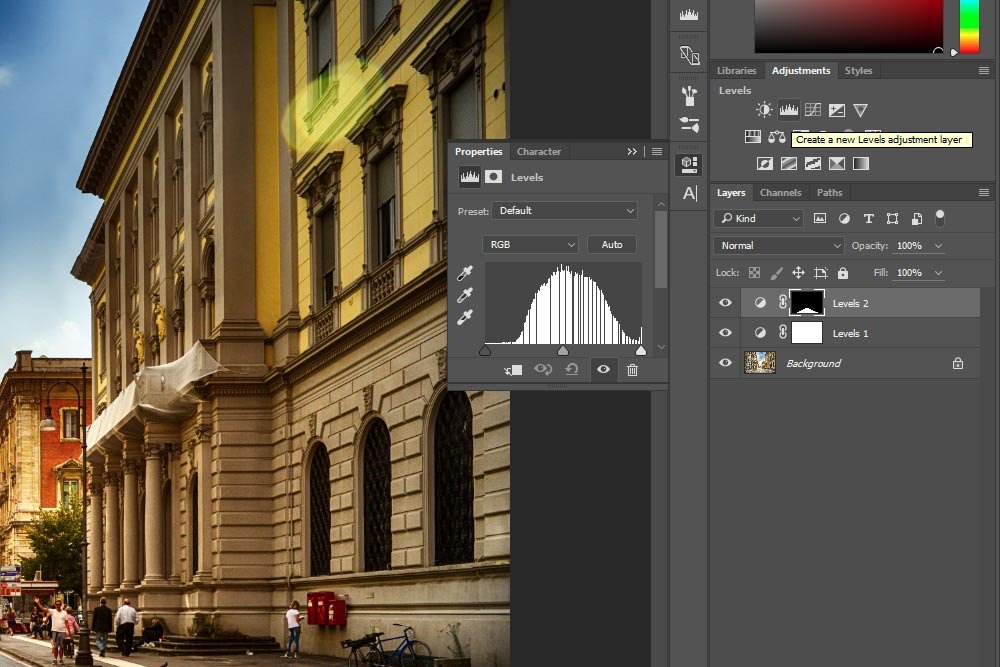
From the above screenshot, you can see two things. First, there’s a new adjustment layer. The mask portion of this layer is shaped like the selection. The white part of the mask is what will be edited and the black part will be invisible. Second, the new histogram has a smaller tonal range. Also, there are vertical lines that travel through the histogram, indicating areas of the range that are lacking data.
Since the darker side of the graph has some flatness, I’ll push the black slider to the right, just until it meets the upward curve. Then, I’ll push the midtone slider to the right until I feel the road has a “just paved” look. That’s what I’m going for. Take a look at the sliders now.

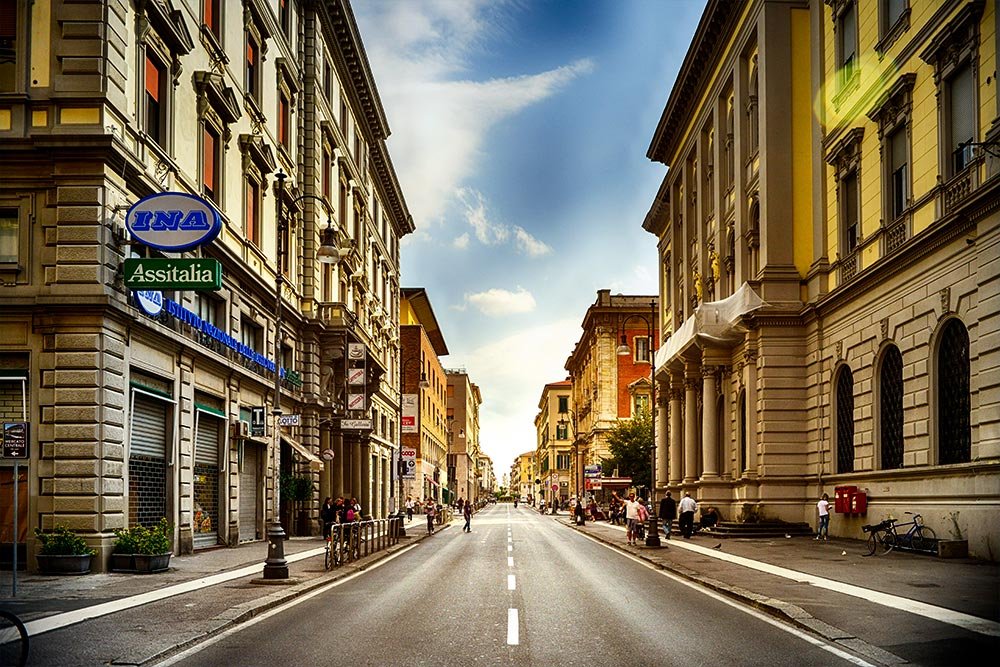
These adjustments give me the final image.
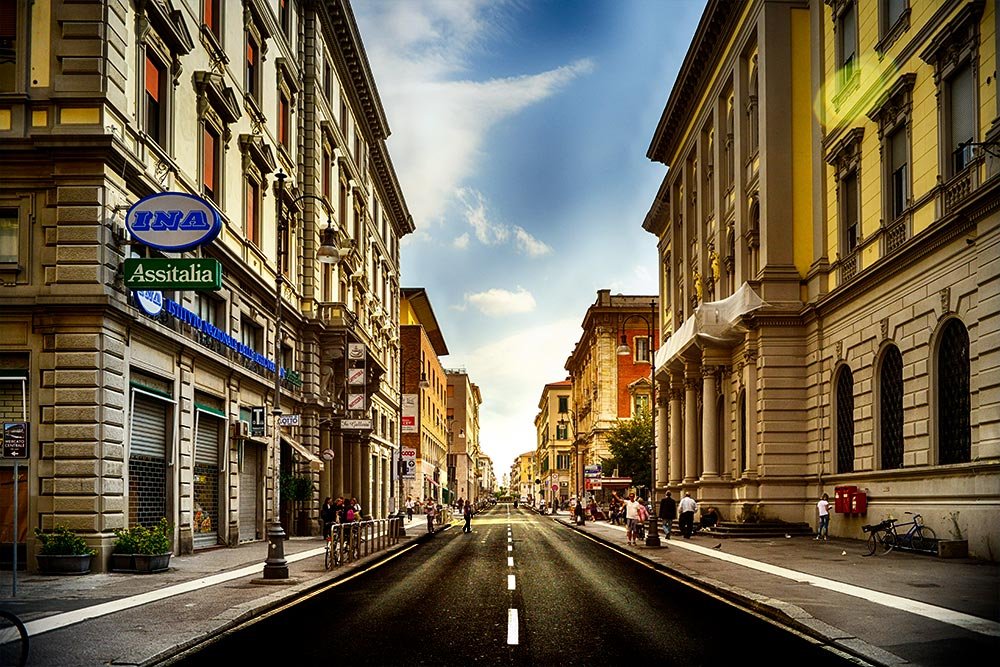
How cool is that?
I hope I’ve done a good job introducing you to the Levels adjustment in Adobe Photoshop. If you have any questions or would like to add anything to this post, please let me know in the comment section below. Thanks for reading!
So, what exactly is dynamic range? Let me try to explain it as simply as I can. Dynamic range is the difference between the darkest and lightest areas of a photo. Dynamic range doesn’t only apply to photography. I want you to know that. But for our purposes and for the purposes of this post, this is the only area we’ll cover.
I’ve been thinking a lot about this topic lately because I’m in the market for a new camera. My T3i has a dynamic range that’s not so hot, according to today’s standards. And the more I use it, the more I feel like I’m not getting what I want out of it. As I mentioned above, cameras with dynamic ranges on the more narrow side might not be noticed all too readily by newer photographers, but for someone who’s more experienced, details in the shadows and highlights become very important.
To sum it up, dynamic range is one area of photography that’s often overlooked, but is absolutely critical to be aware of. It’s what the high-end photographers pay attention to and it’s what makes or breaks a photograph. Narrow dynamic ranges can kill an otherwise beautiful piece of art. Wide dynamic ranges can take a so-so photo and make it exponentially more interesting.
In today’s post, I’m going to demonstrate how you can adjust the range between shadows and highlights in Adobe Photoshop when using an adjustment layer. The adjustment layer I’ll be focusing on is called Levels. Levels allows for the adjustment of a histogram that expresses a photograph’s luminance. The histogram luminance values range from pure black to pure white on one axis and the relative quantity of light for that luminance on another axis. In simple terms, it’s a more scientific and graphical picture of your picture. Don’t worry, this will all become very clear below.
For my demonstration, I’ll be using a photo of a city street. I’ll apply the Levels adjustment layer to the photo and then adjust, or narrow, the range until it suits my needs. After that, I’ll make a selection and for that selection, I’ll create another adjustment layer of the same type. I’ll change the selection range in an effort to show you that adjustment layers aren’t only meant to apply to entire photos, but pieces, or objects, inside a photo as well.
Original Image
This is the original photo. In my opinion, it’s a bit washed out. Perhaps the camera the photo was taken with had a very wide dynamic range and all of that range was used in the editing.
My goal is to narrow the range between darks and lights using the Levels adjustment layer. This will add contrast. Also, I’d like to bring more focus to the blacktop on the street, so that it stands out from its surroundings. I’ll use another adjustment layer for that.
Applying the Adjustment Layer
The very first task I’ll complete is to apply the Levels adjustment layer. To do this, I can go up to the Layer > New Adjustment Layer menu item and then select Levels from there. Alternatively, I could visit the bottom of the Layers panel and press the Click for New Fill or Adjustment Layer icon and select Levels. Finally, I could do what I actually did, which is to click the Levels icon in the Adjustments panel. To me, that’s the easiest.
If you look at the screenshot above, you’ll see that after I clicked the Levels icon, a few things happened. First, a new adjustment layer was added to the Layers panel. Second, the Levels Properties panel appeared to the left of the Layers panel. It’s inside this Properties panel that I’ll complete most of my work.
A Closer Look at the Histogram
I’d like to stop for a moment to take a closer look at the histogram that’s located in the Properties panel. You can see it by looking at the screenshot above.In this post, I’m going to focus primarily on the histogram itself, along with the three sliders located directly below the graph. These sliders are, from left to right, the black point slider, the midtone slider and the white point slider. Initially, each of these sliders is located in their default positions. Black has an RGB value of 0, white has an RGB value of 255 and the midtones have an RGB value of 1. You’ll see these default settings each time you create a new Levels adjustment layer.
Why Adjust the Histogram Sliders?
You may be asking why anyone would want to adjust the sliders I just described above. Well, the answer to that question is very simple. Let’s say you’re taking a photo and forget to look at your camera histogram while doing so. Because of this, you don’t notice that the image you’re capturing doesn’t entirely fill the tonal range, which will result in a bland looking, or washed out, photograph that can lack contrast. Once the photo is taken, you can open the image into Photoshop for editing, just as I’m doing now in this post. By pushing the three sliders I referred to above so they’re closer to where the action is in the histogram, we’re essentially adjusting the tonal range. So, instead of accomplishing this via the camera, we’re attempting to accomplish it via post-processing. The goal is to set the sliders right up against the beginning and end of the curve, so the ultimate histogram extends all the way from 0 to 255, as opposed to a smaller range.Moving the Sliders
I’ve seen images with histograms that have tons of dead space on both the dark and light sides. Adjusting those images is easy. All you need to do is bump the black slider to the right, so it’s up against the beginning of the curve – the point at which it begins to climb and to bump the white slider to the left, so it sits right at the point where the curve hits the bottom and begins to flatten out. For the midtone slider, that’s more of an eyeball thing. You can push it to the left or the right depending on how you want the image to look. Most of the time, if you’re attempting to add contrast, you’ll push the center slider to the right.The image I’m using isn’t terrible. While I do think it’s a bit washed out, I really don’t need to aggressively push the sliders. All I’m going to do is to move the black slider to the right a hair and then move the midtone slider to the right a hair as well. This will add the contrast I’m after.

Take a look at the photo below. You can definitely tell that I’ve reduced the original bland look. It looks pretty good.

Adjusting the Levels of a Selection
This is where things get interesting. Inside a photograph, there are many objects or areas. These objects and areas all have their own tonal ranges. So, while you may have taken the most perfectly balanced overall photograph with your camera, there may be elements of the picture you’d like to adjust. This is fairly normal and corrections like this happen all the time.I feel that the road in the photo I’m working on is too light. I’d like it to have some punch and for it to be darker. To accomplish this edit, I’ll use the Polygonal Lasso Tool and outline the road. This will create the marching ants and create a selection.

From here, I’ll go back to the Adjustments panel and click the Levels icon again. This will create a new adjustment layer and will pop out the Properties box that will include a histogram just for the selected area. Let’s take a look at that.

From the above screenshot, you can see two things. First, there’s a new adjustment layer. The mask portion of this layer is shaped like the selection. The white part of the mask is what will be edited and the black part will be invisible. Second, the new histogram has a smaller tonal range. Also, there are vertical lines that travel through the histogram, indicating areas of the range that are lacking data.
Since the darker side of the graph has some flatness, I’ll push the black slider to the right, just until it meets the upward curve. Then, I’ll push the midtone slider to the right until I feel the road has a “just paved” look. That’s what I’m going for. Take a look at the sliders now.

These adjustments give me the final image.

How cool is that?
A Note About the Midtone Slider
As you may have noticed, I pushed the midtone slider to the right quite a bit in the previous section. This was different than what I did the section previous to that. The reason I pushed the slider so far is because I wanted to darken the selection. In its essence, the midtone slider compresses the shadow and highlight tones that are located to the right or left of the slider itself. If I pushed the midtone slider to the left, I’d be opening up the highlights and compressing the shadows. This would result in a lighter area. Since I pushed the midtone slider to the right, I compressed the highlights and opened up the shadows, which resulted in a darker selection. Since this is what I was going after, everything worked out well.I hope I’ve done a good job introducing you to the Levels adjustment in Adobe Photoshop. If you have any questions or would like to add anything to this post, please let me know in the comment section below. Thanks for reading!
