15Katey
Member
- Joined
- May 10, 2021
- Messages
- 130
- Reaction Score
- 0
- Points
- 23
- #1
I remember back, years ago, when I used to color correct photos for one of my blogs. I used auto-correct as if it was going out of style. Throughout my editing, I learned that I only did so many corrections and over time, I concluded that auto-correct was the way to go. I’d use auto-tone, auto-contrast and auto-color ad nauseum. This type of editing held me over for a very long time. It’s not like I was selling professional photographs or anything. I was only taking pictures of trees and flowers in my back yard.
In case you’re wondering, the auto-correct options I’m referring to are located under the Image menu inside of Adobe Photoshop. If you click on that menu item, you’ll see the three options. Again, they are Auto Tone, Auto Contrast and Auto Color.
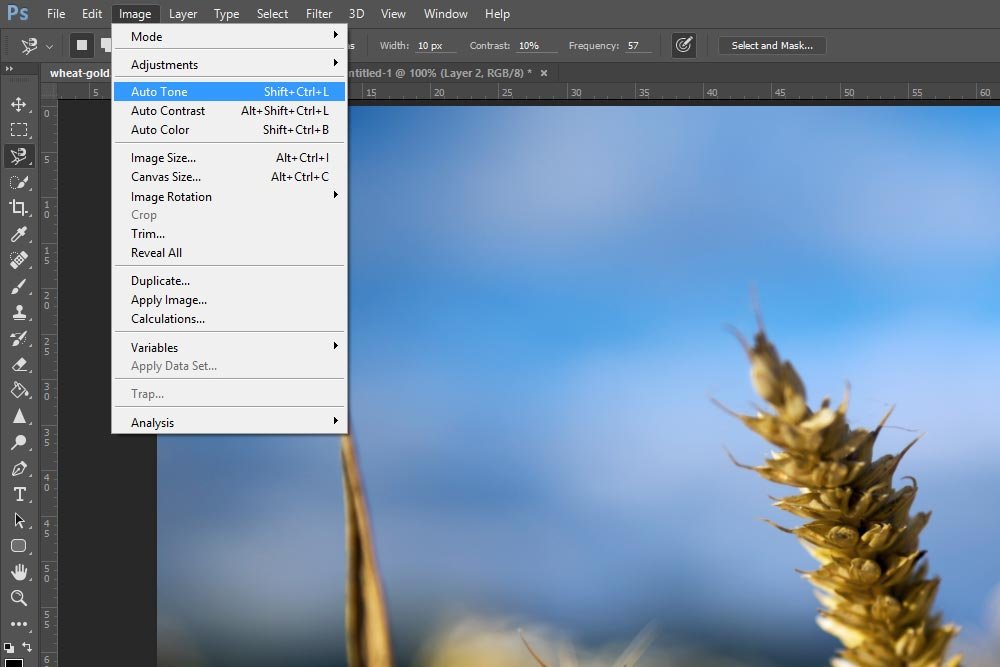
The one thing I always thought about was how the auto-correct options I was using were permanent. Once I made the change, that was it. I was stuck with them. They were what we consider, “destructive.” As you may well know, destructive editing should be avoided when possible. More often then not, you’ll want to go back and change something. Rarely does someone simply make an edit and remain happy with that edit forever. Photoshop was made for manipulating photos, not once, but always. You need to keep your options open.
In today’s post, I’d like to show you how you can take advantage of the Auto mode of two adjustment layer types in Photoshop. While only two are available right now, I’m sure more will be along soon. The two modes I’m talking about are Levels and Curves. Both of these modes adjust tone and color, so they should do us just fine. And the best part is, using the Auto feature in these two adjustment types is completely non-destructive. Any changes made can immediately be discarded at any time.

Using the Adobe Photoshop Curves Tool For Photography
In the post, I walk through the exact instructions you’ll need to apply pretty much any adjustment layer. While I focus on only Curves in the post, the same general idea can be used for all of them.
I’ll apply the Levels adjustment layer by clicking the appropriate icon in the Adjustments panel. Once I do that, I’ll see the new layer in the Layers panel. The related Properties panel will also appear.
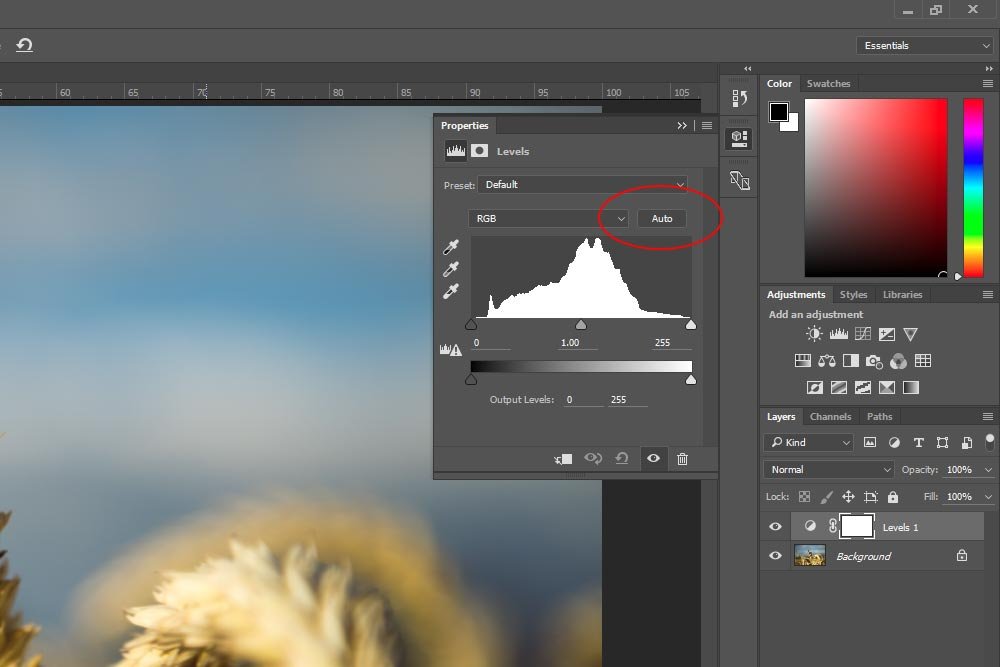
When I apply this adjustment layer, nothing happens. That’s the way it’s supposed to be. It isn’t until I begin moving things around that the photo will appear differently. In this case though, I’m only going to use the Auto capabilities of this tool.
In you take a look at the above screenshot, you’ll notice that I circled the Auto button. If I click on the button, the levels will automatically adjust according to what Photoshop things are the proper settings. I’ll do that now.
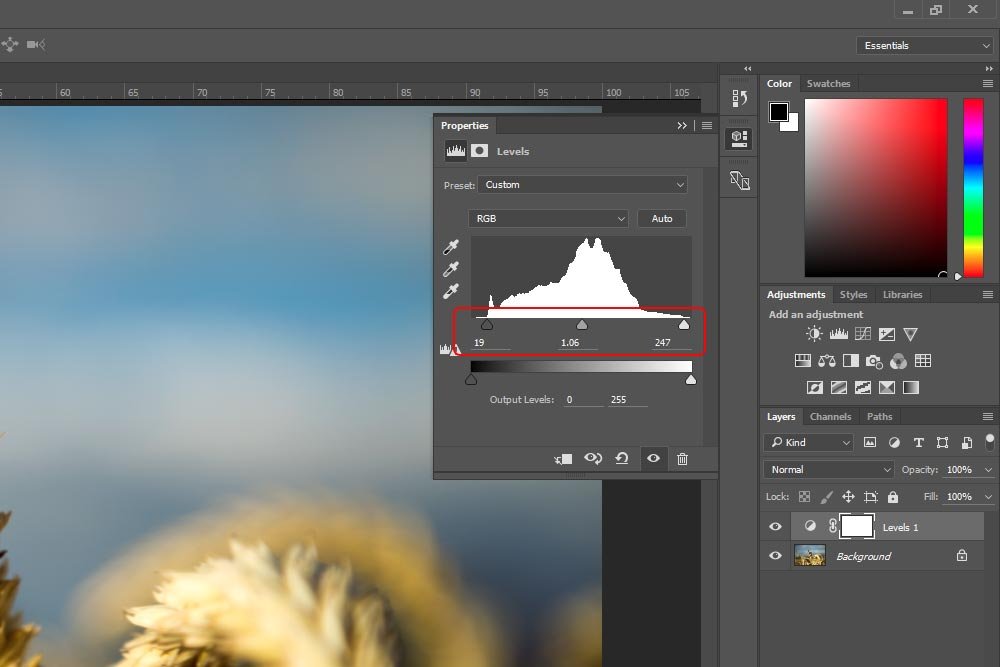
If you compare the values for the blacks, mid-tones and whites between the two most recent screenshots, you’ll see they’re different. For a lot of folks, this is fine. But not for me.
If I press and hold down the Alt key (Windows) or the Option key (Mac) and then click on the Auto button, the Auto Color Correction Options dialog box will appear.
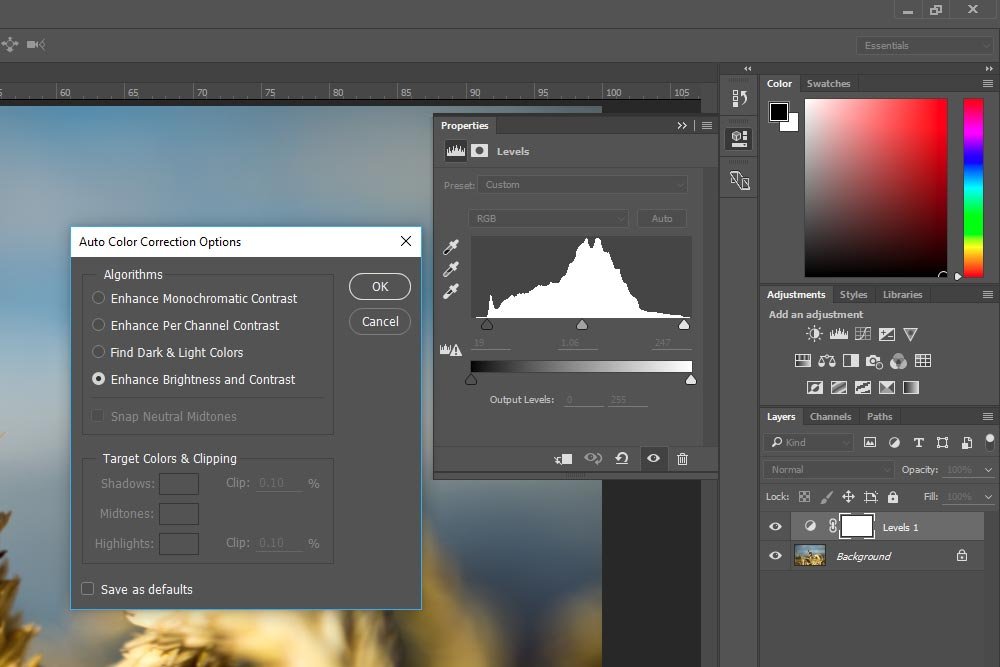
As you can see, there are a few options to choose from. I’ll focus primarily on the Algorithms section.
In this section, there are four options. They are Enhance Monochromatic Contrast, Enhance Per Channel Contrast, Find Dark & Light Colors and Enhance Brightness and Contrast. Each option does its own thing and if you roll over the radio button for each option and stay there for a second or two without clicking, some informative text will appear that describes the feature exactly.
Below these options is a check box. It’s called Snap Neutral Midtones and it subtly adjusts whichever selection you choose. All but the last one. The checkbox is grayed out and unavailable for the last selection.
Now, you can go in and play with each of these settings to get a glimpse of their effects. What I want to do right now is show you how each of them alters the photo I’m using for this post. to do this, I’ll slice a section from each altered photo and combine them into one. They go from left to right.
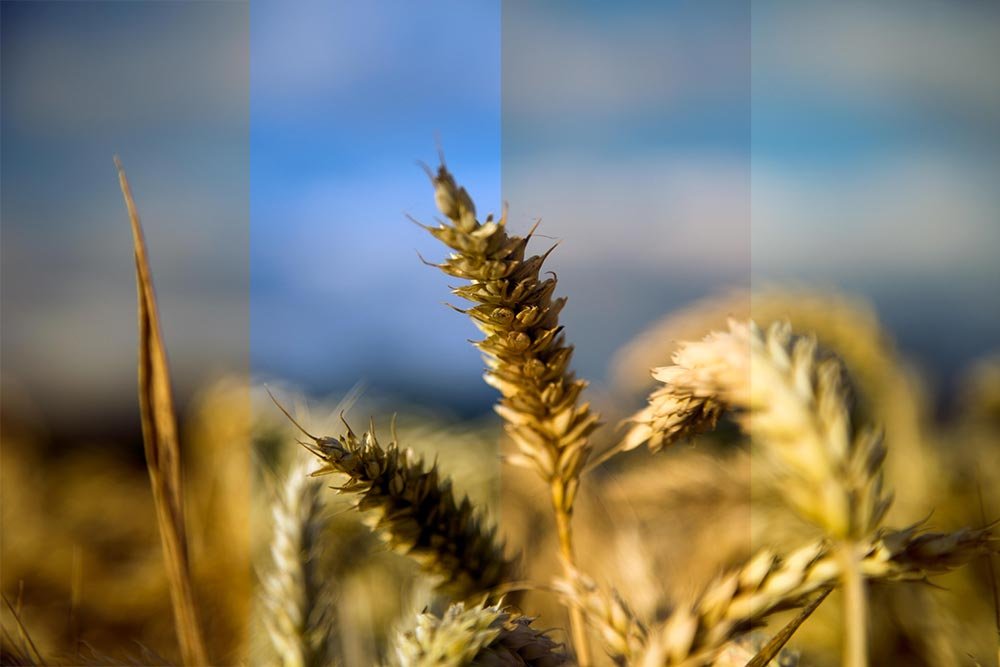
By looking at the examples, I can see that the second option, Enhance Per Channel Contrast, gives me the most accurate and vibrant look. I’ll apply that to see the entire photo now.

I can tell you right now that this one change made the photo look a heck of a lot better. I’ll go ahead and press OK to apply this selection to the adjustment layer. Remember, I can delete this change at any time since it’s non-destructive.
If I go ahead and apply the Curves adjustment and then hold down my Alt key while pressing the Auto button in the Properties panel, the same dialog box will appear.
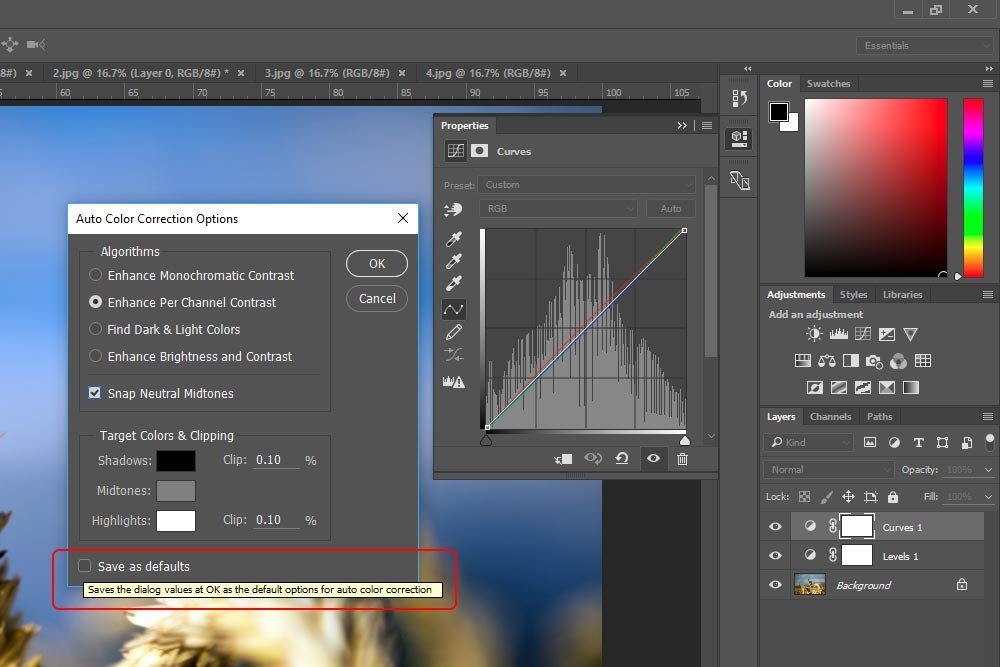
I’ve gone through each selection and have settled on the same combination I picked earlier. I chose Enhance Per Channel Contrast and checked off the Snap Neutral Midtones box. I can see that this is becoming a habit.
When choosing the same selection over and over again, it may be in your best interest to make that your default choice when you press the Auto button, as opposed to having to constantly change the selection. To make it the default, simply make the selection and then check the Save as Defaults box all the way at the bottom of the dialog box. When you press the OK button, Photoshop will remember what you did and what you’ve chosen will appear the next time you use this feature.
I hope I’ve clearly explained how you can use the auto-correction features that are built into the Levels and Curves adjustment layers in Adobe Photoshop. If you have any questions or concerns, please share them in the comment section below. Thanks for reading!
In case you’re wondering, the auto-correct options I’m referring to are located under the Image menu inside of Adobe Photoshop. If you click on that menu item, you’ll see the three options. Again, they are Auto Tone, Auto Contrast and Auto Color.

The one thing I always thought about was how the auto-correct options I was using were permanent. Once I made the change, that was it. I was stuck with them. They were what we consider, “destructive.” As you may well know, destructive editing should be avoided when possible. More often then not, you’ll want to go back and change something. Rarely does someone simply make an edit and remain happy with that edit forever. Photoshop was made for manipulating photos, not once, but always. You need to keep your options open.
In today’s post, I’d like to show you how you can take advantage of the Auto mode of two adjustment layer types in Photoshop. While only two are available right now, I’m sure more will be along soon. The two modes I’m talking about are Levels and Curves. Both of these modes adjust tone and color, so they should do us just fine. And the best part is, using the Auto feature in these two adjustment types is completely non-destructive. Any changes made can immediately be discarded at any time.
Original Photo
For this post, I’m going to use a fairly generic photograph of some wheat. The reason I decided on this photo was because of its blandness. It’s a great photo, it just doesn’t “pop” and it could certainly use some correcting.
Auto-Correcting Levels
To kick things off, I’ll apply the Levels adjustment layer. If you aren’t familiar with adjustment layers, I encourage you to read this post:Using the Adobe Photoshop Curves Tool For Photography
In the post, I walk through the exact instructions you’ll need to apply pretty much any adjustment layer. While I focus on only Curves in the post, the same general idea can be used for all of them.
I’ll apply the Levels adjustment layer by clicking the appropriate icon in the Adjustments panel. Once I do that, I’ll see the new layer in the Layers panel. The related Properties panel will also appear.

When I apply this adjustment layer, nothing happens. That’s the way it’s supposed to be. It isn’t until I begin moving things around that the photo will appear differently. In this case though, I’m only going to use the Auto capabilities of this tool.
In you take a look at the above screenshot, you’ll notice that I circled the Auto button. If I click on the button, the levels will automatically adjust according to what Photoshop things are the proper settings. I’ll do that now.

If you compare the values for the blacks, mid-tones and whites between the two most recent screenshots, you’ll see they’re different. For a lot of folks, this is fine. But not for me.
If I press and hold down the Alt key (Windows) or the Option key (Mac) and then click on the Auto button, the Auto Color Correction Options dialog box will appear.

As you can see, there are a few options to choose from. I’ll focus primarily on the Algorithms section.
In this section, there are four options. They are Enhance Monochromatic Contrast, Enhance Per Channel Contrast, Find Dark & Light Colors and Enhance Brightness and Contrast. Each option does its own thing and if you roll over the radio button for each option and stay there for a second or two without clicking, some informative text will appear that describes the feature exactly.
Below these options is a check box. It’s called Snap Neutral Midtones and it subtly adjusts whichever selection you choose. All but the last one. The checkbox is grayed out and unavailable for the last selection.
Now, you can go in and play with each of these settings to get a glimpse of their effects. What I want to do right now is show you how each of them alters the photo I’m using for this post. to do this, I’ll slice a section from each altered photo and combine them into one. They go from left to right.

By looking at the examples, I can see that the second option, Enhance Per Channel Contrast, gives me the most accurate and vibrant look. I’ll apply that to see the entire photo now.

I can tell you right now that this one change made the photo look a heck of a lot better. I’ll go ahead and press OK to apply this selection to the adjustment layer. Remember, I can delete this change at any time since it’s non-destructive.
Auto-Correcting Curves
As I mentioned above, I can follow the same instructions for the Curves adjustment layer, so I won’t rehash them here. What I do want to point out is one small item.If I go ahead and apply the Curves adjustment and then hold down my Alt key while pressing the Auto button in the Properties panel, the same dialog box will appear.

I’ve gone through each selection and have settled on the same combination I picked earlier. I chose Enhance Per Channel Contrast and checked off the Snap Neutral Midtones box. I can see that this is becoming a habit.
When choosing the same selection over and over again, it may be in your best interest to make that your default choice when you press the Auto button, as opposed to having to constantly change the selection. To make it the default, simply make the selection and then check the Save as Defaults box all the way at the bottom of the dialog box. When you press the OK button, Photoshop will remember what you did and what you’ve chosen will appear the next time you use this feature.
I hope I’ve clearly explained how you can use the auto-correction features that are built into the Levels and Curves adjustment layers in Adobe Photoshop. If you have any questions or concerns, please share them in the comment section below. Thanks for reading!
