LukeLewis
Member
- Joined
- May 7, 2021
- Messages
- 134
- Reaction Score
- 0
- Points
- 21
- #1
This is pretty cool. I’ve always loved playing with the lighting effects filters in Adobe Photoshop. Adobe has added a lot to this area in the past few years and the changes are worth looking at.
In today’s post, I’ll be exploring the Lighting Effects area of the Filters menu in Adobe Photoshop. This is quite the extensive area, so there’s obviously a lot more involved than what I’m going to include in this post. Effects, in general, have grown to consume a rather large portion of Photoshop. It’s possible that I’ll be writing many more posts on this one topic. For now though, I’d like to merely launch the effects area to get you more familiar with what’s going on inside of it.

I haven’t done much more to this photo than to add some contrast in Adobe Camera Raw. Well, there was some grain I needed to get rid of and some sharpening that the picture benefited from. Beyond that, this is almost the original.
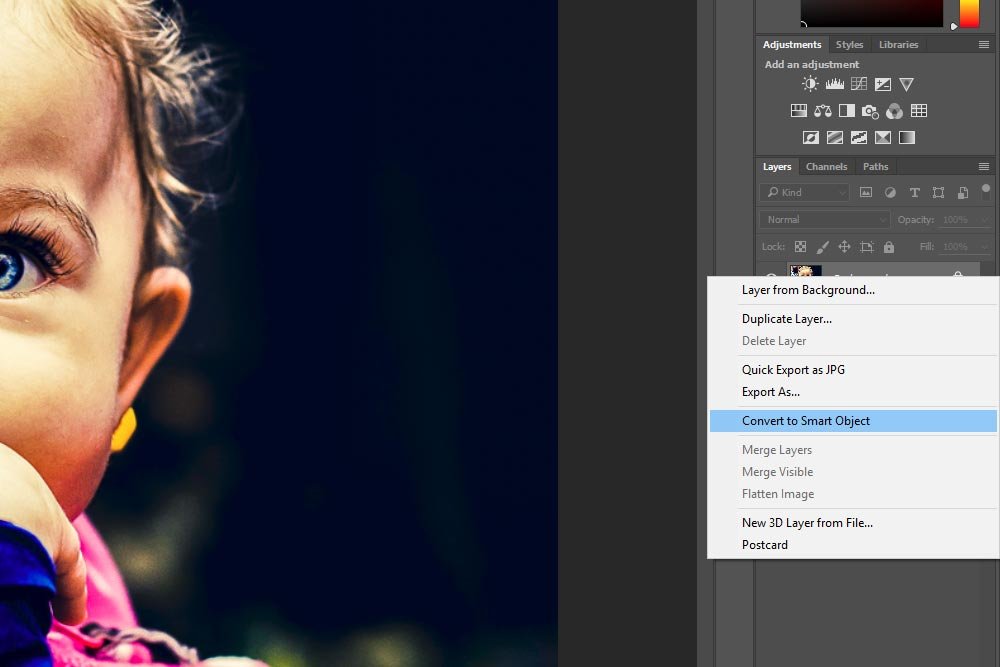
I’ll go ahead now and right-click on my layer and then chose Convert to Smart Object.
Once I do that, I can head into the filters area.
After I choose this menu item, the Lighting Effects workspace will appear. For the uninitiated, this is an odd phenomenon. The actual workspace changes to something else. It’s not like an editor or a panel opens or anything – all the other panels disappear and are replaced by new ones. Here’s a screenshot of the options bar up top:
And here’s a screenshot of the panels on the right side. Notice the Lighting Effects name in the workspace drop-down in the upper right corner.
To demonstrate, I’ll choose Five Lights Down.
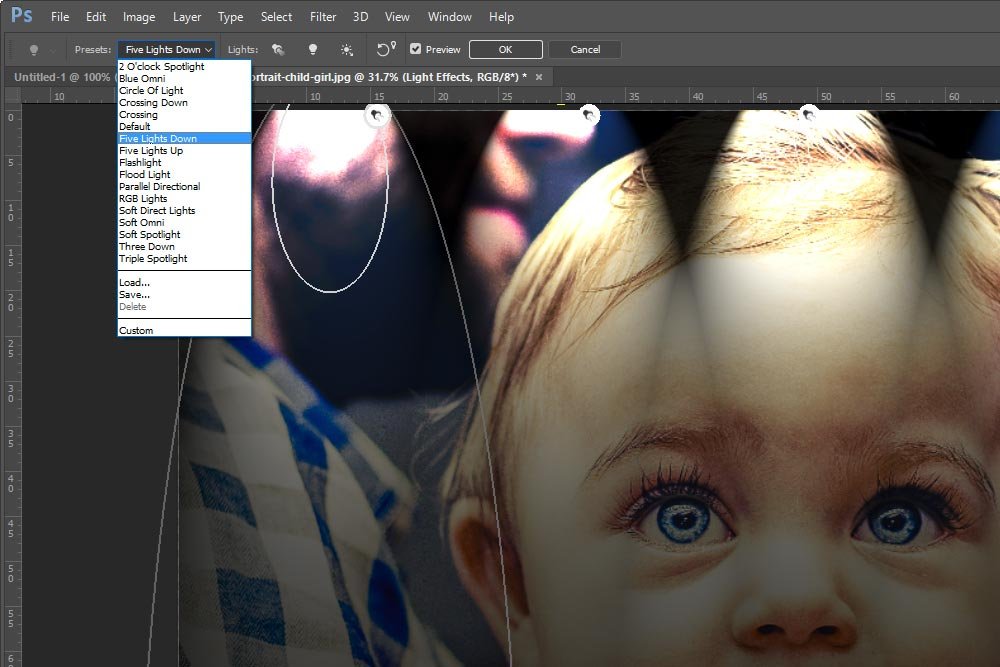
With this preset, five light sources appear at the top of the photo. When I click on any of the light sources (the small white circles at the top of the photo), I can manipulate that particular light. I can change its intensity, change its scale, rotate it, move it and many more things. I can also choose the light source from the Lights panel over on the right and pretty much do exactly the same types of things to them.
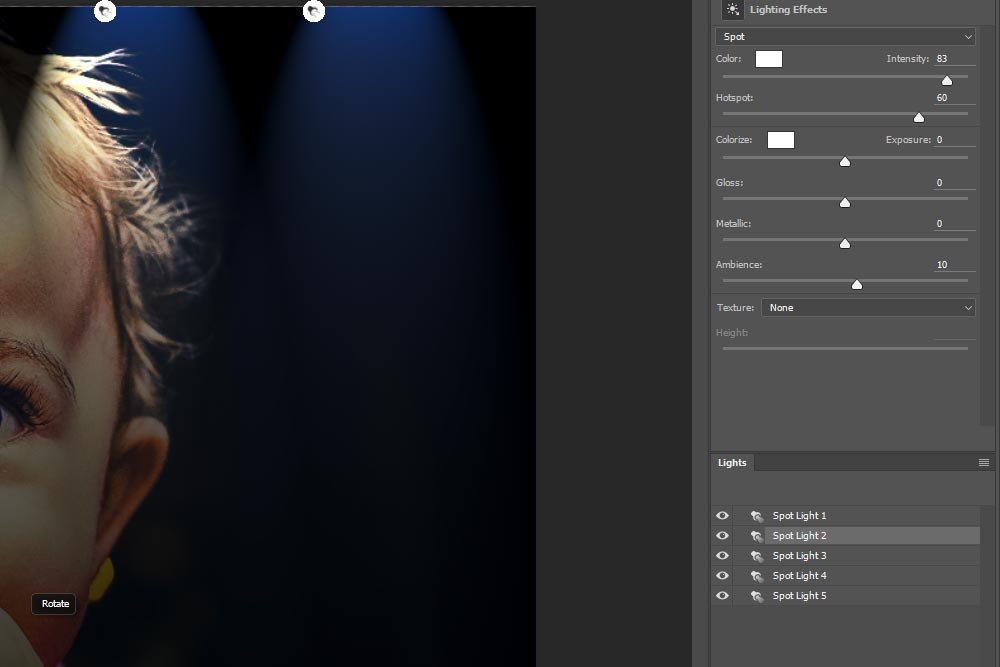
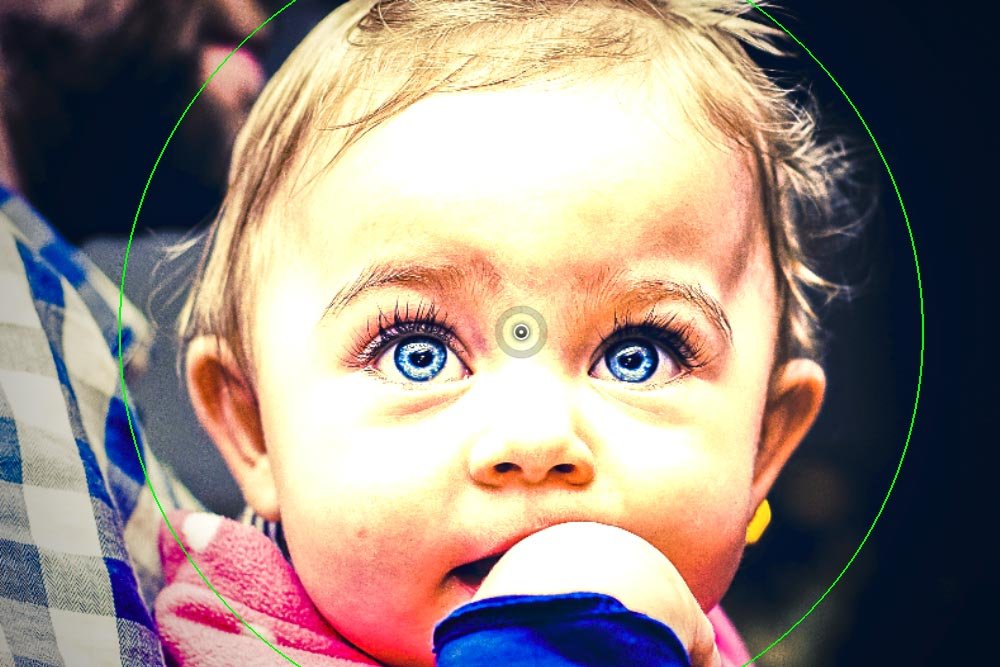
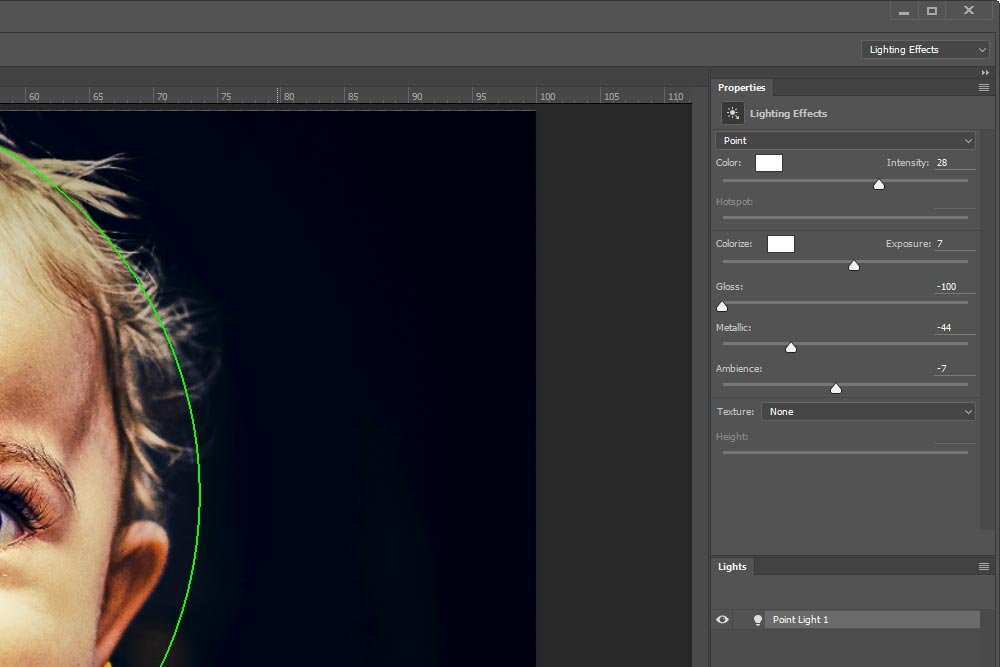
Changing the attributes of this effect is really easy. All I need to do is to click and drag the circle from its center so it’s in the position I would like to see it. Then, I can just push the sliders in the Properties panel over in the right column. I’ll explain what each of these sliders means next.
Colorize: Tints the overall lighting.
Exposure: Controls highlight and shadow detail.
Gloss: Determines how much surfaces reflects light.
Metallic: Determines which is more reflective, the light or the object on which the light is cast.
Ambience: Diffuses the light as if it were combined with other light in a room, such as sunlight or fluorescent light. Choose a value of 100 to use only the light source, or a value of –100 to remove the light source.
Texture: Applies a texture channel.
I’ll push the sliders for this image now. Just as an FYI, you’ll need to really experiment with all the available sliders to see which ones will work best for your photo. For instance, when I pushed the Metallic slider, absolutely nothing happened, no matter where I put it. I did, however, manage to get a good result with the other sliders.

As you can see, the background has been somewhat muted out and the emphasis of the lighting has been placed on the model’s face. Just where I wanted it.
If you’d like to make similar changes to your own photos, all you need to do is to follow the same pattern of steps. There’s not much more to it. Of course, I can go into the specifics of each and every attribute of the workspace and I may actually do that one day, but I think this was a good introduction. If you have any questions or concerns, please leave them in the comment section below. Thanks for reading!
In today’s post, I’ll be exploring the Lighting Effects area of the Filters menu in Adobe Photoshop. This is quite the extensive area, so there’s obviously a lot more involved than what I’m going to include in this post. Effects, in general, have grown to consume a rather large portion of Photoshop. It’s possible that I’ll be writing many more posts on this one topic. For now though, I’d like to merely launch the effects area to get you more familiar with what’s going on inside of it.
Original Photo
While there are tons of different types of photos that would work perfectly with many of the variations of available lighting effects, I chose a portrait of a small child. I think this is a good choice because any sort of additional lighting would make a profound difference in the way the photo is interpreted. And by working with a photo like this, I think the gears in your minds will be turning as you think of the possibilities.
I haven’t done much more to this photo than to add some contrast in Adobe Camera Raw. Well, there was some grain I needed to get rid of and some sharpening that the picture benefited from. Beyond that, this is almost the original.
Converting Layer to a Smart Object
The very first thing I want to do after opening the image into Photoshop is to convert the background layer to a Smart Object. I’ve covered this in a few other posts, but basically, the reason for this is protection. When the photo layer is a Smart Object, I can apply many different filters and effects to it while preserving the layer’s integrity. In other words, I can delete the filter later on if I don’t like it and I’ll still have the original, untouched, image at my disposal.I’ll go ahead now and right-click on my layer and then chose Convert to Smart Object.

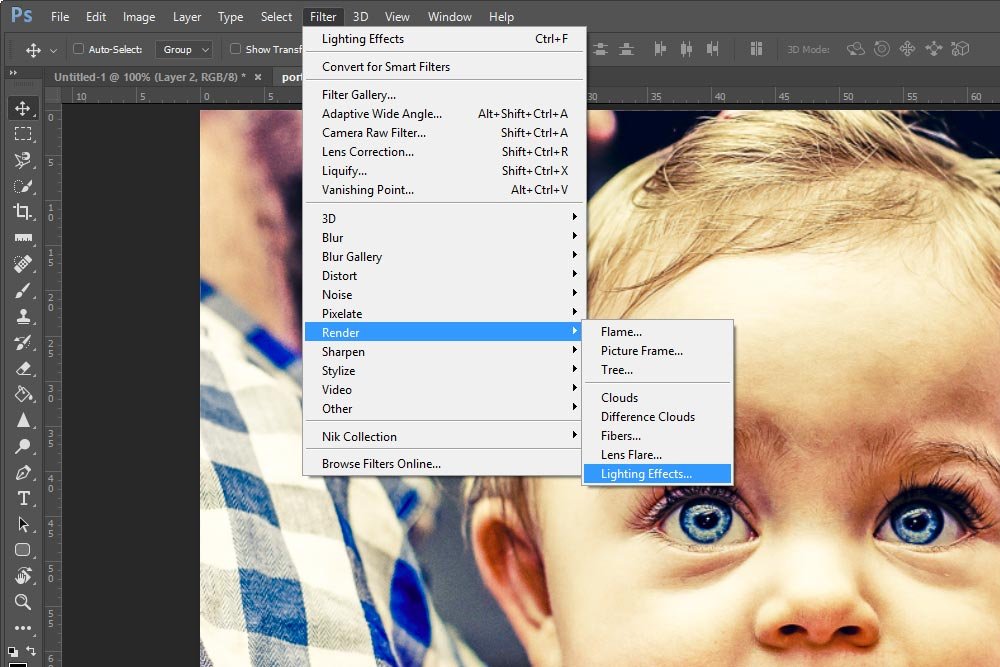
Once I do that, I can head into the filters area.
How to Launch Lighting Effects
Diving into the Lighting Effects area is simple. I’ll go up to the Filter menu item and click it. Then, I’ll go down to the Render menu and hover over that. Finally, I’ll click on the Lighting Effects menu item to launch the editor.
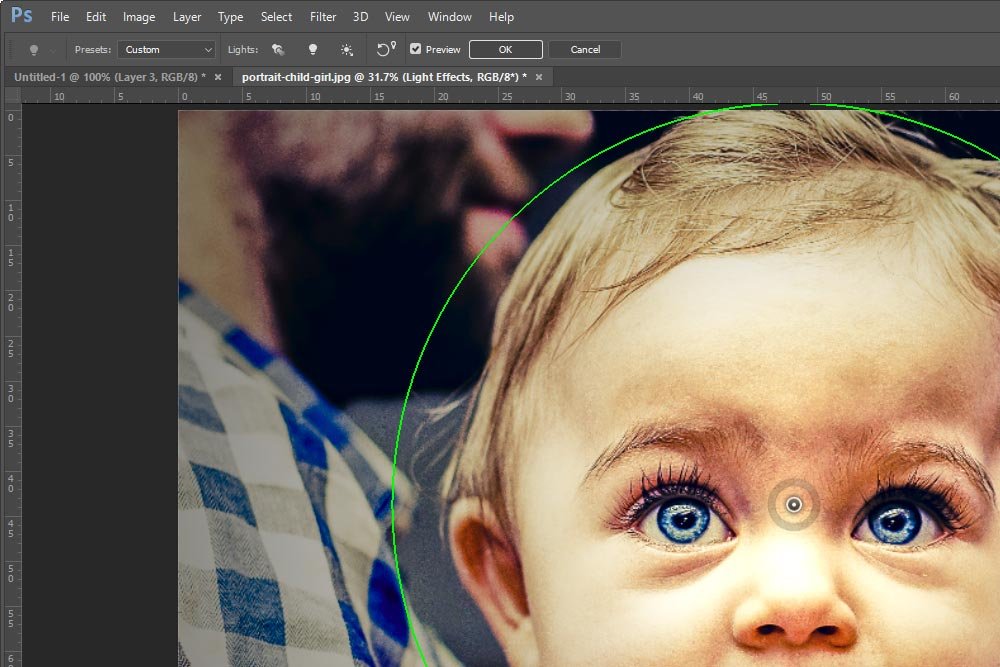
After I choose this menu item, the Lighting Effects workspace will appear. For the uninitiated, this is an odd phenomenon. The actual workspace changes to something else. It’s not like an editor or a panel opens or anything – all the other panels disappear and are replaced by new ones. Here’s a screenshot of the options bar up top:

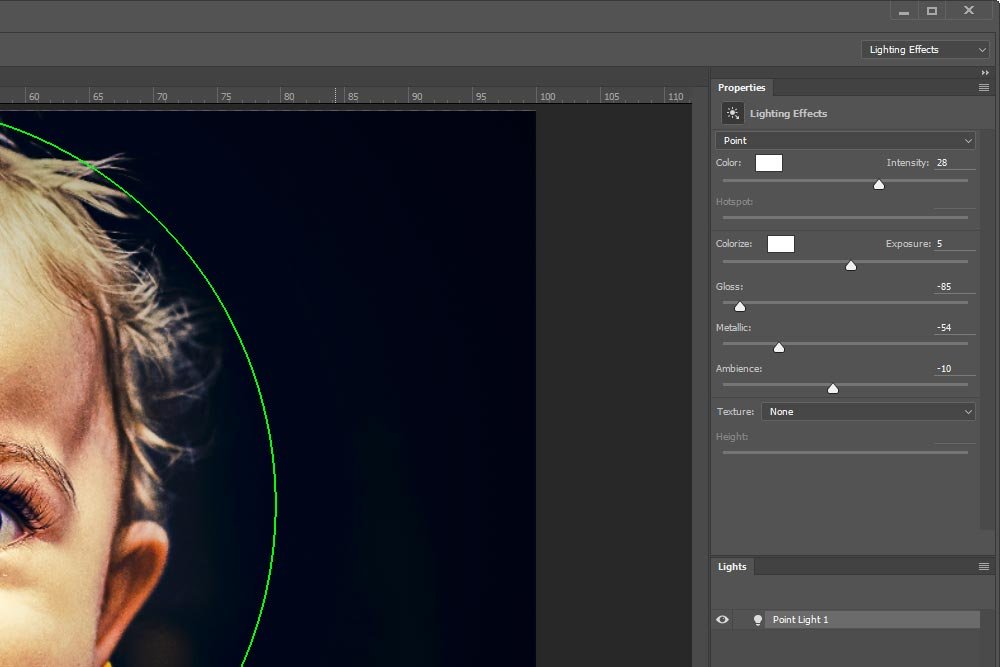
And here’s a screenshot of the panels on the right side. Notice the Lighting Effects name in the workspace drop-down in the upper right corner.

Lighting Effects Presets
One of the most popular areas of this new workspace is the Presets menu. This is probably the best place to start off if you aren’t a Photoshop expert. There are many types of effects to choose from, so I suggest you click on each one to become familiar with what they do. Exploring this like puts the necessary information in the back of your head so the next time you think you might want to add some light to a photo, so you quickly head to this area.To demonstrate, I’ll choose Five Lights Down.

With this preset, five light sources appear at the top of the photo. When I click on any of the light sources (the small white circles at the top of the photo), I can manipulate that particular light. I can change its intensity, change its scale, rotate it, move it and many more things. I can also choose the light source from the Lights panel over on the right and pretty much do exactly the same types of things to them.

Adding a Soft Light to the Photo
Since this photo is a portrait with the subject front and center, I think a nice soft light is appropriate. I think I’ll go for Soft Omni in the Presets drop-down. This will place a circle overlay on top of the image that I can modify.
Changing the attributes of this effect is really easy. All I need to do is to click and drag the circle from its center so it’s in the position I would like to see it. Then, I can just push the sliders in the Properties panel over in the right column. I’ll explain what each of these sliders means next.
Colorize: Tints the overall lighting.
Exposure: Controls highlight and shadow detail.
Gloss: Determines how much surfaces reflects light.
Metallic: Determines which is more reflective, the light or the object on which the light is cast.
Ambience: Diffuses the light as if it were combined with other light in a room, such as sunlight or fluorescent light. Choose a value of 100 to use only the light source, or a value of –100 to remove the light source.
Texture: Applies a texture channel.
I’ll push the sliders for this image now. Just as an FYI, you’ll need to really experiment with all the available sliders to see which ones will work best for your photo. For instance, when I pushed the Metallic slider, absolutely nothing happened, no matter where I put it. I did, however, manage to get a good result with the other sliders.

The Final Photo
Once I’m done with the sliders, I can click on the OK button up in the Options bar to apply my changes. When I do that, I’ll have to wait for a few seconds as the changes are applied to the Smart Object. Once they are, a Smart Filters layer will appear in the Layers panel and my filter will take effect. Check out the photo now.
As you can see, the background has been somewhat muted out and the emphasis of the lighting has been placed on the model’s face. Just where I wanted it.
If you’d like to make similar changes to your own photos, all you need to do is to follow the same pattern of steps. There’s not much more to it. Of course, I can go into the specifics of each and every attribute of the workspace and I may actually do that one day, but I think this was a good introduction. If you have any questions or concerns, please leave them in the comment section below. Thanks for reading!
