EmeraldHike
Member
- Joined
- May 10, 2021
- Messages
- 133
- Reaction Score
- 0
- Points
- 21
- #1
As you go about editing video in Adobe Photoshop, you’ll find that using layer masks is very helpful as a method for telling your story. While working on video, these layer masks act almost identically as they do when editing regular photographs. In essence, they nondestructively hide and reveal parts of a layer, depending on how you color over it. To learn more about layer masks in general, as they pertain to Photoshop, please take a look at these resources:
What are Layer Masks in Adobe Photoshop?
How to Adjust Layer Masks by Color Range in Adobe Photoshop
How to Duplicate Masks Between Layers in Adobe Photoshop
2 Super Fast Masking Tips for Adobe Photoshop
4 Masking Power Tips for Adobe Photoshop
In today’s post, I’ll be creating a very simple mask in a video project. I’ve gone ahead and found two videos I took in 2013 to use in my tutorial. These videos aren’t related, but they do look unique enough that we’ll be able to clearly see what’s going on in the post. My primary goal is to show you what options you have when settings up the mask and how you can go about customizing it to fit your needs.
Initially, each file will be opened into its own tab. To combine both files into one tab, I’ll click on the layer in one tab, drag that layer up to the other tab until it gets highlighted, then, I’ll drag the layer down into the work area of that highlighted tab. I’ll drop the layer and things will look just like this:
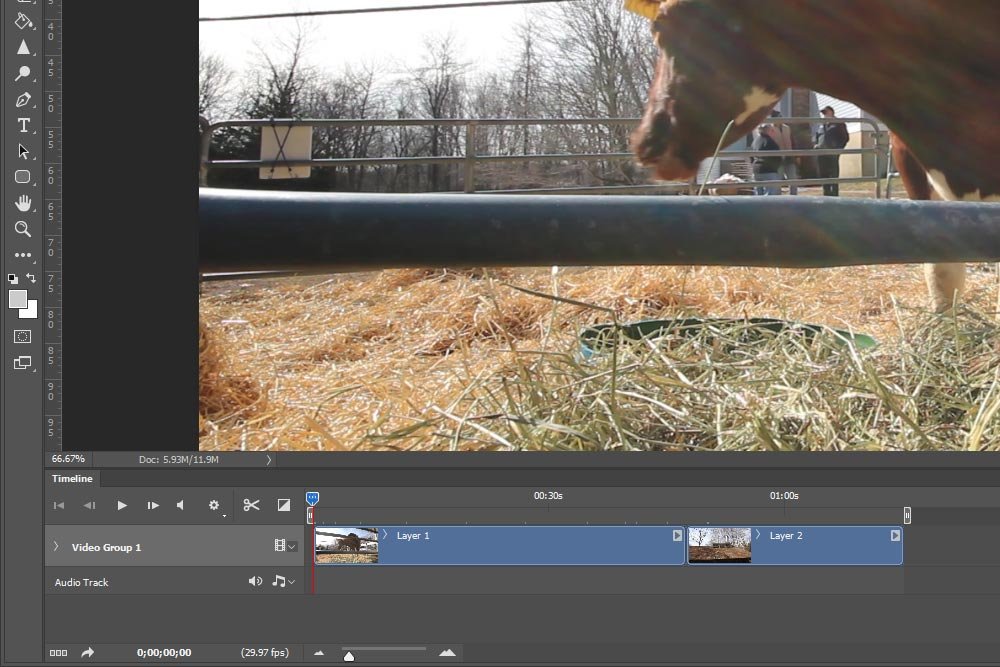
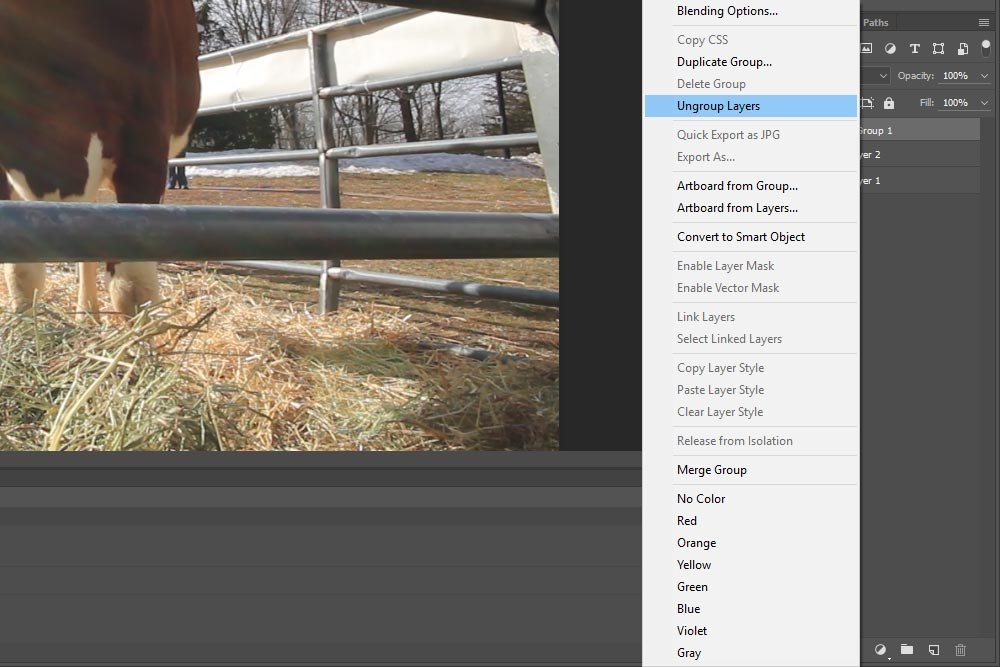
Right now, the two video clips are lined up sequentially in the timeline. In order to demonstrate what I’d like to demonstrate in this post, I’ll need to remove the clips from the group they’re in. I’d prefer them to be stacked on top of one another in the timeline. To do this, I’ll right-click on the Video Group 1 layer in the Layers panel and choose Ungroup Layers.
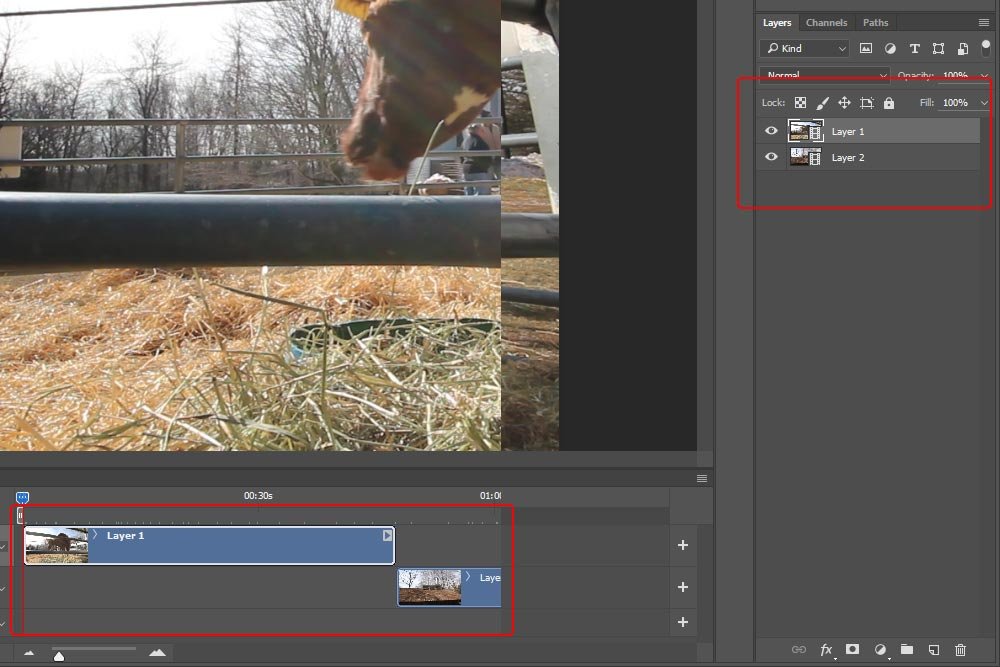
After I do this, the group layer will disappear and I’ll have the clips arranged the way I want them to be. In the following screenshot, I put the two halves of the screen into one image. You can see the stacked clips on the left and the ungrouped layers on the right.
The only thing I need to do now is to click and drag the bottom clip over to the left so it sits at the beginning of the timeline.
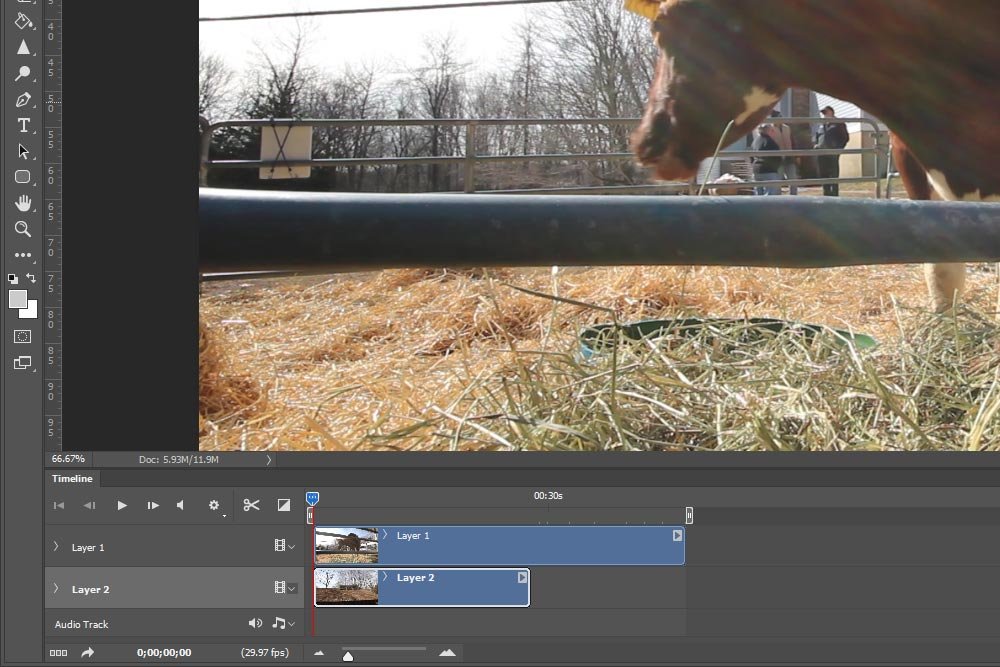
Okay, now that the clips are set up the way I need them to be, I can move onto the next section.
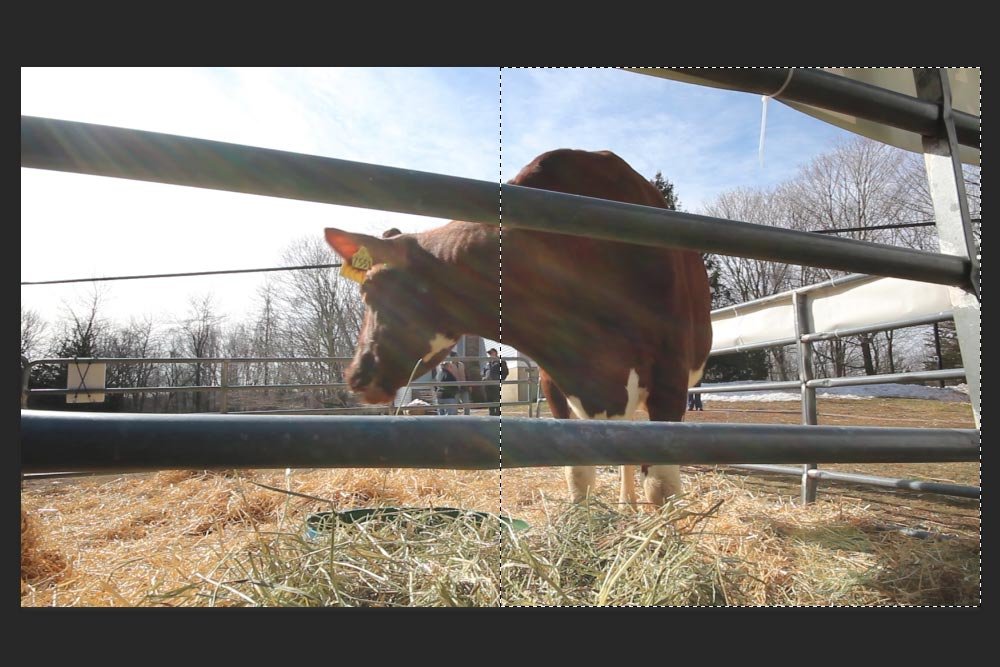
For this demonstration, I think I’ll merely cut the screen in half, so half of each video plays simultaneously. This would probably be the most clear thing to do so it’s understandable. So, with that in mind, I’ll click on the Rectangular Marquee Tool (or press M on my keyboard) and draw a rectangle over half of the currently visible video clip. It will look like this:
Now that I’ve made a selection, I have a few ways I can create the actual mask. One of them is to visit the Layer > Layer Mask menu area and choose from the options. They are currently Reveal All, Hide All, Reveal Selection and Hide Selection.
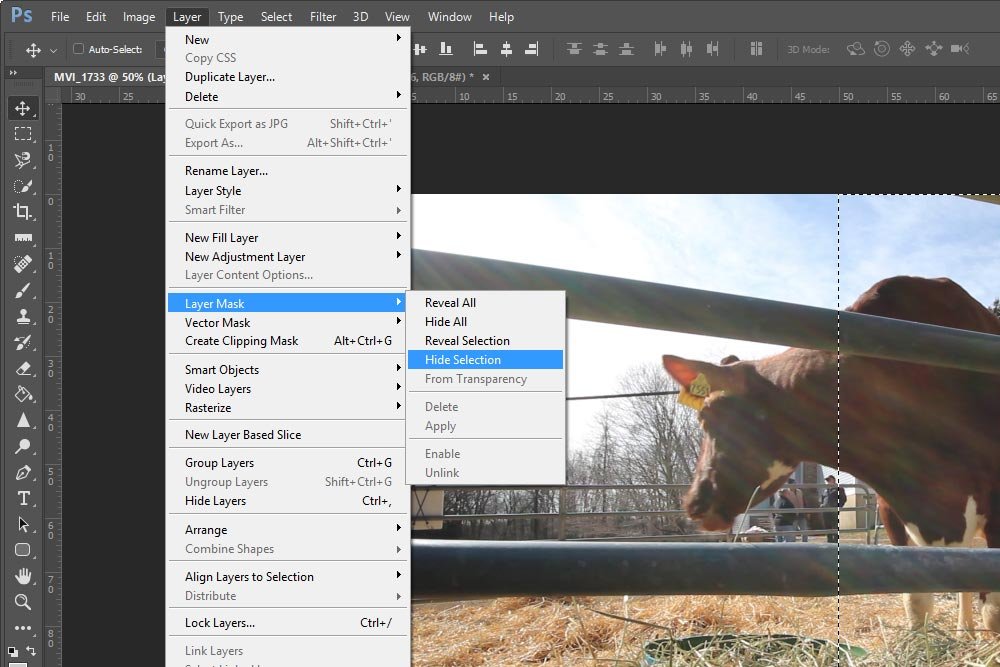
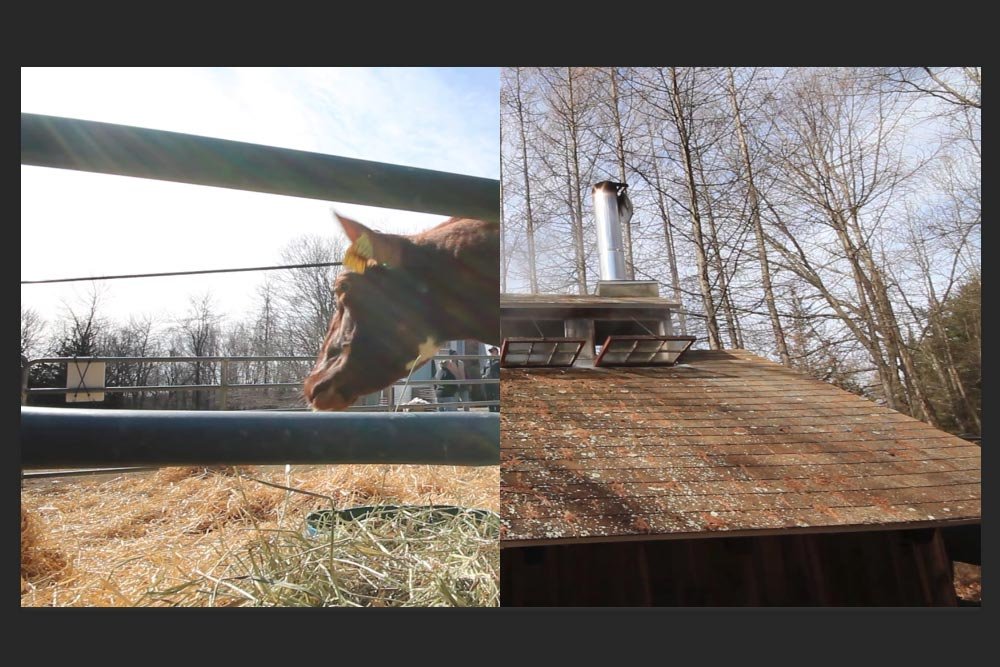
Since I have the right side of the video clip selected, I’ll choose Hide Selection. That will make it so the right side of the top clip is hidden and the right side of the bottom clip is revealed. Take a look:
Another method for creating a mask is to select an area that you would like to be visible. Then, you can head down to the bottom of the Layers panel and click on the Add Vector Mask button.
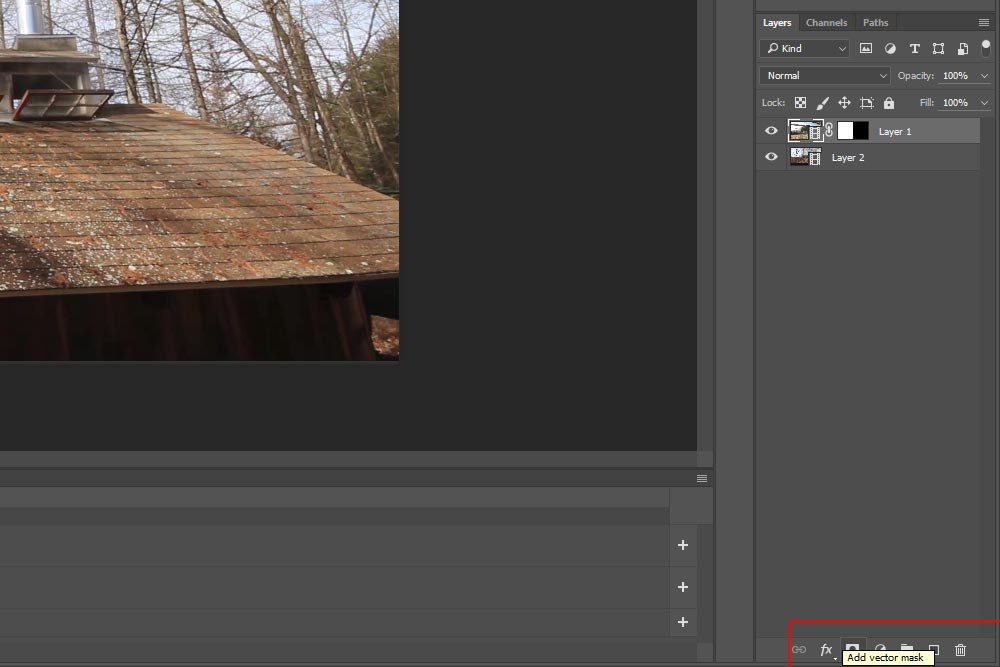
The only thing you need to be aware of when using this method is that it’s somewhat limited. It will always hide the area outside of your initial selection. If you would like to reverse that, you’d need to invert the mask. I’ll show you how you can do that in a bit.
If I wanted to see exactly what is going to be revealed and what’s going to be hidden in the mask I created I can hold down the Option (Mac) or the Alt (Windows) key on my keyboard and click once on the black and white mask thumbnail in the Layers panel. That will superimpose the raw mask over the image or video. It will look like this:
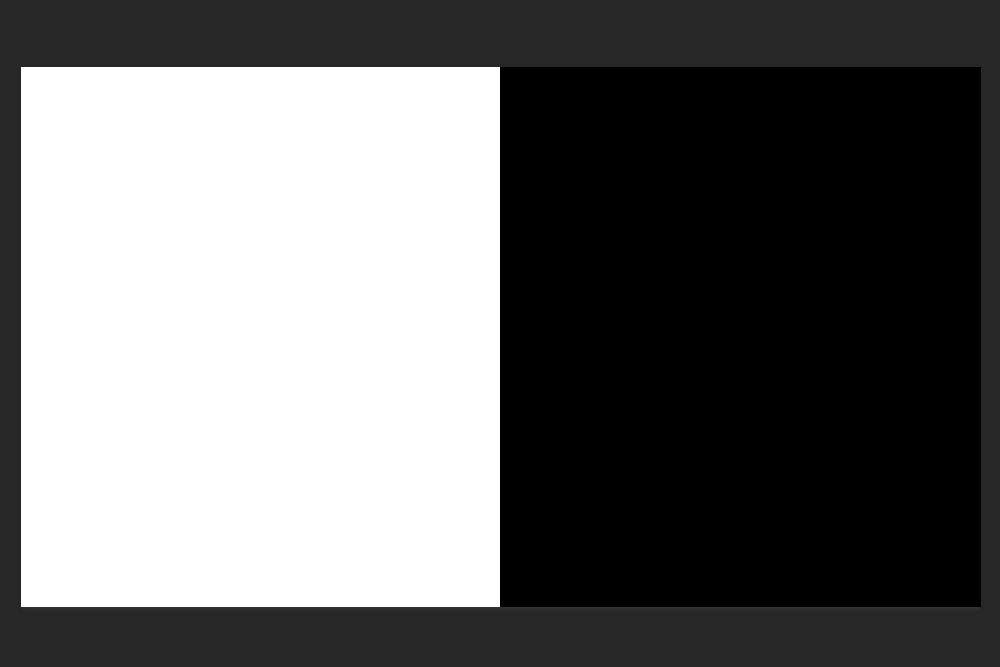
While it’s not terribly important to do this in my case right now, it does become rather helpful if you’re masking intricate areas and need to see things with a different view. To reverse this view, simple hold down those keys again and click the mask thumbnail once more. Things will return to normal.
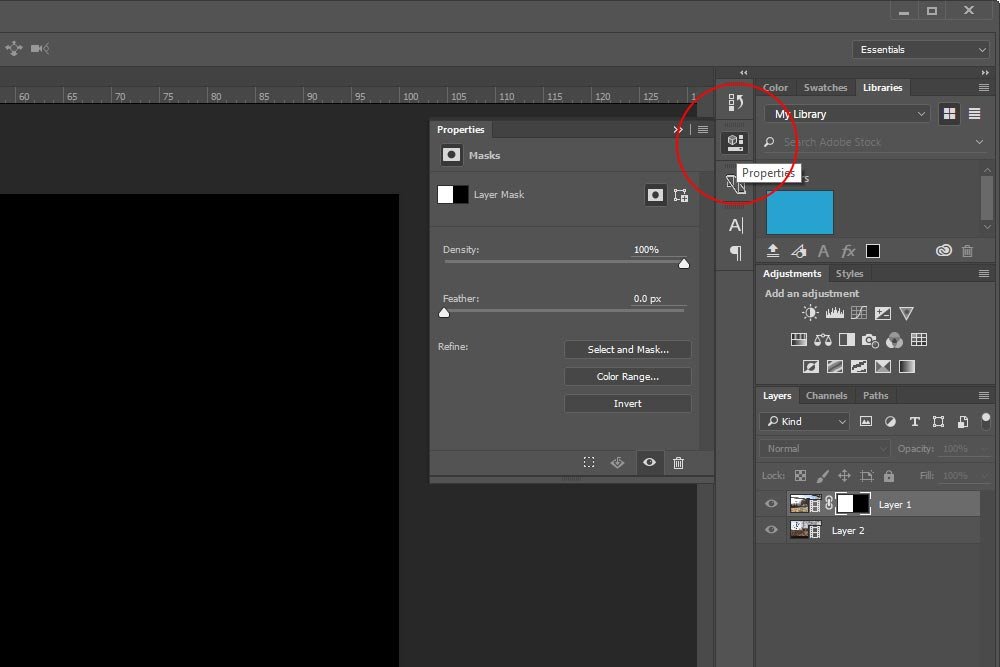
I’m really only going to focus on three areas in the Properties panel. They are Density, Feather and Invert. I’ll list and describe them now.
Density: Pushing the Density slider adjusts the opacity of the mask, for lack of a better word. At 100%, the mask is in full effect and is either hiding or revealing what it’s suppose to with all its force. If you lessen the density by pushing the slider left to a lower percentage, say to 50%, the effectiveness of the mask will lessen by half.
Feather: The Feather slider controls how hard or soft the distinction between one side of the mask is with the other. When this slider is all the way to the left, the edge of the mask is as hard as it’s going to get. As you push the slider to the right, the edge will become softer.
Invert: As I mentioned earlier, you can swap how a mask is set up. If you click on the Invert button at the bottom of the Properties panel, you can hide what’s revealed and reveal what’s hidden. It’s as easy as that. Basically black becomes white and vice-versa.
I think this was a good introduction into how you can create masks in Adobe Photoshop while working on editing video. If you have any questions or concerns, please leave them for me in the comment section below. Thanks for reading!
What are Layer Masks in Adobe Photoshop?
How to Adjust Layer Masks by Color Range in Adobe Photoshop
How to Duplicate Masks Between Layers in Adobe Photoshop
2 Super Fast Masking Tips for Adobe Photoshop
4 Masking Power Tips for Adobe Photoshop
In today’s post, I’ll be creating a very simple mask in a video project. I’ve gone ahead and found two videos I took in 2013 to use in my tutorial. These videos aren’t related, but they do look unique enough that we’ll be able to clearly see what’s going on in the post. My primary goal is to show you what options you have when settings up the mask and how you can go about customizing it to fit your needs.
Opening the Video Files into Photoshop
The very first thing I’m going to do is to open the two files I’ve chosen to work on into Photoshop. I’ll use the traditional method for opening these files as I described in this post. I’ll use the File > Open menu item to browse and locate the files. Then, I’ll select them and finally, I’ll click on the Open button.Initially, each file will be opened into its own tab. To combine both files into one tab, I’ll click on the layer in one tab, drag that layer up to the other tab until it gets highlighted, then, I’ll drag the layer down into the work area of that highlighted tab. I’ll drop the layer and things will look just like this:

Right now, the two video clips are lined up sequentially in the timeline. In order to demonstrate what I’d like to demonstrate in this post, I’ll need to remove the clips from the group they’re in. I’d prefer them to be stacked on top of one another in the timeline. To do this, I’ll right-click on the Video Group 1 layer in the Layers panel and choose Ungroup Layers.

After I do this, the group layer will disappear and I’ll have the clips arranged the way I want them to be. In the following screenshot, I put the two halves of the screen into one image. You can see the stacked clips on the left and the ungrouped layers on the right.

The only thing I need to do now is to click and drag the bottom clip over to the left so it sits at the beginning of the timeline.

Okay, now that the clips are set up the way I need them to be, I can move onto the next section.
Creating a Layer Mask
Creating a layer mask in Photoshop is super simple. There are a few ways to do it and I’ll cover one of them now.For this demonstration, I think I’ll merely cut the screen in half, so half of each video plays simultaneously. This would probably be the most clear thing to do so it’s understandable. So, with that in mind, I’ll click on the Rectangular Marquee Tool (or press M on my keyboard) and draw a rectangle over half of the currently visible video clip. It will look like this:

Now that I’ve made a selection, I have a few ways I can create the actual mask. One of them is to visit the Layer > Layer Mask menu area and choose from the options. They are currently Reveal All, Hide All, Reveal Selection and Hide Selection.

Since I have the right side of the video clip selected, I’ll choose Hide Selection. That will make it so the right side of the top clip is hidden and the right side of the bottom clip is revealed. Take a look:

Another method for creating a mask is to select an area that you would like to be visible. Then, you can head down to the bottom of the Layers panel and click on the Add Vector Mask button.

The only thing you need to be aware of when using this method is that it’s somewhat limited. It will always hide the area outside of your initial selection. If you would like to reverse that, you’d need to invert the mask. I’ll show you how you can do that in a bit.
If I wanted to see exactly what is going to be revealed and what’s going to be hidden in the mask I created I can hold down the Option (Mac) or the Alt (Windows) key on my keyboard and click once on the black and white mask thumbnail in the Layers panel. That will superimpose the raw mask over the image or video. It will look like this:

While it’s not terribly important to do this in my case right now, it does become rather helpful if you’re masking intricate areas and need to see things with a different view. To reverse this view, simple hold down those keys again and click the mask thumbnail once more. Things will return to normal.
Customizing the Mask
From here, there are a few things I can do to customize the mask. To do this, I’ll click on the Properties panel button to expose the panel.
I’m really only going to focus on three areas in the Properties panel. They are Density, Feather and Invert. I’ll list and describe them now.
Density: Pushing the Density slider adjusts the opacity of the mask, for lack of a better word. At 100%, the mask is in full effect and is either hiding or revealing what it’s suppose to with all its force. If you lessen the density by pushing the slider left to a lower percentage, say to 50%, the effectiveness of the mask will lessen by half.
Feather: The Feather slider controls how hard or soft the distinction between one side of the mask is with the other. When this slider is all the way to the left, the edge of the mask is as hard as it’s going to get. As you push the slider to the right, the edge will become softer.
Invert: As I mentioned earlier, you can swap how a mask is set up. If you click on the Invert button at the bottom of the Properties panel, you can hide what’s revealed and reveal what’s hidden. It’s as easy as that. Basically black becomes white and vice-versa.
I think this was a good introduction into how you can create masks in Adobe Photoshop while working on editing video. If you have any questions or concerns, please leave them for me in the comment section below. Thanks for reading!
