JodyBuchanan
Member
- Joined
- May 10, 2021
- Messages
- 138
- Reaction Score
- 0
- Points
- 21
- #1
Comments are huge when it comes to almost any type of development. I’ve been working online for a very long time and I have to tell you, the more comments, the better. Notes are critical as well, but we’ll discuss that another time. Today, it’s all about comments.
I comment when writing code. Pretty much every language allows this. I also comment when browsing inside of Google Analytics. If I make a website change, I like to record when that change was made to assess the resulting traffic. I just explained how you can comment while using Microsoft Edge. Comments are everywhere and for good reason. They help to keep your head on straight. Blindly making changes alone is bad, but it’s no where near as bad as when you’re working with someone else or with a team. Trust me – from personal experience, you never really know what’s going on inside of someone else’s head. It has to be written out for you. That’s just the way it is.
Let’s do a little exercise. Can you imagine a time when someone was editing video file and the project became so complex that they had trouble remembering everything about what was going on? I bet the answer is yes. It is because that’s surely happened. Can you imagine a time when two people worked on the same video file? Of course you can. Can you imagine a time when multiple people worked on a video file? Again, yes. Can you imagine a file being handed off to someone else because the first developer decided not to work on it at all? Yes, yes, yes.
Now, can you imagine being a video editor in one of the above scenarios and flying blind with absolutely no idea of what’s going on? I sure can. And it’s in these types of situations that comments are the key. It’s like saying to someone, “I’ll get back to you tomorrow after I review all the notes regarding this project.” At least you’ll have something to look at.
In today’s post, I’m going to demonstrate how to do a few things inside of the video timeline in Adobe Photoshop. After that, I’ll demonstrate how to go about adding a comment so it sits very clearly and in plain view in that same timeline. After reading this post, I can almost guarantee that you’ll never forget the whys and hows of commenting in the Photoshop video timeline.

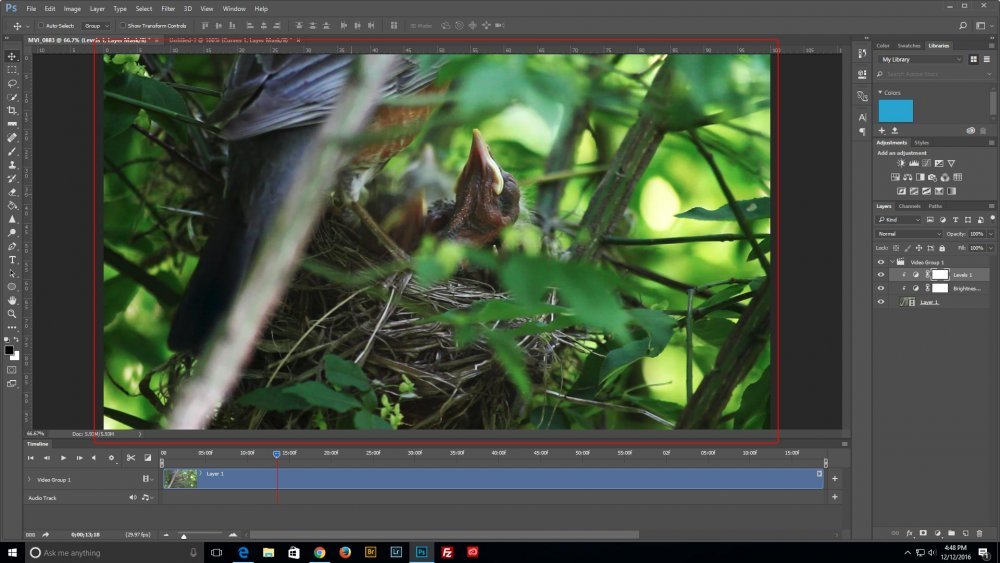
Most people resize their video to fit the frame when this happens. Most of the time, you’ll want things nice and large, but there are occasions when you’ll need to see the video in its entirely. Luckily, there are a few methods for resizing things easily.
The absolute quickest way to enlarge and shrink the video view is to use a keyboard shortcut. I must do this 100 times a day. To shrink a file view, I simply press the Ctrl+- keys on my keyboard and to enlarge it, I press the Ctrl++ keys. That’s the Control (Windows) or Command (Mac) key and the Minus or the Plus keys, to make things as clear as possible.
Another method for zooming in and out is to use the View menu that sits up at the top of the application.
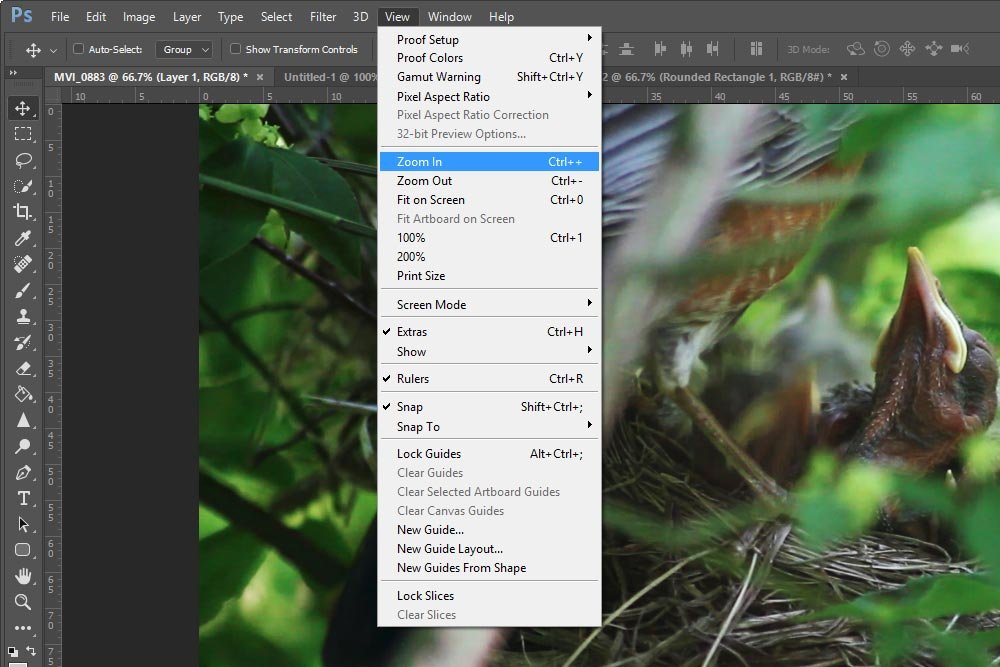
To zoom in, use the View > Zoom In menu item and to zoom out, use the View > Zoom Out one. If you look closely, you’ll see a few other sizing options in the list as well.
To fit the view in the allotted size, you can use the View > Fit On Screen menu item. You can alternately use the Ctrl+0 or Command+0 keyboard shortcut to do the same thing. You can also view the video at either 100% or 200% using this menu area. The keyboard shortcut for viewing the file at 100% is Ctrl+1 or Command+1.
Take my word for it – you’ll be resizing things quite a bit, so I encourage you to get used to the keyboard shortcuts.
Now, in a previous post, I already explained that you can simply click on the playhead and drag it back and forth. That’s easy and you probably already knew that. Did you know there’s also another way to move the playhead?
If you look down towards the bottom of the Timeline panel, you’ll see the exact time of your playhead.
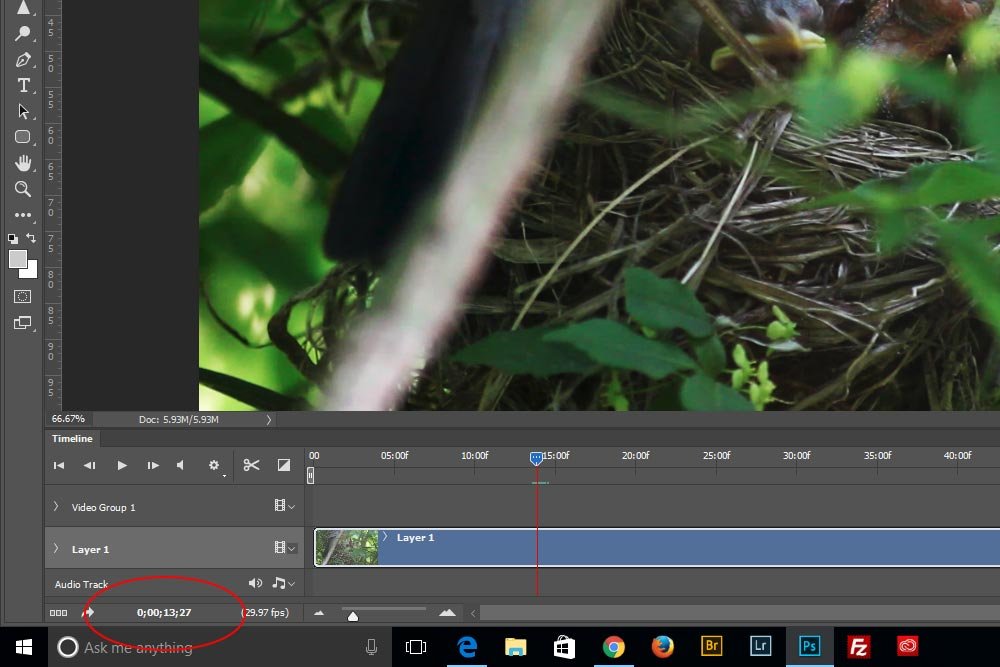
If you roll your mouse over that time, you’ll see your mouse pointer change from a single arrow to a double arrow. If you click and drag (scrub) to the left or right, you’ll notice that the playhead moves as well.
Here’s another thing. If you would like to view the timeline in frames as opposed to seconds, you can easily change this. Move your mouse down over the time again and press Alt (Window) or Option (Mac) and then click. When you do this, the measurement will change and you’ll be able to drag back and forth again, but this time, looking at the frame units of measurement.
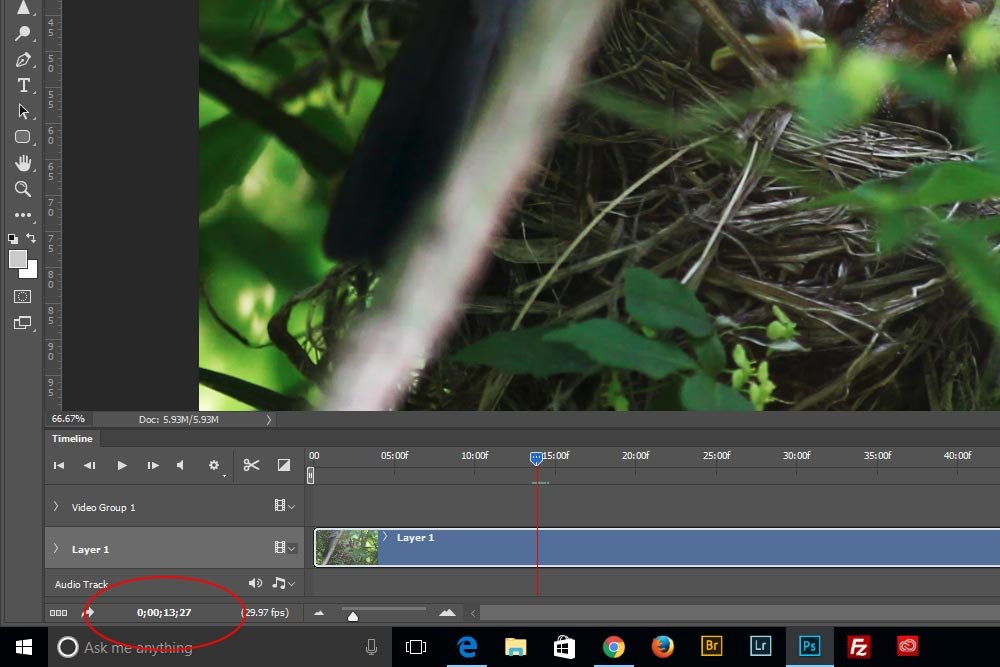
By the way, when you click and drag your mouse pointer over either the time or frame measurements, it’s called Scrubbing the Timeline.
The first thing we need to do is expose the Comment Track. To do this, I’ll move over to the Timeline panel menu and click. When the menu opens, I’ll roll over Show and then click on Comments Track.
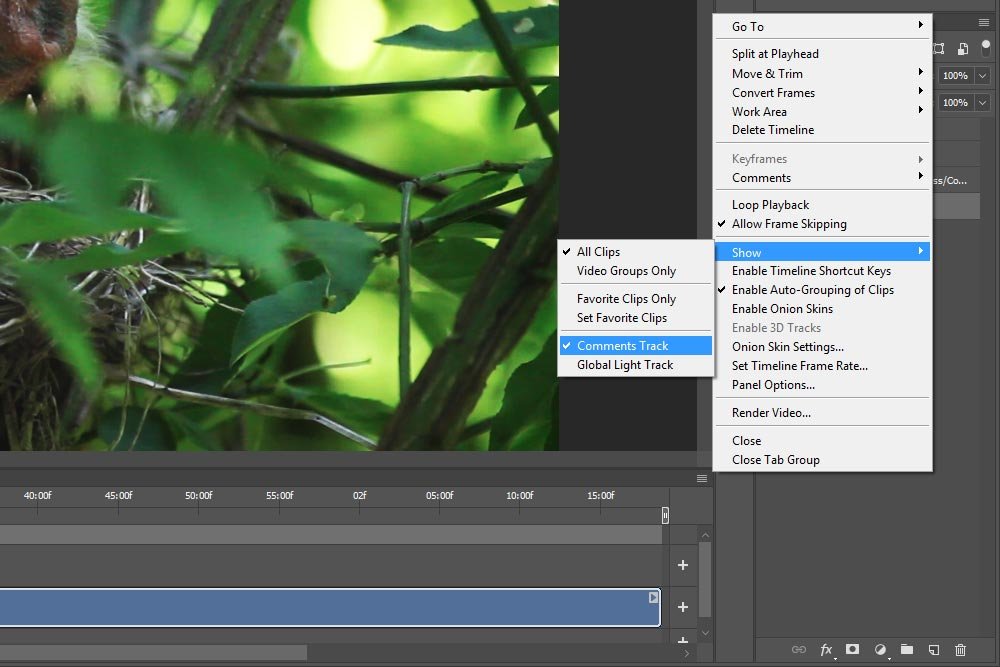
Once I do this, I’ll see an additional row in the timeline appear. This row holds any comments that might be created.
To add a comment to the timeline, all I need to do is to click on the small stopwatch that sits to the left of the word Comments.
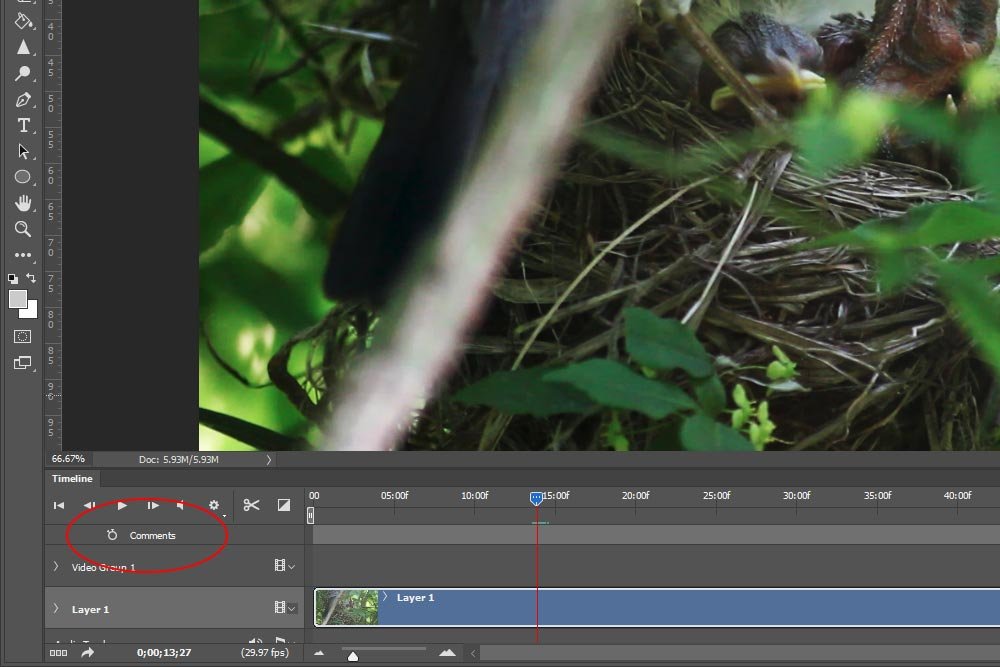
When I do that, the Edit Timeline Comment dialog box appears. I can fill in any comment I’d like to appear at that exact point in the timeline.
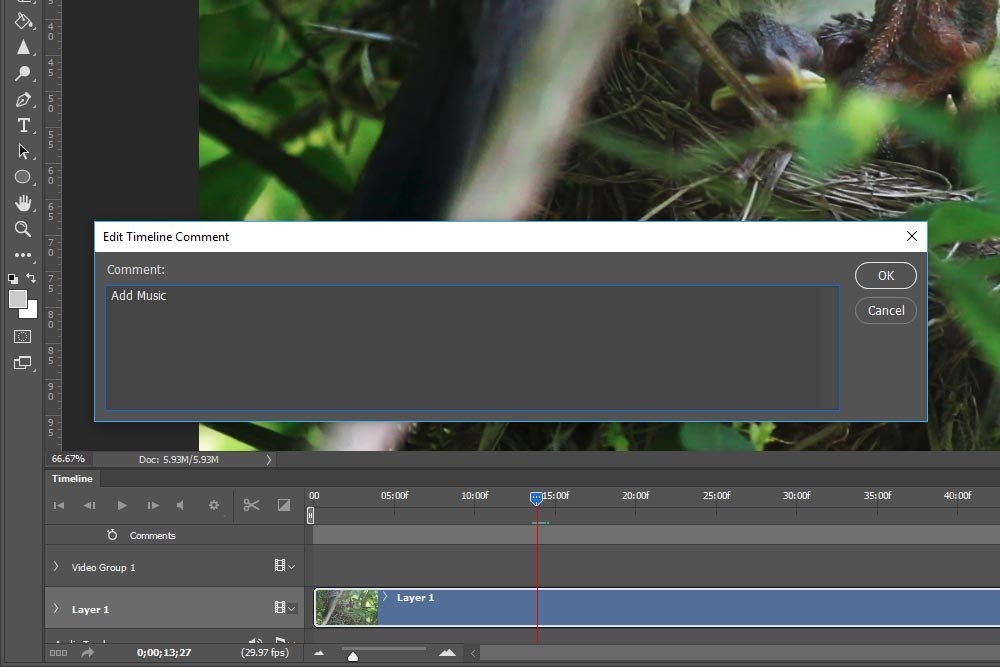
After I enter the comment, I can click the OK button to apply it to the timeline. A small yellow box will appear.
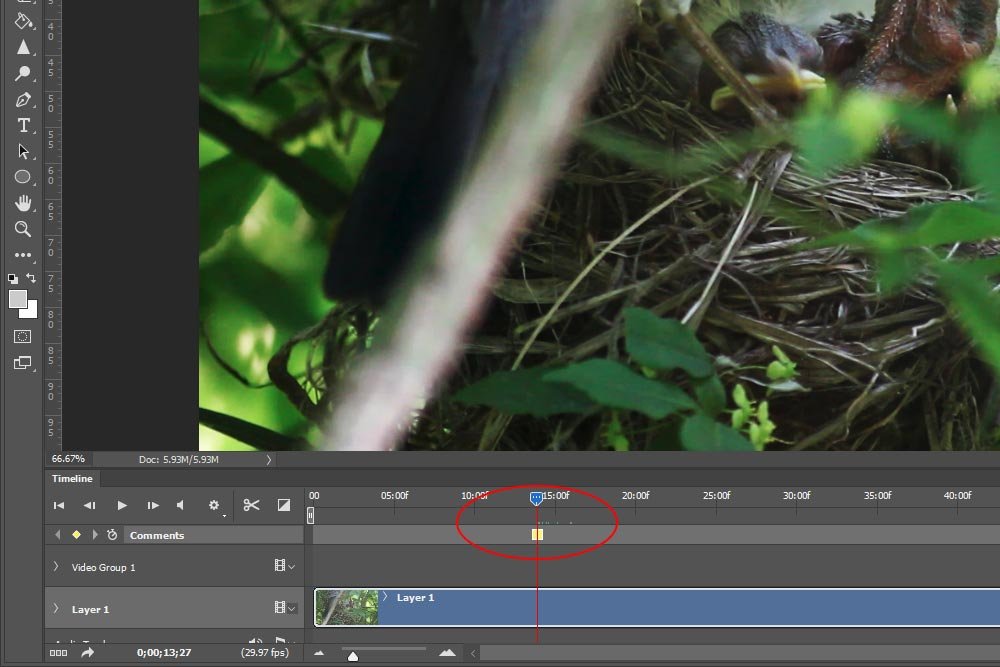
To view the comment, just double-click on the yellow box. The dialog box will pop open again.
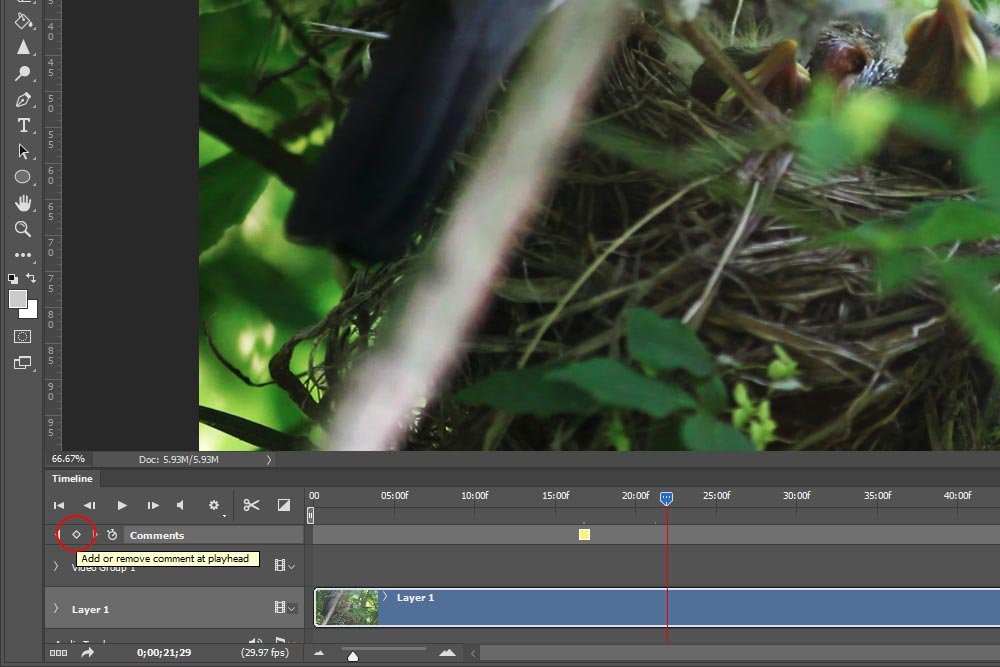
If you’d like to add another comment, you’ll need to do something slightly different. Instead of clicking the small stopwatch (doing that will remove all comments), you’ll need to move the playhead to the next point in the timeline you’d like to comment and then click on the small keyframe.
Then, follow the same instructions I gave above. And that’s it!
Well, there we have it. How to add comments to the video timeline in Adobe Photoshop along with a few other odds and ends. I hope you enjoyed the post. If you have any questions or concerns, please leave them in the comment section below. Thanks for reading!
COMMENT: Nice tutorial. Is it the same way if using adobe photoshop CS6?
COMMENT: You know – I’m not sure. It’s been a while since I’ve used CS6. I’m willing to say yes because I think this is a fairly basic feature.
COMMENT: I was trying to learn how to create comments along the Video Timeline in Adobe Photoshop. I have tried a lot before but couldn’t figure it out. I am glad to have this information. It is very helpful. Thank you!
COMMENT: Thanks for such a helpful article. It really helps me with my Photoshop video editing.
I comment when writing code. Pretty much every language allows this. I also comment when browsing inside of Google Analytics. If I make a website change, I like to record when that change was made to assess the resulting traffic. I just explained how you can comment while using Microsoft Edge. Comments are everywhere and for good reason. They help to keep your head on straight. Blindly making changes alone is bad, but it’s no where near as bad as when you’re working with someone else or with a team. Trust me – from personal experience, you never really know what’s going on inside of someone else’s head. It has to be written out for you. That’s just the way it is.
Let’s do a little exercise. Can you imagine a time when someone was editing video file and the project became so complex that they had trouble remembering everything about what was going on? I bet the answer is yes. It is because that’s surely happened. Can you imagine a time when two people worked on the same video file? Of course you can. Can you imagine a time when multiple people worked on a video file? Again, yes. Can you imagine a file being handed off to someone else because the first developer decided not to work on it at all? Yes, yes, yes.
Now, can you imagine being a video editor in one of the above scenarios and flying blind with absolutely no idea of what’s going on? I sure can. And it’s in these types of situations that comments are the key. It’s like saying to someone, “I’ll get back to you tomorrow after I review all the notes regarding this project.” At least you’ll have something to look at.
In today’s post, I’m going to demonstrate how to do a few things inside of the video timeline in Adobe Photoshop. After that, I’ll demonstrate how to go about adding a comment so it sits very clearly and in plain view in that same timeline. After reading this post, I can almost guarantee that you’ll never forget the whys and hows of commenting in the Photoshop video timeline.
My Video
For this post, I’ll be using a video clip I took of some baby birds being fed outside my living room window. I set my tripod up in the living room and recorded the event as it unfolded right through the closed window. Here’s a photo of the birds.
Resizing the Video View
One thing you’ll quickly notice when launching a video into Adobe Photoshop is that the Timeline panel automatically opens. When this happens, the work area shrinks as a result.
Most people resize their video to fit the frame when this happens. Most of the time, you’ll want things nice and large, but there are occasions when you’ll need to see the video in its entirely. Luckily, there are a few methods for resizing things easily.
The absolute quickest way to enlarge and shrink the video view is to use a keyboard shortcut. I must do this 100 times a day. To shrink a file view, I simply press the Ctrl+- keys on my keyboard and to enlarge it, I press the Ctrl++ keys. That’s the Control (Windows) or Command (Mac) key and the Minus or the Plus keys, to make things as clear as possible.
Another method for zooming in and out is to use the View menu that sits up at the top of the application.

To zoom in, use the View > Zoom In menu item and to zoom out, use the View > Zoom Out one. If you look closely, you’ll see a few other sizing options in the list as well.
To fit the view in the allotted size, you can use the View > Fit On Screen menu item. You can alternately use the Ctrl+0 or Command+0 keyboard shortcut to do the same thing. You can also view the video at either 100% or 200% using this menu area. The keyboard shortcut for viewing the file at 100% is Ctrl+1 or Command+1.
Take my word for it – you’ll be resizing things quite a bit, so I encourage you to get used to the keyboard shortcuts.
Moving the Playhead
The next area I’d like to discuss is the various methods for viewing the units of time in the timeline as well as how to move the playhead without actually pressing the Play button.Now, in a previous post, I already explained that you can simply click on the playhead and drag it back and forth. That’s easy and you probably already knew that. Did you know there’s also another way to move the playhead?
If you look down towards the bottom of the Timeline panel, you’ll see the exact time of your playhead.

If you roll your mouse over that time, you’ll see your mouse pointer change from a single arrow to a double arrow. If you click and drag (scrub) to the left or right, you’ll notice that the playhead moves as well.
Here’s another thing. If you would like to view the timeline in frames as opposed to seconds, you can easily change this. Move your mouse down over the time again and press Alt (Window) or Option (Mac) and then click. When you do this, the measurement will change and you’ll be able to drag back and forth again, but this time, looking at the frame units of measurement.

By the way, when you click and drag your mouse pointer over either the time or frame measurements, it’s called Scrubbing the Timeline.
Adding Comments to the Timeline
In this final section, I’ll explain how to add the comments I mentioned above to the timeline.The first thing we need to do is expose the Comment Track. To do this, I’ll move over to the Timeline panel menu and click. When the menu opens, I’ll roll over Show and then click on Comments Track.

Once I do this, I’ll see an additional row in the timeline appear. This row holds any comments that might be created.
To add a comment to the timeline, all I need to do is to click on the small stopwatch that sits to the left of the word Comments.

When I do that, the Edit Timeline Comment dialog box appears. I can fill in any comment I’d like to appear at that exact point in the timeline.

After I enter the comment, I can click the OK button to apply it to the timeline. A small yellow box will appear.

To view the comment, just double-click on the yellow box. The dialog box will pop open again.
If you’d like to add another comment, you’ll need to do something slightly different. Instead of clicking the small stopwatch (doing that will remove all comments), you’ll need to move the playhead to the next point in the timeline you’d like to comment and then click on the small keyframe.

Then, follow the same instructions I gave above. And that’s it!
Well, there we have it. How to add comments to the video timeline in Adobe Photoshop along with a few other odds and ends. I hope you enjoyed the post. If you have any questions or concerns, please leave them in the comment section below. Thanks for reading!
COMMENT: Nice tutorial. Is it the same way if using adobe photoshop CS6?
COMMENT: You know – I’m not sure. It’s been a while since I’ve used CS6. I’m willing to say yes because I think this is a fairly basic feature.
COMMENT: I was trying to learn how to create comments along the Video Timeline in Adobe Photoshop. I have tried a lot before but couldn’t figure it out. I am glad to have this information. It is very helpful. Thank you!
COMMENT: Thanks for such a helpful article. It really helps me with my Photoshop video editing.
