Search

Color & Luminance Range Mask Tool in Adobe Lightroom

  • Thread starter WendyMay
  • Start date
WendyMay

WendyMay

Member
Joined
May 11, 2021
Messages
142
Reaction Score
0
Points
21
  • #1
This exciting feature is brand new for 2018. It’s called the Range Mask and it works alongside the Graduated Filter, Radial Filter and the Adjustment Brush in Adobe Lightroom. Basically, this tool allows you to mask out areas that you’de rather not have affected by the filters I just mentioned. This is a very powerful tool that I’m sure many of you have been waiting for. So, if you’re a fan of either the Graduated Filter or Radial Filter in Lightroom, but have experienced their limitations, please read on below. This new tool may just help you out significantly.

In today’s post, I’m going to merely introduce this tool. I’m not going to get too deep into its intricacies; I’ll save all that for later posts. I’ll use an image of a flower as an example and I’ll apply the two different filters to it. Then, I’ll experiment with both the Color and Luminance features of the tool in an effort to discover what effects they have on the filters. This should be fun.
The Demo Image​

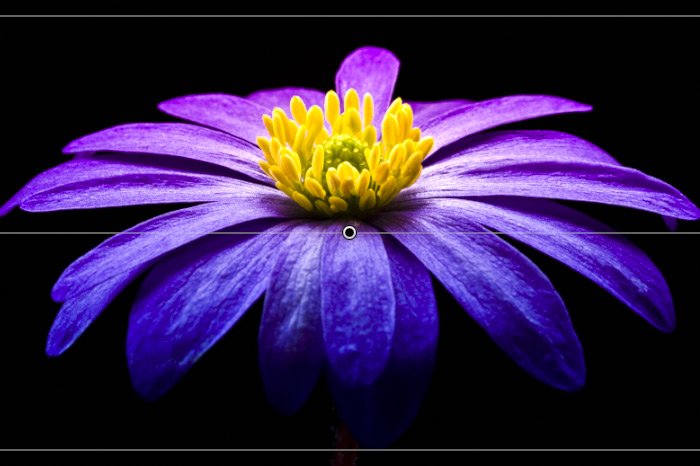
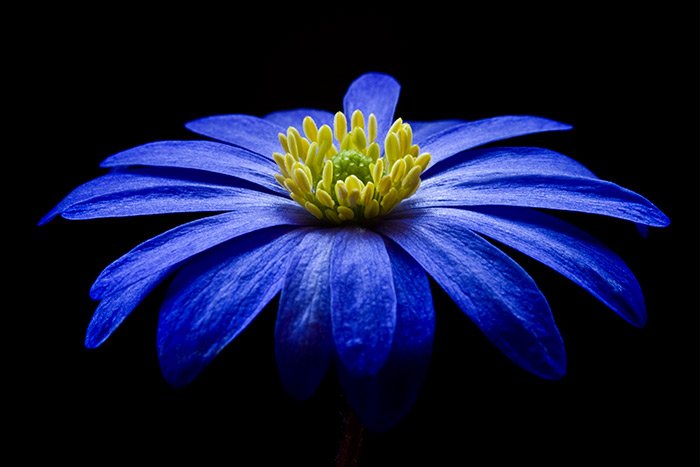
For this post, I’ll be using a photo of a blue flower with a yellow center. The reason for this is because I feel that the image will exemplify the information I’d like to convey. There are some darker areas, lighter areas and different colors. Let’s see how far we can get with this one. If something isn’t clear in regards to the image, I’ll try to explain it best I can via test.

purple-flower.jpg

Color Range Mask + Radial Filter​

Okay, I’m going to start things off by first explaining what the Color Range Mask is. In the most basic sense, this tool will mask out any alterations made via the filter tools I mentioned earlier, except for those I select. So, if I have an image that includes solid purple and solid yellow and I apply the Radial Filter to it with some random change, I can click on the yellow and have any change that’s been applied to the purple disappear. It’s sort of like coloring over an entire piece of paper with a crayon and then erasing part of that coloring in only some areas. In this case, those areas would be based on what colors were underneath that crayon coverage.

Included with this feature area two controls. They are:

Color Range Selector: This is a basic dropper that’s used to select which color you’d like the filter to be applied to. To make it function, all you need to do is click on the tool to activate it and then click on the color you’re interested in changing in the image.

Amount: This one’s fairly self explanatory. Once the color is selected with the dropper, you can control how strong the mask effect is. The slider gets pushed to the right or to the left.

Also, I do want to mention that with this tool, you have the opportunity to click and drag the dropper to select a range of contiguous color. Also, if you hold the Shift key on your keyboard and click around the image, you have the ability to select multiple colors you’d like to keep filtered.

I already have the photo opened up in Adobe Lightroom. For this example, I’ll apply a Radial Filter and will make a few adjustments to it so the flower looks different than it originally did. Let’s see how that looks.
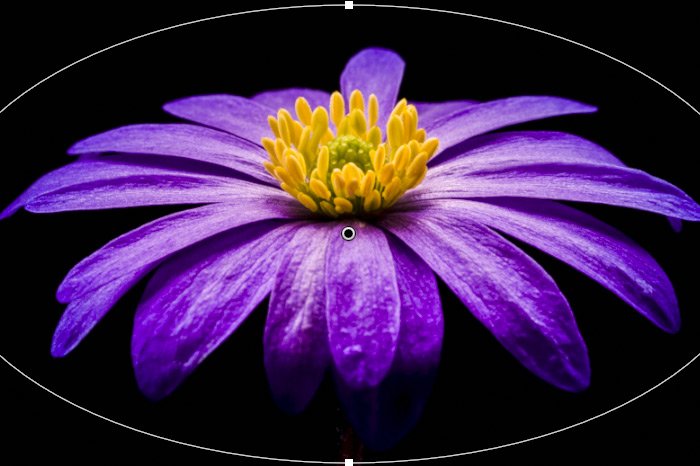
radial-adjustment.jpg

Now let’s see which sliders I pushed to make the blue flower turn purple.
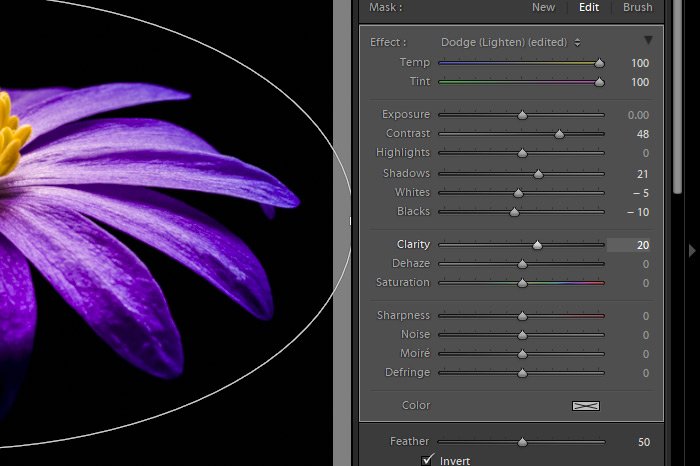
radial-filter-sliders.jpg

Okay, now, if I head down to the bottom of the slider area in the right panel, I’ll see an area with a Range Mask drop-down. I’ll click that drop-down and select the Color option.
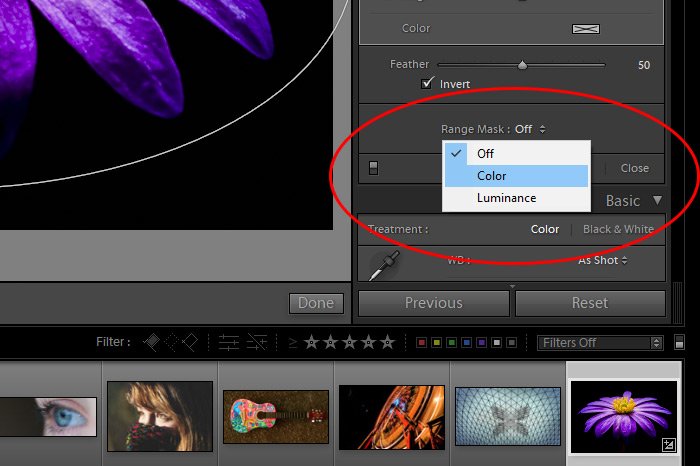
color-range-mask.jpg

Now here’s the exciting part. I’ve already applied a Radial Filter to this image, but the only problem is, it’s affecting everything inside of that radial. What if I only wanted the filter applied to a specific color in the image. A color such as the yellow center of the flower? I’ll go ahead and click on the Color Range Selector and then I’ll click on the yellow center of the flower to see what happens.
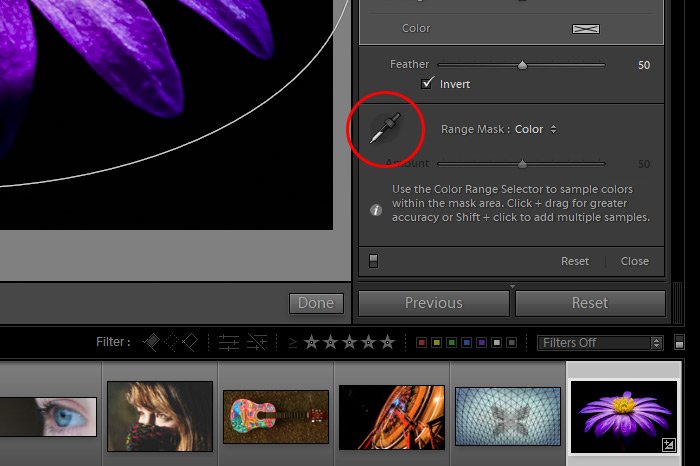
color-range-selector.jpg

This is what the image looks like after I click the yellow center.
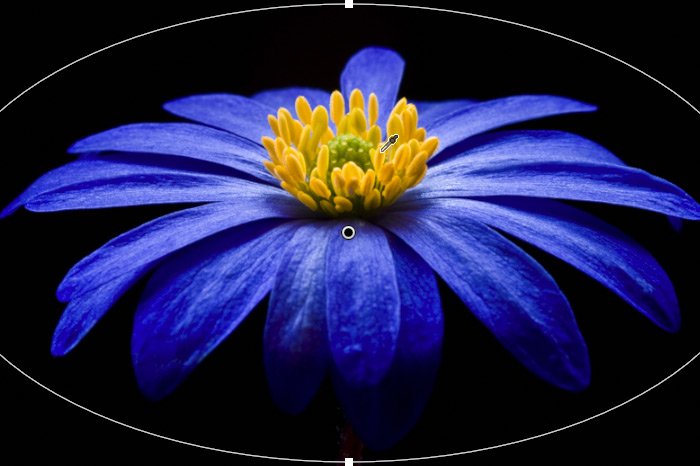
yellow-center.jpg

Do you see how everything else was masked out, except for the changes made to the yellow center? Now, I’ll go ahead and click on one of the petals.
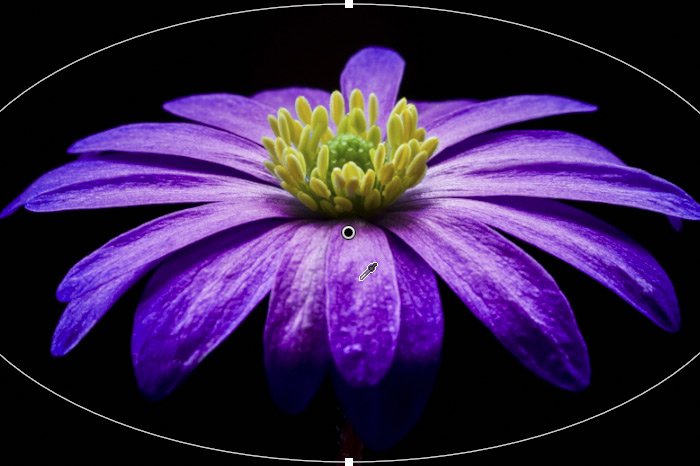
purple-leaves.jpg

After I did this, the effects to the yellow center were masked out and the Radial Filter changes are now only applied to the color on the petals I clicked on. If I wanted to continue, I could hold Shift and click multiple times to expand the range of color the effects would be applied to. I could also click and drag to do the same thing. Finally, I could push the Amount slider to either lessen or increase the amount of change that’s applied to the areas that are affected by the filter. This is what the flower looks like when I reduce the amount all the way to zero.
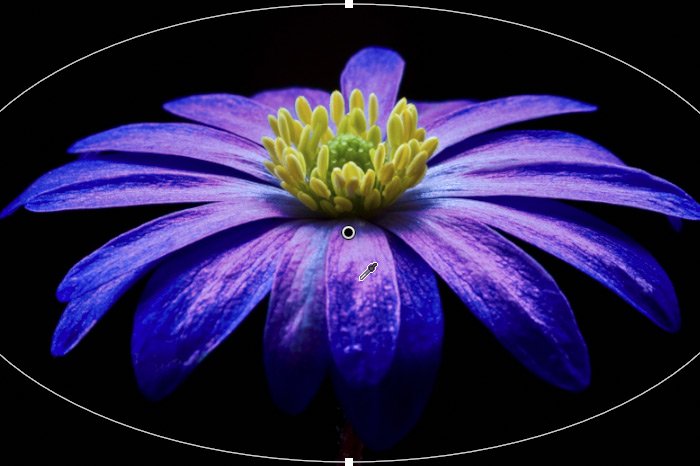
low-amount.jpg

Really, the concept here is the most important thing to understand. Once you get what this tool does exactly, it all becomes very easy to work with.

Luminance Range Mask + Graduated Filter​

For this next example, I’ll delete the Radial Filter I was just working with. After that, I’ll apply the Graduated Filter and will push some sliders around again to make the original flower appear differently.

Here’s the output of the flower.

graduated-filter.jpg

This is what the sliders look like for this filter.
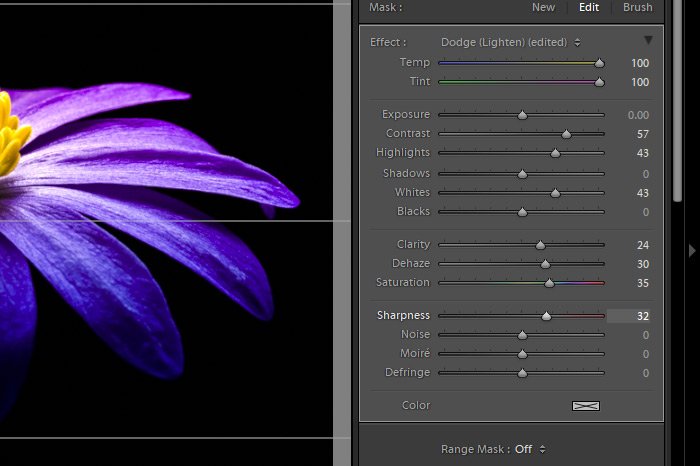
graduated-filter-sliders.jpg

Again, if I head down to the bottom of the sliders area, I’ll find the same Range Mask drop-down. This time though, I’ll select Luminance from the available options.
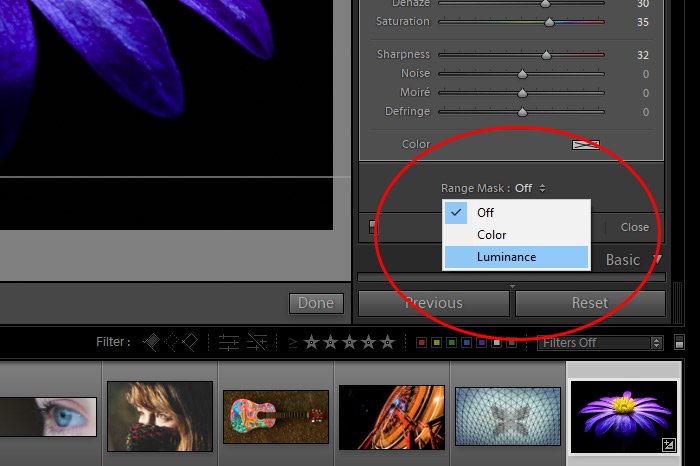
liminance-option.jpg

When this option is selected, two controls appear. They are:

Range: This option controls which area of the image will be affected, based on its tonal lightness or darkness. There is a range inside of this area that can be set. The range can be compressed to limit the range or uncompressed to expand the range. Also, the compressed range can be moved along the scale of light, from dark to bright.

Smoothness: This control is sort of like feathering the result. You can choose to have a more abrupt effect, which only affects the very specific luminance values you chose above or you can smooth the area out so it’s more liberal with the resulting filter.

There is no dropper with this Luminance option. Everything is controlled right down in the area I outlined above.

Now, I’ll go ahead and set the range for this mask between 80-100. I’ll also push the Smoothness slider all the way to the right, so things are as smooth as they can get.
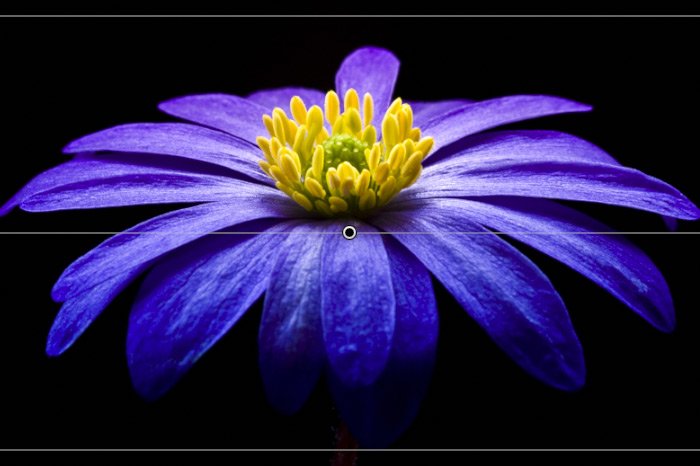
high-luminance-smoothness.jpg

As you can see, the effect of the filter has been reduced somewhat. It’s now only affecting the brightest areas of the flower petals. Also, since I smoothed the result out, it’s less noticeable. This is one area that you’ll need to play with on your own to see the true power of. It’s pretty remarkable what it can accomplish.

In the next post I write on this topic, I’ll be walking through a real world photographic example of using these tools. If done correctly, the results can be rather profound. Stay tuned.

I hope I clearly introduced and explained how to use the Range Mask Tool in Adobe Lightroom. If you have any questions about this post, please leave them in the comment section below. Thanks for reading!
 
WendyMay

WendyMay

Member
Joined
May 11, 2021
Messages
142
Reaction Score
0
Points
21
  • #2

Color Range Masking the Graduated & Radial Filters in Adobe Lightroom​

Taking advantage of the different types of filters (Graduated, Radial) in both Adobe Camera Raw and Lightroom can totally transform a wide variety of photos. I’ve actually talked about these types of filters on this blog many times. I’ve also worked on all types of photos with a variety of filters and each time I edit a photo using one of these tools, I’m both amazed at how powerful they are and somewhat frustrated by their limitations. What I’ve come to realize as time has passed though is that while I sometimes experience frustration while I’m using a particular filter, it’s mostly because of something I don’t understand. To be honest, 99 times out of 100, there’s a workaround available and I just need to learn more about it. That’s what this post is going to be about.

In today’s post, I’d like to talk about something called Range Masking in Adobe Lightroom. Range masking, and more specifically, color range masking, is basically the process of masking something out of an altered photo by the colors a particular area isn’t. I know, that’s pretty difficult to understand. I’ll give you an example to make things easier. Let’s say you have an image that’s half red and half blue. Now let’s say that you apply a filter to the entire image that increases its exposure. The problem is, you didn’t really want to increase the exposure of the blue side. You only wanted to brighten the red one. Well, with the color masking feature inside of Lightroom, you can select the red color and everything but that color will have the filter not affect it any longer. Essentially, by using this tool, you’ll be telling Lightroom to only filter the red and mask out everything else. Of course, if there’s any red in other parts of the photo, you’ll have to deal with them another way, but I’ll deal with that later down below. For now, I’d like to simply help you understand how you can mask things out of a photo, using the color range masking tool.

To demonstrate in this post, I’ll be using a photo that contains a variety of colors. I’ll first apply a Graduated Filter to the photo and then alter a few aspects of it. After that, I’ll use the color range masking tool to select an area of the photo that I’d like to keep affected by the change, therefore rendering the remainder of the photo unaffected.

The Demo Photo​

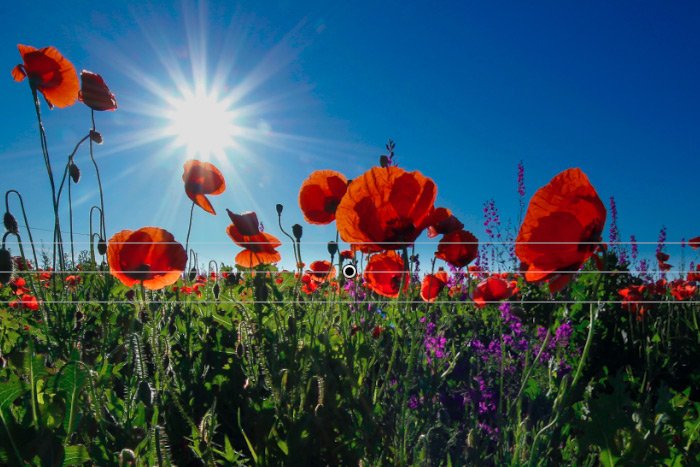
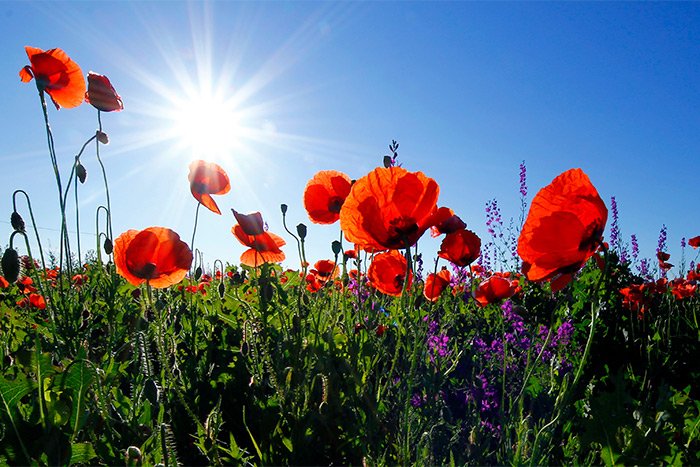
For this demonstration, I wanted to find a photo that truly separated many of its colors. I think I found that photo. With this one below, I can distinctly see a blue sky, red flowers and green stems and leaves. I should have no issues explaining what’s going on with any change I decide to make down below.

flowers.jpg

Applying a Graduated Filter​

I’ll cover the steps necessary to apply a graduated filter to a photo, but if you’d like a more in-depth description, please take a look at this post. I go into many more details there.

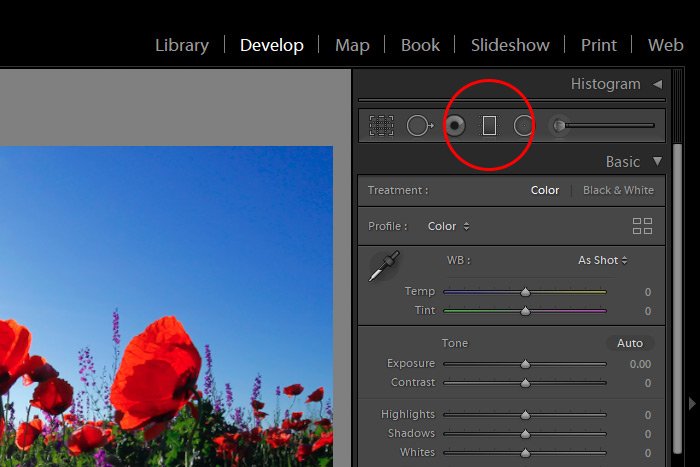
Anyway, since the image is already imported into Lightroom and I’m in the Develop module, I’ll go ahead and click on the Graduate Filter icon in the right side of the application, above the Basic panel.

gradutated-filter-icon.jpg

Then, I’ll apply the filter and make a few slider adjustments over to the right.

applied-filter.jpg

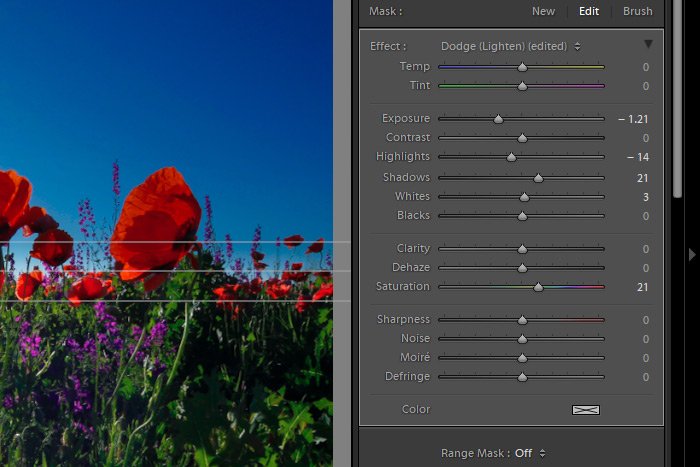
As you may notice, the sky is bluer than it originally was. Here are the sliders that I pushed.

graduated-filter-sliders.jpg

I think that looks pretty good.

So What’s the Problem?​

After applying a graduated filter to a photograph, as I just did, it’s sometimes tough to identify the exact problem. Because of this, I’ll tell you what it is. Before I applied this filter, I decided that I wanted to adjust the exposure and the saturation of the sky. I didn’t really want to adjust anything that had to do with the flowers though. The problem is, because the Graduate Filter is a linear tool, meaning it goes straight across the entire photo, some of the flowers got caught in the cross-fire. So anything I did to the sky is now also applied to those flowers. This isn’t what I want and this issue is what this post is about.

Masking a Filter by Color​

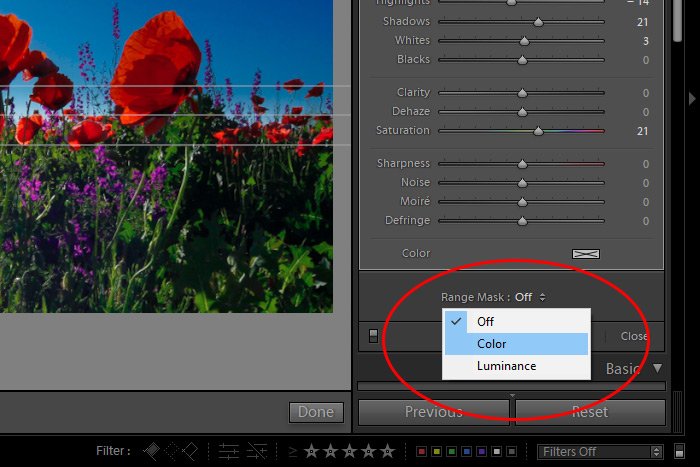
Luckily, inside of Lightroom there’s a tool that allows us to select the color range that we’d like to limit the filter to. This is the Range Mask tool I spoke of above. If I head down to the bottom of the slider panel, I’ll see a small drop-down box that’s labeled Range Mask. If I click that drop-down, I’ll see three choices. Off, Color and Luminance.

color-range-mask.jpg

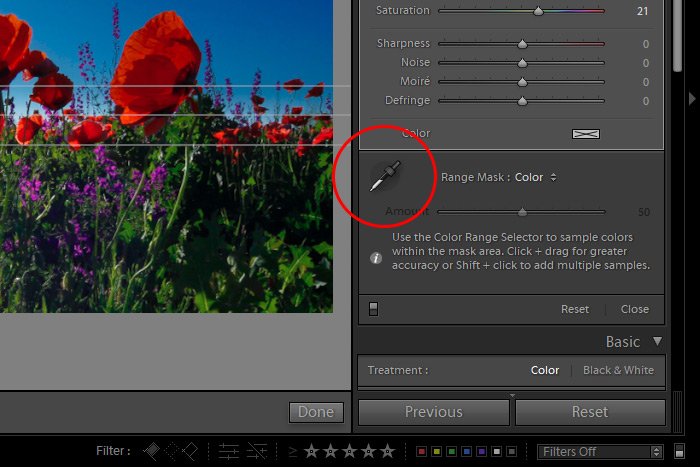
If I click to select Color from this short list, I’ll have the ability to mask out anything other than the color I’m interested in filtering. So, I’ll do that and then I’ll click on the eye-dropper tool that appears.

eye-dropper-tool.jpg

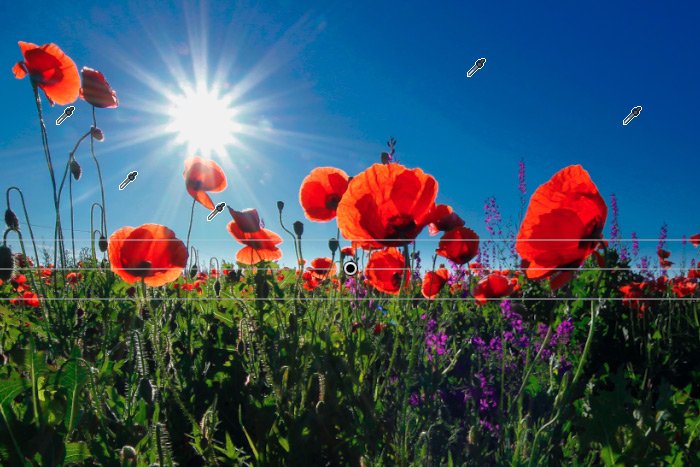
Finally, I’ll head back up to the photo and I’ll click inside the blue sky somewhere to select the blue color. If the color is a gradient as this sky is, I can hold down the Shift key on my keyboard to take multiple samples. Also, I could just as easily click and drag across the sky to capture all the different shades of blue.

Here’s an example of multiple clicks. You can see the dropper tools.

multiple-clicks.jpg

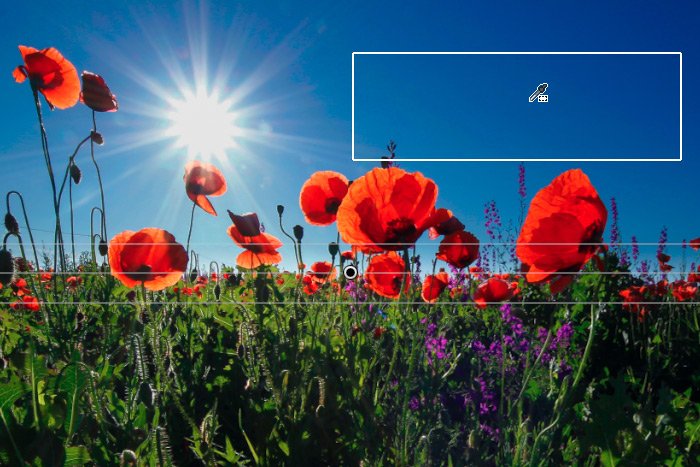
And here’s an example of clicking and dragging. All the color captured inside of the box will be filtered while anything outside the box won’t be.

click-drag.jpg

Do you see how the sun and the red flowers brightened back up? That’s because they aren’t being filtered anymore and those sliders positions are having no effect on them. They’re affecting only the blue sky.

Below the drop-down box and the eye-dropper tool in the right panel is an Amount slider. I can drag this slider to the left and to the right to adjust how strong and precise I want the color masking to be. If I drag to the left, the masking effect won’t be that strong and if I drag to the right, it will be stronger. This is a trial and error type thing that needs to be experimented with.

Using in Conjunction With the Brush​

Even though I took advantage of the Color Range Mask tool and the Graduated Filter, that doesn’t mean that I can’t also go in and make further edits with the Brush tool up above. But, since I already wrote a super duper post on this topic, I’ll just direct you to that if you’re interested.

How to Brush Away Parts of the Graduated Filter in Adobe Lightroom

I just wanted to mention that the brush option is always a possibility.

Also, one last thing. Anything I did with the Graduated Filter in this post is also possible with the Radial Filter. Both filters behave the same way when it comes to masking and further edits with the brush.

I hope I clearly explained how to use the Graduated Filter and the Color Range Mask in Adobe Lightroom. If you have any questions regarding this post, please leave them in the comment section below. Thanks for reading!
 
WendyMay

WendyMay

Member
Joined
May 11, 2021
Messages
142
Reaction Score
0
Points
21
  • #3

Masking by Luminance Values in Adobe Lightroom​

There’s this thing out there called “luminance masking” that’s sort of confusing. It’s a great feature that can be found in a number of Adobe products and it really shouldn’t be ignored. If you’re into using localized adjustment tools and have had issues with separating what you’re attempting to adjust with surrounding objects and areas, this may be just your ticket to success.

The luminance mask is one of the “range” masks inside of Adobe Lightroom. By range, I mean the mask will only work within a specified range of whatever that mask is. It’s actually sort of tough to explain this one, but I’ll do the best I can.

Let’s say I apply a Graduated Filter to an entire image in Lightroom. Pertaining to that graduated filter, I push a few sliders around to change the look of what’s behind it. So now, as it stands, I have an image with a filter over it that makes the image look completely different.

Let’s also say that the image I’m working with has some bright areas in it as well as some darker areas. What if I wanted to have the Graduated Filter only affect the bright areas? Can I do that? Well, with the Luminance Mask feature I can. What the Luminance Mask has the ability to do is hide parts of a filter, based on the image’s luminance. So, if you had a picture that was black and white and some parts were really bright and some parts were really dark and you applied a filter (Graduated, Radial, Adjustment Brush) to the entire image, you could easily hide some parts of that filter and protect other parts, based solely on how bright or dark those areas are. It’s really a very helpful tool and it’s one that should be taken advantage of.

I hope I explained the idea behind this feature clearly above. If you still don’t completely understand the concept, please read on down below. I think it will all come together.

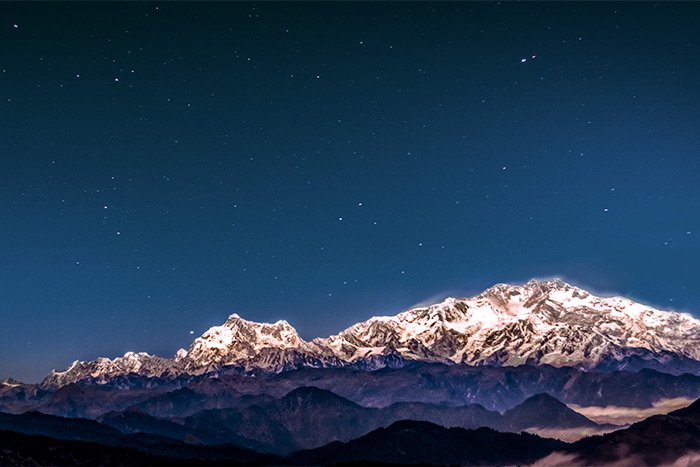
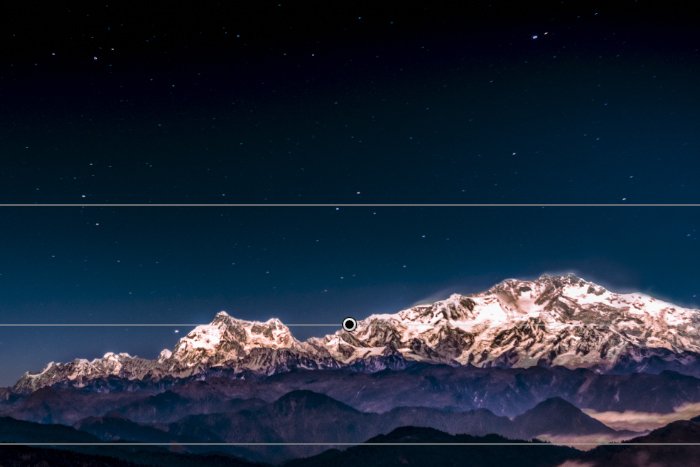
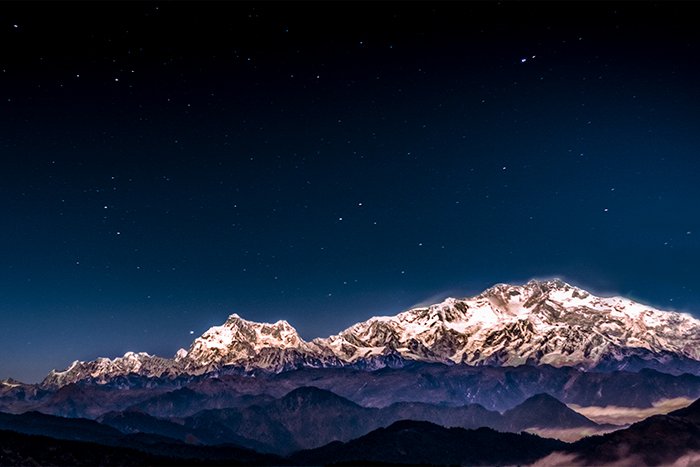
In today’s post, I’m going to apply a Graduated Filter to an image of a mountain range. The reason I chose the photo I’ll be using is because there is obvious separation between the mountains and the sky above it. I’ll apply the filter and then push some sliders around to darken the sky. After that, I’ll activate the Luminance Range Mask in an effort to mask out the mountains from the filter. I don’t want the mountains affected by the filter at all; I’ll adjust the range mask so that doesn’t happen. Finally, I’ll smooth out the mask by pushing another slider, which will have a profound effect.

Today’s Demo Photo​

This is the photograph I’ll be using for this post.

mountain-range.jpg

Like I said, there’s good separation between the mountains and the sky. I suppose you could say there are differnt “luminance” values between those areas, which is what will help when using these tool I’m speaking of.

Applying the Graduated Filter​

Since I’ve already written a nice post on how to use the Graduated Filter in Adobe Lightroom, I’ll just link to that below and go ahead and apply the filter. If you’d like to read about this topic, I encourage you to click through.

Beautifying an Image with the Graduated Filter in Adobe Lightroom

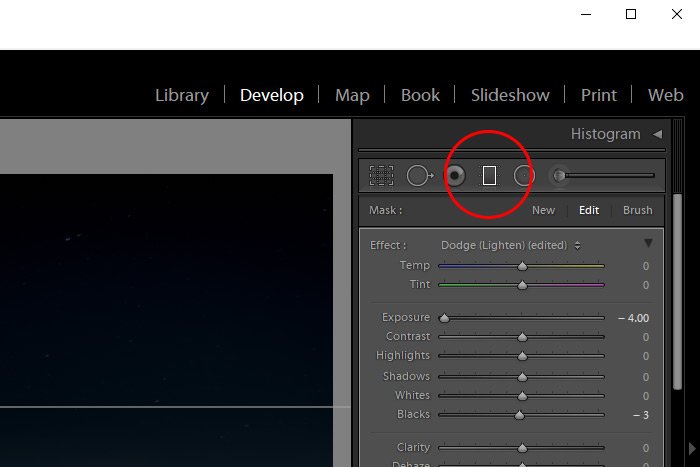
Okay, I’ve gone ahead and clicked the Graduated Filter icon in the right side of the Develop panel.

graduated-filter-icon.jpg

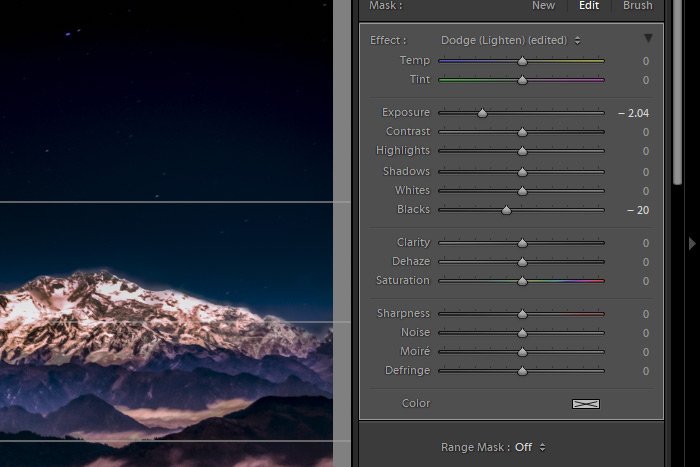
After that, I reduced the Exposure and Blacks values so they are -2.04 and -20 respectively. Here’s a screenshot of the sliders.

sliders.jpg

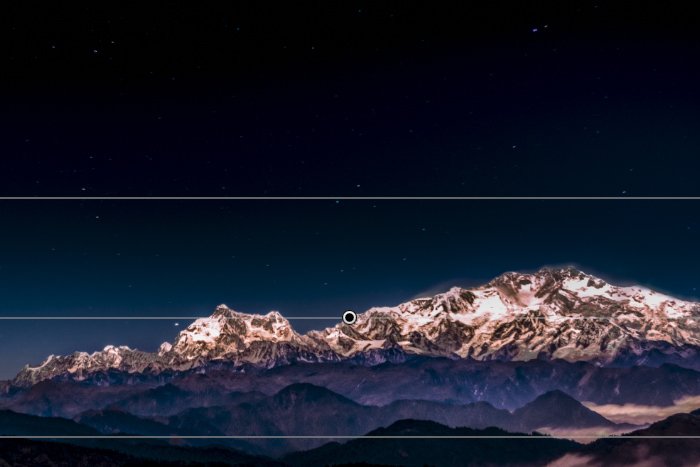
And here’s the output of the image as it stands.

output-1.jpg

Here’s the problem. While it doesn’t look like anything is wrong with this image, there is. the “darkness” of the filter I just added is covering up many of the stars and it’s also slightly reducing the illumination of the tops of the white mountains. Someone probably wouldn’t even notice this if they hadn’t seen the original version of this photo, but since we have, it’s too late. We know what it’s supposed to look like.

Activating the Luminance Range Mask​

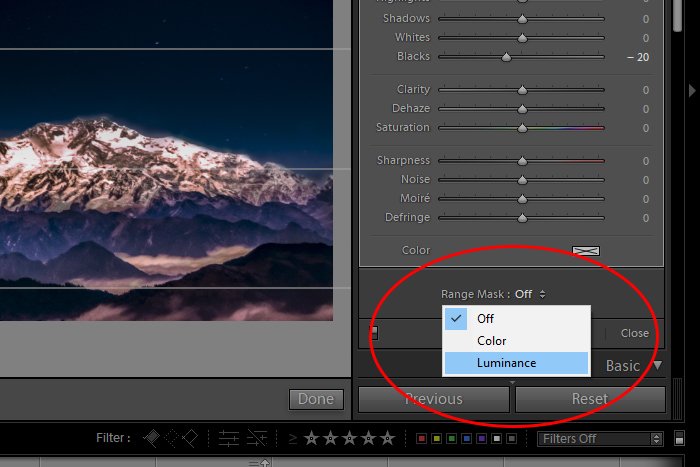
To correct this issue, I’m going to move down to the bottom are of the right panel and click the Range Mask drop-down box. When the box opens, I’ll select Luminance.

range-mask-drop-down.jpg

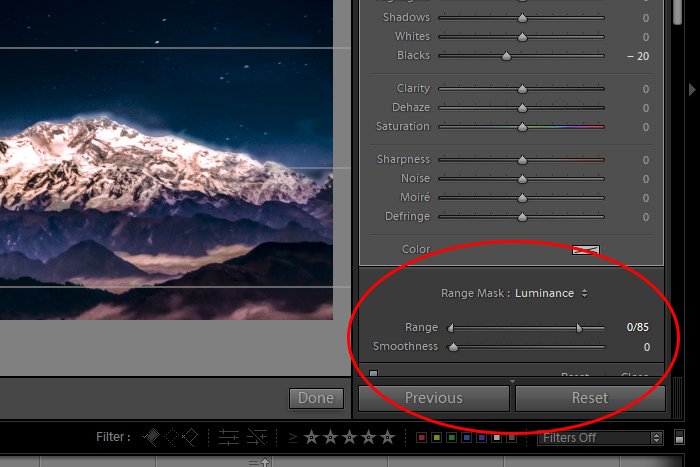
After I do that, two additional controls will appear in the form of sliders. These two sliders are labeled Range and Smoothness.

range-smoothness-sliders.jpg

Okay, here’s the truth about these two sliders. They are going to need to be experimented with for you to get used to them. I’ll explain them below, but the results will still be unpredictable the first few times you use these things.

Think about the Range slider as a control for where you want the graduated filter effects to appear. As I stated up above, this slider can control which parts of this image the filter are applied to, so if I wanted the filter to affect only the bright areas, such as the stars and the white mountain tops, I can certainly make that happen. Of, if I wanted this filter to ignore the stars and white mountain tops, I can make that happen as well. All I need to do is push each of the small slider controls to the left or the right to find that sweet spot of what I’m after. In this case, I kept the left control where it originated at the value and pushed the right control to the left until it had a value of 85.

The Smoothness slider does exactly what you think it should do. It smooths out the transition between the area the luminance mask is affecting and the area that mask isn’t affecting. The higher the Smoothness value, the smoother the transition. If I were to keep this slider all the way to the left so it had a very low value, the transition would be sharp and abrupt. Since I’m looking for something more realistic, I’ll push the slider to the right until is has a value of 65. That’s nice and smooth.

Now I’m looking at a much better result.

luminance-adjusted.jpg

Here’s the final image, which is slightly more exciting than the original.

final-image-3.jpg

I just want to tell you that there are a zillion different uses for this range mask and tons of different possible results you might see. You really need to play around with this tool to get a gauge of what type of effect you can conjure up from it. What I showed you above is a good start.

I hope I clearly explained how to use the Luminance Range Mask feature in Adobe Lightroom. If you have any questions regarding this post, please leave them in the comment section down below. Thanks for reading!
 
WendyMay

WendyMay

Member
Joined
May 11, 2021
Messages
142
Reaction Score
0
Points
21
  • #4

Brightening & Coloring with the Color Mask in Adobe Lightroom​

I think I’m going to mess around in Adobe Lightroom today, just for practice. Out of all the Adobe applications I use, Lightroom sees the least amount of daylight. I’ve said it a million times, my workflow consists of Bridge to Camera Raw to Photoshop. If you aren’t aware, Lightroom is sort of a combination of Bridge and Camera Raw. I generally prefer to keep my applications separate because of simplicity, but that’s not to say that Lightroom isn’t awesome. It is and that’s why I like to stay up to snuff on what it can do.

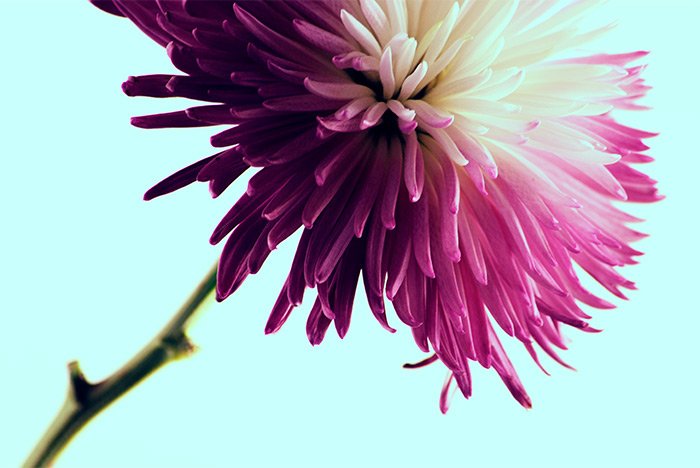
In today’s post, I’m going to change some aspects of a flower photograph. As it stands, the image is kind of dull. I don’t like the background color very much and the flower itself can use some work. Not much, mind you, but just enough to make it interesting. I guess I want to see thing pop or zing or whatever you call it. I want the flower to stand out more.

To adjust this image, I’ll use the Radial Filter and Adjustment Brush features of Adobe Lightroom. I’ve found that it’s easy to get rusty with these tools if they’re not used that much. When combined with the Color Range Mask, things can get even more confusing after a while. That’s why I wanted to undertake this small project.

The Original Photo​

Here’s what I’ll be working with. This image is already imported into Lightroom, so I can hit the ground running with the filters and color mask.

purple-flower.jpg

Brightening the Background with the Radial Filter​

My goal with this first step is to simply lighten the background of the image. It’s currently got a weird looking blue/green thing going on and I don’t like it. I’d much prefer something that’s clean and white.

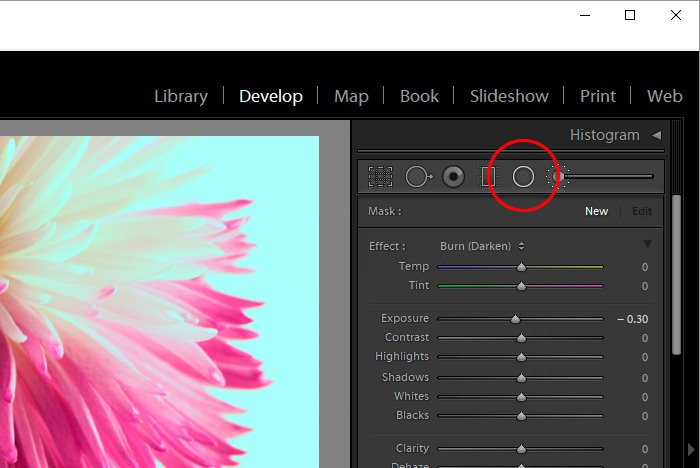
To brighten the background, I’ll select the Radial Filter tool located at the top of the right panel.

radial-filter.jpg

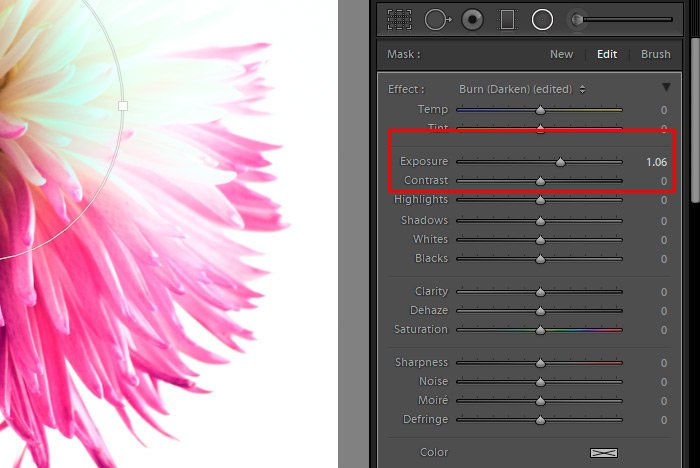
Once selected, I’ll draw a circle on top of the flower. After that, I’ll raise the exposure value until I see the background change from the green to pure white. If the Invert box is checked below the sliders, I’ll uncheck it because I want the effect to be seen outside the radial, not inside. All other sliders will remain in their default positions.

exposure-radial.jpg

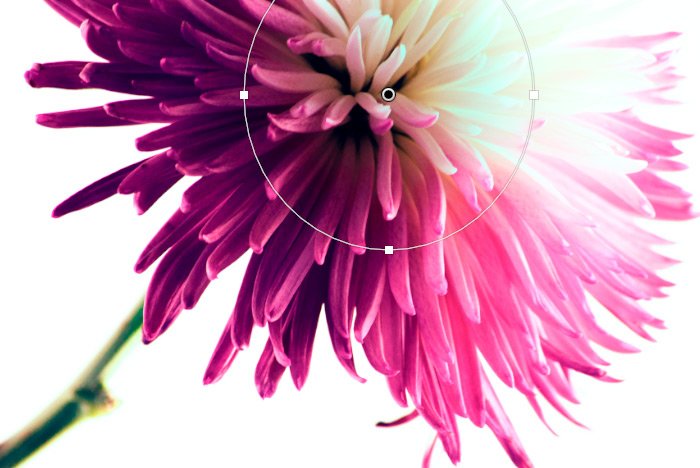
Here’s the result of this action.

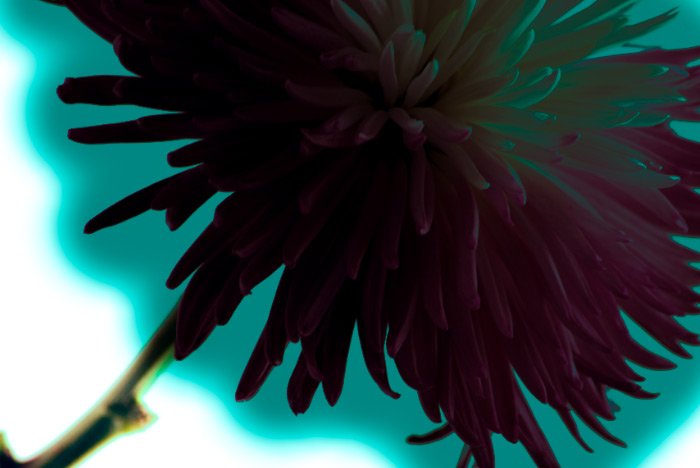
brightened-background.jpg

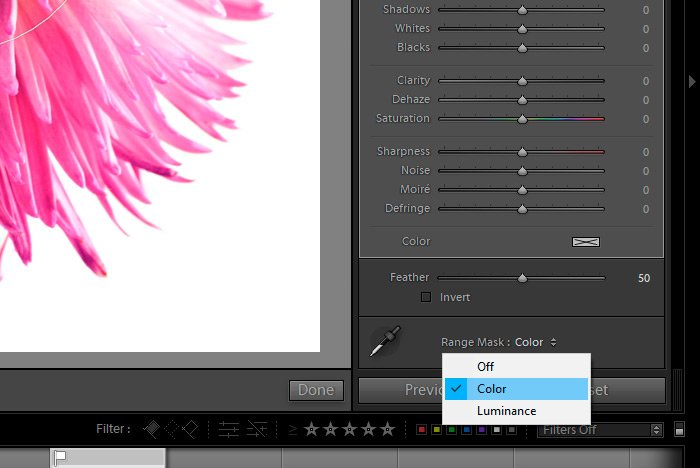
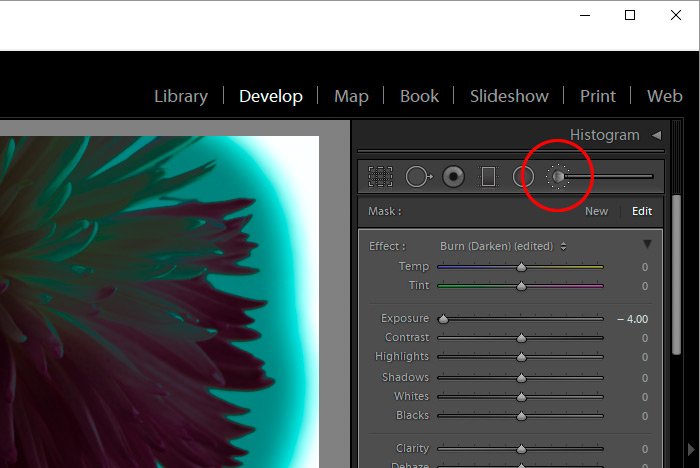
As you may have noticed, the overexposure adjustment I just made to the background was also applied to the flower itself. Since I don’t want the flower to be touched yet, I’ll need to mask that part out. This is where the Color Range Mask comes into play. To activate this mask, I’ll head down to the bottom of the slider area of the Radial Filter panel and click the small Range Mask drop-down.

color-range-mask.jpg

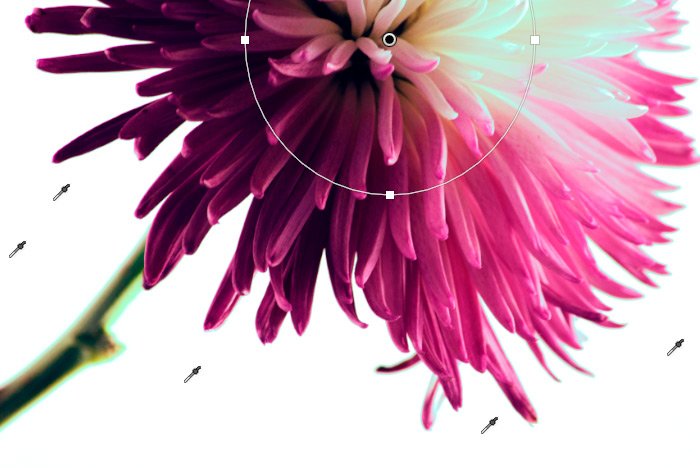
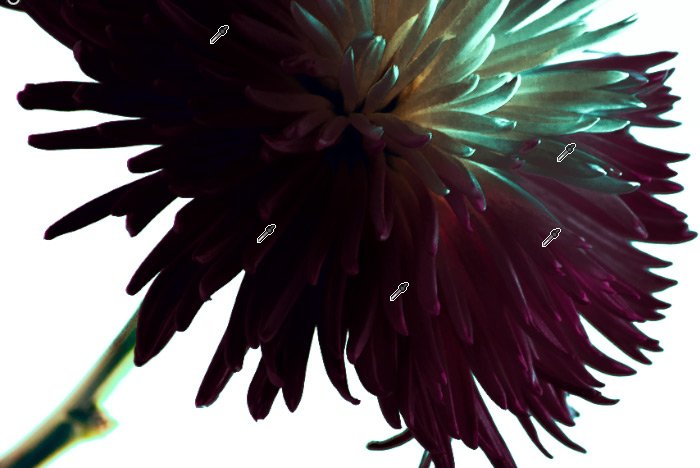
Inside of that, I’ll click Color. Finally, I’ll click on the small dropper tool that sits just to the left of the drop-down and then I’ll click everywhere I want the radial filter effect applied.

range-mask-selections.jpg

Since I wanted to be thorough, I held down the Shift key on my keyboard and clicked multiple times. Doing this takes the various color gradients of the background into account. If the background were completely solid, I’d only need to click once.

As you may have noticed, after making those selections, the flower reverted back to being unaffected by the Radial Filter. That’s exactly what I wanted to happen.

Adjusting & Colorizing the Flower​

Now comes the fun part. I really don’t know what I’m going to do to the flower yet, so I’ll have to engage in some experimenting. At least I know the process. This time though, I’ll be using the Adjustment Brush because I’d like to paint over the flower area as opposed to using one of the filters. I suppose I could use either the Graduated Filter or the Radial Filter, but I think the Adjustment Brush will give me better results. I’ll need to mask any areas “outside the lines” again though, but that’s easy.

To start off, I’ll click the word New at the top of the right panel to step away from the Radial Filter and then I’ll click on the Adjustment Brush icon.

adjustment-brush.jpg

After that, I’ll make some crazy adjustment to one of the sliders and then paint over the area of the flower I’d like to customize. The reason for the crazy adjustment is to make it obvious where I’ve painted. If there’s no adjustment, my painting will be invisible and I’ll have difficulty seeing what I’m doing.

Here’s the result of my painting.

painting.jpg

Pretty ugly, I know. At this point though, I can mask out the background, since I don’t want that affected at all by the changes I’m about to make. To do this, I’ll head back down to the area under the sliders and I’ll click on the Range Mask: Color options once more. Then, I’ll hold down the Shift key again and click a few times around the purple of the flower. I forgot to mention this above, but the maximum amount of samples I can take when holding Shift is five. That’s all Lightroom allows.

adjustment-brush-mask.jpg

Do you see how my adjustment now only affects the flower? Now, I have two adjustments; one for the background and one for the flower. They are distinct from one another and editable at any time.

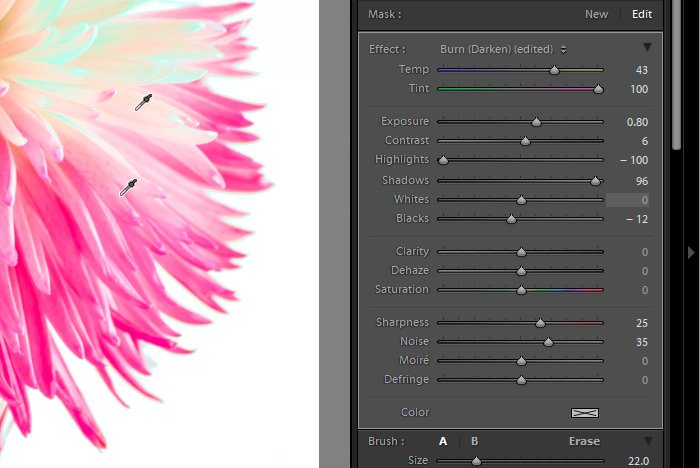
Now that everything is set, I can go ahead with my slider adjustments. As I mentioned above, I’d like the flower to come alive. This will require some brightening and coaxing of the colors. These are some of the adjustments I made in the Adjustment Brush panel.

slider-adjustments.jpg

And here is the final image. I’d say it’s a pretty big improvement over the original.

final-purple-flower-image.jpg

Mind you, I could have gone in any direction with this image, once the adjustment areas were created and properly masked. I chose to keep things tame, but I’m sure I could have swapped a few colors around here and there. This is good though and I’m very happy with the results.

——

I hope I clearly demonstrated how to use the Radial Filter tool, the Adjustment Brush tool and the Range Mask options in Adobe Lightroom. If you have any questions regarding this post, please let me know in the comment area below. Thanks for reading!
 
Top