15Katey
Member
- Joined
- May 10, 2021
- Messages
- 130
- Reaction Score
- 0
- Points
- 23
- #1
When editing images in Adobe Lightroom, the last thing you want to happen is to get bogged down by repetitive tasks. If you’ve been using Lightroom for any amount of time, you surely know how cumbersome things can get by repeating the same slider movements over and over again when editing multiple images. After a few times of doing that, you have to ask yourself what in the heck you’re doing. I mean, there has to be a better way, right? Well, for those of you who mass-edit similarly lighted photographs, I have some really handy tips for you. You’re going to absolutely love this.
In today’s post, I’d like to show you the process for copying and synchronizing edits across one or more images in Adobe Lightroom. I’ll use the photos I already have imported into Lightroom for this demonstration, just to keep things simple. Basically, I’ll make some edits to one primary photo and then I’ll apply those same changes, by using various techniques, to other single or multiple photographs. As you’ll quickly learn with what I’m about to show you, if taken advantage of, these steps can save you a ton of time.

I already have lots of photos imported into Lightroom, so I’ll go ahead and make sure I’m in the Develop panel. Then, I’ll find the demo image I’d like to work with and click its thumbnail to select it.
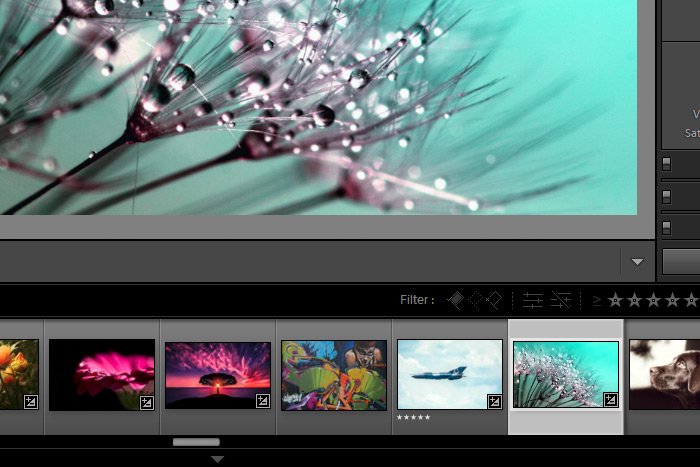
As you can see from the above screenshot, the teal water droplet thumbnail is now selected and the larger version of the image is showing in the center panel. At this point, I’ll head over to the Basic panel to push a few sliders around. I think I’ll push the Contrast, Highlights, Whites, Blacks and Clarity sliders in an effort to bring some more contrast out of the image. Here’s a screenshot of the Basic panel sliders.
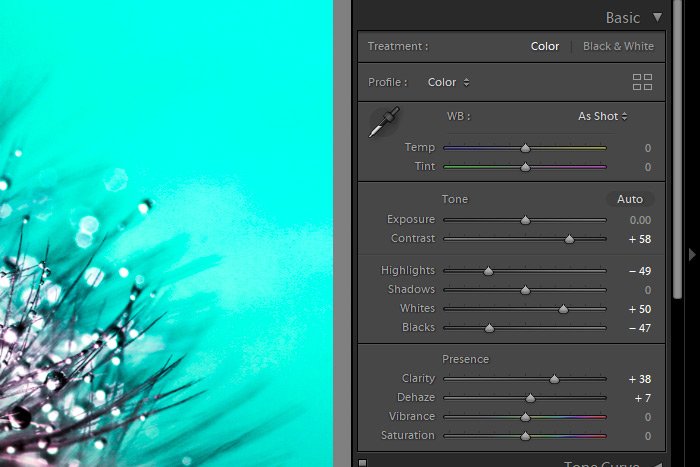
There’s nothing earth-shattering here. Just a few edits.
Let’s say that I had another photo that could use the same settings that I just applied. Instead of abandoning this one and moving onto the other one to repeat what I just did, I can actually copy the changes I just made and paste them onto the other photo. To do this, I’ll make sure the original image thumbnail is still selected and then I’ll head up to the Settings > Copy Settings menu item and click.
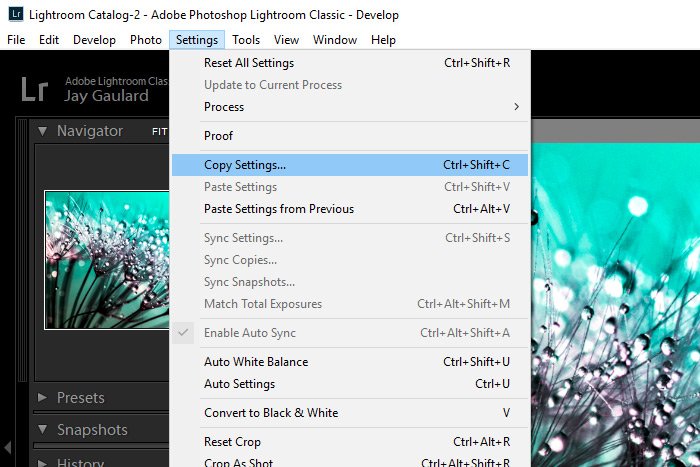
After I do this, the Copy Settings dialog box will appear.
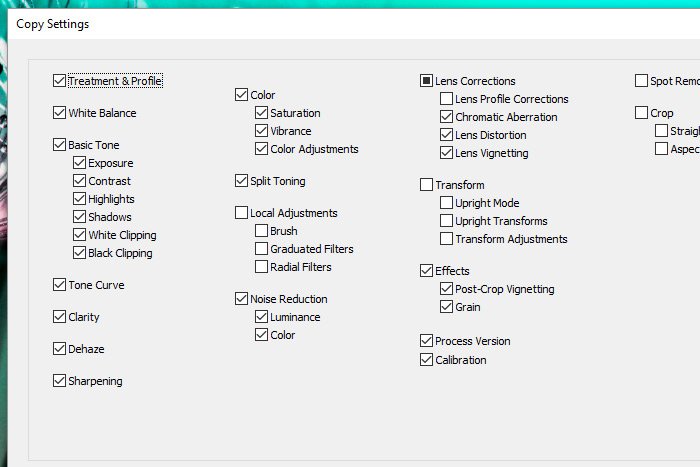
After checking the boxes of the attributes I’d like to copy over to the other image, I’ll click on the Copy button down at the bottom right corner. Once I click on the Copy, button, Lightroom will add what I’d like to copy to its memory. I can then move over to the other image’s thumbnail and click on that to select it. When I’m ready to paste, I’ll head back up to the Settings menu, but this time, I’ll click on Paste Settings.
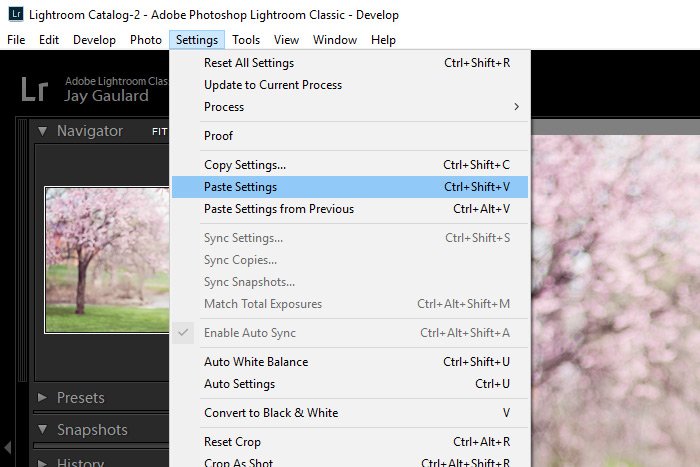
After I do that, I’ll see the sliders in the Basic panel for this image move automatically to the exact same positions they were in for the previous image. It’s that easy. Here’s the other image.
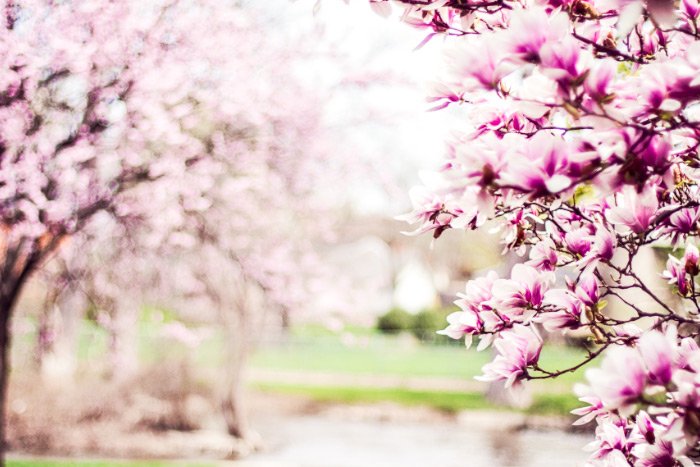
Even though this technique is intended for photo shoots that consist of many similar images, it works great for images that you know you want to make the same or similar changes to.
This next tip is somewhat simpler and faster than the one I just showed you. This time, to copy the changes I make to one image over to another one, all I have to do is press one button. To show you how to accomplish this, I’ll go ahead and apply some changes to the original photo again. I’ll just push the same sliders to the same positions I pushed them to earlier.
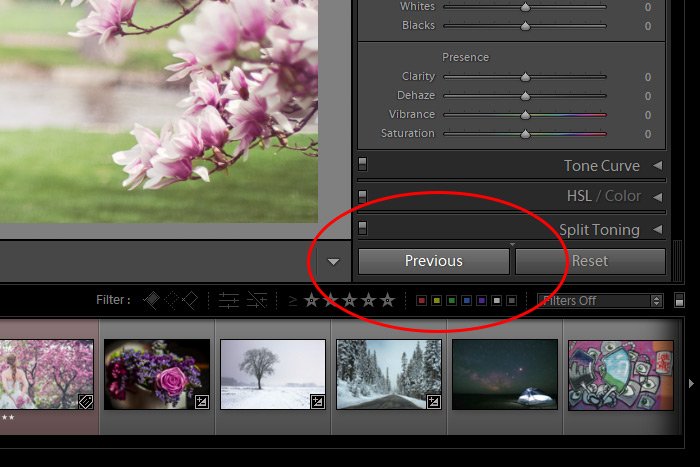
Now, if I want to copy the edits to the other image the faster way, all I would need to do is click on the other image’s thumbnail. Then, I would click the Previous button that’s at the bottom of the Basic panel. Once I do that, I’ll immediately see the previous changes applied to this new photograph.
Okay, let’s say I made edits to one original image, just like I did with the two previous examples I gave above. What would I need to do if I wanted to apply those same edits to more than one other image? What about two images? Or three, or four? Well, just like the previous example, this type of thing is very easy to accomplish.
I’ll go ahead and make my edits again to the original image. Then, I’ll find the other images (in this case, two) I’d like to apply the same edits to in the list of thumbnails. For this example, I’ll choose two random photos that have similar luminance values as the original image. I’ll click to select the first thumbnail of the new images and then I’ll hold down the Ctrl (Command on Mac) key on my keyboard and I’ll click on the second thumbnail I’d like to apply the changes to. Once I do that, I’ll head back to the Basic panel and I’ll click on the Sync button that’s located at the bottom of that panel.
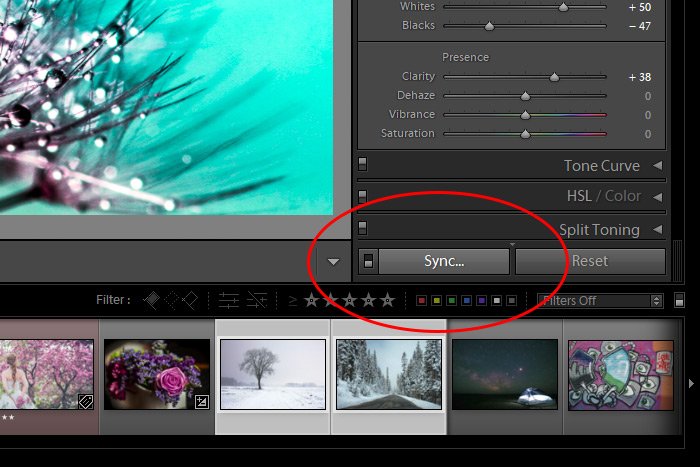
Note: If the Auto Sync button is showing instead of the Sync button, simply click on the small switch that’s located just to the left of the button. Doing that will flip between the two buttons.
You’ll notice that once you select more than one thumbnail in the filmstrip panel, the Previous button turns into the Sync button. Anyway, after I click the Sync button, the Synchronize Settings dialog box will appear, which looks remarkably similar to the dialog box we saw previously.
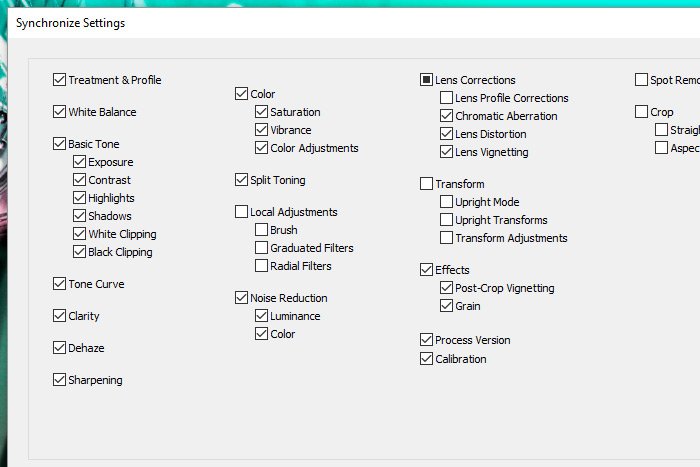
When the box appears, I’ll be sure the check the boxes for the attributes I’d like to apply across the other photos and then I’ll click on the Synchronize button that’s down in the lower right corner of the box. Doing this will promptly apply the previous edits to the two additional photographs. Here’s one of them.

The process I just described explains what to do if you want to apply edits to other images after they’ve already been made to one image. What if you wanted to simply synchronize a group of photographs so that any time you make a change to one, you’ll also make a change to the others in the group? Luckily, we can accomplish just this sort of thing in Lightroom.
To make edits to a group of photos in Lightroom, you’ll first need to select that group of photos. To do this, you’ll need to click one thumbnail, then hold down the Ctrl key on your keyboard and click the successive thumbnails until all of the photos you’re interested in editing have been selected. If the thumbnails are adjacent to one another, you can click on the first one and then hold the Shift key down and click on the last one. That will select all the thumbnails just as well.
The next thing you’ll need to do is to make sure the Sync button I just showed you is visible. Click that button and then when the dialog box pops up, be sure to check any box you feel is appropriate. After that, be sure to click on the Synchronize button at the bottom of the dialog box. Then, go back to the Sync button at the bottom of the Basic panel and click on the small switch that sits just to the left of the button. When you do that, the Auto Sync button will appear.
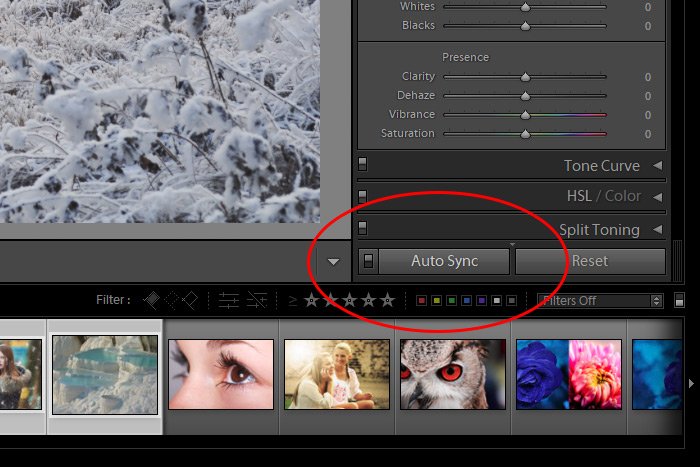
Finally, go ahead and make your changes to the image by pushing the appropriate sliders back and forth. There’s nothing you need to do to the Auto Sync button once it’s visible. You don’t need to click on it or anything. Basically, when you see that button visible after you followed the instructions above, Lightroom is in a “mode.” Any changes you make to one image in the group will be made to the others in the group. It’s that easy.
——
I hope I clearly explained how to copy and synchronize edits across single and multiple photographs in Adobe Lightroom. If you have any questions regarding this post, please let me know in the comment section below. Thanks for reading!
In today’s post, I’d like to show you the process for copying and synchronizing edits across one or more images in Adobe Lightroom. I’ll use the photos I already have imported into Lightroom for this demonstration, just to keep things simple. Basically, I’ll make some edits to one primary photo and then I’ll apply those same changes, by using various techniques, to other single or multiple photographs. As you’ll quickly learn with what I’m about to show you, if taken advantage of, these steps can save you a ton of time.
The Demo Photo
I have many demo photos, so I’ll just go ahead and choose something random. I think I’ll use this one below because it’s so similar in brightness to many others I have. By making alterations to this one, those alterations will also look just as good across a fair number of others.
Copying Edits From One Photo to Another
Okay, so the goal is to make one group of changes to one photo in Lightroom and then easily and efficiently apply those same changes to other photos in Lightroom. Sounds easy, doesn’t it? Well, that’s because it is. I’ll show you exactly how to do it.I already have lots of photos imported into Lightroom, so I’ll go ahead and make sure I’m in the Develop panel. Then, I’ll find the demo image I’d like to work with and click its thumbnail to select it.

As you can see from the above screenshot, the teal water droplet thumbnail is now selected and the larger version of the image is showing in the center panel. At this point, I’ll head over to the Basic panel to push a few sliders around. I think I’ll push the Contrast, Highlights, Whites, Blacks and Clarity sliders in an effort to bring some more contrast out of the image. Here’s a screenshot of the Basic panel sliders.

There’s nothing earth-shattering here. Just a few edits.
Let’s say that I had another photo that could use the same settings that I just applied. Instead of abandoning this one and moving onto the other one to repeat what I just did, I can actually copy the changes I just made and paste them onto the other photo. To do this, I’ll make sure the original image thumbnail is still selected and then I’ll head up to the Settings > Copy Settings menu item and click.

After I do this, the Copy Settings dialog box will appear.

After checking the boxes of the attributes I’d like to copy over to the other image, I’ll click on the Copy button down at the bottom right corner. Once I click on the Copy, button, Lightroom will add what I’d like to copy to its memory. I can then move over to the other image’s thumbnail and click on that to select it. When I’m ready to paste, I’ll head back up to the Settings menu, but this time, I’ll click on Paste Settings.

After I do that, I’ll see the sliders in the Basic panel for this image move automatically to the exact same positions they were in for the previous image. It’s that easy. Here’s the other image.

Even though this technique is intended for photo shoots that consist of many similar images, it works great for images that you know you want to make the same or similar changes to.
Applying the Previous Settings
At this point, I’m going to go ahead and reset everything I just did, so I can start back at the beginning. To reset the sliders for both images, I’ll simply press the Reset button that sits at the bottom of the Basic panel.This next tip is somewhat simpler and faster than the one I just showed you. This time, to copy the changes I make to one image over to another one, all I have to do is press one button. To show you how to accomplish this, I’ll go ahead and apply some changes to the original photo again. I’ll just push the same sliders to the same positions I pushed them to earlier.
Now, if I want to copy the edits to the other image the faster way, all I would need to do is click on the other image’s thumbnail. Then, I would click the Previous button that’s at the bottom of the Basic panel. Once I do that, I’ll immediately see the previous changes applied to this new photograph.

Syncing & Auto-Syncing Edits Among Multiple Images
So far, I’ve shown you how to copy edits from one image to one other image in Adobe Lightroom. At this point, I think it would be helpful if I demonstrated how to copy edits from one image to multiple images. The term that’s used to describe this process is called “syncing.” We’re going to synchronize settings across images. I’ll show you exactly how to do this below.Okay, let’s say I made edits to one original image, just like I did with the two previous examples I gave above. What would I need to do if I wanted to apply those same edits to more than one other image? What about two images? Or three, or four? Well, just like the previous example, this type of thing is very easy to accomplish.
I’ll go ahead and make my edits again to the original image. Then, I’ll find the other images (in this case, two) I’d like to apply the same edits to in the list of thumbnails. For this example, I’ll choose two random photos that have similar luminance values as the original image. I’ll click to select the first thumbnail of the new images and then I’ll hold down the Ctrl (Command on Mac) key on my keyboard and I’ll click on the second thumbnail I’d like to apply the changes to. Once I do that, I’ll head back to the Basic panel and I’ll click on the Sync button that’s located at the bottom of that panel.

Note: If the Auto Sync button is showing instead of the Sync button, simply click on the small switch that’s located just to the left of the button. Doing that will flip between the two buttons.
You’ll notice that once you select more than one thumbnail in the filmstrip panel, the Previous button turns into the Sync button. Anyway, after I click the Sync button, the Synchronize Settings dialog box will appear, which looks remarkably similar to the dialog box we saw previously.

When the box appears, I’ll be sure the check the boxes for the attributes I’d like to apply across the other photos and then I’ll click on the Synchronize button that’s down in the lower right corner of the box. Doing this will promptly apply the previous edits to the two additional photographs. Here’s one of them.

The process I just described explains what to do if you want to apply edits to other images after they’ve already been made to one image. What if you wanted to simply synchronize a group of photographs so that any time you make a change to one, you’ll also make a change to the others in the group? Luckily, we can accomplish just this sort of thing in Lightroom.
To make edits to a group of photos in Lightroom, you’ll first need to select that group of photos. To do this, you’ll need to click one thumbnail, then hold down the Ctrl key on your keyboard and click the successive thumbnails until all of the photos you’re interested in editing have been selected. If the thumbnails are adjacent to one another, you can click on the first one and then hold the Shift key down and click on the last one. That will select all the thumbnails just as well.
The next thing you’ll need to do is to make sure the Sync button I just showed you is visible. Click that button and then when the dialog box pops up, be sure to check any box you feel is appropriate. After that, be sure to click on the Synchronize button at the bottom of the dialog box. Then, go back to the Sync button at the bottom of the Basic panel and click on the small switch that sits just to the left of the button. When you do that, the Auto Sync button will appear.

Finally, go ahead and make your changes to the image by pushing the appropriate sliders back and forth. There’s nothing you need to do to the Auto Sync button once it’s visible. You don’t need to click on it or anything. Basically, when you see that button visible after you followed the instructions above, Lightroom is in a “mode.” Any changes you make to one image in the group will be made to the others in the group. It’s that easy.
——
I hope I clearly explained how to copy and synchronize edits across single and multiple photographs in Adobe Lightroom. If you have any questions regarding this post, please let me know in the comment section below. Thanks for reading!
