WendyMay
Member
- Joined
- May 11, 2021
- Messages
- 142
- Reaction Score
- 0
- Points
- 21
- #1
Have you ever taken a photo and then inspected it in a post-processing application such as Adobe Lightroom, Camera Raw or Photoshop and noticed that some of the edges are glowing red, green or blue? It’s a strange phenomenon and it’s so common that it’s almost something that we don’t even notice anymore. If there aren’t many edges and if you’re using a high quality lens under optimal lighting conditions, you may not notice these edges, but if you’re shooting trees, landscapes or just about anything else with wide angle lenses in bright conditions, parts of your photo may appear to have a slight tint to them. Actually, this type of thing can affect photos in so many situations, I don’t want to limit it to those I just mentioned. And really, it’s a clarity thing because if you’ve got too much chromatic aberration going on in your photos, you’ll lose some of the image’s definition.
What is “chromatic aberration”? Well, simply put, it’s when a camera lens fails to concentrate the light that’s traveling through it properly. The official definition is this:
In optics, chromatic aberration is a failure of a lens to focus all colors to the same point. It is caused by dispersion: the refractive index of the lens elements varies with the wavelength of light. The refractive index of most transparent materials decreases with increasing wavelength.
The result of having light misbehave is the glowing edges I just mentioned above. Again, you may not notice this. I just inspected a whole bunch of photos and I had to truly look for it. And when I finally saw it, I was surprised because it was so obvious. After all these years, I think I’ve tuned this type of defect out.
In today’s post, I’ll show you how to remove color fringing, or “chromatic aberration,” from your images using either Adobe Camera Raw or Adobe Lightroom. I took a bunch of photos last weekend of a few scenes here in Maine and after zooming in on the tree leaves off in the distance, I noticed some red/magenta edges. And on the stones that are in the foreground of the shots, there are some blue/aqua edges. This is easy enough to fix and since the controls are exactly the same in both applications, I figured I’d write one post to cover both.

I’m still in the middle of editing these photos, but you get the idea.
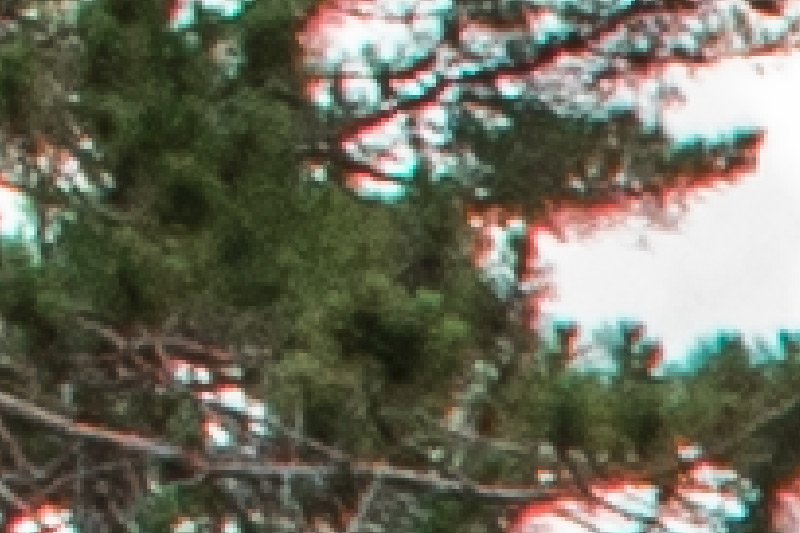
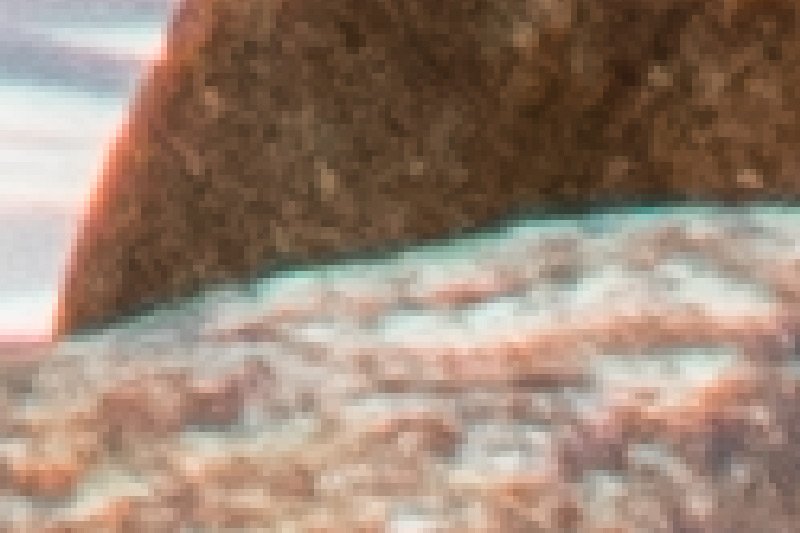
I bet you didn’t notice this before. As I said, it’s fairly hidden, but if there’s too much of it, it can cause an odd looking color-cast in your photos. If you have no idea what I’m referring to, look at the red glow on the undersides of the branches and the blue glow on the top edge of the rock in the second photo.
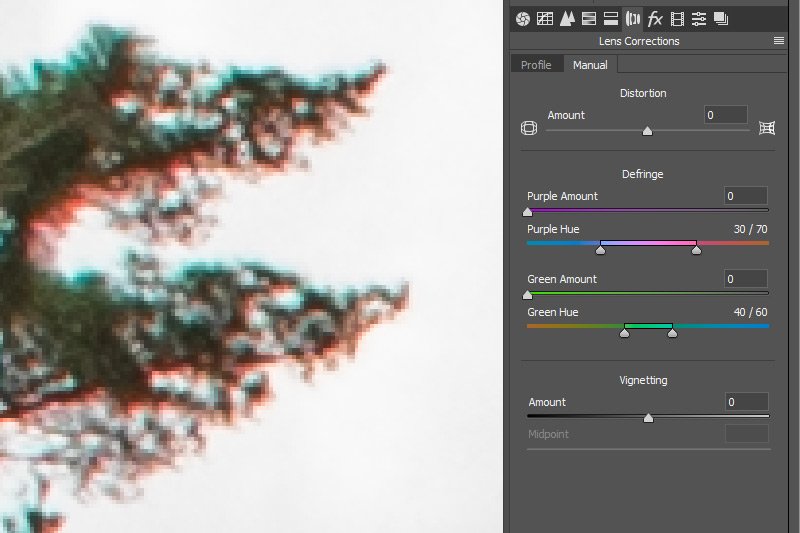
In the Defringe sections of this panel, you’ll see four sliders. The top section includes the Purple Amount and Purple Hue sliders and the bottom section includes the Green Amount and Green Hue sliders. The trick to removing the color fringing from each section of your image is to first identify what the offending color is and then reduce it just enough as to not affect too much of the photo.
For this reddish fringe that’s sitting below the tree branches, I’ll push the Purple Hue slider all the way to the right (I’ll click on the slider, between the two handles and drag to the right). What I’m doing in this step is matching the hue in the slider to the hue in the photo. Next, I’ll click and drag the Purple Amount slider to the right, just until I see the fringe disappear and turn gray.
Actually, I just noticed that these branches have both purple and green fringing, so I’ll push the green sliders as well. Here are their new positions. I didn’t even notice this blue/green fringe before. See what I’m talking about?
If you’re following along with your own photo, you’ll notice that you may have to push the Purple and Green Hue sliders back and forth a bit. If you go too far, you’ll replace the original color with something else. It’s important that you match the color exactly. Luckily, this isn’t too difficult. It will require some trial and error though.
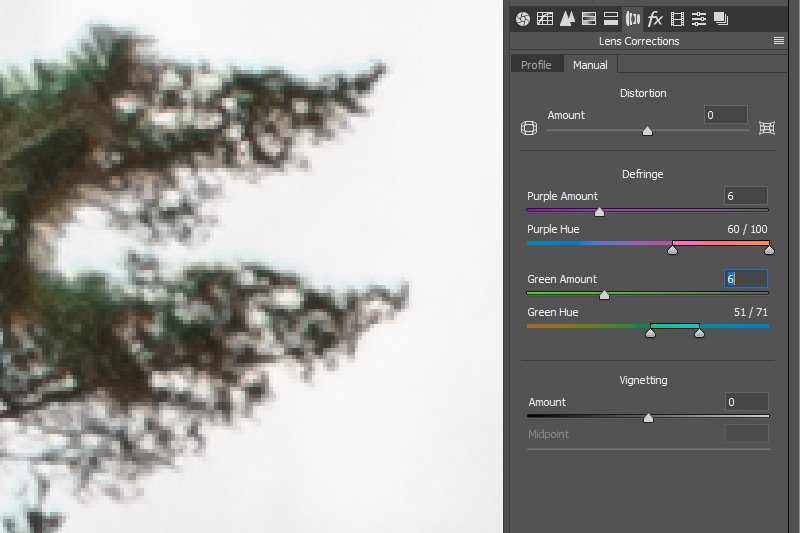
Once you do this, you’re done! That was easy, wasn’t it? In the above screenshot, you can see how there’s no more fringing.
If you have any questions about how to remove the color fringing from your photos, please ask down below. Thanks for reading!
What is “chromatic aberration”? Well, simply put, it’s when a camera lens fails to concentrate the light that’s traveling through it properly. The official definition is this:
In optics, chromatic aberration is a failure of a lens to focus all colors to the same point. It is caused by dispersion: the refractive index of the lens elements varies with the wavelength of light. The refractive index of most transparent materials decreases with increasing wavelength.
The result of having light misbehave is the glowing edges I just mentioned above. Again, you may not notice this. I just inspected a whole bunch of photos and I had to truly look for it. And when I finally saw it, I was surprised because it was so obvious. After all these years, I think I’ve tuned this type of defect out.
In today’s post, I’ll show you how to remove color fringing, or “chromatic aberration,” from your images using either Adobe Camera Raw or Adobe Lightroom. I took a bunch of photos last weekend of a few scenes here in Maine and after zooming in on the tree leaves off in the distance, I noticed some red/magenta edges. And on the stones that are in the foreground of the shots, there are some blue/aqua edges. This is easy enough to fix and since the controls are exactly the same in both applications, I figured I’d write one post to cover both.
Demo Photo
Okay, this is a picture I took of the Carrabassett River in Carrabassett Valley, Maine last Sunday. Check it out.
I’m still in the middle of editing these photos, but you get the idea.
The Up-Close
I know that you can’t see what I’m referring to in the image above. I’ll go ahead and zoom in to show you exactly what’s happened.

I bet you didn’t notice this before. As I said, it’s fairly hidden, but if there’s too much of it, it can cause an odd looking color-cast in your photos. If you have no idea what I’m referring to, look at the red glow on the undersides of the branches and the blue glow on the top edge of the rock in the second photo.
Fixing Color Fringing
Let’s get to the removing the color fringe instructions now. This is a super simple thing to do. In Camera Raw, I’ll click into the Lens Corrections tab and in Lightroom, I’ll do the same. In Lightroom, this section is inside of the Develop module. Here’s a screenshot from Camera Raw. Again, the controls in both applications are identical.
In the Defringe sections of this panel, you’ll see four sliders. The top section includes the Purple Amount and Purple Hue sliders and the bottom section includes the Green Amount and Green Hue sliders. The trick to removing the color fringing from each section of your image is to first identify what the offending color is and then reduce it just enough as to not affect too much of the photo.
For this reddish fringe that’s sitting below the tree branches, I’ll push the Purple Hue slider all the way to the right (I’ll click on the slider, between the two handles and drag to the right). What I’m doing in this step is matching the hue in the slider to the hue in the photo. Next, I’ll click and drag the Purple Amount slider to the right, just until I see the fringe disappear and turn gray.
Actually, I just noticed that these branches have both purple and green fringing, so I’ll push the green sliders as well. Here are their new positions. I didn’t even notice this blue/green fringe before. See what I’m talking about?
If you’re following along with your own photo, you’ll notice that you may have to push the Purple and Green Hue sliders back and forth a bit. If you go too far, you’ll replace the original color with something else. It’s important that you match the color exactly. Luckily, this isn’t too difficult. It will require some trial and error though.

Once you do this, you’re done! That was easy, wasn’t it? In the above screenshot, you can see how there’s no more fringing.
If you have any questions about how to remove the color fringing from your photos, please ask down below. Thanks for reading!
