KodyWallice
Member
- Joined
- May 7, 2021
- Messages
- 123
- Reaction Score
- 1
- Points
- 23
- #1
Adobe Photoshop is full of automated tools that we, as photographers and designers, can take advantage of. One group of such tools are called Photo Filters. These filters can be added as an adjustment layer and can give a photograph an entirely new mood. If you want to warm a photo up, you can do that. If you want to cool it down, you can do that too. If you simply want to add some of a specific color to a photo and then adjust how much of the color is actually added, you can even do that as well. Photo filters are quite versatile and should be included in every photographer’s bag of tricks.
In today’s post, I’ll use a demo photo to walk through the process of adding and adjusting a photo filter in Adobe Photoshop. I’ll show you the multiple methods for applying an adjustment layer, which one to apply and how to go about making selections from the pre-set filters. I’ll even demonstrate how you can edit the color of the filter and how you can adjust the density of that color.

Now, just to let you know, I did some editing to this image in Camera Raw before I launched it into Photoshop. I cleaned a few things up and added some vibrancy. Now, it’s got some good color going on.
How to Use the Gradient Tool with Adjustment Layers in Adobe Photoshop
Adding Color: Blend Modes & Adjustments in Adobe Photoshop
How To Adjust Brightness & Contrast In Adobe Photoshop
Using the Adobe Photoshop Curves Tool For Photography
Using the Levels Adjustment in Adobe Photoshop for Photography
If you do take a look at the posts I just linked to, I think you’ll get a strong handle on how these things work. In today’s post, I’ll merely continue on with a different type of adjustment layer.
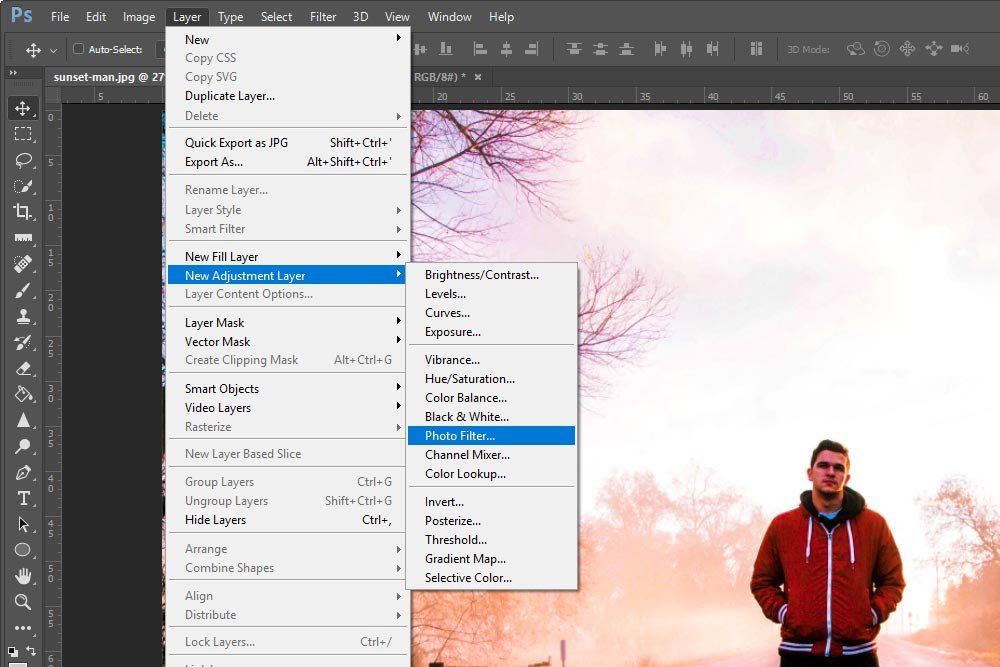
To apply the photo filter adjustment layer, we’ve got three choices. We can either visit the Layer > New Adjustment Layer > Photo Filter menu item and select that.
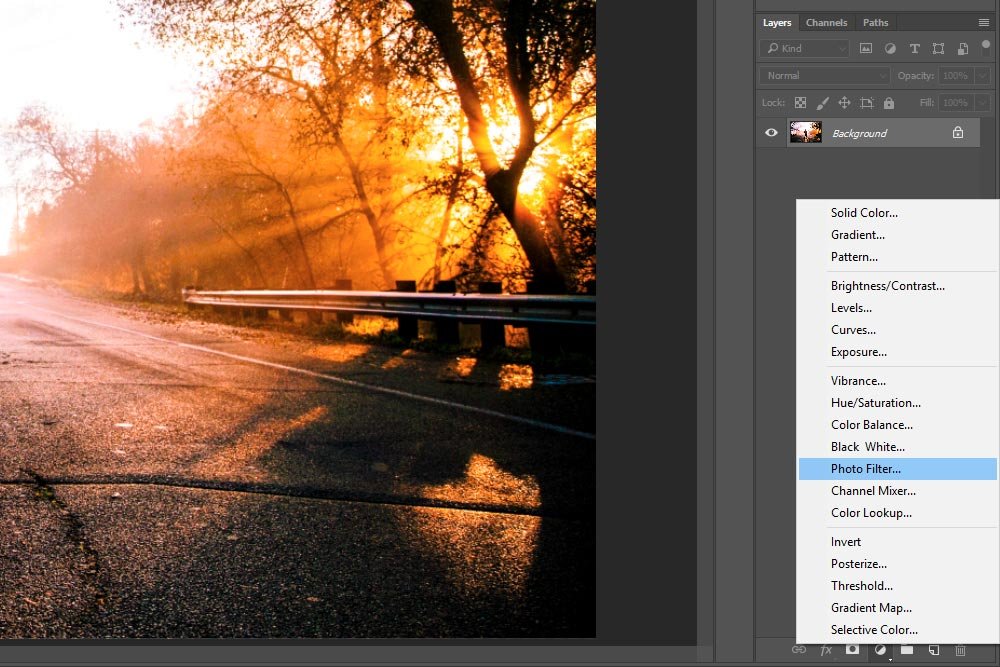
Or, we can click the Create New Fill or Adjustment Layer button down at the bottom of the Layers panel and then click the Photo Filter menu item.
Finally, we can simply click on the Photo Filter button in the Adjustments panel. This one is my favorite because I generally have this panel open and the buttons are easy to find.
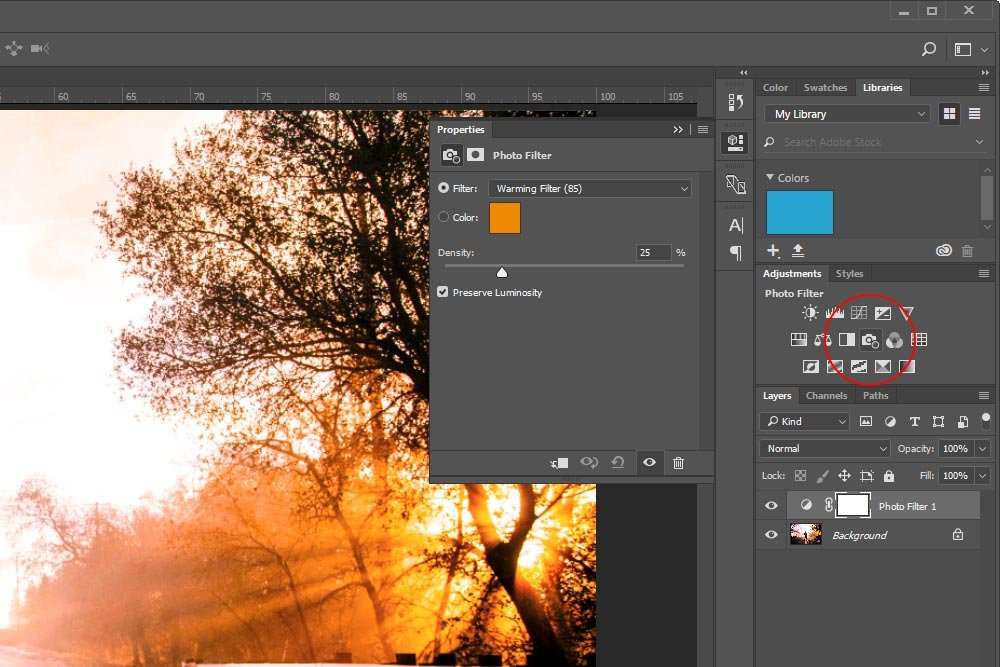
Whichever method you choose, you’ll ultimately end up with a new adjustment layer in the Layers panel and the Properties panel for that adjustment open as well. You can see both of these areas in the above screenshot.
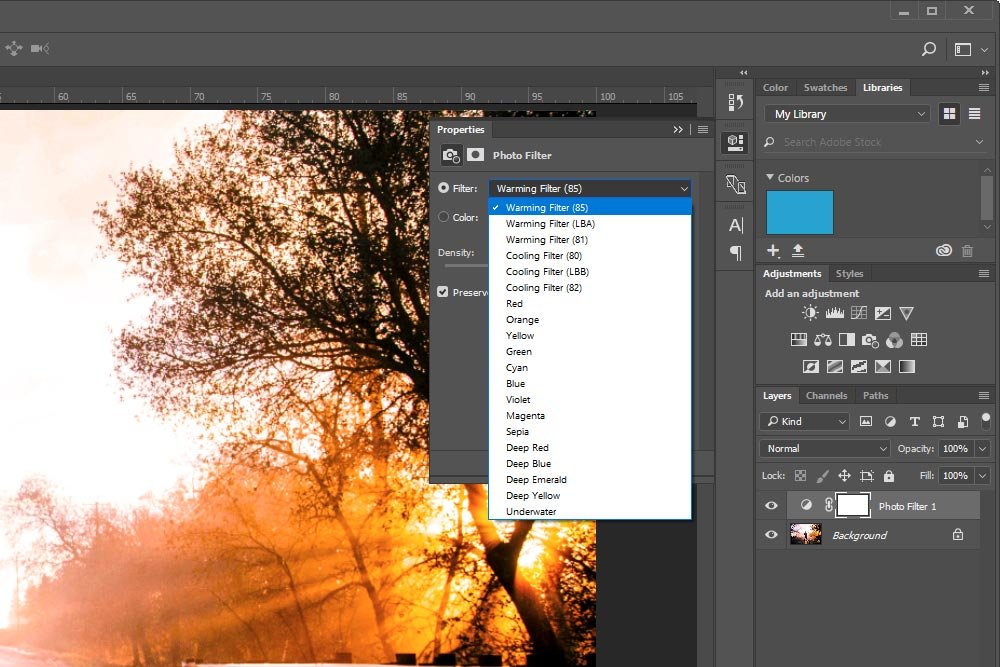
Doing this will give my a photo that looks like this:

That doesn’t look all that much different than the original.
Next, I’ll see what a cooling filter looks like. I’ll click on the drop-down box again and this time, I’ll select Cooling Filter (82). This will give me a photo that looks like this:

Can you see the difference between the two? I sure can. They both gave distinct color-casts to the photograph.
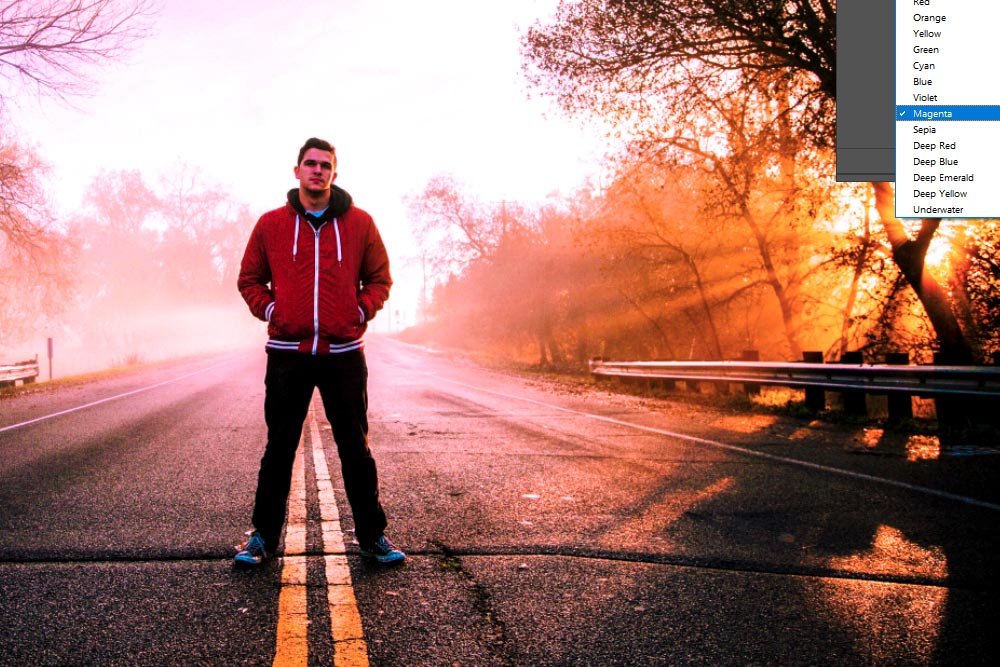
I can even go into the same drop-down and apply a color cast to the photo using straight colors. In this case, I chose to apply Magenta to the photo which gave everything a reddish hue.
By now, I’m sure you’ve got the wheels in your head turning. The possibilities…
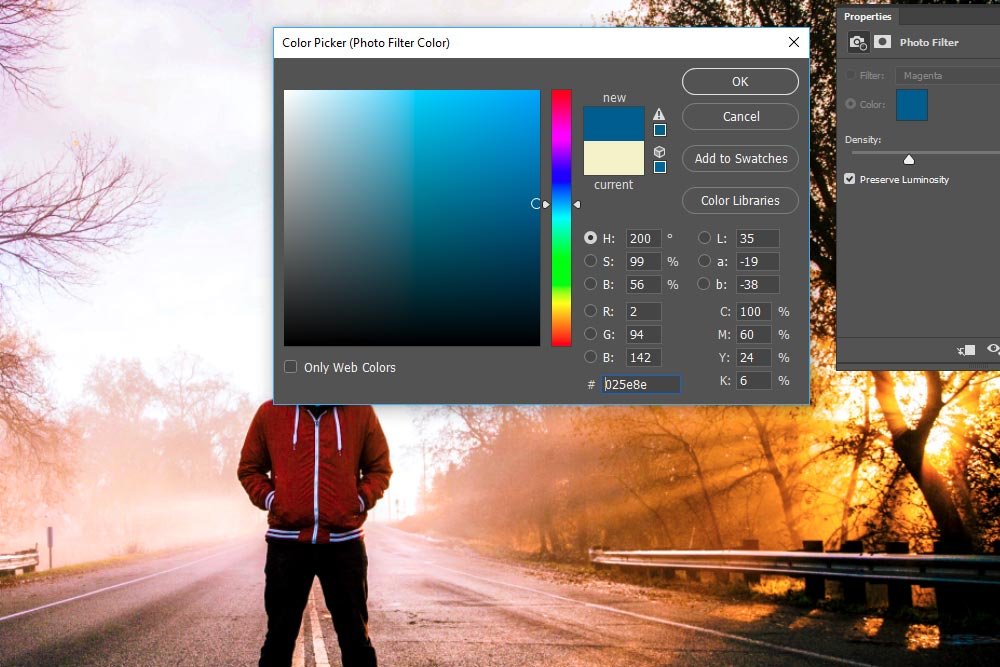
After I select the color, all I have to do is click OK to apply it as a photo filter.
In the screenshot above, I applied the color blue to the photo. It looks okay, but what I really want is the color blue to take the photo over. I want to see a lot of blue. To accomplish this, I’ll push the Density slider all the way to the right, so it reads 100%.
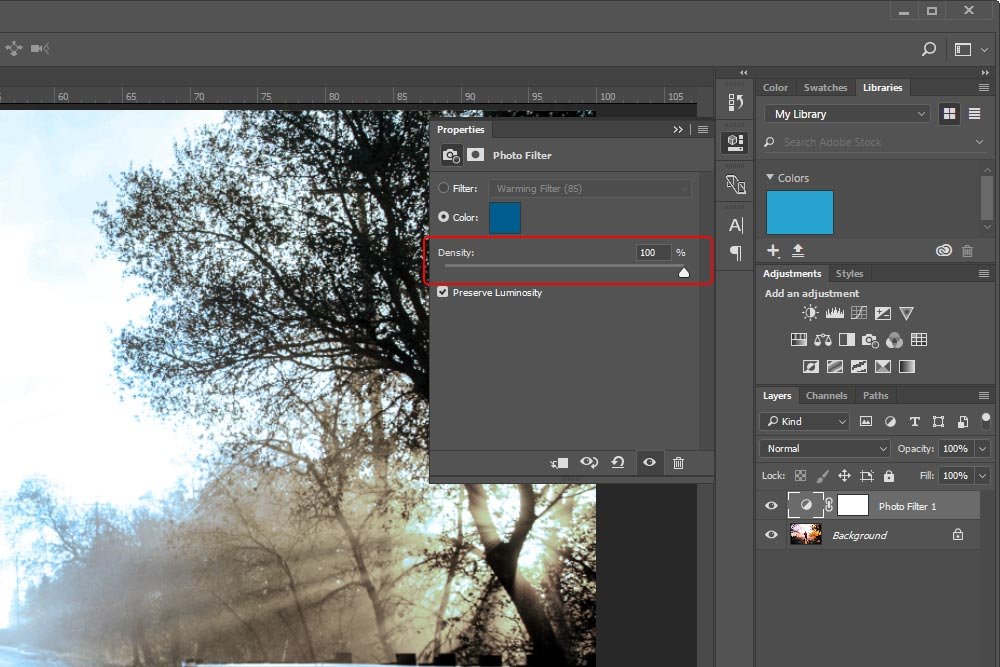
Doing this will give me this result:

That’s what I’m talking about!
Oftentimes, when you really crank up the density of a photo filter color, the photo will get a lot darker. To combat this, you can keep the Preserve Luminosity check box checked off.
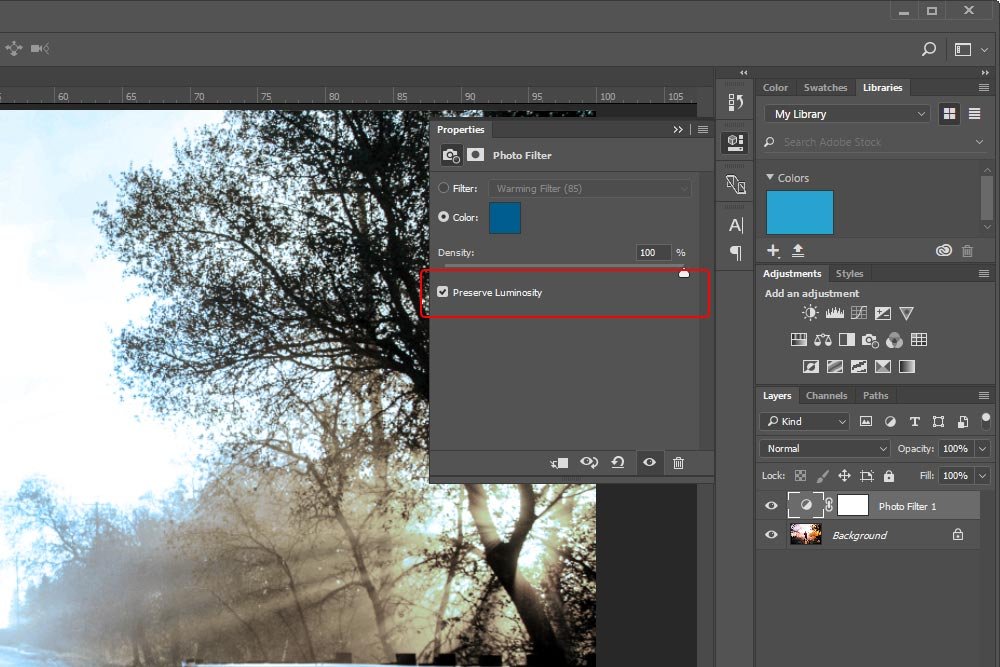
To give you an idea of how dark things can get, I’ll show you a split photo. The left side will have the Preserve Luminosity box checked and the right side won’t.
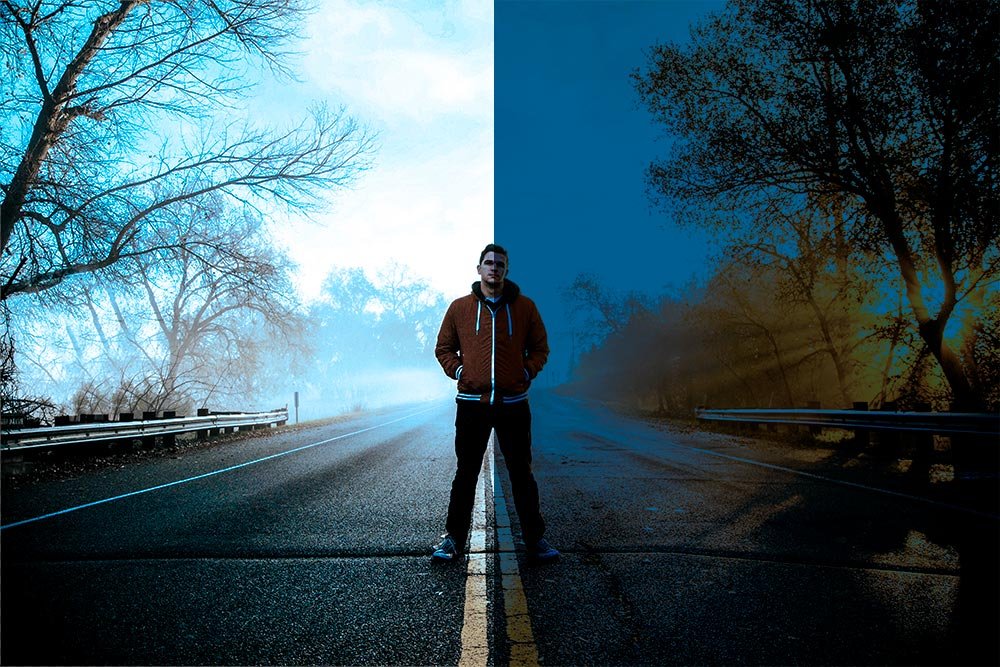
That’s a pretty stark difference. Luckily, this check box is active by default, so the only time you need to concern yourself with it is when you want to allow the applied color to darken the image.
Well, there you have it. I hope I explained how to apply a photo filter to a photograph in Adobe Photoshop using an adjustment layer. If you have any questions or concerns, please leave them in the comment section below. Thanks for reading!
In today’s post, I’ll use a demo photo to walk through the process of adding and adjusting a photo filter in Adobe Photoshop. I’ll show you the multiple methods for applying an adjustment layer, which one to apply and how to go about making selections from the pre-set filters. I’ll even demonstrate how you can edit the color of the filter and how you can adjust the density of that color.
Original Photo
I plan on using the photo below. I tried to find one that has pre-existing “mood” that would work well with a photo filter. I think this image fits the bill.
Now, just to let you know, I did some editing to this image in Camera Raw before I launched it into Photoshop. I cleaned a few things up and added some vibrancy. Now, it’s got some good color going on.
Creating the Photo Filter Adjustment Layer
I’ve written about adjustment filters in regards to Photoshop before. If you’d like to review those posts, you can do so via the links below.How to Use the Gradient Tool with Adjustment Layers in Adobe Photoshop
Adding Color: Blend Modes & Adjustments in Adobe Photoshop
How To Adjust Brightness & Contrast In Adobe Photoshop
Using the Adobe Photoshop Curves Tool For Photography
Using the Levels Adjustment in Adobe Photoshop for Photography
If you do take a look at the posts I just linked to, I think you’ll get a strong handle on how these things work. In today’s post, I’ll merely continue on with a different type of adjustment layer.
To apply the photo filter adjustment layer, we’ve got three choices. We can either visit the Layer > New Adjustment Layer > Photo Filter menu item and select that.

Or, we can click the Create New Fill or Adjustment Layer button down at the bottom of the Layers panel and then click the Photo Filter menu item.

Finally, we can simply click on the Photo Filter button in the Adjustments panel. This one is my favorite because I generally have this panel open and the buttons are easy to find.

Whichever method you choose, you’ll ultimately end up with a new adjustment layer in the Layers panel and the Properties panel for that adjustment open as well. You can see both of these areas in the above screenshot.
Applying a Filter
Next, I’ll head into the Properties panel for this adjustment layer and apply a filter to the photo. I’ll do this just so you can see how they look with a typical photo. I’ll make my first selection by clicking on the Filter drop-down box. I’ll select Warming Filter (85).
Doing this will give my a photo that looks like this:

That doesn’t look all that much different than the original.
Next, I’ll see what a cooling filter looks like. I’ll click on the drop-down box again and this time, I’ll select Cooling Filter (82). This will give me a photo that looks like this:

Can you see the difference between the two? I sure can. They both gave distinct color-casts to the photograph.
I can even go into the same drop-down and apply a color cast to the photo using straight colors. In this case, I chose to apply Magenta to the photo which gave everything a reddish hue.

By now, I’m sure you’ve got the wheels in your head turning. The possibilities…
Choosing a Custom Color
If I can’t find the exact color I want from the pre-set filter drop-down box, I can always click into the small color block that sits below the drop-down box. Once I click that, the color picker will open up and I can select my preferred color from there.
After I select the color, all I have to do is click OK to apply it as a photo filter.
Adjusting Density & Preserving Luminosity
Sometimes, I feel like the color I choose as a photo filter isn’t strong enough. As you can see from my examples above, adding one of these types of filters can’t readily be seen. To deal with this, Photoshop offers a Density slider which controls how strong or weak the applied color is.In the screenshot above, I applied the color blue to the photo. It looks okay, but what I really want is the color blue to take the photo over. I want to see a lot of blue. To accomplish this, I’ll push the Density slider all the way to the right, so it reads 100%.

Doing this will give me this result:

That’s what I’m talking about!
Oftentimes, when you really crank up the density of a photo filter color, the photo will get a lot darker. To combat this, you can keep the Preserve Luminosity check box checked off.

To give you an idea of how dark things can get, I’ll show you a split photo. The left side will have the Preserve Luminosity box checked and the right side won’t.

That’s a pretty stark difference. Luckily, this check box is active by default, so the only time you need to concern yourself with it is when you want to allow the applied color to darken the image.
Well, there you have it. I hope I explained how to apply a photo filter to a photograph in Adobe Photoshop using an adjustment layer. If you have any questions or concerns, please leave them in the comment section below. Thanks for reading!
