Cameron
Member
- Joined
- May 10, 2021
- Messages
- 108
- Reaction Score
- 3
- Points
- 23
- #1
This is one of those areas that might seem extremely complicated, but is actually very straight forward. I’m talking about creating animations in video. The truth of the matter is, both video and animation are probably some of the most intimidating areas of graphic design and photography, but in all honesty, they’re both some of the most fun and creative, once you get used to them.
Way back in 2000 or 2001, I began using Adobe’s very first animation application called LiveMotion. Somehow, some way, I figured out how to manage that program and for a few years after that, I put together tons of really neat animations. When that program was discontinued, I turned towards Macromedia Flash. I’m telling you – that was the real deal. I read the entire (very thick) “how to” book within a week and after that, I was creating commercial ready animations for a cluster of five radio stations in New York. I think back to those days and wonder whatever happened to those files. I’d like to look at them as, sort of, a reflection on how far I’ve come. I’m not sure if you remember, but those early 2000s days were full of “web intros.” Man, I’m glad they’re gone.
Anyway, Adobe Photoshop has a fairly robust video editor built right in. And inside that video editor, we have the capability to create keyframe animations, or transformations. If you aren’t familiar, a “keyframe” is a point on a timeline. It’s sort of like a bookmark. To create an animation, all one needs to do is place a beginning keyframe somewhere on their timeline as well as an ending one. In between those two keyframes, the magic happens. We can add just two (a beginning one and an ending one) keyframes for some simple movement or we can add many more keyframes to brighten things up even further. The sky’s the limit.
The challenging part is in the mechanics. When people hear about keyframes, they tune out. It’s as if something is difficult to understand about them. Trust me when I say this – there isn’t. To create a transformation, all someone needs to do is click their mouse a few times. Probably fewer than five. You check your email with more clicks than that, so this shouldn’t be too tough.
In today’s post, I’m going to walk through a very simple demonstration that will cover how to apply keyframes to a timeline. I’ll use one of my trusted demo videos and I’ll write some text on top of it in a new layer. From there, I’ll rasterize that layer and make it move. If you read this post until the end, you’ll have the ability to do exactly what I did yourself. Hopefully, it’ll spark an interest in video and animation.
5 Ways to Open Video Files into Adobe Photoshop
Today, I’ll simply click on the File menu item up at the top of the application and then select Open. From there, I’ll browse my computer until I find my video file. I’ll double click it and it’ll open right up. After that, I’ll select the Motion workspace from the drop-down in the upper right corner of Photoshop. To learn all about customizing and selecting workspaces in Photoshop, please read this post:
How to Customize Your Workspace & Interface in Photoshop
After doing all this, I’ll be looking at my video in Photoshop, which will look like this:
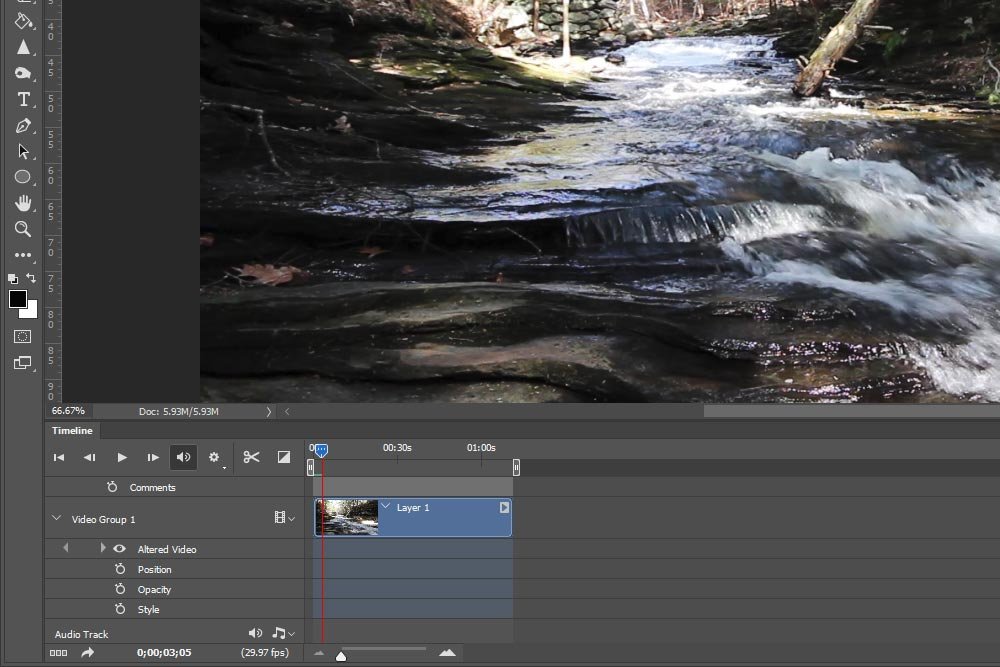
To stretch out the timeline so I can see what I’m doing, I’ll push the Timeline Magnification slider to the right a bit.
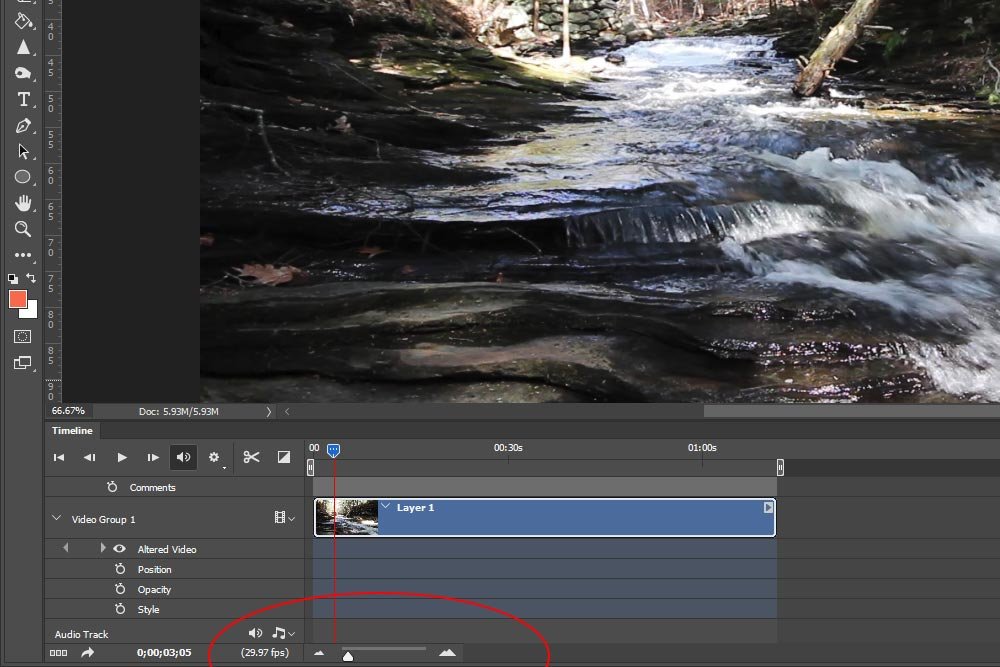
That ought to give me some breathing space to set some keyframes. If I need more room later on, I’ll push that same slider to the right even more.
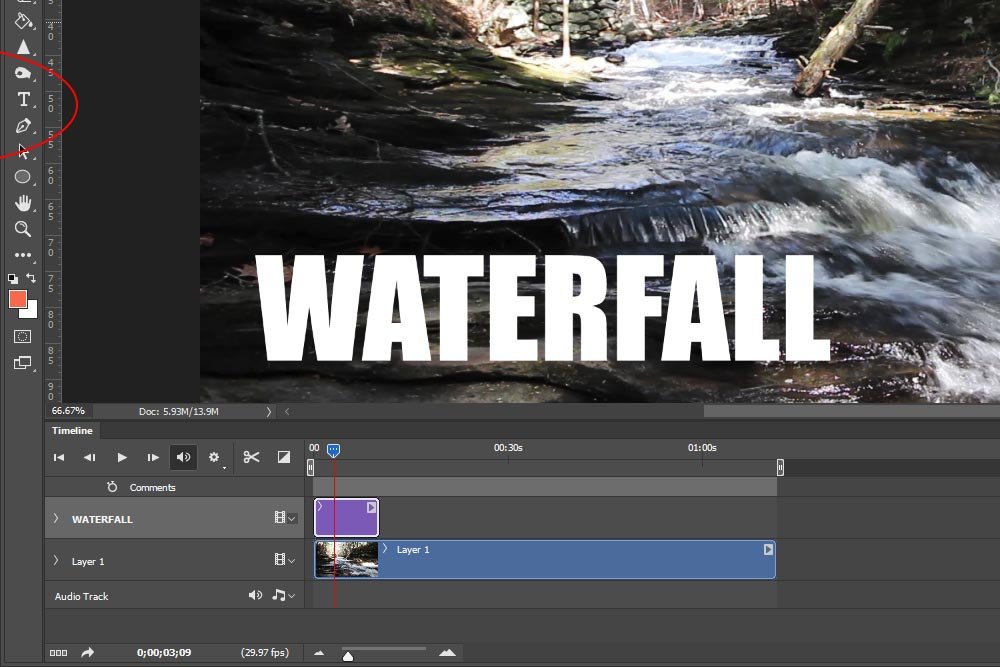
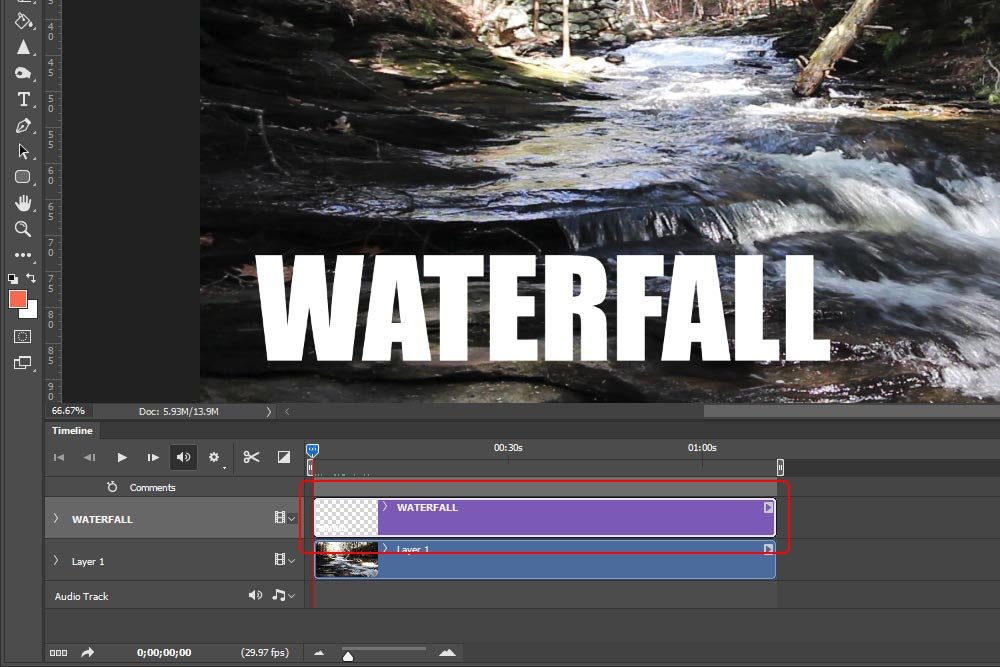
At this point, I’ve got a fairly large word sitting in the bottom left corner of the video. I need to continue on with two more steps.
First, I’ll need to adjust the visibility of the text layer according to how long I’d like to see it in the video. The entire clip measures one minute and eleven seconds, so if I wanted to see the text for only a few seconds, I could keep the purple text part of the timeline where it is. Since I’d like the text to be visible for the entire length of the video, I’ll click and drag the right edge of the purple to the end of the video.
Finally, for this part, I’ll rasterize the text layer, so it’ll be able to be manipulated in Photoshop. Why rasterize and what does rasterizing do? Read this:
To rasterize this layer, I’ll right-click on it in the Layers panel and select Rasterize Type from the menu that appears.
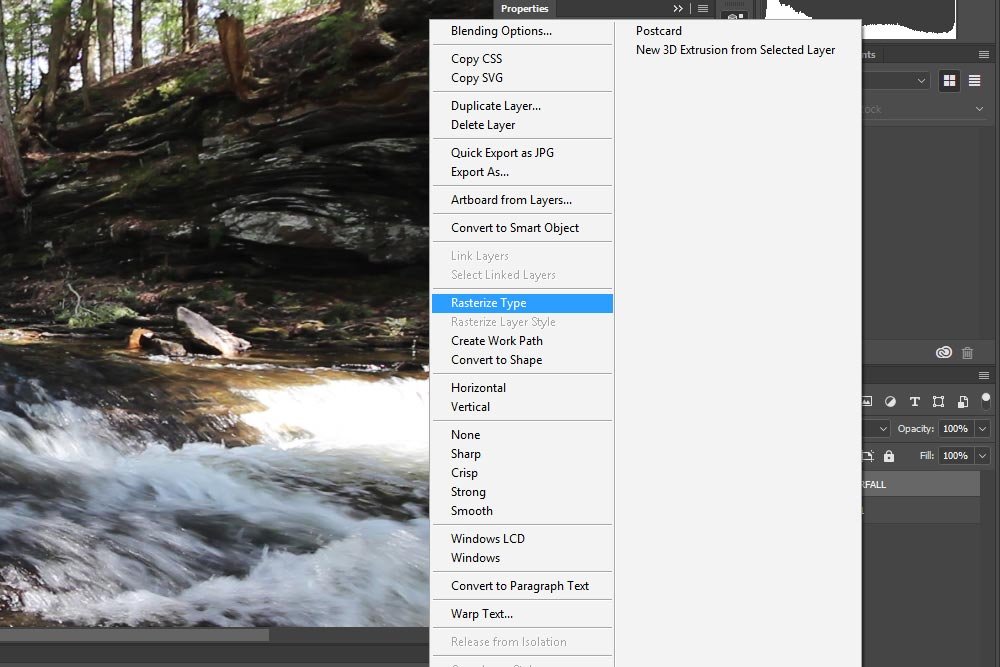
After I do this, I’ll see the text layer convert to a regular pixel based layer.
To begin, I’ll open up the keyframe area for the text layer in the Timeline panel. To do this, I’ll click on the small arrow that sits directly to the left of the word WATERFALL.
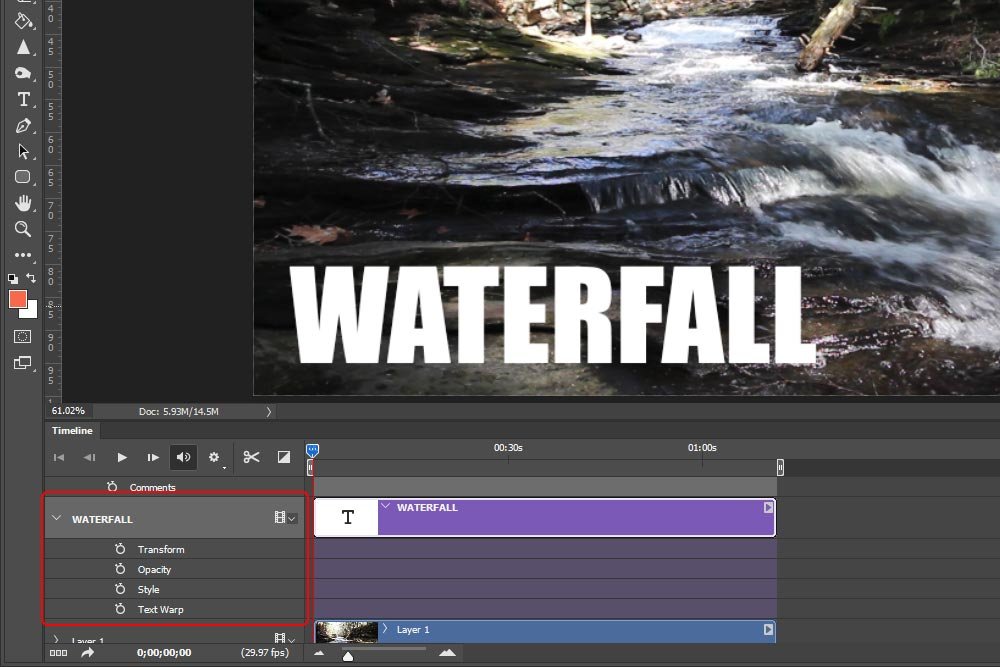
This will expose various types of transitions I’m able to apply to the layer. For this post, I’ll focus on only two of them; Transform and Opacity. Transform will move the text and Opacity will make it disappear.
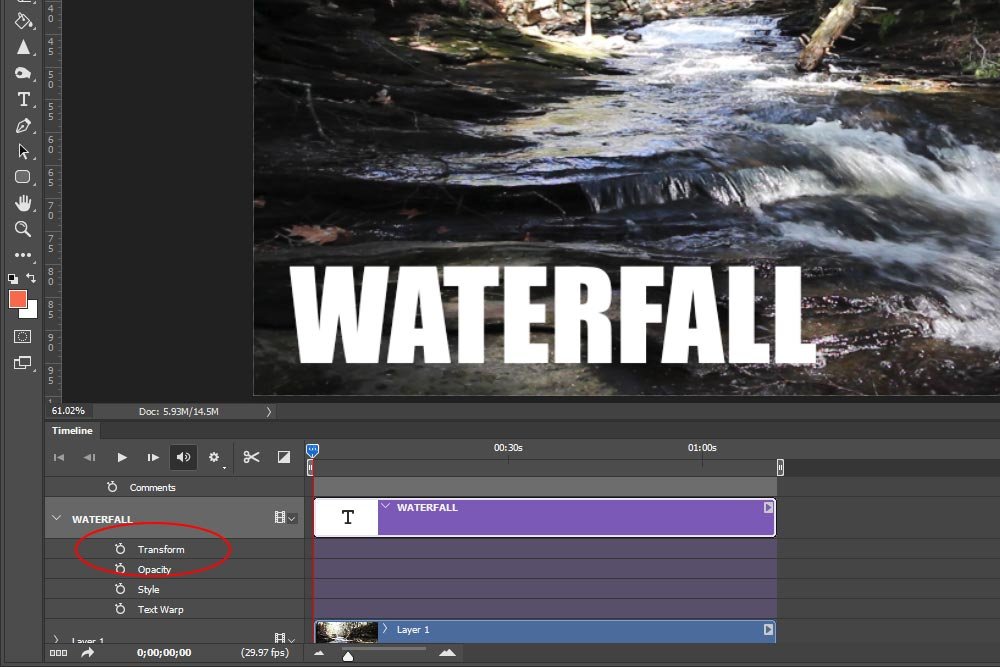
Next, I’ll create the first keyframe. I’ll move the playhead (red vertical line) to the beginning of the video clip, because that’s where I want the text layer to start moving. Then, I’ll click on the little icon of the stopwatch that sits directly to the left of the word Transform. This will create the beginning keyframe on the timeline. It looks like a small diamond.
After that, I’ll move the playhead down the timeline until I get to the time I want the text to stop moving to the right. In this case, I’d say that should be somewhere around the 1:00 mark.
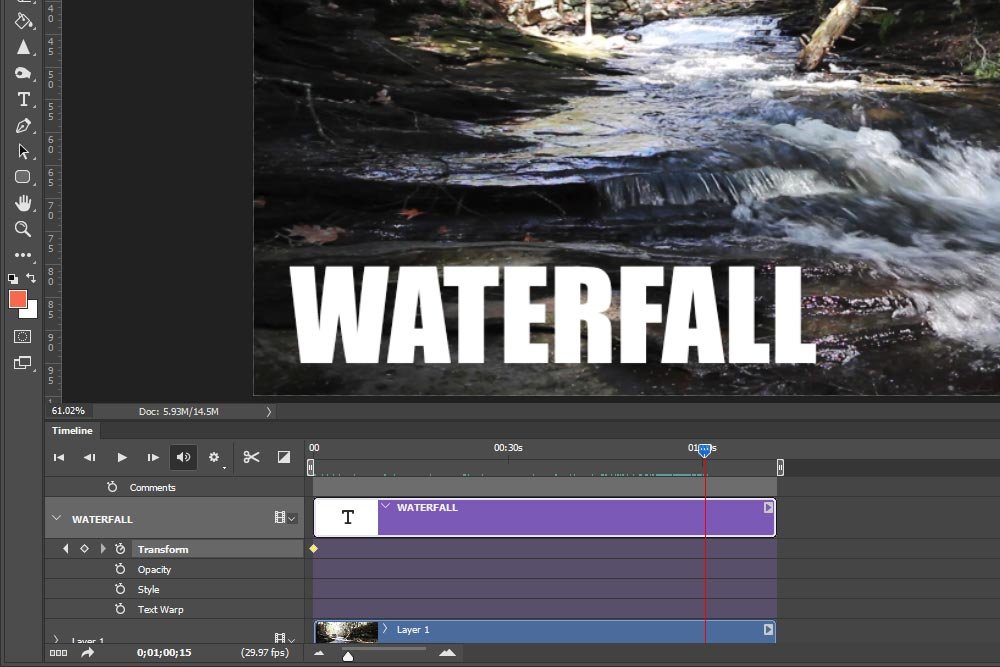
Finally, I’ll move the text straight over to the right. To do this, I’ll make sure the layer is active and I’ll hold down the Shift key on my keyboard. This will keep the movement locked horizontally as I move it. When I’m finished moving the text and I let go of the layer, Photoshop will automatically set the “stop” keyframe.
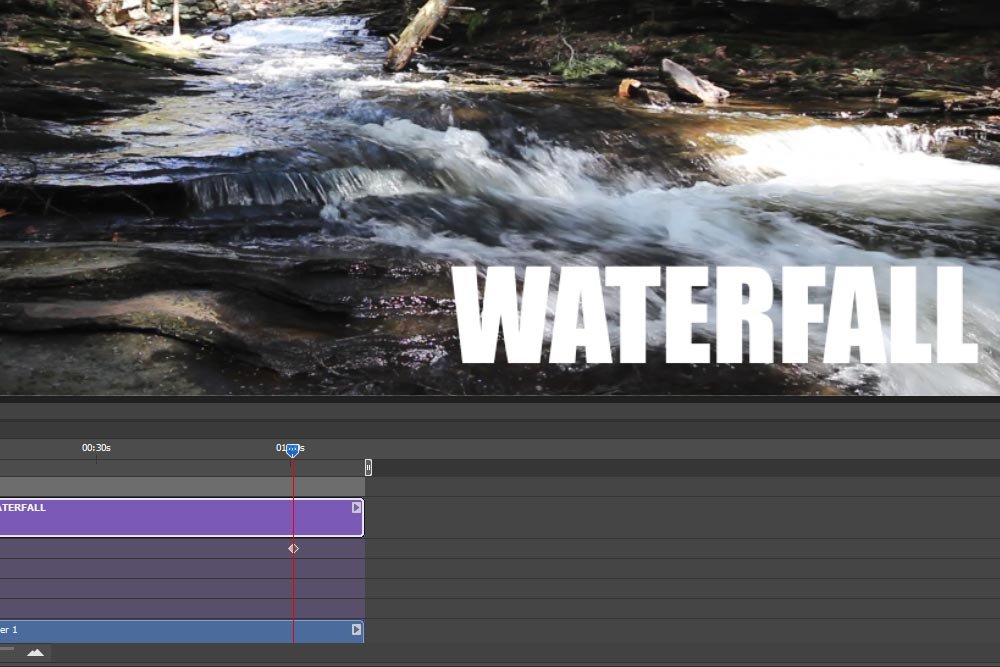
At this point, if I tested the video out by pressing Play in the timeline controls, I’d see the text slowly move across the bottom of the video. That’s the first transition.
Again, I’ll move the playhead to the time on the timeline I’d like the text to begin moving upward. Then, when it’s in position, I’ll click the diamond. In this particular case, the new keyframe will sit right on top of the stop keyframe from the previous transition, so it’ll look like there’s only one there.
Next, I’ll push the playhead all the way to the end of the timeline, because that’s where I want the animation to stop. I’ll use the Shift key to move the layer again and when I let go, Photoshop will create the stop keyframe, just like it did previously.
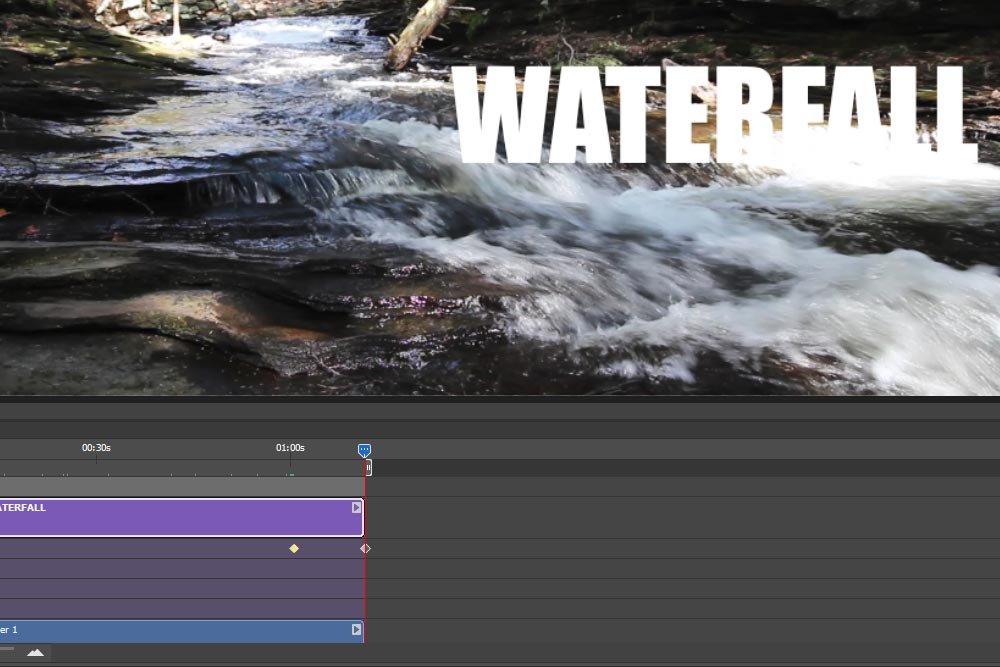
See? Isn’t that easy? I just created two transitions in no time flat.
To start off, I’ll move the playhead to the position I want the opacity change to begin. In this case, that would be the one minute mark again, because that’s when the text begins to move upward. Then, I’ll press the stopwatch icon that sits directly to the left of the word Opacity over in the timeline controls area. After that, I’ll push the playhead to the time position I’d like to see the end of the opacity change, head over to the Layers menu and change the opacity. The moment I make that change, Photoshop with create that stop keyframe I mentioned above.
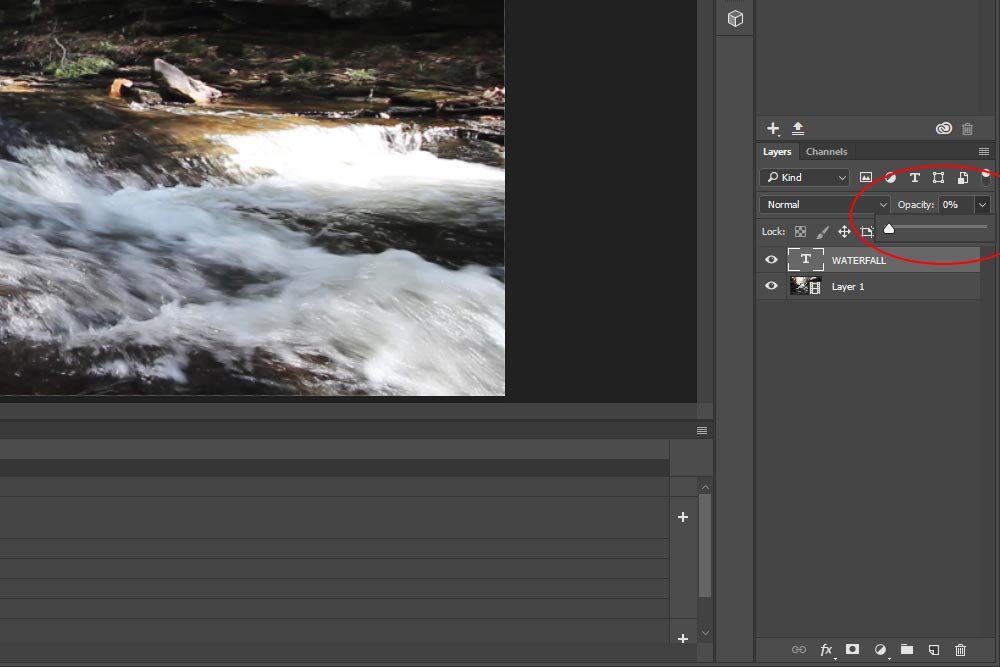
Now, I can check out the Opacity keyframes in the timeline.
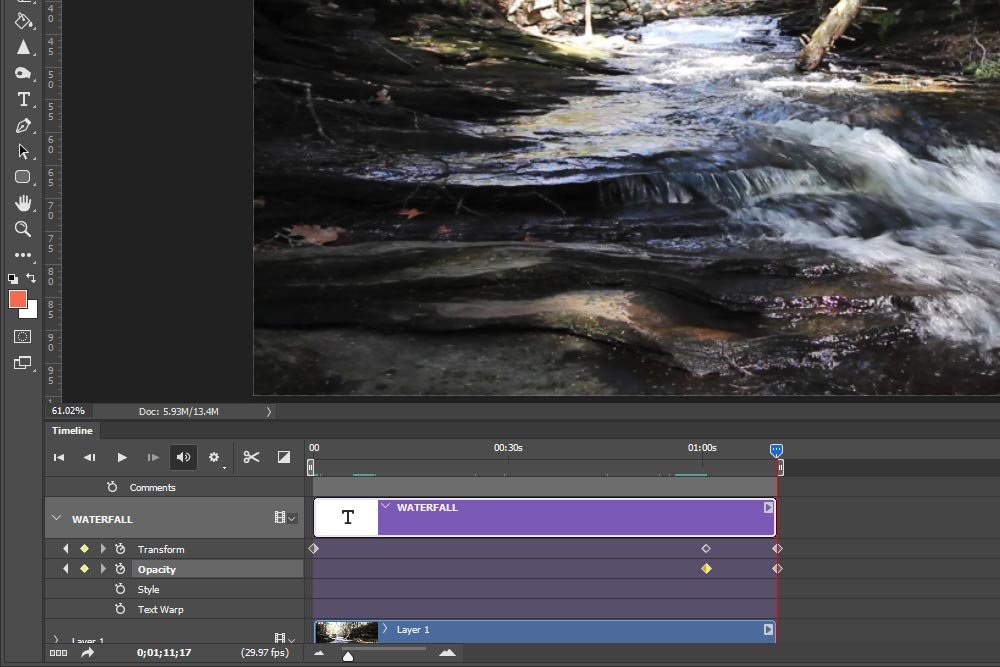
There. It’s finished. That’s all I need to do. I created one animation that moves the text to the right. Then, I created another animation that moves it slightly upward. Finally, I created a transformation that makes the text disappear as it moves up. And I did all that in just a few movements. If I can do this so easily, just think about what I could do if I was really trying. Jeesh.
As a second bonus, I exported this video from Photoshop and uploaded it to Youtube so you could see it in action. Yes, it’s extremely boring, but that’s because I only added two simple animations to it. Focus on the beauty of the waterfall. Yeah, do that. If you’re reading this post via email, you’ll need to click through to the website to see the video. It doesn’t show up in email.
In the future, I’ll cover how to save and export a video from Adobe Photoshop. If you have any questions or concerns, please let me know in the comment section below. Thanks for reading!
Way back in 2000 or 2001, I began using Adobe’s very first animation application called LiveMotion. Somehow, some way, I figured out how to manage that program and for a few years after that, I put together tons of really neat animations. When that program was discontinued, I turned towards Macromedia Flash. I’m telling you – that was the real deal. I read the entire (very thick) “how to” book within a week and after that, I was creating commercial ready animations for a cluster of five radio stations in New York. I think back to those days and wonder whatever happened to those files. I’d like to look at them as, sort of, a reflection on how far I’ve come. I’m not sure if you remember, but those early 2000s days were full of “web intros.” Man, I’m glad they’re gone.
Anyway, Adobe Photoshop has a fairly robust video editor built right in. And inside that video editor, we have the capability to create keyframe animations, or transformations. If you aren’t familiar, a “keyframe” is a point on a timeline. It’s sort of like a bookmark. To create an animation, all one needs to do is place a beginning keyframe somewhere on their timeline as well as an ending one. In between those two keyframes, the magic happens. We can add just two (a beginning one and an ending one) keyframes for some simple movement or we can add many more keyframes to brighten things up even further. The sky’s the limit.
The challenging part is in the mechanics. When people hear about keyframes, they tune out. It’s as if something is difficult to understand about them. Trust me when I say this – there isn’t. To create a transformation, all someone needs to do is click their mouse a few times. Probably fewer than five. You check your email with more clicks than that, so this shouldn’t be too tough.
In today’s post, I’m going to walk through a very simple demonstration that will cover how to apply keyframes to a timeline. I’ll use one of my trusted demo videos and I’ll write some text on top of it in a new layer. From there, I’ll rasterize that layer and make it move. If you read this post until the end, you’ll have the ability to do exactly what I did yourself. Hopefully, it’ll spark an interest in video and animation.
Opening the Video File into Photoshop
I’ve talked about this before, but I’ll go over it again quickly. Before I do that though, please feel free to read about the multiple methods you can use to launch a video into Photoshop:5 Ways to Open Video Files into Adobe Photoshop
Today, I’ll simply click on the File menu item up at the top of the application and then select Open. From there, I’ll browse my computer until I find my video file. I’ll double click it and it’ll open right up. After that, I’ll select the Motion workspace from the drop-down in the upper right corner of Photoshop. To learn all about customizing and selecting workspaces in Photoshop, please read this post:
How to Customize Your Workspace & Interface in Photoshop
After doing all this, I’ll be looking at my video in Photoshop, which will look like this:

To stretch out the timeline so I can see what I’m doing, I’ll push the Timeline Magnification slider to the right a bit.

That ought to give me some breathing space to set some keyframes. If I need more room later on, I’ll push that same slider to the right even more.
Adding Text
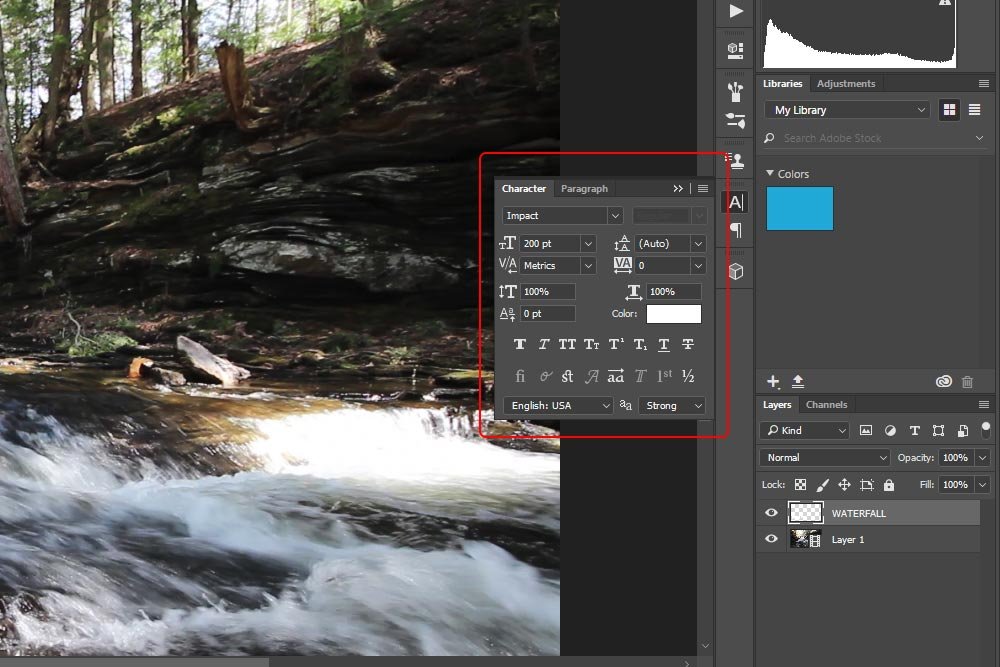
The next thing I’m going to do is to add some text. For this demo, I really don’t care what that text says. I’m merely attempting to go through the motions. Since this is the case, I’ll type “WATERFALL” with the Horizontal Type Tool. Then, I’ll pick a good font and color and then size things correctly in the Character panel.

At this point, I’ve got a fairly large word sitting in the bottom left corner of the video. I need to continue on with two more steps.
First, I’ll need to adjust the visibility of the text layer according to how long I’d like to see it in the video. The entire clip measures one minute and eleven seconds, so if I wanted to see the text for only a few seconds, I could keep the purple text part of the timeline where it is. Since I’d like the text to be visible for the entire length of the video, I’ll click and drag the right edge of the purple to the end of the video.

Finally, for this part, I’ll rasterize the text layer, so it’ll be able to be manipulated in Photoshop. Why rasterize and what does rasterizing do? Read this:
Rasterizing converts a layer to pixels rather than vectors. When you draw a shape, use a font or use other operations where the graphics are drawn as lines, not pixels, you can scale these (make them bigger or smaller) without loss of quality. This is called “vector graphics.” Rasterizing converts these to ordinary pixels, so when you scale them, you lose quality, but you can edit them in the same way you edit other photographic elements.
To rasterize this layer, I’ll right-click on it in the Layers panel and select Rasterize Type from the menu that appears.

After I do this, I’ll see the text layer convert to a regular pixel based layer.
Creating the Animation
Okay, I think we’re good to go. All of what I just did was housekeeping and prep for the actual animation. In this section, I’ll create the keyframes, which in turn, will create the movement for the text. My goal is to first move the text from the left part of the video to the right. After that, I’d like to move it up until it disappears. I’ll explain everything below.To begin, I’ll open up the keyframe area for the text layer in the Timeline panel. To do this, I’ll click on the small arrow that sits directly to the left of the word WATERFALL.

This will expose various types of transitions I’m able to apply to the layer. For this post, I’ll focus on only two of them; Transform and Opacity. Transform will move the text and Opacity will make it disappear.
Next, I’ll create the first keyframe. I’ll move the playhead (red vertical line) to the beginning of the video clip, because that’s where I want the text layer to start moving. Then, I’ll click on the little icon of the stopwatch that sits directly to the left of the word Transform. This will create the beginning keyframe on the timeline. It looks like a small diamond.

After that, I’ll move the playhead down the timeline until I get to the time I want the text to stop moving to the right. In this case, I’d say that should be somewhere around the 1:00 mark.

Finally, I’ll move the text straight over to the right. To do this, I’ll make sure the layer is active and I’ll hold down the Shift key on my keyboard. This will keep the movement locked horizontally as I move it. When I’m finished moving the text and I let go of the layer, Photoshop will automatically set the “stop” keyframe.

At this point, if I tested the video out by pressing Play in the timeline controls, I’d see the text slowly move across the bottom of the video. That’s the first transition.
Adding Additional Keyframes
Since I would like the text to move upward, I’ll need to add another keyframe. This time though, I’m not going to click on the stopwatch icon. I’ll click on the small diamond icon that’s to the left of that.Again, I’ll move the playhead to the time on the timeline I’d like the text to begin moving upward. Then, when it’s in position, I’ll click the diamond. In this particular case, the new keyframe will sit right on top of the stop keyframe from the previous transition, so it’ll look like there’s only one there.
Next, I’ll push the playhead all the way to the end of the timeline, because that’s where I want the animation to stop. I’ll use the Shift key to move the layer again and when I let go, Photoshop will create the stop keyframe, just like it did previously.

See? Isn’t that easy? I just created two transitions in no time flat.
Changing Opacity
As a little bonus in this post, I’ll show you how to change the opacity as a transition. It’s pretty much exactly like I just demonstrated above, but we’ll use the Opacity keyframes as opposed to the Transform ones.To start off, I’ll move the playhead to the position I want the opacity change to begin. In this case, that would be the one minute mark again, because that’s when the text begins to move upward. Then, I’ll press the stopwatch icon that sits directly to the left of the word Opacity over in the timeline controls area. After that, I’ll push the playhead to the time position I’d like to see the end of the opacity change, head over to the Layers menu and change the opacity. The moment I make that change, Photoshop with create that stop keyframe I mentioned above.

Now, I can check out the Opacity keyframes in the timeline.

There. It’s finished. That’s all I need to do. I created one animation that moves the text to the right. Then, I created another animation that moves it slightly upward. Finally, I created a transformation that makes the text disappear as it moves up. And I did all that in just a few movements. If I can do this so easily, just think about what I could do if I was really trying. Jeesh.
As a second bonus, I exported this video from Photoshop and uploaded it to Youtube so you could see it in action. Yes, it’s extremely boring, but that’s because I only added two simple animations to it. Focus on the beauty of the waterfall. Yeah, do that. If you’re reading this post via email, you’ll need to click through to the website to see the video. It doesn’t show up in email.
In the future, I’ll cover how to save and export a video from Adobe Photoshop. If you have any questions or concerns, please let me know in the comment section below. Thanks for reading!
