JodyBuchanan
Member
- Joined
- May 10, 2021
- Messages
- 138
- Reaction Score
- 0
- Points
- 21
- #1
I’ll be the first to admit that I’m no painter. As a matter of fact, I can’t draw or paint. I can hardly even trace. But when I saw how cool the Mixer Brush was in Adobe Photoshop, I had to stop to take a closer look. Today, I’m here to tell you that it’s not only cool – it’s really really cool.
Who would have thought that you can actually imitate real painting inside of a computer program? Boy, we’ve come a long way from those early days. In today’s Photoshop, you can control all sorts of stuff, including how much paint comes off the brush, the color or colors you’ll paint with and the wetness of that paint. If you learn how to set and adjust each of these aspects, I think you’ll be truly surprised and impressed with what your results can look like.
In today’s post, I’d like to introduce you to the Mixer Brush Tool inside of Adobe Photoshop. This is a post for those who have never seen, or perhaps even heard of, this tool. It’s intended to be an intro. Hopefully, by the end of this post, you’ll have a grip on what this tool is and what it can do. You may even be able to hold your own during a conversation on the topic.
Alternatively, you can press the B key on your keyboard to cycle through the brush options. That’s a handy shortcut to know.
Once you select the Mixer Brush Tool, you’ll notice the options bar up top change to offer more appropriate features and options. While I won’t cover everything up there in this post, I will talk about a few of the most important areas.
If you click the small arrow to the right of the color swatch, you’ll see a few options. They are Load Brush, Clean Brush and Load Solid Colors Only. Think of using the Mixing Brush exactly as you would when using a real paint brush. You need to load it with paint, mix it with other paint and clean the brush off to start over. This isn’t terribly different and it’s in this area that controls that aspect of things.
The next area I’ll cover is called the Preset Pop-up Menu. Even though I haven’t discussed them yet, this drop-down menu can pre-populate the paint measurement controls I’ll talk about in the next section. Keep your eye on this menu though because it can be a huge time saver later on when you get more used to this tool.
Next up are four values that are critical to your painting. They are Wet, Load, Mix and Flow. Just as their names imply, they have everything to do with the amount of paint that gets loaded onto the brush, what the consistency is, how it looks and how it comes off the brush. I’ll describe them more thoroughly right now.
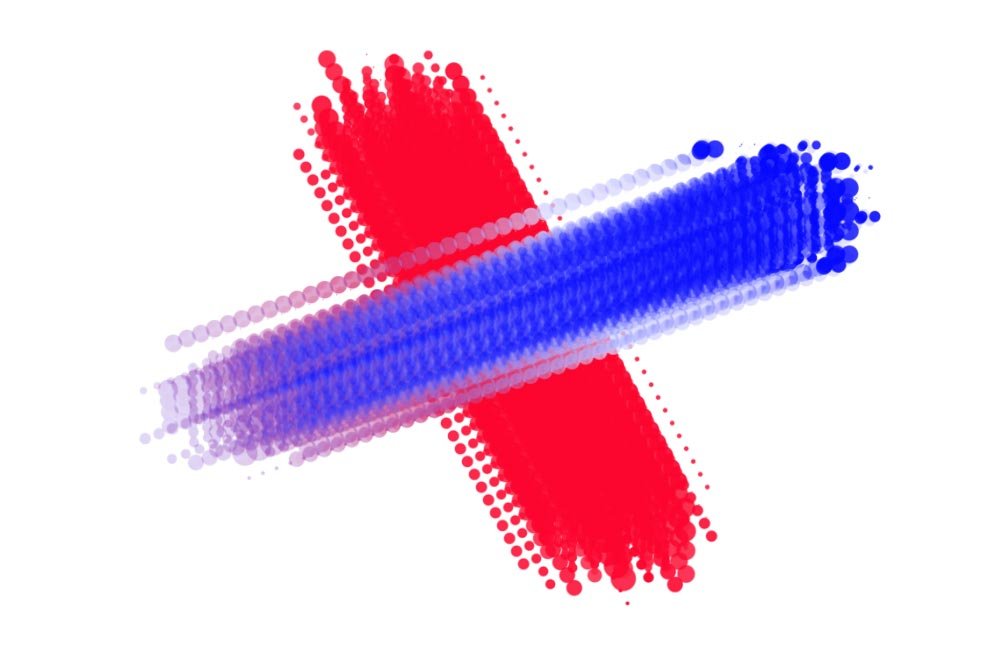
Wet – This value tells Photoshop how much paint the brush should pick up from the canvas. If the brush picks up more (a higher value), it’ll return more of a paint streak when painting over other paint. So, if you paint one stroke and then paint over that stroke with another color (or even the same color), a “wet” brush will drag the bottom paint pretty far, depending on this setting. Be aware, the Wet value is extremely sensitive. You may not notice all too much of a difference between just 1% and higher values. It’ll take some getting used to to perfect this setting.
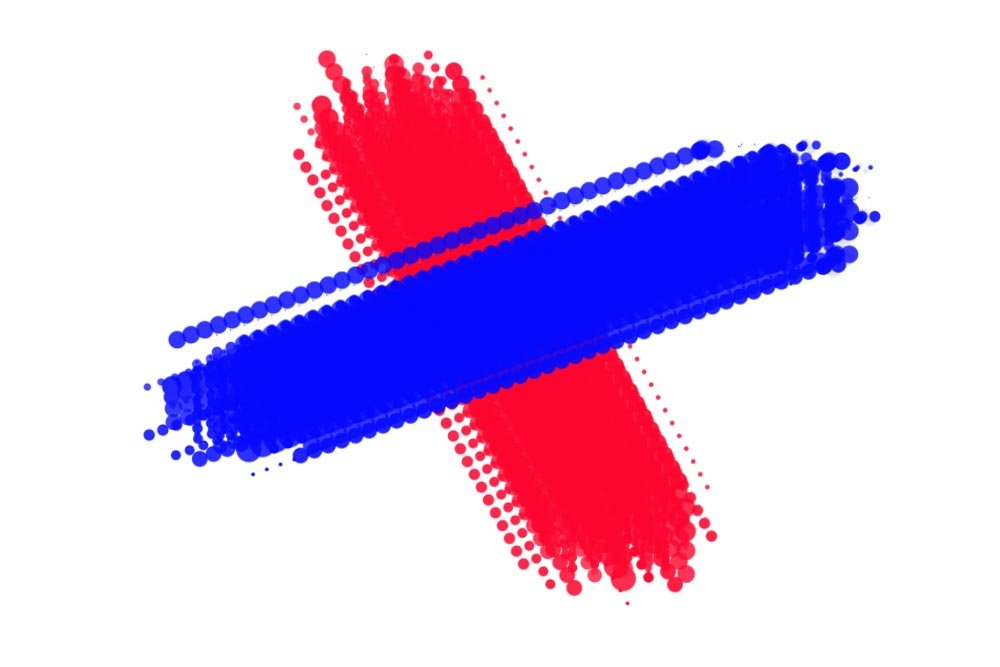
Take a look. The first image is Wet set to 100% and the second is Wet set to 0%. See the way the first one drags the lower layer of paint?
In this example, no paint was dragged at all, not even the blue.
Load – This setting controls the amount of paint that’s loaded into the reservoir. A low setting doesn’t load much paint, while a high setting does. Think of it this way; if you had a real paintbrush in your hand and scooped up tons of paint on it, you’d be able to paint for a long time. If you merely dabbed the brush into some paint, you wouldn’t be able to use it for nearly as long.
In this example, I set the Load beginning at 1% and then increased it to 30% and then 60% and then 100%.
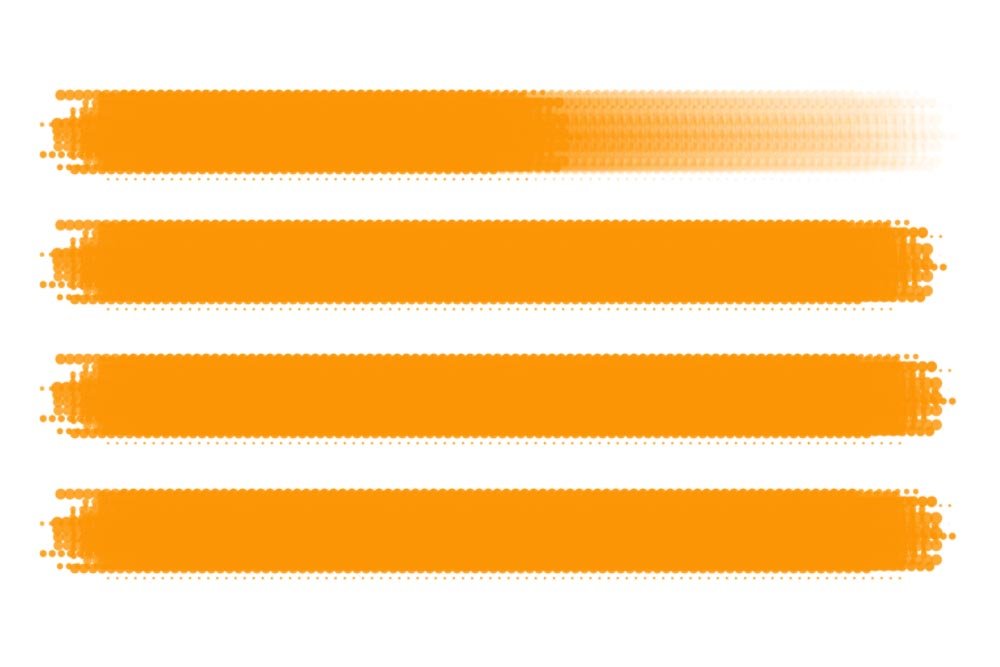
I thought it was interesting how the bottom three strokes were the same. Because of this, I reduced the size of the brush and repeated the experiment. Here’s how that turned out.

As you can see, the effectiveness of this value depends on brush size, so be cognizant of that when you use it.
Mix – This setting specifies the ratio of how much paint is picked up from the canvas versus how much comes from the reservoir. Think of it this way; if you set this value to 100%, it’ll be like painting over paint that’s already been put down on the canvas, but with a dry, empty brush. If you set this value to 0%, it’ll be like painting with paint from only the brush that’s in the reservoir. This one is sort of tricky because the Wet setting is somewhat similar. It’ll take some getting used to.
In the example below, I painted a vertical line. Then, for the horizontal lines, I set the Mix value to 0%, 50% and 100%, respectively.
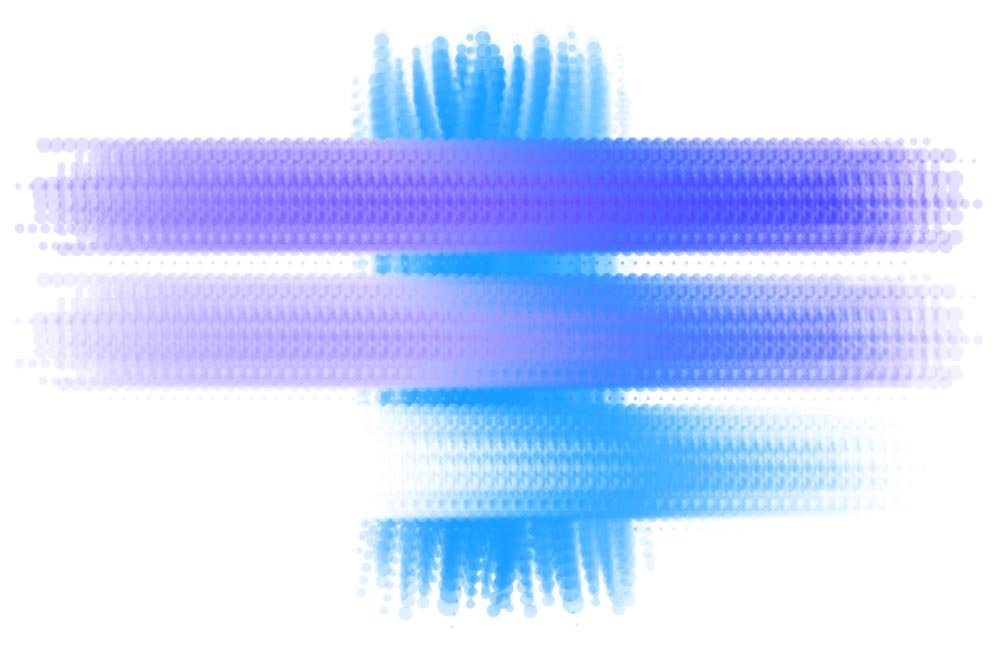
I’d say the results coincide well with the description I wrote above.
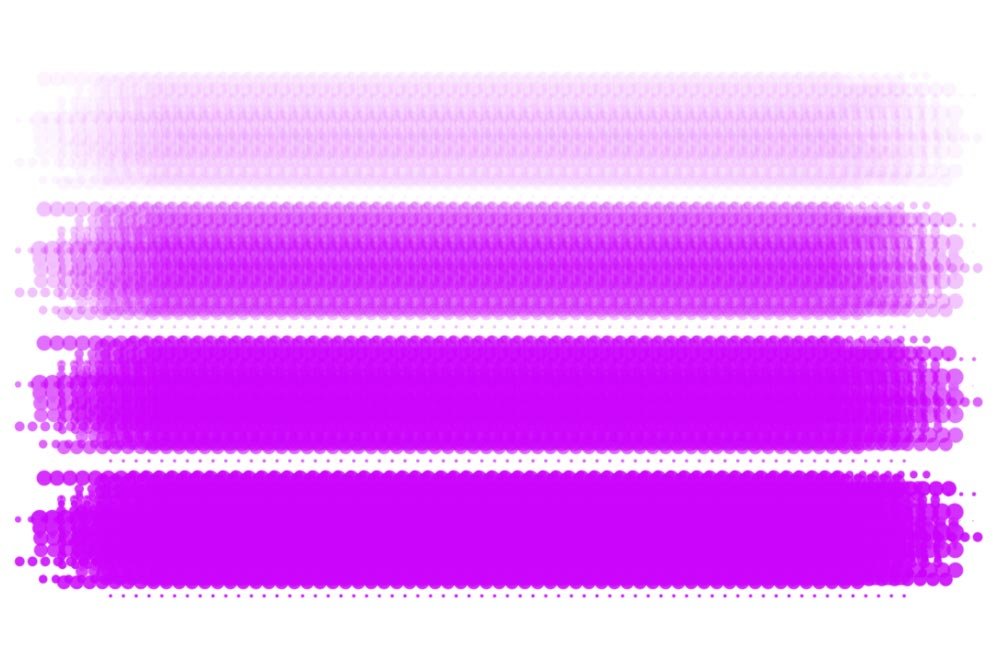
Flow – This final setting is easy to grasp. Basically, it tells Photoshop how much paint to push out of the brush. It’s sort of like ink flowing from a pen. If the value is low, there will be hardly any paint being released from the brush. As this value is raised, more and more paint will be released.
In the example below, I started off with a value of 5%. Then, I increased it to 30%, 70% and then 100%. The reason I had to start at 5% was because if I want any lower, you wouldn’t have been able to see any paint.
The last setting I’d like to discuss in this post is called Sample All Layers. This one is important. You can find it all the way at the right side of the options bar and it consists of a check box.
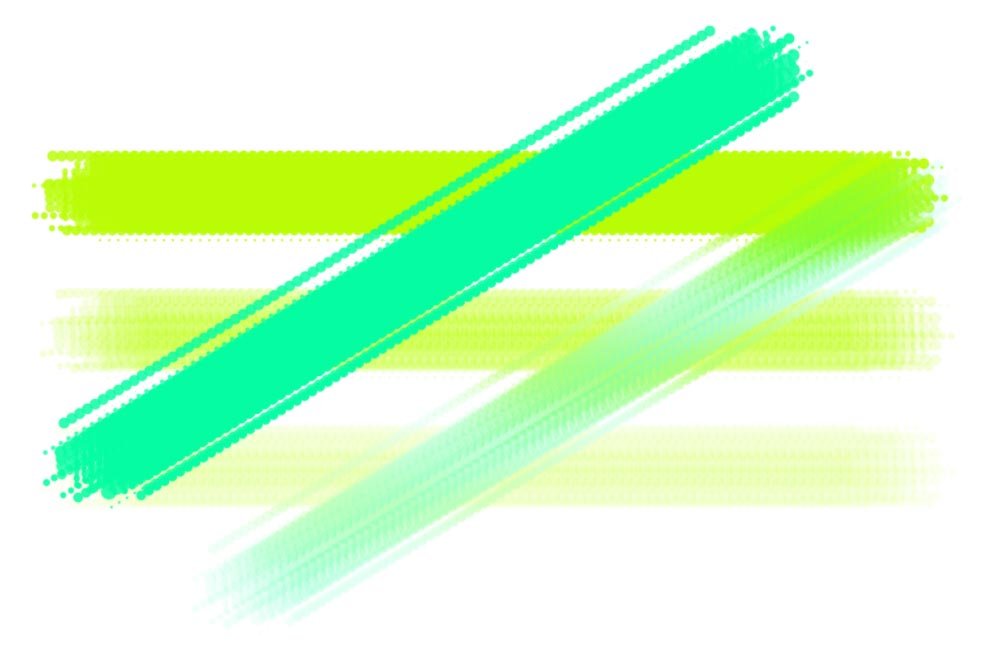
If you leave this box unchecked, you’ll have the ability to paint on one layer and then paint on another layer without the paint on either layer having an effect on anything other than itself. Each layer will remain isolated. Conversely, if you check this box, whatever is on one layer will affect whatever is on another layer. It’ll be as though everything is on the same layer. In later posts, I’ll explain why this is important and how this can help or hurt you.
For now, I tried to explain this concept through another example. On one layer, I painted three horizontal green lines. Then, I created a new layer and I painted, with aqua, the top diagonal line. As you can see, this top line didn’t affect the green lines at all.
After that, I checked the “Sample All Layers” box and painted another aqua line in that separate top layer. I’m referring to the lower diagonal line. You can clearly see that this one affected itself, as well as the green lines in the lower layer.
This setting will become extraordinarily important when you begin painting over photographs. You’ll need to have an impact on the layers below.
Anyway, I think I’ll stop there. This really is a huge topic and I think I’ve done a decent job at giving you an introduction to the Mixer Brush Tool. There is so much to this tool that I think it’s going to take a heck of a lot more posts. I’ll build off this one in the future.
If you have any questions or concerns, please leave them in the comment section below. Thanks for reading!
Who would have thought that you can actually imitate real painting inside of a computer program? Boy, we’ve come a long way from those early days. In today’s Photoshop, you can control all sorts of stuff, including how much paint comes off the brush, the color or colors you’ll paint with and the wetness of that paint. If you learn how to set and adjust each of these aspects, I think you’ll be truly surprised and impressed with what your results can look like.
In today’s post, I’d like to introduce you to the Mixer Brush Tool inside of Adobe Photoshop. This is a post for those who have never seen, or perhaps even heard of, this tool. It’s intended to be an intro. Hopefully, by the end of this post, you’ll have a grip on what this tool is and what it can do. You may even be able to hold your own during a conversation on the topic.
What is the Mixer Brush
Before I go any further, I think I should give you a very brief overview of what the Mixer Brush does. Basically, it allows you to mix paint on either a blank canvas or from a photo. It does a great job of blending colors, whether they’re already on the brush or on the canvas itself. In the sections that follow, I’ll show you what some of the controls look like and then in later posts, I’ll walk through the process of painting and mixing color right over a photograph. This will make it look like I painted a picture rather than closely following the lines of something that already existed.The Mixer Brush Tool & the Options Bar
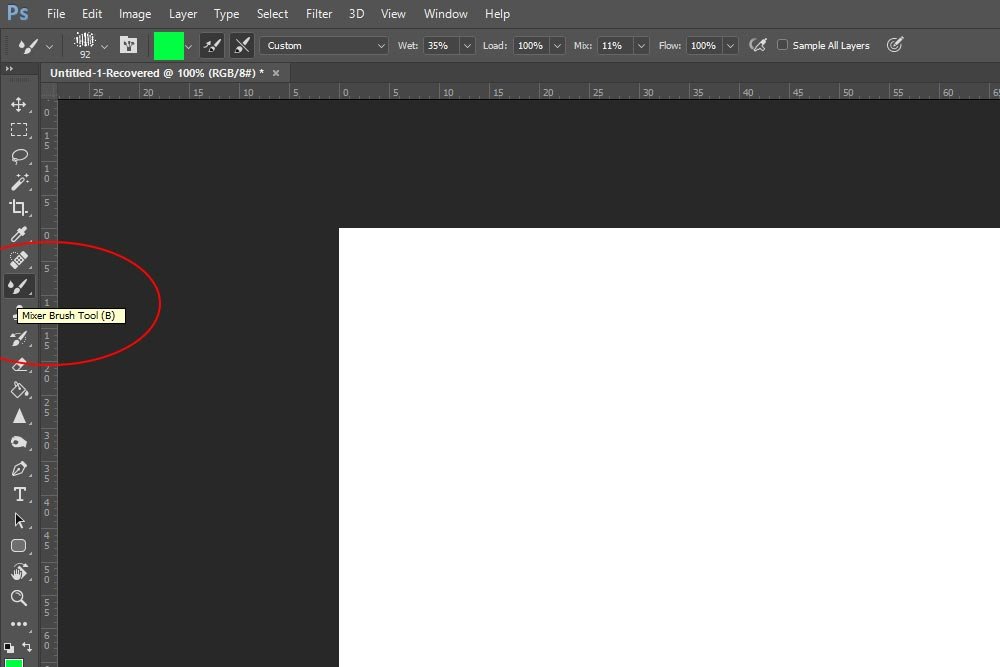
Accessing the Mixer Brush Tool is easy. All you need to do is head over to the left vertical toolbar and click and drag out the Brush Tool. Once the additional brush options are available, you can select the bottom choice. That’s the Mixer Brush. The icon looks like a brush with a small droplet next to it.
Alternatively, you can press the B key on your keyboard to cycle through the brush options. That’s a handy shortcut to know.
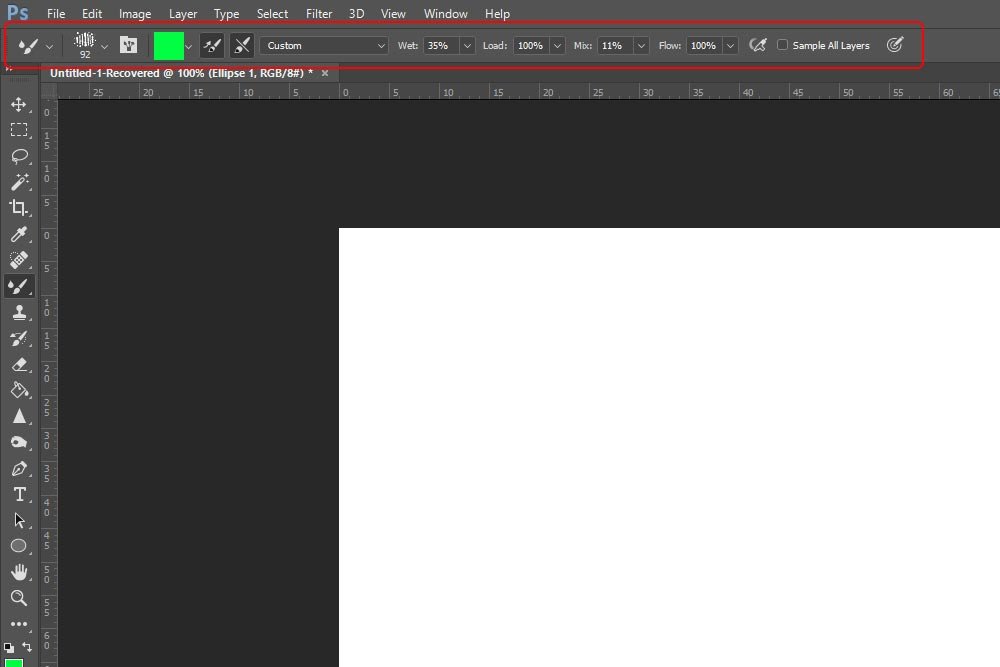
Once you select the Mixer Brush Tool, you’ll notice the options bar up top change to offer more appropriate features and options. While I won’t cover everything up there in this post, I will talk about a few of the most important areas.

Choosing a Brush
Choosing a brush and setting that brush up so it works well with the Mixer Brush Tool can get somewhat involved. It’s tough to stay focused here and not run off on a tangent, so I’m going to do my best to keep thing simple. In that vein, I’ll choose a custom brush I created back when I was writing a previous post on how to make and save your very own custom brush. I’ll also size the brush so it’s a good working size for my canvas.Options Bar Controls
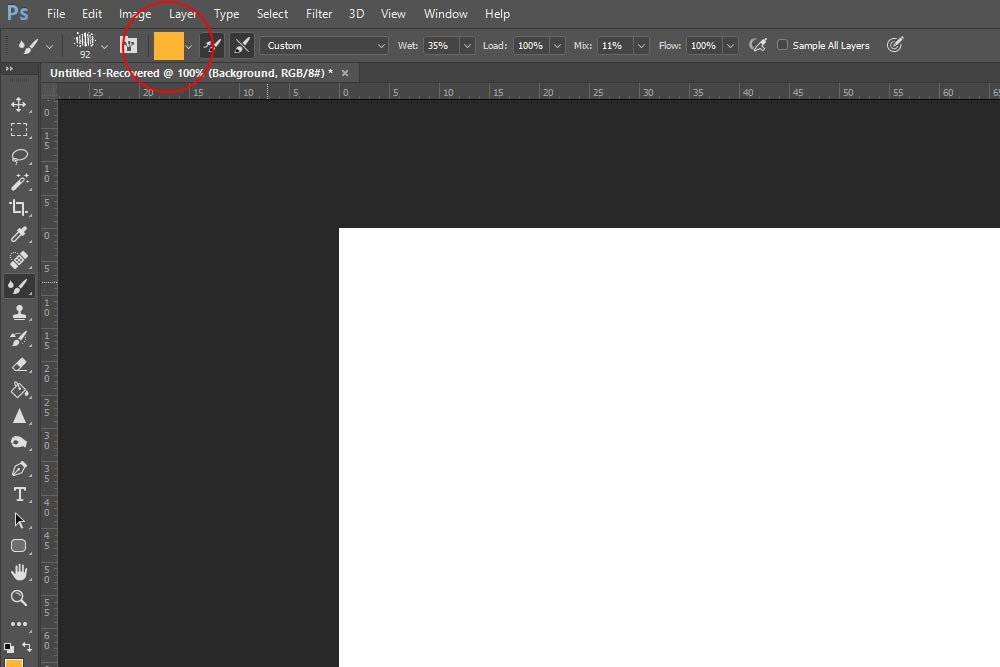
The first primary area I’ll focus on in the options bar is the Current Brush Load & Clean Swatch.
If you click the small arrow to the right of the color swatch, you’ll see a few options. They are Load Brush, Clean Brush and Load Solid Colors Only. Think of using the Mixing Brush exactly as you would when using a real paint brush. You need to load it with paint, mix it with other paint and clean the brush off to start over. This isn’t terribly different and it’s in this area that controls that aspect of things.
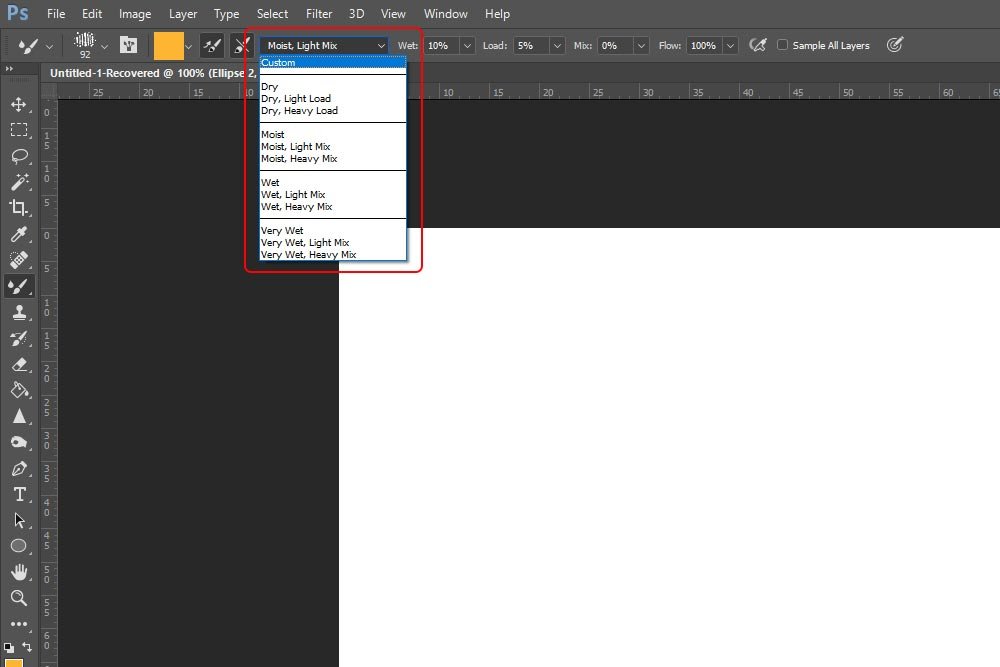
The next area I’ll cover is called the Preset Pop-up Menu. Even though I haven’t discussed them yet, this drop-down menu can pre-populate the paint measurement controls I’ll talk about in the next section. Keep your eye on this menu though because it can be a huge time saver later on when you get more used to this tool.

Next up are four values that are critical to your painting. They are Wet, Load, Mix and Flow. Just as their names imply, they have everything to do with the amount of paint that gets loaded onto the brush, what the consistency is, how it looks and how it comes off the brush. I’ll describe them more thoroughly right now.
Wet – This value tells Photoshop how much paint the brush should pick up from the canvas. If the brush picks up more (a higher value), it’ll return more of a paint streak when painting over other paint. So, if you paint one stroke and then paint over that stroke with another color (or even the same color), a “wet” brush will drag the bottom paint pretty far, depending on this setting. Be aware, the Wet value is extremely sensitive. You may not notice all too much of a difference between just 1% and higher values. It’ll take some getting used to to perfect this setting.
Take a look. The first image is Wet set to 100% and the second is Wet set to 0%. See the way the first one drags the lower layer of paint?

In this example, no paint was dragged at all, not even the blue.

Load – This setting controls the amount of paint that’s loaded into the reservoir. A low setting doesn’t load much paint, while a high setting does. Think of it this way; if you had a real paintbrush in your hand and scooped up tons of paint on it, you’d be able to paint for a long time. If you merely dabbed the brush into some paint, you wouldn’t be able to use it for nearly as long.
In this example, I set the Load beginning at 1% and then increased it to 30% and then 60% and then 100%.

I thought it was interesting how the bottom three strokes were the same. Because of this, I reduced the size of the brush and repeated the experiment. Here’s how that turned out.

As you can see, the effectiveness of this value depends on brush size, so be cognizant of that when you use it.
Mix – This setting specifies the ratio of how much paint is picked up from the canvas versus how much comes from the reservoir. Think of it this way; if you set this value to 100%, it’ll be like painting over paint that’s already been put down on the canvas, but with a dry, empty brush. If you set this value to 0%, it’ll be like painting with paint from only the brush that’s in the reservoir. This one is sort of tricky because the Wet setting is somewhat similar. It’ll take some getting used to.
In the example below, I painted a vertical line. Then, for the horizontal lines, I set the Mix value to 0%, 50% and 100%, respectively.

I’d say the results coincide well with the description I wrote above.
Flow – This final setting is easy to grasp. Basically, it tells Photoshop how much paint to push out of the brush. It’s sort of like ink flowing from a pen. If the value is low, there will be hardly any paint being released from the brush. As this value is raised, more and more paint will be released.
In the example below, I started off with a value of 5%. Then, I increased it to 30%, 70% and then 100%. The reason I had to start at 5% was because if I want any lower, you wouldn’t have been able to see any paint.

The last setting I’d like to discuss in this post is called Sample All Layers. This one is important. You can find it all the way at the right side of the options bar and it consists of a check box.
If you leave this box unchecked, you’ll have the ability to paint on one layer and then paint on another layer without the paint on either layer having an effect on anything other than itself. Each layer will remain isolated. Conversely, if you check this box, whatever is on one layer will affect whatever is on another layer. It’ll be as though everything is on the same layer. In later posts, I’ll explain why this is important and how this can help or hurt you.
For now, I tried to explain this concept through another example. On one layer, I painted three horizontal green lines. Then, I created a new layer and I painted, with aqua, the top diagonal line. As you can see, this top line didn’t affect the green lines at all.
After that, I checked the “Sample All Layers” box and painted another aqua line in that separate top layer. I’m referring to the lower diagonal line. You can clearly see that this one affected itself, as well as the green lines in the lower layer.

This setting will become extraordinarily important when you begin painting over photographs. You’ll need to have an impact on the layers below.
Anyway, I think I’ll stop there. This really is a huge topic and I think I’ve done a decent job at giving you an introduction to the Mixer Brush Tool. There is so much to this tool that I think it’s going to take a heck of a lot more posts. I’ll build off this one in the future.
If you have any questions or concerns, please leave them in the comment section below. Thanks for reading!
