KristinaW
Member
- Joined
- May 7, 2021
- Messages
- 127
- Reaction Score
- 0
- Points
- 18
- #1
By this point, you probably know how important Smart Objects can be when it comes to editing photos in Adobe Photoshop. What you may not know is that the concept that’s applied to photos is also applied to video in the same application. Smart Objects are a critical piece of editing with the freedom of resizing, reshaping, twisting and turning. No matter what you do to a Smart Object, you can rest assured that the original is still available and it hasn’t been destroyed in any way.
By the way, if you’d like a refresher on Smart Objects in Photoshop, please read through the posts I link to below.
What are Smart Objects in Adobe Photoshop?
Converting Multiple Layers into a Smart Object in Adobe Photoshop
Linking a Smart Object to a File in Adobe Photoshop
Editing RAW Files as Smart Objects in Adobe Photoshop
The Difference Between Duplicate Smart Objects in Adobe Photoshop
There are more posts, but I didn’t want to go nuts with the linking here. If you really truly have an interest, simply search “smart objects” in the search bar above.
In today’s post, I’ll demonstrate how to work with two video clips at the same time. I’ll convert one of the clips into a Smart Object and then set it up so it transforms in size. Then, I’ll export the final product and post the movie here so you can see it. Along the way, I’ll explain the importance of working with Smart Objects during video production in Photoshop.
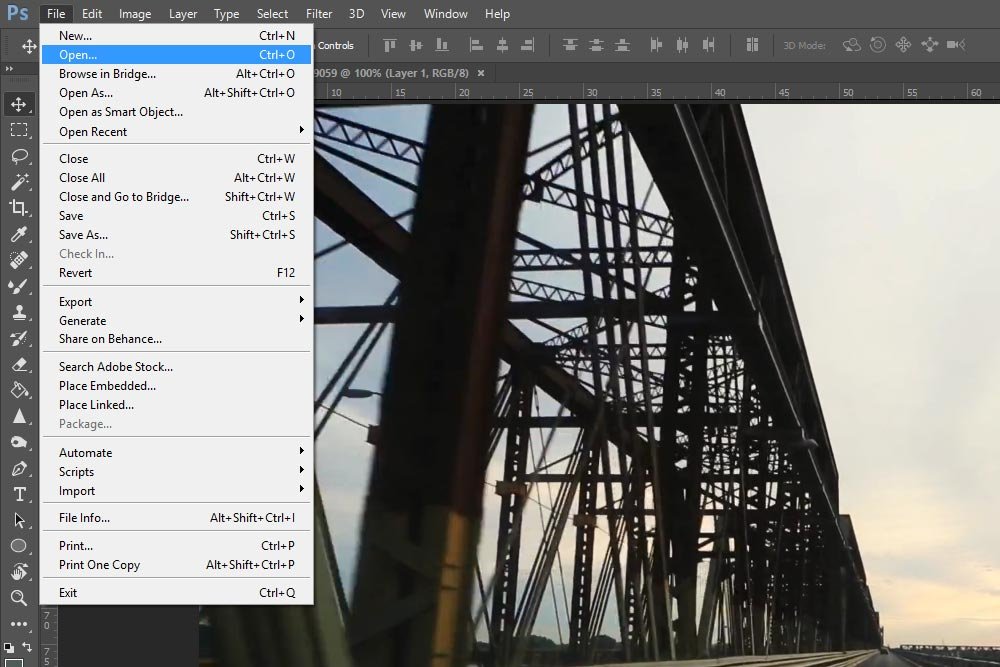
First, I’ll head up to the File > Open menu item and click. I’ll locate the video clip I’d like to launch into Photoshop and select it so it opens in its own tab.
Next, I’ll do the same exact thing for the second video clip I’d like to launch into Photoshop. Once both files are opened up, I’ll have two tabs with one video in each.
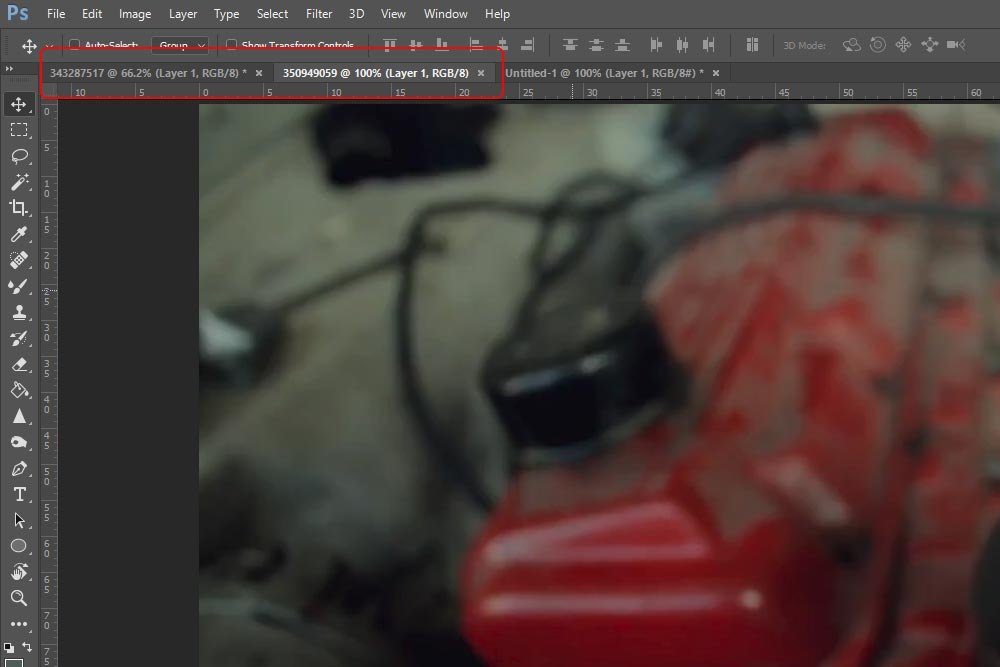
In the above screenshot, please excuse the third tab. I’m using that one to create these graphics.
To combine the second clip into the tab the first clip is in, all I need to do is, inside the second tab, click and drag the video layer onto the first tab. After that, while continuing to drag, move the layer down on top of the first video. Then, I’ll let go.
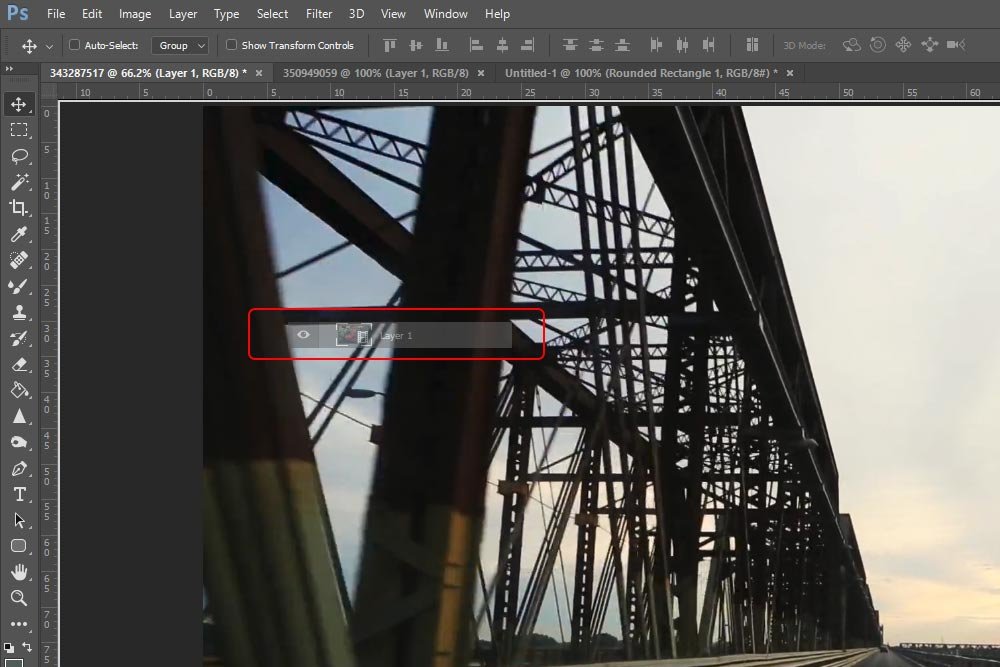
In the above screenshot, you can see the ghost of the layer being dragged and dropped into the first tab. After they’re both included, they should reside inside of the same group. In the next screenshot, you’ll see them stacked in the Layers panel. They’ll be contained in Video Group 1.
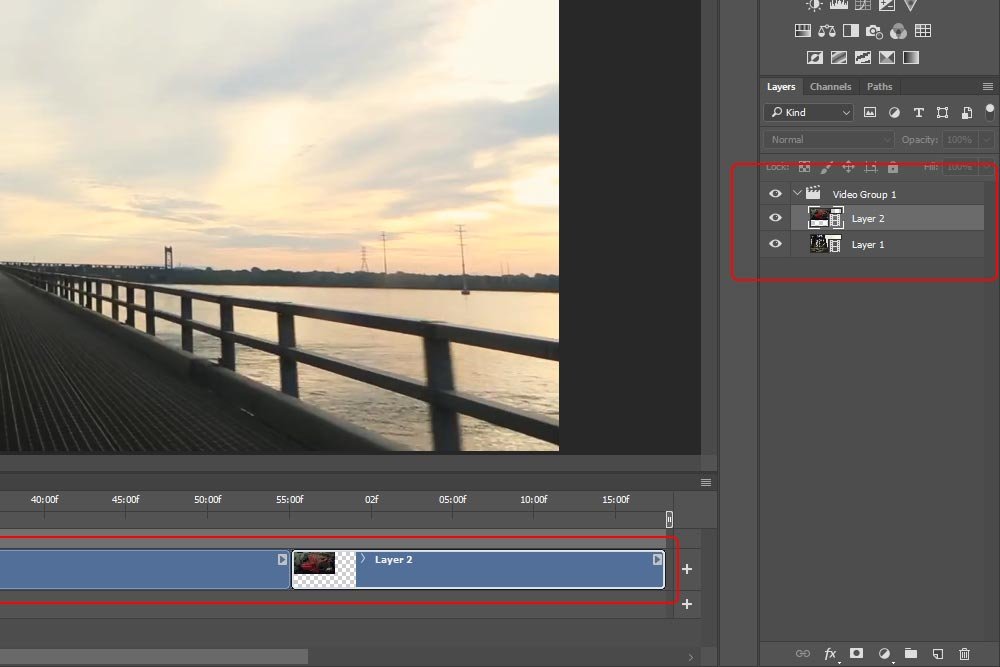
When video clips are contained in a group, they play sequentially. This is shown in the Timeline panel above. In order to have both clips play in parallel, I’ll need to break the group apart. To achieve this, I’ll simply right-click on the Video Group 1 layer and select Ungroup Layers from the menu that appears.
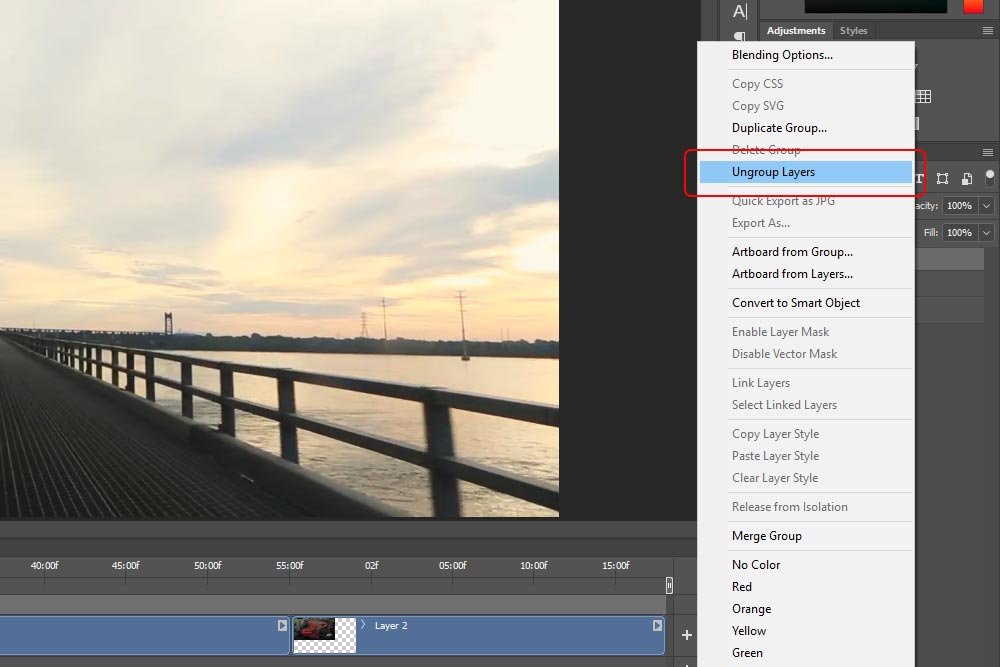
Now, if you look at the next screenshot, you’ll see the “Group” layer in the Layers panel has disappeared. Also, the two video clips are no longer forced to play sequentially.
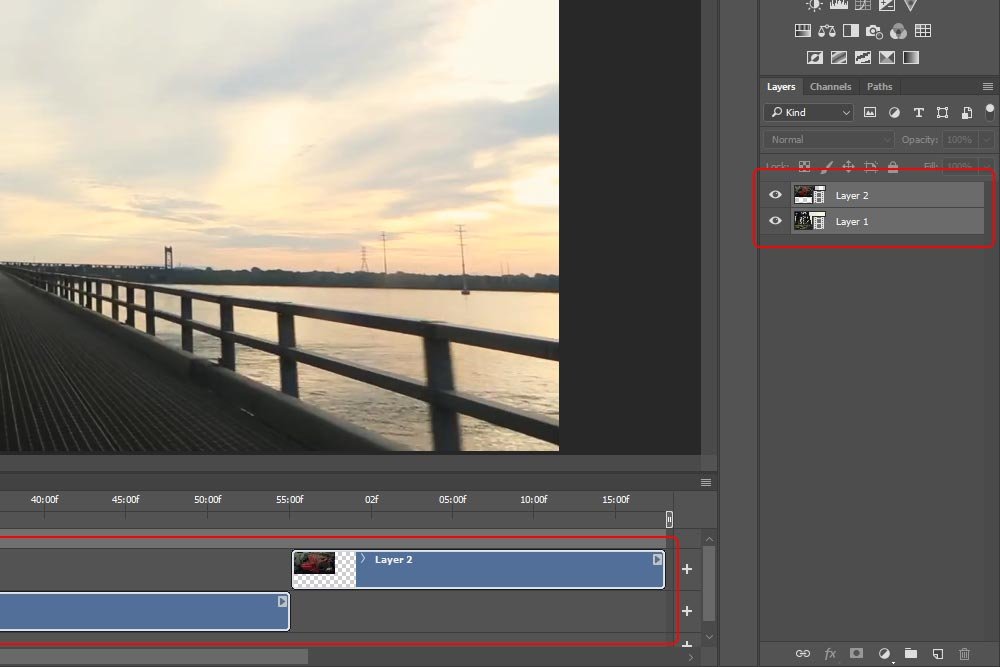
If I click and drag Layer 2 over to the beginning of the Timeline panel, both clips will play at the same time. Perfect.
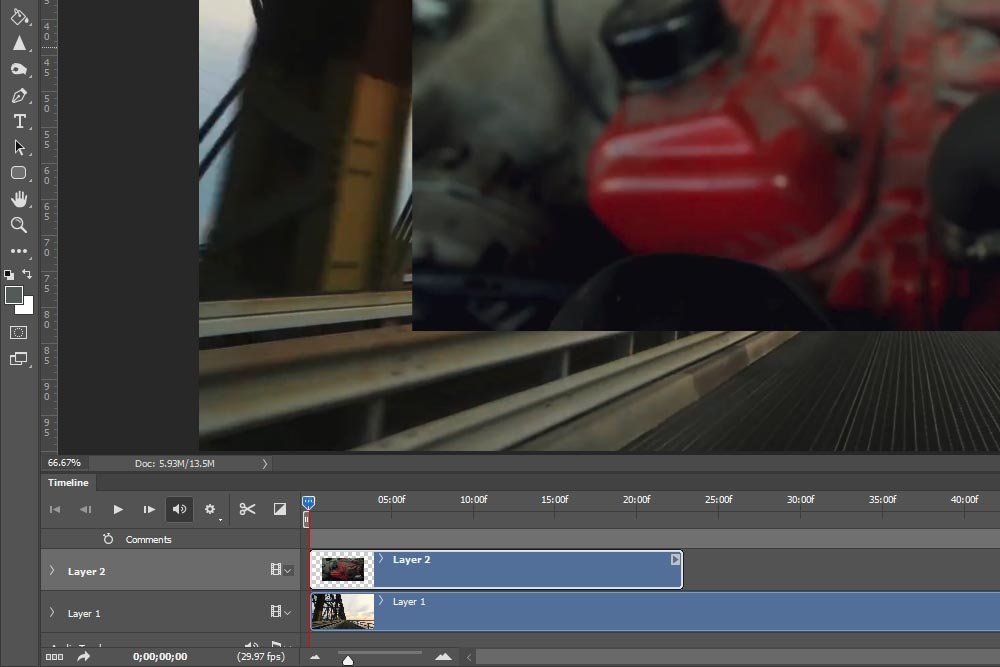
There’s a funny thing that happens inside of Photoshop when you attempt to transform a video layer. Before you can accomplish the task, you’re told to make the layer a Smart Object. When I select the layer I want to transform and then press Ctrl+T (Command+T for Mac) on my keyboard, I see this message:
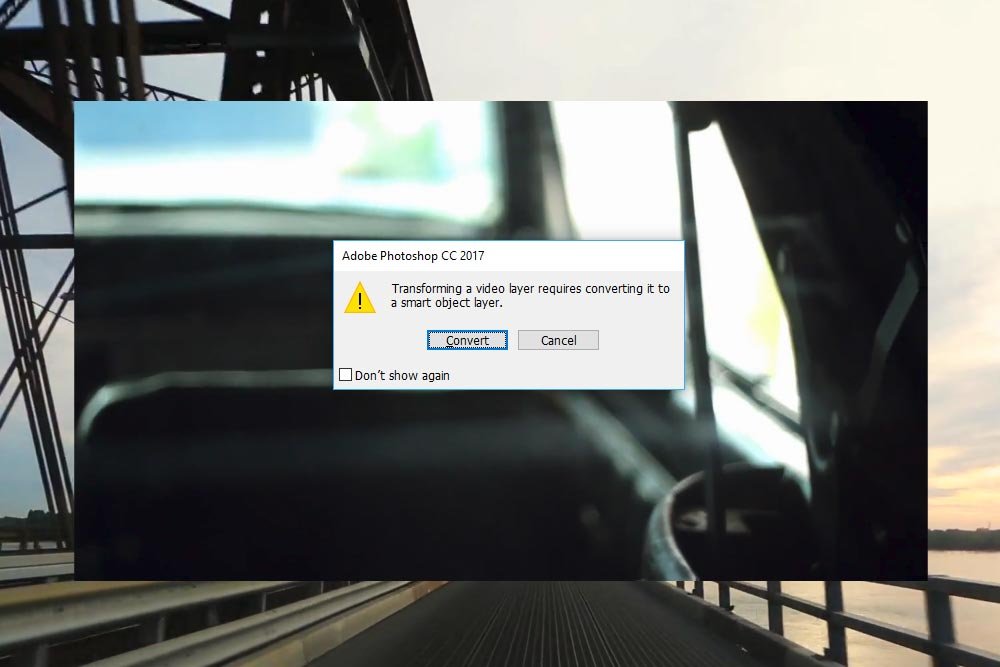
This message states: Transforming a video layer requires converting it to a smart object layer. So, to convert the layer, I can either click on the Convert button or do what I should have already done – manually converted the layer.
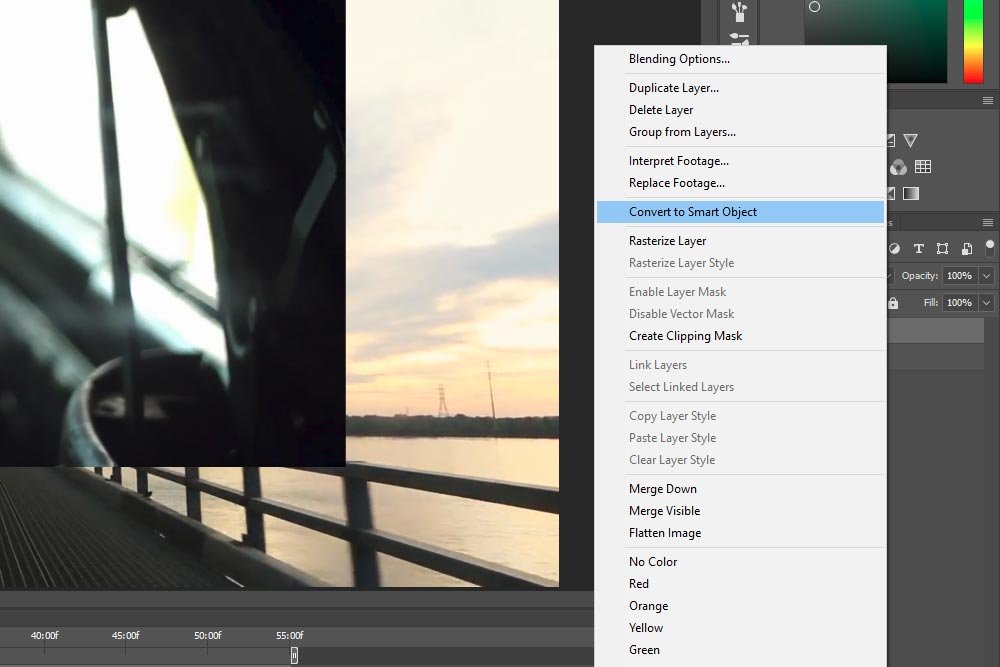
To convert a layer to a Smart Object, right click on the layer in the Layers panel. Then, inside the menu that appears, choose Convert to Smart Object. When I need to transform a layer from now on, I’ll know to take this step first, so I don’t waste time dealing with the pop-up box.
Once the layer has been converted to a Smart Object, it’ll turn purple down in the Timeline panel.
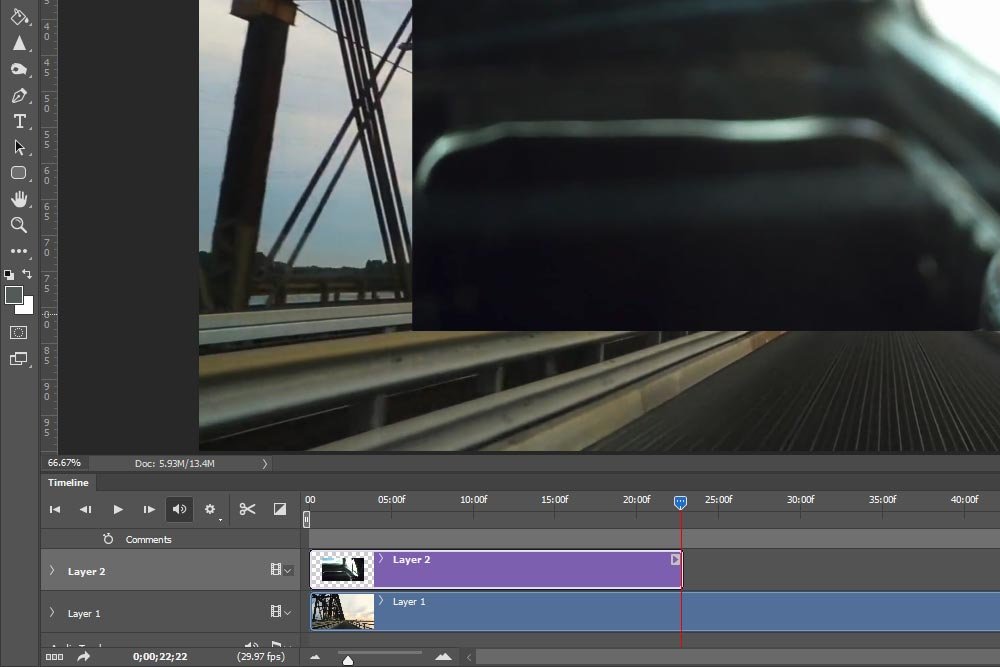
To trim this longer video clip, all I need to do is hover my mouse over the far end of it until the pointer turns into a black half-square with a double-arrow that goes through it. When that happens, I can click and drag the video clip to the left until it snaps into position at the end of the shorter clip. Basically, I’m just clicking and dragging to shorten the clip.
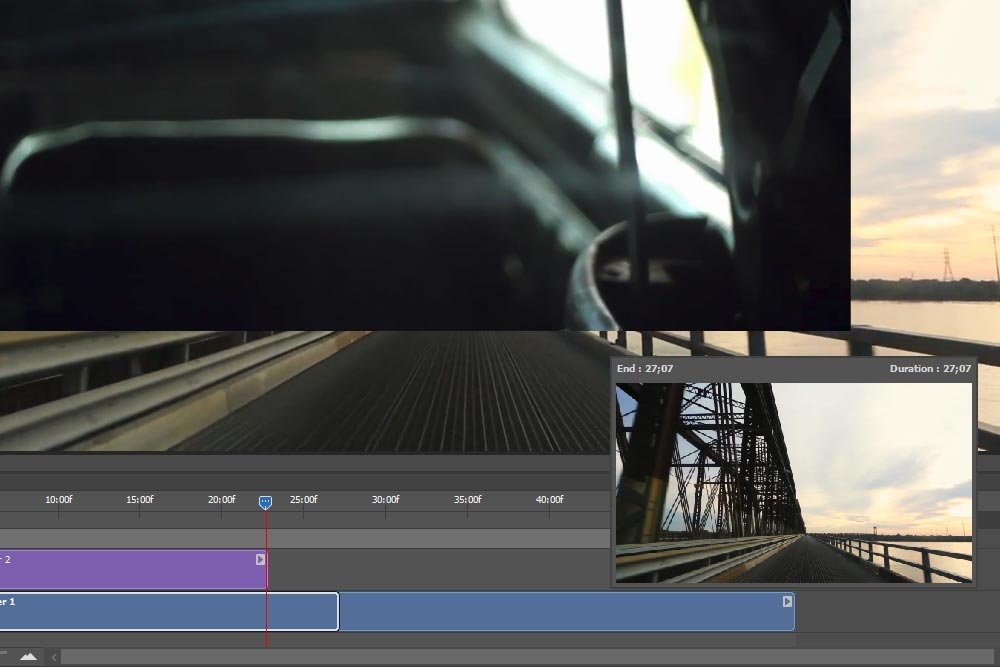
This next screenshot shows the process about halfway through.
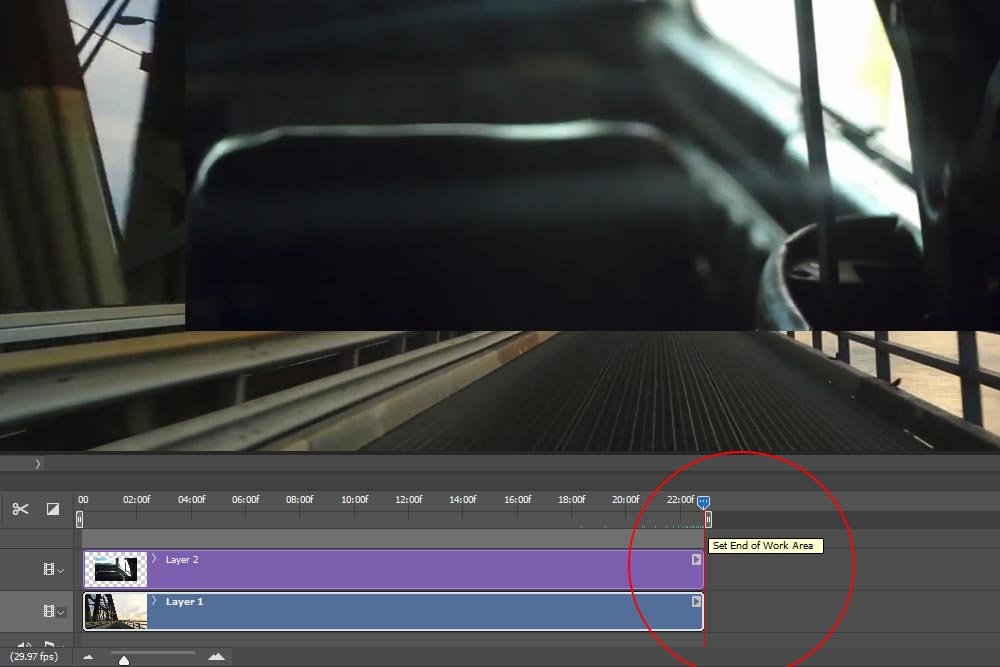
After I do that, I can move the Set End of Work Area marker so it trims off the millisecond difference from both clips, so they’ll end at exactly the same time.
To make this transition, I’ll need to follow a few steps. First, I’ll open up the layer options by clicking on the small arrow that’s to the left of the layer name. This will expose the available transitions.
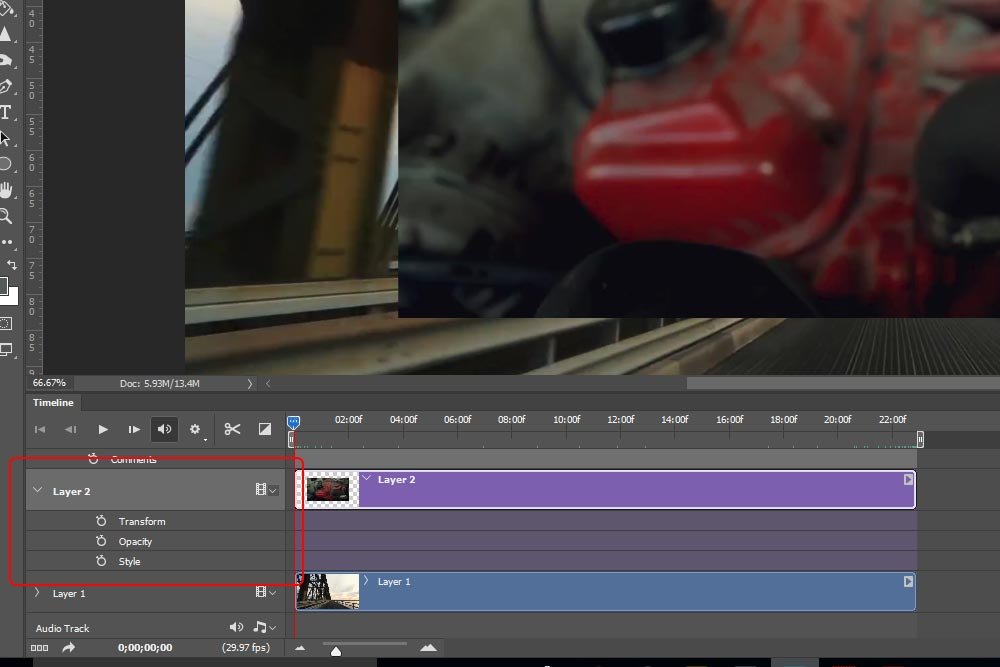
Next, I’ll press Ctrl+T (Command+T for Mac) on my keyboard to activate the free transform option. I’ll shrink the layer down to the size I’d like it to begin.
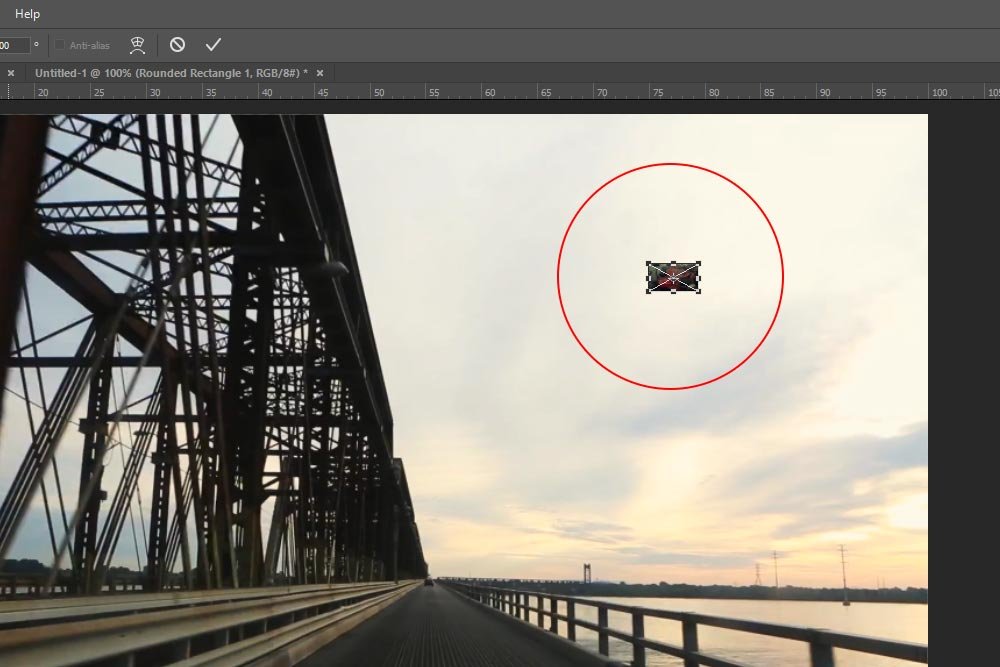
After that, I’ll position the layer where I want it to be when it’s small. I’ll create a few guides that will assist me when I’m enlarging the layer as well.
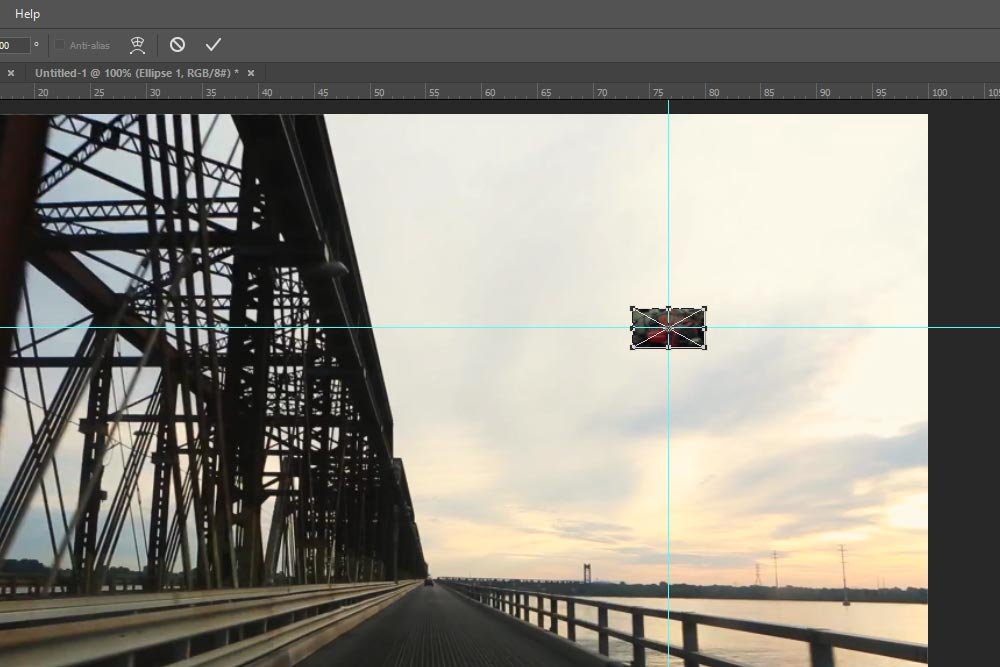
I want to stop here to mention something very quickly. As you can see, I’ve reduced the size of this layer quite a bit. If this was a photograph and I didn’t convert it to a Smart Object, you can probably imagine how horrible and pixelated it would look after I enlarged it again. Converting the layer to a Smart Object preserves the sharpness and quality, no matter what size you transform it to (as long as it’s no larger than the original). You can see why Photoshop makes Smart Object conversion mandatory with this type of transformation while working in video.
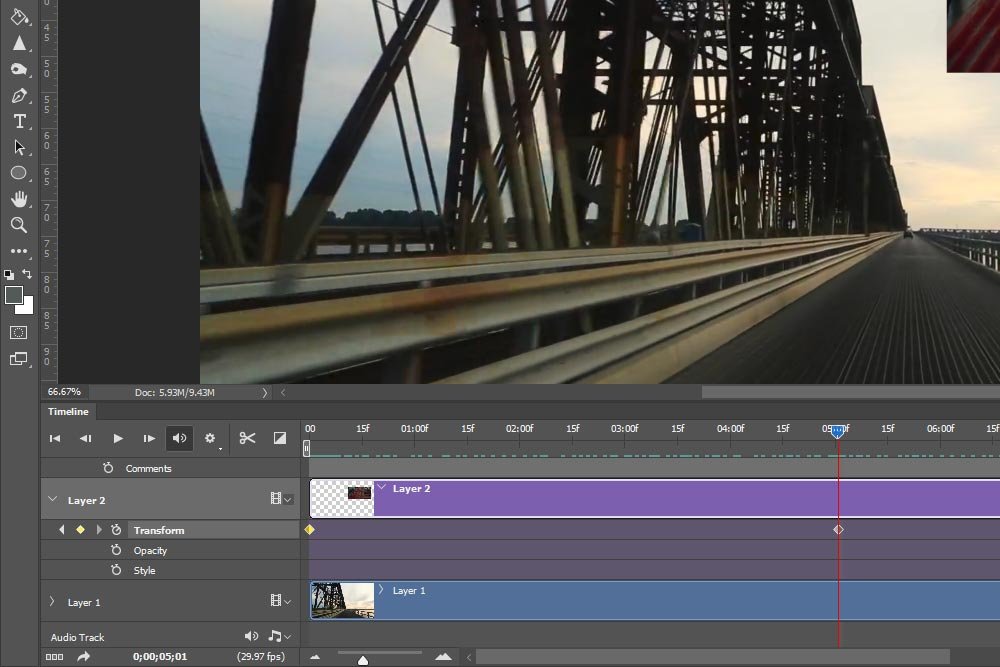
At this point, I can head back down to the Timeline panel, move the playhead to the position I want this transition to begin and click on the Transform stopwatch icon. This will add a keyframe to the timeline.
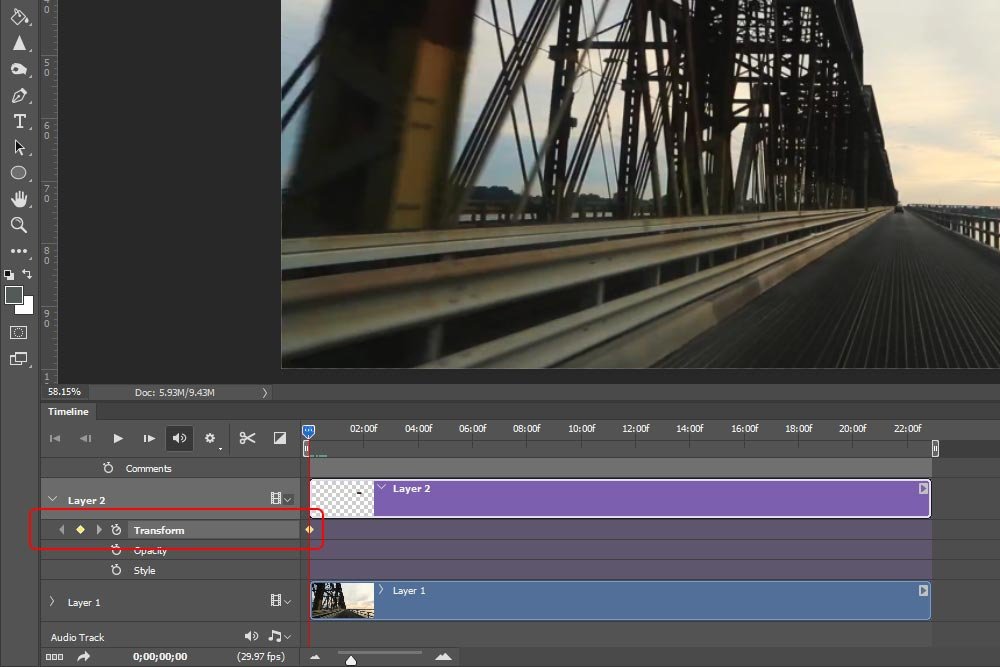
Now, I’ll push the playhead to the 5 second mark, transform the layer so it’s the size and position I want and press Enter on my keyboard. I’ll use the guides I set up to keep the small video in place (centered on the guides). Also, after I press Enter, Photoshop will automatically add the second keyframe. The first keyframe indicates the smaller size and the second keyframe indicates the larger size. Everything in between is transition performed automatically by Photoshop.
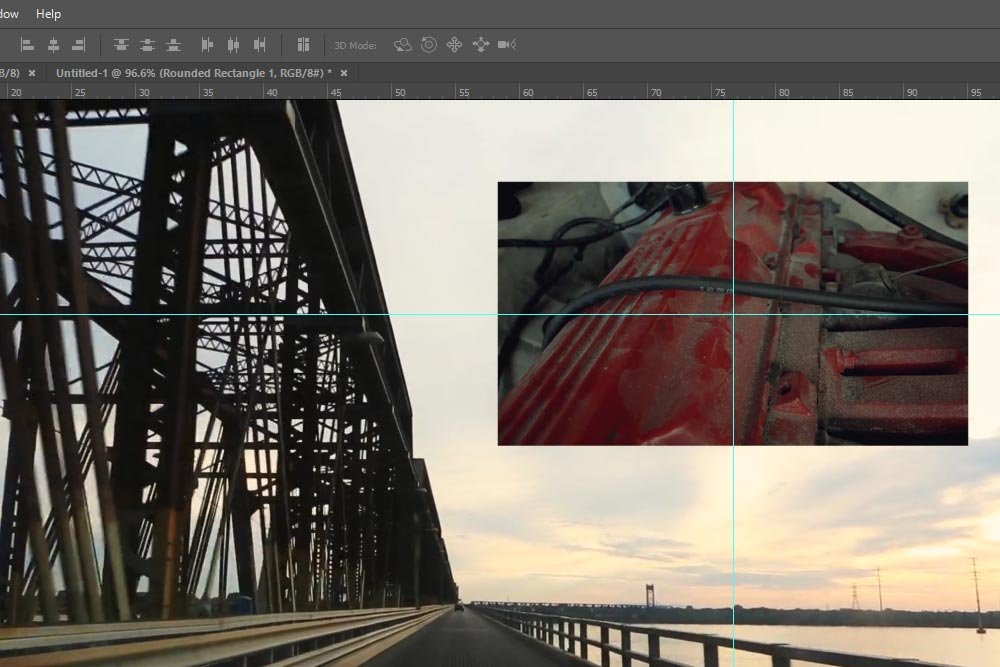
Here is the final size for the smaller video.
Depending on the length and quality of the video, rendering my take a few minutes. In my case, it took about 60 seconds to complete.
I uploaded the video to Youtube and here it is. Please let me know what you think. Also, if you have any questions or concerns about this post, please let me know in the comment section below. Thanks for reading!
Editing Video in Adobe Photoshop – Converting Layer to Smart Object
By the way, if you’d like a refresher on Smart Objects in Photoshop, please read through the posts I link to below.
What are Smart Objects in Adobe Photoshop?
Converting Multiple Layers into a Smart Object in Adobe Photoshop
Linking a Smart Object to a File in Adobe Photoshop
Editing RAW Files as Smart Objects in Adobe Photoshop
The Difference Between Duplicate Smart Objects in Adobe Photoshop
There are more posts, but I didn’t want to go nuts with the linking here. If you really truly have an interest, simply search “smart objects” in the search bar above.
In today’s post, I’ll demonstrate how to work with two video clips at the same time. I’ll convert one of the clips into a Smart Object and then set it up so it transforms in size. Then, I’ll export the final product and post the movie here so you can see it. Along the way, I’ll explain the importance of working with Smart Objects during video production in Photoshop.
Opening & Combining Clips Into the Same Tab
It’s easy to open multiple video clips into Adobe Photoshop. It’s even easier to combine all those clips into one tab. Below, I’ll explain exactly how to do that.First, I’ll head up to the File > Open menu item and click. I’ll locate the video clip I’d like to launch into Photoshop and select it so it opens in its own tab.

Next, I’ll do the same exact thing for the second video clip I’d like to launch into Photoshop. Once both files are opened up, I’ll have two tabs with one video in each.

In the above screenshot, please excuse the third tab. I’m using that one to create these graphics.
To combine the second clip into the tab the first clip is in, all I need to do is, inside the second tab, click and drag the video layer onto the first tab. After that, while continuing to drag, move the layer down on top of the first video. Then, I’ll let go.

In the above screenshot, you can see the ghost of the layer being dragged and dropped into the first tab. After they’re both included, they should reside inside of the same group. In the next screenshot, you’ll see them stacked in the Layers panel. They’ll be contained in Video Group 1.

When video clips are contained in a group, they play sequentially. This is shown in the Timeline panel above. In order to have both clips play in parallel, I’ll need to break the group apart. To achieve this, I’ll simply right-click on the Video Group 1 layer and select Ungroup Layers from the menu that appears.

Now, if you look at the next screenshot, you’ll see the “Group” layer in the Layers panel has disappeared. Also, the two video clips are no longer forced to play sequentially.

If I click and drag Layer 2 over to the beginning of the Timeline panel, both clips will play at the same time. Perfect.

Creating a Smart Object
The goal for this project is to have Layer 2 start off very small in the upper right corner of the Video 1 layer and transition to a window that measures about 25% of the larger video. Basically, I’d like to have two videos playing at the same time. I want one of them full size and the other a smaller size. I’d like the entire video to last a bit over 20 seconds and for about 5 of those seconds, I want the smaller video to transition from really small to just small.There’s a funny thing that happens inside of Photoshop when you attempt to transform a video layer. Before you can accomplish the task, you’re told to make the layer a Smart Object. When I select the layer I want to transform and then press Ctrl+T (Command+T for Mac) on my keyboard, I see this message:

This message states: Transforming a video layer requires converting it to a smart object layer. So, to convert the layer, I can either click on the Convert button or do what I should have already done – manually converted the layer.
To convert a layer to a Smart Object, right click on the layer in the Layers panel. Then, inside the menu that appears, choose Convert to Smart Object. When I need to transform a layer from now on, I’ll know to take this step first, so I don’t waste time dealing with the pop-up box.

Once the layer has been converted to a Smart Object, it’ll turn purple down in the Timeline panel.

Trimming Unwanted Footage
As you may have noticed, both video clips aren’t the same length. One is around 22 seconds and the other is around 55. I’d like it so each clip is around 22 seconds long, so they match up.To trim this longer video clip, all I need to do is hover my mouse over the far end of it until the pointer turns into a black half-square with a double-arrow that goes through it. When that happens, I can click and drag the video clip to the left until it snaps into position at the end of the shorter clip. Basically, I’m just clicking and dragging to shorten the clip.
This next screenshot shows the process about halfway through.

After I do that, I can move the Set End of Work Area marker so it trims off the millisecond difference from both clips, so they’ll end at exactly the same time.

Transforming the Layer
Okay, things are looking very good. I made all the preparations I needed to make and it’s time to transform the layer.To make this transition, I’ll need to follow a few steps. First, I’ll open up the layer options by clicking on the small arrow that’s to the left of the layer name. This will expose the available transitions.

Next, I’ll press Ctrl+T (Command+T for Mac) on my keyboard to activate the free transform option. I’ll shrink the layer down to the size I’d like it to begin.

After that, I’ll position the layer where I want it to be when it’s small. I’ll create a few guides that will assist me when I’m enlarging the layer as well.

I want to stop here to mention something very quickly. As you can see, I’ve reduced the size of this layer quite a bit. If this was a photograph and I didn’t convert it to a Smart Object, you can probably imagine how horrible and pixelated it would look after I enlarged it again. Converting the layer to a Smart Object preserves the sharpness and quality, no matter what size you transform it to (as long as it’s no larger than the original). You can see why Photoshop makes Smart Object conversion mandatory with this type of transformation while working in video.
At this point, I can head back down to the Timeline panel, move the playhead to the position I want this transition to begin and click on the Transform stopwatch icon. This will add a keyframe to the timeline.

Now, I’ll push the playhead to the 5 second mark, transform the layer so it’s the size and position I want and press Enter on my keyboard. I’ll use the guides I set up to keep the small video in place (centered on the guides). Also, after I press Enter, Photoshop will automatically add the second keyframe. The first keyframe indicates the smaller size and the second keyframe indicates the larger size. Everything in between is transition performed automatically by Photoshop.

Here is the final size for the smaller video.

Rendering the Video
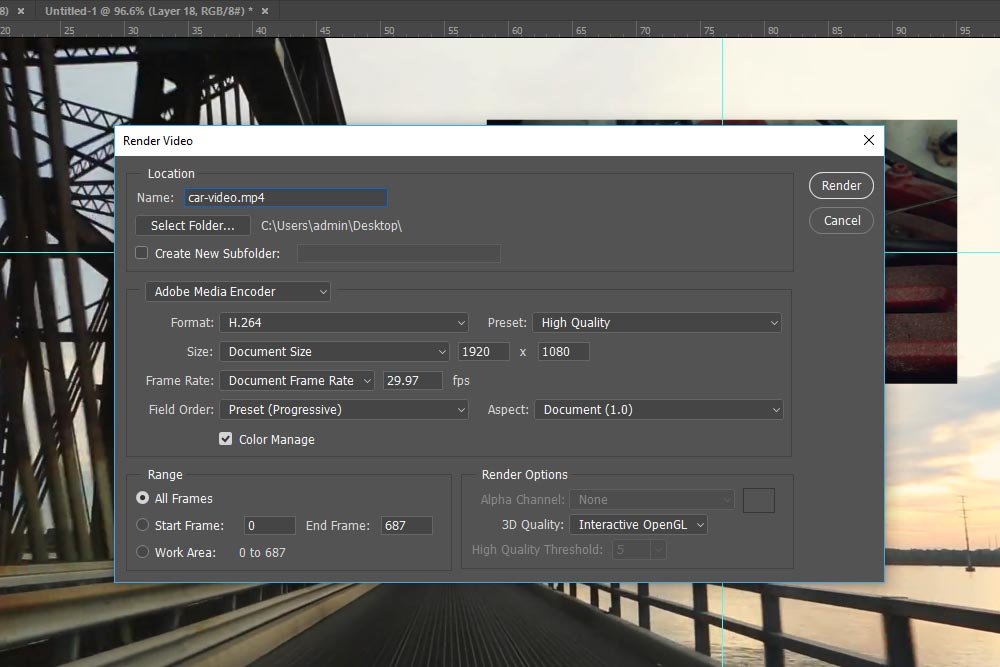
That’s it! All my editing is complete and I can render the video for output. To do this, I’ll head up to the File > Export > Render Video. I’ll be writing posts that focus on how to properly render video in the future, so I won’t harp on it now. I will, however, give you a quick screenshot of the Render Video dialog box.
Depending on the length and quality of the video, rendering my take a few minutes. In my case, it took about 60 seconds to complete.
I uploaded the video to Youtube and here it is. Please let me know what you think. Also, if you have any questions or concerns about this post, please let me know in the comment section below. Thanks for reading!
Editing Video in Adobe Photoshop – Converting Layer to Smart Object
