CraigHardy
Member
- Joined
- May 11, 2021
- Messages
- 223
- Reaction Score
- 2
- Points
- 18
- #1
I remember back when Adobe began integrating its different applications with one another. In the beginning, it was a noble effort. While they claimed integration, what I found was something much less. Let’s just say there were some bugs that needed to get worked out. As a matter of fact, much of my workflow today is derived from lessons learned all the way back then.
Today is much different. It appears that the connection between Adobe’s image editing applications is tried and true. When working on different types of photos, you can seamlessly work on one in one particular application and then jump to another one. The best part is, you can do what you have to do and then jump back to the first one. I know this sort of sounds confusing, but stick with me throughout this post. I’ll make it all seem super simple.
In today’s post, I’ll do a little editing on an image in Adobe Lightroom. When I feel that I’ve done enough in that application, I’ll make the leap over to Photoshop. While there, I’ll take advantage of something random that that application excels at. Then, I’ll make a quick edit in Camera Raw and jump back to Photoshop again. Finally, I’ll save the file out, which will close Photoshop and bring me all the way back to Lightroom. It’ll be like a big circle of coolness because stuff like this is awesome. I love it when things like this come together.

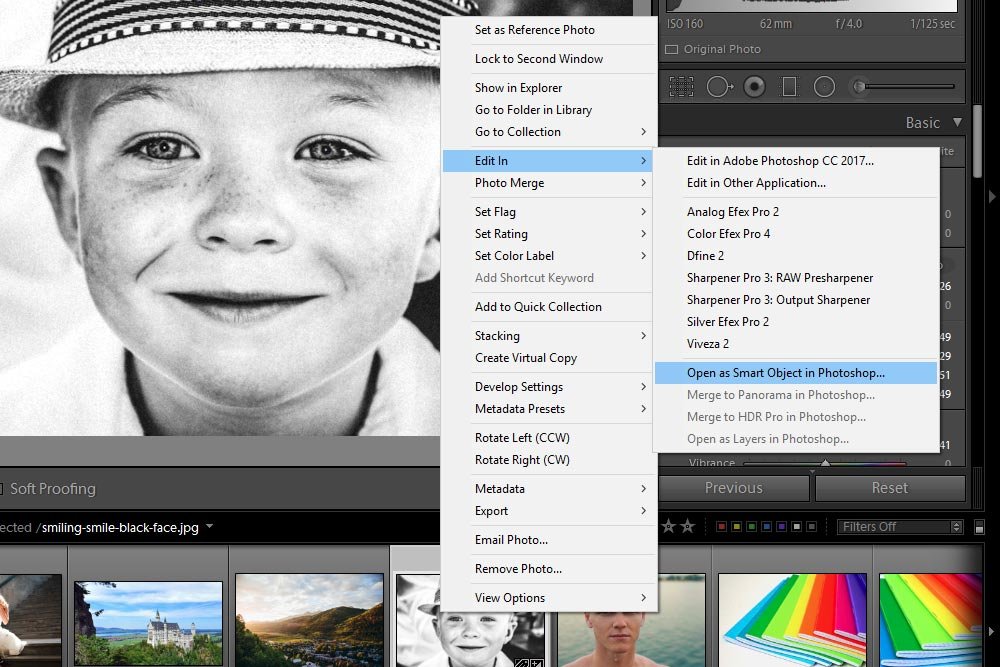
When I feel I’ve done enough editing in Lightroom, I can launch the photo into Photoshop. To do this, I’ll right-click on the image’s thumbnail down in the Filmstrip panel, roll over Edit In and then click on Open as Smart Object in Photoshop.
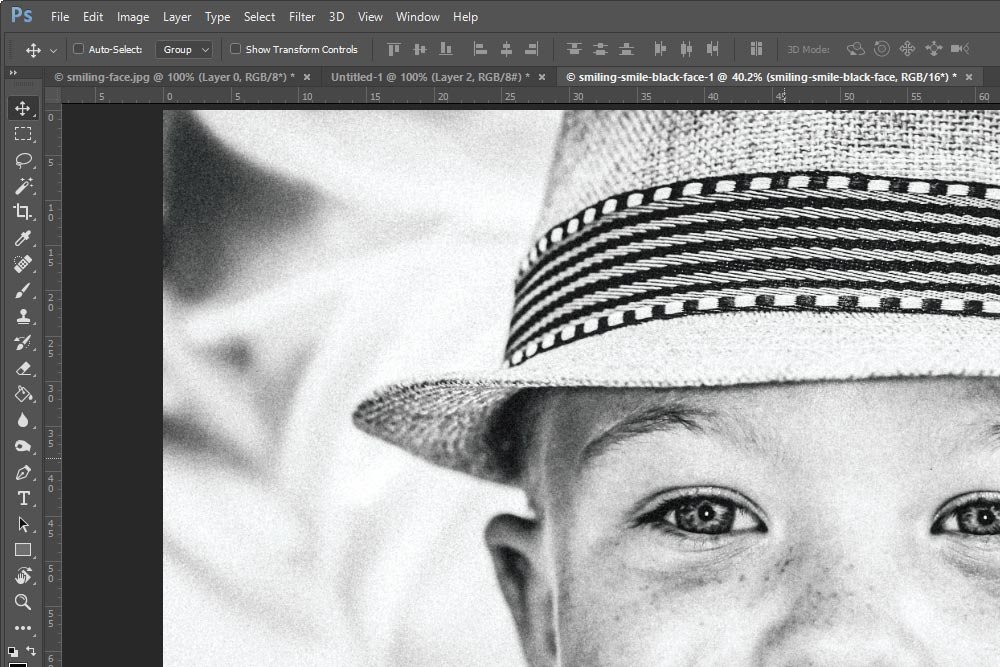
Once I do that, the photo will automatically open up inside of Adobe Photoshop where I can do all sorts of editing.
Once I’m finished with that, I’ll take a look at the photo to decide if it needs any further editing. Since I’m going through a sequence here, I’ll say that it perhaps needs something from Camera Raw. To open this Smart Object in Camera Raw from Photoshop, I’ll simply double-click the layer thumbnail in the Layers panel. That will immediately open Camera Raw (without the Photoshop adjustment layer applied).
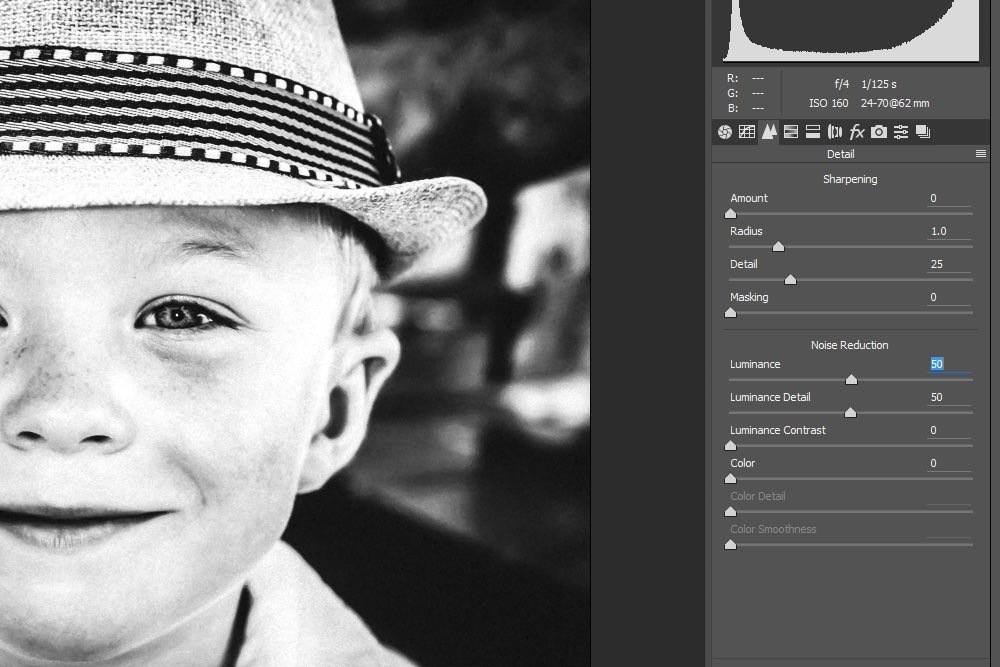
Since I think the image needs some more contrast, I’ll push a few sliders around in Camera Raw’s Basic panel. I also think there’s some grain that shouldn’t be there, so I’ll head into the Detail panel and push the Noise Reduction Luminance slider to the right a bit. That will get rid of some of the noise.
When I’m done, I’ll click the OK button to return to where I was in Photoshop.
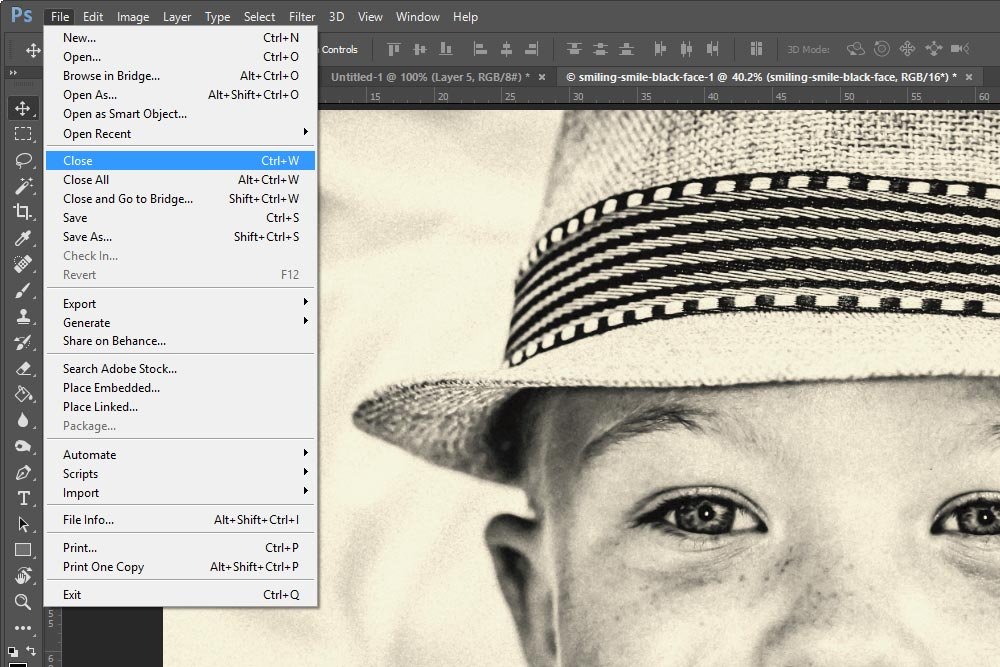
To close the image, I’ll go to the File > Close menu item and click.
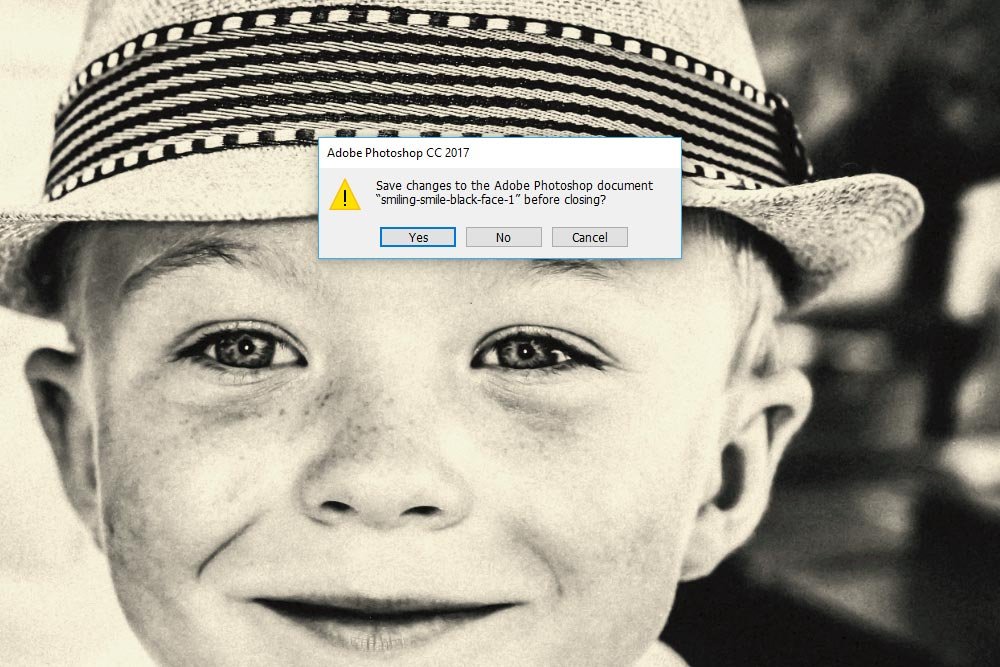
After I do that, a small dialog box will appear and ask if I want to save the file. I’ll click on Yes and watch as that tab and image disappear from Photoshop’s workspace.
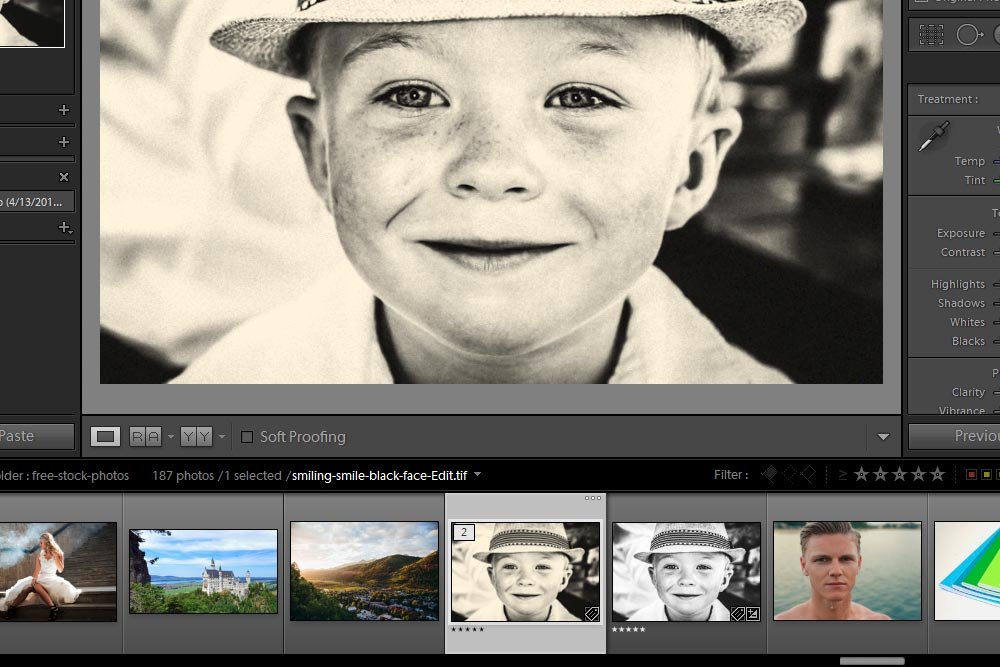
When I click back into Lightroom, I’ll find a new image there waiting for me. The original will be in the Filmstrip panel with the new, modified version sitting right next to it – adjustments from Photoshop, Camera Raw and all.
Isn’t that cool? I told you it would be a big circle. At this point, I could save the image, print it, turn it into a PDF file or whatever else I feel like doing in Lightroom.
——
I hope I clearly explained how easy it is to edit in Adobe Lightroom, open the edited photo into Photoshop, do some more editing in Camera Raw and then return to Lightroom. Once you get the gist of it and go through the process a few times, I think you’ll easily remember all the steps and fly through it after that. If you have any questions or concerns, please leave them in the comment section below. Thanks for reading!
Today is much different. It appears that the connection between Adobe’s image editing applications is tried and true. When working on different types of photos, you can seamlessly work on one in one particular application and then jump to another one. The best part is, you can do what you have to do and then jump back to the first one. I know this sort of sounds confusing, but stick with me throughout this post. I’ll make it all seem super simple.
In today’s post, I’ll do a little editing on an image in Adobe Lightroom. When I feel that I’ve done enough in that application, I’ll make the leap over to Photoshop. While there, I’ll take advantage of something random that that application excels at. Then, I’ll make a quick edit in Camera Raw and jump back to Photoshop again. Finally, I’ll save the file out, which will close Photoshop and bring me all the way back to Lightroom. It’ll be like a big circle of coolness because stuff like this is awesome. I love it when things like this come together.
Demo Photo
For today’s post, I’ll be working with a version of the photo I display below. Remember, it’s not important which photo I choose or what I do to it. What is important is how I get from one application to another. That’s the lesson I’m trying to convey.
Editing in Lightroom & Jumping to Photoshop
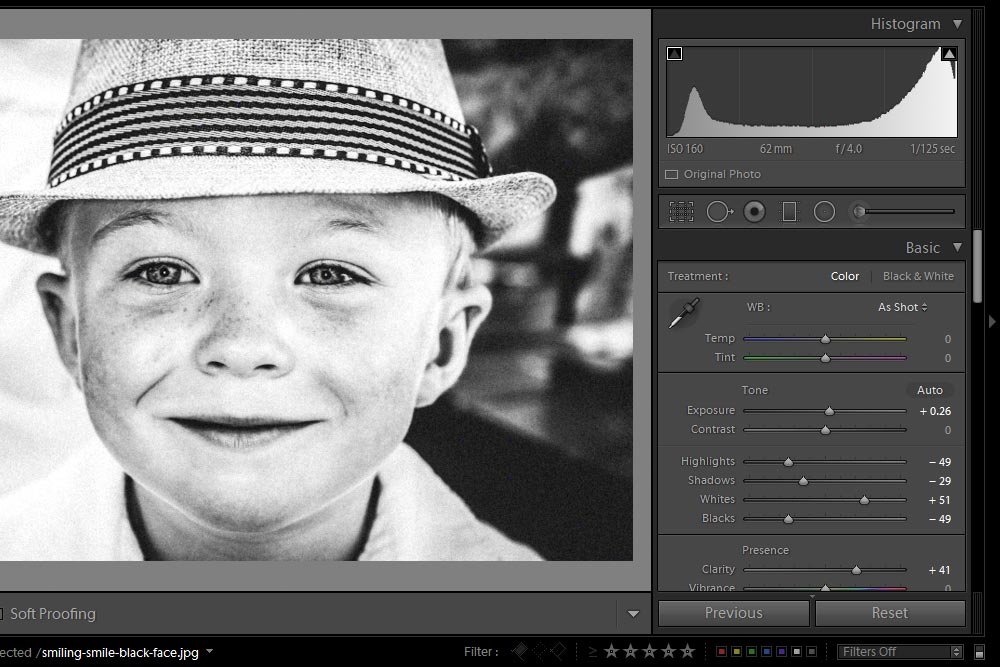
I’ve already got Lightroom opened up on my computer. The image I’d like to work on is selected and I’m in the Develop module. The first thing I’m going to do is to make a few edits in the Basic panel. Nothing crazy – just a couple of things to give the image some contrast.
When I feel I’ve done enough editing in Lightroom, I can launch the photo into Photoshop. To do this, I’ll right-click on the image’s thumbnail down in the Filmstrip panel, roll over Edit In and then click on Open as Smart Object in Photoshop.

Once I do that, the photo will automatically open up inside of Adobe Photoshop where I can do all sorts of editing.

Editing in Photoshop & Camera Raw
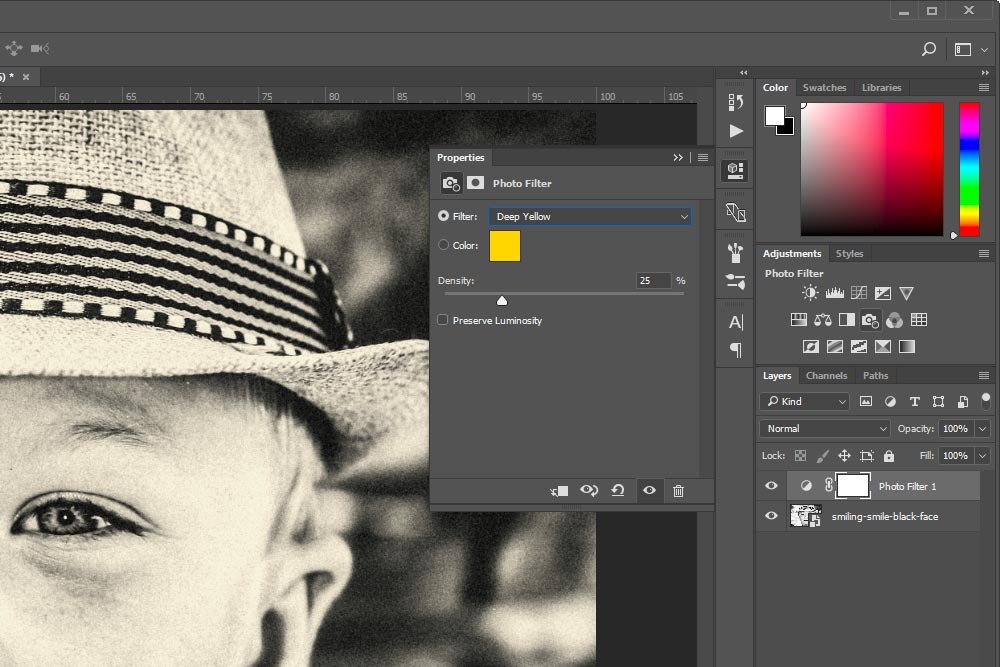
Now that I have the image opened up as a Smart Object in Photoshop, I can make some additional adjustments if necessary. In this case, just for fun, I’ll apply an adjustment layer. I’ll click the Photo Filter icon in the Adjustments panel to apply the new layer and to open up the Properties panel for the filter. Then, I’ll choose Deep Yellow from the Filter drop-down box. This will give the image sort of a yellow overlay to make it look more antique.
Once I’m finished with that, I’ll take a look at the photo to decide if it needs any further editing. Since I’m going through a sequence here, I’ll say that it perhaps needs something from Camera Raw. To open this Smart Object in Camera Raw from Photoshop, I’ll simply double-click the layer thumbnail in the Layers panel. That will immediately open Camera Raw (without the Photoshop adjustment layer applied).
Since I think the image needs some more contrast, I’ll push a few sliders around in Camera Raw’s Basic panel. I also think there’s some grain that shouldn’t be there, so I’ll head into the Detail panel and push the Noise Reduction Luminance slider to the right a bit. That will get rid of some of the noise.

When I’m done, I’ll click the OK button to return to where I was in Photoshop.
Closing Out of Photoshop & Going Back to Lightroom
Okay, I think I’ve done all the editing I would like to do, so I want to bring the photo back to Lightroom, which is my editing application of choice. To do this, all I need to do is close the image out of Photoshop.To close the image, I’ll go to the File > Close menu item and click.

After I do that, a small dialog box will appear and ask if I want to save the file. I’ll click on Yes and watch as that tab and image disappear from Photoshop’s workspace.

When I click back into Lightroom, I’ll find a new image there waiting for me. The original will be in the Filmstrip panel with the new, modified version sitting right next to it – adjustments from Photoshop, Camera Raw and all.

Isn’t that cool? I told you it would be a big circle. At this point, I could save the image, print it, turn it into a PDF file or whatever else I feel like doing in Lightroom.
——
I hope I clearly explained how easy it is to edit in Adobe Lightroom, open the edited photo into Photoshop, do some more editing in Camera Raw and then return to Lightroom. Once you get the gist of it and go through the process a few times, I think you’ll easily remember all the steps and fly through it after that. If you have any questions or concerns, please leave them in the comment section below. Thanks for reading!
