Cameron
Member
- Joined
- May 10, 2021
- Messages
- 108
- Reaction Score
- 3
- Points
- 23
- #1
While there are tons of great methods for altering the brightness, darkness and saturation of entire photos in Adobe Photoshop, there are also some very effective methods for altering only parts of a photo in the same application.
I’ll admit, I rarely edit anything other than entire photos. Generally, what I do is good enough. I plow through so many images on a daily basis that other, more detailed, workflows are simply out of the question. In addition, what I do, in my opinion, looks good. Rarely do I encounter something that needs a more detailed approach.
This isn’t to say that photos shouldn’t be edited on a more localized scale. Of course they should and in this post I plan on introducing you to a few tools that will assist with that endeavor. Be warned though – the tools I’m about to show you below have got a nasty past. As a matter of fact, I’ve hardly ever used them. With the upgrades and modifications of these tools in the more recent releases of Photoshop, however, their shortcomings have been greatly improved and I encourage all editors to take full advantage of what they can now offer.
In today’ post, I’ll work through the Dodge Tool, Burn Tool and Sponge Tool in an effort to demonstrate what editing with these assets used to result in and what the same edits can result in today. There’s a huge difference.
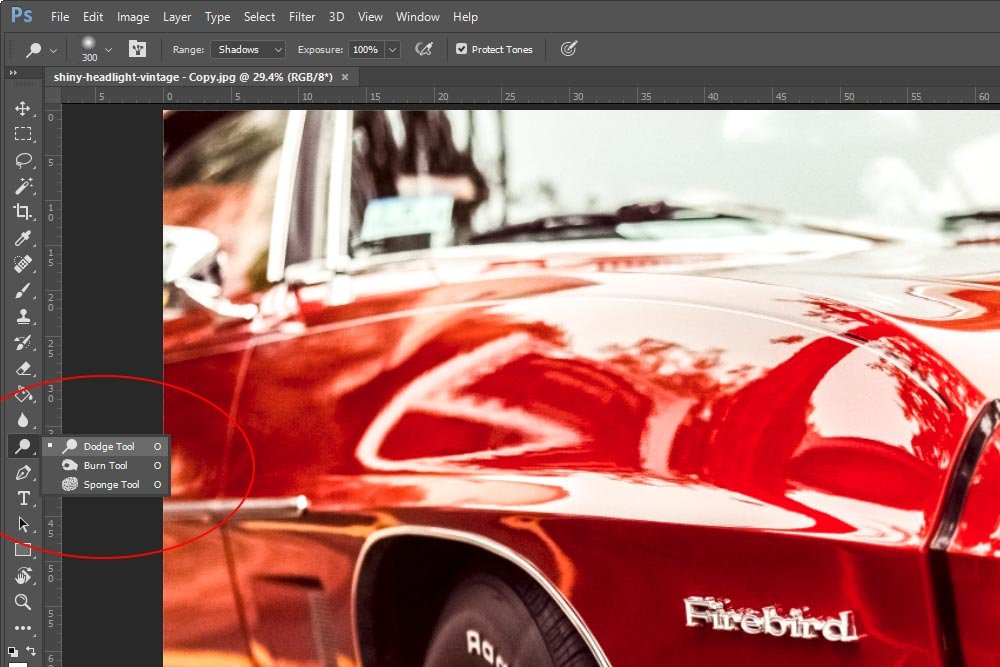
First, let me show you where both tools reside. I’ve already got the photo opened up into Photoshop. If I head over to the left vertical toolbar, I can click and drag open a tool set. Inside this tool set are the Dodge Tool, the Burn Tool and the Sponge Tool.
I selected the Dodge Tool. Now, if you take a look up at the top of Photoshop, above the photo, you’ll notice a new options bar. In this next screenshot, I outlined it in red.
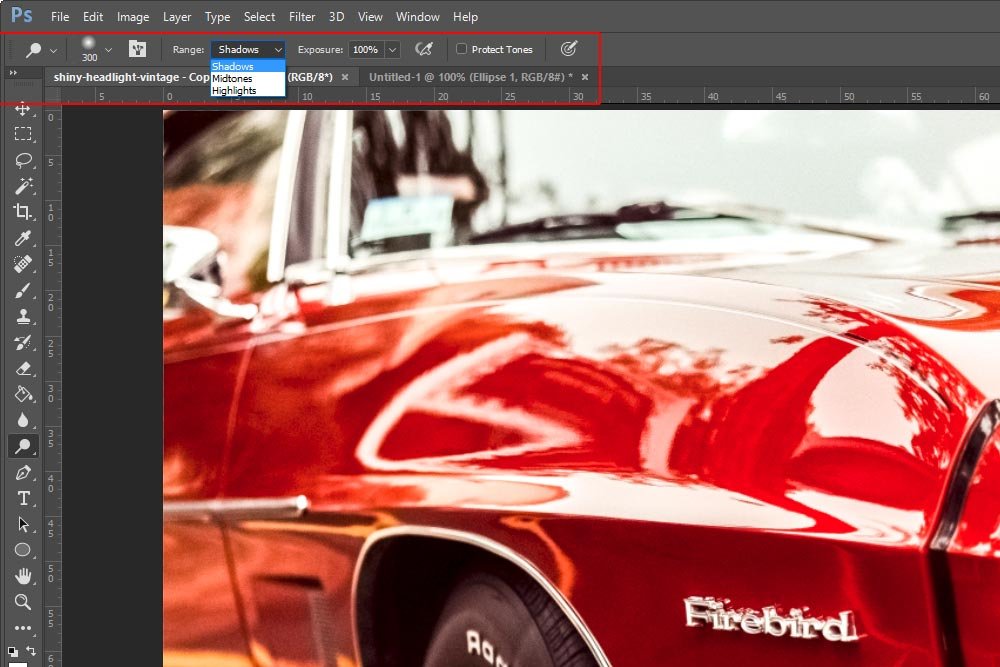
Inside the options bar, towards the left, is the brush selection area. You’re probably already familiar with this area because I’m sure you’ve used a brush previously. This is where you choose which brush size and texture you’d like to have applied to the tool at hand. I’ve gone with a soft, medium size brush that will most likely change in size as I continue on with this post.
To the right of that is a very helpful drop-down box. Inside the box are three values; Shadows, Midtones and Highlights. It’s important to select the value for the area you’d like to affect in the photo. For example, if I wanted to use the Dodge Tool to lighten a shadowed area on this vehicle, I’d select Shadows from the drop-down. If I chose Shadows and attempted to brush over a lighter area of the image, virtually no change would be made. Conversely, if I chose Highlights from the drop-down and then tried to brush over a darker area of the vehicle to lighten it, again, nothing would happen. In that case, I’d have to change the drop-down selection to Shadows.
Really, all this drop-down does is target the shade of the area you’d like to either lighten or darken. Match the shade of the area in your photo to what it says in the drop-down. It’s very straightforward.
Continuing on to the right, we’ll find the Exposure value slider. Think of this slider controlling the intensity of the change you’d like to make. For this post, I’ll keep this value set at 100%, so any change I make is easy to see.
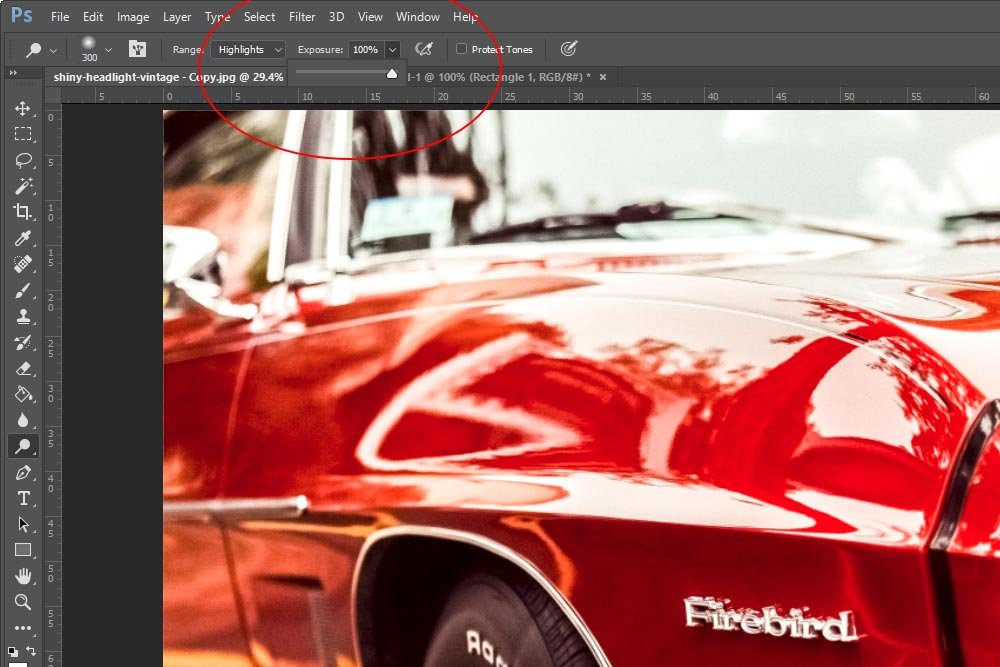
The only other area in the options bar I’m going to talk about is called Protect Tones and it’s turned on and off via a checkbox. For now, I’ll leave this box unchecked.
The concept of these two tools is simple. As I stated above, they are meant to lighten and darken the areas you brush. The problem is, throughout history, the results of using this tool have been dreadful. Let me show you what I mean. In the next screenshot, I’ll paint the fender of the car with the Dodge Tool. I’ll set the drop-down box to Shadows and keep the Exposure at 100%. Here’s what that looks like.
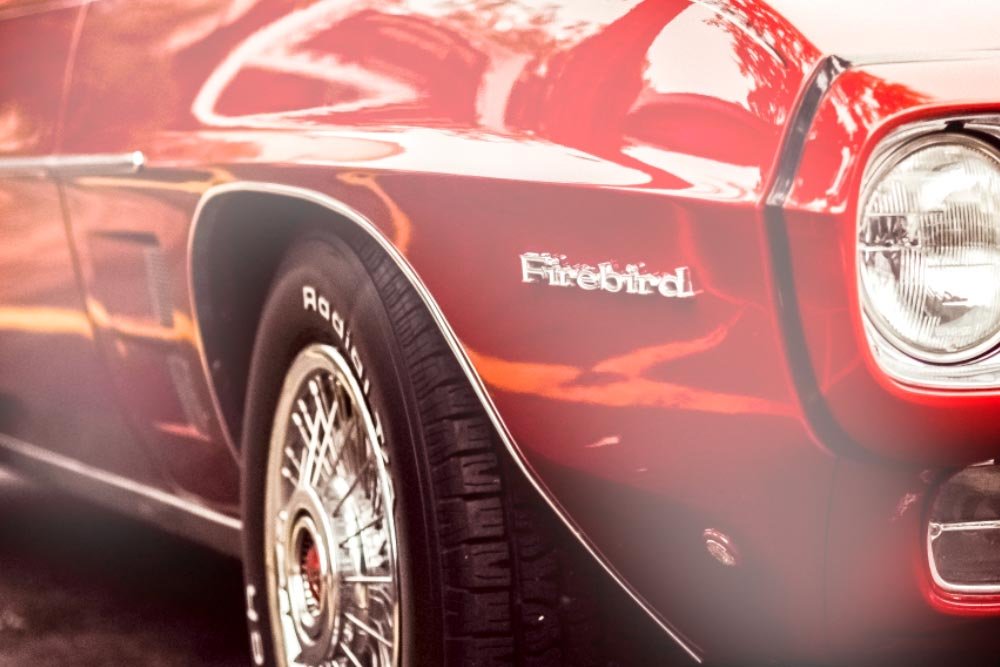
And if I use the Burn Tool to do the same thing, here is the result I get.
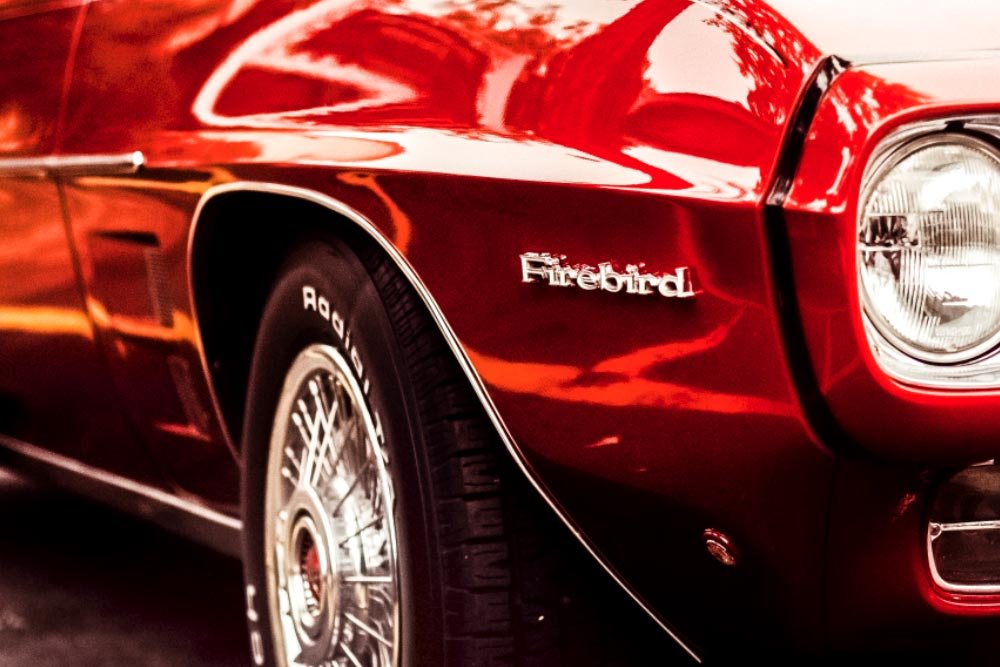
While the Burn Tool example isn’t nearly as offensive as the Dodge Tool, it’s still not very accurate.
To compensate for the lack of love because of this imperfect product, Adobe improved both tools. They now offer a feature that will protect tones, which is controlled by the checkbox I described above. I’ll go ahead and check the Protect Tones box and use the Dodge Tool to lighten some shadows. Let’s see the result.
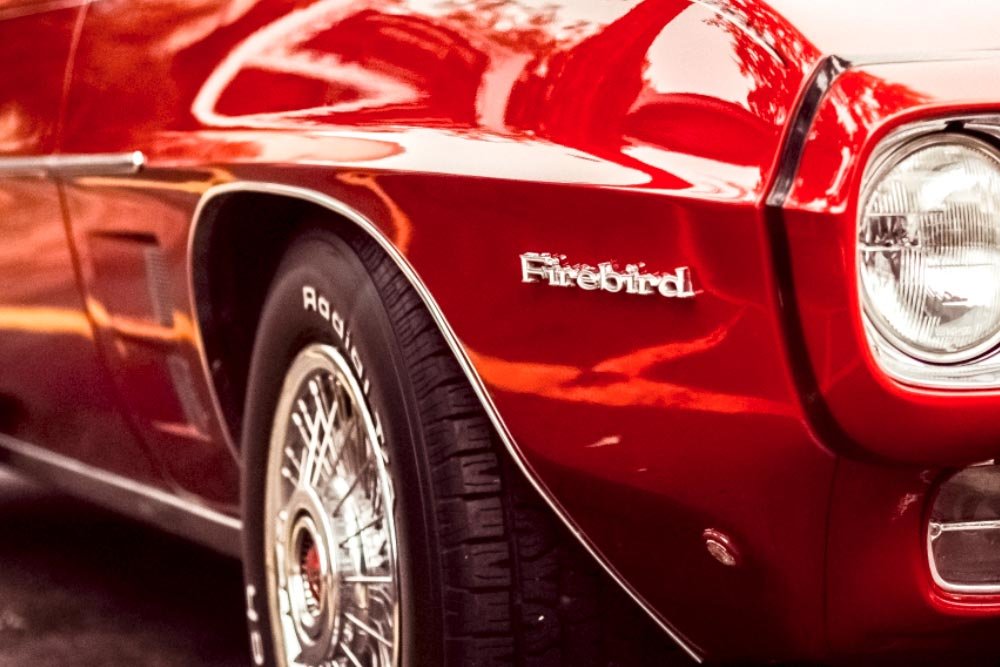
As you can see, there’s no more white haze over the fender. Now, the shadows have been lightened in a crisp manner.
Next, keeping the box checked, I’ll use the Burn Tool to darken some some of the highlights on the fender.
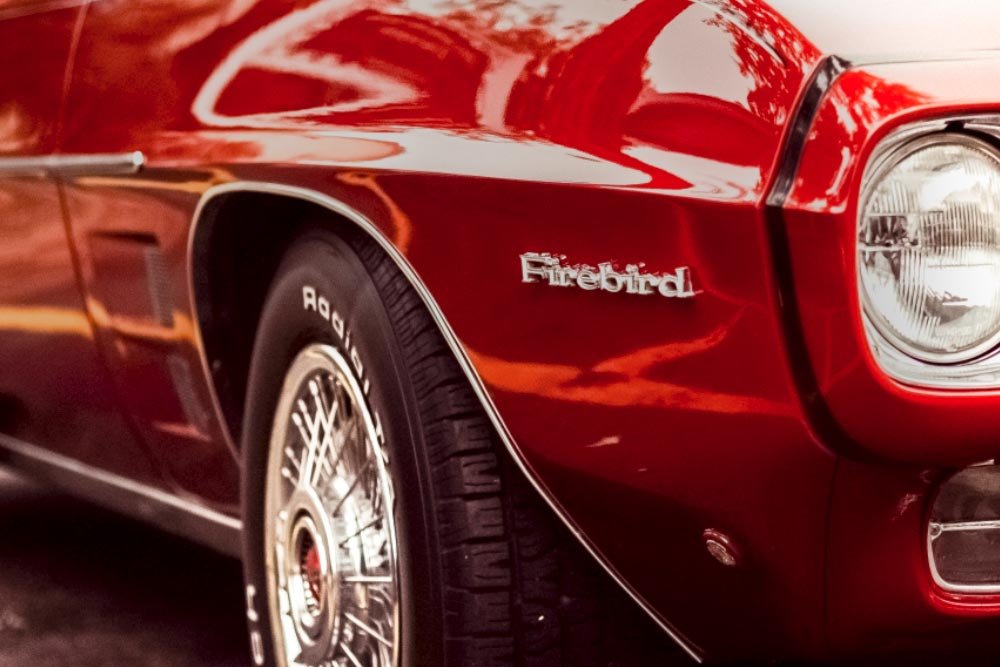
Again, the result is fairly pleasing. The highlights have been taken down a notch. Also, please be aware that this tool is cumulative, meaning the more you paint, the more change is applied. Finally, always be sure to make changes like this on a duplicate layer as to preserve the original image. The edits I’m making to this file are destructive and that’s never a good thing.
My advice for using the Dodge Tool is to always keep the Protect Tones box checked. I’m not sure you can get good results otherwise. For the Burn Tool, try it both ways. The original tool isn’t bad, but the new version is better. Experimentation and hitting “undo” a lot will help you learn the ins and outs.
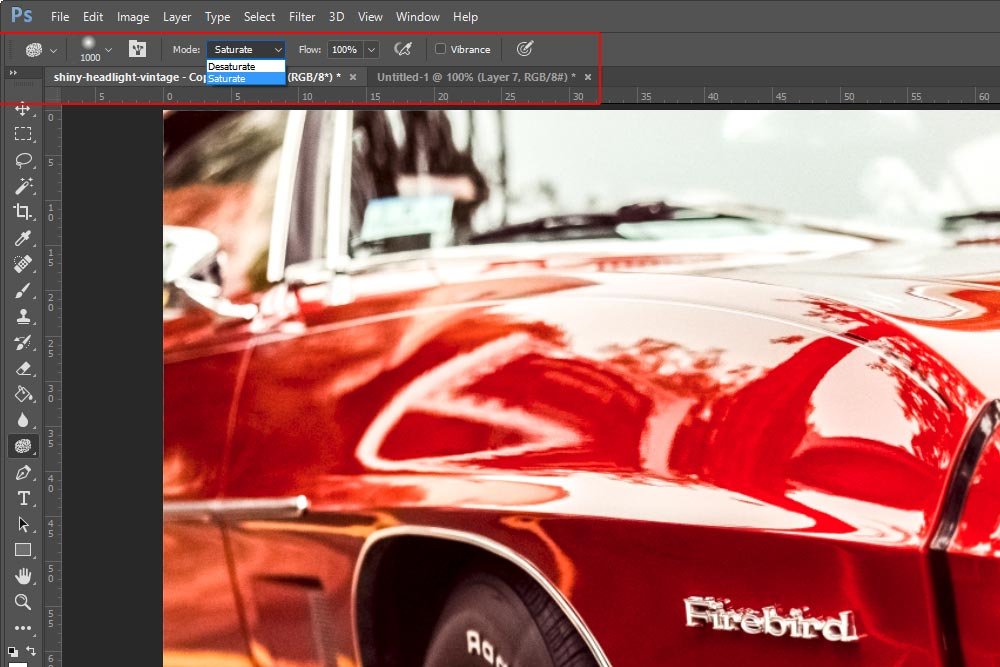
In the drop-down box, you can see two values. They are Saturate and Desaturate.
Here’s the deal; if you set the drop-down to Saturate and brush parts of an image, you’ll add color to it. You’ll saturate whatever color is already there. If you set the drop-down to Desaturate, you’ll do the opposite. You’ll remove saturation from whatever it is you brush. The Flow slider controls how fast those changes take place. For this post, I’ll keep Flow set to 100%.
What’s really neat is the Vibrance check box. This is the setting that controls which colors are actually altered when using this tool. If I were to set the drop-down to Desaturate and keep the Vibrance box unchecked, saturation would be removed across the entire spectrum of colors. If I were to check the Vibrance box and do the same thing, most colors would lose their saturation, but the oranges and reds wouldn’t be affected. This is because, in Photoshop, Vibrance affects skin tone and much of skin tone consists of those two colors. It’ll take some experimenting to get used to this.
In the next screenshot, I’ll set the drop-down to Desaturate and keep the Vibrance box unchecked. I’ll then paint the entire fender. Let’s see what happens.
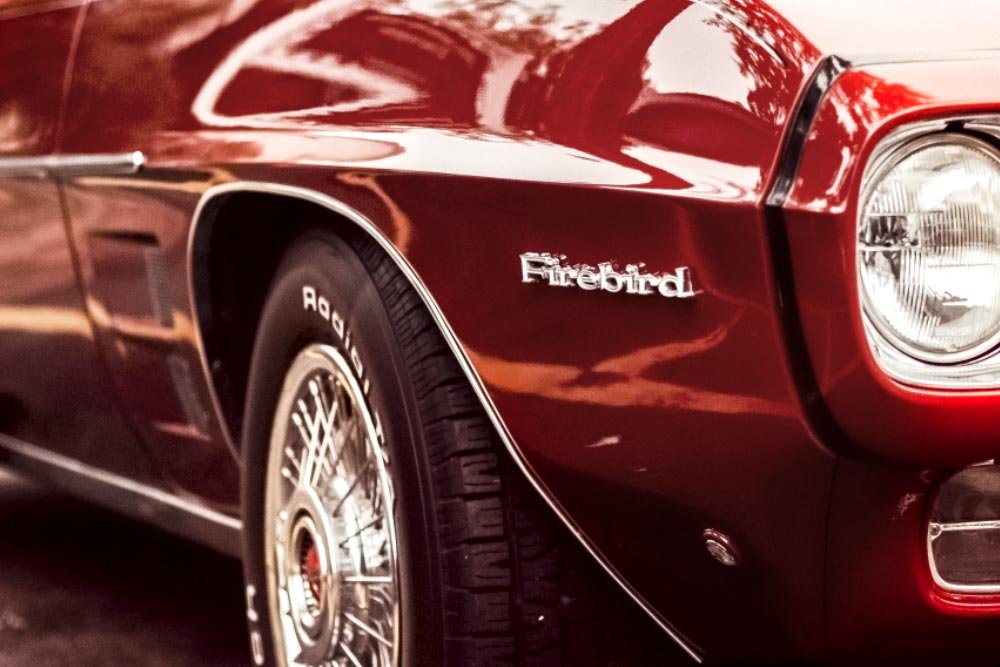
Much of the color has been removed. Now, I’ll check the Vibrance box and paint the fender again.
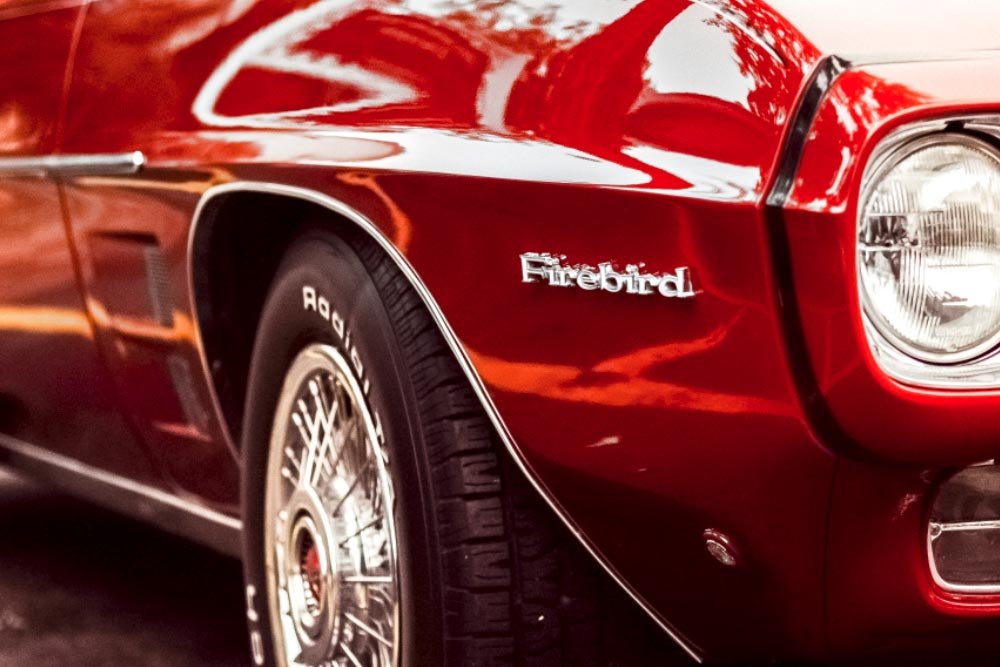
See? Even though I’m desaturating, the Vibrance box is checked, so hardly any change is being made. There’s a distinct difference between those two settings.
Now, I’ll change the drop-down to Saturate and remove the check from the Vibrance box. I’ll paint the fender with the brush again to see what happens.
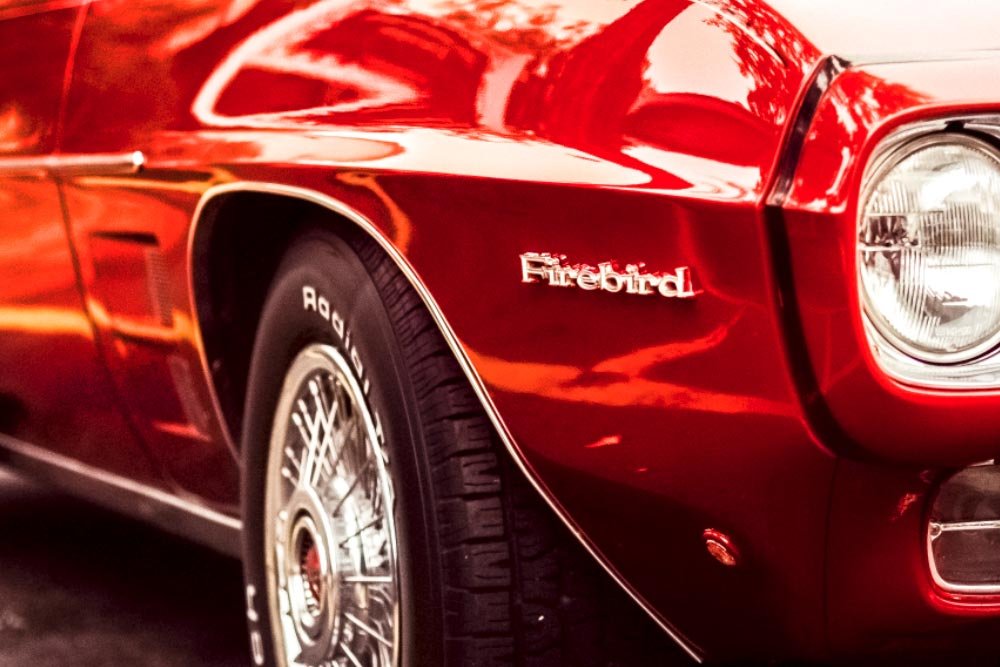
Now, I’ll check the Vibrance box and repeat what I just did.
If you look at the difference between these last two screenshots, you’ll see that on a red car, saturation was more effective when having the Vibrance box checked. It’s brighter. I don’t think this change would have been nearly as profound if the car was blue.
——
I hope you enjoyed learning about the Dodge Tool, the Burn Tool and the Sponge Tool in Adobe Photoshop. If you like editing photos, these three tools are definitely a must-know. These days, they’re much better than they’ve ever been and they’re actually quite user friendly. As I was going through this post, I kept looking for areas that might trip you up and I really didn’t find any.
If you have any questions or concerns regarding this post, please let me know in the comment section below. Thanks for reading!
I’ll admit, I rarely edit anything other than entire photos. Generally, what I do is good enough. I plow through so many images on a daily basis that other, more detailed, workflows are simply out of the question. In addition, what I do, in my opinion, looks good. Rarely do I encounter something that needs a more detailed approach.
This isn’t to say that photos shouldn’t be edited on a more localized scale. Of course they should and in this post I plan on introducing you to a few tools that will assist with that endeavor. Be warned though – the tools I’m about to show you below have got a nasty past. As a matter of fact, I’ve hardly ever used them. With the upgrades and modifications of these tools in the more recent releases of Photoshop, however, their shortcomings have been greatly improved and I encourage all editors to take full advantage of what they can now offer.
In today’ post, I’ll work through the Dodge Tool, Burn Tool and Sponge Tool in an effort to demonstrate what editing with these assets used to result in and what the same edits can result in today. There’s a huge difference.
Demo Photo
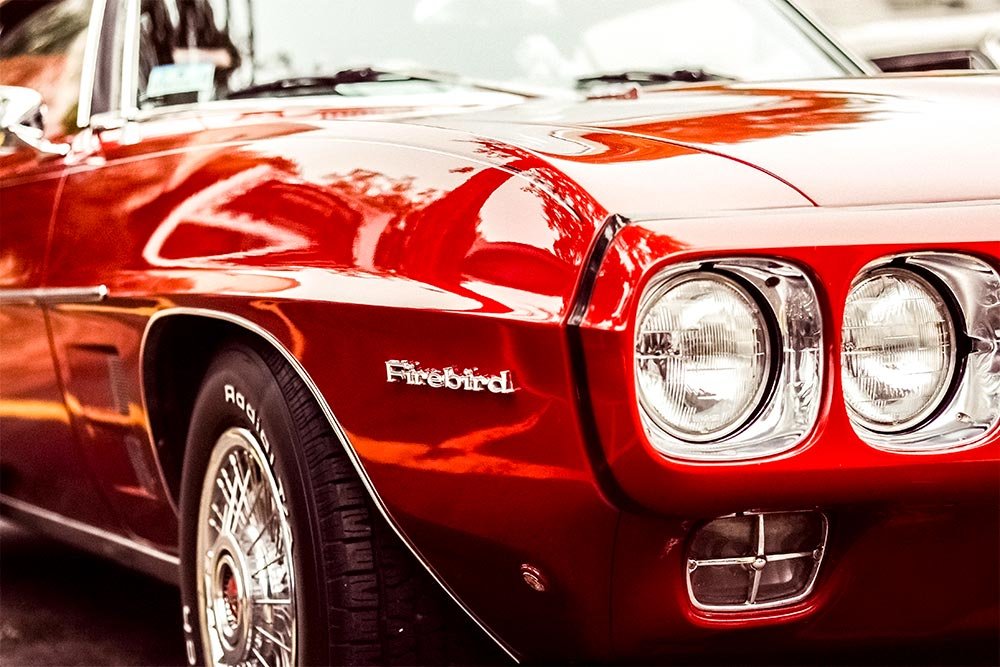
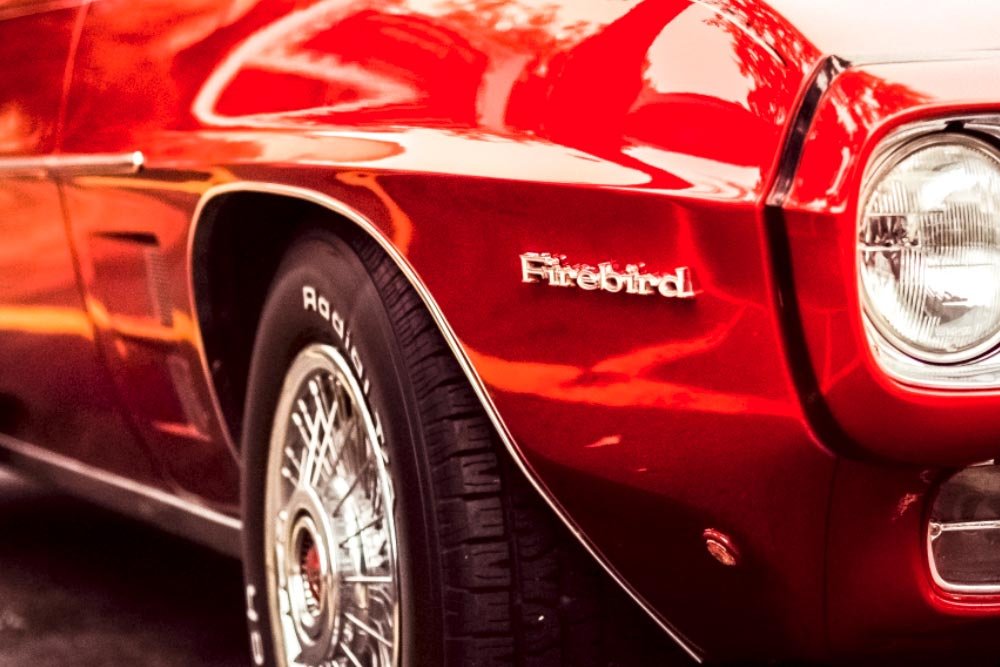
For today’s post, I’ll be using this demo photo of a hot rod. The reason I chose this photo is because of its shiny exterior and the fact that there are some shadowed and darker areas as well as some highlighted and lighter areas. Working on this photo with these three tools should be lots of fun.
The Dodge & Burn Tools
The Dodge Tool and the Burn Tool are very similar in that they either lighten or darken parts of a photo. Originally, Adobe created these tools to mimic traditional darkroom techniques where the photographer would either hold back light to lighten the photo or increase light to darken it. These days, things have changed substantially with how these two tools affect an image so I’ll continue on with both methods in mind.First, let me show you where both tools reside. I’ve already got the photo opened up into Photoshop. If I head over to the left vertical toolbar, I can click and drag open a tool set. Inside this tool set are the Dodge Tool, the Burn Tool and the Sponge Tool.

I selected the Dodge Tool. Now, if you take a look up at the top of Photoshop, above the photo, you’ll notice a new options bar. In this next screenshot, I outlined it in red.

Inside the options bar, towards the left, is the brush selection area. You’re probably already familiar with this area because I’m sure you’ve used a brush previously. This is where you choose which brush size and texture you’d like to have applied to the tool at hand. I’ve gone with a soft, medium size brush that will most likely change in size as I continue on with this post.
To the right of that is a very helpful drop-down box. Inside the box are three values; Shadows, Midtones and Highlights. It’s important to select the value for the area you’d like to affect in the photo. For example, if I wanted to use the Dodge Tool to lighten a shadowed area on this vehicle, I’d select Shadows from the drop-down. If I chose Shadows and attempted to brush over a lighter area of the image, virtually no change would be made. Conversely, if I chose Highlights from the drop-down and then tried to brush over a darker area of the vehicle to lighten it, again, nothing would happen. In that case, I’d have to change the drop-down selection to Shadows.
Really, all this drop-down does is target the shade of the area you’d like to either lighten or darken. Match the shade of the area in your photo to what it says in the drop-down. It’s very straightforward.
Continuing on to the right, we’ll find the Exposure value slider. Think of this slider controlling the intensity of the change you’d like to make. For this post, I’ll keep this value set at 100%, so any change I make is easy to see.

The only other area in the options bar I’m going to talk about is called Protect Tones and it’s turned on and off via a checkbox. For now, I’ll leave this box unchecked.
The concept of these two tools is simple. As I stated above, they are meant to lighten and darken the areas you brush. The problem is, throughout history, the results of using this tool have been dreadful. Let me show you what I mean. In the next screenshot, I’ll paint the fender of the car with the Dodge Tool. I’ll set the drop-down box to Shadows and keep the Exposure at 100%. Here’s what that looks like.

And if I use the Burn Tool to do the same thing, here is the result I get.

While the Burn Tool example isn’t nearly as offensive as the Dodge Tool, it’s still not very accurate.
To compensate for the lack of love because of this imperfect product, Adobe improved both tools. They now offer a feature that will protect tones, which is controlled by the checkbox I described above. I’ll go ahead and check the Protect Tones box and use the Dodge Tool to lighten some shadows. Let’s see the result.

As you can see, there’s no more white haze over the fender. Now, the shadows have been lightened in a crisp manner.
Next, keeping the box checked, I’ll use the Burn Tool to darken some some of the highlights on the fender.

Again, the result is fairly pleasing. The highlights have been taken down a notch. Also, please be aware that this tool is cumulative, meaning the more you paint, the more change is applied. Finally, always be sure to make changes like this on a duplicate layer as to preserve the original image. The edits I’m making to this file are destructive and that’s never a good thing.
My advice for using the Dodge Tool is to always keep the Protect Tones box checked. I’m not sure you can get good results otherwise. For the Burn Tool, try it both ways. The original tool isn’t bad, but the new version is better. Experimentation and hitting “undo” a lot will help you learn the ins and outs.
The Sponge Tool
The Sponge Tool is an awesome tool. I love it. It’s sort of like the previous two tools I described, but it’s different at the same time. It basically lets you add or remove saturation (or color) from different areas of an image. It uses a brush, so those settings are the same. The differences are with the drop-down, Flow value and the Vibrance check box. I’ll show you those settings in the next screenshot. I’ll outline the options bar in red.
In the drop-down box, you can see two values. They are Saturate and Desaturate.
Here’s the deal; if you set the drop-down to Saturate and brush parts of an image, you’ll add color to it. You’ll saturate whatever color is already there. If you set the drop-down to Desaturate, you’ll do the opposite. You’ll remove saturation from whatever it is you brush. The Flow slider controls how fast those changes take place. For this post, I’ll keep Flow set to 100%.
What’s really neat is the Vibrance check box. This is the setting that controls which colors are actually altered when using this tool. If I were to set the drop-down to Desaturate and keep the Vibrance box unchecked, saturation would be removed across the entire spectrum of colors. If I were to check the Vibrance box and do the same thing, most colors would lose their saturation, but the oranges and reds wouldn’t be affected. This is because, in Photoshop, Vibrance affects skin tone and much of skin tone consists of those two colors. It’ll take some experimenting to get used to this.
In the next screenshot, I’ll set the drop-down to Desaturate and keep the Vibrance box unchecked. I’ll then paint the entire fender. Let’s see what happens.

Much of the color has been removed. Now, I’ll check the Vibrance box and paint the fender again.

See? Even though I’m desaturating, the Vibrance box is checked, so hardly any change is being made. There’s a distinct difference between those two settings.
Now, I’ll change the drop-down to Saturate and remove the check from the Vibrance box. I’ll paint the fender with the brush again to see what happens.

Now, I’ll check the Vibrance box and repeat what I just did.

If you look at the difference between these last two screenshots, you’ll see that on a red car, saturation was more effective when having the Vibrance box checked. It’s brighter. I don’t think this change would have been nearly as profound if the car was blue.
——
I hope you enjoyed learning about the Dodge Tool, the Burn Tool and the Sponge Tool in Adobe Photoshop. If you like editing photos, these three tools are definitely a must-know. These days, they’re much better than they’ve ever been and they’re actually quite user friendly. As I was going through this post, I kept looking for areas that might trip you up and I really didn’t find any.
If you have any questions or concerns regarding this post, please let me know in the comment section below. Thanks for reading!
