LukeLewis
Member
- Joined
- May 7, 2021
- Messages
- 134
- Reaction Score
- 0
- Points
- 21
- #1
When it comes to Adobe Photoshop, or any Adobe application for that matter, there are a thousand different ways to do the same thing. Just this past weekend, I was talking to someone about how best to go about editing photos for different uses. I had to sit back and think for a while because it’s extremely tempting to go overboard and start talking about every little nook and cranny of what the program can offer. I decided that the direct route I use every day would suffice.
The issue with explaining how to go about completing a project in Photoshop is that you must consider future use. Most likely, when learning the program, someone isn’t going to stop at just color correcting and resizing photographs. If they have the interest, they’ll probably move onto other, more complex, tasks. It’s this type of thinking that gave me the most difficulty. Was I supposed to teach this person just the basics to get by or what I supposed to teach them what they’ll need down the road? I guess they’ll learn it as they go because really, this stuff has a tendency to become confusing – fast. Especially if too much information is thrown around all at once.
I’m going to use today’s post to shake the feeling that I had cheated someone with only covering the basics. I’d like to walk through a short project that will compare two different methods for arriving at the same result. The first method will leave you high and dry if it ever comes time to make additional edits and the second method will set you up for future success. It’s the second method you want to stick with because of all the flexibility it offers.
Down below, I’ll be talking about selections and masking. I’ve covered both of these topics in previous posts, but what I’d like to really emphasize here is workflow. It’s important that you know how to do things in Photoshop, but it’s also just as important that you know when to do those same things.
For this example, I’ll be using the Quick Selection Tool.
I’m going to do my best to quickly select the vehicle.
If you look closely at the above screenshot, you’ll see the marching ants around the areas I selected. Remember, this was a quick job, so I really hope I got everything. Now, I’m going to press Ctrl+C on my keyboard to copy. Then, I’ll click the tab for the background image that’s already opened in Photoshop and press Ctrl+V to paste. Let’s see what the result looks like.
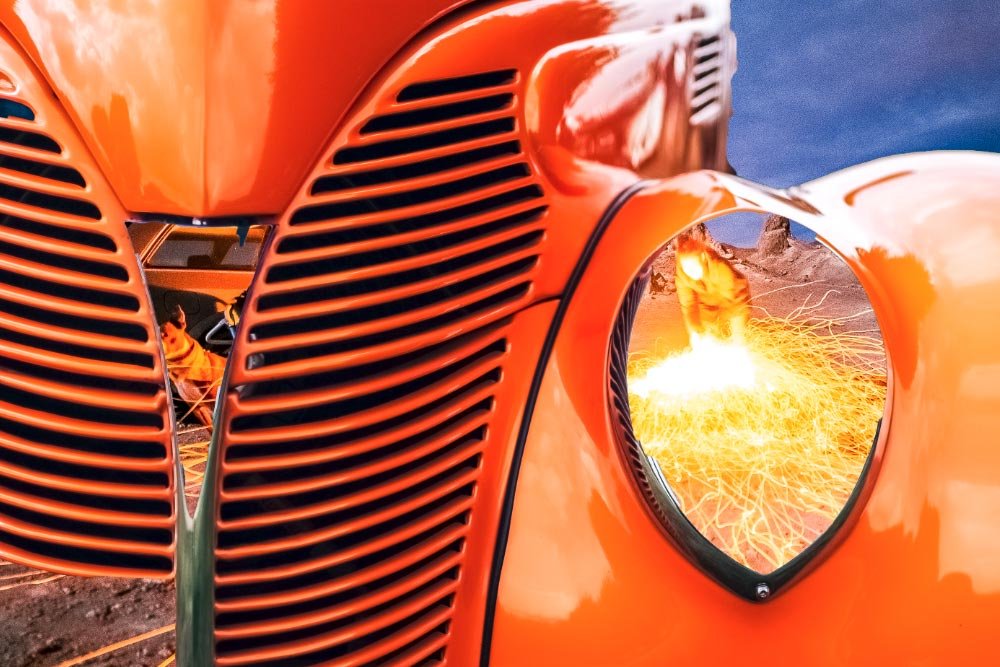
Oh man! What in the heck have I done? In my rush to finish this project, I’ve done an absolutely horrible job selecting the vehicle. The headlight is missing and so is part of the grill, not to mention the car’s logo. Here’s the issue – what’s my recourse? What can I do now? What if I had spent much more time making this selection, was confident, and closed out the original file? That’s right, I have no recourse and I’d have to start all over again. That’s a bummer and not a situation that saves time. It actually costs time and is no good.
By the way, what I just created was called a static selection and is a relic of the past. Let’s move on to something much more dynamic and futuristic.
Now that I have a selection, I’ll create a mask. I’ll head down to the bottom of the Layers panel and click on the Add a Mask icon.
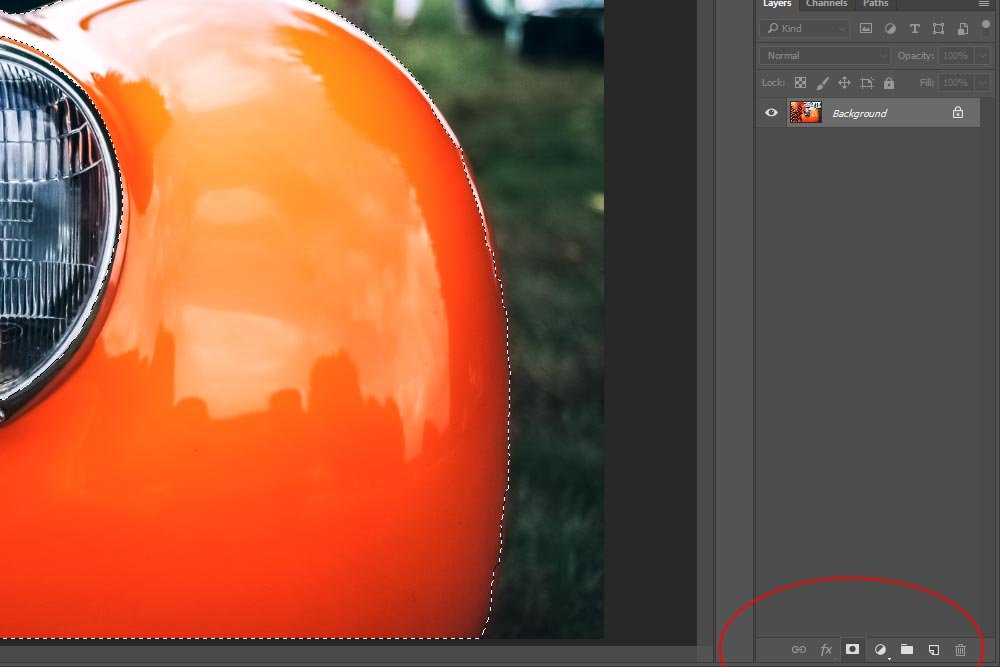
Doing this will change a number of things. First, it’ll unlock the background layer I was working in and make it a floating layer. Next, it’ll create a mask that will hide anything outside of my selection and finally, it’ll give me that all too familiar checkerboard pattern for the areas that are hidden. Take a look.
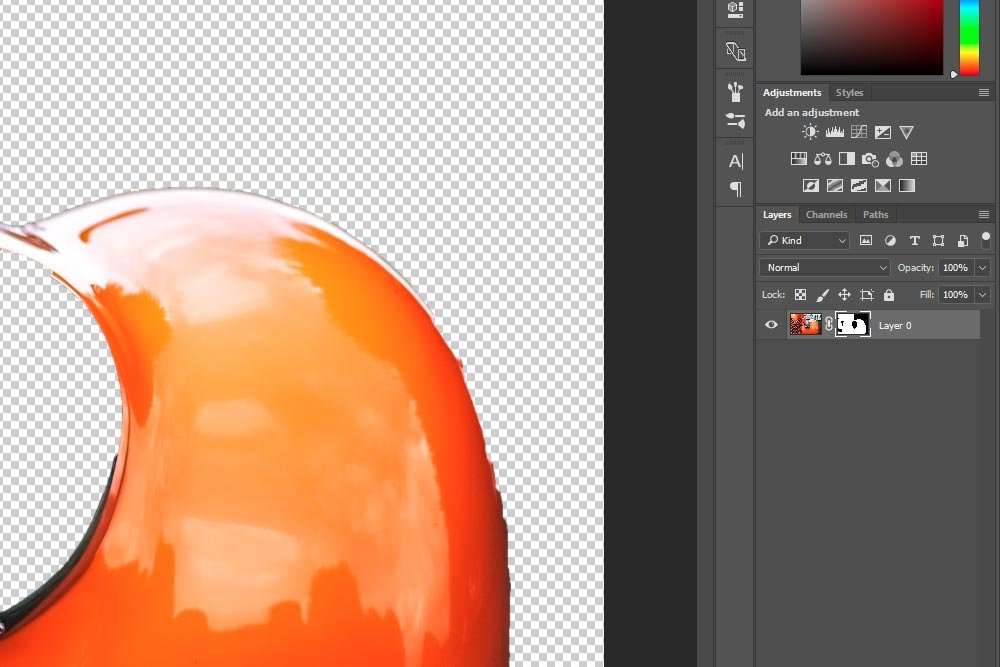
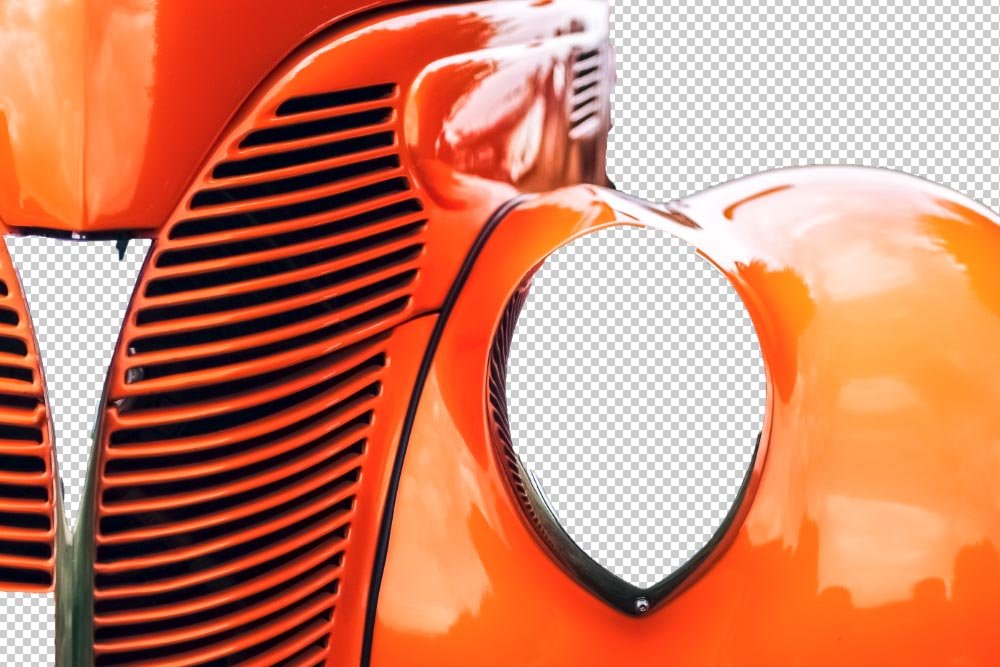
Now, if you’ve ever worked with masks, you know that the invisible parts of the car are still there. If I were to paint any area of this image with white, they area would reappear. That’s the benefit of working with non-destructive masks and that’s why this process is much better than the one I described previously. Remember, when using masks in Adobe Photoshop, white reveals and black conceals. That’s the rule.
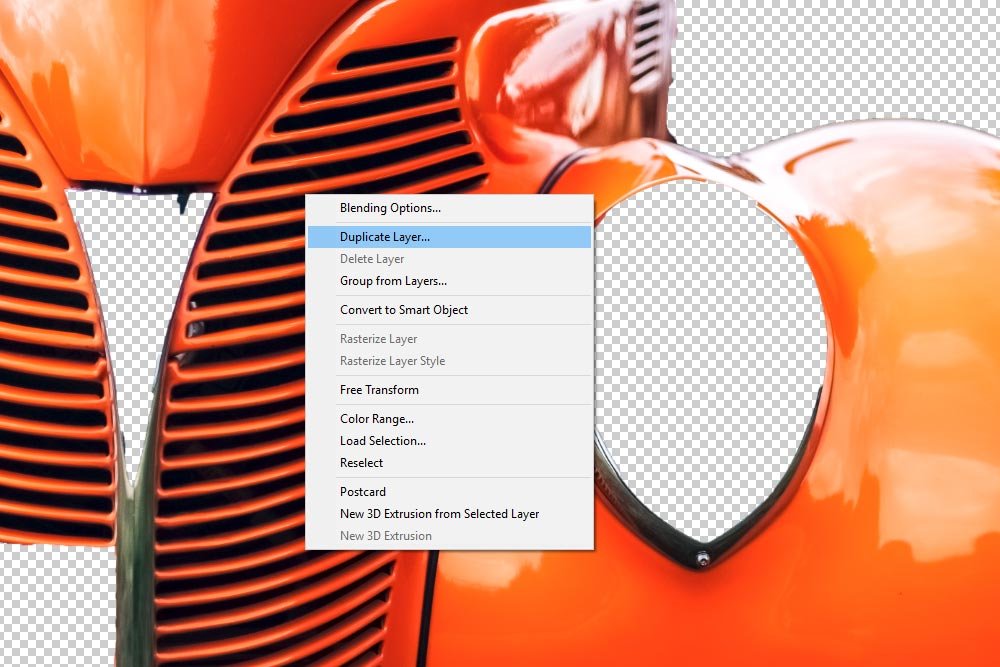
At this point, I could fix up this selection by doing some painting right in this file. I’m not going to do that though. What I’d like to do is copy the layer over to the background file and then fix things up there. How can I do this? Well, the easy way is to click into any Marquee Tool in the left vertical toolbar and then right click in the image somewhere. From there, select Duplicate Layer.
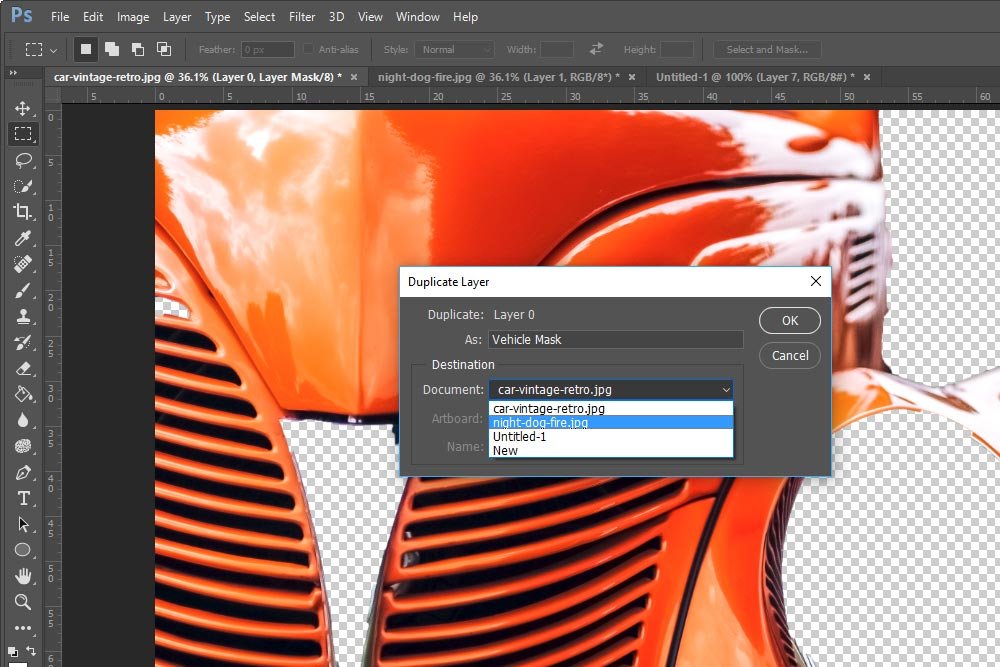
When the Duplicate Layer dialog box appears, I can name the layer I’d like to duplicate and then choose which file in Photoshop I’d like it placed. In this case, I’ll name the layer Vehicle Mask and place it in the file that’s opened in the other tab. For this, I’ll use the drop-down box to pick the file.
Now, I’ll change tabs in Photoshop so I can get a look of the file I’m using as the background. I want to make sure the vehicle layer was renamed and duplicated over inside of it.
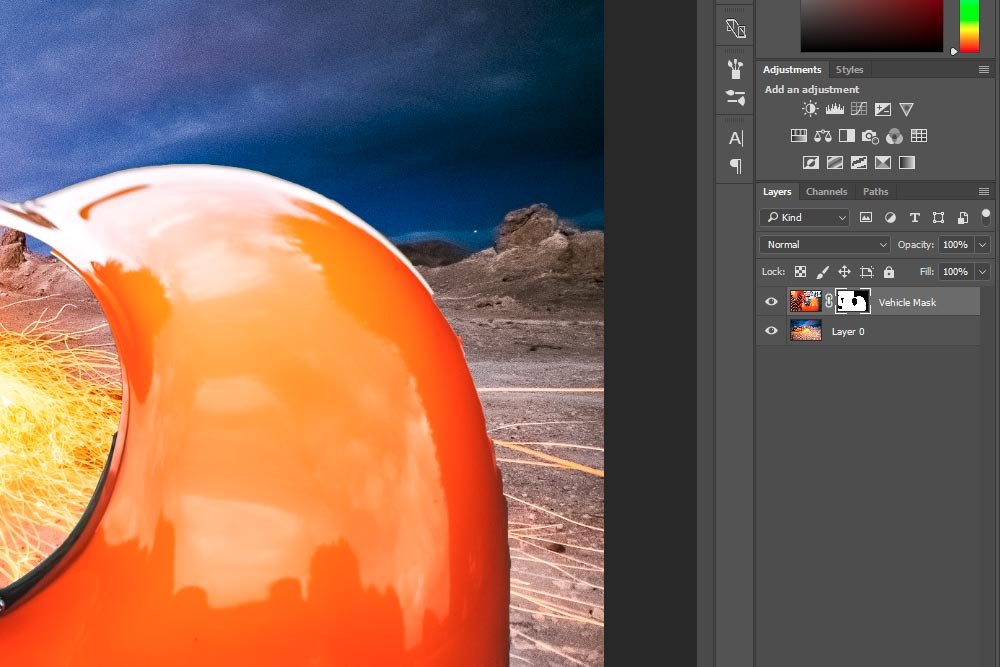
Why yes it has. Everything has worked perfectly.
At this point, I would use some lessons I wrote about in previous posts to clean up the mask. I can begin by simply painting the areas of the vehicle that are missing with white. I’ll be sure to select the layer mask itself in the Layers panel before I do that though, or else I’ll be simply painting the layer white.

Boy, I sure am glad I now have some flexibility. If you’d like to learn more about masking in Adobe Photoshop, please take a look at these posts below. They’ll tell you a whole heck of a lot:
What are Layer Masks in Adobe Photoshop?
Using Masks to Colorize Only Part of a Photo in Adobe Photoshop
Working Faster with the Quick Mask Tool in Adobe Photoshop
Selecting Objects & Refining Edges in Adobe Photoshop
But, since I was in a rush, the time for refining those edges has passed. Good thing I created a mask, because Photoshop has a pretty awesome tool to deal with situations like this.
If I go ahead and double click on the mask thumbnail in the Layers panel, the Mask Properties panel will appear.
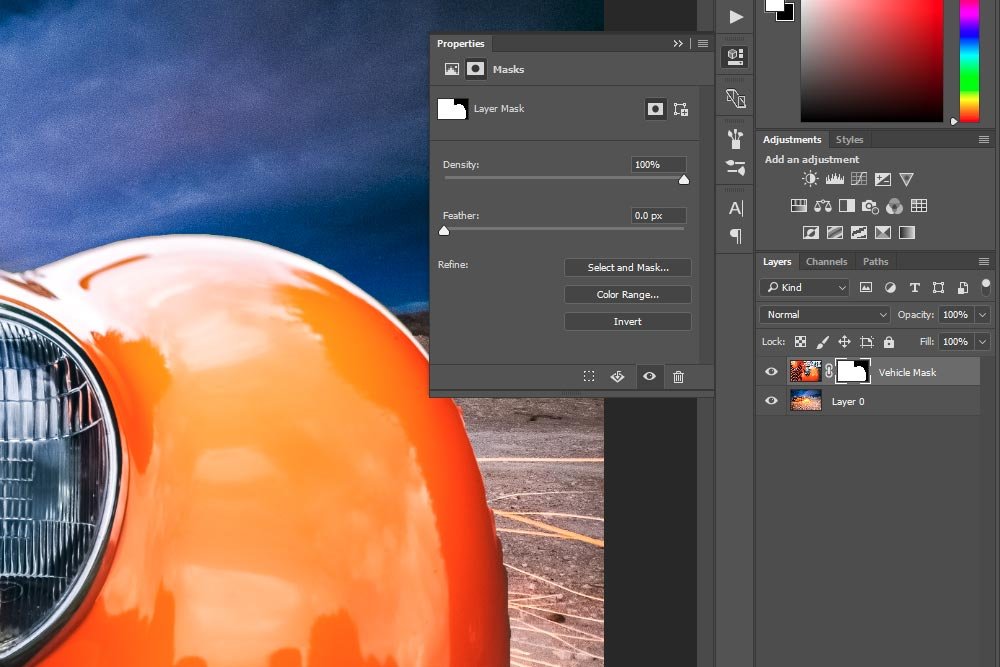
Inside of this panel are a few sliders that can help make the edge look better. The real power is in the Select and Mask tool though. So, if I click on the Select and Mask button that’s in the Properties panel, I’ll enter a new workspace.
It’s got some really great tools to help out with mask edges.
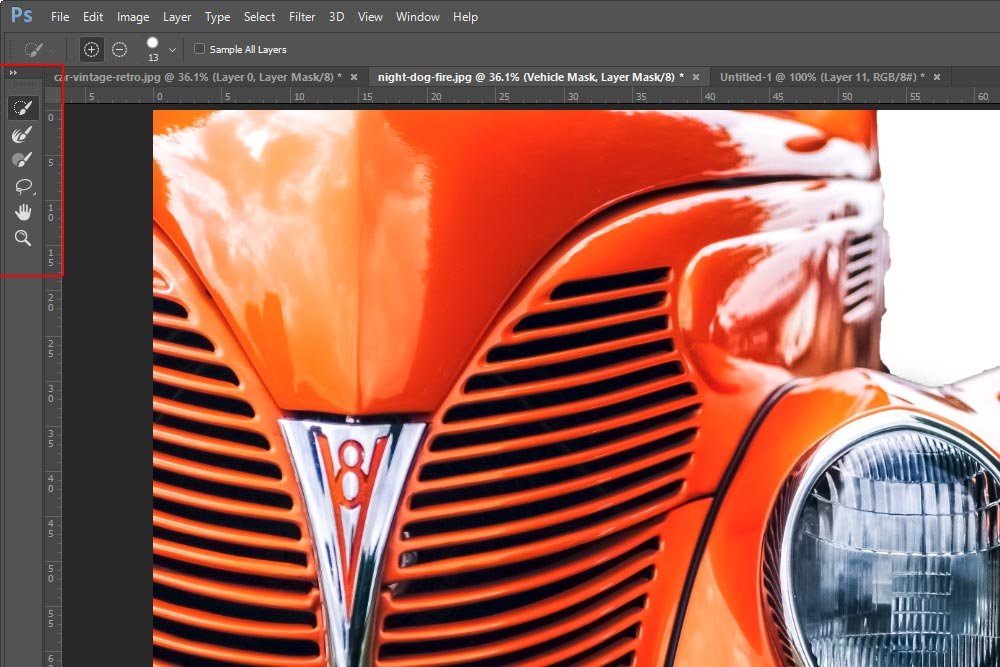
And it also has a Properties panel all to its own that will help you find and manipulate any edges inside of the mask.
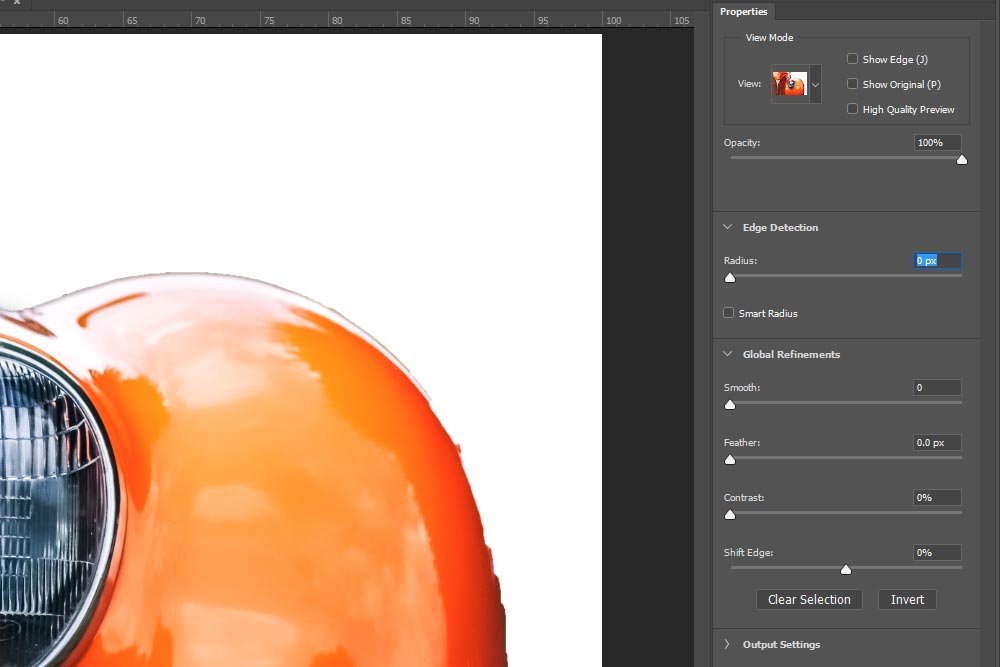
I do want to give you a word of caution here. There may be an error so large that you might want to just use the paintbrush to correct. Either use white to make something appear again or black to hide it from existence.
While I’m going to write an entire post about this Select and Mask workspace in the future, I did want to introduce it to you here. If you’re super interested in what it can do, please check out this post on how to refine edges in Photoshop to get a quick primer. Adobe uses many of the same tools for multiple situations.
I also wrote a bit about edges in this post:
Colorizing Grayscale Objects in Adobe Photoshop
Once you’re finished with making things perfect, you could treat your document as any other. Add to it, remove from it and export it to the file type of your choice. It’s that easy. If you’ve put a lot of work into your document, just be sure to save it as a PSD file so you can go back to it any time you want for modification.
——
I hope I did a good job with explaining how to make a selection, create a mask and duplicate that mask into another file inside of Photoshop. This method is very flexible, so please get used to it. Photoshop is full of tools that people used to use all the time, but that are beginning to move away from. In this case, creating and copying a static selection is one of those things you want to move away from.
If you have any questions or concerns regarding this post, please let me know in the comment section below. Thanks for reading!
The issue with explaining how to go about completing a project in Photoshop is that you must consider future use. Most likely, when learning the program, someone isn’t going to stop at just color correcting and resizing photographs. If they have the interest, they’ll probably move onto other, more complex, tasks. It’s this type of thinking that gave me the most difficulty. Was I supposed to teach this person just the basics to get by or what I supposed to teach them what they’ll need down the road? I guess they’ll learn it as they go because really, this stuff has a tendency to become confusing – fast. Especially if too much information is thrown around all at once.
I’m going to use today’s post to shake the feeling that I had cheated someone with only covering the basics. I’d like to walk through a short project that will compare two different methods for arriving at the same result. The first method will leave you high and dry if it ever comes time to make additional edits and the second method will set you up for future success. It’s the second method you want to stick with because of all the flexibility it offers.
Down below, I’ll be talking about selections and masking. I’ve covered both of these topics in previous posts, but what I’d like to really emphasize here is workflow. It’s important that you know how to do things in Photoshop, but it’s also just as important that you know when to do those same things.
Working Photos
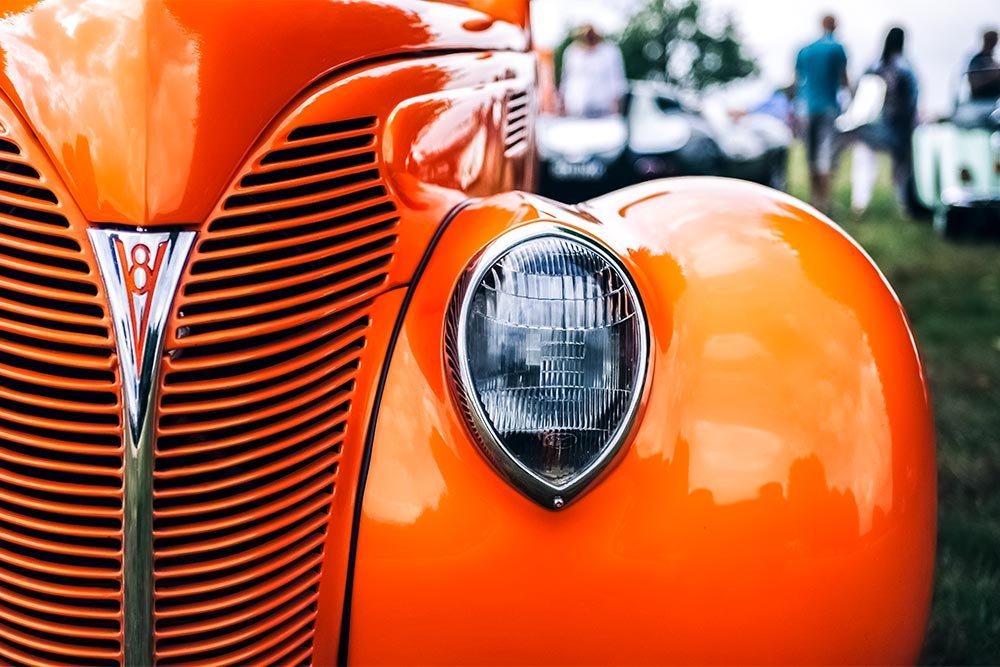
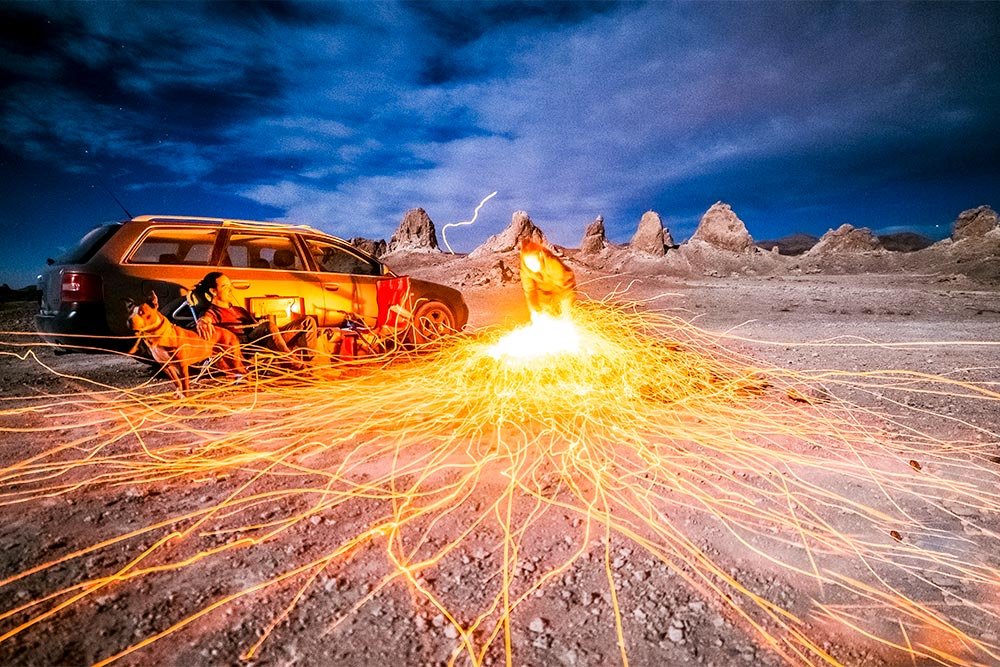
In this post, I’ll be working with two photos. The first one is of the front of a car and the second is of an outdoor setting. I’d like to select the car from the first photo and place it in the second. I want to do this because the background in the car photo is lazy and boring. I’d like to spice things up a bit. Here are the two photos.

Selecting, Copying & Pasting
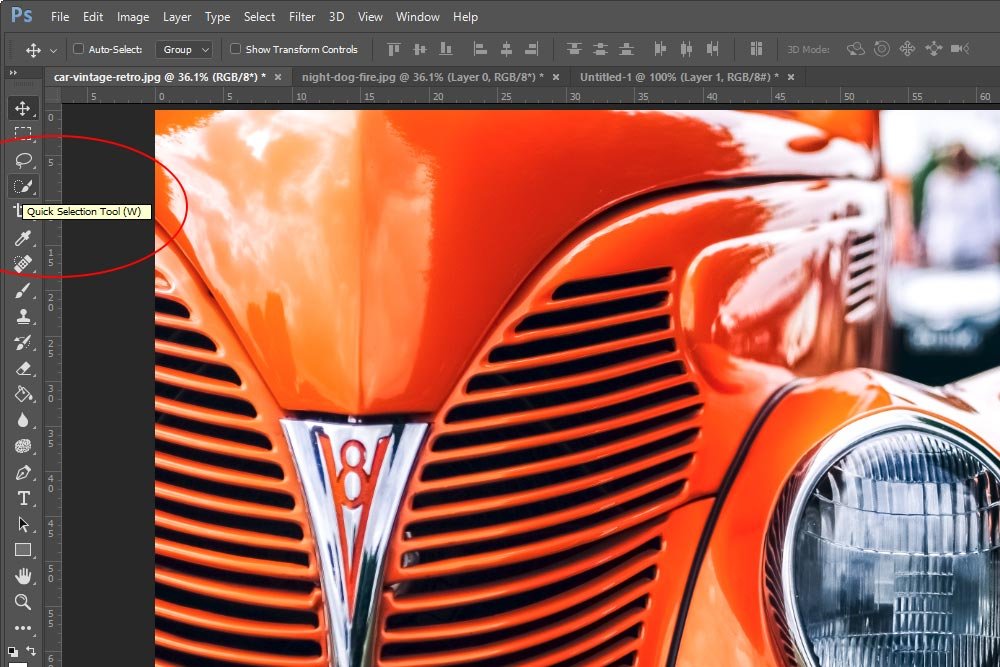
This is the way I used to move objects from one image to another. I’d select whatever it was that I wanted to move, press Ctrl+C to copy, then head over to the image I’d like to move the object to and press Ctrl+V to paste. What I was left with was what I was left with, meaning, I was stuck with exactly whatever it was that I copied and pasted. There was no recourse if I screwed up in any way. Let me show you exactly what I mean.For this example, I’ll be using the Quick Selection Tool.

I’m going to do my best to quickly select the vehicle.

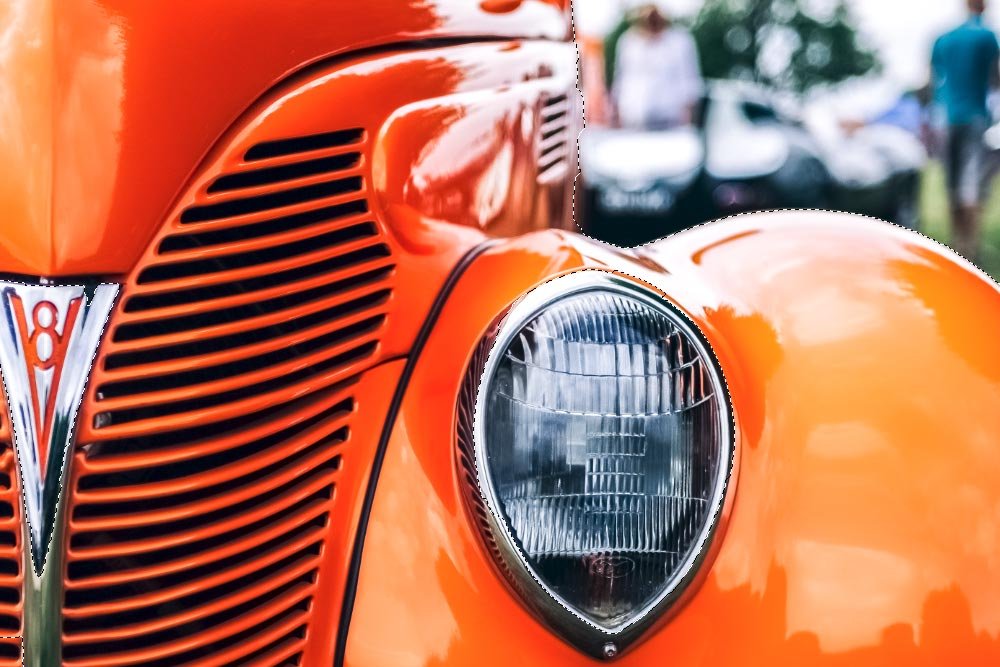
If you look closely at the above screenshot, you’ll see the marching ants around the areas I selected. Remember, this was a quick job, so I really hope I got everything. Now, I’m going to press Ctrl+C on my keyboard to copy. Then, I’ll click the tab for the background image that’s already opened in Photoshop and press Ctrl+V to paste. Let’s see what the result looks like.

Oh man! What in the heck have I done? In my rush to finish this project, I’ve done an absolutely horrible job selecting the vehicle. The headlight is missing and so is part of the grill, not to mention the car’s logo. Here’s the issue – what’s my recourse? What can I do now? What if I had spent much more time making this selection, was confident, and closed out the original file? That’s right, I have no recourse and I’d have to start all over again. That’s a bummer and not a situation that saves time. It actually costs time and is no good.
By the way, what I just created was called a static selection and is a relic of the past. Let’s move on to something much more dynamic and futuristic.
Masking & Duplicating
Since I’ve already got something in the vehicle image selection, I’ll work from that point so I don’t have to go about selecting all over again. This time though, I’m going to do things a bit differently. Watch this – you’re going to love it.Now that I have a selection, I’ll create a mask. I’ll head down to the bottom of the Layers panel and click on the Add a Mask icon.

Doing this will change a number of things. First, it’ll unlock the background layer I was working in and make it a floating layer. Next, it’ll create a mask that will hide anything outside of my selection and finally, it’ll give me that all too familiar checkerboard pattern for the areas that are hidden. Take a look.


Now, if you’ve ever worked with masks, you know that the invisible parts of the car are still there. If I were to paint any area of this image with white, they area would reappear. That’s the benefit of working with non-destructive masks and that’s why this process is much better than the one I described previously. Remember, when using masks in Adobe Photoshop, white reveals and black conceals. That’s the rule.
At this point, I could fix up this selection by doing some painting right in this file. I’m not going to do that though. What I’d like to do is copy the layer over to the background file and then fix things up there. How can I do this? Well, the easy way is to click into any Marquee Tool in the left vertical toolbar and then right click in the image somewhere. From there, select Duplicate Layer.

When the Duplicate Layer dialog box appears, I can name the layer I’d like to duplicate and then choose which file in Photoshop I’d like it placed. In this case, I’ll name the layer Vehicle Mask and place it in the file that’s opened in the other tab. For this, I’ll use the drop-down box to pick the file.

Now, I’ll change tabs in Photoshop so I can get a look of the file I’m using as the background. I want to make sure the vehicle layer was renamed and duplicated over inside of it.

Why yes it has. Everything has worked perfectly.
At this point, I would use some lessons I wrote about in previous posts to clean up the mask. I can begin by simply painting the areas of the vehicle that are missing with white. I’ll be sure to select the layer mask itself in the Layers panel before I do that though, or else I’ll be simply painting the layer white.

Boy, I sure am glad I now have some flexibility. If you’d like to learn more about masking in Adobe Photoshop, please take a look at these posts below. They’ll tell you a whole heck of a lot:
What are Layer Masks in Adobe Photoshop?
Using Masks to Colorize Only Part of a Photo in Adobe Photoshop
Working Faster with the Quick Mask Tool in Adobe Photoshop
Select & Mask
As you may be able to tell, I didn’t make a very good original selection because the edges of the vehicle are jagged and really bad looking. As I was making the selection, I could have refined the selection edges and things would have come out much better. To see how to do this, please read this post:Selecting Objects & Refining Edges in Adobe Photoshop
But, since I was in a rush, the time for refining those edges has passed. Good thing I created a mask, because Photoshop has a pretty awesome tool to deal with situations like this.
If I go ahead and double click on the mask thumbnail in the Layers panel, the Mask Properties panel will appear.

Inside of this panel are a few sliders that can help make the edge look better. The real power is in the Select and Mask tool though. So, if I click on the Select and Mask button that’s in the Properties panel, I’ll enter a new workspace.
It’s got some really great tools to help out with mask edges.

And it also has a Properties panel all to its own that will help you find and manipulate any edges inside of the mask.

I do want to give you a word of caution here. There may be an error so large that you might want to just use the paintbrush to correct. Either use white to make something appear again or black to hide it from existence.
While I’m going to write an entire post about this Select and Mask workspace in the future, I did want to introduce it to you here. If you’re super interested in what it can do, please check out this post on how to refine edges in Photoshop to get a quick primer. Adobe uses many of the same tools for multiple situations.
I also wrote a bit about edges in this post:
Colorizing Grayscale Objects in Adobe Photoshop
Once you’re finished with making things perfect, you could treat your document as any other. Add to it, remove from it and export it to the file type of your choice. It’s that easy. If you’ve put a lot of work into your document, just be sure to save it as a PSD file so you can go back to it any time you want for modification.
——
I hope I did a good job with explaining how to make a selection, create a mask and duplicate that mask into another file inside of Photoshop. This method is very flexible, so please get used to it. Photoshop is full of tools that people used to use all the time, but that are beginning to move away from. In this case, creating and copying a static selection is one of those things you want to move away from.
If you have any questions or concerns regarding this post, please let me know in the comment section below. Thanks for reading!
