KristinaW
Member
- Joined
- May 7, 2021
- Messages
- 127
- Reaction Score
- 0
- Points
- 18
- #1
I’m a nut when it comes to organization on my computer. Sometimes, I just sit and think about how I can make things better than they are. I know, it sounds weird, but I’ve come up with some pretty interesting solutions like this.
Disorganization costs you time and money down the road. There’s no excuse for it and it can truly make a project you’re working on suffer. If you’re working with a team and you try to pull something like this, you’ll be tossed out on your ear faster than you can bat an eye. Editors who are efficient and organized exhibit these traits in their work product and are worth their weights in gold.
In today’s post, I’d like to discuss one area of workflow when editing video in Adobe Photoshop. Really, you can apply this technique to any other video editing software as well, such as Adobe Premiere Pro CC, Apple Final Cut Pro X, Corel VideoStudio Ultimate X10 or Adobe Premiere Elements. I think what I’m going to share with you below is creative and effective, so read on.
Let’s say I’m working on a video of a really cool looking iguana.

I already have an idea of what I want. The project is going to require two different scenes and each scene will be distinct from each other. Also, each scene will have movement, transitions, masks and different images used inside of it. Because of all this confusion, I can tell you that the best route to take would be to create one master file and then to create separate files for each scene. Here’s how things would work:
1. I’d open each scene clip into Photoshop, one at a time and in its own file, and work on it until it’s complete. I’d also be sure to appropriately size the clip so it’ll work well with others in the project.
2. When finished, I’d export each clip at the highest quality available. I’d treat it sort of as a final, stand alone, movie.
3. I’d create a master file that I could use as a shell to import both clips into and that I would also use to export as the real final movie. I’d make whatever adjustments are necessary inside of this file, such as additional transitions and things like that.
If you aren’t sure how to open, import or export a video clip into Adobe Photoshop, please take a look at these posts:
5 Ways to Open Video Files into Adobe Photoshop
How to Export Video From Adobe Photoshop
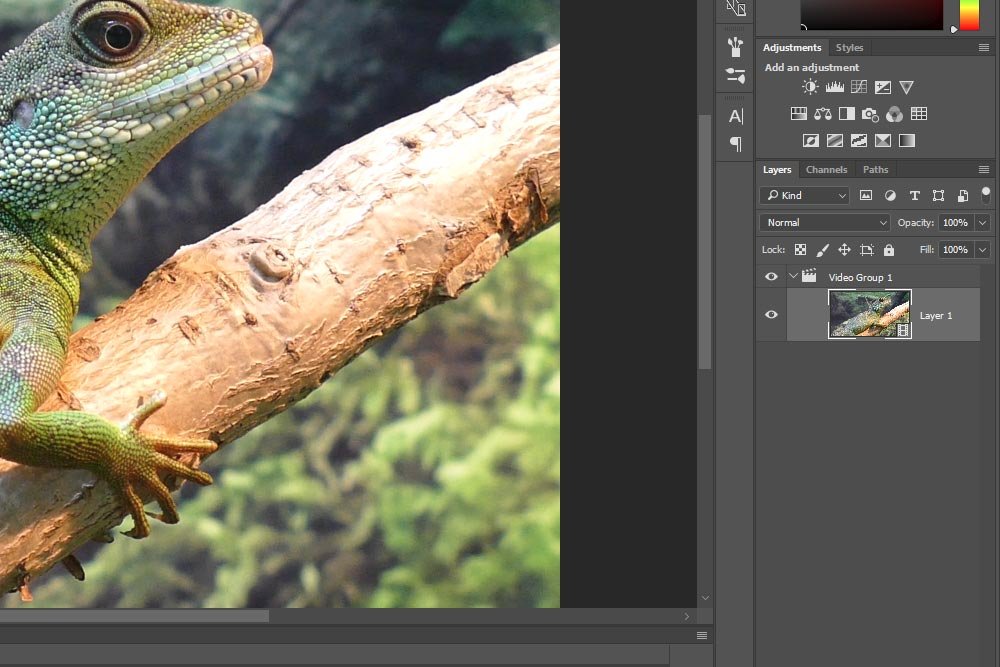
Inside the Layers panel, there would only be one video layer to start off with.
I would open both video clips like this, separately, and make all the edits I saw fit. When I was completely finished with them, as I stated above, I’d export them as their own mp4 files. Again, here are the instructions for how to export a video file from Photoshop.
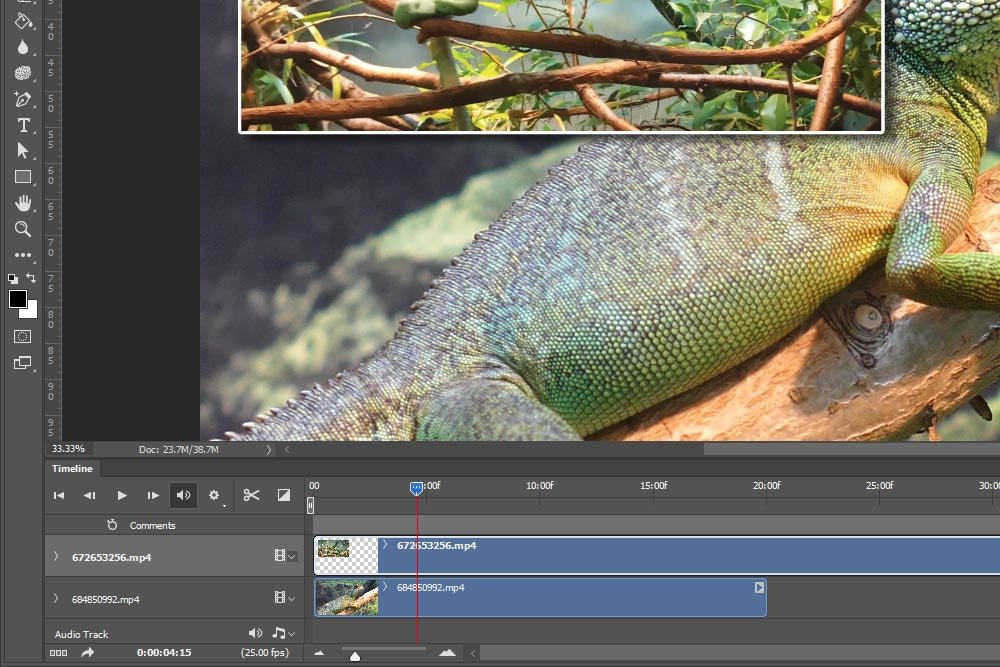
Once finished, I’d create the shell file. I’d give it a descriptive name and I’d import both finished video files into it. At this point, I’d have two clips in the timeline.
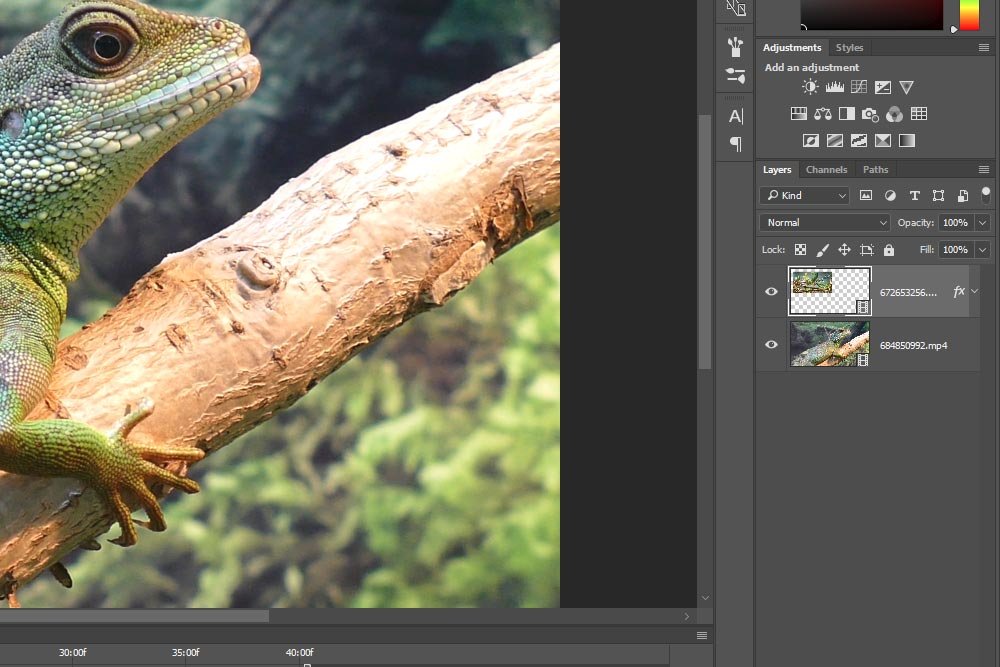
And I’d have multiple layers in the Layers panel.
Of course, as the final video progresses from one clip to another, different transitions will be necessary. I would create all of them right in this file. When done, I’d export it as the final file.
By the way, when recording video with your camera, you really should record at the largest and best quality available. You can always scale down once you’re in your editor. You can’t scale up to improve quality later on.
Anyway, after a video clip has been launched into Photoshop, you can set the frame rate by clicking on the small menu icon that’s located at the top right of the Timeline panel.
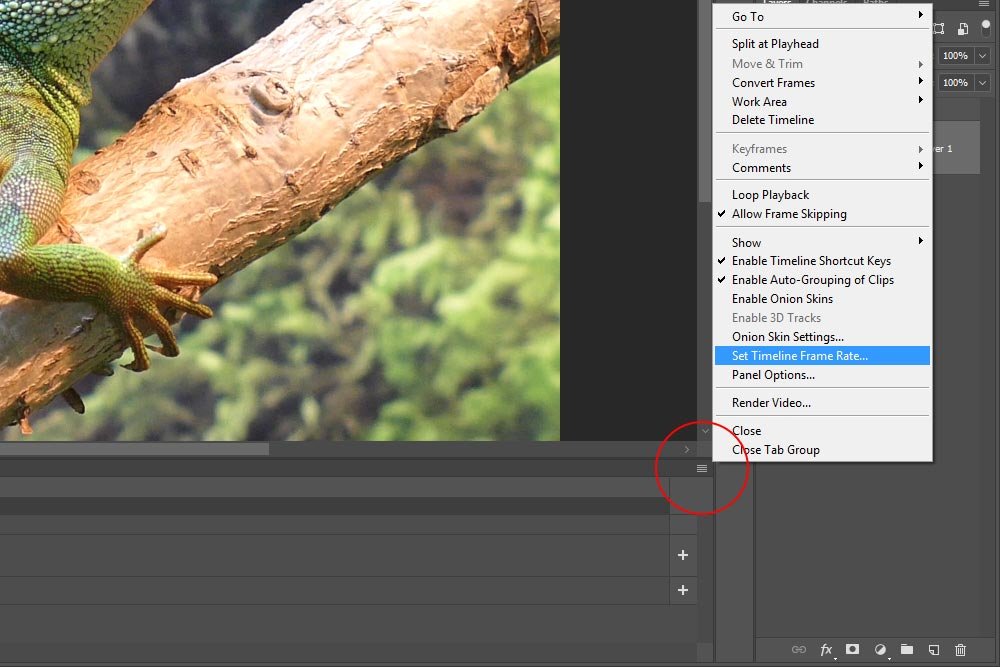
Once the menu opens, click on the Set Timeline Frame Rate menu item.
From there, you’ll see the Timeline Frame Rate dialog box appear, where you can either manually type in the desired frame rate or you can choose a preset one from the drop-down menu.
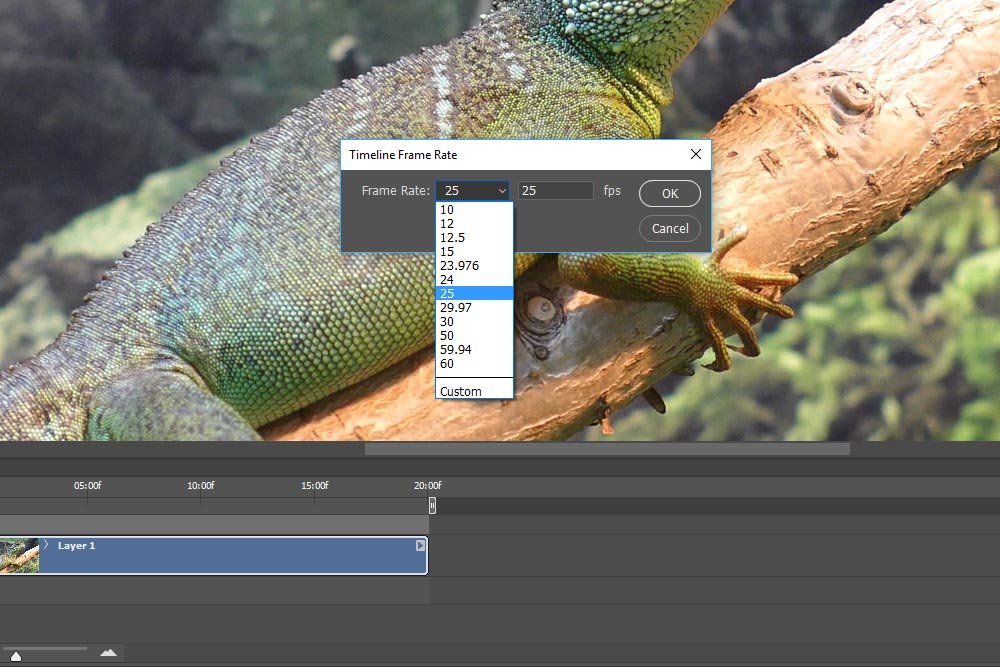
After you do that, simply click the OK button and you’ll be all set. You can continue on with your editing and then follow the workflow tips I outlined above.
——
I’m not sure which area I intended to focus on with this post, the workflow tip or the instructions for how to alter the timeline frame rate. Either way, I hope I at least explained everything clearly enough to understand. If you have any questions or concerns regarding this post, please let me know in the comment section below. Thanks for reading!
Disorganization costs you time and money down the road. There’s no excuse for it and it can truly make a project you’re working on suffer. If you’re working with a team and you try to pull something like this, you’ll be tossed out on your ear faster than you can bat an eye. Editors who are efficient and organized exhibit these traits in their work product and are worth their weights in gold.
In today’s post, I’d like to discuss one area of workflow when editing video in Adobe Photoshop. Really, you can apply this technique to any other video editing software as well, such as Adobe Premiere Pro CC, Apple Final Cut Pro X, Corel VideoStudio Ultimate X10 or Adobe Premiere Elements. I think what I’m going to share with you below is creative and effective, so read on.
Separate Clips
Years ago, when I first began dabbling in the world of video, I had no idea what I was doing. I’d create a new file in my current video editor, import a video and begin making changes. I’d add clips and for each clip, I’d make transitions and movements and all sorts of stuff. By the end of the project, I had a list of things I was working on that was about a mile long. I’m sure you can imagine how tough it was to get around inside the software. Not to mention how long I had to wait for all the various pieces of the project to render and complete the processes that made things tick. In one word, I can describe my experience – horrible. It was horrible to work like this and I vowed that I would never do it again. That’s when I began piecing things out, working on them and then putting them back together.Let’s say I’m working on a video of a really cool looking iguana.

I already have an idea of what I want. The project is going to require two different scenes and each scene will be distinct from each other. Also, each scene will have movement, transitions, masks and different images used inside of it. Because of all this confusion, I can tell you that the best route to take would be to create one master file and then to create separate files for each scene. Here’s how things would work:
1. I’d open each scene clip into Photoshop, one at a time and in its own file, and work on it until it’s complete. I’d also be sure to appropriately size the clip so it’ll work well with others in the project.
2. When finished, I’d export each clip at the highest quality available. I’d treat it sort of as a final, stand alone, movie.
3. I’d create a master file that I could use as a shell to import both clips into and that I would also use to export as the real final movie. I’d make whatever adjustments are necessary inside of this file, such as additional transitions and things like that.
If you aren’t sure how to open, import or export a video clip into Adobe Photoshop, please take a look at these posts:
5 Ways to Open Video Files into Adobe Photoshop
How to Export Video From Adobe Photoshop
The Workflow
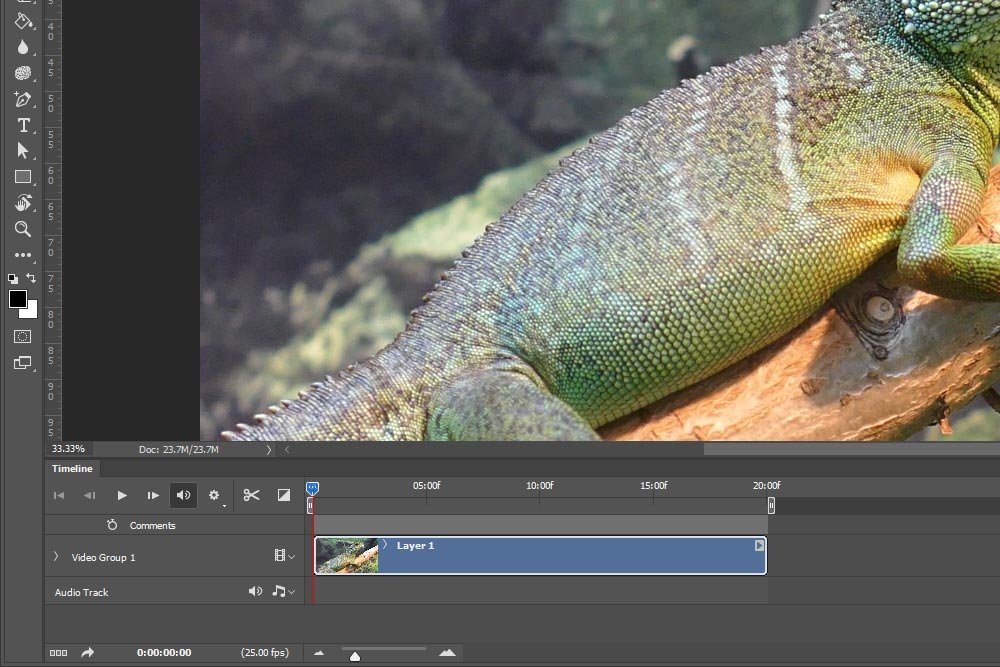
Basically, I would launch the first clip into Photoshop and work on it. Here’s a screenshot of the Timeline panel.
Inside the Layers panel, there would only be one video layer to start off with.

I would open both video clips like this, separately, and make all the edits I saw fit. When I was completely finished with them, as I stated above, I’d export them as their own mp4 files. Again, here are the instructions for how to export a video file from Photoshop.
Once finished, I’d create the shell file. I’d give it a descriptive name and I’d import both finished video files into it. At this point, I’d have two clips in the timeline.

And I’d have multiple layers in the Layers panel.

Of course, as the final video progresses from one clip to another, different transitions will be necessary. I would create all of them right in this file. When done, I’d export it as the final file.
How To Set the Timeline Frame Rate
When working on multiple video clips for one large project, it’s important to set the frame rate of each clip so it coincides with all the others. You certainly don’t want different variables across multiple clips. Luckily, setting the frame rate in Photoshop is easy.By the way, when recording video with your camera, you really should record at the largest and best quality available. You can always scale down once you’re in your editor. You can’t scale up to improve quality later on.
Anyway, after a video clip has been launched into Photoshop, you can set the frame rate by clicking on the small menu icon that’s located at the top right of the Timeline panel.

Once the menu opens, click on the Set Timeline Frame Rate menu item.
From there, you’ll see the Timeline Frame Rate dialog box appear, where you can either manually type in the desired frame rate or you can choose a preset one from the drop-down menu.

After you do that, simply click the OK button and you’ll be all set. You can continue on with your editing and then follow the workflow tips I outlined above.
——
I’m not sure which area I intended to focus on with this post, the workflow tip or the instructions for how to alter the timeline frame rate. Either way, I hope I at least explained everything clearly enough to understand. If you have any questions or concerns regarding this post, please let me know in the comment section below. Thanks for reading!
