15Katey
Member
- Joined
- May 10, 2021
- Messages
- 130
- Reaction Score
- 0
- Points
- 23
- #1
When doing heavy editing on images in Adobe Photoshop, you’ll find that you do tons of selecting. While I’ve already written a few posts on this site regarding selections, I thought I’d go a bit further and offer some new tricks. Well, I guess they really aren’t tricks because what I’ll demonstrate is readily available through the different menus at the top of the application. I do, however, want to bring attention to these areas and some strategies.
In today’s post, I’ll use two demo images to work on and I’ll make different types of selections while going about a quick project. During the process of completing the project, I’ll demonstrate the use of a few different selection commands. Hopefully, by the end of this post, you’ll have a handle on some new tips that can make selections in Photoshop all the easier.
By the way, if you’re interested in reading about selections, please check out these posts:
Making Selections in Adobe Photoshop
How to Combine & Trim Selections in Adobe Photoshop
Selecting, Masking & Moving Image Objects in Adobe Photoshop
How to Select & Mask Hair in Adobe Photoshop
Inverting & Coloring with the Magic Wand Tool in Adobe Photoshop

How To Make A Photo “Pop” With Adobe Camera Raw
I currently have three tabs open in Photoshop. Two for the images themselves and one for use making screenshots for this post.
In order to move the snowflake image to the other tab, I’ll first select all the available pixels. I’ll head up to the Select > All menu item and click.
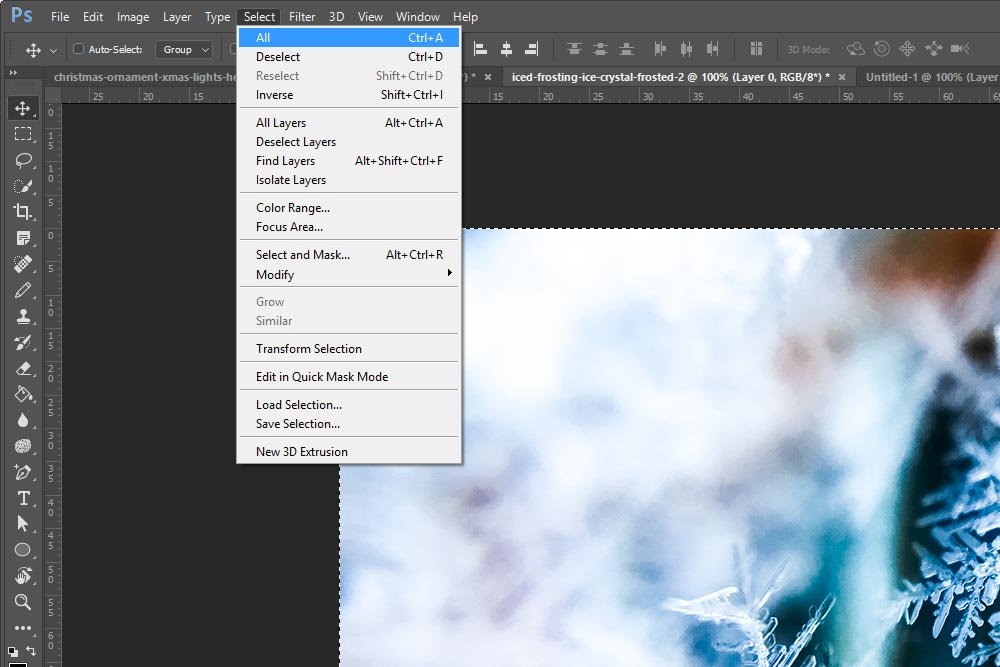
If I didn’t want to use the menu, I could have used the Ctrl+A keyboard shortcut. They do the same thing. Also, notice how I have the Move Tool active and still had the ability to make a selection. In order to get those marching ants moving, I don’t need to have the Rectangular Marquee tool selected. Any active tool will do.
I have a few options for copying this layer. I can use the Edit > Copy menu item or I can simply press Ctrl+C on my keyboard.
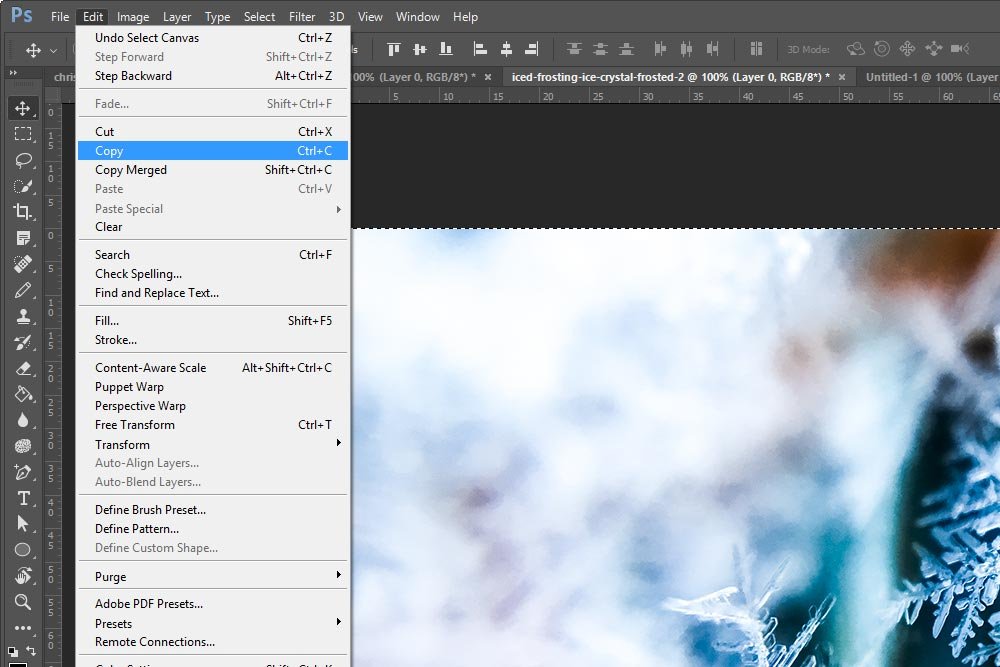
Once I use one of these copy commands, the data will be saved to my computer’s clipboard. I can now click on the Christmas ornament tab to paste the data there.
To paste, I can either use the keyboard shortcut Ctrl+V or the Edit > Paste menu item.
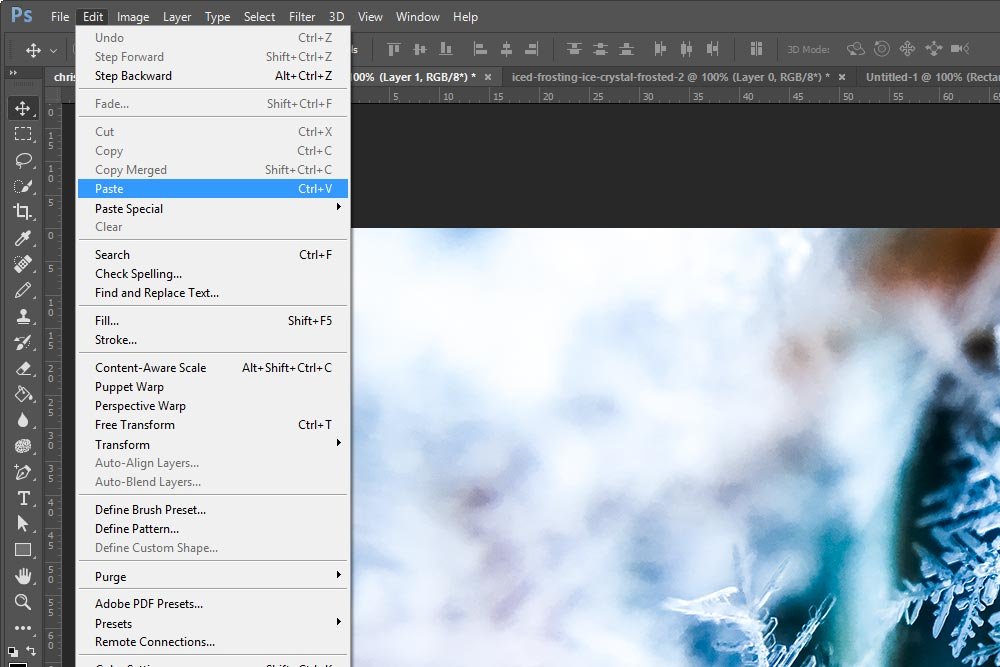
And once I do paste, I’ll see both of the layers I’ll need to work on over in the Layers panel.
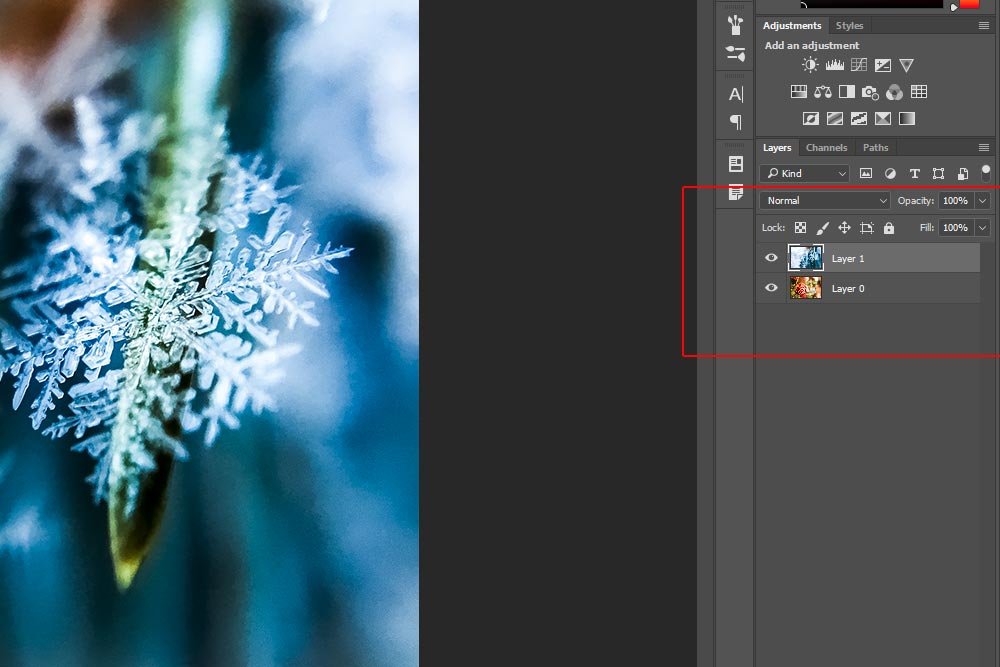
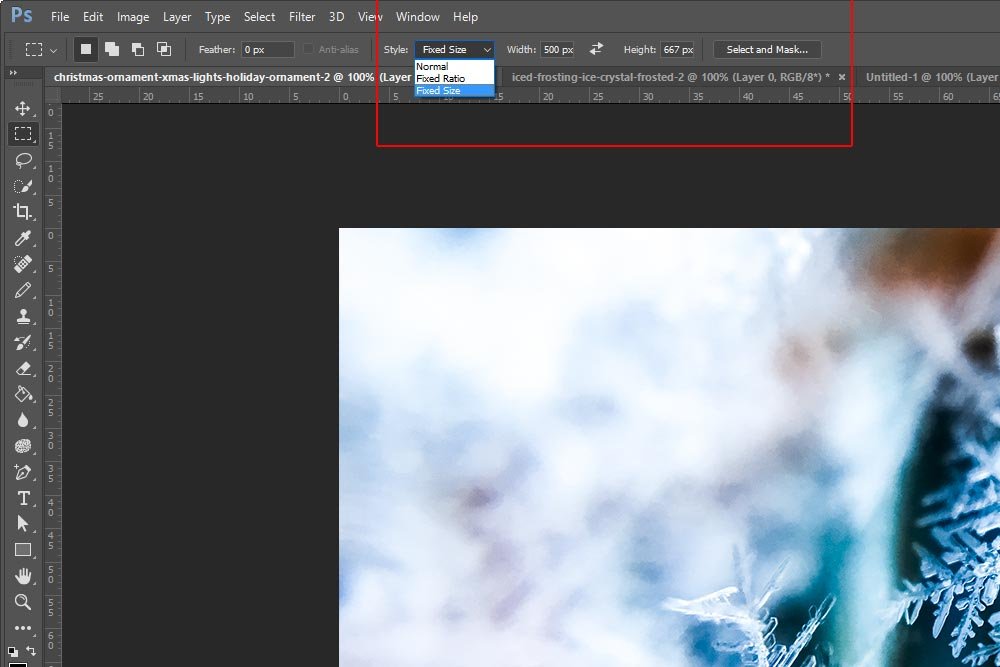
I already know the dimensions of the images are 1000 pixels wide by 667 pixels high. So, if I click on the Rectangular Marquee Tool and then head up to the tool’s options bar up top, I can choose Fixed Size from the Style drop-down box. From there, I can input 500 pixels in the Width field and 667 in the Height field. Doing this will give me a selection that’s exactly half of the image when I’m ready to use the tool.
I’ll first select the right half of the snowflake layer. I’ll go over to the Layers panel and make sure that Layer 1 (the snowflake layer) is highlighted. Then, I’ll click in the workspace to the right of the entire image. That will make sure that the right half of the layer is selected, all the way to the edge.
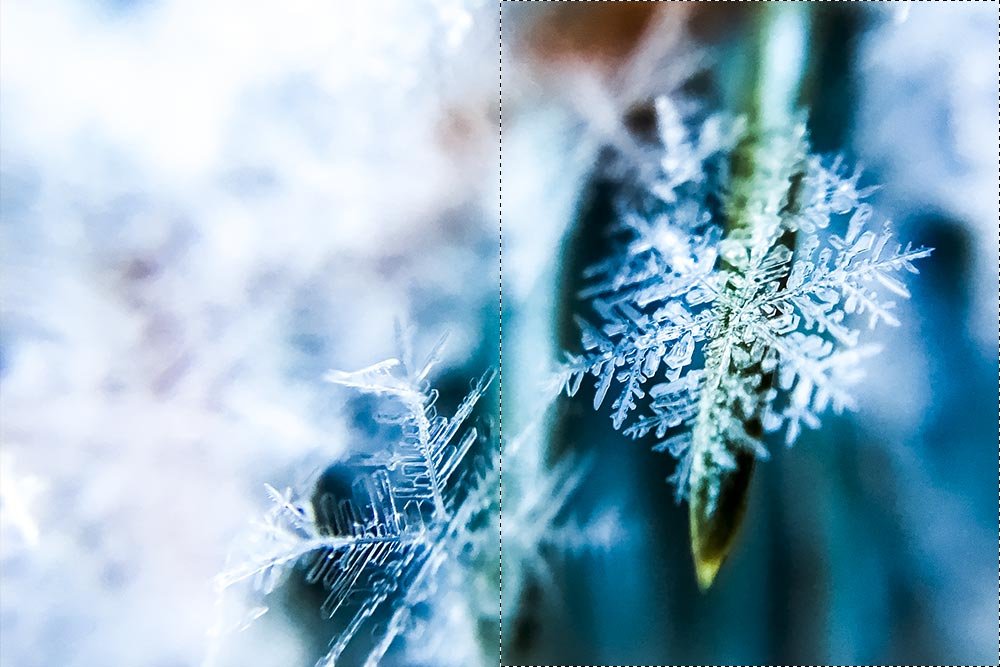
Look for the marching ants in the screenshot above.
Now that the selection is made, I’ll press Delete on my keyboard to remove that part of the layer. Here’s what the result looks like.
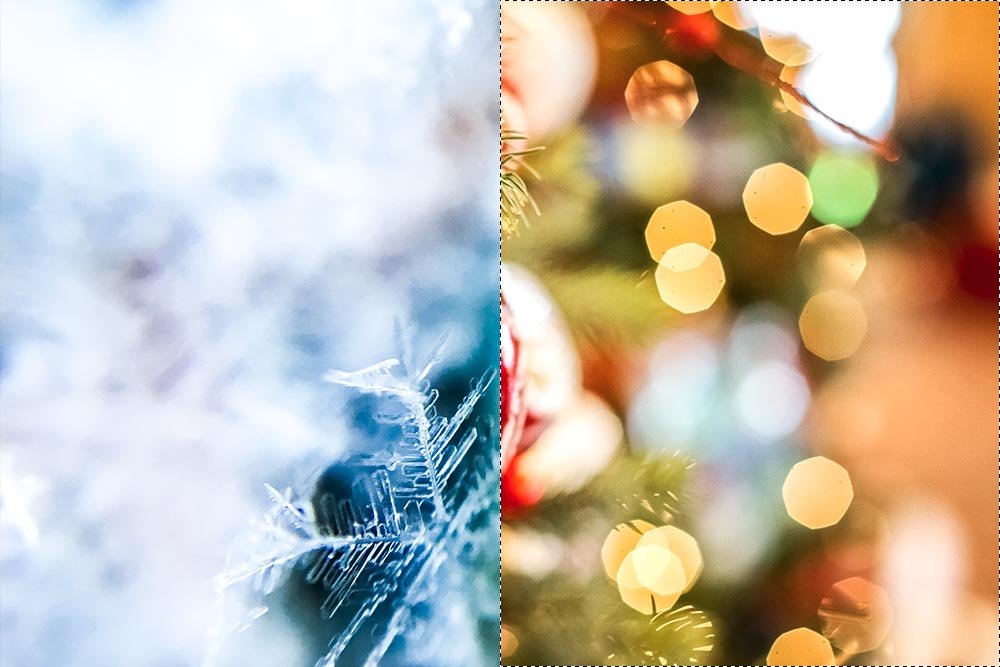
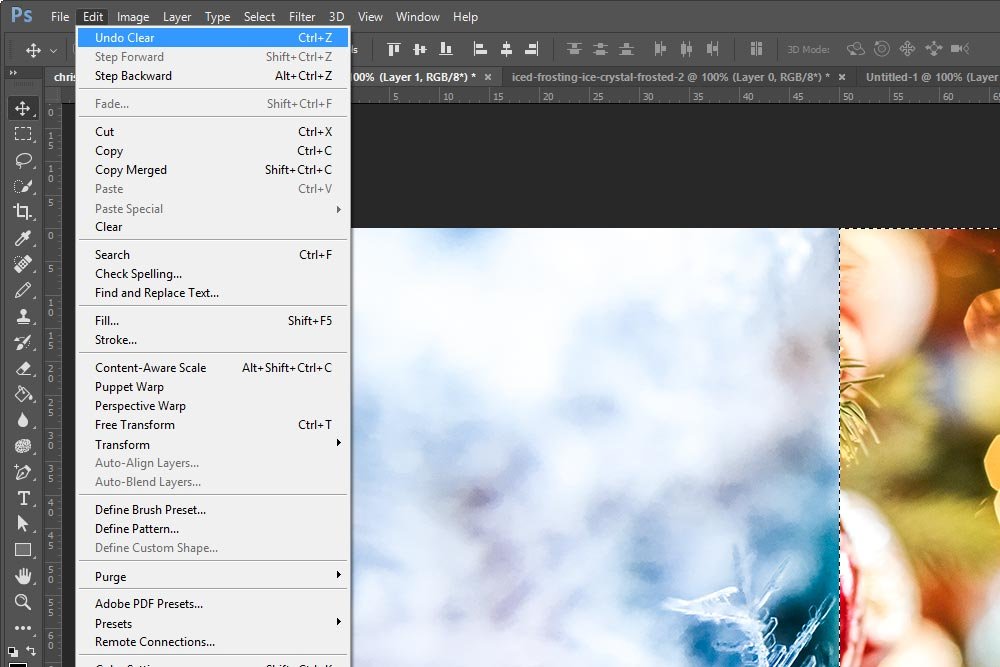
Well, that doesn’t look very good. It’s not exactly what I had in mind. I think I’ll need undo the deletion I just made by pressing Ctrl+Z on my keyboard or heading up to the Edit > Undo Clear menu item and clicking on that. By the way, the Undo menu item changes wording based on the last task you completed in Photoshop.
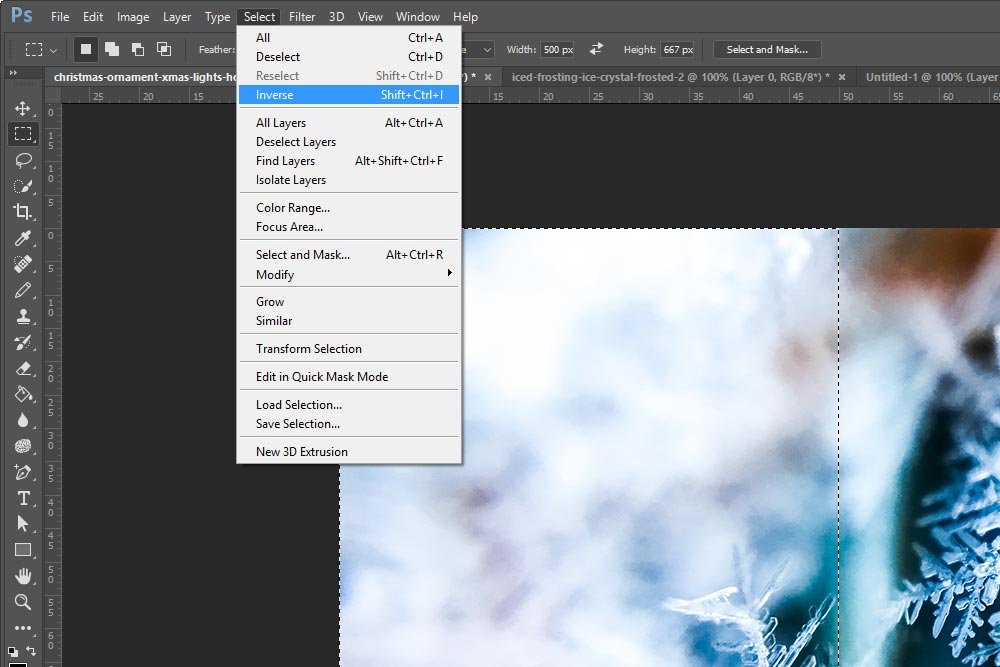
I think I’d like to delete the other side of the snowflake layer. Instead of deselecting the selection and then reselecting the other side, all I need to do to flip the current selection is to use the Select > Inverse menu item.
I want you to think about the power of this command for a second. Selections can get crazy complex in Photoshop and having the ability to invert any selection you make with just a few clicks in insane. I’ve made some selections that I probably would never be able to make again. Just thinking of inverting them so easily puts a smile on my face.
Okay, now that the selection has been inverted, the other side of the snowflake layer has the marching ants around it. I can click Delete on my keyboard once again to see how that looks.
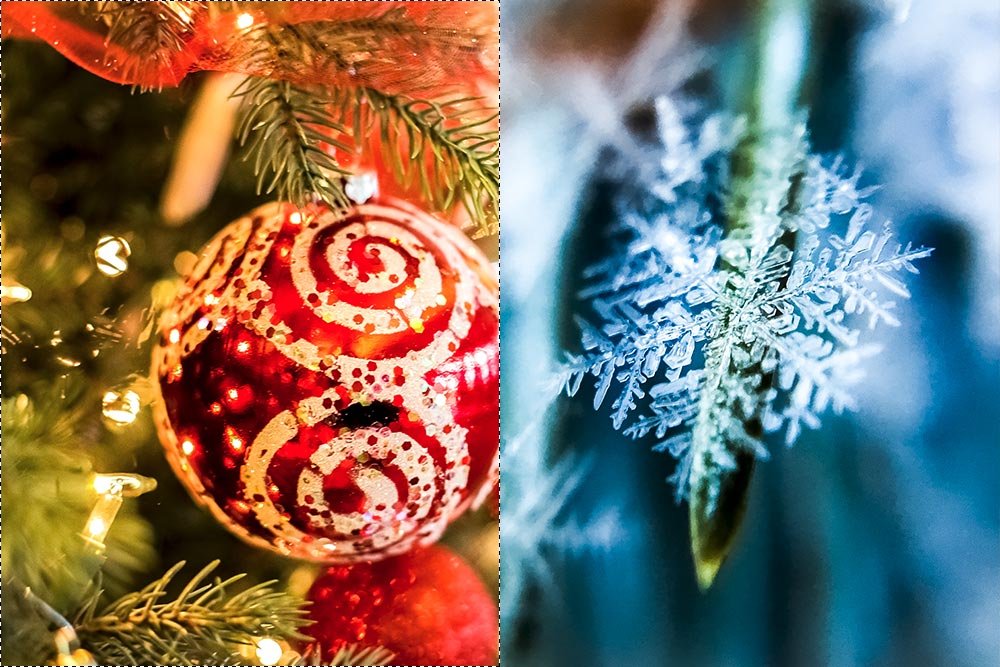
That looks much better. I think I can now do something with that.
Either way, the marching ants will disappear.
Now, I want to help you out here. I know, from past experience, that there are times when you wish you didn’t just deselect something. In my case today, it’s no big deal because I didn’t put any work into any selection I’ve made. When using other tools, such as the Lasso Tool, Quick Select Tool or the Magic Wand Tool, selections can become very detailed very quickly. If you accidentally deselect something you’ve been working a long time on, it can get frustrating and not to mention, a waste of time.
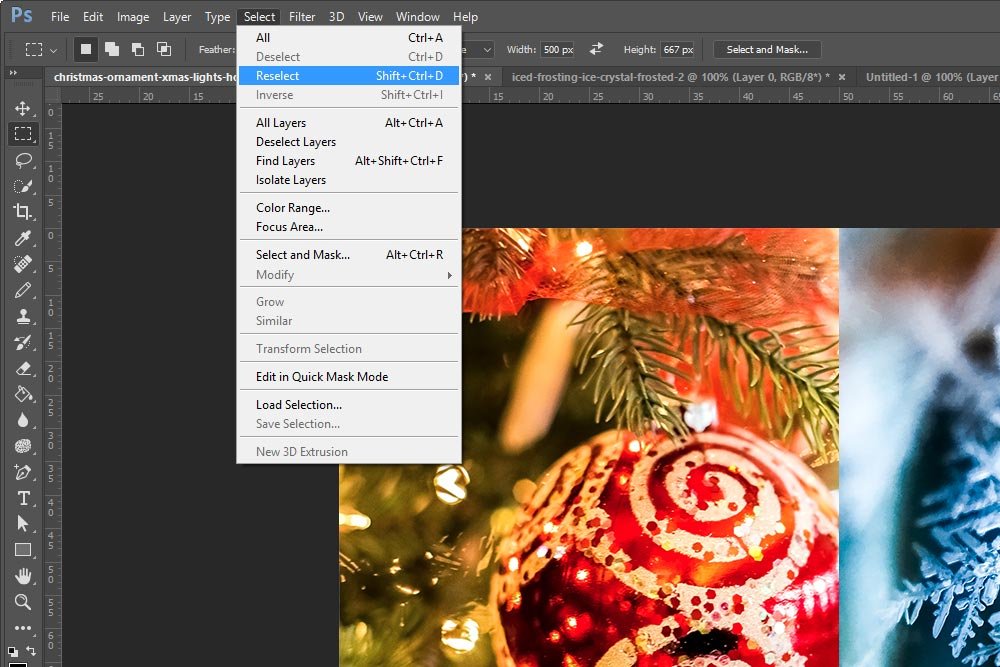
To reselect a deselected selection (say that three times fast), all you need to do is use the Select > Reselect menu item. This command will basically undo your most recent deselection. I must say, this feature is extraordinarily handy and can be a real life saver.
Here’s what Adobe says about this particular blend mode:
Hard Light: Multiplies or screens the colors, depending on the blend color. The effect is similar to shining a harsh spotlight on the image. If the blend color (light source) is lighter than 50% gray, the image is lightened, as if it were screened. This is useful for adding highlights to an image. If the blend color is darker than 50% gray, the image is darkened, as if it were multiplied. This is useful for adding shadows to an image. Painting with pure black or white results in pure black or white.
If you aren’t sure what blending modes are or what they do in Photoshop, please take a look at these two posts:
What are Blending Modes in Adobe Photoshop?
Learning the Difference Between Blending Modes in Adobe Photoshop
Anyway, this is the result I get:

Not great, sorta cool and certainly enough to use as an example for this post.
——
That’s about it for today. I hope I clearly explained how to select all, invert, deselect and reselect a selection in Adobe Photoshop. If you have any questions or concerns regarding this, or any other post, please leave them in the comment section below. Thanks for reading!
In today’s post, I’ll use two demo images to work on and I’ll make different types of selections while going about a quick project. During the process of completing the project, I’ll demonstrate the use of a few different selection commands. Hopefully, by the end of this post, you’ll have a handle on some new tips that can make selections in Photoshop all the easier.
By the way, if you’re interested in reading about selections, please check out these posts:
Making Selections in Adobe Photoshop
How to Combine & Trim Selections in Adobe Photoshop
Selecting, Masking & Moving Image Objects in Adobe Photoshop
How to Select & Mask Hair in Adobe Photoshop
Inverting & Coloring with the Magic Wand Tool in Adobe Photoshop
Demo Images
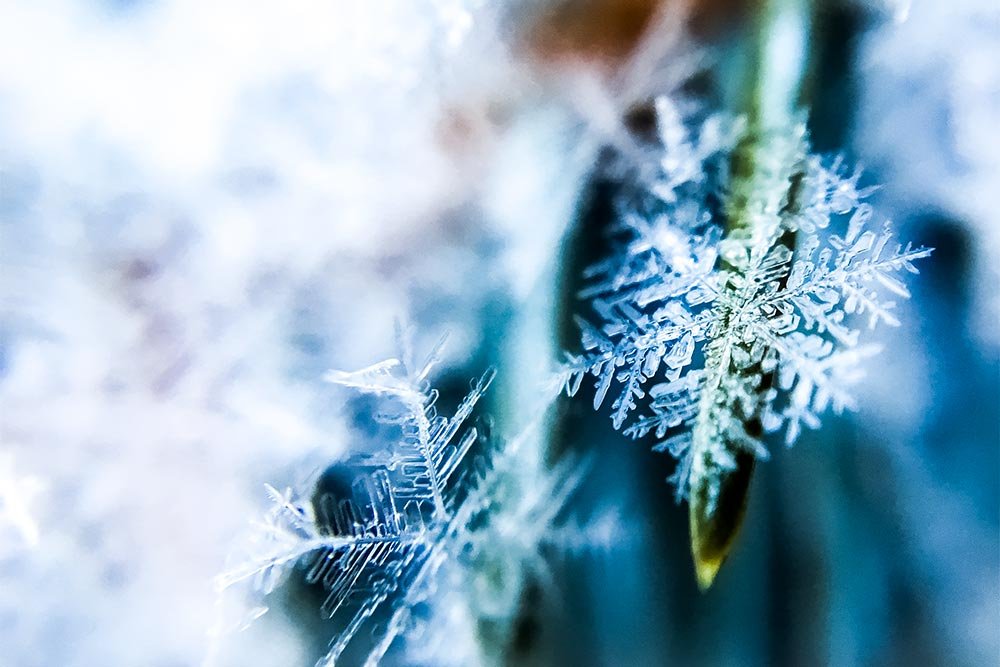
I’ll be using the images below for this post. While the project I’ll undertake will be quite simple, I think these photos will work out well.

Opening the Images into Photoshop
I’ve already gone ahead and finished up any aesthetic edits to the photos that I wanted to make in Camera Raw. From there, I launched the finished photos into Photoshop. If you’re interested in the edits I usually make to a wide majority of photos I edit, please read this post:How To Make A Photo “Pop” With Adobe Camera Raw
I currently have three tabs open in Photoshop. Two for the images themselves and one for use making screenshots for this post.
Select All
The very first task I need to complete is to move the snowflake image layer over to the tab that contains the Christmas ornament. My goal with this project is to make sort of a half and half Christmas card cover. Just for demonstration purposes, of course. If I really wanted to go to print with something like this, the image resolution would need to be much higher.In order to move the snowflake image to the other tab, I’ll first select all the available pixels. I’ll head up to the Select > All menu item and click.

If I didn’t want to use the menu, I could have used the Ctrl+A keyboard shortcut. They do the same thing. Also, notice how I have the Move Tool active and still had the ability to make a selection. In order to get those marching ants moving, I don’t need to have the Rectangular Marquee tool selected. Any active tool will do.
Copying & Pasting
Next, I’ll need to copy and paste this image’s pixels to the other tab. I don’t need to select the proper layer in the Layers panel because it’s the only one there. It’s selected by default.I have a few options for copying this layer. I can use the Edit > Copy menu item or I can simply press Ctrl+C on my keyboard.

Once I use one of these copy commands, the data will be saved to my computer’s clipboard. I can now click on the Christmas ornament tab to paste the data there.
To paste, I can either use the keyboard shortcut Ctrl+V or the Edit > Paste menu item.

And once I do paste, I’ll see both of the layers I’ll need to work on over in the Layers panel.

Inverting the Selection
Now, I mentioned above that this project would be simple. It really is. All I want to do is to remove half of the snowflake layer. Which half I’ll keep removed is still to be determined. I’ll need to do a little fooling around to see which look I like better.I already know the dimensions of the images are 1000 pixels wide by 667 pixels high. So, if I click on the Rectangular Marquee Tool and then head up to the tool’s options bar up top, I can choose Fixed Size from the Style drop-down box. From there, I can input 500 pixels in the Width field and 667 in the Height field. Doing this will give me a selection that’s exactly half of the image when I’m ready to use the tool.

I’ll first select the right half of the snowflake layer. I’ll go over to the Layers panel and make sure that Layer 1 (the snowflake layer) is highlighted. Then, I’ll click in the workspace to the right of the entire image. That will make sure that the right half of the layer is selected, all the way to the edge.

Look for the marching ants in the screenshot above.
Now that the selection is made, I’ll press Delete on my keyboard to remove that part of the layer. Here’s what the result looks like.

Well, that doesn’t look very good. It’s not exactly what I had in mind. I think I’ll need undo the deletion I just made by pressing Ctrl+Z on my keyboard or heading up to the Edit > Undo Clear menu item and clicking on that. By the way, the Undo menu item changes wording based on the last task you completed in Photoshop.

I think I’d like to delete the other side of the snowflake layer. Instead of deselecting the selection and then reselecting the other side, all I need to do to flip the current selection is to use the Select > Inverse menu item.

I want you to think about the power of this command for a second. Selections can get crazy complex in Photoshop and having the ability to invert any selection you make with just a few clicks in insane. I’ve made some selections that I probably would never be able to make again. Just thinking of inverting them so easily puts a smile on my face.
Okay, now that the selection has been inverted, the other side of the snowflake layer has the marching ants around it. I can click Delete on my keyboard once again to see how that looks.

That looks much better. I think I can now do something with that.
Deselecting & Reselecting in Photoshop
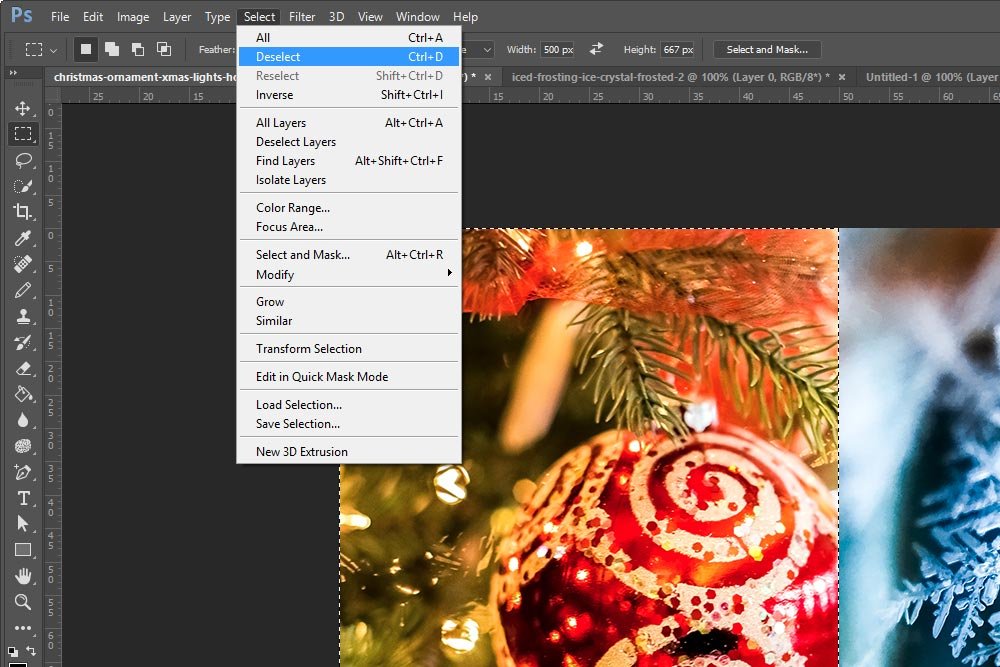
Now that the Christmas card cover is starting to look good, I no longer need an active selection. To remove the marching ants, I can do two things. First, I can simply click, while a selection tool is active, anywhere inside the selection. That will get rid of it in a jiffy. Another way to deselect a selection is to head up to the Select > Deselect menu item and click.
Either way, the marching ants will disappear.
Now, I want to help you out here. I know, from past experience, that there are times when you wish you didn’t just deselect something. In my case today, it’s no big deal because I didn’t put any work into any selection I’ve made. When using other tools, such as the Lasso Tool, Quick Select Tool or the Magic Wand Tool, selections can become very detailed very quickly. If you accidentally deselect something you’ve been working a long time on, it can get frustrating and not to mention, a waste of time.
To reselect a deselected selection (say that three times fast), all you need to do is use the Select > Reselect menu item. This command will basically undo your most recent deselection. I must say, this feature is extraordinarily handy and can be a real life saver.

Finishing the Project
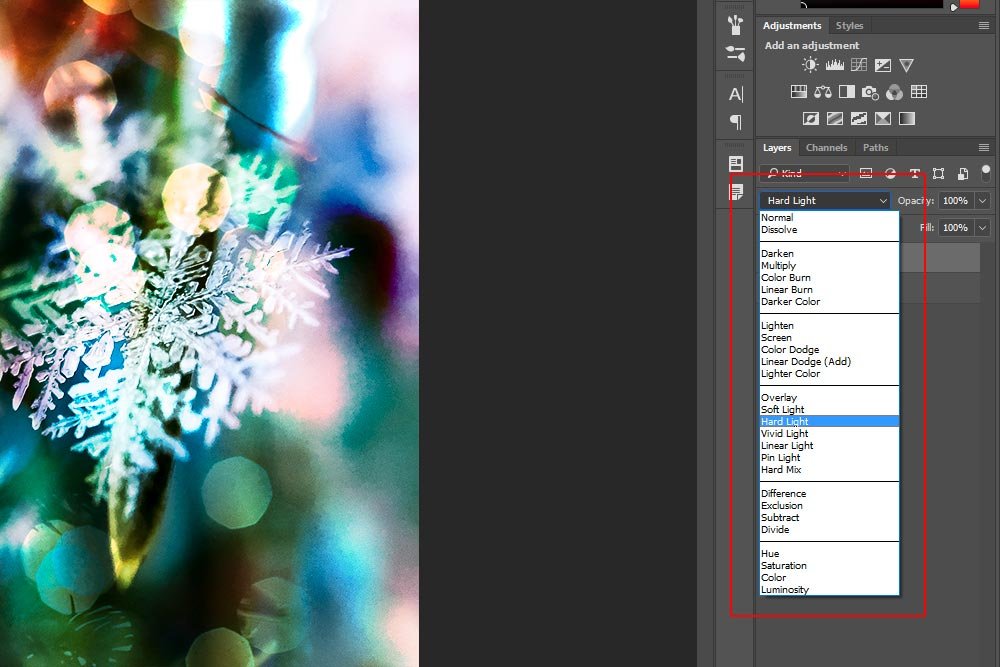
Since both halves of this card cover don’t blend together as well as I’d like, I thought I could apply a blend mode to the top layer. I skimmed through each one and found that the Hard Light blending mode looked the best.
Here’s what Adobe says about this particular blend mode:
Hard Light: Multiplies or screens the colors, depending on the blend color. The effect is similar to shining a harsh spotlight on the image. If the blend color (light source) is lighter than 50% gray, the image is lightened, as if it were screened. This is useful for adding highlights to an image. If the blend color is darker than 50% gray, the image is darkened, as if it were multiplied. This is useful for adding shadows to an image. Painting with pure black or white results in pure black or white.
If you aren’t sure what blending modes are or what they do in Photoshop, please take a look at these two posts:
What are Blending Modes in Adobe Photoshop?
Learning the Difference Between Blending Modes in Adobe Photoshop
Anyway, this is the result I get:

Not great, sorta cool and certainly enough to use as an example for this post.
——
That’s about it for today. I hope I clearly explained how to select all, invert, deselect and reselect a selection in Adobe Photoshop. If you have any questions or concerns regarding this, or any other post, please leave them in the comment section below. Thanks for reading!
