15Katey
Member
- Joined
- May 10, 2021
- Messages
- 130
- Reaction Score
- 0
- Points
- 23
- #1
When you begin working with multiple video clips inside of Adobe Photoshop, one of the very first things you’ll likely want to do is to arrange the clips in some sort of sequential order. This is obvious. After all, you edited each individual clip so it had a specific position in the overall movie. Why wouldn’t you want to position those clips so they make sense later on?
In today’s post, I’m going to show you just how easy it is to arrange clips in the Timeline panel and the Layers panel of Photoshop. This post should be brief, because there really ins’t all that much to cover. The material is important though, so be sure to read it all the way through.
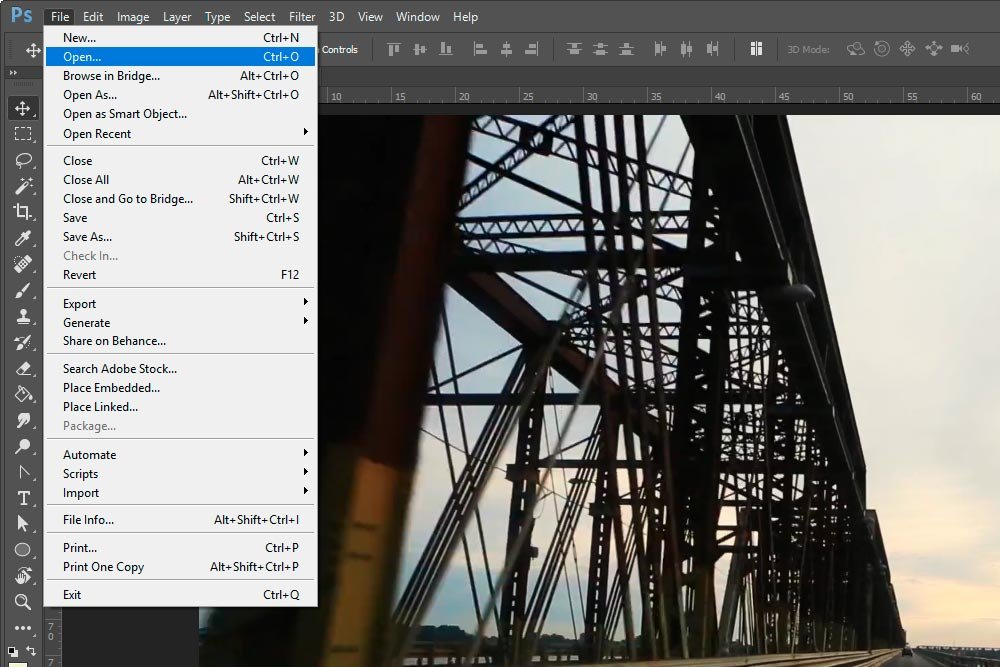
First, I used the File > Open menu item to navigate to one of the clips I wanted to use.
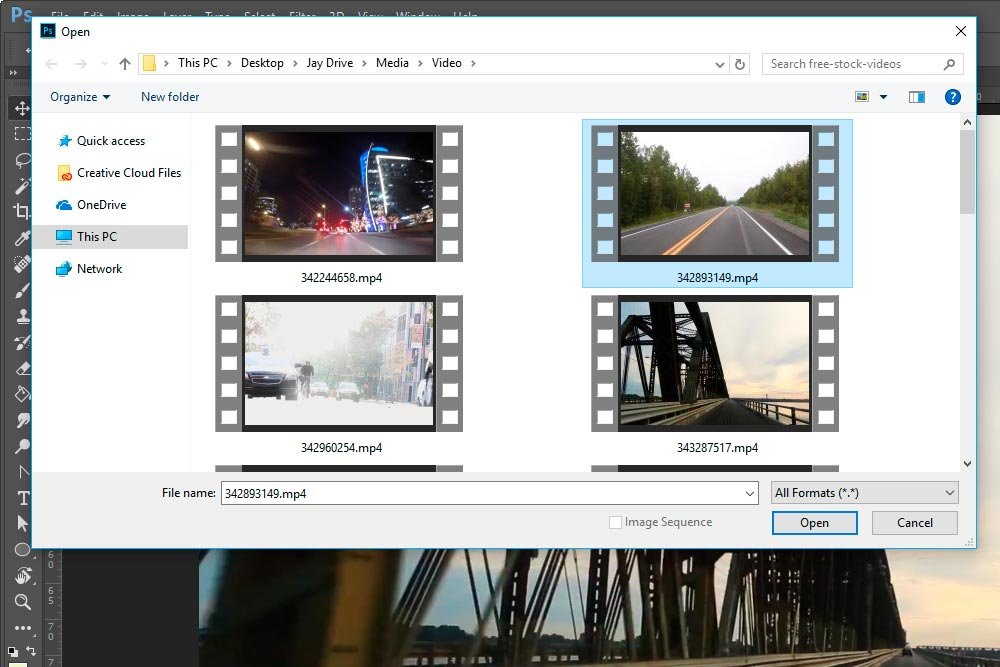
When I found the clips, I either double-clicked on one to open it or I could simply click on the Open button down in the lower right area of the window.
Either way, the clip will open into Photoshop and the Timeline panel will appear. Also, this one clip will be contained in a Group all its own in the Layers panel. You can think of a group as sort of like a folder in the Layers panel. It’s merely something that contains multiple video clips.
To open the remaining clips, I’ll click the “+” symbol at the end (right side) of the existing timeline track.
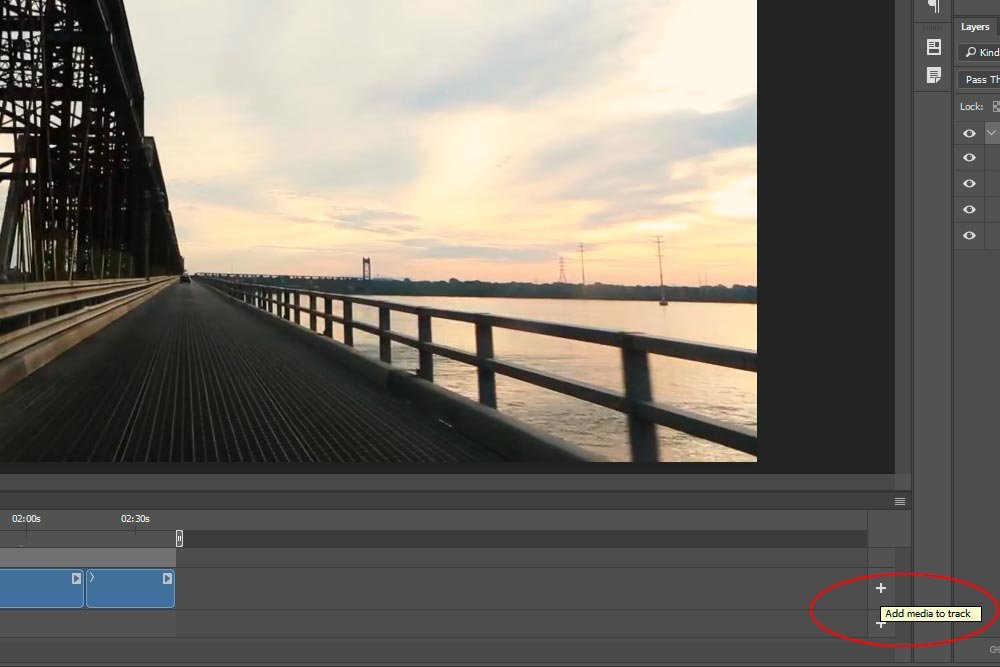
Once I click that symbol, I can again navigate to the files I’d like to open and follow the same instructions I used for the individual file. Once I’m done with all that, I’ll see that all the clips are now contained in the same group I had initially formed.
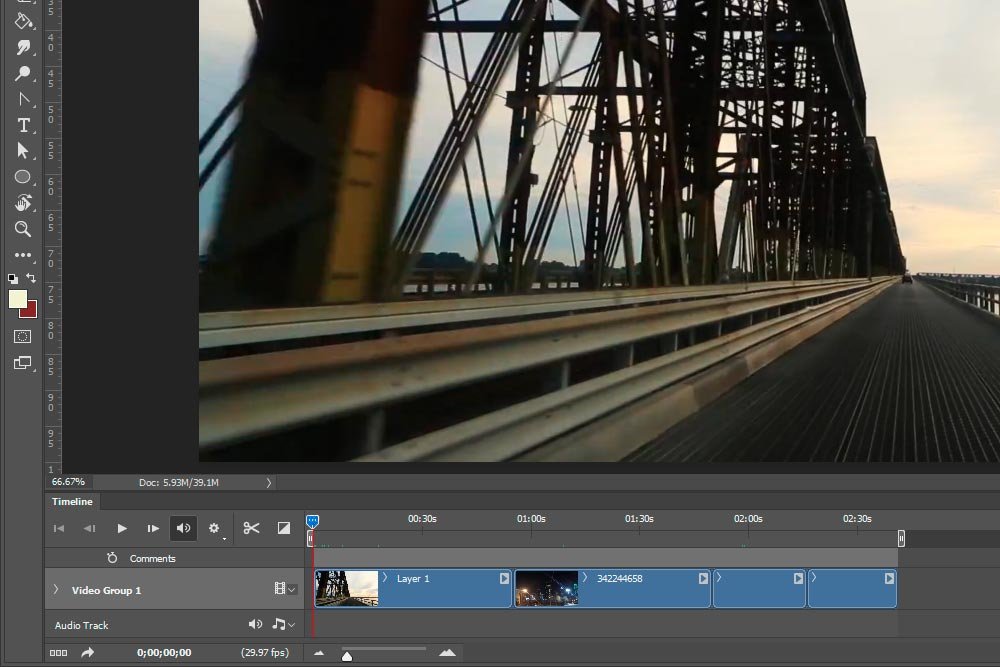
Below, you can see the clips lined up in the same track in the Timeline panel as well as the clips contained in the same group in the Layers panel.
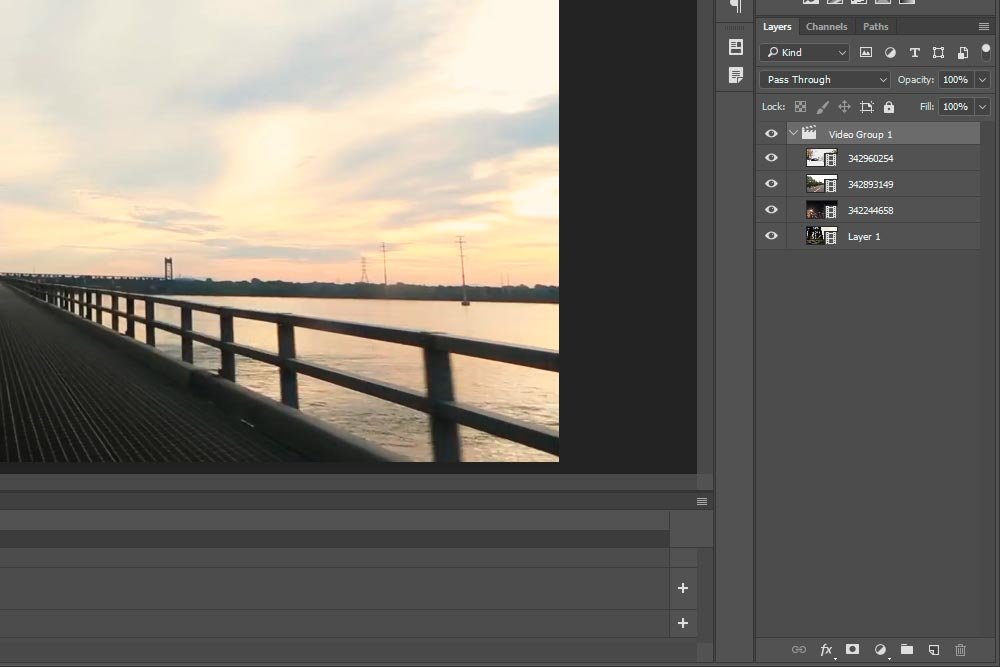
Now, I’m sure you’ve seen clips staggered in various tracks in the timeline panel before. That’s a different scenario that I’ll be covering in later posts, so don’t be too concerned with that setup right now.
To exemplify how these two areas are related, I can go ahead and click on any blue clip in the Timeline panel and it will become highlighted. The corresponding clip will be highlighted in the Layers panel as well. I could do this backwards too. It doesn’t matter. In the screenshot below. I went ahead and clicked the last clip in the track in the Timeline panel. It’s now highlighted. The same one in the Layers panel is also highlighted.
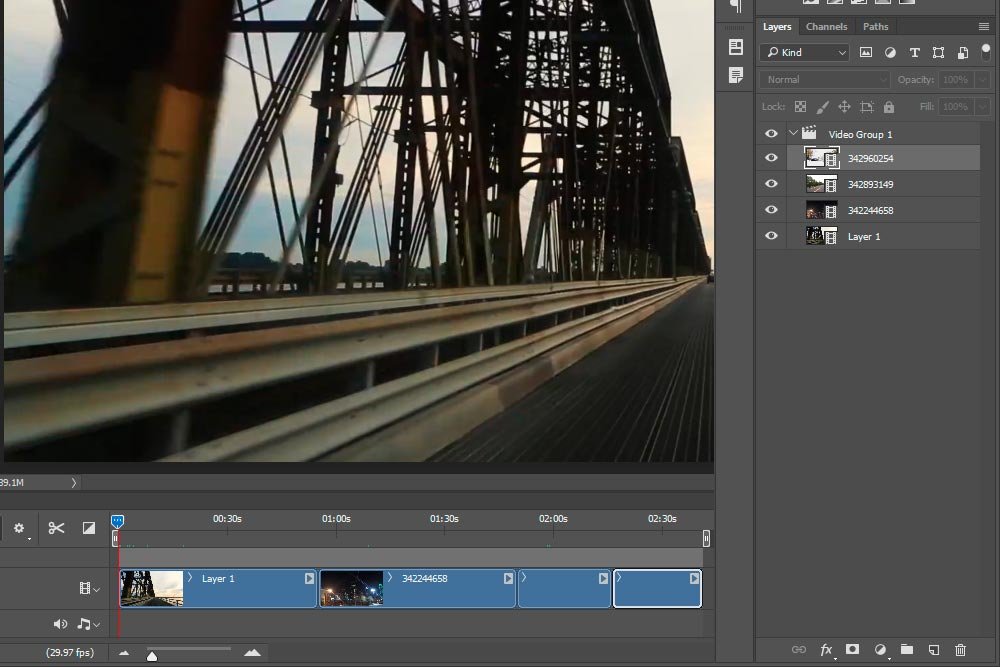
This relationship between these areas is important because it will give you two different options when it comes to reordering things.
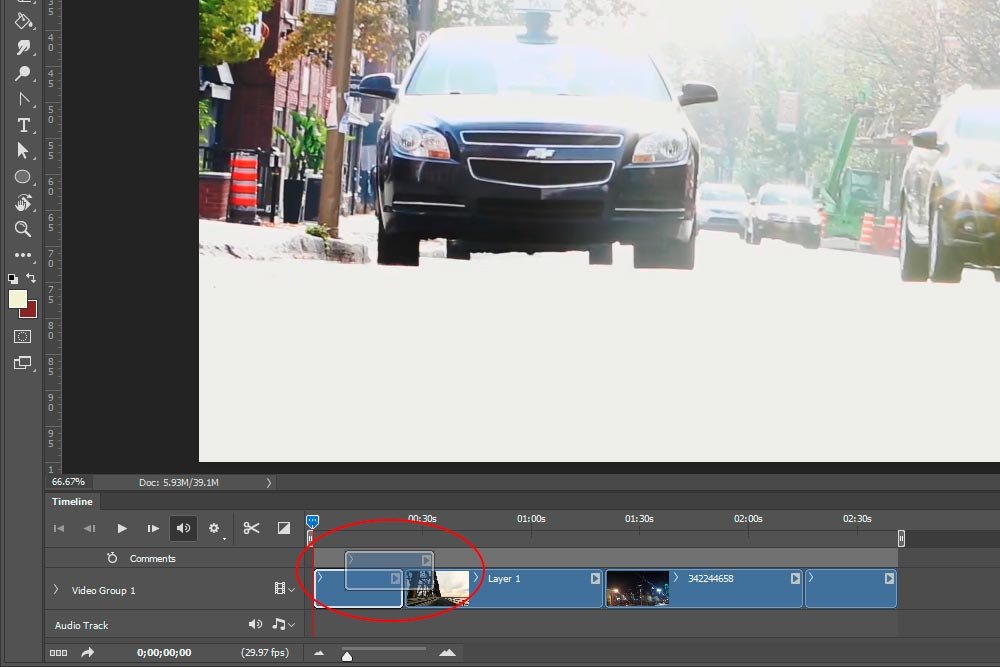
Basically, to reposition any clip in either the Timeline or Layers panel, all you need to do is click and drag it to a new position. One that’s occupied by something else. So, if I wanted to make the currently last clip play first, I could click and drag the blue box that’s all the way to the right on the Timeline panel on top of the left-most clip and drop it there. That would bump the current first one to the second position and make the last one first.
Similarly, I could drag one of the layers in the Layers panel to another position and the same thing would happen. The sequence of the clips would be altered.
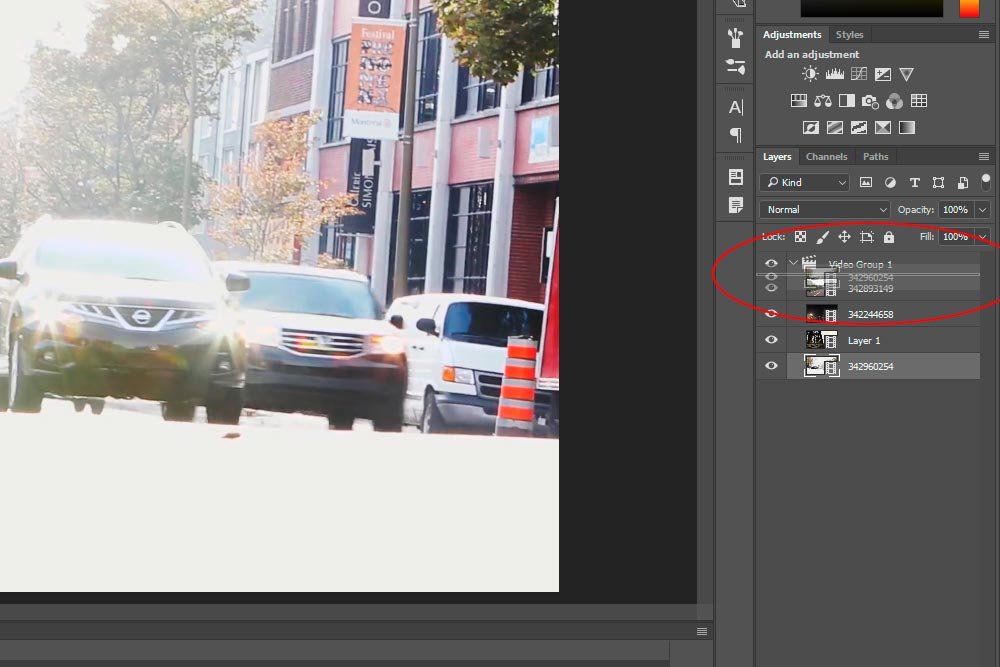
And really, that’s it. Reorganizing video clips so they play in a different sequence is a very simple task to execute.
——
While this was a short post, I feel it covers an important task. When you know what you can click and drag around Photoshop, you can increase the speed of your workflow, which helps you become more efficient. If you have any questions or concerns regarding this post, please let me know in the comment section below. Thanks for reading!
In today’s post, I’m going to show you just how easy it is to arrange clips in the Timeline panel and the Layers panel of Photoshop. This post should be brief, because there really ins’t all that much to cover. The material is important though, so be sure to read it all the way through.
Adding Clips to a Group
In this post, I’m going to first open one video file into Photoshop and then I’ll add three additional videos to the group that was initially created. I’ve already gone ahead and done this, but I’ll share the steps I took.First, I used the File > Open menu item to navigate to one of the clips I wanted to use.

When I found the clips, I either double-clicked on one to open it or I could simply click on the Open button down in the lower right area of the window.

Either way, the clip will open into Photoshop and the Timeline panel will appear. Also, this one clip will be contained in a Group all its own in the Layers panel. You can think of a group as sort of like a folder in the Layers panel. It’s merely something that contains multiple video clips.
To open the remaining clips, I’ll click the “+” symbol at the end (right side) of the existing timeline track.

Once I click that symbol, I can again navigate to the files I’d like to open and follow the same instructions I used for the individual file. Once I’m done with all that, I’ll see that all the clips are now contained in the same group I had initially formed.
Below, you can see the clips lined up in the same track in the Timeline panel as well as the clips contained in the same group in the Layers panel.


Now, I’m sure you’ve seen clips staggered in various tracks in the timeline panel before. That’s a different scenario that I’ll be covering in later posts, so don’t be too concerned with that setup right now.
Changing the Sequence of the Clips
As you may have already guessed, the clips are positioned in the timeline as they’ll play through. The final movie will play left to right, so the leftmost clip will play first, then the second one and so on. Also, the bottom layer of the group in the Layers panel is equivalent to the left-most clip in the Timeline panel. So, clips in the Timeline panel play from left to right and layers in the Layers panel play from bottom to top.To exemplify how these two areas are related, I can go ahead and click on any blue clip in the Timeline panel and it will become highlighted. The corresponding clip will be highlighted in the Layers panel as well. I could do this backwards too. It doesn’t matter. In the screenshot below. I went ahead and clicked the last clip in the track in the Timeline panel. It’s now highlighted. The same one in the Layers panel is also highlighted.

This relationship between these areas is important because it will give you two different options when it comes to reordering things.
Basically, to reposition any clip in either the Timeline or Layers panel, all you need to do is click and drag it to a new position. One that’s occupied by something else. So, if I wanted to make the currently last clip play first, I could click and drag the blue box that’s all the way to the right on the Timeline panel on top of the left-most clip and drop it there. That would bump the current first one to the second position and make the last one first.

Similarly, I could drag one of the layers in the Layers panel to another position and the same thing would happen. The sequence of the clips would be altered.

And really, that’s it. Reorganizing video clips so they play in a different sequence is a very simple task to execute.
——
While this was a short post, I feel it covers an important task. When you know what you can click and drag around Photoshop, you can increase the speed of your workflow, which helps you become more efficient. If you have any questions or concerns regarding this post, please let me know in the comment section below. Thanks for reading!
