CraigHardy
Member
- Joined
- May 11, 2021
- Messages
- 223
- Reaction Score
- 2
- Points
- 18
- #1
When I think of editing video, I think of adjusting the actual length of each clip used in the overall work product the most. Sure, there’s a lot more that goes into video production, but manipulating duration is, by far, one of the most common and important tasks involved. It’s sort of like photography. You go out there and take tons of photos, but very few of them make it into the final product. And even after you choose the photos you want to work with, there’s a lot of editing that goes into them. With video, it’s the same thing. Oftentimes, there is a huge amount of extra footage recorded. If you were to attempt to keep all that footage in any movie, no one would ever watch it. That’s almost guaranteed. It would be way too long. You need to trim those clips down to remove the dull and boring parts and to keep only the good parts. That’s video editing.
In today’s post, I’m going to show you the basics when it comes to adjusting the length of individual video clips in Adobe Photoshop. It’s sort of an intimidating topic to discuss, but really, it’s very simple and straightforward. Much more so than most people know. As a matter of fact, you can accomplish some of these tasks with a simple click and drag with your mouse. If people only knew how easy it was to edit video, I’m sure a lot more of them would be doing it.
For this post, I have three demo video clips. I already put them into one tab in Photoshop and kept them all part of the same group. By keeping all of the clips in the same group, they sit side by side on the timeline. Trimming and splitting them will make much more sense with this type of setup.
While I’m sure you’ll figure this out as the post goes on, all three of the video clips contain footage of a night at some sort of a carnival or amusement park. I took a few screen captures of the clips for you.


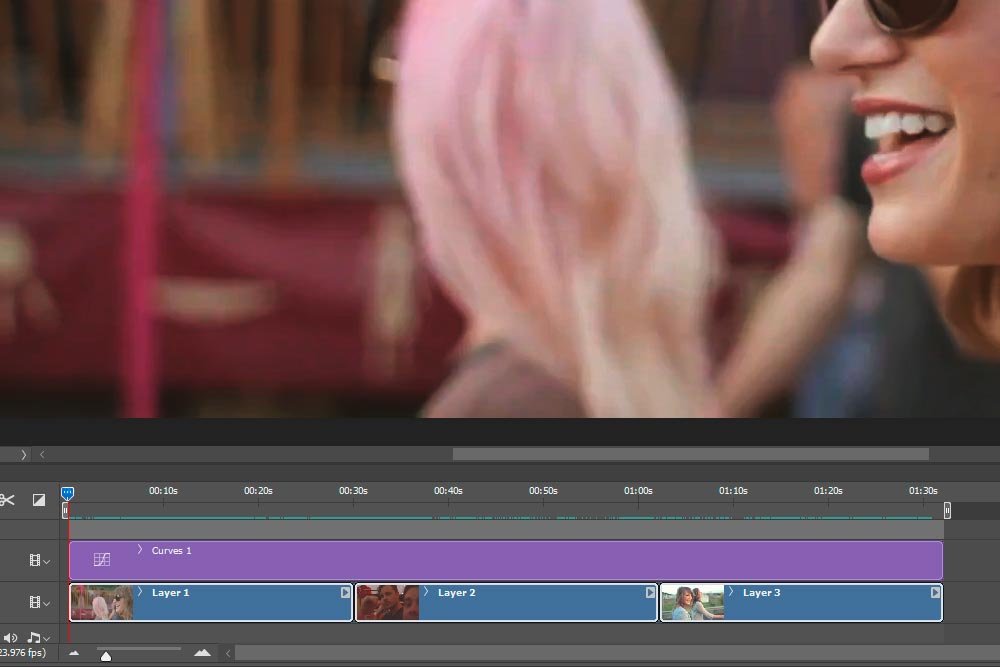
Don’t mind the purple adjustment layer. I added that because these clips were really washed out. I couldn’t stand looking at them that way, so I added some contrast via the Curves adjustment.
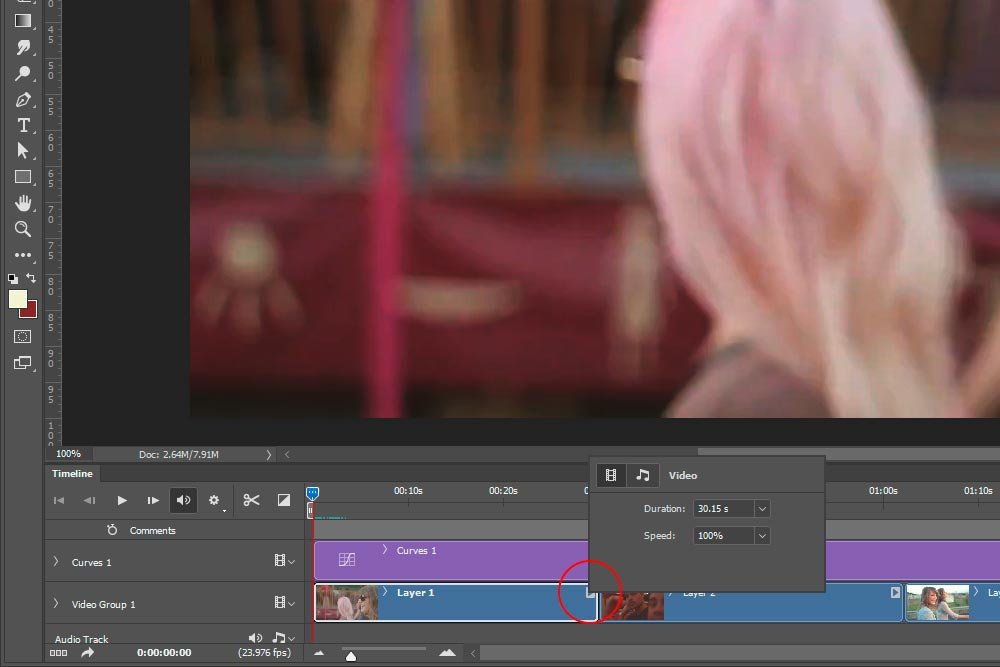
In the upper right corner of each clip in the timeline is a small arrow. I just clicked on that arrow and a box popped up. If you’ll notice in the screenshot above, there are two variables that can be adjusted in this box. The first one is the Duration and the second is the Speed. In today’s post, we’ll only concern ourselves with Duration.
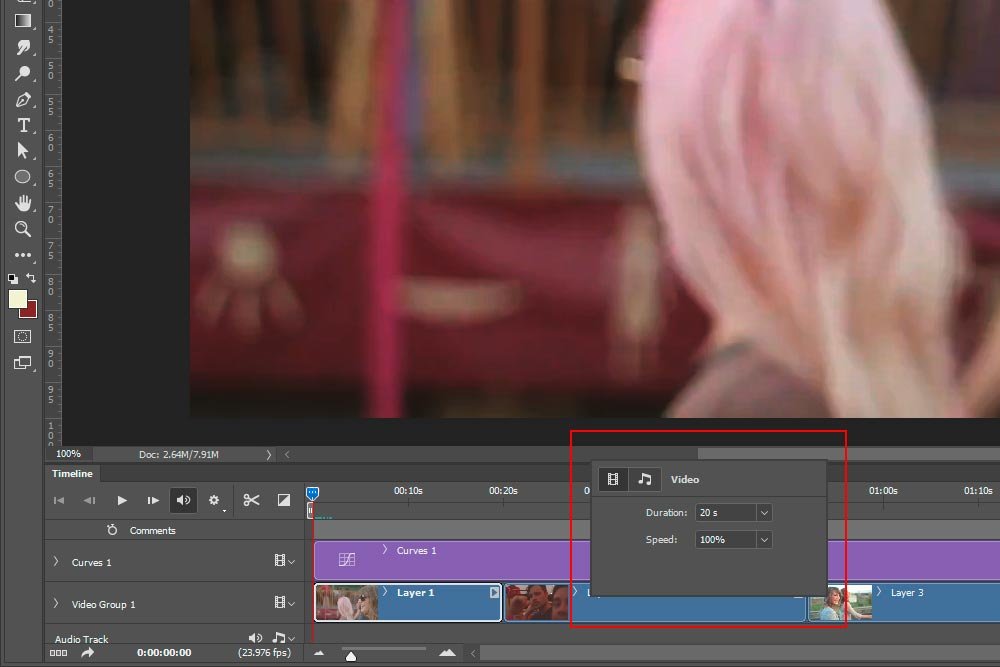
If I click on the small down arrow that’s located to the right of the current length of the video, a slider will appear. I can move that slider to the left and it will essentially remove the back end of the clip. Or, I can simply type a new duration into the appropriate box like I did below. I typed in 20 seconds instead of 30.15. Doing that shrunk the clip size on the timeline down a bit.
That’s pretty easy. Let’s say that I would like to do this same operation manually though. And let’s also say that I want to remove not only some of the back end of the clip, but also some of the front end. I’ll show you how to do that now.
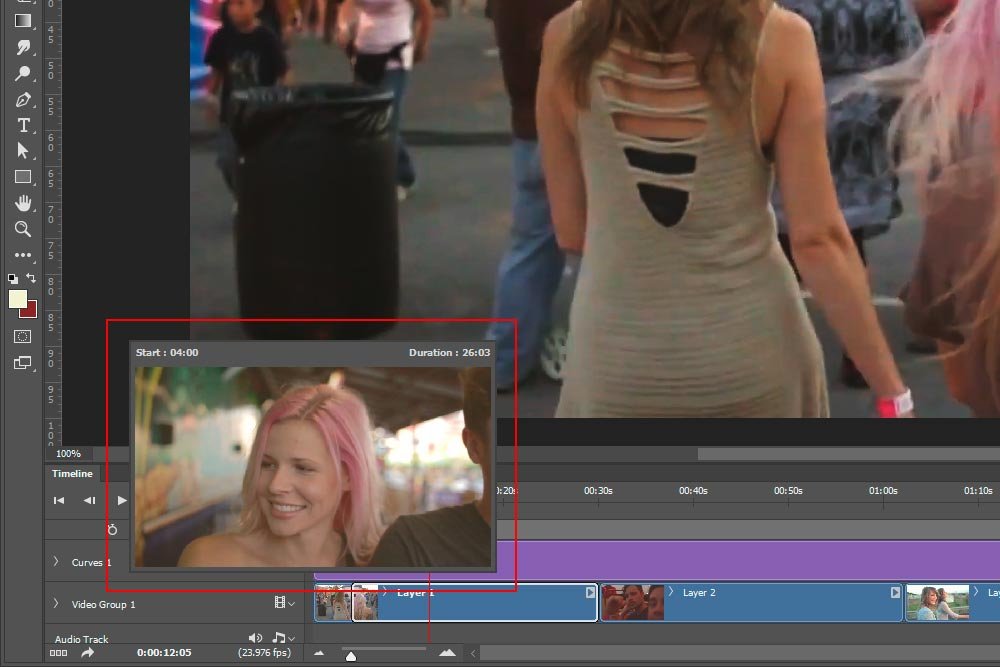
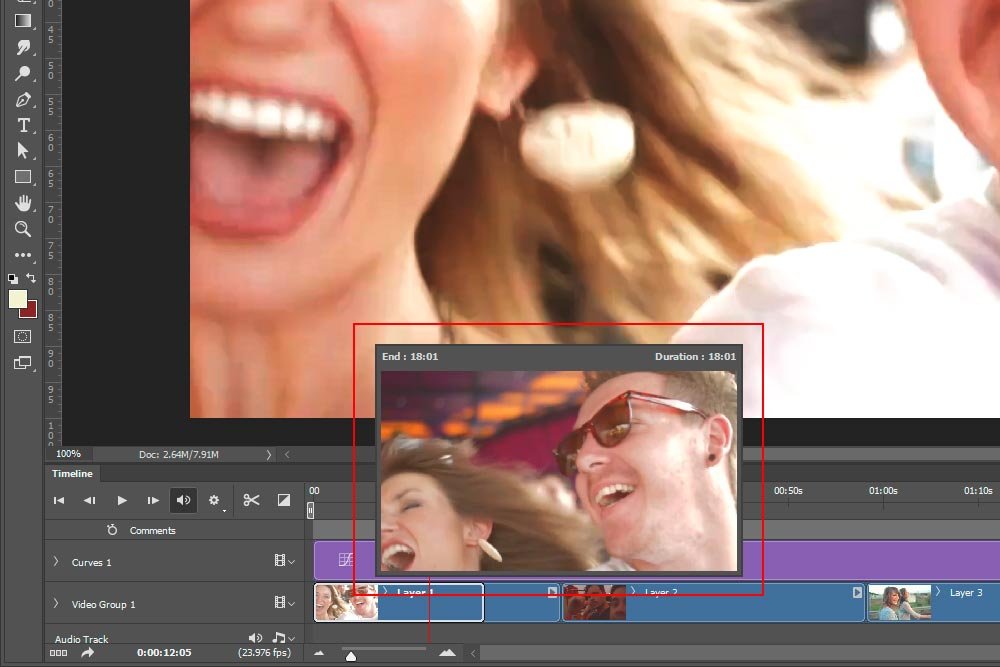
If you look at the screenshot below, you’ll see that a different window is visible in the timeline. Basically, I hovered my mouse pointer over the front edge of the clip. Then, when I saw the the mouse pointer changed into a different “editing” icon, I clicked and dragged the front side of the clip inward, to the right. As I did this, the window appeared and the times at the top of that window changed. Instead of saying that the clip begins at 0:00 seconds, I dragged the front of the clip so it now begins at 4:00 seconds. Everything before that will be removed. Also, up at the right corner of this window, you’ll see the entire new duration of this one clip. Instead of it being the original 30:15 seconds, it’s been reduced to 26:03 seconds because of the footage I trimmed out.
I could do the same exact thing from the back side of the clip as well. If I hover my mouse pointer over the right edge of clip and click and drag it to the left, I can reduce the length from that end. Or, I could do both. It’s up to me.
How cool is that? Was that as straightforward as I claimed it would be? I think so.
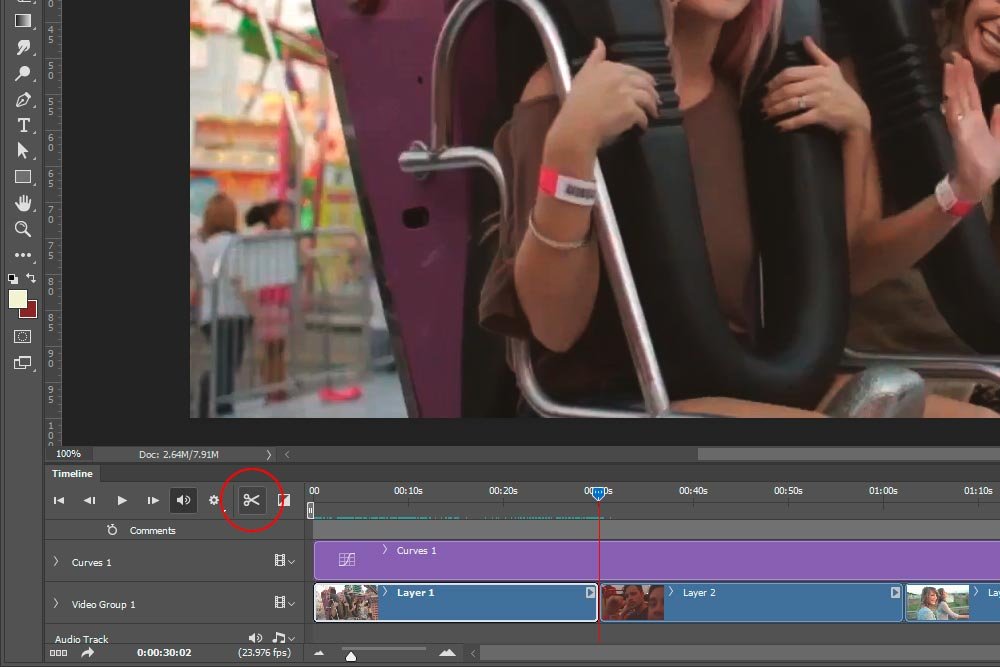
If I roll over and hover my mouse pointer on the icon, I’ll see a small tool tip appear that says Split at Playhead. Basically, if I move the playhead anywhere in the clip and click on the scissor icon, that clip will be cut at that specific spot. Nothing in the clip will change and all of it will still be there, but it will be cut into different pieces. Here’s an example.
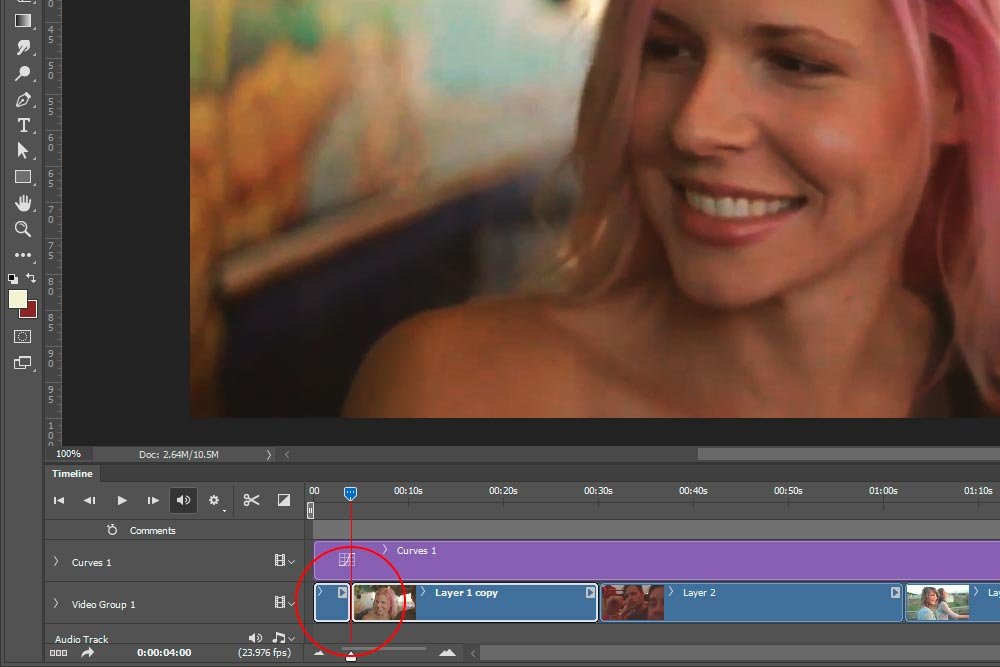
In this case, I moved the playhead to the 4:00 minute mark and split the clip there. Now, that first clip that was about 30 seconds long is now two clips. One is four seconds and the other is 26 seconds. How does this help? Well, I could click to select the first (four second) clip and press the Delete key on my keyboard. That would remove the short portion altogether, while keeping the longer portion. You can do this multiple times in as many clips as you want.
Okay, let me try to explain this a different way, because I know it can be confusing. Say you have one clip that’s 30 seconds long. You use the first method that I described above to remove five seconds from the front of the clip and five seconds from the rear. You’re left with a 20 second clip. Because Photoshop doesn’t actually remove any material when using the trim method, everything you started out with is still there. It’s just hidden behind this new 20 second window.
So you now have a video clip that begins at the five second mark and ends at the 25 second mark. Again, there are only 20 seconds visible. Here’s the thing. What if you’re trying to keep the clip within that 20 second restraint, but have the wrong 20 seconds showing? Is there a way to just move the part of the video that plays, without having to adjust the edges of the clip again? Yes, there is. It’s called Slip Editing. Here’s how you do it.
Since you already have the clip reduced to 20 seconds, you would only need to hold down the Option+Command (Mac) or Ctrl+Alt (Windows) keys and click and drag on the clip. As you do this, you’ll see that the entire clip slides around, within that 20 second window. You can find the new start and end points and let go of the mouse button. That’s it. It’s done.
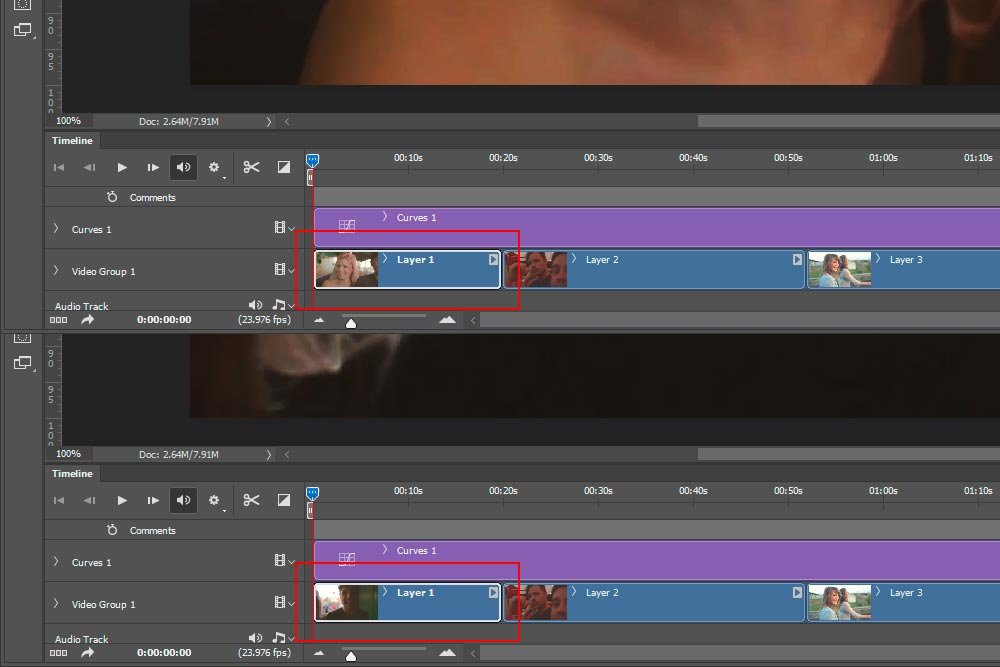
If you take a look at the next screenshot, you’ll notice that the first clip in the top and bottom frames are the same, but the thumbnail in each is different. That’s because each has a different start and end point.
The best way to get used to editing a clip like this is to open one up, trim it and hold down the modifier keys I described above and drag to the left and to the right. You’ll quickly discover what the results are and you’ll use this tool every time you edit video.
——
There we have it. How to trim, cut and slip video clips in Adobe Photoshop. I sincerely hope I explained everything clearly. If you have any questions or concerns about this post, please leave them in the comment section down below. Thanks for reading!
In today’s post, I’m going to show you the basics when it comes to adjusting the length of individual video clips in Adobe Photoshop. It’s sort of an intimidating topic to discuss, but really, it’s very simple and straightforward. Much more so than most people know. As a matter of fact, you can accomplish some of these tasks with a simple click and drag with your mouse. If people only knew how easy it was to edit video, I’m sure a lot more of them would be doing it.
For this post, I have three demo video clips. I already put them into one tab in Photoshop and kept them all part of the same group. By keeping all of the clips in the same group, they sit side by side on the timeline. Trimming and splitting them will make much more sense with this type of setup.
While I’m sure you’ll figure this out as the post goes on, all three of the video clips contain footage of a night at some sort of a carnival or amusement park. I took a few screen captures of the clips for you.


The Setup in the Timeline
Just to give you a better idea of what the clips look like in the Timeline panel, I’ll display a screenshot below.
Don’t mind the purple adjustment layer. I added that because these clips were really washed out. I couldn’t stand looking at them that way, so I added some contrast via the Curves adjustment.
Trimming a Video Clip
Let’s say you want to take a 30 second video clip and reduce it to only 20 seconds. Basically, you would like to chop 10 seconds off the back end of it. Well, there’s a very quick and easy way to accomplish something like this. Take a look at this screenshot.
In the upper right corner of each clip in the timeline is a small arrow. I just clicked on that arrow and a box popped up. If you’ll notice in the screenshot above, there are two variables that can be adjusted in this box. The first one is the Duration and the second is the Speed. In today’s post, we’ll only concern ourselves with Duration.
If I click on the small down arrow that’s located to the right of the current length of the video, a slider will appear. I can move that slider to the left and it will essentially remove the back end of the clip. Or, I can simply type a new duration into the appropriate box like I did below. I typed in 20 seconds instead of 30.15. Doing that shrunk the clip size on the timeline down a bit.

That’s pretty easy. Let’s say that I would like to do this same operation manually though. And let’s also say that I want to remove not only some of the back end of the clip, but also some of the front end. I’ll show you how to do that now.
If you look at the screenshot below, you’ll see that a different window is visible in the timeline. Basically, I hovered my mouse pointer over the front edge of the clip. Then, when I saw the the mouse pointer changed into a different “editing” icon, I clicked and dragged the front side of the clip inward, to the right. As I did this, the window appeared and the times at the top of that window changed. Instead of saying that the clip begins at 0:00 seconds, I dragged the front of the clip so it now begins at 4:00 seconds. Everything before that will be removed. Also, up at the right corner of this window, you’ll see the entire new duration of this one clip. Instead of it being the original 30:15 seconds, it’s been reduced to 26:03 seconds because of the footage I trimmed out.

I could do the same exact thing from the back side of the clip as well. If I hover my mouse pointer over the right edge of clip and click and drag it to the left, I can reduce the length from that end. Or, I could do both. It’s up to me.

How cool is that? Was that as straightforward as I claimed it would be? I think so.
Splitting a Clip
Another good method for reducing the duration of a video clip in Photoshop is to split it. If you have ever opened the Timeline panel, I’m sure you’ve see that small icon of the scissors. If not, check out the screenshot below. I circled the icon in red.
If I roll over and hover my mouse pointer on the icon, I’ll see a small tool tip appear that says Split at Playhead. Basically, if I move the playhead anywhere in the clip and click on the scissor icon, that clip will be cut at that specific spot. Nothing in the clip will change and all of it will still be there, but it will be cut into different pieces. Here’s an example.

In this case, I moved the playhead to the 4:00 minute mark and split the clip there. Now, that first clip that was about 30 seconds long is now two clips. One is four seconds and the other is 26 seconds. How does this help? Well, I could click to select the first (four second) clip and press the Delete key on my keyboard. That would remove the short portion altogether, while keeping the longer portion. You can do this multiple times in as many clips as you want.
Slip Editing
Do you want to learn about an extremely helpful feature? I believe this one was first available in Photoshop version CS6. It’s called Slip Editing and it’s used to control where the beginning point and the end point of a clip are located. If you use the first method I described above (trimming), you “virtually” remove parts of the clip to shorten it. What I mean is that, while you can’t physically see the parts of the clip that you hid, they are still there in the timeline in Photoshop. If you wanted to, you could move the visible part of the shot inside that reduced portion of video.Okay, let me try to explain this a different way, because I know it can be confusing. Say you have one clip that’s 30 seconds long. You use the first method that I described above to remove five seconds from the front of the clip and five seconds from the rear. You’re left with a 20 second clip. Because Photoshop doesn’t actually remove any material when using the trim method, everything you started out with is still there. It’s just hidden behind this new 20 second window.
So you now have a video clip that begins at the five second mark and ends at the 25 second mark. Again, there are only 20 seconds visible. Here’s the thing. What if you’re trying to keep the clip within that 20 second restraint, but have the wrong 20 seconds showing? Is there a way to just move the part of the video that plays, without having to adjust the edges of the clip again? Yes, there is. It’s called Slip Editing. Here’s how you do it.
Since you already have the clip reduced to 20 seconds, you would only need to hold down the Option+Command (Mac) or Ctrl+Alt (Windows) keys and click and drag on the clip. As you do this, you’ll see that the entire clip slides around, within that 20 second window. You can find the new start and end points and let go of the mouse button. That’s it. It’s done.
If you take a look at the next screenshot, you’ll notice that the first clip in the top and bottom frames are the same, but the thumbnail in each is different. That’s because each has a different start and end point.

The best way to get used to editing a clip like this is to open one up, trim it and hold down the modifier keys I described above and drag to the left and to the right. You’ll quickly discover what the results are and you’ll use this tool every time you edit video.
——
There we have it. How to trim, cut and slip video clips in Adobe Photoshop. I sincerely hope I explained everything clearly. If you have any questions or concerns about this post, please leave them in the comment section down below. Thanks for reading!
