Phoenix1
Member
- Joined
- May 7, 2021
- Messages
- 135
- Reaction Score
- 0
- Points
- 23
- #1
As you become better at using Adobe Photoshop and more experienced with various styles of workflows, it’s inevitable that you will begin to form different types of efficiencies. For instance, think about how someone might use the same template for different photos they edit in Photoshop. Or, perhaps someone might create an action to perform a number of tasks that are common among files they work with frequently. Also, it’s sometimes worthwhile to hold onto and save some very involved adjustment layers that took a long time to adjust.
If you consider this way of thinking in a more extreme fashion, you might conclude that software as a whole is actually built on these types of efficiencies. We don’t go creating new software programming languages every time we want to make a piece of software, right? And we certainly don’t create a brand new font every single time we want to place some text in a graphic. I suppose it just depends on how far you want to take these types of ideas. I can tell you from personal experience, while there are already quite a few time savers built right into applications like Photoshop, there certainly is room for more.
In today’s post, I’d like to work through a fairly simple project in Adobe Photoshop. I’ll start off by selecting a marble in the demo photo that I’ll be working with and then I’ll apply a random adjustment to it. Once that’s finished, I’ll begin using different types of efficiencies whenever possible. Since one of my goals is to apply the same exact adjustment to another marble in the photo, instead of making an entirely new selection and adjustment layer that I’ll have to start from scratch with, I’ll simply duplicate the existing adjustment layer I already created. Also, I’ll work through the process of relocating and resizing that selection so it fits properly on the second marble. In between these steps, I’ll sprinkle small tips that will be sure to make everything easier. I hope you get something out of this post. There could be a few tricks that might just light up your eyes.
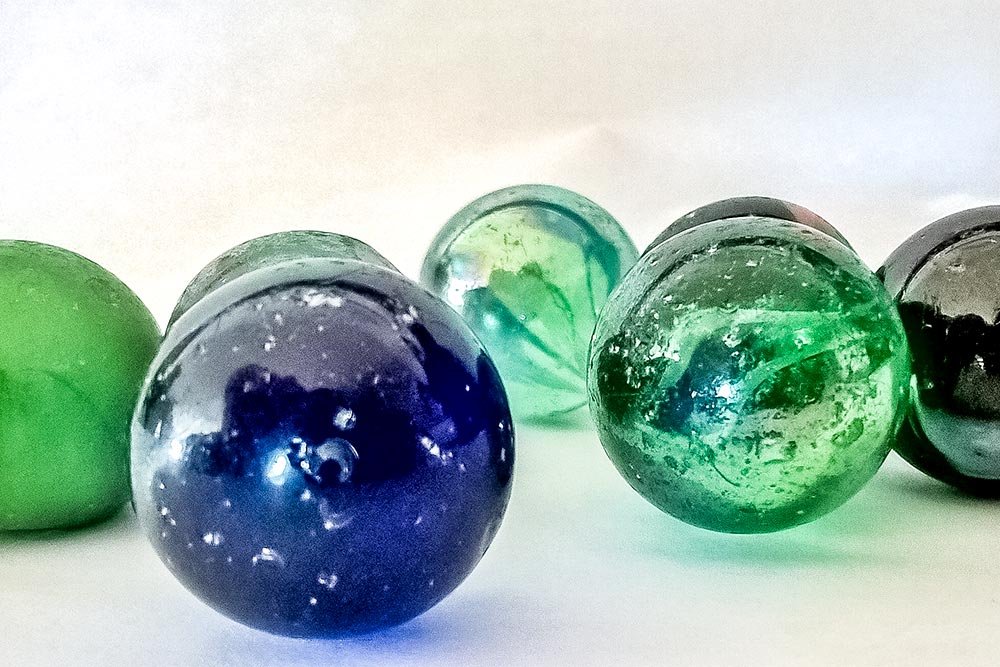
It’s nothing fancy, but it will get the job done for me.
I’ll start off by using the Elliptical Marquee Tool to select the blue marble that sits at the front of the photo.
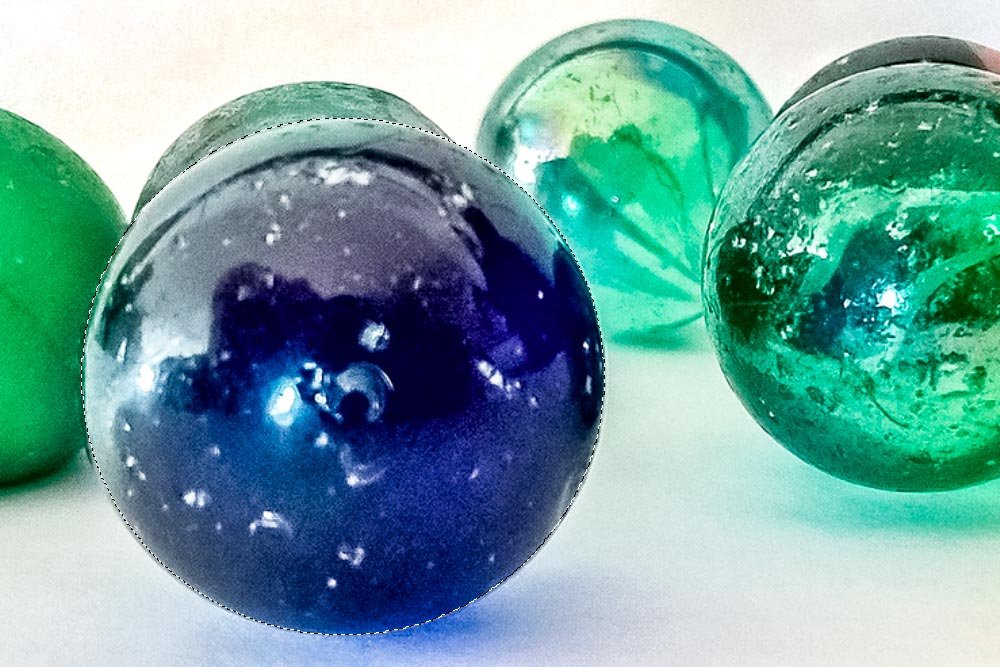
In the screenshot above, you can see the marching ants surrounding the marble, if you look closely.
Now that I have the marble selected, I can go ahead and choose whatever adjustment I’d like to apply to it. In this case, I’ll merely add some contrast to the marble. I think that would suit the photo well. To accomplish this, I’ll head over to the Adjustments panel and click on the Curves icon.
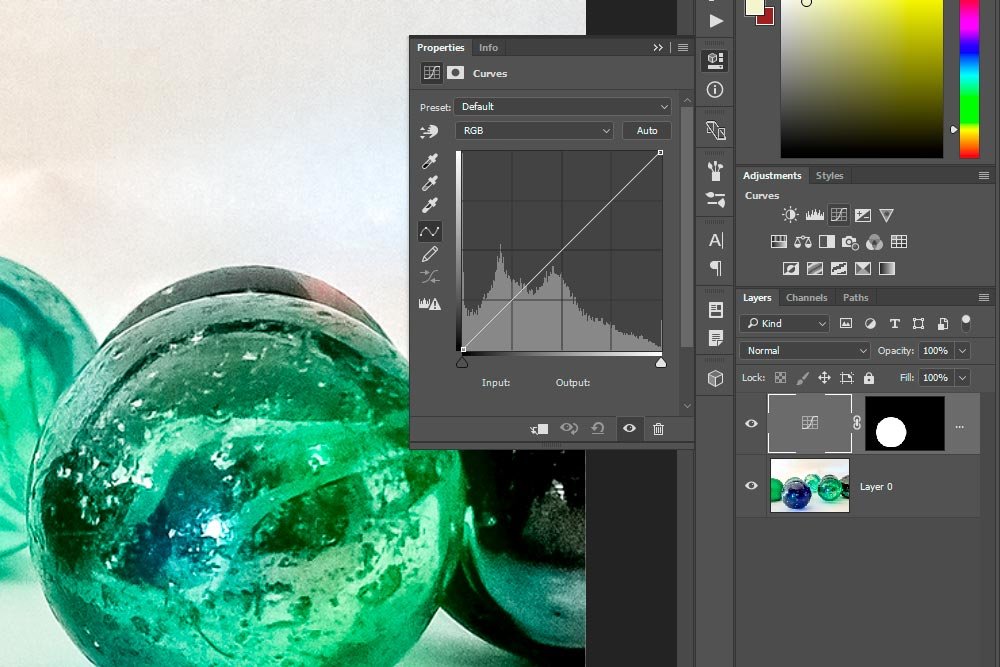
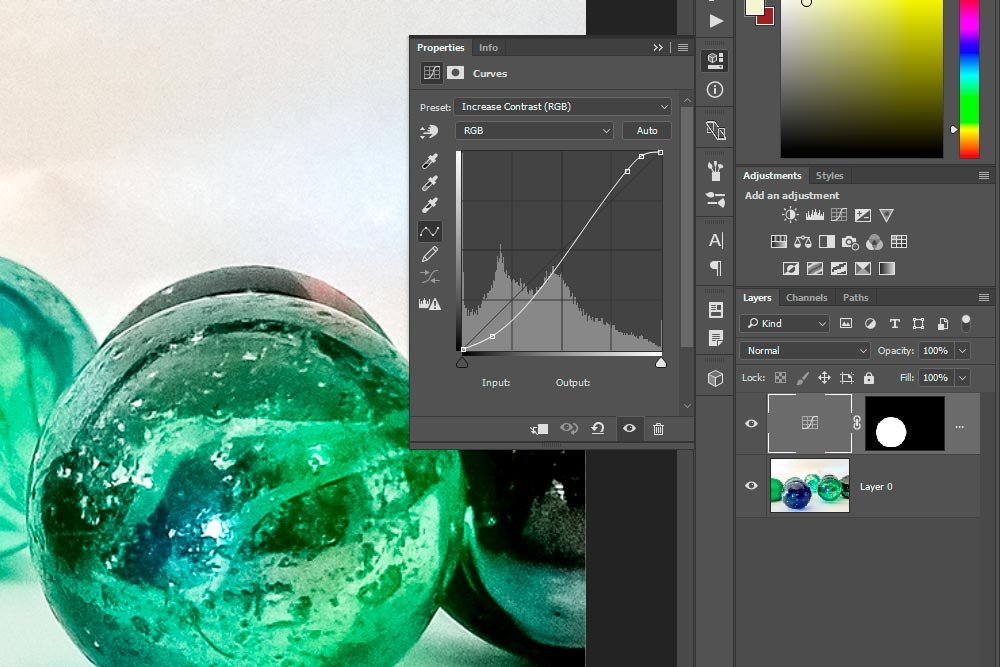
The moment I do this, the selection (marching ants) will disappear and an adjustment layer will appear in the Layers panel. Also, the Properties panel will open up and inside this panel the curve will be waiting for manipulation. You can see all this in the screenshot directly above.
Now, to get the change I’m after, I’ll click on the Preset drop-down box and select Increase Contrast. I could have made this additional contrast edit by hand, but it’s so much faster using a preset.
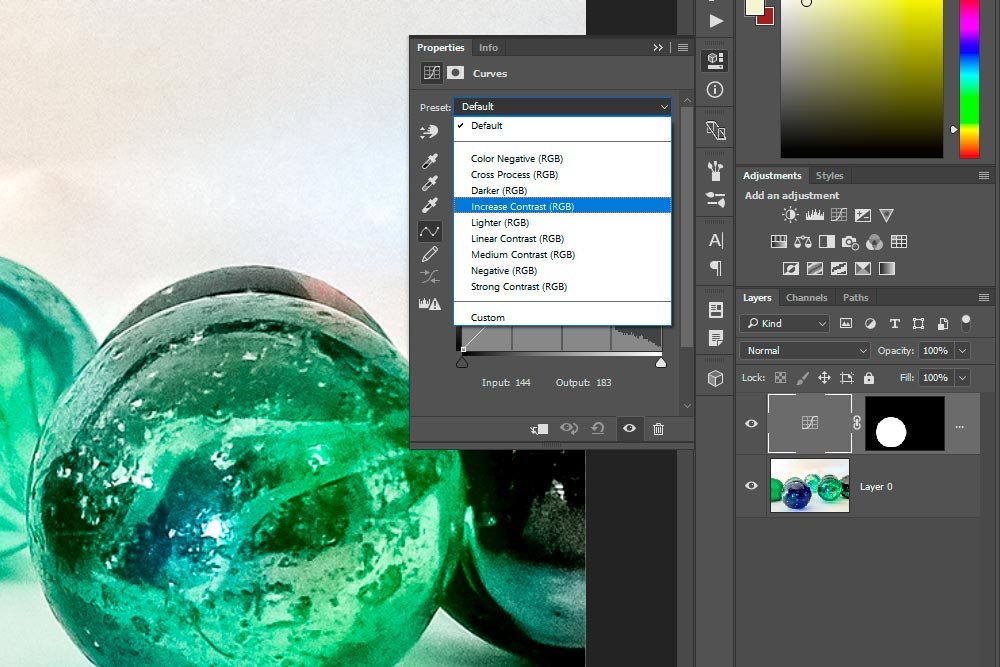
When I click on this preset, the curve line will get some points added to it and those points will drag the line around a bit. This is the output. It’s not a crazy change, but it’s perfect for a demonstration.
With this in mind, I’ll go ahead and start saving time now. To duplicate the adjustment layer, I’ll right-click in the gray area of the layer I’d like to make a copy of. This won’t work if I right-click on the mask thumbnail. It needs to be where it’s gray to the right of the thumbnail. When I do this, a large menu will pop up.
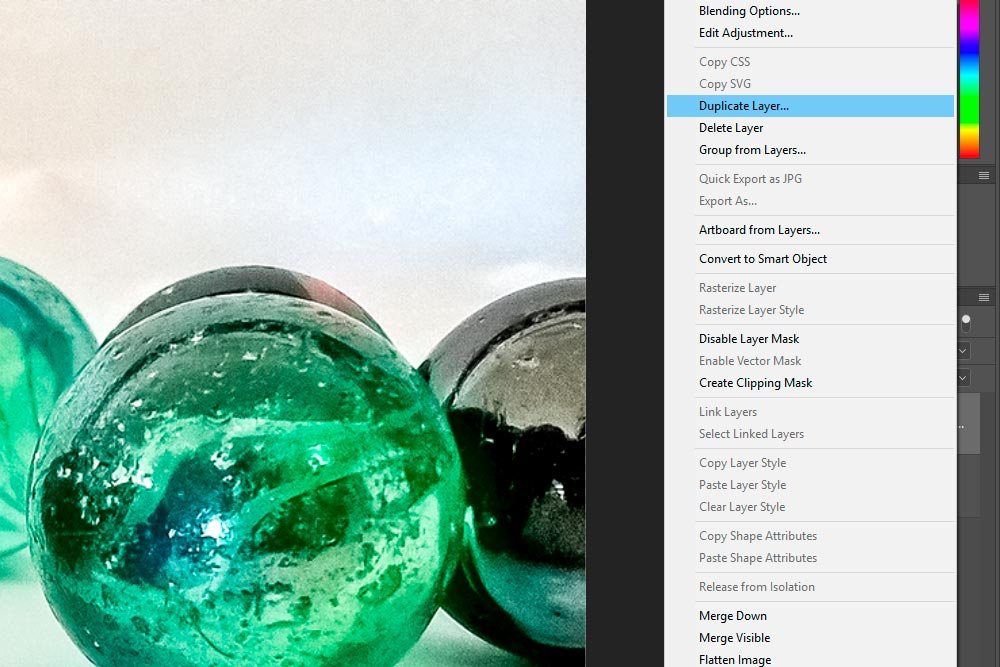
I’ll click on the Duplicate Layer menu item. When I do this, I’ll be presented with the Duplicate Layer dialog box.
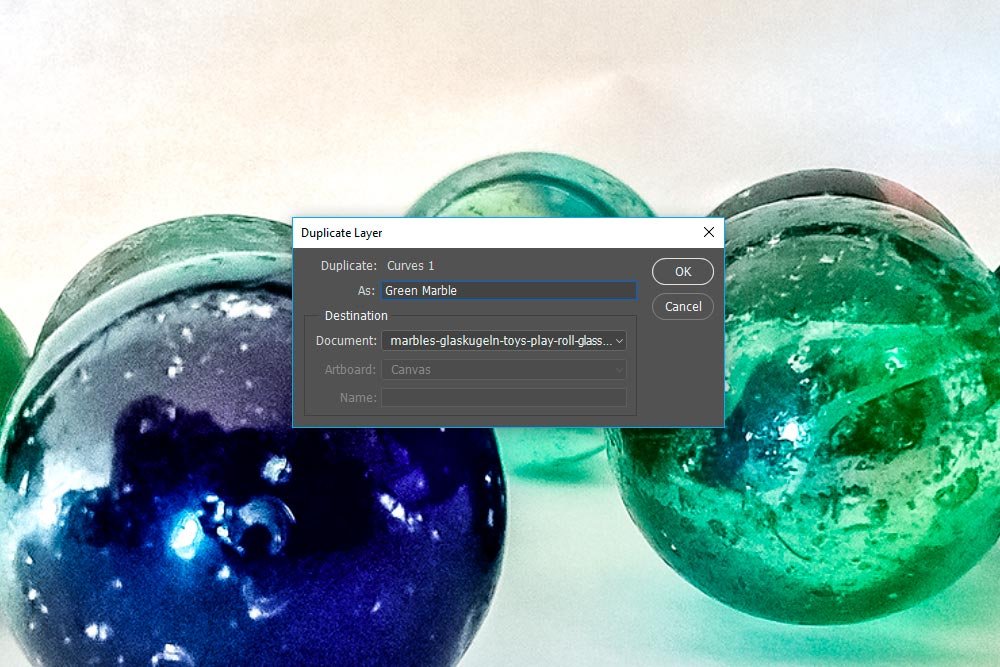
Inside this box, in the As field, I’ll name the new layer. Since I’ll be applying this adjustment layer to the green marble off to the right, I’ll type in Green Marble.
Here’s a serious tip for you. If you look at the next field down, right under the one I just typed into (Document), you’ll see that I can apply this duplicate layer to another document that’s open in Photoshop, not just the one I’m currently working in. This is huge and it’s very helpful. I use this feature a lot and I’ll surely cover this incredible feature more in future posts. I just didn’t want to leave it out here, in case you could use it sooner rather than later.
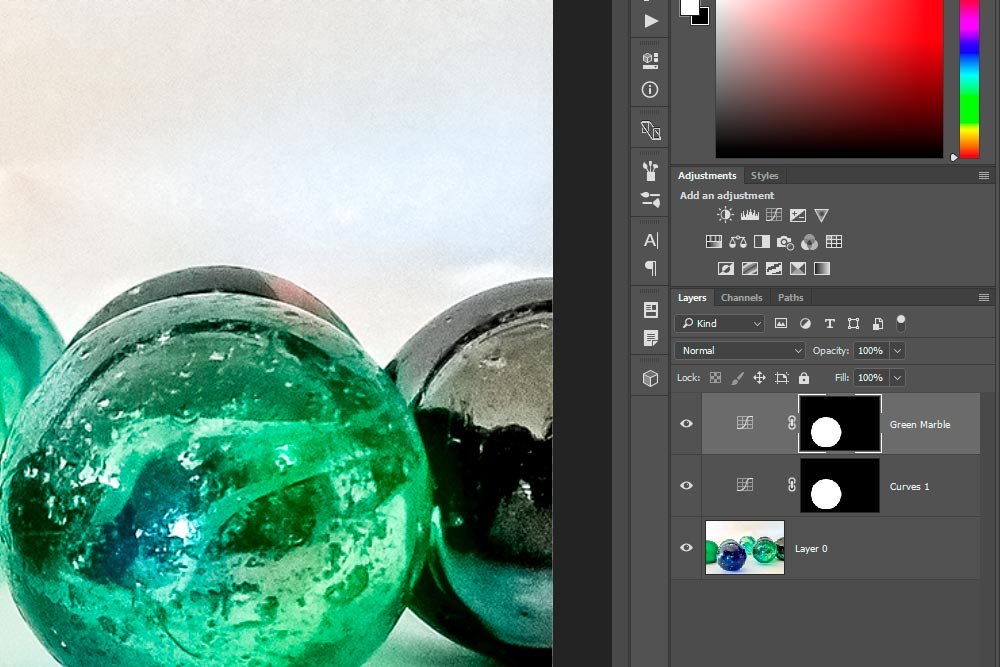
To turn a mask back into a selection, I’ll hold down the Ctrl key on my keyboard and click the mask itself in the Layers panel. Once the duplicate adjustment layer selection is active again, which can be verified by the marching ants, I’ll go ahead and use the keyboard shortcut Ctrl+T on my keyboard to activate the Free Transform tool. Once I see the bounding box around the selection, I’ll click inside the selection with my mouse and drag it over to the area of the green marble.
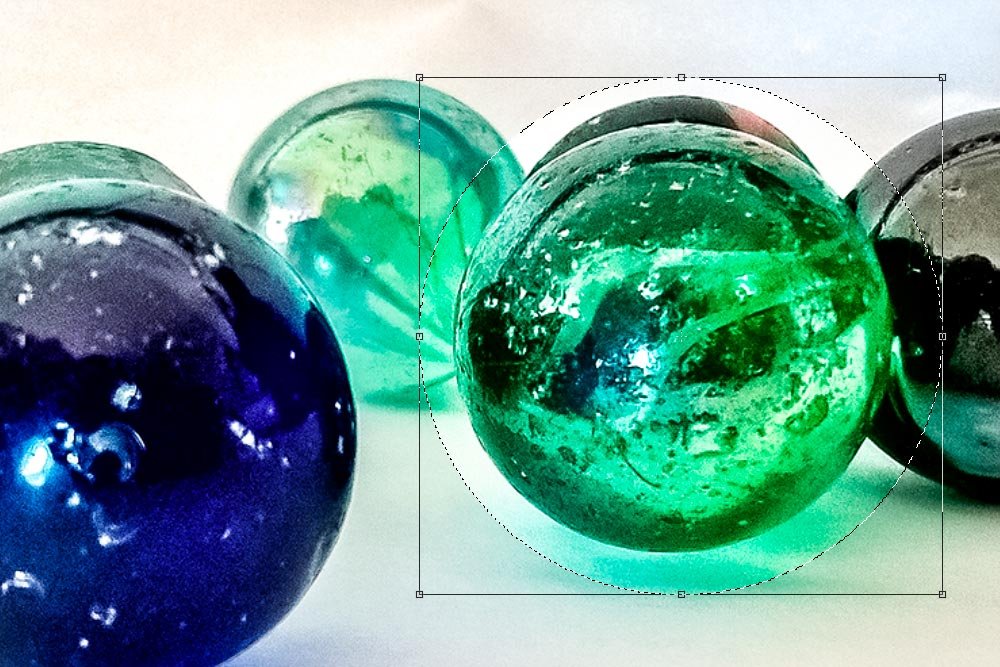
I’ll drag in a few guides to help me accurately resize the selection and when they’re in place, I’ll move the upper left corner of the bounding box to the intersection of the guides. Then, I’ll click and drag the bottom right corner of the transform box inward, towards the marble. When the section matches up with the outer edge of the marble, I’ll press the Enter key on my keyboard to apply the change.
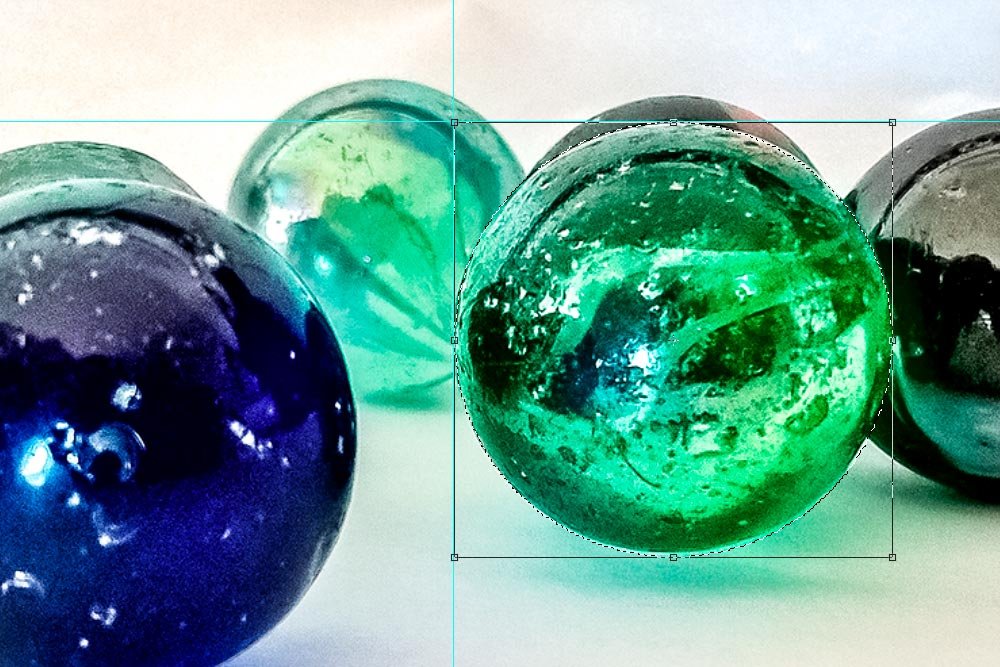
I want to tell you a few things here. First, while my changes seem simple and while it may have been easier for me to simply start over and re-select the green marble and move along with an entirely new adjustment layer, I’m sure you can see the value of duplicating, moving and resizing something like this. After all, every adjustment won’t be so simple and after a while, it becomes tiresome repeating the same changes over and over again.
Second, this transformation was simple and I was able to get away with using the Free Transform tool only. If I needed to make some more complex transformations, I could have right-clicked inside the bounding box and the selection to choose a larger variety of transformation types. From Rotate to Skew to Distort, they’re all available.
A really easy method for keeping sure these two area are the way they’re supposed to be is to use a few menu items. First, since the selection is still active, I’ll head up to the Edit > Fill menu item.
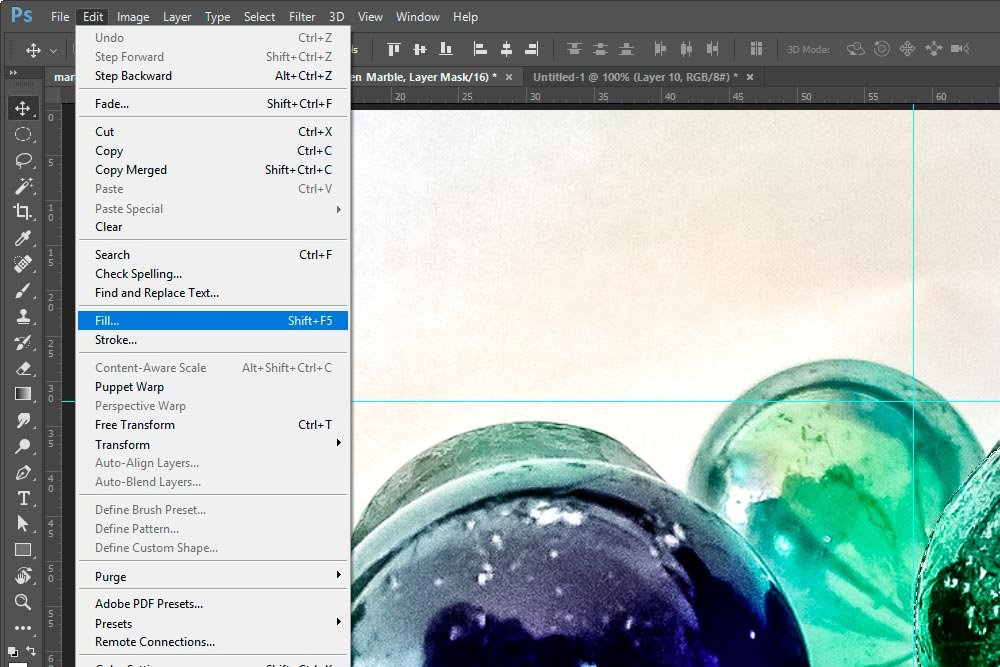
When I click that menu item, the Fill dialog box will appear. I’ll be sure to select White from the Contents drop-down box.
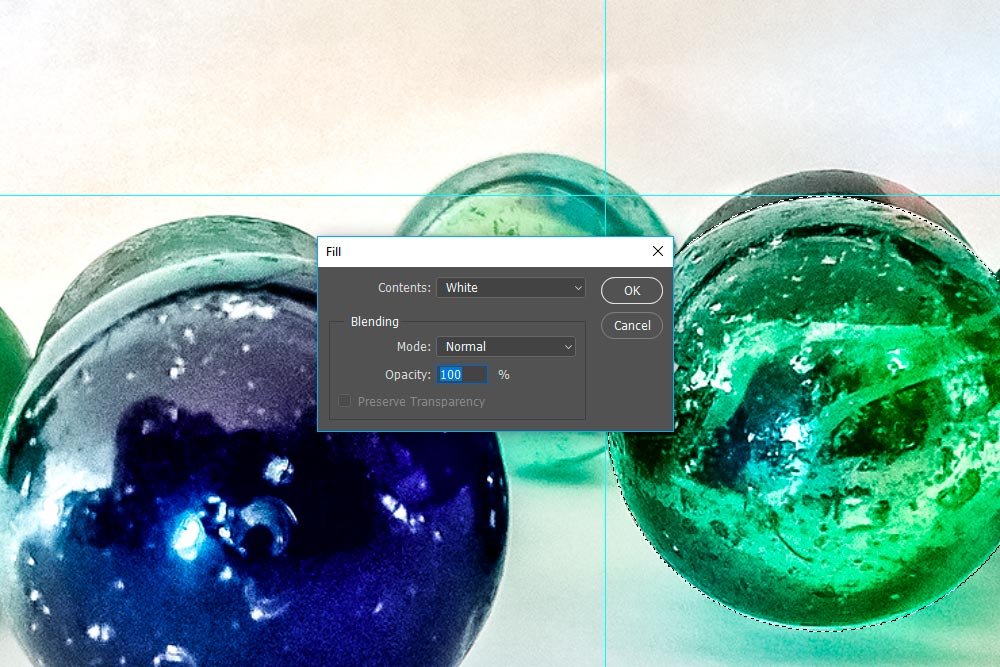
Again, this mask area is already white for me. I’m just making sure it is.
Now, since I want to make sure all mask areas outside the selection are black, I’ll need to invert the selection. To do this, I’ll head up to the Select > Inverse menu item and click. This will immediately invert the selected area, so everything outside the original selection is now selected.
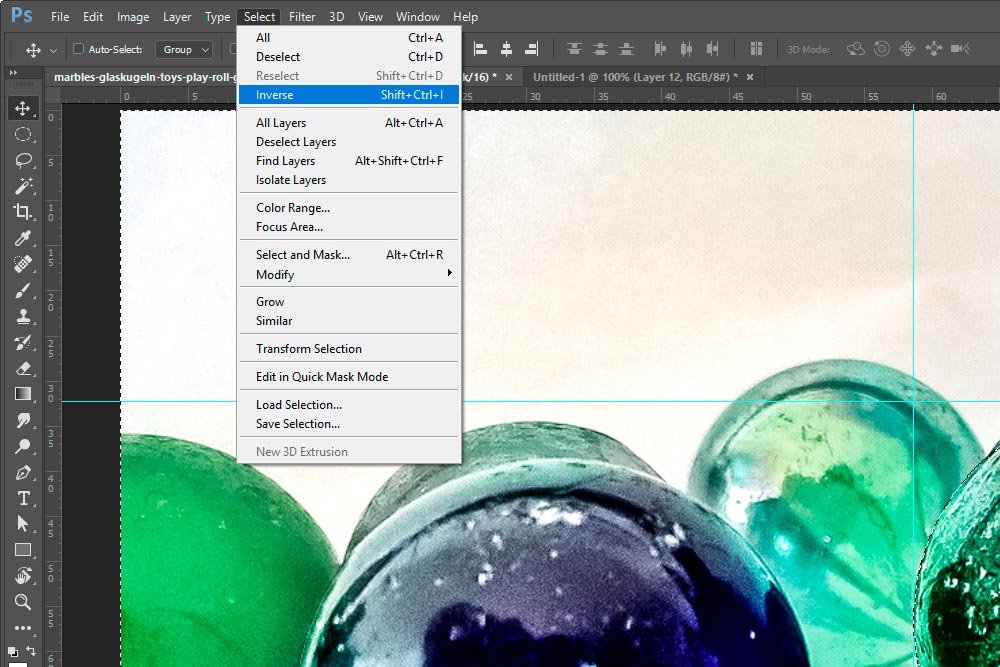
At this point, I can go back and use the Edit > Fill menu item again, but this time, I’ll select Black from the Contents drop-down. If there something that isn’t black in the mask out there, it will be now.
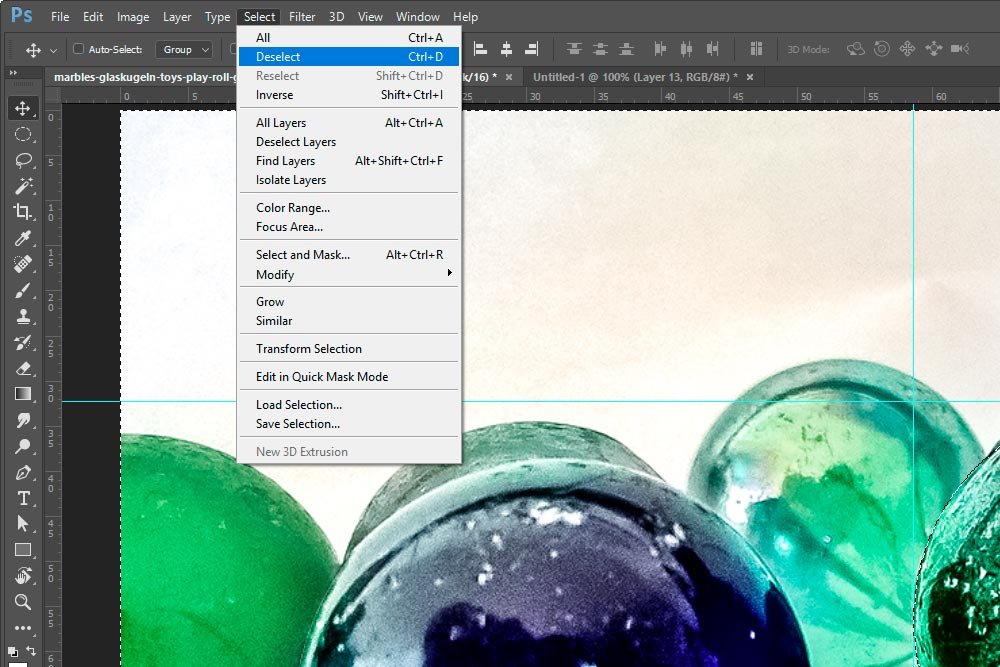
With that, this project is completed. I’m happy with it.
——
There were a few really good nuggets included in this post. Duplicating adjustment layers, moving and resizing selections, filling selected areas and everything outside those areas as well – it’s all good stuff. With Photoshop, to become proficient, you’ll need to steer clear of thinking in a rigid and linear way to something much more creative. It’s not enough to simply know how a tool functions. You’ll need to keep working hard and studying to learn about all the different approaches others out there take with the same tool. There are dozens, if not hundreds, of various methods and tactics available.
I hope I clearly explained how to duplicate masks and move selections in Adobe Photoshop. If you have any questions or concerns regarding this post, please leave them in the comment section below. Thanks for reading!
If you consider this way of thinking in a more extreme fashion, you might conclude that software as a whole is actually built on these types of efficiencies. We don’t go creating new software programming languages every time we want to make a piece of software, right? And we certainly don’t create a brand new font every single time we want to place some text in a graphic. I suppose it just depends on how far you want to take these types of ideas. I can tell you from personal experience, while there are already quite a few time savers built right into applications like Photoshop, there certainly is room for more.
In today’s post, I’d like to work through a fairly simple project in Adobe Photoshop. I’ll start off by selecting a marble in the demo photo that I’ll be working with and then I’ll apply a random adjustment to it. Once that’s finished, I’ll begin using different types of efficiencies whenever possible. Since one of my goals is to apply the same exact adjustment to another marble in the photo, instead of making an entirely new selection and adjustment layer that I’ll have to start from scratch with, I’ll simply duplicate the existing adjustment layer I already created. Also, I’ll work through the process of relocating and resizing that selection so it fits properly on the second marble. In between these steps, I’ll sprinkle small tips that will be sure to make everything easier. I hope you get something out of this post. There could be a few tricks that might just light up your eyes.
The Demo Photo
Here’s the demo photo I’ll be using for this post. As I stated above, it’s simply a picture of some marbles on a surface.
It’s nothing fancy, but it will get the job done for me.
Making a Selection & Setting Up an Adjustment Layer
Since I have already covered selections and adjustment layers ad nauseam on this website, I’ll fly through these steps. If you would like to learn more about either of these topics, I encourage you to use the search box above to find the posts you’re interested in. There are quite a few of them, so please feel free to browse around a bit.I’ll start off by using the Elliptical Marquee Tool to select the blue marble that sits at the front of the photo.

In the screenshot above, you can see the marching ants surrounding the marble, if you look closely.
Now that I have the marble selected, I can go ahead and choose whatever adjustment I’d like to apply to it. In this case, I’ll merely add some contrast to the marble. I think that would suit the photo well. To accomplish this, I’ll head over to the Adjustments panel and click on the Curves icon.

The moment I do this, the selection (marching ants) will disappear and an adjustment layer will appear in the Layers panel. Also, the Properties panel will open up and inside this panel the curve will be waiting for manipulation. You can see all this in the screenshot directly above.
Now, to get the change I’m after, I’ll click on the Preset drop-down box and select Increase Contrast. I could have made this additional contrast edit by hand, but it’s so much faster using a preset.

When I click on this preset, the curve line will get some points added to it and those points will drag the line around a bit. This is the output. It’s not a crazy change, but it’s perfect for a demonstration.

Duplicating & Naming the Adjustment Layer
Okay, so let’s see where we are here. I’ve made a selection, created an adjustment layer and have applied some changes to that layer. Now, I’m ready to move on with some of those efficiencies I referred to at the beginning of this post. Since I already went through the trouble of selecting and editing the first marble and since I want to do the same exact thing to the second marble, why not just duplicate my efforts instead of starting all over again?With this in mind, I’ll go ahead and start saving time now. To duplicate the adjustment layer, I’ll right-click in the gray area of the layer I’d like to make a copy of. This won’t work if I right-click on the mask thumbnail. It needs to be where it’s gray to the right of the thumbnail. When I do this, a large menu will pop up.

I’ll click on the Duplicate Layer menu item. When I do this, I’ll be presented with the Duplicate Layer dialog box.

Inside this box, in the As field, I’ll name the new layer. Since I’ll be applying this adjustment layer to the green marble off to the right, I’ll type in Green Marble.
Here’s a serious tip for you. If you look at the next field down, right under the one I just typed into (Document), you’ll see that I can apply this duplicate layer to another document that’s open in Photoshop, not just the one I’m currently working in. This is huge and it’s very helpful. I use this feature a lot and I’ll surely cover this incredible feature more in future posts. I just didn’t want to leave it out here, in case you could use it sooner rather than later.

Activating & Moving the Selection
Now that I have an exact duplicate of the adjustment layer I made earlier, I have to reactivate the selection, move it to the next marble and resize it so it’s appropriate for its new location.To turn a mask back into a selection, I’ll hold down the Ctrl key on my keyboard and click the mask itself in the Layers panel. Once the duplicate adjustment layer selection is active again, which can be verified by the marching ants, I’ll go ahead and use the keyboard shortcut Ctrl+T on my keyboard to activate the Free Transform tool. Once I see the bounding box around the selection, I’ll click inside the selection with my mouse and drag it over to the area of the green marble.

I’ll drag in a few guides to help me accurately resize the selection and when they’re in place, I’ll move the upper left corner of the bounding box to the intersection of the guides. Then, I’ll click and drag the bottom right corner of the transform box inward, towards the marble. When the section matches up with the outer edge of the marble, I’ll press the Enter key on my keyboard to apply the change.

I want to tell you a few things here. First, while my changes seem simple and while it may have been easier for me to simply start over and re-select the green marble and move along with an entirely new adjustment layer, I’m sure you can see the value of duplicating, moving and resizing something like this. After all, every adjustment won’t be so simple and after a while, it becomes tiresome repeating the same changes over and over again.
Second, this transformation was simple and I was able to get away with using the Free Transform tool only. If I needed to make some more complex transformations, I could have right-clicked inside the bounding box and the selection to choose a larger variety of transformation types. From Rotate to Skew to Distort, they’re all available.
Filling Inside & Outside of the Selection
At this point, the new selection is in place and it’s resized properly. Since this selection was simple, I could leave things as they are and call this a successful edit. The thing is, not all selections are so clean and simple. Sometimes changes with masking occurs and the area inside the selection becomes adulterated and areas outside the mask become tarnished as well. In cases like this, it’s best to make sure that anything inside the selection is white and anything outside the selection is black. This is, of course, speaking in terms of the mask. Remember, white reveals and black conceals. So, since I made changes to the area inside the selection, via an adjustment layer, I would like to keep those changes visible. Also, since I didn’t make any adjustments outside of the selection, I want to make sure all those areas are hidden (black).A really easy method for keeping sure these two area are the way they’re supposed to be is to use a few menu items. First, since the selection is still active, I’ll head up to the Edit > Fill menu item.

When I click that menu item, the Fill dialog box will appear. I’ll be sure to select White from the Contents drop-down box.

Again, this mask area is already white for me. I’m just making sure it is.
Now, since I want to make sure all mask areas outside the selection are black, I’ll need to invert the selection. To do this, I’ll head up to the Select > Inverse menu item and click. This will immediately invert the selected area, so everything outside the original selection is now selected.

At this point, I can go back and use the Edit > Fill menu item again, but this time, I’ll select Black from the Contents drop-down. If there something that isn’t black in the mask out there, it will be now.
Deselecting the Area
Since I have completed everything that needs to be completed, I can go ahead and deselect the area I most recently edited. To do this, I’ll use the Select > Deselect menu item.
With that, this project is completed. I’m happy with it.
——
There were a few really good nuggets included in this post. Duplicating adjustment layers, moving and resizing selections, filling selected areas and everything outside those areas as well – it’s all good stuff. With Photoshop, to become proficient, you’ll need to steer clear of thinking in a rigid and linear way to something much more creative. It’s not enough to simply know how a tool functions. You’ll need to keep working hard and studying to learn about all the different approaches others out there take with the same tool. There are dozens, if not hundreds, of various methods and tactics available.
I hope I clearly explained how to duplicate masks and move selections in Adobe Photoshop. If you have any questions or concerns regarding this post, please leave them in the comment section below. Thanks for reading!
