WendyMay
Member
- Joined
- May 11, 2021
- Messages
- 142
- Reaction Score
- 0
- Points
- 21
- #1
Today is one of those days that I feel like working though an easy project in Adobe Photoshop. To complete the project, I’m going to rely on things I’ve already shared on this blog. The thing is, I’m going to go about things a bit differently than I have ever before. The value in this post is in the process I use. As I’ve said before, there are many ways to tackle a project in Photoshop and by learning about all the various possible methods, you’ll be expanding your game wide open. The more you learn about how others do things, the better you’ll get at doing similar things yourself.
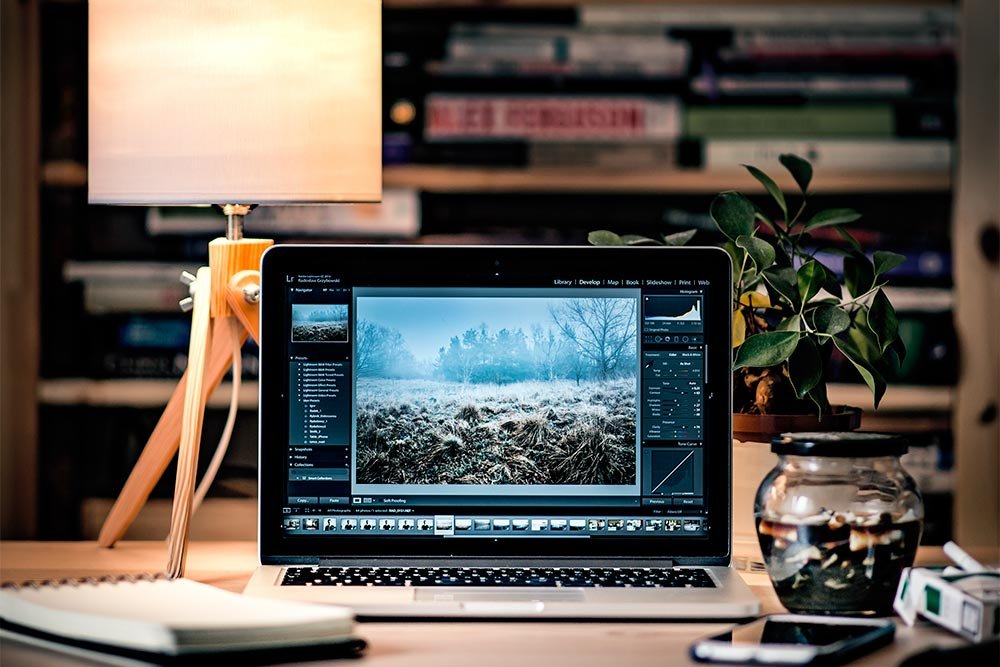
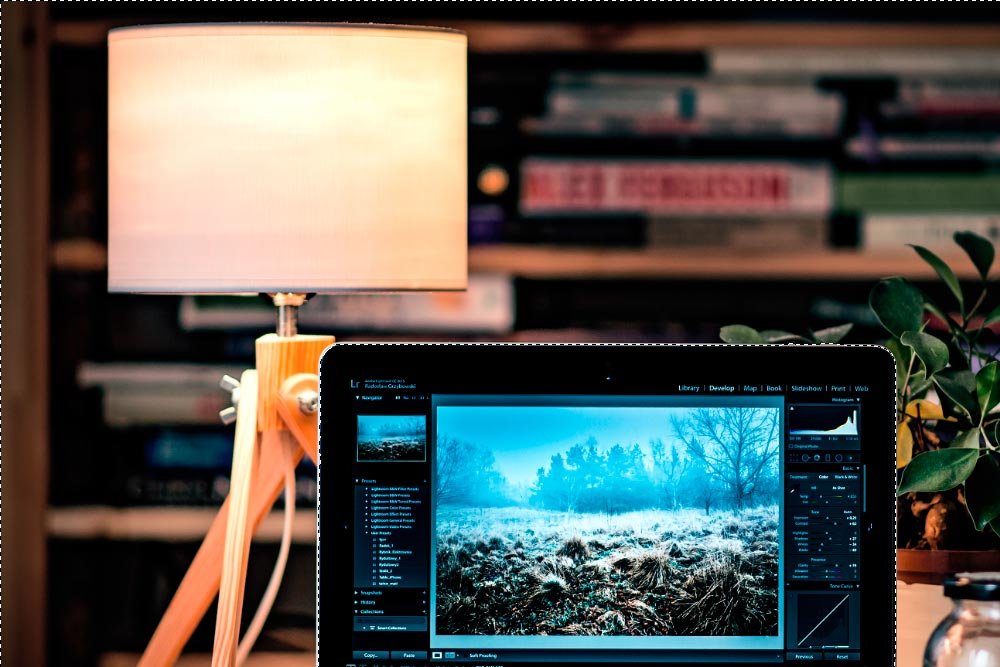
In today’s post, I’ll be using a photo of a laptop on a desk. The goal is to select the screen of the laptop, to alter the color somewhat via an adjustment layer and then to strip the color from anything outside the selection. In other words, the background will be grayscale.
To go about getting this done, I’ll show you a few tricks that have to do with selections, masking and adjustment layers. Again, even though I’ve already demonstrated each of the tasks I’ll be discussing below, I’ve never done things quite like this.
After the tool is activated, I’ll click and trace around the edge of the laptop to make my selection. Remember, if you’re selecting anything with the Quick Selection Tool and you trace out of the lines, you can always deselect by holding down the Alt key on your keyboard and by painting over what you don’t want selected. There’s a tiny tip for you.
I’m not sure if you can see it or not, but there are now some marching ant outside the screen, indicating a selection.
From there, inside the Properties panel that popped up, I’ll keep the RGB selection the way it is in the color drop-down and select Increase Contrast from the Preset drop-down. This will merely add a bit of contrast to only the computer screen.
My computer screen has some more contrast. Not much, but enough for this example. Also, as you can see in the Layers panel, the adjustment layer I added includes a mask.
4 Super Layer Masking Tips for Adobe Photoshop
To re-select a selection from a mask or to create a selection from a mask from scratch, all you need to do is to hold down the Ctrl key on your keyboard and then click on the mask thumbnail in the Layers panel. That’s it. Once you do that, the marching ants will appear along the edges of the masked area in your photo. I did this and I have my selection back.
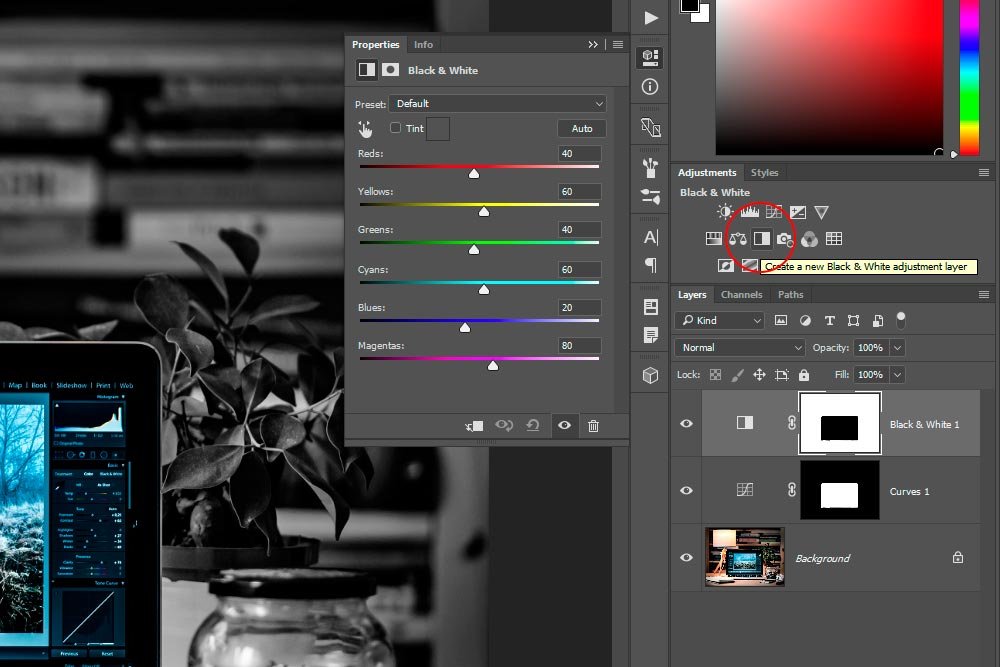
As you can see from the screenshot above, a new adjustment layer was formed in the Layers panel, the background of the photo turned grayscale and the Properties panel for the current adjustment layer popped open.
The reason I decided to use the Black & White adjustment layer as opposed to the Hue/Saturation one and simply reducing the saturation all the way is because by choosing the Black & White adjustment, I’m able to adjust each color for maximum effect via the Properties panel. In this case though, to keep things simple, I’ll choose one of the available presets from the Preset drop-down. After playing around a bit, I thought the Yellow Filter looked the best.
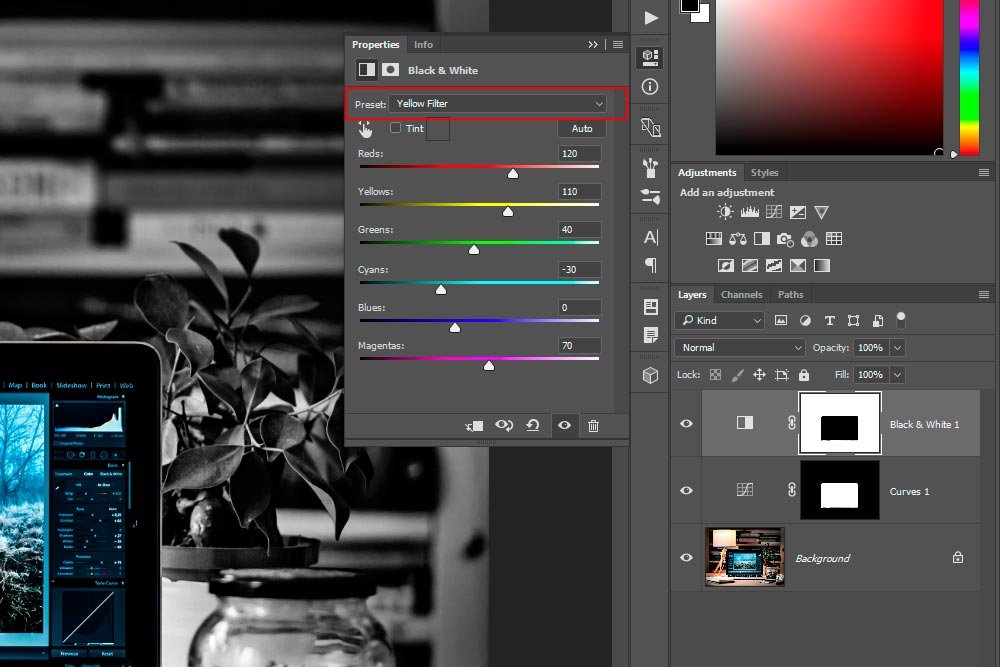
After picking this choice, the color sliders moved by themselves, as can be seen in the above screenshot.
Now, I have the finished photo. Let’s see what it looks like.
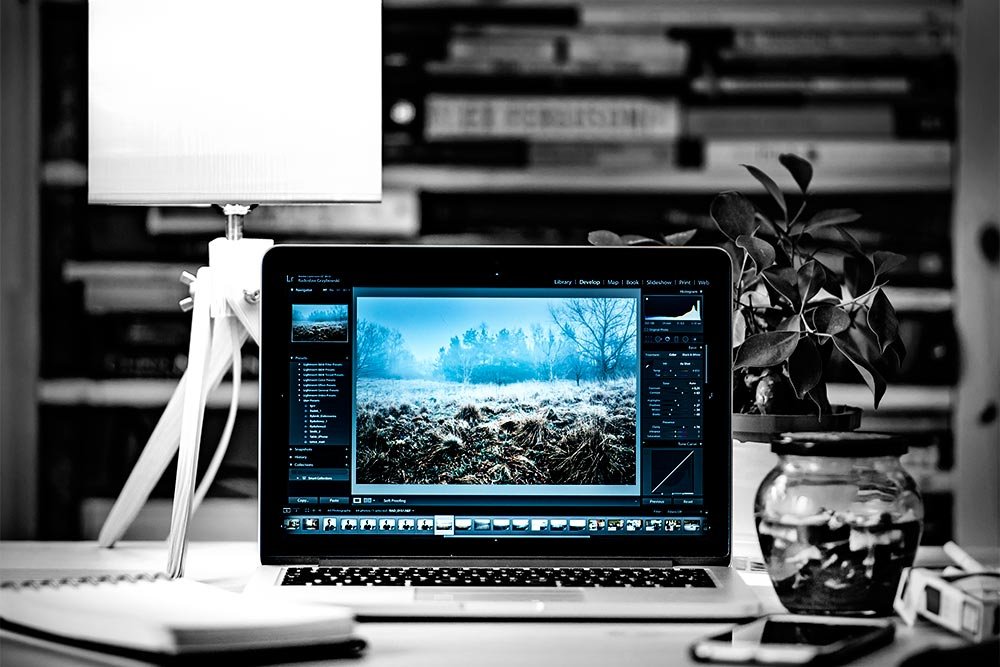
I don’t know. It’s not crazy, but it’s pretty cool. It’s certainly enough to get my point across in this post.
Here’s the before and after shot.
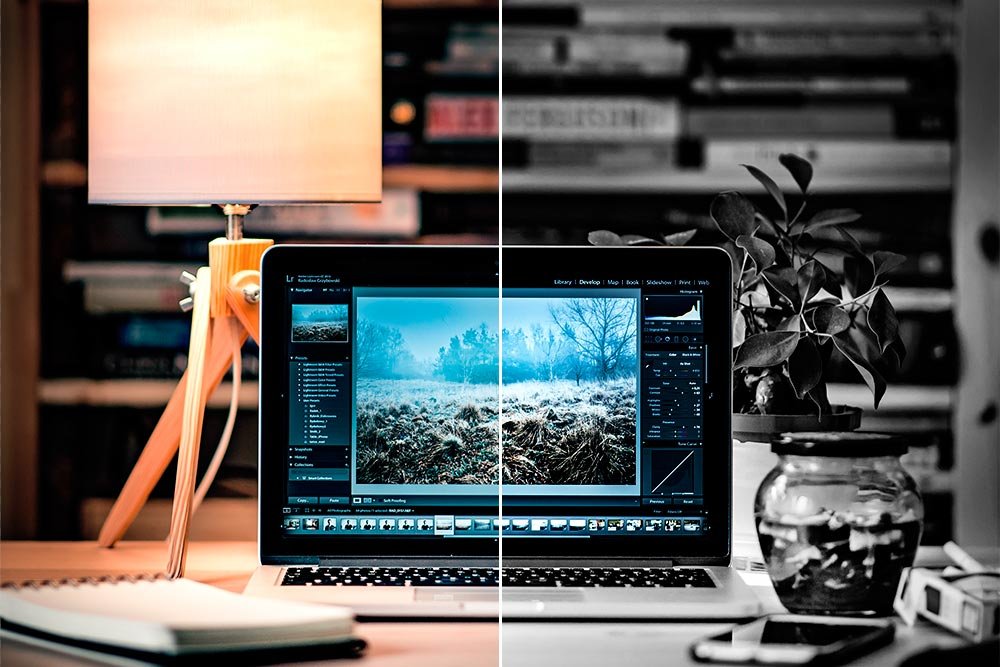
In this post, my goal was to demonstrate how to make a selection using the Quick Select Tool and how to modify that selection by deselecting parts of it. I also wanted to show you how to recreate a selection from a layer mask and how to invert that selection. These are easy tips that, once known, can be used over and over to save a lot of time. I know this wasn’t the most extensive demonstration out there, but it did provide a few critical steps in photo editing. I hope you enjoyed it. If you have any questions or concerns regarding this post, please leave them in the comment section below. Thanks for reading!
In today’s post, I’ll be using a photo of a laptop on a desk. The goal is to select the screen of the laptop, to alter the color somewhat via an adjustment layer and then to strip the color from anything outside the selection. In other words, the background will be grayscale.
To go about getting this done, I’ll show you a few tricks that have to do with selections, masking and adjustment layers. Again, even though I’ve already demonstrated each of the tasks I’ll be discussing below, I’ve never done things quite like this.
The Demo Photo
As you can see, there’s not a whole lot that you wouldn’t expect in this photo. You’ve probably seen something like it before. The reason I chose this particular photo is because the screen of the laptop has a nice, hard edge. Since I’m going to be discussing a few different topics in this post, I didn’t want to spend all day attempting to select a fuzzy, blurry edge and then another half a day refining that edge. I figured a hard edge would make things flow better (and faster). If you are into learning about how to make all different types of selections in Photoshop, I can suggest that you search Photoshop Selections in the search bar at the top of this site. There are quite a few posts that cover this.
Selecting the Laptop Screen
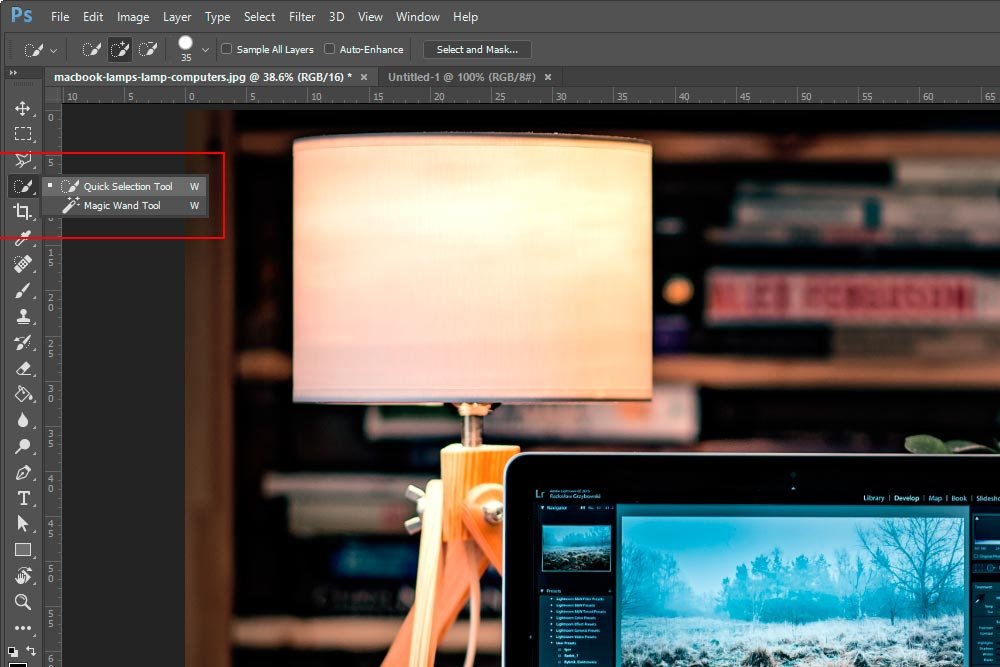
Since the screen on the laptop is so straightforward, I’ll use the Quick Selection Tool to do the work for me. I’ll select that tool from the left vertical toolbar to activate it. Currently, this is the fourth tool from the top.
After the tool is activated, I’ll click and trace around the edge of the laptop to make my selection. Remember, if you’re selecting anything with the Quick Selection Tool and you trace out of the lines, you can always deselect by holding down the Alt key on your keyboard and by painting over what you don’t want selected. There’s a tiny tip for you.

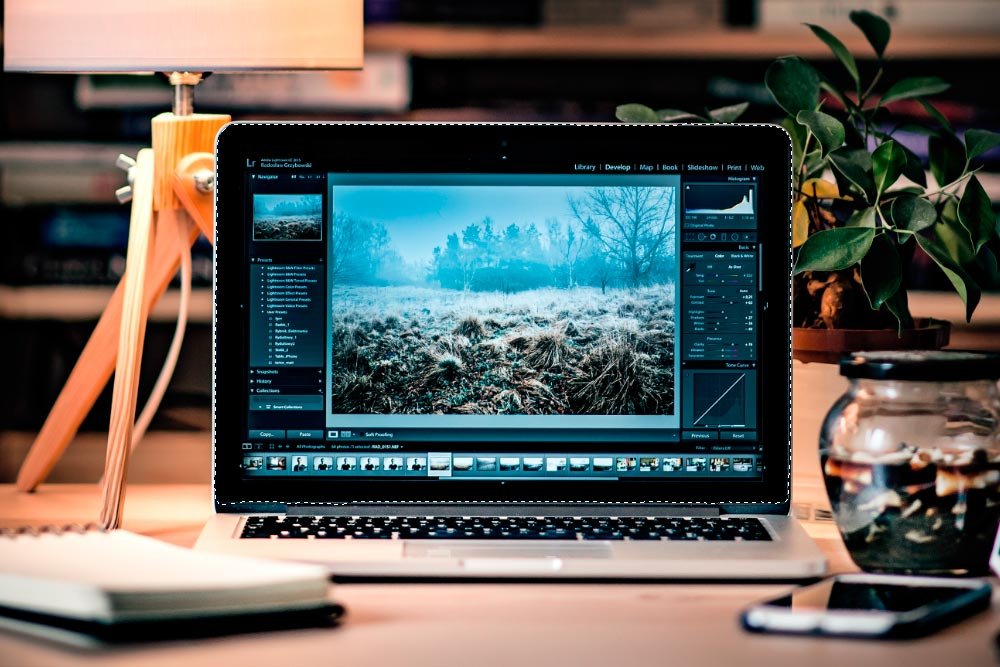
I’m not sure if you can see it or not, but there are now some marching ant outside the screen, indicating a selection.
Contrasting the Screen with Some Curves
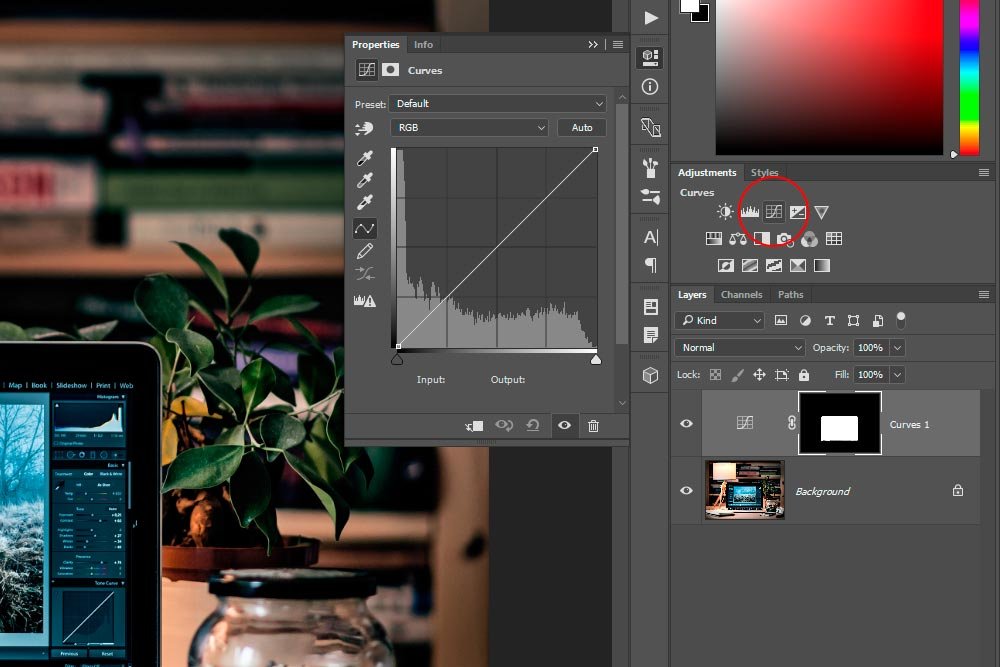
Okay, I have what I need selected, selected. I’d now like to add some contrast to the laptop screen. Since I haven’t edited this photo at all yet in Camera Raw, in cases like this, I’d generally add contrast to whatever I’m working on in Photoshop. To do this, I’ll head over to the Adjustments panel and click on the Curves icon.
From there, inside the Properties panel that popped up, I’ll keep the RGB selection the way it is in the color drop-down and select Increase Contrast from the Preset drop-down. This will merely add a bit of contrast to only the computer screen.

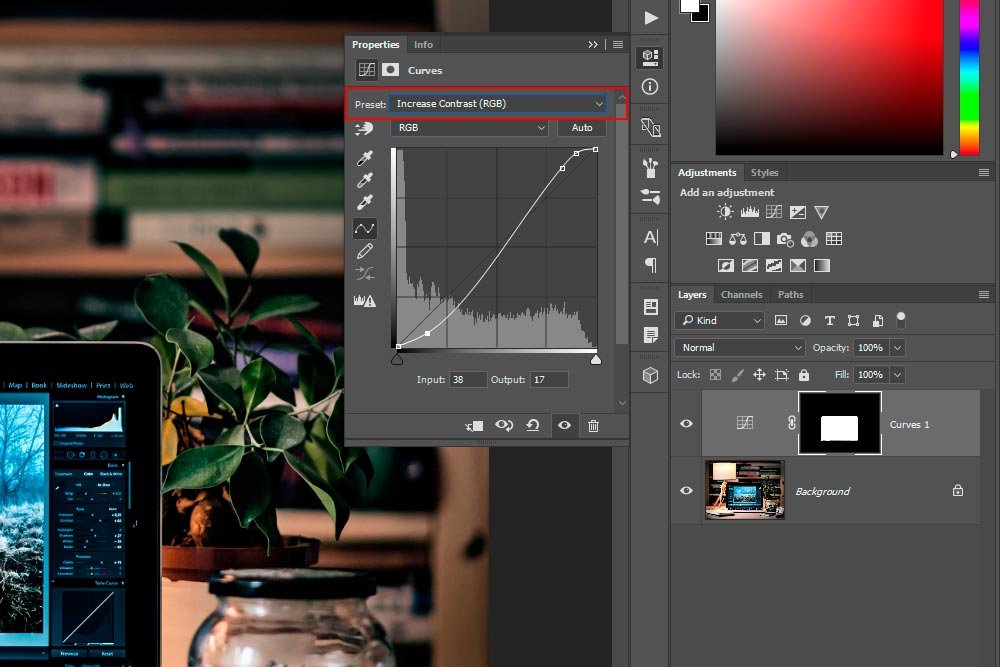
My computer screen has some more contrast. Not much, but enough for this example. Also, as you can see in the Layers panel, the adjustment layer I added includes a mask.
4 Super Layer Masking Tips for Adobe Photoshop
Re-Selecting the Selection
To continue on with the remaining steps for this project, I’ll need to have the screen selected again. If you haven’t noticed, once I created the first adjustment layer, a mask was formed from the selection and the selection disappeared. Since I need that back, I’ll use a shortcut to get it.To re-select a selection from a mask or to create a selection from a mask from scratch, all you need to do is to hold down the Ctrl key on your keyboard and then click on the mask thumbnail in the Layers panel. That’s it. Once you do that, the marching ants will appear along the edges of the masked area in your photo. I did this and I have my selection back.
Inverting a Selection
As I explained in the beginning of this post, I’d like to turn the background (everything outside the original selection) of this photo grayscale. Since I currently have the laptop screen selected, I’ll need to invert the selection so everything but the screen is selected. To accomplish this, I’ll head up to the Select > Inverse menu item and click. When I do that, I’ll see the selected area change to the opposite of what’s currently selected. You can see what I’m referring to below. Look closely at the edge of the screenshot and the edge of the laptop screen for the marching ants.
Adding a Black & White Adjustment Layer
This part is easy. To make the area around the laptop screen (the selection) grayscale, all I need to do is to click the Black & White adjustment layer icon.
As you can see from the screenshot above, a new adjustment layer was formed in the Layers panel, the background of the photo turned grayscale and the Properties panel for the current adjustment layer popped open.
The reason I decided to use the Black & White adjustment layer as opposed to the Hue/Saturation one and simply reducing the saturation all the way is because by choosing the Black & White adjustment, I’m able to adjust each color for maximum effect via the Properties panel. In this case though, to keep things simple, I’ll choose one of the available presets from the Preset drop-down. After playing around a bit, I thought the Yellow Filter looked the best.

After picking this choice, the color sliders moved by themselves, as can be seen in the above screenshot.
Now, I have the finished photo. Let’s see what it looks like.

I don’t know. It’s not crazy, but it’s pretty cool. It’s certainly enough to get my point across in this post.
Here’s the before and after shot.

In this post, my goal was to demonstrate how to make a selection using the Quick Select Tool and how to modify that selection by deselecting parts of it. I also wanted to show you how to recreate a selection from a layer mask and how to invert that selection. These are easy tips that, once known, can be used over and over to save a lot of time. I know this wasn’t the most extensive demonstration out there, but it did provide a few critical steps in photo editing. I hope you enjoyed it. If you have any questions or concerns regarding this post, please leave them in the comment section below. Thanks for reading!

