LukeLewis
Member
- Joined
- May 7, 2021
- Messages
- 134
- Reaction Score
- 0
- Points
- 21
- #1
I know that many photographers and designers choose to do a good percentage of their photo editing in Adobe Camera Raw and Lightroom before ever entering into Photoshop, but I also recognize the fact that some folks out there don’t even know what Camera Raw and Lightroom are. Many people, including myself up until a few years ago, perform all of their editing straight inside of Photoshop. They open their photos, manipulate them and export them from this one application. While I’m definitely a proponent of using Camera Raw for the heavy lifting, I can understand the simplicity of getting things done using other methods.
Since there’s surely an audience for this type of thing, I thought I’d write today’s post from the perspective of someone, perhaps a photographer, who would like to refrain from using ancillary applications. I’d like to launch a photo into Adobe Photoshop and edit it from start to finish right there. Of course, I won’t show you how to open and export the image (I’ve already written about those topics), but I will cover the steps necessary to enhance the color and vibrancy of what we’re going to be looking at. And the picture I found is perfect too. It’s going to allow me to focus on lighting, which, when done correctly, can make any ho-hum photo look so much better than it originally did.
Also, I think some clarity around the people would help as would some overall vibrance throughout the photo. So, as you can see, I’ll need to take quite a few different approaches to enhance this image. I can’t simply add saturation or something similar and call it a day.
The first thing I’ll do is to click on the Color Balance icon in the Adjustments panel. This will pop open the Properties panel for this adjustment. It will also create a Color Balance adjustment layer.
Next, I’ll push the top slider in the Properties panel to the left, towards Cyan, leave the middle slider alone and finally, I’ll push the bottom slider to the right, towards Blue. I’ll keep nudging the sliders until I see the sky turn the color I want. Mind you, the entire photo will turn blue, but ignore all that. Stay focused on only the sky.
From here, since it’s sometimes easier to paint in changes as opposed to removing them from areas I don’t want them, I’ll click on the mask thumbnail in the adjustment layer and then I’ll use the keyboard shortcut of Ctrl+i (Command+i on Mac) to invert the mask. The white thumbnail should turn from white to black.
Finally, I’ll enlarge the Brush Tool nice and big and I’ll use a soft edge as well. I’ll make sure the brush is white and will paint the areas of the sky that I want to add blue to. I’ll be sure to avoid the sun and the people. I’ll also add some blue to the top area of mountains, since they’re blue already.
How to Adjust the Brush Tool Settings in Adobe Photoshop
Here’s the result. Not overwhelming, but it does add some color.
For this adjustment, I’ll follow the same exact steps from above, but this time, when I get to the pushing of the sliders, I’ll move the top slider to the right, towards the Red and the bottom slider to the left, towards the Yellow.
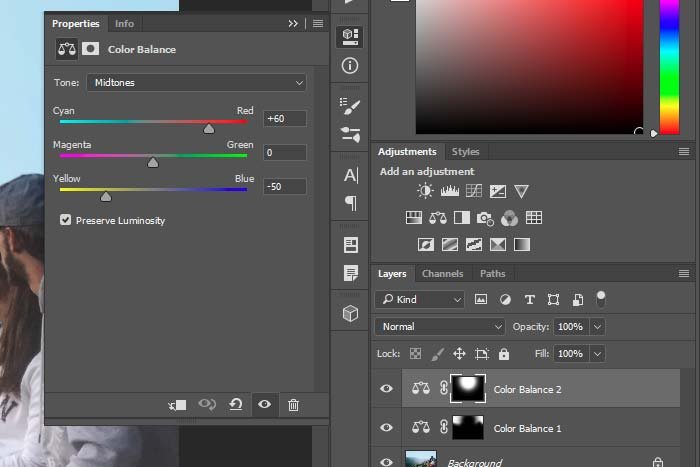
After that, I’ll invert the mask for this adjustment layer and I’ll use the large white Brush Tool to dab one big spot over the sun. This should add a sort of an orange and pink fuzzy circle over the white sun. Check it out.
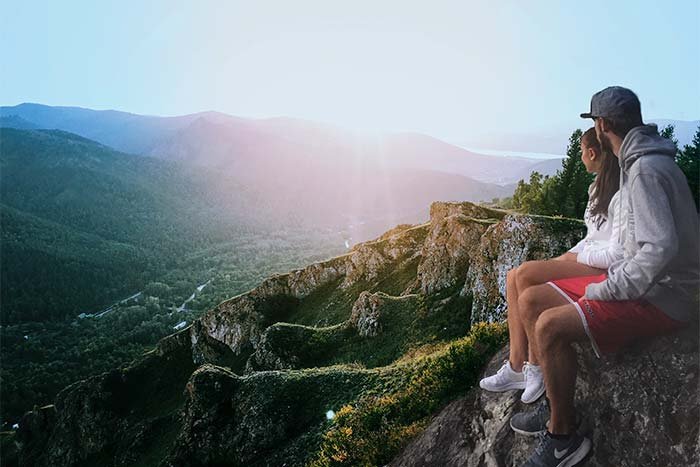
As you can see, just these two changes have made substantial changes to the photo. I couldn’t acquire these changes any other way than to apply them specifically to certain areas.
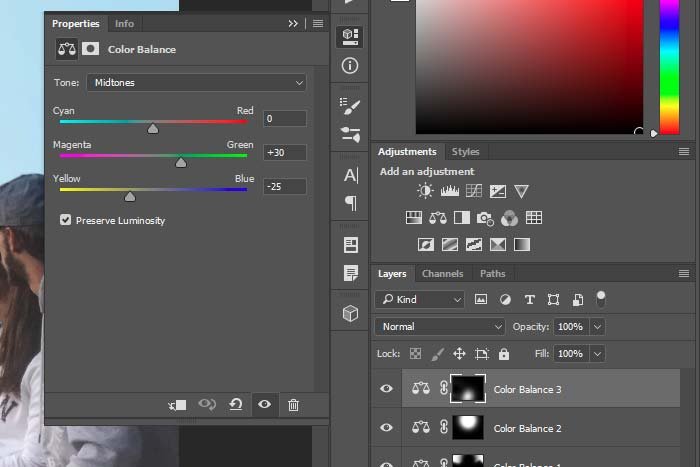
Then, I’ll again invert the mask and I’ll use the Brush Tool to paint white over the green area directly under the sun. My goal with this is to have the pink of the sun overflow the rocks, right into the vegetation. Let’s see how things look so far.
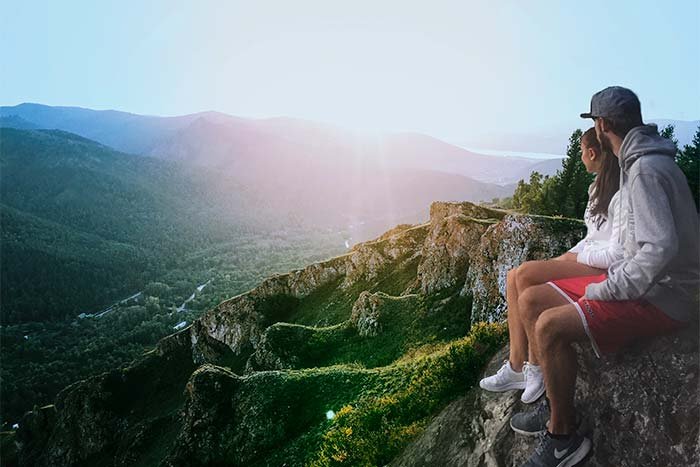
I’m really liking the look of this image a lot. I can tell that I already brought out so many nice colors. The ones that matter, anyway.
With that in mind, I’ll click on the Curves icon in the Adjustments panel and when the pop up appears, I’ll click and drag the primary RGB line upwards just a bit. Then, I’ll use the drop-down that currently says RGB in it to pull the Red line upward a hint and the Blue line downward a hint.
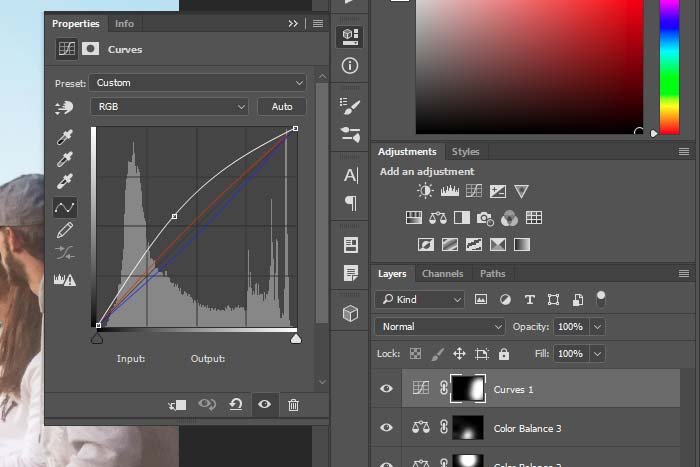
Doing this will add an overall brightness to the area as well as correct the colors within.
Using the Adobe Photoshop Curves Tool For Photography
Working with Selections & Adjustment Layers in Adobe Photoshop
How to Enhance Color Using Curves in Adobe Photoshop
Then again, I’ll invert this adjustment layer’s mask and use the Brush Tool to paint white over the area the people are in. Let’s see how the result looks.
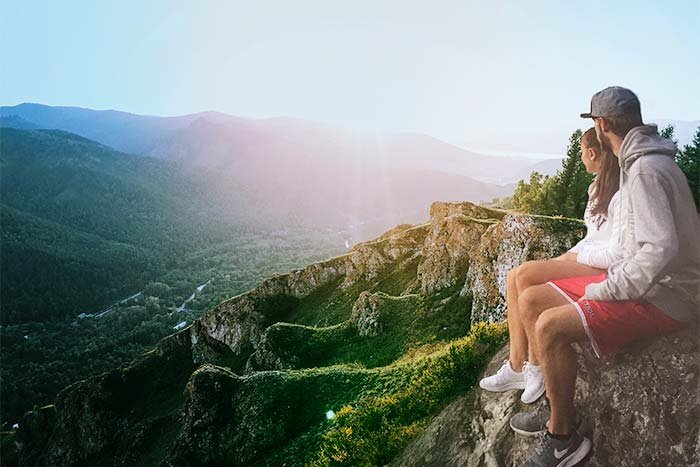
That looks really great, but I still think the people look hazy. I need to add some contrast to that area.
For this adjustment, I’ll follow every step I just took previously, but this time, instead of pulling lines around, I’ll click on the Preset drop down and choose Increase Contrast. This preset will do the dirty work for me and will move the line where it should be. The result will be a cleaner, more contrasted lower right area.
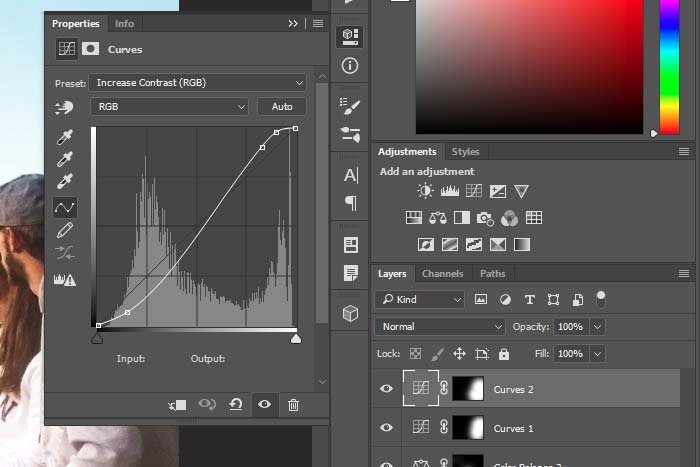
I’ll invert and paint this area identically to the way I did it above as well. Let’s see the result. I have a feeling it’s going to look good.
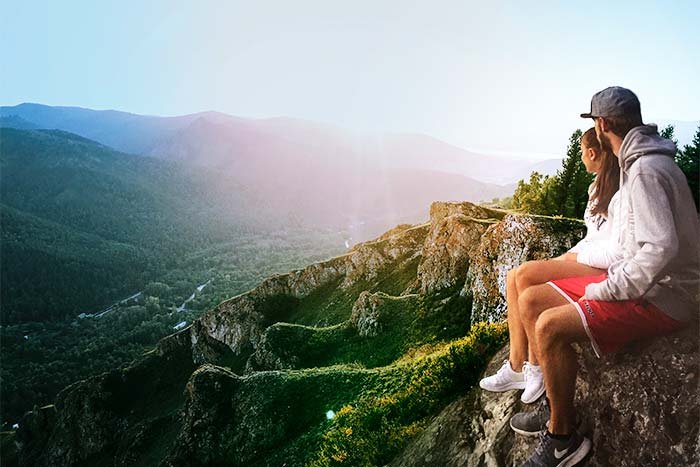
Yeah, now that looks much better than the original. If I wanted to, I could call this image finished. I do want to add just one more touch though.
I won’t be doing any inverting or coloring for this adjustment because I would like it applied evenly over everything. This enhancement is barely noticeable, but good nonetheless.
Let’s take a peek at the before and after shots.
I’d say that looks much better. I hope you would too.
See? Wasn’t that easy? I encourage you to open a photo into Photoshop to practice some of what I covered in this post. Once you become comfortable with adjustment layers in Adobe Photoshop, life becomes much easier when you want to edit more complex projects. If you have any questions or concerns regarding this post, please let me know in the comment section down below. Thanks for reading!
Since there’s surely an audience for this type of thing, I thought I’d write today’s post from the perspective of someone, perhaps a photographer, who would like to refrain from using ancillary applications. I’d like to launch a photo into Adobe Photoshop and edit it from start to finish right there. Of course, I won’t show you how to open and export the image (I’ve already written about those topics), but I will cover the steps necessary to enhance the color and vibrancy of what we’re going to be looking at. And the picture I found is perfect too. It’s going to allow me to focus on lighting, which, when done correctly, can make any ho-hum photo look so much better than it originally did.
The Demo Photo
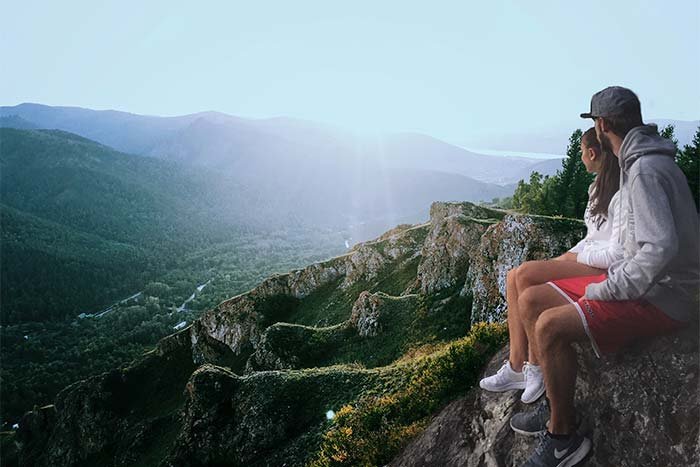
This is the photo I’ll be working with. If you take a look at it, you’ll notice that it’s got some potentially really nice aspects. I’m primarily interesting in bringing out the lighted area right in front of the peoples’ sneakers, bringing some color to the mountains, making the sun more orange and bringing some blues out of the sky.
Also, I think some clarity around the people would help as would some overall vibrance throughout the photo. So, as you can see, I’ll need to take quite a few different approaches to enhance this image. I can’t simply add saturation or something similar and call it a day.
Adding Blue to the Sky
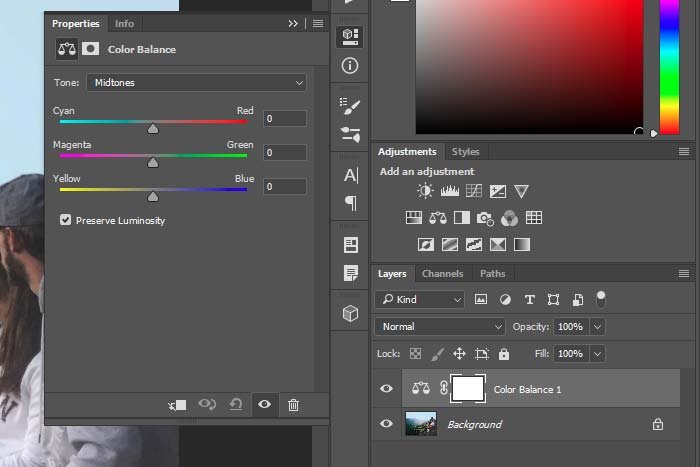
The lowest hanging fruit here is to add some more blue to the sky area. As you can see, it’s very washed out looking. Now, I know I’m limited in this regard because any color I add is going to make the area I’m working on stick out when compared to the remaining photo, so I really need to be careful. I need to keep my changes mild.The first thing I’ll do is to click on the Color Balance icon in the Adjustments panel. This will pop open the Properties panel for this adjustment. It will also create a Color Balance adjustment layer.

Next, I’ll push the top slider in the Properties panel to the left, towards Cyan, leave the middle slider alone and finally, I’ll push the bottom slider to the right, towards Blue. I’ll keep nudging the sliders until I see the sky turn the color I want. Mind you, the entire photo will turn blue, but ignore all that. Stay focused on only the sky.

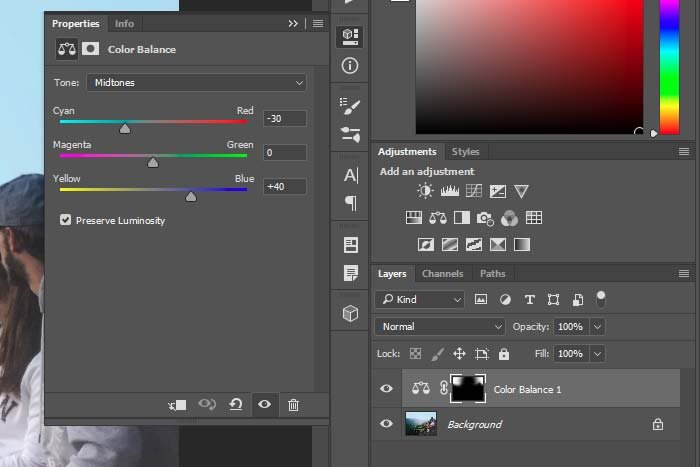
From here, since it’s sometimes easier to paint in changes as opposed to removing them from areas I don’t want them, I’ll click on the mask thumbnail in the adjustment layer and then I’ll use the keyboard shortcut of Ctrl+i (Command+i on Mac) to invert the mask. The white thumbnail should turn from white to black.
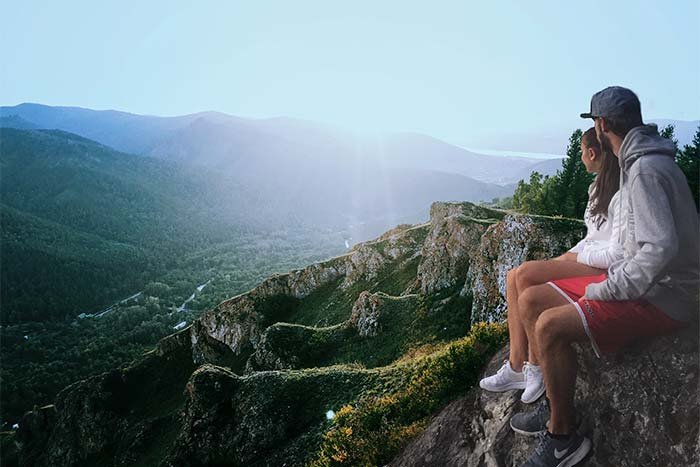
Finally, I’ll enlarge the Brush Tool nice and big and I’ll use a soft edge as well. I’ll make sure the brush is white and will paint the areas of the sky that I want to add blue to. I’ll be sure to avoid the sun and the people. I’ll also add some blue to the top area of mountains, since they’re blue already.
How to Adjust the Brush Tool Settings in Adobe Photoshop
Here’s the result. Not overwhelming, but it does add some color.

Making the Sun Orange
Since the sun is almost white in this photo, it really doesn’t tell the story of what a sun should tell. Suns are orange, so that’s the way I’ll attempt to make this one.For this adjustment, I’ll follow the same exact steps from above, but this time, when I get to the pushing of the sliders, I’ll move the top slider to the right, towards the Red and the bottom slider to the left, towards the Yellow.

After that, I’ll invert the mask for this adjustment layer and I’ll use the large white Brush Tool to dab one big spot over the sun. This should add a sort of an orange and pink fuzzy circle over the white sun. Check it out.

As you can see, just these two changes have made substantial changes to the photo. I couldn’t acquire these changes any other way than to apply them specifically to certain areas.
Adding Green to the Vegetation
Here’s the thing with this photo; it’s just dying to have the vegetation that sits in front of the two people brought out. As it stands, I can see that the sun is shining right on that lighter area. I’d like to accentuate that. So, following what I did above, I’ll add another Color Balance adjustment layer, but this time, I’ll push the middle slider to the right, towards Green and the bottom slider to the left, towards Yellow.
Then, I’ll again invert the mask and I’ll use the Brush Tool to paint white over the green area directly under the sun. My goal with this is to have the pink of the sun overflow the rocks, right into the vegetation. Let’s see how things look so far.

I’m really liking the look of this image a lot. I can tell that I already brought out so many nice colors. The ones that matter, anyway.
Clarifying & Adding Contrast to the People
Okay, I’m done adding individual colors to this photo. I am noticing that the area around the people is kind of dull though. I don’t like it. I think I’ll use the next two adjustment layers to clean that area up. First, I’ll add some brightness, reduce some of the blues and add just a hint of red via the Curves adjustment layer.With that in mind, I’ll click on the Curves icon in the Adjustments panel and when the pop up appears, I’ll click and drag the primary RGB line upwards just a bit. Then, I’ll use the drop-down that currently says RGB in it to pull the Red line upward a hint and the Blue line downward a hint.

Doing this will add an overall brightness to the area as well as correct the colors within.
Using the Adobe Photoshop Curves Tool For Photography
Working with Selections & Adjustment Layers in Adobe Photoshop
How to Enhance Color Using Curves in Adobe Photoshop
Then again, I’ll invert this adjustment layer’s mask and use the Brush Tool to paint white over the area the people are in. Let’s see how the result looks.

That looks really great, but I still think the people look hazy. I need to add some contrast to that area.
For this adjustment, I’ll follow every step I just took previously, but this time, instead of pulling lines around, I’ll click on the Preset drop down and choose Increase Contrast. This preset will do the dirty work for me and will move the line where it should be. The result will be a cleaner, more contrasted lower right area.

I’ll invert and paint this area identically to the way I did it above as well. Let’s see the result. I have a feeling it’s going to look good.

Yeah, now that looks much better than the original. If I wanted to, I could call this image finished. I do want to add just one more touch though.
Adding an Overall Vibrance
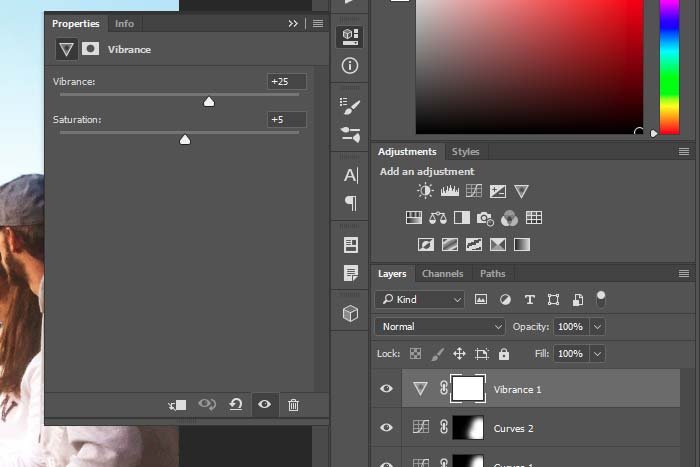
I would like to add just a bit of additional color to the entire photo to wrap things up. To accomplish this, I think I’ll click on the Vibrance icon in the Adjustments panel. Once the Properties panel opens up, I’ll push the Vibrance slider to the right as well as the Saturation slider. Just until things look decent overall.
I won’t be doing any inverting or coloring for this adjustment because I would like it applied evenly over everything. This enhancement is barely noticeable, but good nonetheless.
The Final Photo
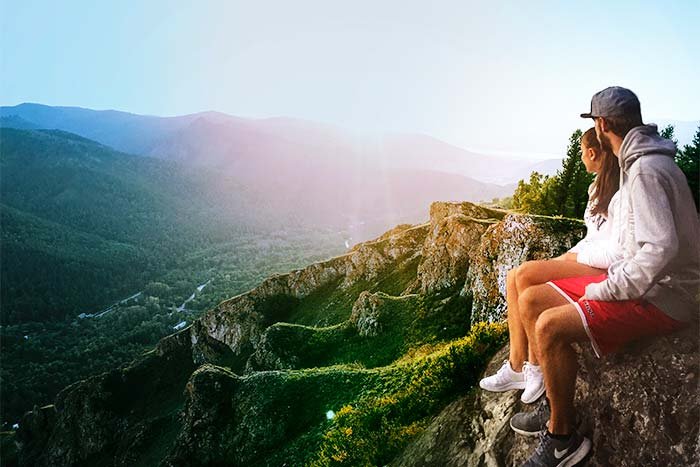
I think this photo came out pretty good. When I was practicing, all of the changes only took about five minutes to complete. If I had to do this again, I’d probably get things done in under two. That’s how straightforward and direct these adjustment layers can be. Let’s take a look at the final image.
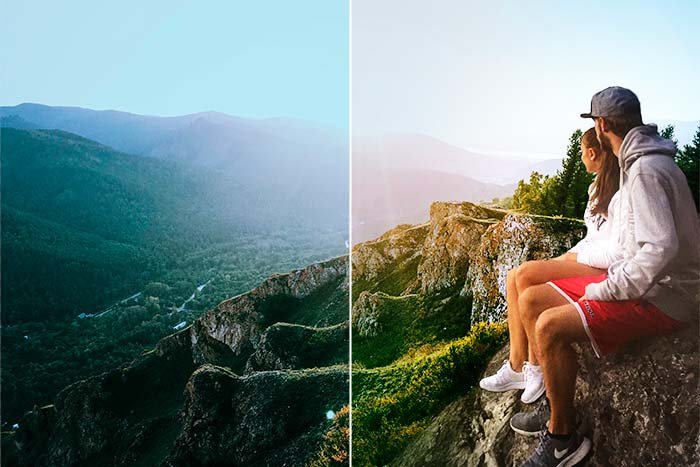
Let’s take a peek at the before and after shots.

I’d say that looks much better. I hope you would too.
See? Wasn’t that easy? I encourage you to open a photo into Photoshop to practice some of what I covered in this post. Once you become comfortable with adjustment layers in Adobe Photoshop, life becomes much easier when you want to edit more complex projects. If you have any questions or concerns regarding this post, please let me know in the comment section down below. Thanks for reading!
