15Katey
Member
- Joined
- May 10, 2021
- Messages
- 130
- Reaction Score
- 0
- Points
- 23
- #1
Have you ever seen those teeth whitening commercials on TV that tell you that they’ll whiten and brighten your smile? Regardless if the products these people are selling work or not, the goal is still to whiten and brighten your teeth. So, when working in Adobe Photoshop to achieve these goals, take a tip from the commercials and use the tools available to make any type of teeth look a lot better than they normally do. You want to whiten and brighten.
In today’s post, I’m going to walk you through the process of whitening teeth in Adobe Photoshop. I’ll make a selection, apply an adjustment layer to that selection and then copy the mask in that layer and apply it to another adjustment layer. The first adjustment layer will take care of the whitening by removing any yellow in the teeth and the second adjustment layer will brighten those teeth up so they’re not so dull. By the end of this post, you should have the knowledge necessary to make any smile look more inviting.
Before I begin, I’d like to tell you that I wrote a post a while back that talks about achieving the same goal, but in Adobe Camera Raw. So, if you’re into that application more than you’re into Photoshop, please feel free to browse through my post.
How to Whiten Eyes & Teeth in Adobe Camera Raw

I’m going to make my selection. First, I’ll size my brush by pressing the [ and ] keys on my keyboard. Since this is a relatively tight area, I’ll use a rather small size. Also, before I select, I’ll make sure to enlarge the photo so I can see what I’m doing. And since I’m sure I’ll select something I don’t intend to, I’ll press and hold the Alt key on my keyboard to unselect that area.
To learn more about this particular tool, please read through the post below.
Selecting Objects & Refining Edges in Adobe Photoshop
I made a pretty good selection. Let’s take a look at what I have at this point.
Once I do that, an entirely new work area will appear. Inside this work area, I’ll push a few sliders around. More specifically, I’ll increase the values of the Radius, Smooth and Contrast sliders and I’ll check the box that says Smart Radius. These sliders really assist with obtaining a sharp selection. Although, the final product of this selection will result in a mask, so it’s not overly critical to seek perfection at this point. I can always paint the mask to either reveal or hide parts of the teeth later on.
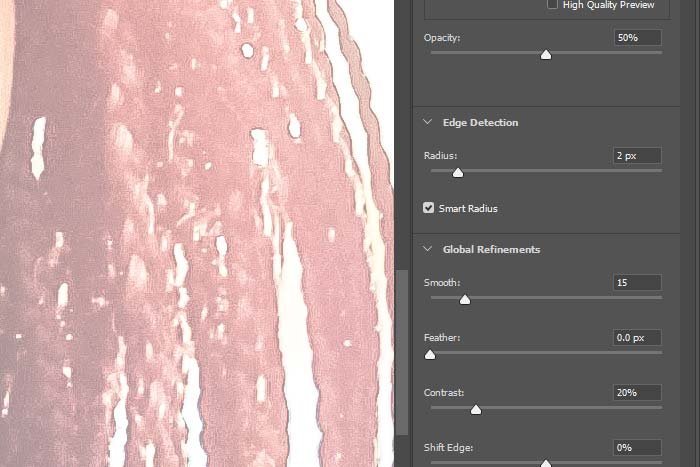
When I’m finished, I’ll press the OK button and I’ll exit the edge refinement work area. Upon returning to the regular work area, I won’t see much of a change. Perhaps just a better selection than before.
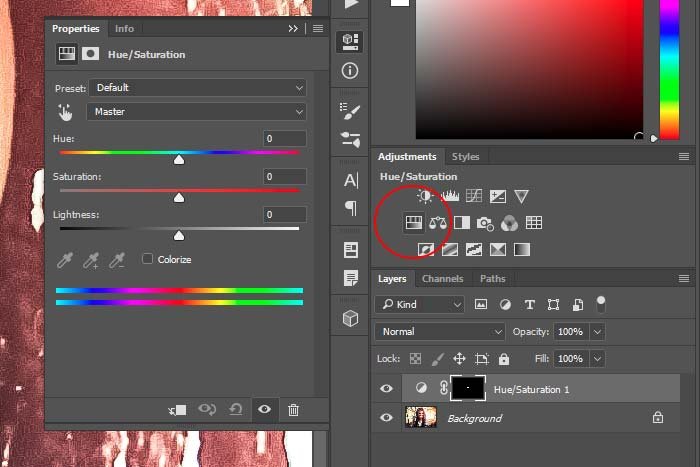
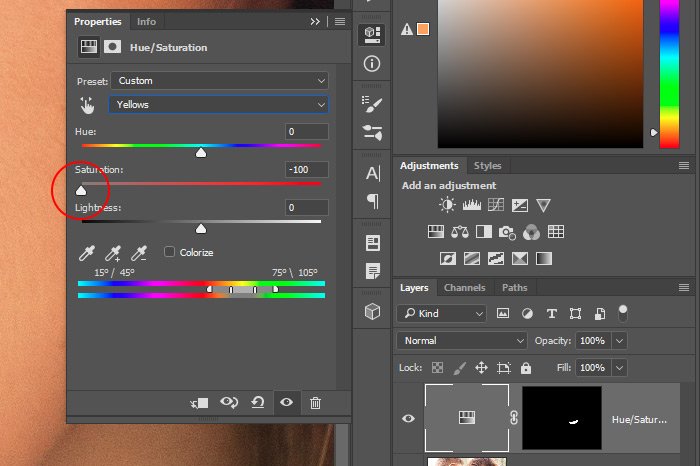
Next, I’ll use the Targeted Adjustment Tool to find the exact color of the teeth. I’ll click the small hand icon in the Properties panel and then I’ll click on the teeth. As you can see from the screenshot below, the bottom color sliders moved to yellow. That’s the current shade of the teeth.
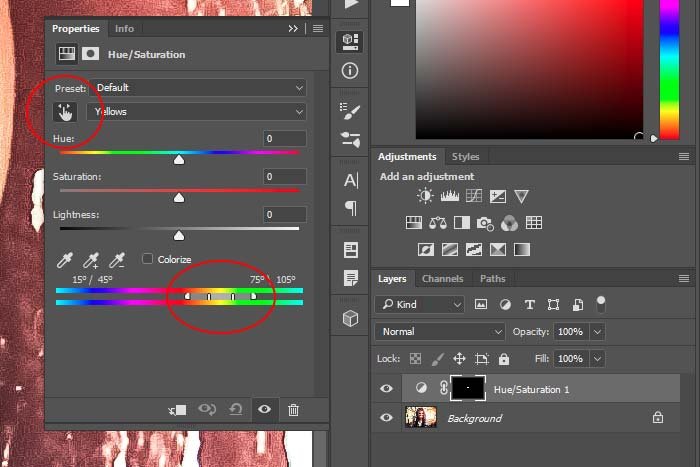
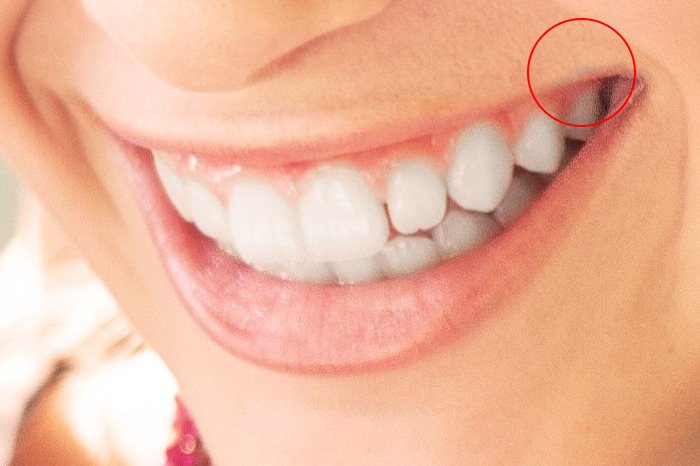
Finally, now that the shade of the teeth has been identified, I’ll push the Saturation slider to the left. Normally, I’d only be able to push this slider to the left a small bit, but this time, pushing it as far as it’ll go doesn’t have any ill effects. I’ll get this result.
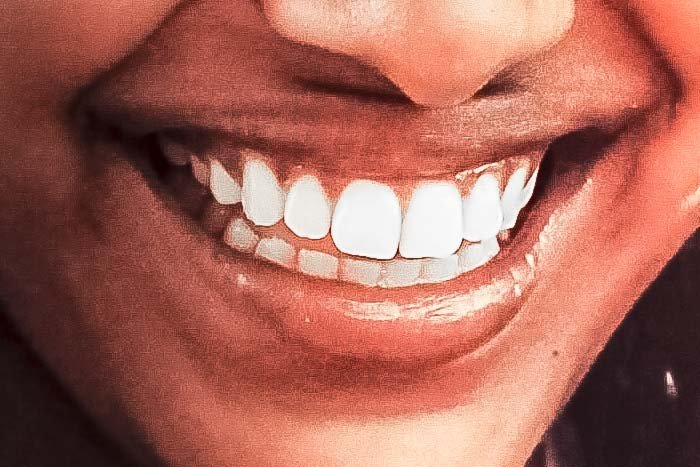
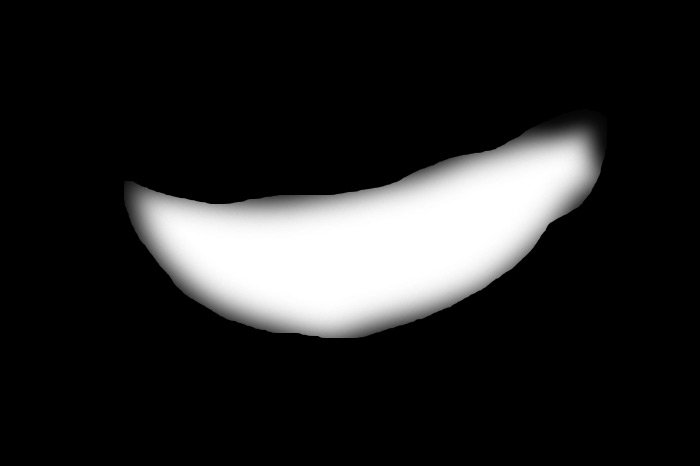
If I ever wanted to see exactly what it is that I’m altering the color of, I can hold down the Alt key on my keyboard and click once on the adjustment layer mask in the Layers panel. Doing that would superimpose the mask on top of the photo. Take a look. I’m editing anything that’s white and not touching anything in black.
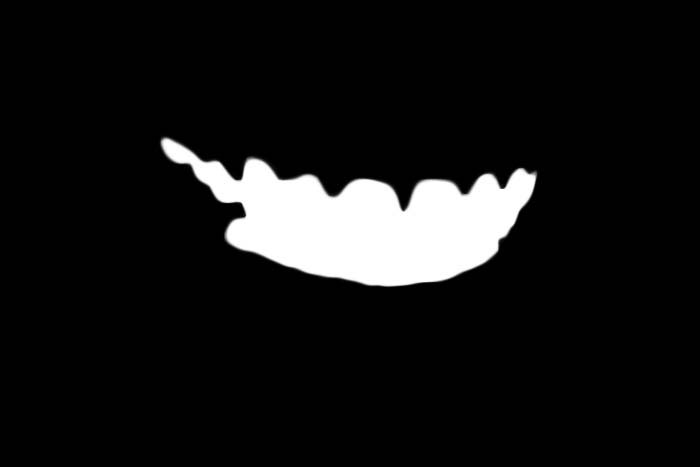
Again, since this is a mask, I have the ability to edit it any time I wish by painting it white or black.
4 Masking Power Tips for Adobe Photoshop
Now, I can see that the teeth are rather bright as they are. I really don’t need to add any brightness to them. I would like to see, however, what the teeth would look like if I darkened their tone somewhat. Or brighten the tone. Either way, I’d like to play around.
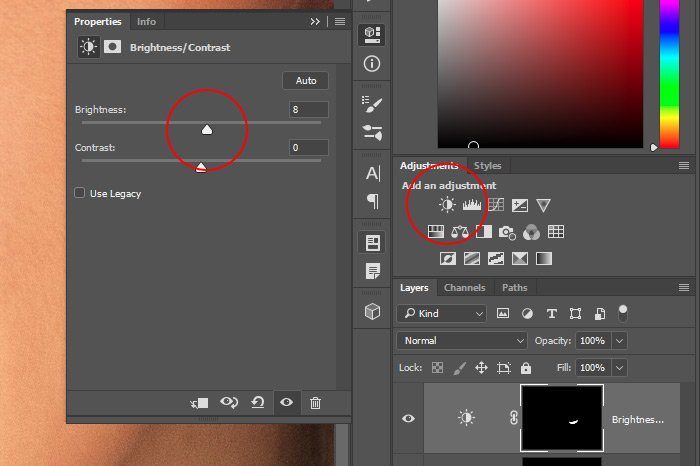
Since the teeth have been reselected, I’ll go ahead and click the Curves icon in the Adjustments panel. As you can see by the screenshot below, a new adjustment layer is formed and new content is seen in the Properties panel that appears.
Using the Adobe Photoshop Curves Tool For Photography
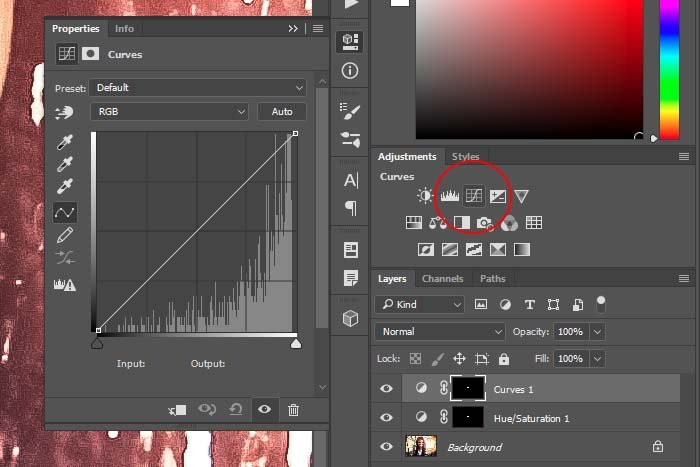
I’m going to adjust the curve until I see that the rear teeth have been brightened and the front teeth have be brought down in their intensity somewhat. Here’s what I came up with.
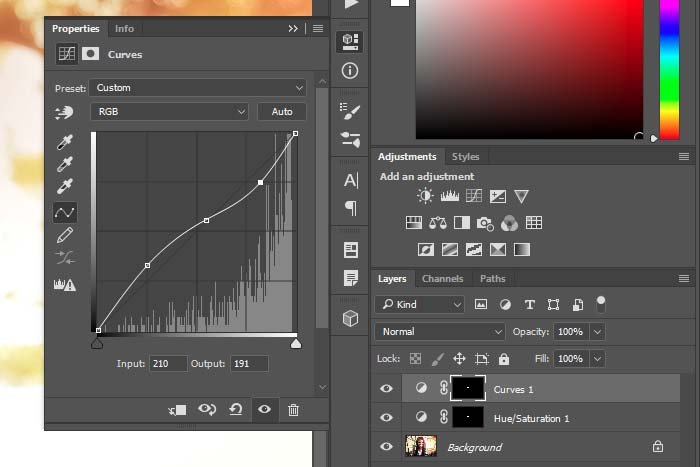
And that concludes the editing. Let’s take a look at the result.

I’d say this looks pretty good. If I ever want to edit either of these adjustments, I can easily do so by double-clicking on the adjustment layer icon in the Layers panel. When I do that, the appropriate Properties panel will pop open and I can do anything I wish.
——
I hope I clearly explained how to go about whitening someone’s teeth in Adobe Photoshop. If you have any questions or concerns regarding this post, please leave them in the comment section down below. Thanks for reading!
In today’s post, I’m going to walk you through the process of whitening teeth in Adobe Photoshop. I’ll make a selection, apply an adjustment layer to that selection and then copy the mask in that layer and apply it to another adjustment layer. The first adjustment layer will take care of the whitening by removing any yellow in the teeth and the second adjustment layer will brighten those teeth up so they’re not so dull. By the end of this post, you should have the knowledge necessary to make any smile look more inviting.
Before I begin, I’d like to tell you that I wrote a post a while back that talks about achieving the same goal, but in Adobe Camera Raw. So, if you’re into that application more than you’re into Photoshop, please feel free to browse through my post.
How to Whiten Eyes & Teeth in Adobe Camera Raw
The Demo Photo
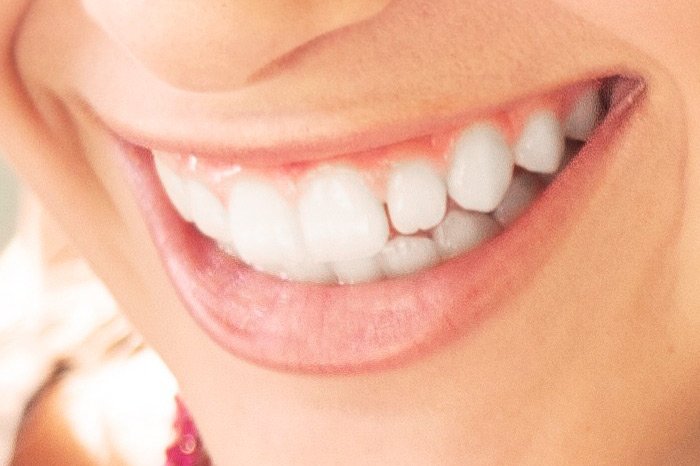
For this post, I’ll be using a photo of a girl in a warm setting. I understand that the lighting may be having an effect upon the girl’s teeth, among other things, but the teeth can be clearly seen and I think they’ll be appropriate for a tutorial like this. Take a look at the photo.
Selecting the Teeth with the Quick Selection Tool
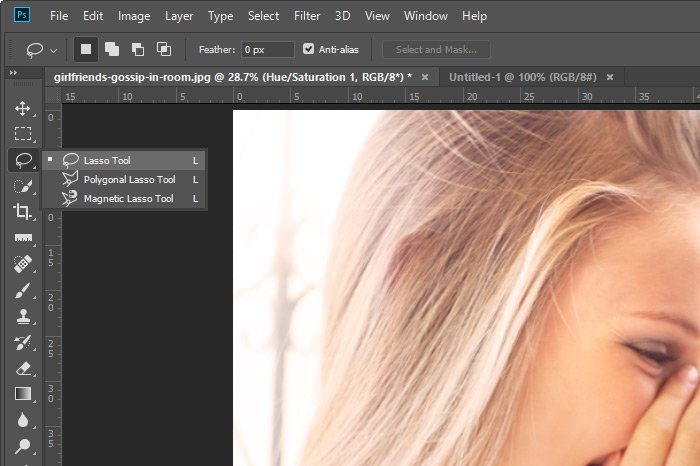
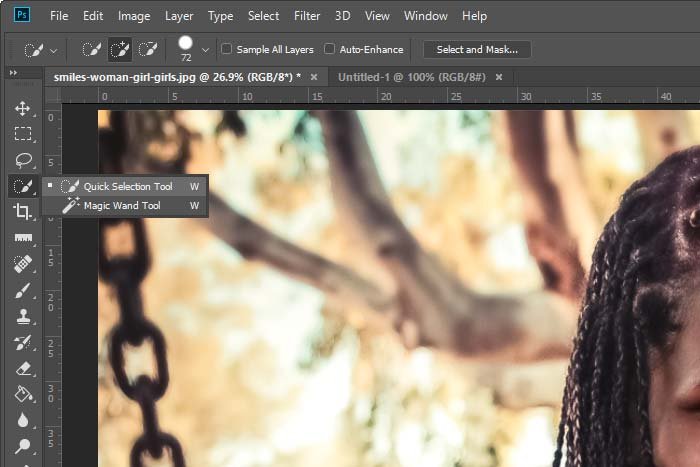
To make my selection, I’ll be using the Quick Selection Tool. I’ll go ahead and activate it from the left vertical toolbar now.
I’m going to make my selection. First, I’ll size my brush by pressing the [ and ] keys on my keyboard. Since this is a relatively tight area, I’ll use a rather small size. Also, before I select, I’ll make sure to enlarge the photo so I can see what I’m doing. And since I’m sure I’ll select something I don’t intend to, I’ll press and hold the Alt key on my keyboard to unselect that area.
To learn more about this particular tool, please read through the post below.
Selecting Objects & Refining Edges in Adobe Photoshop
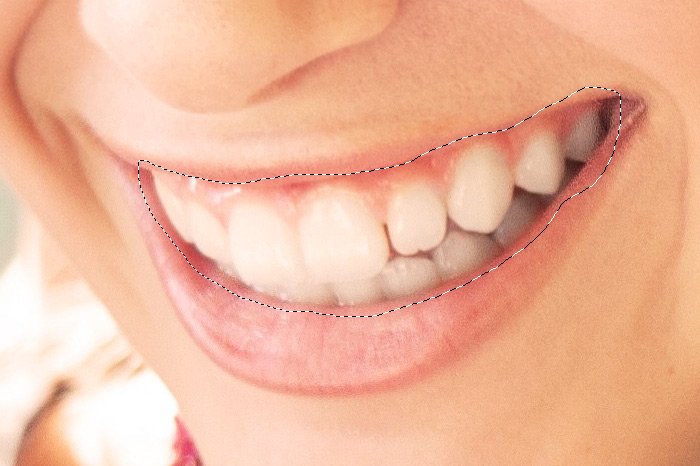
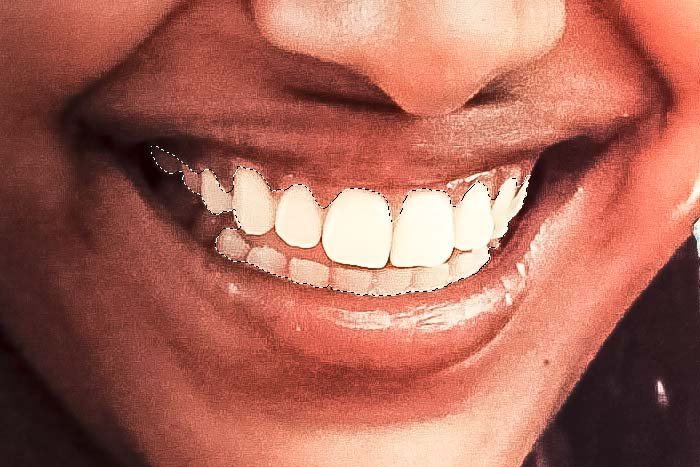
I made a pretty good selection. Let’s take a look at what I have at this point.

Selecting & Masking the Selection
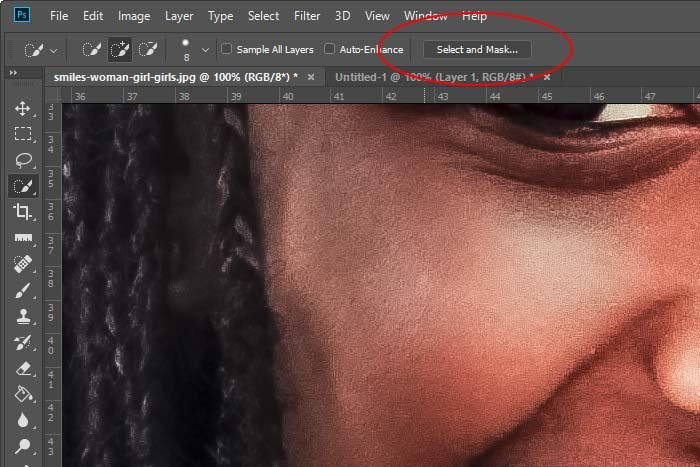
Now that I have a fairly decent selection made, I’d like to clean it up a bit. To do so, I’ll click the Select and Mask button that’s located in the options bar up top.
Once I do that, an entirely new work area will appear. Inside this work area, I’ll push a few sliders around. More specifically, I’ll increase the values of the Radius, Smooth and Contrast sliders and I’ll check the box that says Smart Radius. These sliders really assist with obtaining a sharp selection. Although, the final product of this selection will result in a mask, so it’s not overly critical to seek perfection at this point. I can always paint the mask to either reveal or hide parts of the teeth later on.

When I’m finished, I’ll press the OK button and I’ll exit the edge refinement work area. Upon returning to the regular work area, I won’t see much of a change. Perhaps just a better selection than before.
Whitening the Teeth
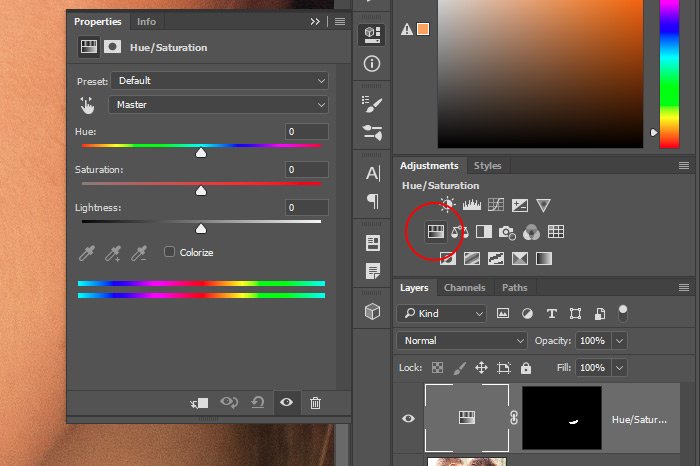
Now that I have the teeth selected, my first goal is to whiten them via an adjustment layer. To do this, I’ll click the Hue/Saturation icon in the Adjustments panel.
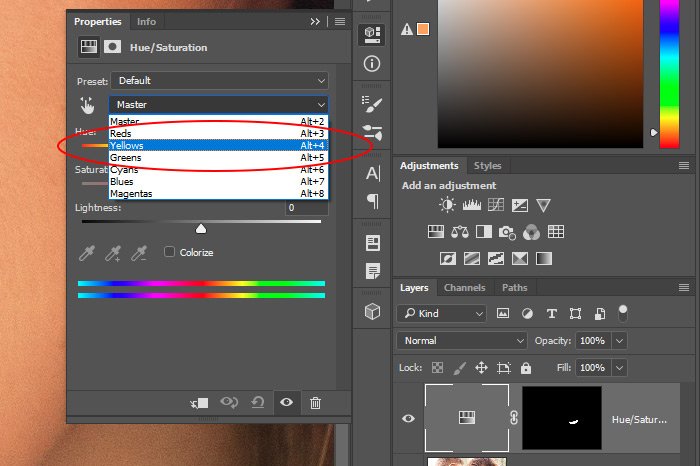
Next, I’ll use the Targeted Adjustment Tool to find the exact color of the teeth. I’ll click the small hand icon in the Properties panel and then I’ll click on the teeth. As you can see from the screenshot below, the bottom color sliders moved to yellow. That’s the current shade of the teeth.

Finally, now that the shade of the teeth has been identified, I’ll push the Saturation slider to the left. Normally, I’d only be able to push this slider to the left a small bit, but this time, pushing it as far as it’ll go doesn’t have any ill effects. I’ll get this result.

If I ever wanted to see exactly what it is that I’m altering the color of, I can hold down the Alt key on my keyboard and click once on the adjustment layer mask in the Layers panel. Doing that would superimpose the mask on top of the photo. Take a look. I’m editing anything that’s white and not touching anything in black.

Again, since this is a mask, I have the ability to edit it any time I wish by painting it white or black.
4 Masking Power Tips for Adobe Photoshop
Reusing the Selection For Another Adjustment
This is a really cool trick. Since I don’t want to go through the agony of (sometimes selecting things can be very challenging) making another, duplicate, selection, I’ll simply hold down the Ctrl key on my keyboard and click once on the mask in the Layers panel. Doing this will reselect the teeth, exactly how I selected them earlier. Or, if I modified the mask by painting it, it’ll create a selection based on the modified mask. Either way, I’ll see the marching ants on the teeth once again.Now, I can see that the teeth are rather bright as they are. I really don’t need to add any brightness to them. I would like to see, however, what the teeth would look like if I darkened their tone somewhat. Or brighten the tone. Either way, I’d like to play around.
Since the teeth have been reselected, I’ll go ahead and click the Curves icon in the Adjustments panel. As you can see by the screenshot below, a new adjustment layer is formed and new content is seen in the Properties panel that appears.
Using the Adobe Photoshop Curves Tool For Photography

I’m going to adjust the curve until I see that the rear teeth have been brightened and the front teeth have be brought down in their intensity somewhat. Here’s what I came up with.

And that concludes the editing. Let’s take a look at the result.

I’d say this looks pretty good. If I ever want to edit either of these adjustments, I can easily do so by double-clicking on the adjustment layer icon in the Layers panel. When I do that, the appropriate Properties panel will pop open and I can do anything I wish.
——
I hope I clearly explained how to go about whitening someone’s teeth in Adobe Photoshop. If you have any questions or concerns regarding this post, please leave them in the comment section down below. Thanks for reading!


