CraigHardy
Member
- Joined
- May 11, 2021
- Messages
- 223
- Reaction Score
- 2
- Points
- 18
- #1
There may come a time when you need to change just one individual layer in your Adobe Photoshop project to grayscale in an otherwise color image. There may also come a time when you’d like to do this in a non-destructive manner, meaning, you can easily change the layer back to color if need be. While I’m a fan of working quickly and simply duplicating layers that I want to experiment with, this isn’t always the best course of action for a layer I plan on making extensive changes to. After all, I don’t want to spend all sorts of time making changes and then decide that the layer would look better in color later on. If I merely duplicated the initial layer in an effort to save the original, I’d have to make all those changes again. That wouldn’t be the most efficient use of my time. And if someone where paying me by the hour, they probably wouldn’t hire me again. I’d cost too much. That’s the whole thrust behind the non-destructive movement. Trying to save money via saved time.
In today’s post, I’d like to talk about three different methods of changing just one layer in a project to grayscale inside of Adobe Photoshop. I’m guessing that everyone already knows how to change an entire document to black and white by using the Image > Mode > Grayscale menu item, but what I’d like to do is keep some separation and independence among layers. I don’t want everything grayscale, just a slice of the pie.
The first method I discuss will be destructive. The second two will be non-destructive. As I sit here and write this post, I’ve already come up with a few more methods to tackle this type of issue, but I’ll stick with what I have planned. Perhaps I’ll talk some more about this in future posts.
Basically, to turn this duplicate layer grayscale, all I need to do is select it and then head up to the Image > Adjustments > Desaturate menu item and click.
This will give me one color layer and one grayscale.
You could do this all day long if you wanted to, just don’t work on the grayscale layer after you desaturated it. Again, if you ever want to go back to color, you’re stuck.
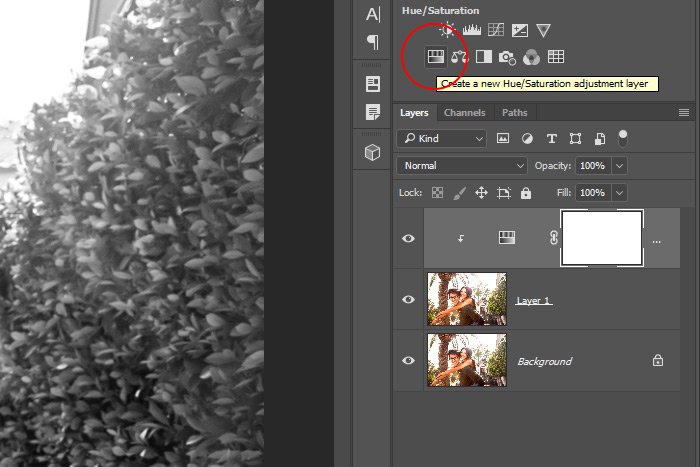
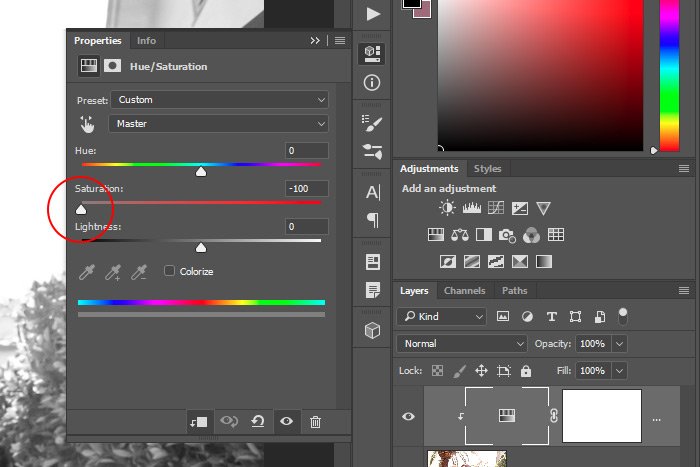
After the new layer has been formed, the Properties panel will appear. Inside this panel, I’ll push the Saturation slider all the way to the left, so there’re no more color in the image.
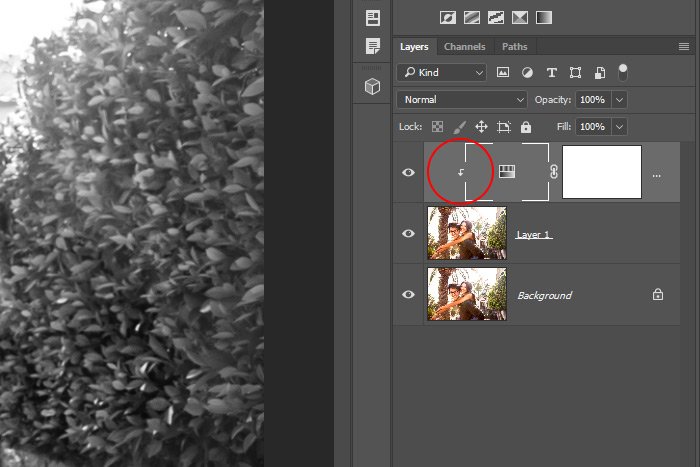
After doing this, I’ll notice that the entire image is grayscale, even the original layer. Since I would like to keep that layer color and not have it affected by the adjustment layer, I’ll need to clip the adjustment layer to the duplicate layer only. To do this, I’ll first press and hold down the Alt key (Option on Mac) on my keyboard and then I’ll hover my mouse over the dividing line between the adjustment layer and the duplicate layer. When I see the little hand change into a downward facing arrow, I’ll click. That will release the original layer from the effect of the adjustment layer.
I’ll know the adjustment layer is clipped when I see the layer indent and a small, downward facing arrow appear near the thumbnail indicator.
You can access this dialog a few different ways, but I like to get into it by simply double-clicking on the thumbnail of the layer I’d like to work on. This will open the window as will selecting the layer in question by clicking on it once and then clicking the FX, or Add a Layer Style menu that sits at the bottom of the Layers panel.
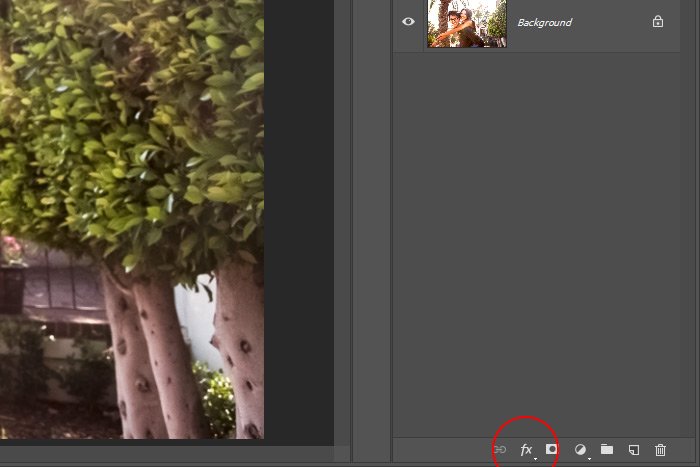
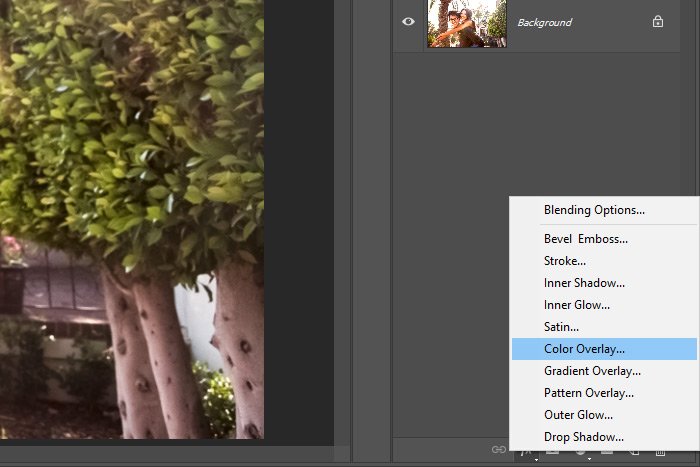
In the case of this post and its goal today, I’ll access that menu and then select Color Overlay from the options.
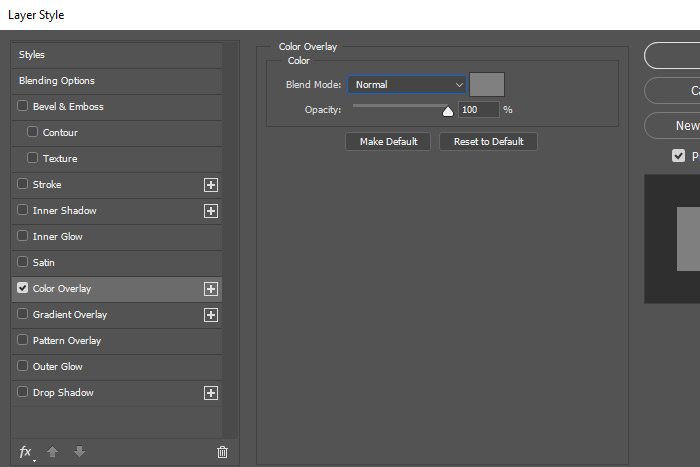
Doing this will launch the Color Overlay portion of the Layer Style dialog.
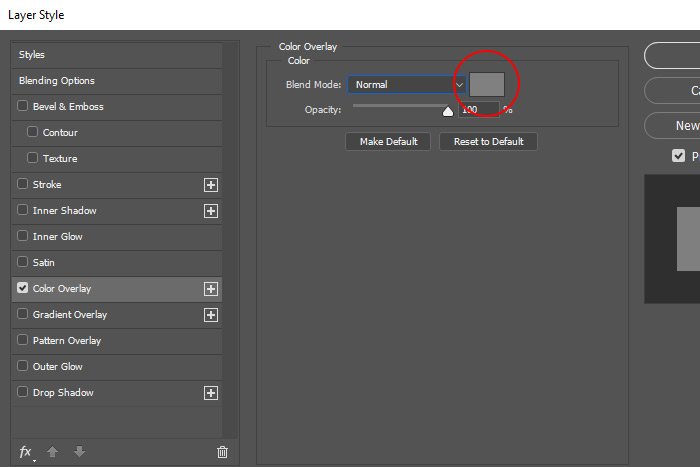
To begin the process of making this particular layer grayscale, I’ll need to click once on the color picker box inside this area.
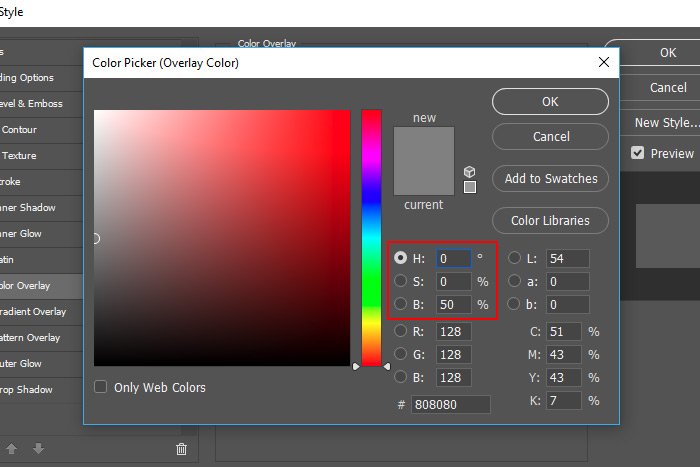
This will open the Color Picker. Inside this new window, I’ll set the Hue value to , the Saturation value to and the Brightness value to 50%.
I’ll then click the OK button to exit the Color Picker. Once that closes, I’ll go ahead and change the Blend Mode by clicking on the appropriate drop-down and selecting Saturation.
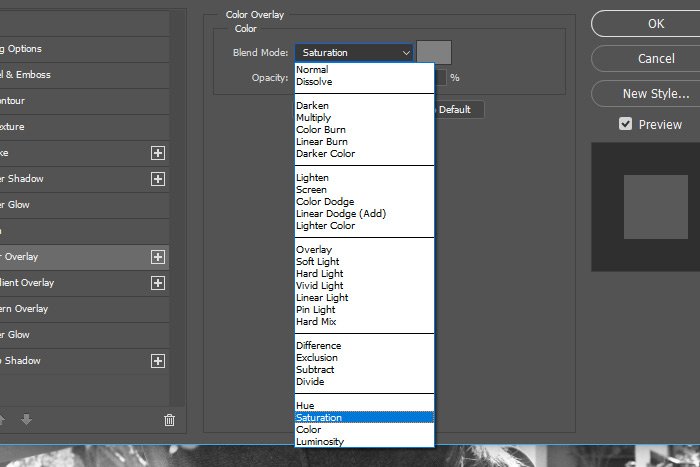
After I do this, I’ll see the layer turn to grayscale, which is exactly what I wanted.
Okay, there’s a small issue with where I just left off. If I had another blend mode applied to the overall layer, I’d notice that this grayscale had superimposed itself on top of areas I may not have wanted it to. Even though this grayscale is now limited to this one layer, I can further isolate it by heading into the Blending Options area of the Layer Style dialog and checking the box that says Blend Interior Effects As Group.
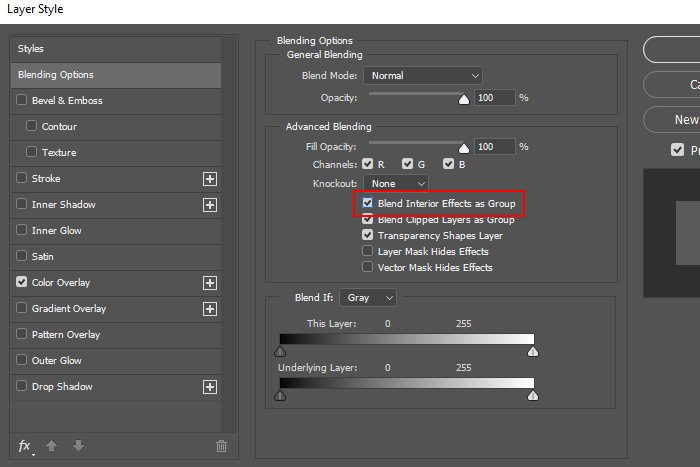
What this does is combine the blending effects of any changes I made in this dialog as a group before applying it to the pixels of the layer as a whole. This will give me the future option of using the overall layer blending mode I spoke of earlier more effectively. This is an advanced topic, so I won’t go into it now. Just know that you should check this box. Once that’s done, I can click the OK button and I’m finished. I’ll have my grayscale image.
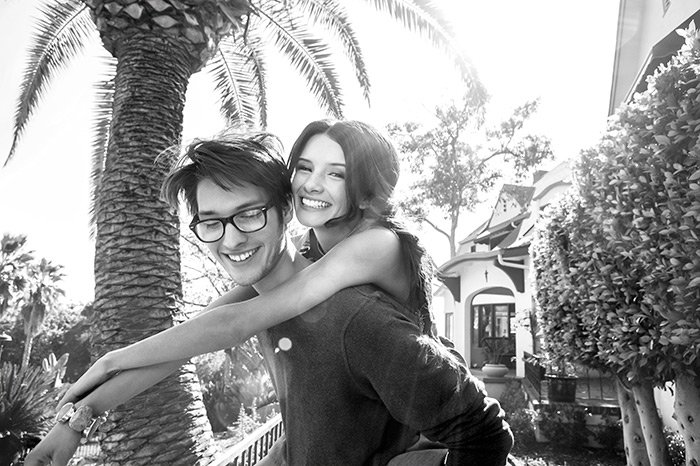
I realize this final option had some more advanced nuances surrounding it, but please know that I’ll definitely be detailing all of these topics much more in the future. Just this one Layer Style area has so many features in it, it’s nuts. Anyway, I hope I clearly explained how to go about making an isolated layer grayscale, without affecting any other layer. If you have any questions or concerns regarding this post, please leave them in the comment section below. Thanks for reading!
In today’s post, I’d like to talk about three different methods of changing just one layer in a project to grayscale inside of Adobe Photoshop. I’m guessing that everyone already knows how to change an entire document to black and white by using the Image > Mode > Grayscale menu item, but what I’d like to do is keep some separation and independence among layers. I don’t want everything grayscale, just a slice of the pie.
The first method I discuss will be destructive. The second two will be non-destructive. As I sit here and write this post, I’ve already come up with a few more methods to tackle this type of issue, but I’ll stick with what I have planned. Perhaps I’ll talk some more about this in future posts.
Demo Image
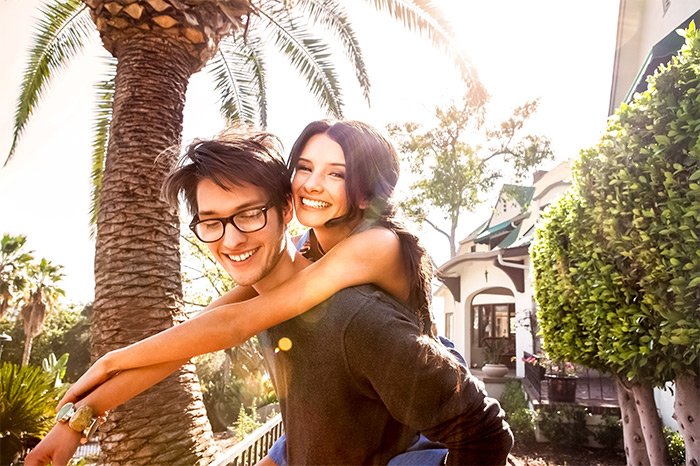
I could have used any color image for this post, but I decided to go with something that would be fairly common among photo editors. And since couples are huge out there, a couple it is. I don’t think anyone would mistake this image for being black and white, which is perfect for my purposes.
The Destructive Grayscale Method
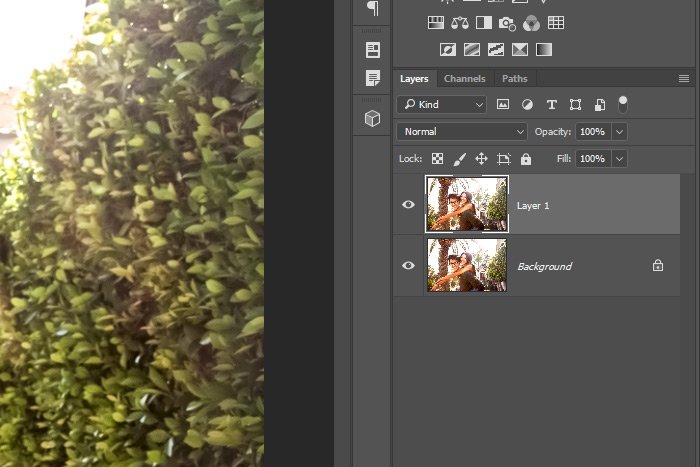
Okay, let’s get going. I’ve already opened the image into Photoshop and have duplicated the layer, just so you can see the differentiation between the original and the one I work on.
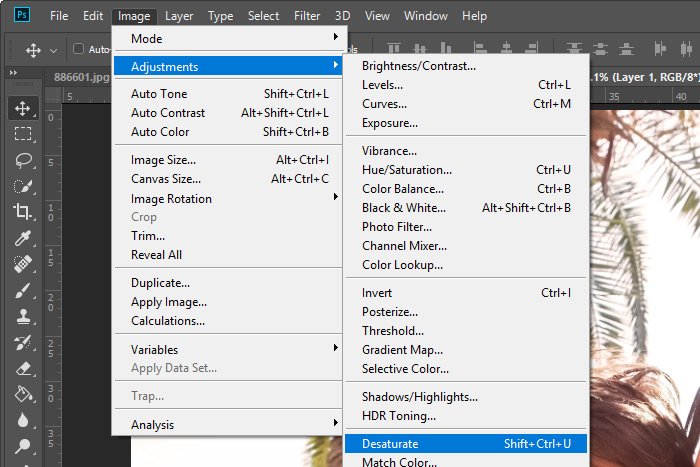
Basically, to turn this duplicate layer grayscale, all I need to do is select it and then head up to the Image > Adjustments > Desaturate menu item and click.

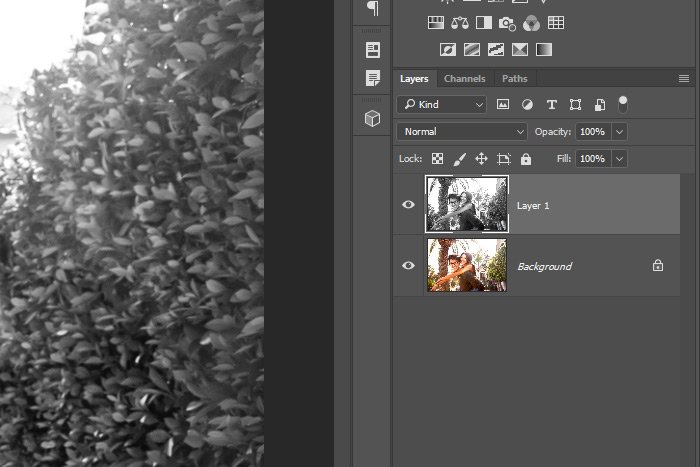
This will give me one color layer and one grayscale.

You could do this all day long if you wanted to, just don’t work on the grayscale layer after you desaturated it. Again, if you ever want to go back to color, you’re stuck.
Using an Adjustment Layer and a Clipping Mask
This is a novel solution that uses an adjustment layer, combined with a clipping mask. Again, I have two duplicate layers that are color, just like in the previous example. This time, instead of using a menu item up top, I’ll go ahead and click the Hue/Saturation icon in the Adjustments panel. This will create a new adjustment layer.
After the new layer has been formed, the Properties panel will appear. Inside this panel, I’ll push the Saturation slider all the way to the left, so there’re no more color in the image.

After doing this, I’ll notice that the entire image is grayscale, even the original layer. Since I would like to keep that layer color and not have it affected by the adjustment layer, I’ll need to clip the adjustment layer to the duplicate layer only. To do this, I’ll first press and hold down the Alt key (Option on Mac) on my keyboard and then I’ll hover my mouse over the dividing line between the adjustment layer and the duplicate layer. When I see the little hand change into a downward facing arrow, I’ll click. That will release the original layer from the effect of the adjustment layer.
I’ll know the adjustment layer is clipped when I see the layer indent and a small, downward facing arrow appear near the thumbnail indicator.

Using a Layer Style
This method is definitely the most complex, but it’ll give you some working knowledge of the Layer Style dialog, which is an incredible area. I’ve been using it for years and it can do so many things.You can access this dialog a few different ways, but I like to get into it by simply double-clicking on the thumbnail of the layer I’d like to work on. This will open the window as will selecting the layer in question by clicking on it once and then clicking the FX, or Add a Layer Style menu that sits at the bottom of the Layers panel.

In the case of this post and its goal today, I’ll access that menu and then select Color Overlay from the options.

Doing this will launch the Color Overlay portion of the Layer Style dialog.

To begin the process of making this particular layer grayscale, I’ll need to click once on the color picker box inside this area.

This will open the Color Picker. Inside this new window, I’ll set the Hue value to , the Saturation value to and the Brightness value to 50%.

I’ll then click the OK button to exit the Color Picker. Once that closes, I’ll go ahead and change the Blend Mode by clicking on the appropriate drop-down and selecting Saturation.

After I do this, I’ll see the layer turn to grayscale, which is exactly what I wanted.
Okay, there’s a small issue with where I just left off. If I had another blend mode applied to the overall layer, I’d notice that this grayscale had superimposed itself on top of areas I may not have wanted it to. Even though this grayscale is now limited to this one layer, I can further isolate it by heading into the Blending Options area of the Layer Style dialog and checking the box that says Blend Interior Effects As Group.

What this does is combine the blending effects of any changes I made in this dialog as a group before applying it to the pixels of the layer as a whole. This will give me the future option of using the overall layer blending mode I spoke of earlier more effectively. This is an advanced topic, so I won’t go into it now. Just know that you should check this box. Once that’s done, I can click the OK button and I’m finished. I’ll have my grayscale image.

I realize this final option had some more advanced nuances surrounding it, but please know that I’ll definitely be detailing all of these topics much more in the future. Just this one Layer Style area has so many features in it, it’s nuts. Anyway, I hope I clearly explained how to go about making an isolated layer grayscale, without affecting any other layer. If you have any questions or concerns regarding this post, please leave them in the comment section below. Thanks for reading!
