Search

How to Use Filters in Adobe Photoshop

  • Thread starter EmeraldHike
  • Start date
EmeraldHike

EmeraldHike

Member
Joined
May 10, 2021
Messages
133
Reaction Score
0
Points
21
  • #1
I can remember the very first time I opened a photo in Adobe Photoshop. It was a very long time ago, but this I recall quite clearly. I opened the photo, looked around Photoshop’s interface a bit and somehow landed inside of the Filter menu. From there, I began randomly clicking things. Blur, Sharpen, Cutout, Plastic Wrap, Wind, Lens Flare. Some of what I just listed may not have even been available back then because I’m just pulling these from the top of my head. It doesn’t matter. My point is, what I discovered was seriously cool. How many of us can remember the days of embossing every single piece of text we ever wrote? Um…yeah.

Filters are huge in Photoshop. There is no shortage of creative potential when it comes to them, but after wasting a few hours or days simply toying around with things, it’s important to get a handle on what’s exactly going on. There’s a lot to learn when it comes to filters and I’ll admit that many folks don’t know nearly enough. Knowledge of how to use filters are what separate the okay editors with the genius ones. Actions are chock full of them. Filters really are where it’s at.

Applying & Reapplying Filters in Adobe Photoshop​

In today’s post, I’d like to begin exploring how to go about applying a filter to a photograph. I’ll use a sample photo to mess around with and I’ll show you a few ins and outs regarding this entire area. I’ll also demonstrate how you can apply a filter and then quickly reapply it using a keyboard shortcut. You’ll want to know about this because as you learn more and more about these things, you’ll be using them much more frequently. You’ll also likely speed up your process and this keyboard shortcut can save a lot of time.

Demo Photo​

Any photo would have been fine for this post, so I decided to go with one of some nostalgic Christmas ornaments. I can remember these pointed ones from when I was a kid. Plus, this photo is really good quality, so whatever I do to it will stand out nicely.

christmas-ornaments.jpg

What Do Filters Look Like in the Layers Panel?​

The very first task I’ll complete before doing anything else is to convert the photo layer into a Smart Object. By now, you know why to do this. It’s to preserve the layer, just in case you’d ever like to see it in its original format again. I’ll convert the layer by right-clicking on its thumbnail in the Layers panel and then by selecting Convert to Smart Object.

Next, I’ll head up to the Filter menu and select a filter. Any one will do at this point, so I’ll just randomly choose Filter > Artistic > Dry Brush.
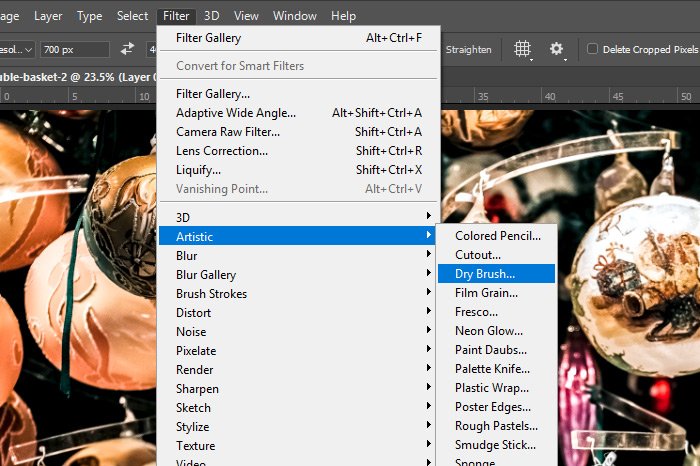
filter-artistic-dry-brush.jpg

I’ll apply that filter and then I’ll head back up to the Filters menu and choose another one. This time, I’ll go with Filter > Blur > Gaussian Blur.
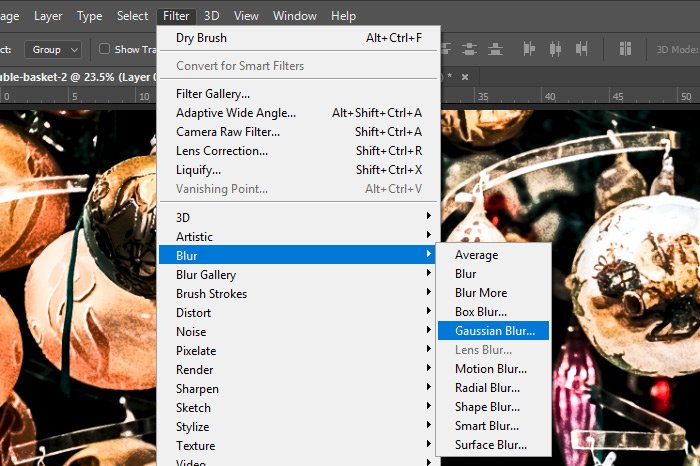
filter-blur-gaussian-blur.jpg

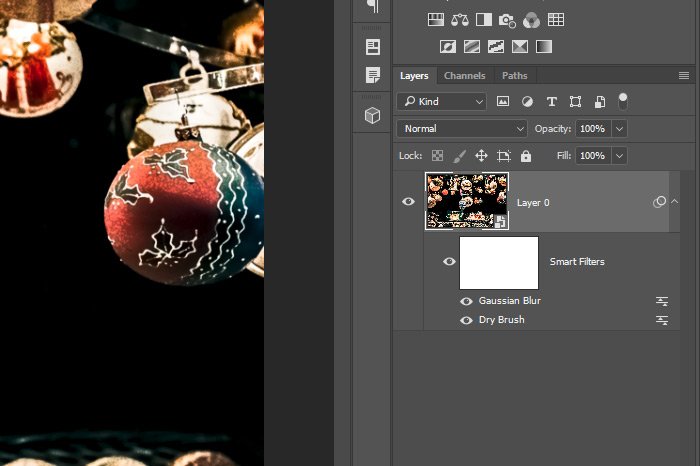
I’ll apply that one too and when I’m done, I have a Layers panel that looks like this.
layers-panel.jpg

What do I have here? Well, it’s basically the background layer that was converted to a Smart Object, with a virtual plastic wrap overlay that holds filters on top of that. Since I converted the background layer into a Smart Object, any filter I apply to the layer will really be applied to a mask that sits on top of the photo. Doing things this way gives me tons of flexibility. If I wanted to, I could use the Brush Tool set to black to wipe away part of the filter effects. I’m not going to do that, but I could if I wanted to. I could also turn off and on the visibility of each filter as well as delete them one by one. All of this is a benefit of working with Smart Objects. If I hadn’t converted the layer before I began, I’d be stuck with whatever filter I applied and I’d have absolutely no recourse if I ever changed my mind.

How Filters Differ From Adjustment Layers in the Layers Panel​

Because both Smart Objects and Adjustment Layers use masks to offer flexibility, many editors confuse the two. I’d like to take just a moment to show you how they differ.

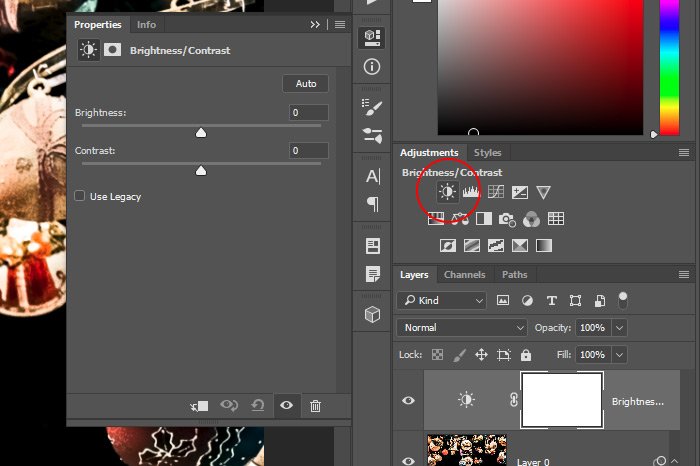
Okay, you’ve already seen the filters in the Layers panel in the above screenshot. Now, I’ll head up to the Adjustments panel and click the Brightness/Contrast icon. This will open up the appropriate Properties panel as well as create a new layer.
brightness-contrast-adjustment.jpg

As you can see, adjustment layers appear differently in the Layers panel than filters do. Adjustment layers are independent from the layer they’re affecting as well as from each other. If I were to apply more than one adjustment layer, each one would be in its own layer. If I were to apply more than one filter, they would all be stacked upon one another under the Smart Filters mask. These two aspects of Photoshop are very different from one another.
Sneaky Extra Filters​

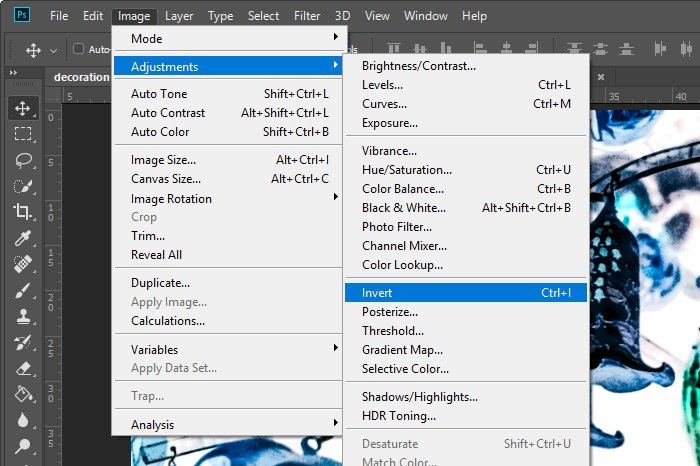
It’s not only filters from the Filters menu that get stacked up under the Smart Filters mask in the Layers panel. If I were to head up to the Image > Adjustments menu item and click something from the sub-menu, that item would be added to the same area. For example, I’ll go ahead and select the Image > Adjustments > Invert menu item to see what happens.

image-adjustments-invert.jpg

If I select that menu item and then look over in the Layers panel, I should see it in the Smart Filters area.
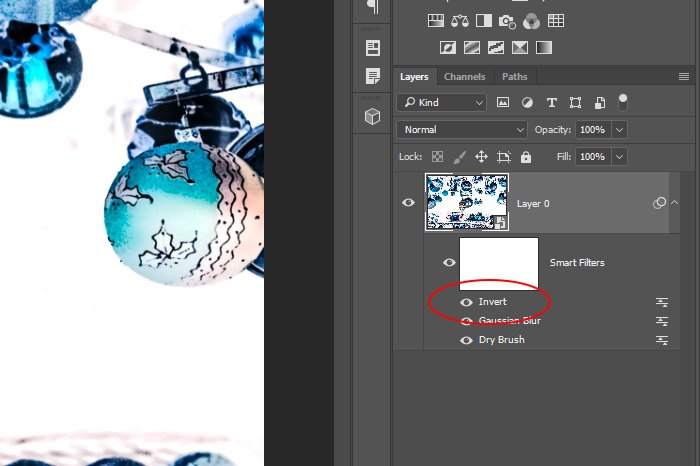
invert-item.jpg

It’s there. What’s the benefit of this? If I double-click the Invert item, the photo will revert to the way it was before that specific item was applied. If I were to go ahead and apply some Shadows/Highlights from the same menu area, something else would take place.
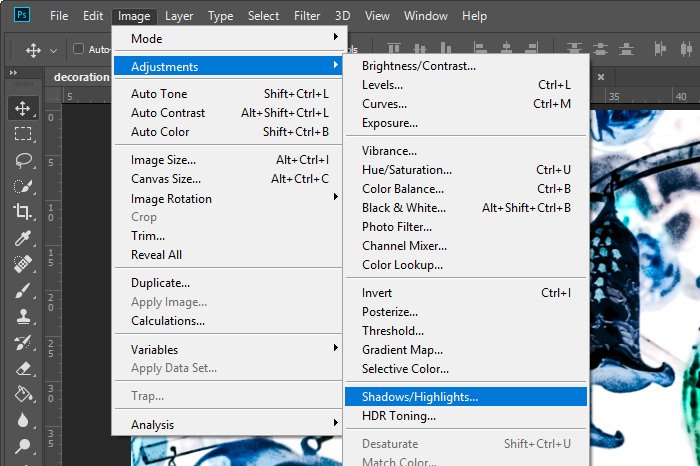
image-adjustments-shadows-highlights.jpg

The Shadows/Highlights item would be added to the Smart Filters area. That would be the same.
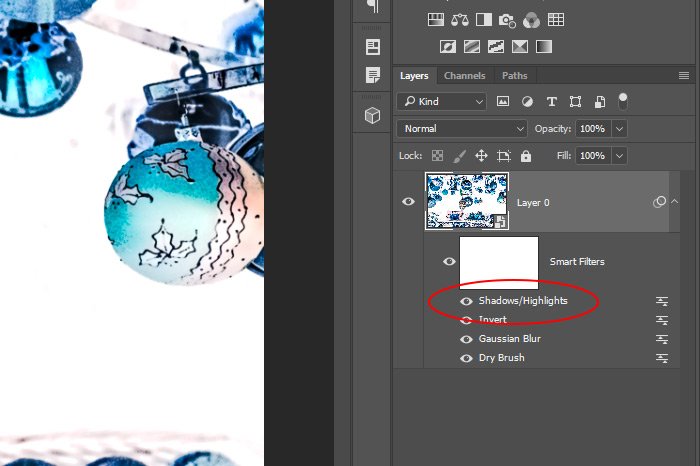
shadows-highlights-item.jpg

But if I double-clicked on this item, the appropriate dialog box would open up where I could edit this item’s values again and again.
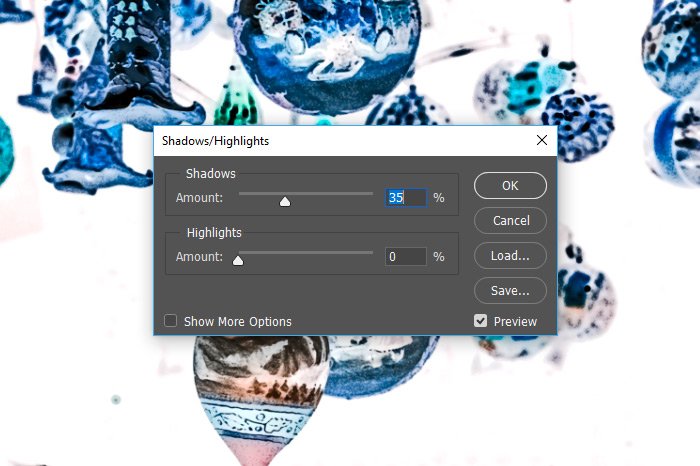
shadows-highlights-dialog.jpg

Since this enhancement has been added to the Smart Filters area, I can edit its values any time I want. That’s wicked handy, I’d say.

Applying & Reapplying Filters​

I’m going to erase everything I’ve done so far, just to get back to the beginning. That will be helpful for this next section. I’ll keep the Smart Object though.

Now, I’m going to apply some brush strokes to this photo. I’ll head back up to the Filter menu and choose Brush Strokes > Accented Edges.
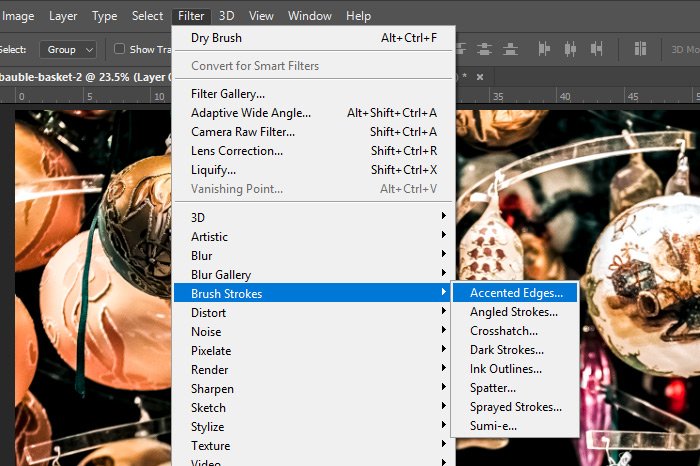
filter-brush-strokes-accented-edges.jpg

I’ll simply click the OK button when the workspace opens up. Doing this will apply the default values and it will add Accented Edges to the list under the Smart Filters mask.
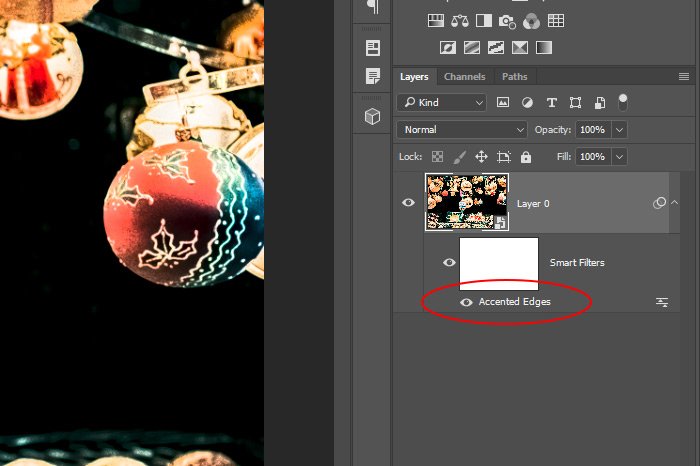
accented-edges.jpg

Earlier in this post, I mentioned that it’s popular to return to the same filter more than once while working on a project. Laying filters gives even more flexibility than I’m discussing here, but we’ll get to that in another post. For now, I’ll tell you that you can easily apply the previous filter by using a simple keyboard shortcut. If I press Ctrl+Alt+F (Command+Option+F on Mac) on my keyboard, the same filter workspace as I just used will open back up for another go round. This time though, it will be used for another of the same filters.
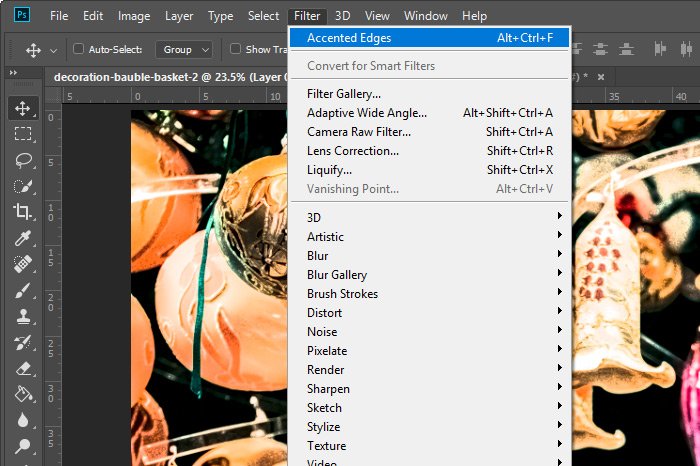
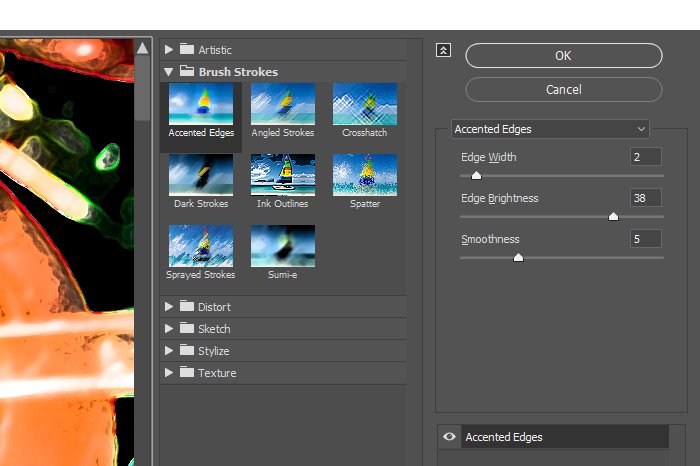
filter-shortcut.jpg accented-edges-workspace.jpg

Whenever you use filters, Photoshop saves the most recent used and places it at the top of the Filter menu. You can click that or just take advantage of the keyboard shortcut I just mentioned.

In previous versions of Photoshop, you could simply press Ctrl+F to reapply your previous filter. If you wanted to reapply and change values, you’d have to use the Ctrl+Alt+F shortcut. It appears that Adobe has removed the Ctrl+F option in these later versions. It appears that way. I may be wrong.

There’s a lot more to the filter feature in Photoshop and I’ll cover all of it in later posts.

I hope I clearly explained how to apply and reapply a filter in Adobe Photoshop. If you have any questions or concerns regarding this post, please leave them in the comment section below. Thanks for reading!
 
EmeraldHike

EmeraldHike

Member
Joined
May 10, 2021
Messages
133
Reaction Score
0
Points
21
  • #2

How to Create Filter Keyboard Shortcuts in Adobe Photoshop​

If you find yourself using a certain command time and time again, you probably should create a keyboard shortcut for that command, if one doesn’t already exist. Personally, I find myself returning to both the sharpen and blur filters almost every time I use Adobe Photoshop. Currently, there aren’t any keyboard shortcuts for these filters, so it would likely be in my best interest to make some. Doing so sure would save a lot of time.

In today’s post, I’d like to walk through the process of creating a keyboard shortcut in Photoshop. I’ll use a random photo in this post and will show you each step necessary to create the shortcut. As I mentioned above, I use the sharpen and blur filters often, so I’ll just choose one of those to work with. The process is fast and painless, so this shouldn’t take too long.

The Demo Photo​

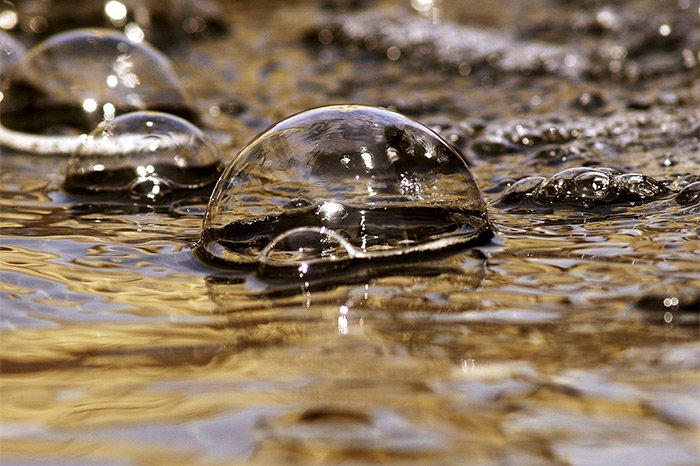
Not that it matters because I won’t be doing anything to it, but here’s the photo I’ll be using in this post. It’s of a few bubbles on top of a liquid. Simple enough.

bubbles.jpg

The Current Situation​

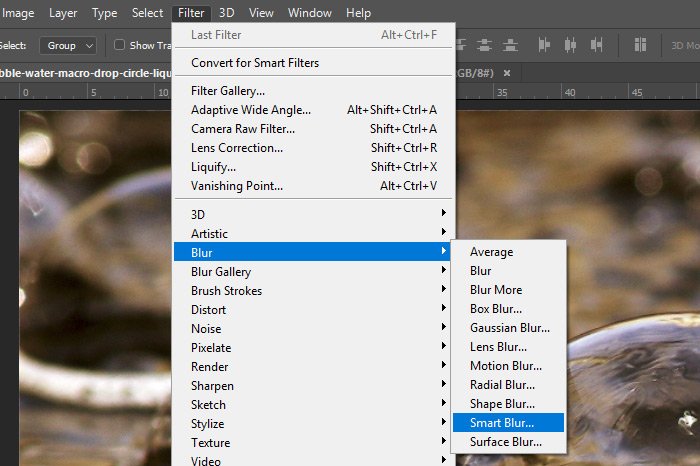
First, let’s make sure that no shortcuts already exist for the Smart Blur filter. I wouldn’t want to go through the trouble of doing all this if I don’t have to. To confirm its absence, I’ll head up to the Filter > Blur > Smart Blur menu item and simply hover over it.

filter-blur-smart-blur.jpg

Okay, it appears that there is no current keyboard shortcut applied to this filter. If there were, it would appear to the right of the menu item, as they are in the above filters such as Liquify and Vanishing Point, among others.

Creating the Keyboard Shortcut​

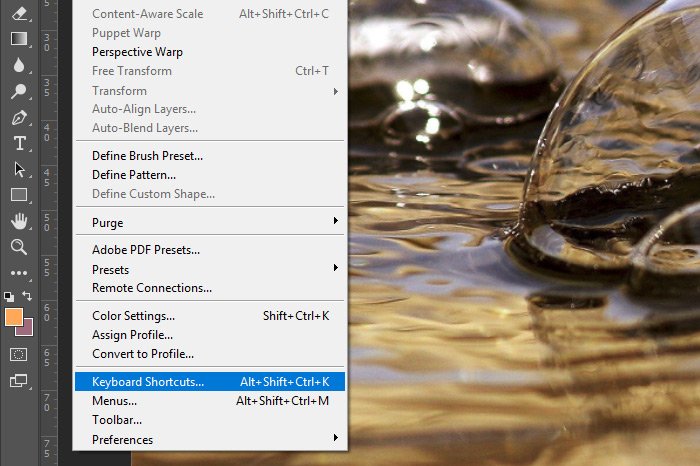
To create the keyboard shortcut, I’ll head up to the Edit > Keyboard Shortcuts menu item.

edit-keyboard-shortcuts.jpg

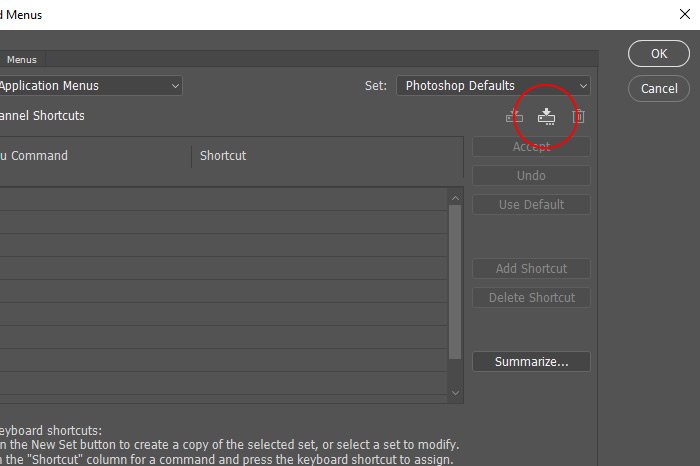
I’ll click on that and then inside the Keyboard Shortcuts and Menus panel that appears, I’ll add a new set.

Creating New Keyboard Shortcut Sets​

When altering the existing set of keyboard shortcuts, it’s important to create a new set altogether. Doing this helps with organization and its keeps any changes you make separate from and default shortcut set.

To create a new set, I’ll click on the New Set button.

new-keyboard-set.jpg

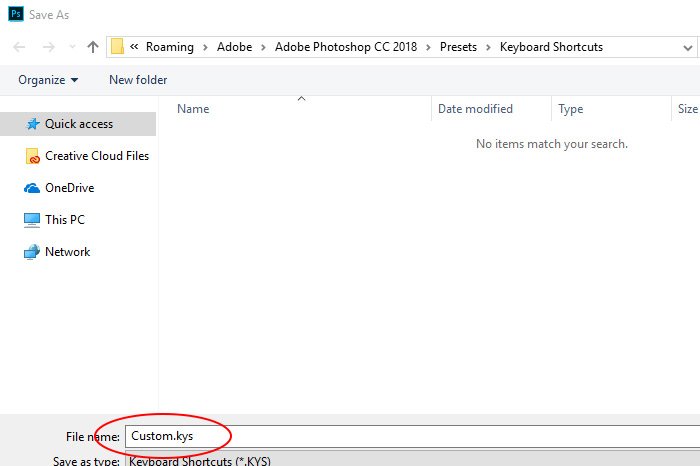
When I do this, the proper folder will automatically pop up, where I’ll have the ability to name the new set. In this case, I’ll call mine Custom. Notice how I kept the .kys file extension intact. I’m not sure if this is necessary, but I decided to keep it there because it was already like this when the folder opened.

folder.jpg

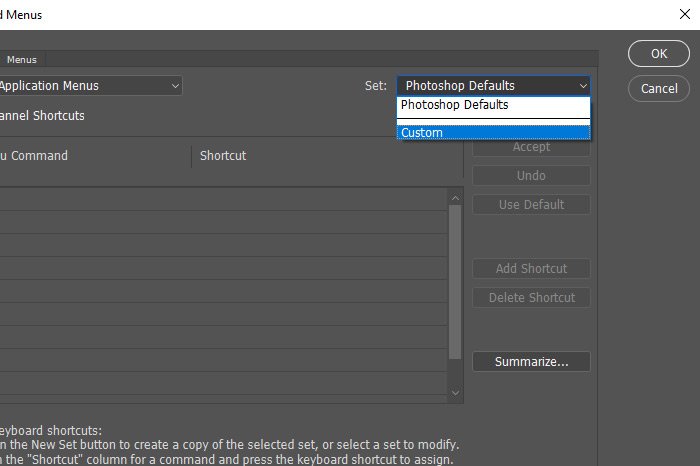
When I’m finished with that, I’ll click on the Save button down in the lower right corner of this window and the new set option will appear in the Set drop-down. If I click the drop-down, I’ll notice that I have Photoshop Defaults and Custom. Perfect. I’ll choose Custom and continue on.

set-dropdown.jpg

Choosing Which Shortcuts to Add or Edit​

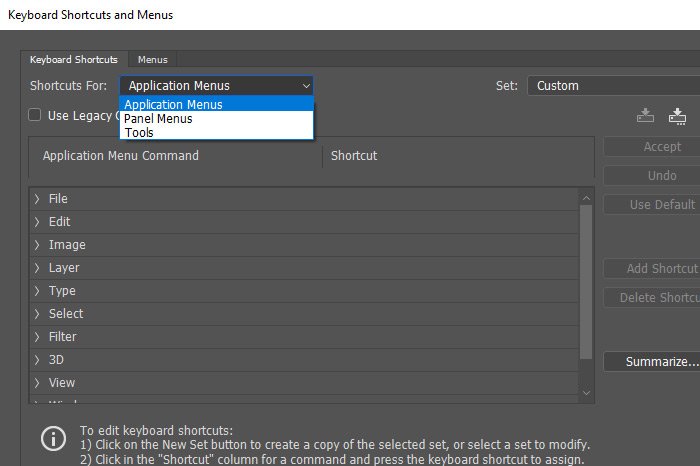
The next area I need to pay close attention is the Shortcuts For drop-down. As you probably already know, Photoshop is full of shortcuts and all those shortcuts can be broken down and divided into sections, The sections include Application Menus, Panel Menus and Tools.

Tools are the actual tools in the toolbars. For instance, if I wanted to use a Lasso Tool in the left vertical toolbar, I can use the keyboard shortcut of L.

Panel Menus are situated inside the panels. The menus are usually in the upper right corner of the panel and are indicated by four or so horizontal lines. Clicking on any one of these menus will offer many different options, some of which have keyboard shortcuts associated with them.

Finally, Application Menus are what I’m interested in today. These are the menus up at the top of the applications, such as those in the File menu, Edit menu and so forth. Since I’ll be working inside of the Filter menu, this is the option I’ll select.

shortcuts-for.jpg

Adding the New Shortcut​

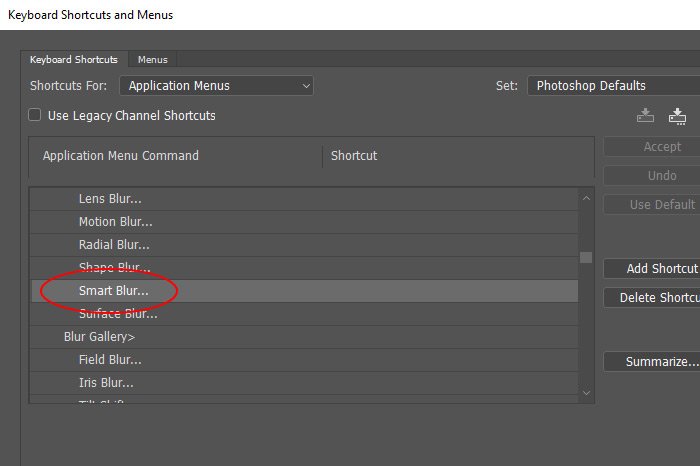
Okay, the time has come to add the new shortcut. To locate the one I’m interested in, I’ll need to do some clicking around in the large box that holds all the menu items. I’ll first click the small arrow that sits to the left of Filter and then I’ll scroll down a bit. When I locate Smart Blur, I’ll stop looking. That’s the one I want to edit.

smart-blur-item.jpg

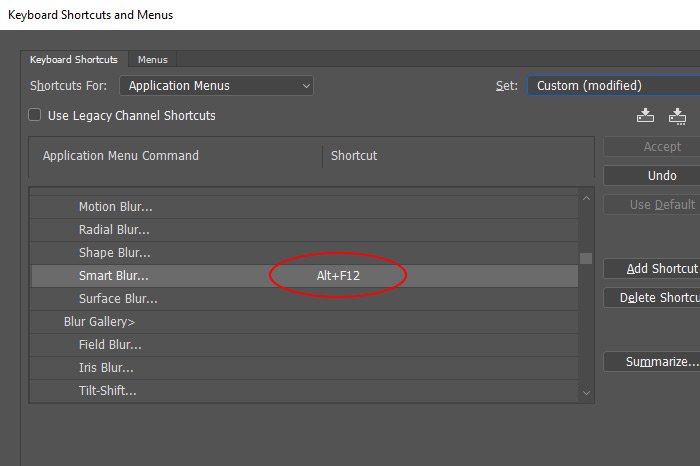
If I click on the words Smart Blur, I’ll notice an editable field appear. It’s there I need to type in the keyboard shortcut that I’d like to add. The issue is, many shortcut combinations have already been used by other areas of Photoshop. I’m either going to have to get lucky and choose something that’s not already in use or overwrite something I don’t use all that often, which is completely doable. For now, I’ll choose Alt+F12 as the new shortcut. That hasn’t been used in Photoshop yet. I’ll just type that right into the waiting field.

new-shortcut.jpg

And finally, I’ll click the Accept button to the right to apply my changes and then the OK button to close out of the window.

Verifying the Creation of the Shortcut​

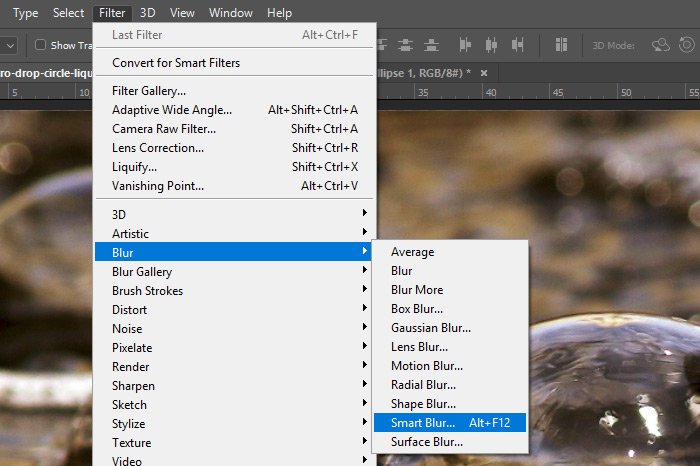
To verify that my new shortcut has actually been created, I’ll take a look at that menu item. I’ll click on Filter > Blur > Smart Blur and look to see if anything has been added to the right of Smart Blur.

smart-blur-shortcut.jpg

It has. That’s good. As one final step, I’ll press Alt+F12 on my keyboard to make sure everything works and the Smart Blur panel opens. And, it does. That’s great.

I hope I clearly explained how to create a new keyboard shortcut in Adobe Photoshop. If you have any questions or concerns regarding this post, please leave them in the comment section below. Thanks for reading!
 
EmeraldHike

EmeraldHike

Member
Joined
May 10, 2021
Messages
133
Reaction Score
0
Points
21
  • #3

How to Display Expanded Filter Gallery Groups & Names in Adobe Photoshop​

If you use filters in conjunction with Smart Objects a lot in Adobe Photoshop, I have a tip you’re going to love. It’s one that you probably didn’t even know you needed, but when you realize what it does, you’ll thank me. It’s so silly, but so easy and powerful.

In today’s post, I’d like to show you two different aspects regarding the filter menu in Photoshop. First, I’ll show you how the default menu appears. Then, I’ll make one small change in the Preference area that will open things up inside the Filter menu and allow you to view a lot more of what you’re working with.

After that, I’ll explain how the change I made affects the named filters listed under the Smart Object mask in the Layers panel. You really need to read this post to determine which view you like the most. Some folks prefer a clean streamlined (default) look, while others prefer to see everything at once. Personally, I like to have as much in front of me as possible. If I can’t see it, there’s a chance I’ll miss it.

Demo Photo​

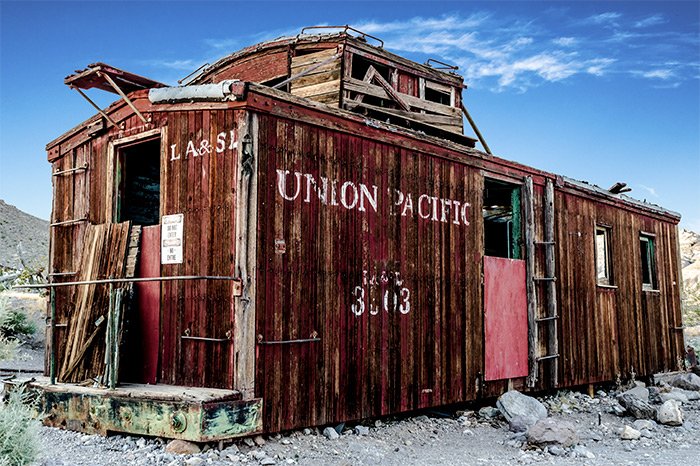
I’ll be applying some filters in this post as examples, so I thought I’d show you the photo that I’ll be using to apply those filters to. It could have been any photo, but I found this one interesting.

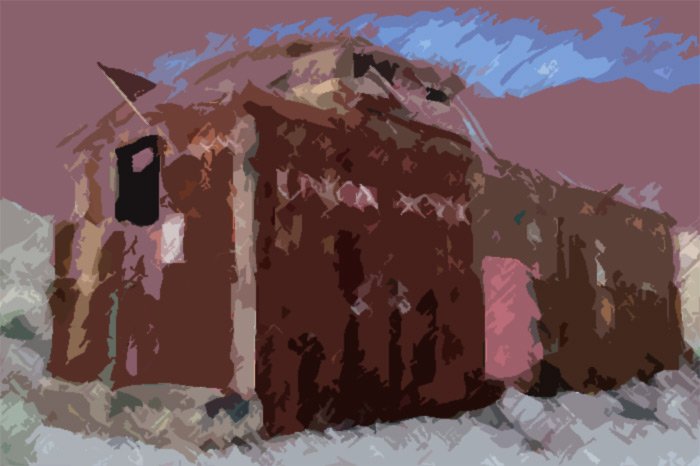
caboose.jpg

The Default Filter Menu View​

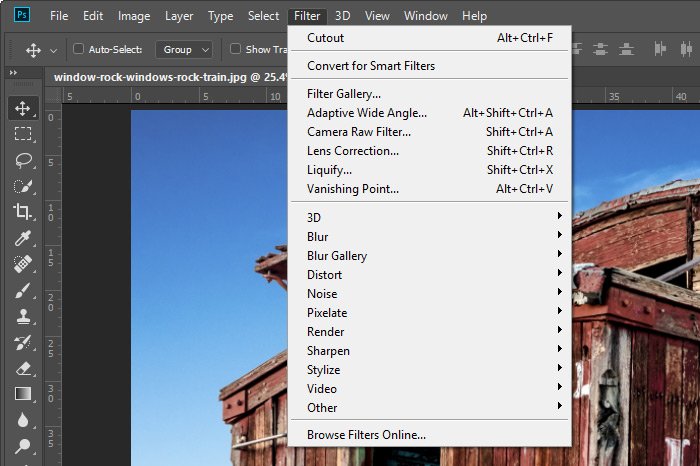
Okay, let’s get going. To start things off, I think I’ll show you what the default view of the Filter menu looks like in Photoshop. This is what you’ll get if you make no modifications to the menu in any way.

filter-menu-default.jpg

If you’ll notice the primary (largest) section of the menu, you’ll see that there are currently 11 items in it. I was a little surprised by this a few years ago because I seemed to have remembered a few more items in there. I wondered where they went. You know which ones I’m talking about. Colored pencil, cutout, dry brush and so many more. Where were these items? I remember them being nested under primary headings, but I couldn’t find them. But really, this was the least of my problems.

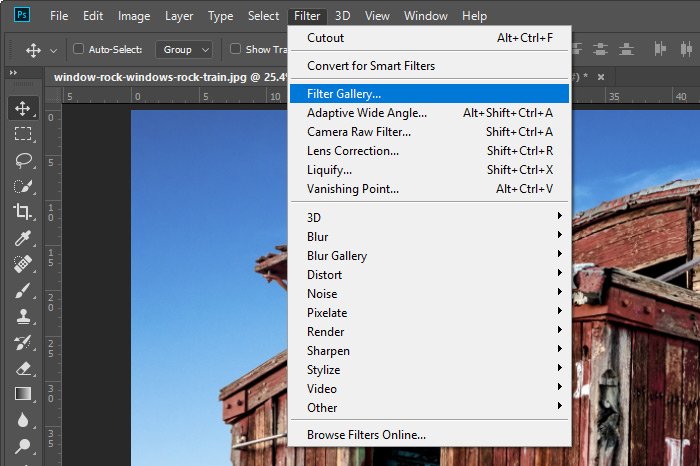
Take a look at this. I’m first going to change the background layer into a Smart Object because I’m going to be applying filters to it and then I’m going to head up into the Filter menu and click on Filter Gallery. Let’s see where that brings me.

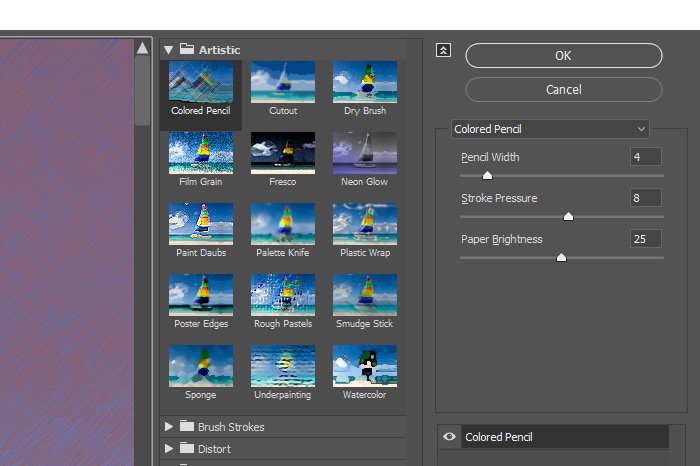
filter-gallery-item.jpg filter-gallery-palatte.jpg

Okay, well I guess I just found where all the filter items I was looking for went. I think Photoshop decided to hide all the top level filter groupings that held these filters and placed them all under the heading of Filter Gallery. This palette contains the filters that were missing. I guess that makes sense if you enjoy having a cleaner interface. One click gets you straight to everything you might want.

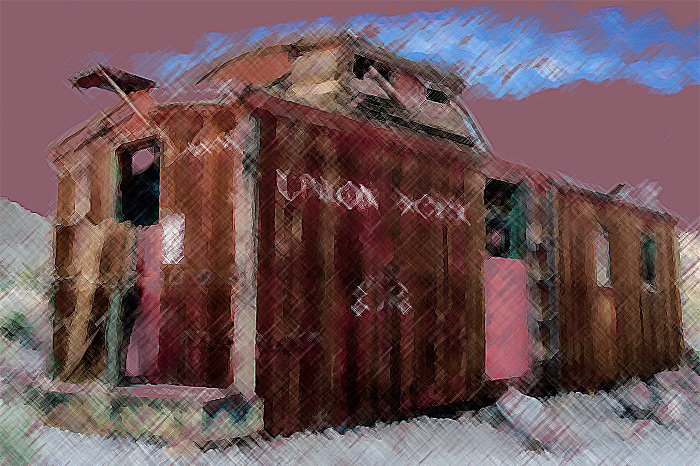
I’m going to go ahead and click on Colored Pencil and then on OK to apply this filter. I want to check something out. First, I’ll show you what a colored pencil picture looks like.

colored-pencil.jpg

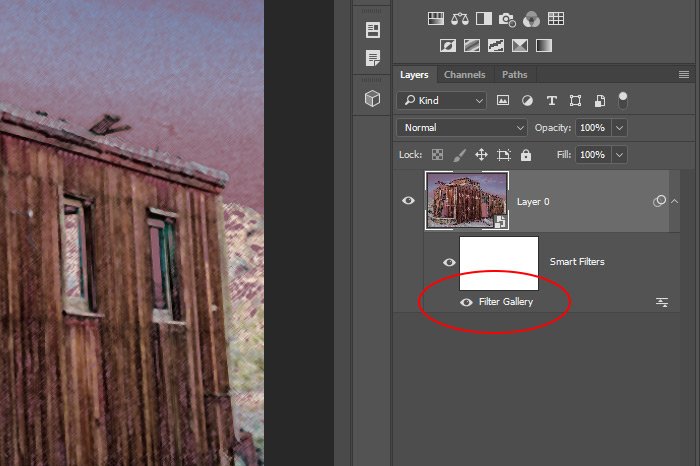
I’m not sure I told you this, but I enjoy working in a descriptive environment. Since I deal with a zillion things a day, I need everything labeled and easily identifiable. I’m going to now head over to the Layers panel to see how this colored pencil filter was labeled under the Smart Filters mask.

layers.jpg

Really? I just applied the Colored Pencil filter and all I get is a label that says Filter Gallery in the Layers panel? Yes, it’s true. That’s what you get these days. I’d like to let you know that if I went ahead and applied more of these types of filters, they’d all say the same thing – Filter Gallery. So let me ask you something. How in the heck am I going to identify the one I may want to double-click on to edit in the future? Do I have to double-click on all of them? There has to be a better way.

Expanding the Filter Menu​

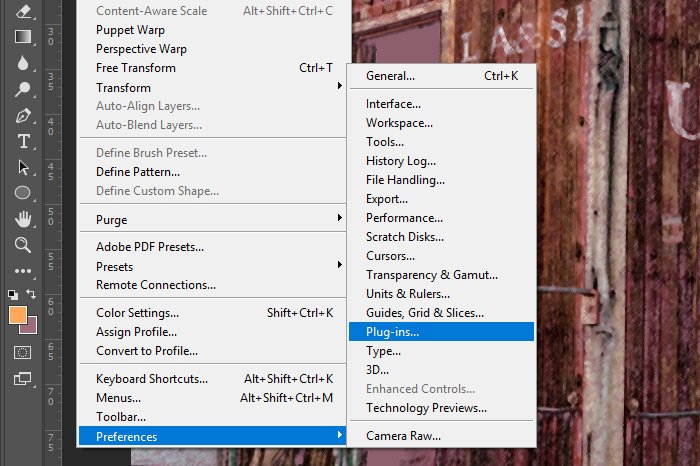
Luckily, there is. To bring the Filter menu back to it’s glory days so I can see a few more options, I’m going to head to the Edit > Preferences > Plug-ins menu item and click.

edit-preferences-plugins.jpg

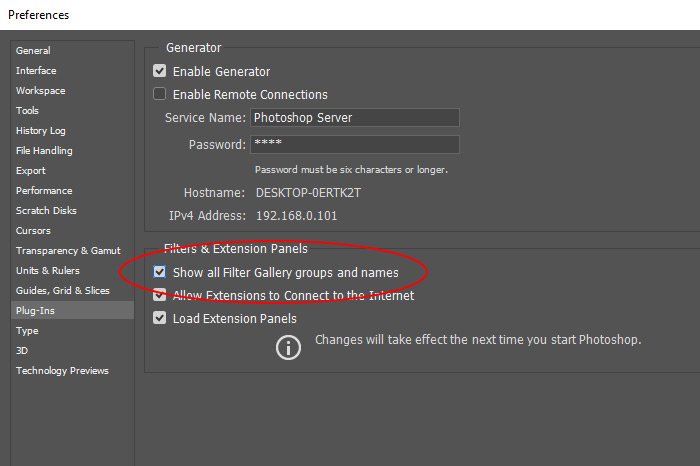
Doing this will open up the Preferences palette, where I’ll check the box that says Show All Filter Gallery Groups and Names.

preferences-palette.jpg

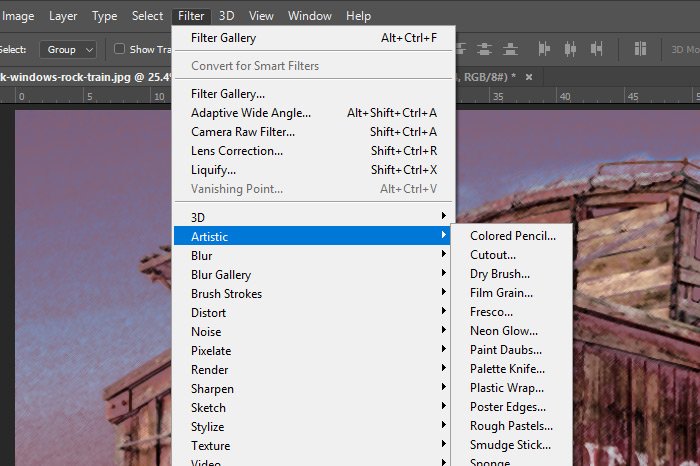
I’ll click on the OK button and then I’ll return to the Filter menu up top. I’d like to see if what I did had any effect.

expanded-filter-gallery.jpg

It did have an effect. I can now see some groupings for those filters that are held in the Filter Gallery palette. The top level groups are Artistic, Brush Strokes and Sketch. While each of these headings contains items that will bring me right back into the Filter Gallery palette, I’ll be brought straight to the section that’s related to the menu item I clicked on. If you aren’t aware, the Filter Gallery is fairly huge and it takes some time to navigate. Landing right in the section I’m working on is a big help.

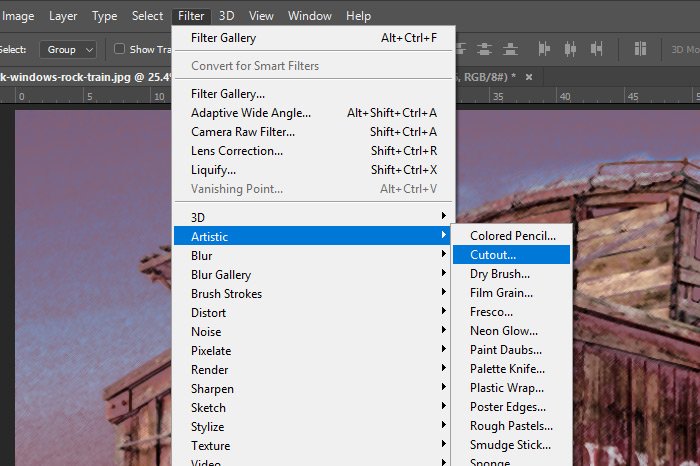
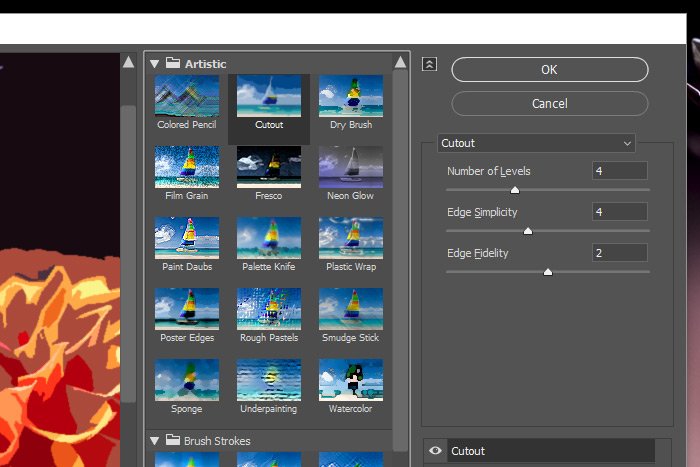
This isn’t the best part though. If I open the Filter Gallery again and apply another filter, I should see something change in the Layers panel. For this example, I’ll apply the Artistic > Cutout filter.

artistic-cutout-filter.jpg

First, let’s see how this filter affects the photograph, just for fun.

cutout-filter-example.jpg

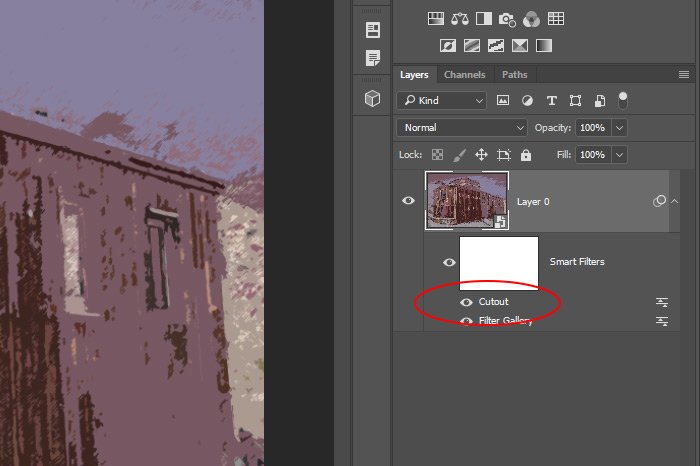
Next, I’ll head over to the Layers panel to see if this filter is labeled differently under the Smart Filters section.

cutout-text.jpg

Ah, would you look at that. Instead of this filter description simply saying Filter Gallery, which isn’t very descriptive at all, it now says Cutout, which is much more descriptive. I like this a lot more.

To wrap up, there are two benefits to altering your preferences in this regard. First, you’ll have the ability to see more in the way of filters under the Filter menu and second, you’ll have more descriptive filter labels in the Layers panel. I really hope this helps.

——

I hope I clearly explained how to expand the filter menu in Adobe Photoshop. If you have any questions or concerns regarding this post, please leave them in the comment section below. Thanks for reading!
 
EmeraldHike

EmeraldHike

Member
Joined
May 10, 2021
Messages
133
Reaction Score
0
Points
21
  • #4

Creating a Sketch Effect with Blend Modes & Filters in Adobe Photoshop​

I remember back when I was first starting off with Adobe Photoshop. I discovered these things called “actions” and from the moment I discovered them, that’s all I looked for online. Free actions, that is. I just thought they were the most miraculous things ever. I didn’t actually want to learn how to use Photoshop, mind you; all I wanted to do was search for these little pieces of magic that would allow me to take advantage of what others made. As you can well imagine, this didn’t last too long. When I had a project to complete that was goal oriented, random actions didn’t fit very well. I did learn a lot from using them though.

If you’ve ever used an action, you have probably noticed all the steps that are involved in their operation. I still have no idea what half of some of the steps I’ve seen do, but boy is it fun to watch these things fly through their routines. Layers upon layers, different filters and blend modes. All sorts of stuff to transform a traditional looking photograph or graphic into something completely different.

The reason I bring this up is because I have a short project I’d like to work through today that sort of reminds me of what I used to see in some of the Photoshop actions I used to work with. I’m going to be applying a sketch effect to a photo and then I’ll use an adjustment to round things out. This is exactly what those who create actions do. They layer, layer and then layer again and use blend modes in between to create some pretty wild effects. So, if you think you’d ever be interested in going further with Photoshop to create actions, this would be a good place to start off. There’s a lot of money out there to be made by creating all sorts of presets and the like. All you need to do is make up an attractive product and offer it to the marketplace.

In today’s post, I’ll be using two different filters to create a sketch effect on a traditional photograph. I’ll use the Graphic Pen and the Sprayed Stroke filters and then I’ll apply the Black & White adjustment to really make the previous effects look real. On top of all this, I’ll use two different blending modes to smooth out the effects of one of the filters as well as the adjustment layer. This is going to be a fun post and one I hope will open your eyes to the possibilities of Photoshop filters.

The Demo Photo​

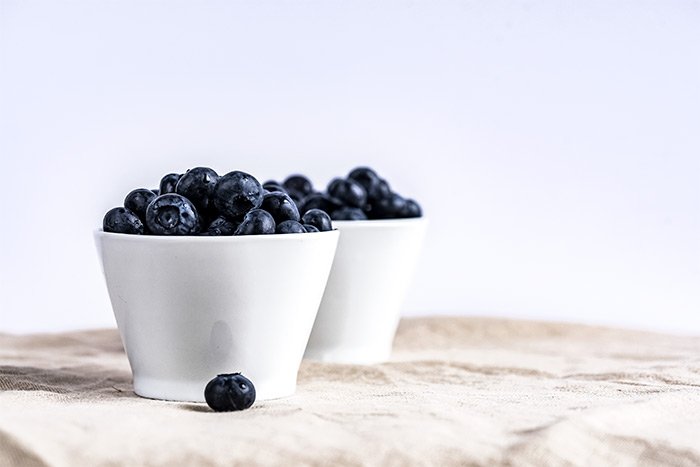
I thought I’d go with something very simple today. Perhaps an object that someone might actually sketch or draw. When I stumbled across these blueberries, I could’t resist. I think these would be perfect sitting on a table during art class.

blueberries.jpg

Smart Object & Graphic Pen​

I’ve said this a million times, but I’ll say it again. When working with filters in Adobe Photoshop, it’s highly advisable to first convert whichever layer you’re working with into a Smart Object. So, with that in mind, I’ll right click on the background image layer in the Layers panel and select Convert to Smart Object.

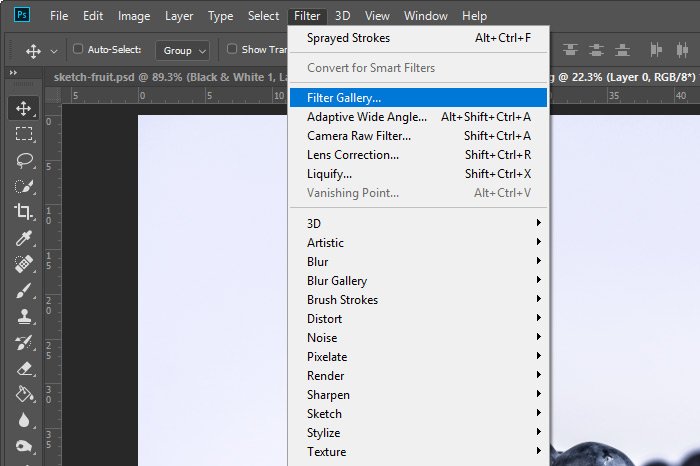
After that, I’ll head up to the Filter > Filter Gallery menu item and click.

filter-gallery.jpg

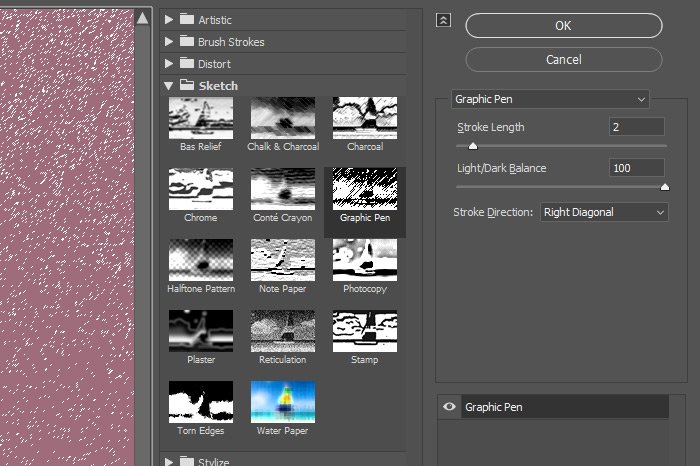
When the Filter Gallery palette opens up, I’ll click the Sketch drop-down arrow and then the Graphic Pen thumbnail. Then, I’ll push the Stroke Length and Light/Dark Balance sliders until I see a result I’m happy with. My goal is to have the photo appear as close to an actual sketch as possible.

sketch-graphic-pen.jpg

When I’m finished, I’ll click the OK button to return to the regular workspace. This is the result of the Graphic Pen filter I just applied.

graphic-pen.jpg

I know it doesn’t look all that great, but these filters are rarely meant to stand alone. That’s why I’m going to take advantage of another filter as well as blend modes down below.

Adding Some Sprayed Strokes​

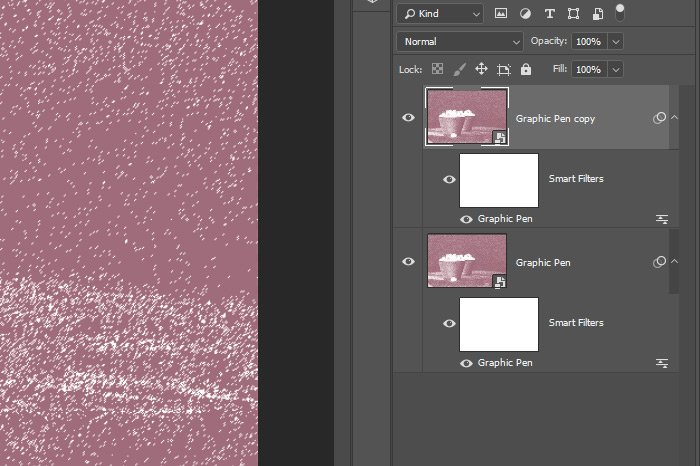
Since I’d like some sort of color in my sketch output and since this Graphic Pen output doesn’t appear overwhelmingly pleasing, I’m going to add another filter to the mix. To do this, I’ll click on the image layer in the Layers panel and then drag it down to the Create New Layer button at the bottom of the panel. I could do that or I could simply use the keyboard shortcut of Ctrl+J. That would create a copy just the same. Either way, I’ll end up with a Layers panel that looks like this.

copied-layer.jpg

Currently, both of these layers are identical, but that will change in just a moment.

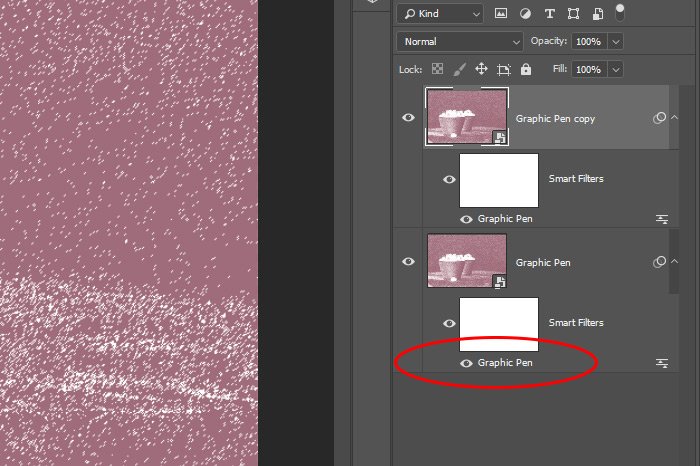
Okay, I’ll go ahead and double-click on the bottom filter layer.

click-filter.jpg

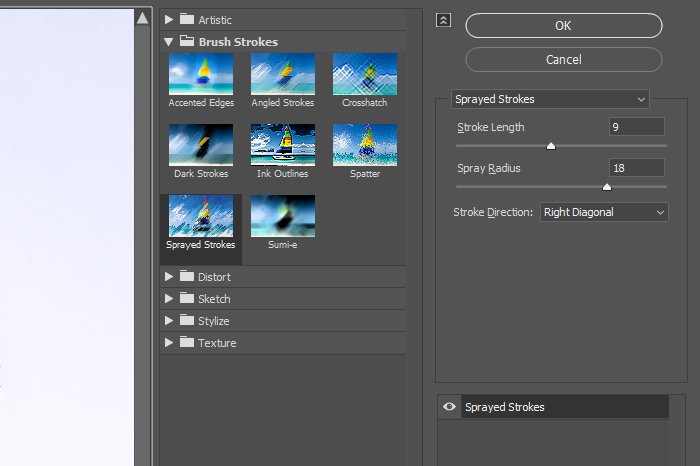
Doing this will open the Filter Gallery palette again, where I’ll click on the Brush Strokes drop-down and then the Sprayed Strokes thumbnail. After that, I’ll push the Stroke Length and Spray Radius sliders until I see a result I’m happy with.

sprayed-strokes.jpg

When I’m finished, I’ll click on the OK button to return to the regular workspace.

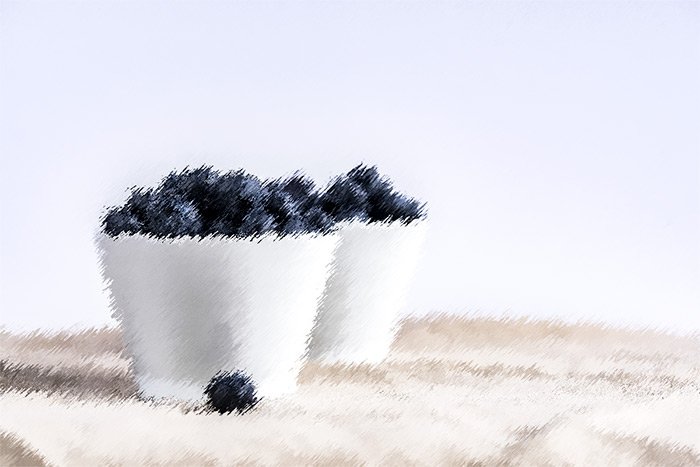
Here’s the result of this filter.

sprayed-strokes-output.jpg

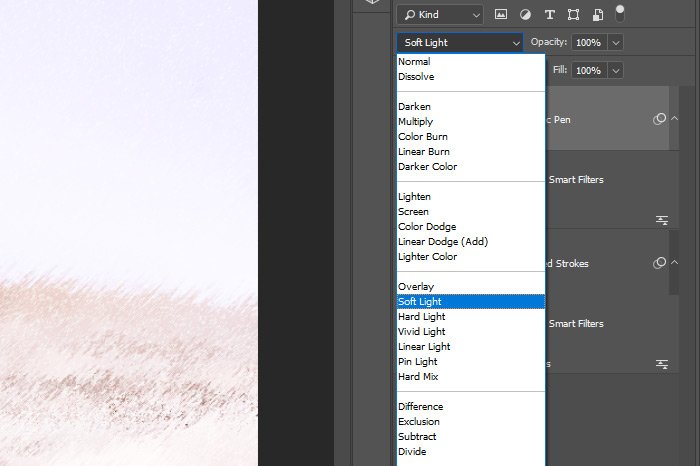
While I’m very pleased with the look of this, I’d like to make things look even more “real.” To do so, I’ll need to apply a blend mode to the Graphic Pen layer, which will sort of merge the two filters together. Since I’ve already played around some this morning to see which blending mode looks best, I’ll just go ahead and click to select the top Graphic Pen layer in the Layers panel and then I’ll click on the blending mode drop-down that sits at the top of the panel and select Soft Light. There were a few other options that did the job, but I’m happy with this one.

soft-light.jpg

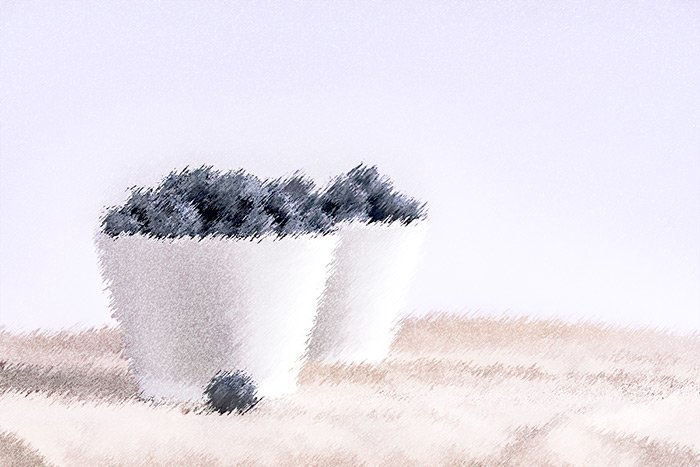
Let’s see the result of my efforts.

two-filter-sketch.jpg

If you look at the photo above closely, you can see elements of both filters.

Adding an Adjustment Layer​

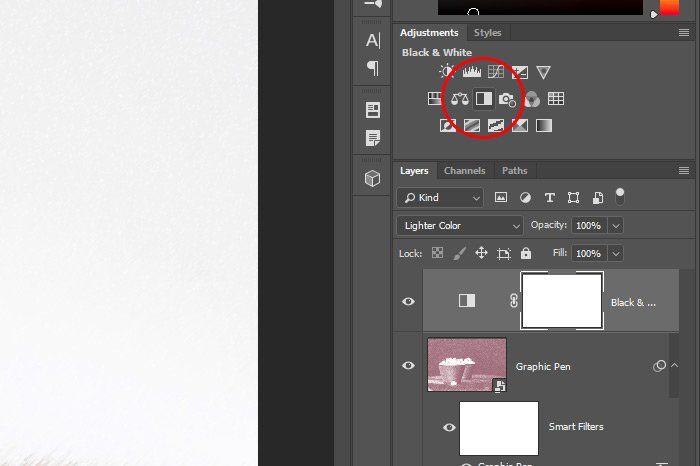
Since the goal for this project is to transform an image into something that looks like an actual sketch, I have decided to add a Black & White adjustment layer above the two other layers. To do this, I went up to the Adjustments panel and clicked the Black & White icon.

black-white-icon.jpg

When I clicked that icon, a new adjustment layer was added to the Layers panel. While that did remove any saturation from the image, it did so in a way that was too harsh for my liking. What I wanted was a more blended adjustment, so I returned to the blend modes drop-down and applied the Lighter Color option.

Here’s the result from that.

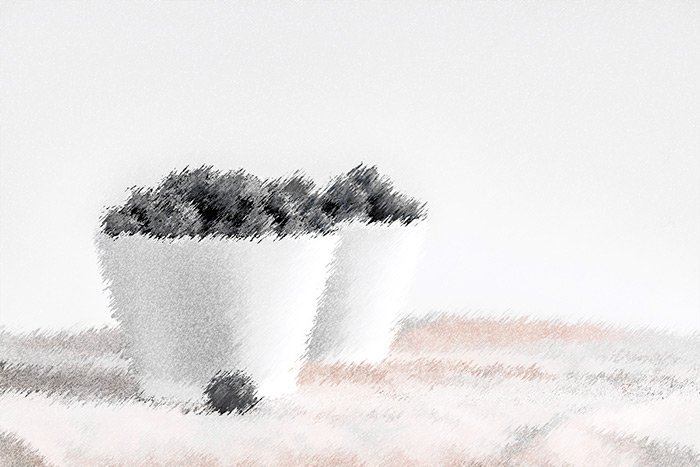
lighter-color.jpg

I’ll also give you two more blend mode options that look good, just so you get an idea of how these things can affect an image.

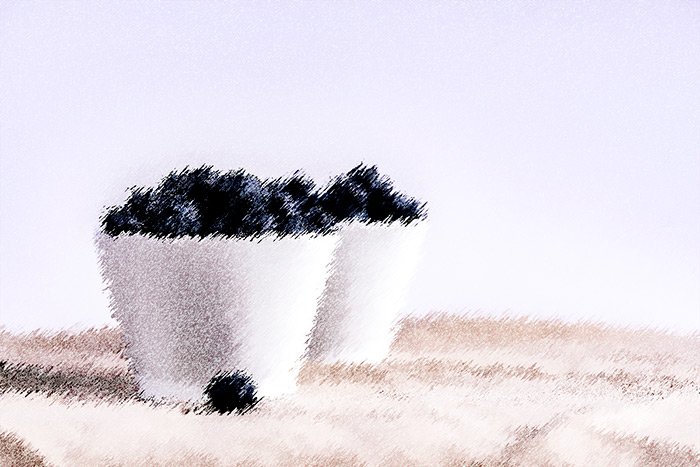
Here’s the Color Burn option.

color-burn.jpg

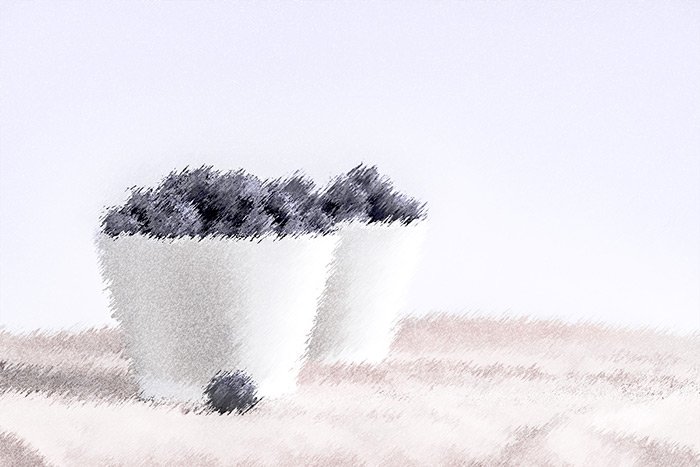
And here’s the Lighten option.

lighten.jpg

I think all three of these blending modes look good, so it’s really up to the editor to decide. Also, as you may have guessed, you can absolutely get creative with which filters and blend modes you’d like to add to your image. The sky really is the limit and there’s no right way to do things. Think of a goal and start clicking. That’s the way I do it.

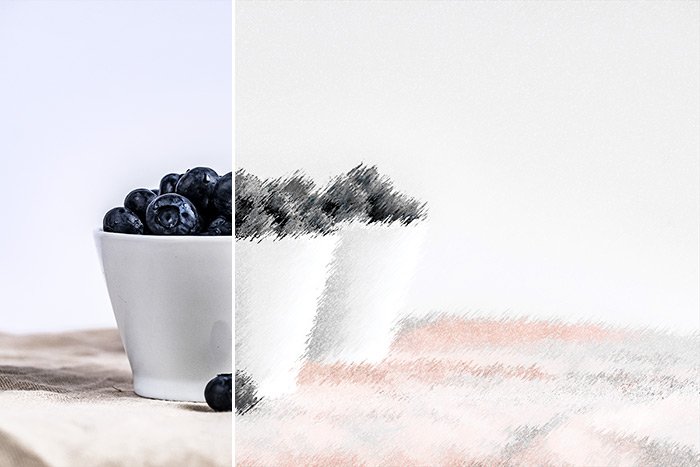
sketch-before-after.jpg

This sort of reminds me of the a-ha – Take On Me video. Almost.

——

I hope I clearly explained how to go about adding different filters to an image and then how to add an adjustment layer as well as two blending modes. The goal was to transform a regular photo into something that looks like a sketch and I think I met that goal. If you have any questions regarding this post, please leave them in the comment section below. Thanks for reading!
 
EmeraldHike

EmeraldHike

Member
Joined
May 10, 2021
Messages
133
Reaction Score
0
Points
21
  • #5

Combining Filter Gallery Effects in Adobe Photoshop​

Most things in Adobe Photoshop don’t really need to be learned. They actually just need to be made aware of. In other words, none of this stuff I talk about on this website is particularly difficult to grasp. It’s more of a case of just letting people know that certain things exist. Of course, certain concepts need to be understood to be taken advantage of, but most of the time, just seeing what’s available is good enough.

In today’s post, nothing too challenging needs to be understood. This is one of those, “Oh that’s so cool” moments I’m hoping people have. I’m going to show you how you can add multiple effects (or filters) to am image inside of the Filter Gallery feature in Adobe Photoshop. If you’re a big filter user and don’t yet know about this capability, you’re going to love this. Let’s just say that it will add extra dimensions to what you already do.

I’m going to open a photo of a flower into Photoshop and then turn that flower layer into a Smart Object so anything I do to it will be non-destructive. After that, I’ll enter the Filter Gallery, where I’ll apply one of the many filters to the image. Then, and this is where things get good, I’ll apply another filter. And then another. Finally, I’ll change the order of those filters to achieve different effects. What I hope to convey is that there’s an almost infinite amount of flexibility when it comes to the Filter Gallery in this application. The final look of a photograph is up to your imagination.

The Demo Photo​

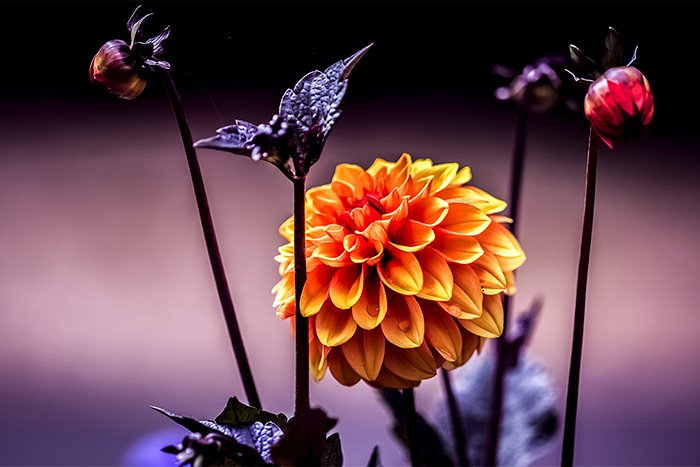
This is the flower photo I’ll be using for this post. The reason I chose it is because I think it can sustain many of the available filters in the Filter Gallery. As a matter of fact, I think it looks fairly artistic the way it is.

flower.jpg

Creating the Smart Object​

The first thing I’ll do after launching this file into Photoshop is to turn the flower layer into a Smart Object. As I’ve said many time, whenever working with filters, it’s a very good idea to use the Smart Object feature because it protects against destructive changes. Destructive changes are those that permanently alter a file.

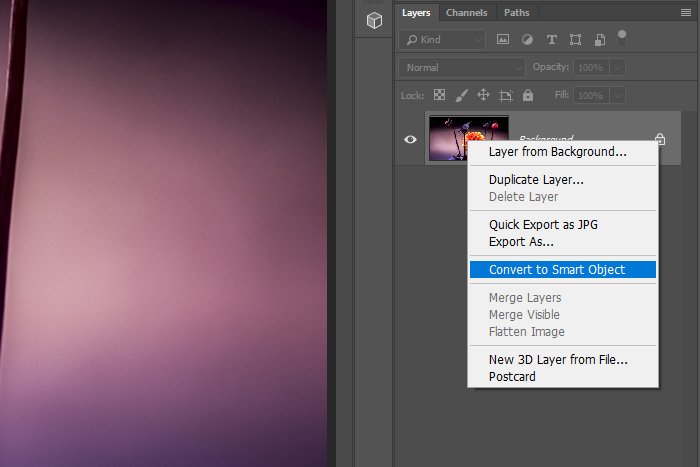
To turn the layer into a Smart Object, I’ll right-click on it in the Layers panel and then click on the Convert to Smart Object option.

convert-smart-object.jpg

Opening the Filter Gallery​

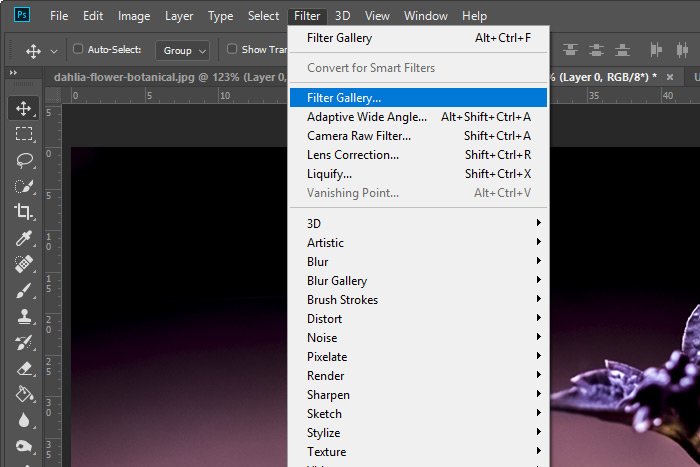
Pretty much all of the work I’d like to complete today will be contained in the Filter Gallery workspace. So I’ll need to enter that gallery. To do so, I’ll head up to the Filter > Filter Gallery menu item and click.

filter-filter-gallery.jpg

Once I click that, the workspace will appear.

filter-gallery.jpg

Applying Some Filters​

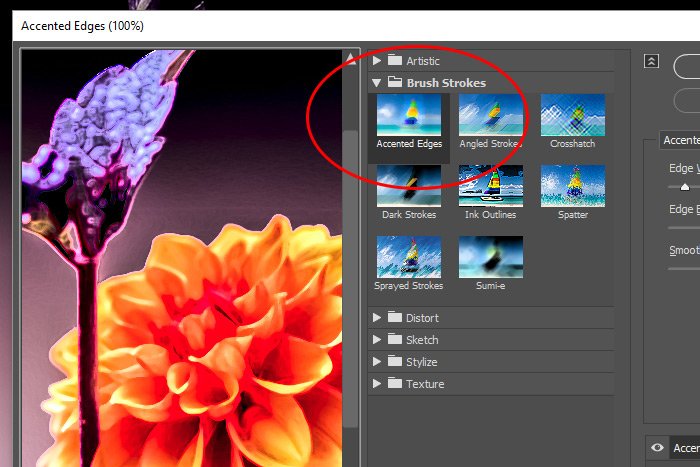
My goal today isn’t to make this image look wonderful. It’s merely to show you that multiple filters can be applied on top of one another right here in the Filter Gallery. To kick things off, I’ll go ahead and randomly choose one of the available filters from the Brush Strokes drop-down. The one I’ll choose is called Accented Edges.

accented-edges.jpg

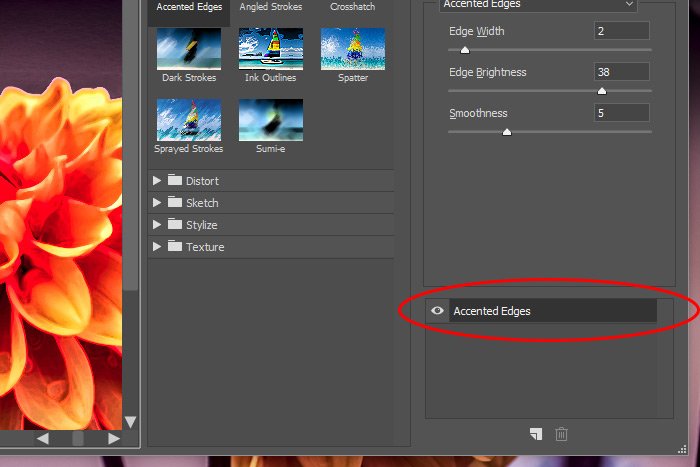
This is important. When I choose this specific filter, a “layer” for it shows up down in the lower right corner. Take a look.

lower-layer.jpg

This is the layer I’m working in. I’ve decided to call this thing a layer because I’m not sure what else to call it. It looks and acts like a layer, but it’s in the Filter Gallery workspace. I’m not sure if that makes a difference or not. Anyway, if I decide to click on a different filter in this workspace, that layer will simply change to the new one I just clicked on. The new filter won’t get added to the area where the layer is. It will take the place of the first one I chose.

Let’s say I want multiple effects to be blended together in this Filter Gallery workspace. As you well know, just one filter is so boring. Let’s add some spice to things.

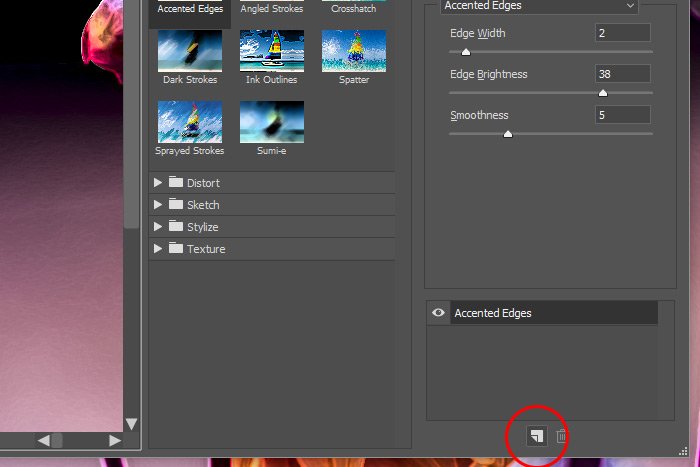
To add another filter to this same image, I’ll click the New Effect Layer button at the bottom of the palette.

new-effect-layer.jpg

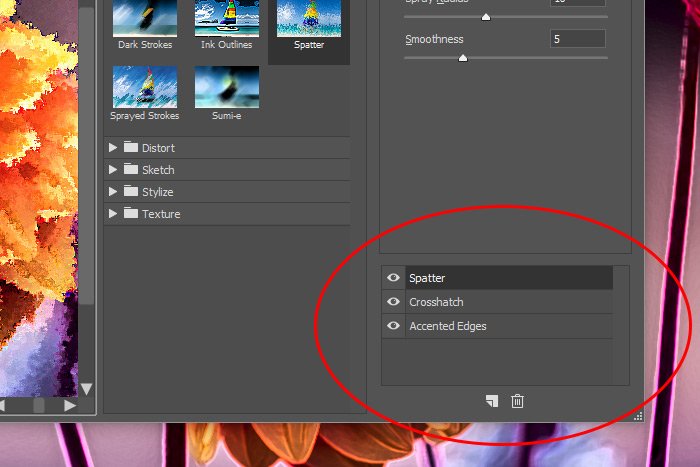
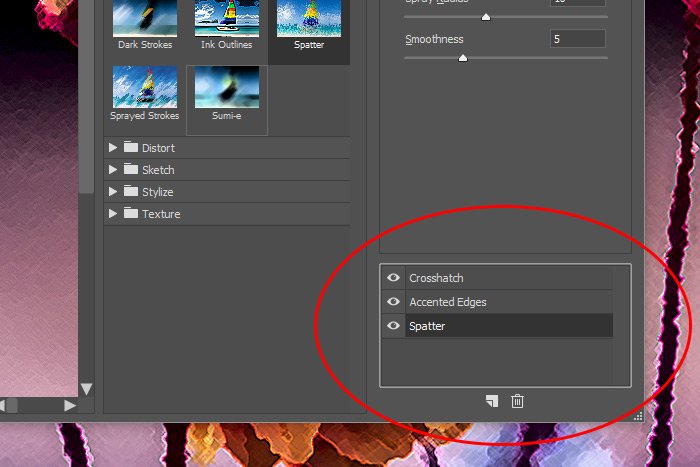
Once I do that, I can go ahead and choose another filter to add. And if I do it once more after that, I can choose yet another filter. Let’s see how these new effects layers look.

effect-layers-1.jpg

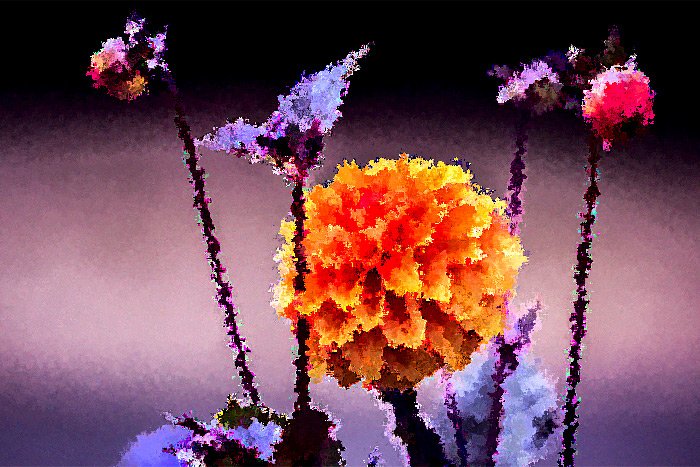
As you can see, I chose to add Accented Edges, Crosshatch and Spatter. Now let’s check out how this photo looks with the applied filters.

spatter-top.jpg

That’s kind of neat.

Changing the Order of the Effect Layers​

Currently, I’ve got the Spatter effect as the top layer in the Filter Gallery workspace. You can see the result of that above. What if I want to change the look of the output and I don’t want the Spatter effect to be so prominent? Well, to minimize the effect Spatter is having on the overall image, I can just click and drag that layer to the bottom of the pile.

crosshatch-top.jpg

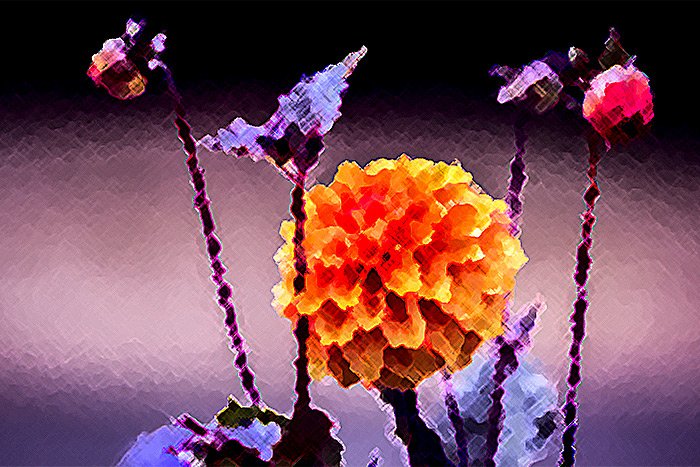
The Crosshatch effect is on top and the Spatter one is at the bottom. Let’s see what the overall image looks like now. I’ll click the OK button to exit this workspace and I’ll save the file out.

crosshatch-effect.jpg

Do you see what a difference that makes? Now the Crosshatch effect takes prominence. My point here is that it’s possible to add multiple effects to the same file in Photoshop, without much work. If I didn’t like what I saw, I could always click and drag one or more of these effect layers down the trash can below to remove them or I could add more layers if I wanted to.

I know I didn’t get into the settings for each effect. I didn’t think those were important for this post. I wanted to stay focused.

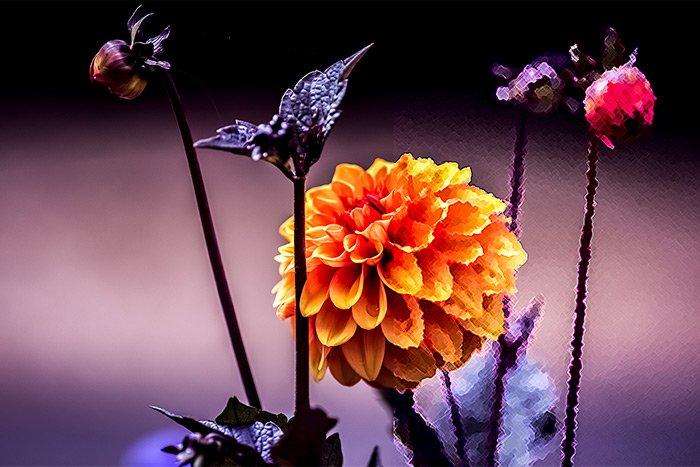
before-after-1.jpg

I hope I clearly explained how to apply multiple Filter Gallery effects to the same image in Adobe Photoshop. If you have any questions regarding this post, please leave them for me in the comment section below. Thanks for reading!
 
Top