Phoenix1
Member
- Joined
- May 7, 2021
- Messages
- 135
- Reaction Score
- 0
- Points
- 23
- #1
I’m going to let you in on a little secret about Adobe Photoshop. I’ve been working in this application for a long time and I’ll tell you that there really aren’t many people on the planet who truly know how to use it. Sure, many folks can launch a photo and edit that photo in a limited fashion, but when it comes to the heavy lifting and getting dirty of making something look beautiful, nine out of ten people have no idea where to begin. So, if this is true, how in the heck do so many of these editors churn out images that appear so stunning and professional? Well, it’s because there are shortcuts built right into the program. You just need to know where to look. And as long as we’re talking about shortcuts, I’ll let you know that almost everything we do in Photoshop these days is a shortcut. If you have ever worked with color channels back in 1999, you know what I’m talking about. We’ve come a very long way. Back then, we oftentimes had to take the long way around. The very long way.
In today’s post, I’m going to explore a very small portion of what I referred to above. There’s an area inside of Photoshop’s Adjustments panel that’s called Color Lookup. This Color Lookup adjustment allows us to change the overall appearance of a photo. It’s sort of like overlaying an old school film effect on top of a photo to give it a haze, contrast, warming or cooling feeling. There are tons of presets in this little area of Photoshop, so once you know about it, you’ll be able to experiment to your heart’s content. Below, all I want to do it tell you how to get to where you need to be and to display a few different examples. You’ll be able to take it from where I leave off.
Once I do that, a new adjustment layer will appear in the Layers panel and the Properties panel for this adjustment will automatically open.
If you take a look inside the Properties panel, you’ll see three drop-down boxes. These are the lookup table categories and they’re called 3DLUT File, Abstract and Device Link. It’s inside of these drop-downs that you’ll find the actual lookup tables. Currently, there are 27, 8 and 5 lookup tables, respectively. Because the first category has so many, you can imagine most people hang out in there. The other categories do have some interesting effects though, so they shouldn’t be overlooked. Here’s a screenshot of the first drop-down.
To select a lookup table to apply the effect, simply click one of the options in the drop-down. I’ll give you a few examples below.
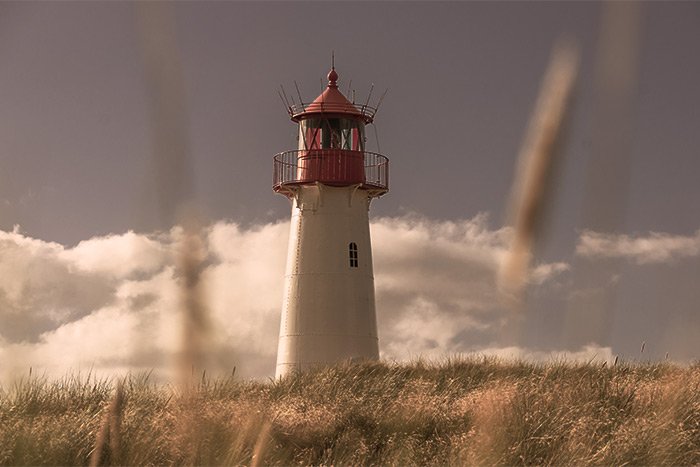
Let’s see, I think I’ll start off with Candlelight.CUBE.
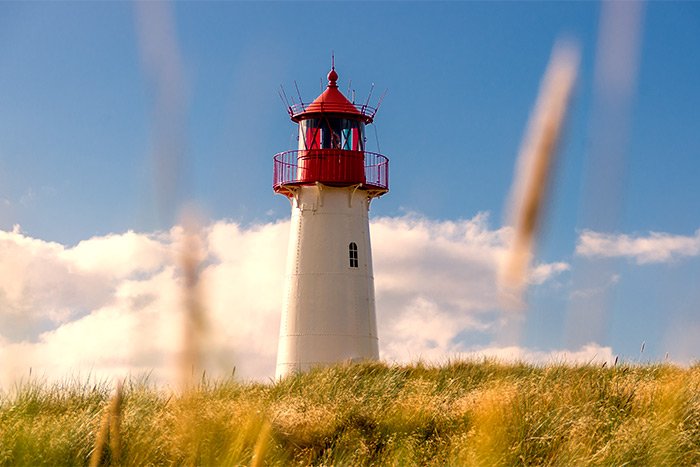
Next, I’ll show you Crisp_Warm.look.
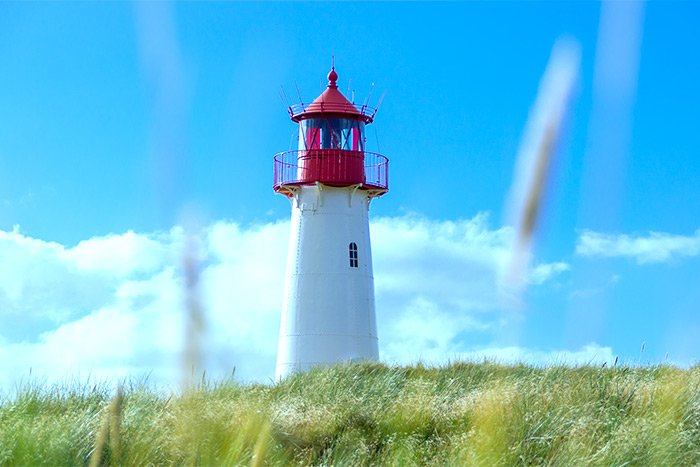
After that, I’ll show you Crisp_Winter.look.
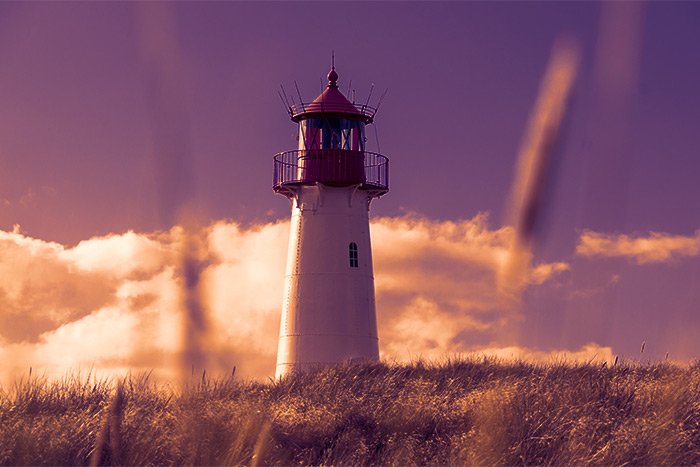
As you can see, by clicking one mere option in a drop-down, the entire look of a photo can be transformed. Some of the options are fairly crazy looking and may need a few extra steps to tame things down a bit. Others, however, can be used right out of the box. Here’s one last one for you. It’s the LateSunset.3DL option.
Basically, as you’re asking yourself how some photographer out there made that photo look so good, remember that it only takes a few steps inside of Photoshop to make a change.
For this example, I’m going to keep the Late Sunset option I just ended with. I’ll head back to the Layers panel and I’ll click the Blend Mode drop-down. Inside this drop-down, I’ll see the Overlay option, so I’ll click it.
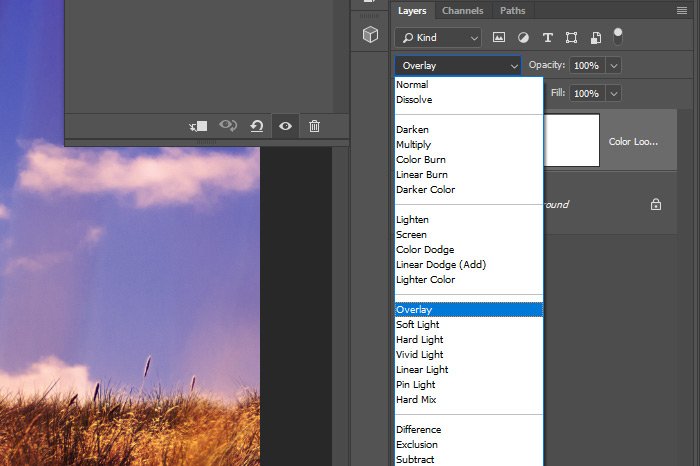
Once I do that, I’ll notice that the contrast inside of the photo was increased. The overall appearance was enhanced as well. If you aren’t familiar with how blend modes work in Photoshop, please read through these posts:
What are Blending Modes in Adobe Photoshop?
Adding Color: Blend Modes & Adjustments in Adobe Photoshop
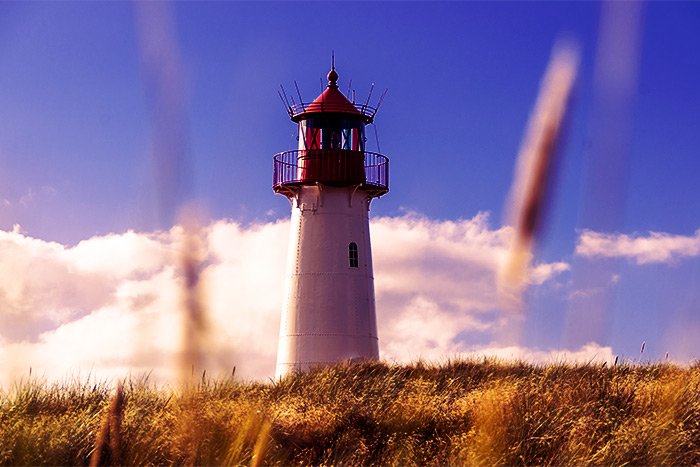
The Overlay blend mode is part of the Contrast group, so that explains things. Let’s take a look at the result.
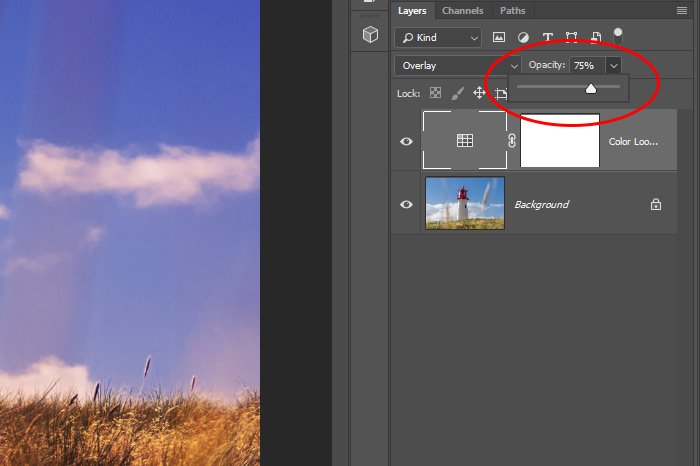
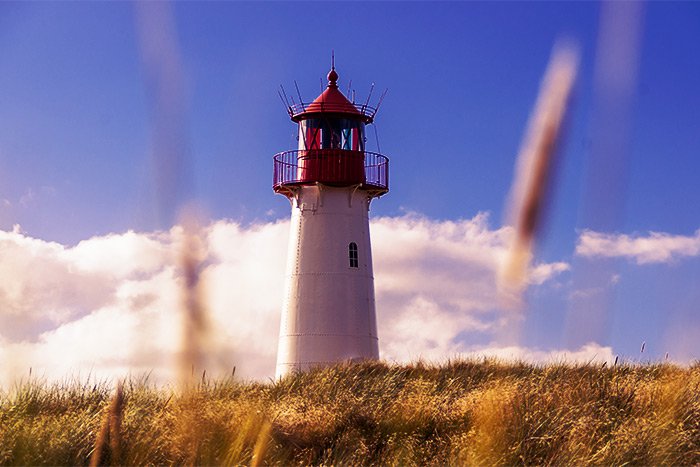
When adjusting opacity, be sure the proper layer in the Layers panel is selected. The change you make will affect whichever layer is active. In my case, I went with 75% opacity. Here’s the result. It’s not too terribly different than the photo above.
As you can see, there are a lot of possibilities here. I encourage you to experiment with them to see what you can come up with. I’m sure you can imagine how things might turn out after you finish making these type of changes and move further along. You can truly transform a photo in no time flat.
——
I hope I clearly explained how to use the Color Lookup adjustment in Adobe Photoshop. If you have any questions or concerns regarding this post, please leave them in the comment section below. Thanks for reading!
In today’s post, I’m going to explore a very small portion of what I referred to above. There’s an area inside of Photoshop’s Adjustments panel that’s called Color Lookup. This Color Lookup adjustment allows us to change the overall appearance of a photo. It’s sort of like overlaying an old school film effect on top of a photo to give it a haze, contrast, warming or cooling feeling. There are tons of presets in this little area of Photoshop, so once you know about it, you’ll be able to experiment to your heart’s content. Below, all I want to do it tell you how to get to where you need to be and to display a few different examples. You’ll be able to take it from where I leave off.
The Color Lookup Adjustment
The best part about using this adjustment is that it’s non-destructive. It functions just the same as any other adjustment in that we can turn it on and off and even delete it if need be. Needless to say, it’s got some flexibility attached to it, so as we use it, there’s very little to be concerned with when it comes to permanently altering a photograph.The Demo Photo
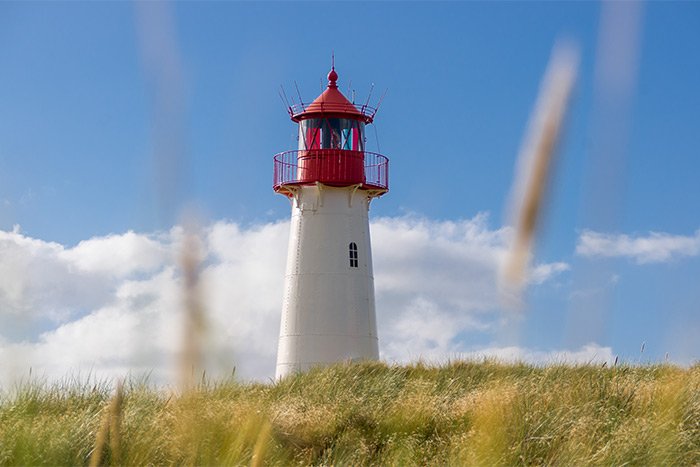
For this post, I wanted to use a photo that offered a way to realistically see what kind of effect these color lookups can offer. I think I found a really good picture to use. It’s of a lighthouse and it’s got lots of sky in it as well as a structure. I think this will be perfect. Here it is.
Applying the Adjustment
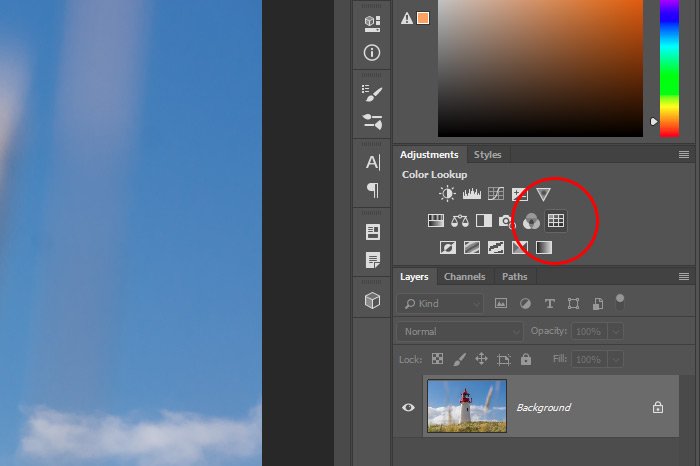
I’ve already got the photo opened up into Photoshop. From here, I’ll head up to the Adjustments panel and click the Color Lookup option.
Once I do that, a new adjustment layer will appear in the Layers panel and the Properties panel for this adjustment will automatically open.

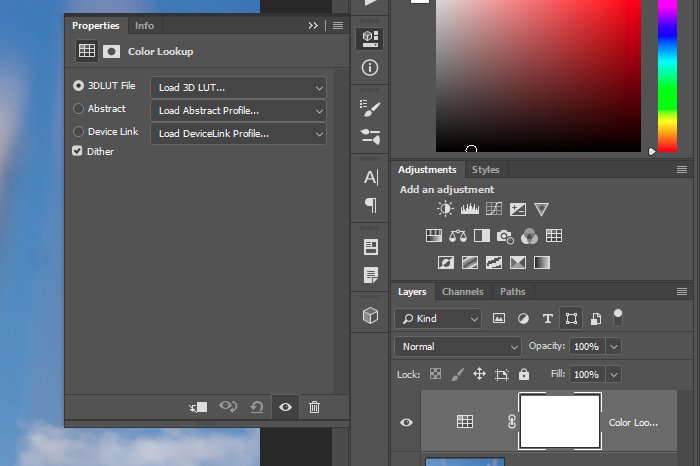
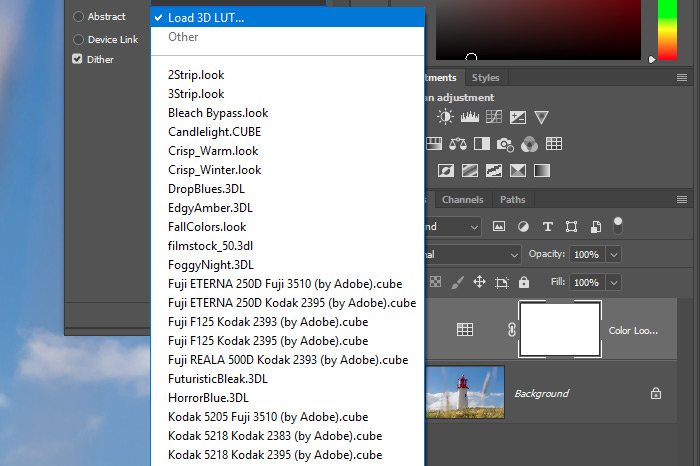
If you take a look inside the Properties panel, you’ll see three drop-down boxes. These are the lookup table categories and they’re called 3DLUT File, Abstract and Device Link. It’s inside of these drop-downs that you’ll find the actual lookup tables. Currently, there are 27, 8 and 5 lookup tables, respectively. Because the first category has so many, you can imagine most people hang out in there. The other categories do have some interesting effects though, so they shouldn’t be overlooked. Here’s a screenshot of the first drop-down.

To select a lookup table to apply the effect, simply click one of the options in the drop-down. I’ll give you a few examples below.
Let’s see, I think I’ll start off with Candlelight.CUBE.

Next, I’ll show you Crisp_Warm.look.

After that, I’ll show you Crisp_Winter.look.

As you can see, by clicking one mere option in a drop-down, the entire look of a photo can be transformed. Some of the options are fairly crazy looking and may need a few extra steps to tame things down a bit. Others, however, can be used right out of the box. Here’s one last one for you. It’s the LateSunset.3DL option.

Basically, as you’re asking yourself how some photographer out there made that photo look so good, remember that it only takes a few steps inside of Photoshop to make a change.
Combining Lookup Tables with Blend Modes
A common step to take after finding the look you’re after is to add a blend mode to the mix. Doing this will tamp down the effect somewhat and will certainly take the edge off, if there is one. It’ll also give you the opportunity to add another effect. Perhaps one that wasn’t available in the lookup table you chose.For this example, I’m going to keep the Late Sunset option I just ended with. I’ll head back to the Layers panel and I’ll click the Blend Mode drop-down. Inside this drop-down, I’ll see the Overlay option, so I’ll click it.

Once I do that, I’ll notice that the contrast inside of the photo was increased. The overall appearance was enhanced as well. If you aren’t familiar with how blend modes work in Photoshop, please read through these posts:
What are Blending Modes in Adobe Photoshop?
Adding Color: Blend Modes & Adjustments in Adobe Photoshop
The Overlay blend mode is part of the Contrast group, so that explains things. Let’s take a look at the result.

Adjusting Opacity
Just like it’s common to play with blend modes in these types of circumstances, it’s also common to adjust the opacity if the overall effect is too strong for your liking. To lessen the effect of the lookup table and the blend mode, I’ll turn to the Opacity slider in the Layers panel and I’ll nudge the slider to the left.
When adjusting opacity, be sure the proper layer in the Layers panel is selected. The change you make will affect whichever layer is active. In my case, I went with 75% opacity. Here’s the result. It’s not too terribly different than the photo above.

As you can see, there are a lot of possibilities here. I encourage you to experiment with them to see what you can come up with. I’m sure you can imagine how things might turn out after you finish making these type of changes and move further along. You can truly transform a photo in no time flat.
——
I hope I clearly explained how to use the Color Lookup adjustment in Adobe Photoshop. If you have any questions or concerns regarding this post, please leave them in the comment section below. Thanks for reading!
