15Katey
Member
- Joined
- May 10, 2021
- Messages
- 130
- Reaction Score
- 0
- Points
- 23
- #1
I’ve been doing a lot of video work in Adobe Photoshop lately and I have to tell you that when it comes to what makes or breaks a video, it’s the audio. It’s strange, because it seems so obvious that the video has to be of some really great quality for folks to admire what’s contained inside of it, but what truly makes the entire project stand out is the audio that accompanies the video. I’ve seen marginal video with excellent audio receive all types of praise. I guess this goes back to the old question of what makes a good film, the movie itself or the soundtrack. Personally, I lean towards the soundtrack.
I’ll be doing a whole lot more writing about video and audio inside of Adobe Photoshop in the future, but I thought a quick post on how to control the audio in a video was in order first. So, with that in mind, I’d like to take some time today to cover which controls manipulate the actual audio volume and which control the fade in and the fade out of that sound. This is super easy stuff, so I don’t think this post will be long at all.
In today’s post, I’m going to use one video clip to demonstrate how to adjust the volume of the audio that came bound to that clip in Photoshop. Then, I’ll demonstrate how to fade that audio in at the beginning of the clip so it’s not abrupt and I’ll also show you how to fade the audio out at the end for a smooth result. And for kicks, I’ll also show you how to mute the audio. Everything I’m going to discuss is contained in one small menu, so there should be no problems.
Before I begin though, I’d like to tell you that, while working in any video editing application, you’ll likely have multiple clips as well as external audio files. The audio controls I show you today are just one piece in a much larger puzzle. This piece is essential though, so use this post as a primer for everything that will come later.

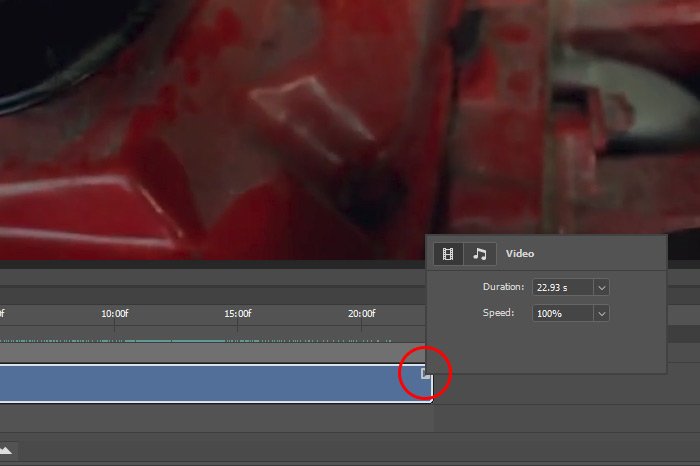
At the end of each video clip in the Timeline panel, there’s a small arrow. I’ll click that arrow and a menu will appear.

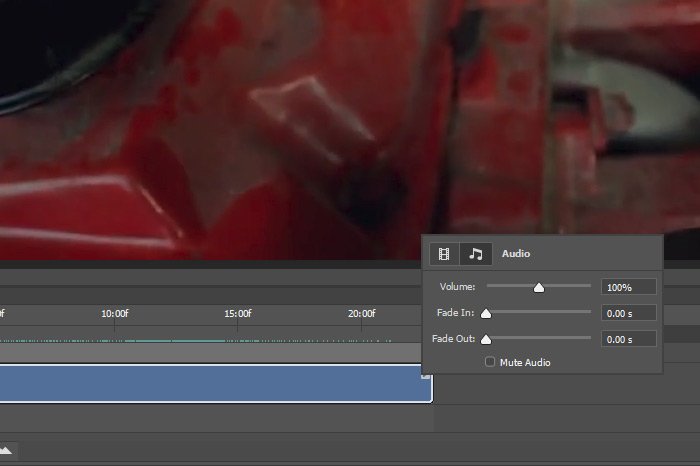
In the above screenshot, I circled the arrow in red. As you can see, there are a few options in the box that pops up. The one we’re interested in is the Audio one. To access that, I’ll click on the button that holds the musical eighth note. When I do that, the audio panel will appear with the controls we want to adjust.

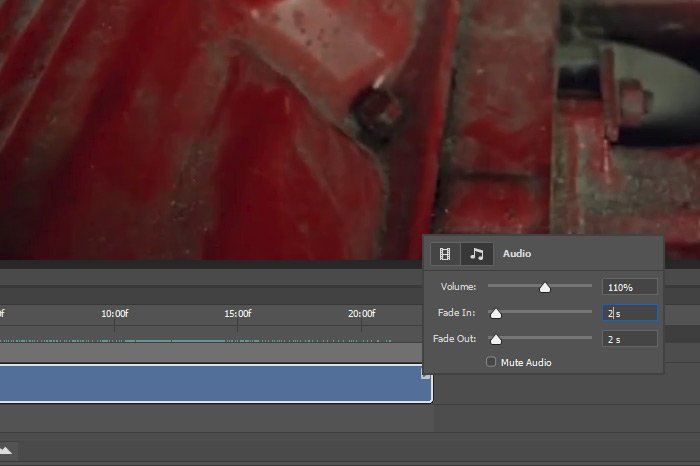
This next part is easy. After listening to the audio contained in the clip and comparing it to other related audio, I’ll either keep the Volume slider set as it is, push it to the right to make the sound louder or push the slider to the left to make the sound quieter. This is where you’ll need to use your “ear.” How does the original audio sound? Is it too loud? Too quiet? That determination will guide your adjustments. In this case, I’ll push the slider to the right so the volume is set to 110%. That seems to work well.
In my case today, I’ll set the Fade In slider to 2 seconds and the Fade Out slider to 2 seconds as well. This will keep things nice and smooth sounding.

Okay, now that I’m finished with that, let me show you the final video. Please listen for the audio. You can clearly tell that I added both fades. The actual volume level is much more difficult to distinguish from what was there originally.
If you’re reading this via email, please click the link below to visit the video on Youtube. These videos don’t show up in the emails that get sent.
I hope I clearly explained how to adjust the audio volume and the fade in and fade out controls while working on video inside of Adobe Photoshop. If you have any questions regarding this post, please leave them in the comment section below. Thanks for reading!
I’ll be doing a whole lot more writing about video and audio inside of Adobe Photoshop in the future, but I thought a quick post on how to control the audio in a video was in order first. So, with that in mind, I’d like to take some time today to cover which controls manipulate the actual audio volume and which control the fade in and the fade out of that sound. This is super easy stuff, so I don’t think this post will be long at all.
In today’s post, I’m going to use one video clip to demonstrate how to adjust the volume of the audio that came bound to that clip in Photoshop. Then, I’ll demonstrate how to fade that audio in at the beginning of the clip so it’s not abrupt and I’ll also show you how to fade the audio out at the end for a smooth result. And for kicks, I’ll also show you how to mute the audio. Everything I’m going to discuss is contained in one small menu, so there should be no problems.
Before I begin though, I’d like to tell you that, while working in any video editing application, you’ll likely have multiple clips as well as external audio files. The audio controls I show you today are just one piece in a much larger puzzle. This piece is essential though, so use this post as a primer for everything that will come later.
The Demo Video
As I mentioned above, I’ll be using only one clip for this post. The clip is of some video work inside of an old Dodge Dart. Here’s the logo from the dashboard.
Adjusting the Audio Volume
With each individual video clip inside of Photoshop, you have the opportunity to set the audio volume for that clip. What this means is that you can’t have the audio begin quietly and then get louder and then get quiet again. The volume is set for the entire duration of the clip, except for any fades you include. If you’d like to have audio that varies in volume, you’ll either need to create some in another application and import it into your project or cut the clip into smaller sections inside of Photoshop and creatively work on in that way. For now, I’ll simply adjust the volume in the most straightforward way possible.At the end of each video clip in the Timeline panel, there’s a small arrow. I’ll click that arrow and a menu will appear.

In the above screenshot, I circled the arrow in red. As you can see, there are a few options in the box that pops up. The one we’re interested in is the Audio one. To access that, I’ll click on the button that holds the musical eighth note. When I do that, the audio panel will appear with the controls we want to adjust.

This next part is easy. After listening to the audio contained in the clip and comparing it to other related audio, I’ll either keep the Volume slider set as it is, push it to the right to make the sound louder or push the slider to the left to make the sound quieter. This is where you’ll need to use your “ear.” How does the original audio sound? Is it too loud? Too quiet? That determination will guide your adjustments. In this case, I’ll push the slider to the right so the volume is set to 110%. That seems to work well.
Setting Fade In & Face Out
To set a fade in and fade out, all you need to do is choose the amount of time, in seconds, for which you’d like this fade to occur. The fade in and the fade out are independent of one another, so you can choose different values for each. If you are completely new to this and don’t yet know what the term fade means, it’s basically a transition from no sound to sound or vice-versa.In my case today, I’ll set the Fade In slider to 2 seconds and the Fade Out slider to 2 seconds as well. This will keep things nice and smooth sounding.

Muting the Audio
Let’s say that you didn’t want any sound at all out of the clip you were working on. Perhaps you imported different audio and you wanted to use that. Well, if you mute the audio that came with the clip, you’d be in good shape. I’m sure you already figured this out, but to mute audio, all you need to do is check the Mute box in that same Audio panel I’ve been working in. That’s it.Okay, now that I’m finished with that, let me show you the final video. Please listen for the audio. You can clearly tell that I added both fades. The actual volume level is much more difficult to distinguish from what was there originally.
If you’re reading this via email, please click the link below to visit the video on Youtube. These videos don’t show up in the emails that get sent.
I hope I clearly explained how to adjust the audio volume and the fade in and fade out controls while working on video inside of Adobe Photoshop. If you have any questions regarding this post, please leave them in the comment section below. Thanks for reading!
