15Katey
Member
- Joined
- May 10, 2021
- Messages
- 130
- Reaction Score
- 0
- Points
- 23
- #1
When working with video in Adobe Photoshop, we sometimes create some rather complex and intricate animations. These animations oftentimes take a lot of effort to get just right. From personal experience, when I used to work with Adobe LiveMotion and Macromedia Flash, I know that out of all things, keyframes and animations require the most time and precision. By the way, I’m dating myself when I mention Macromedia Flash. And LiveMotion? I’d be surprised if you remember that one. That’s from way back; 1998, to be exact.
Anyway, knowing that setting keyframes takes so much time, I’d say it’s in our best interest to figure out a way to use those keyframe over and over again. And just as luck would have it, there is a way! Did you know that it’s possible to copy and paste a string of keyframes from one layer to another in Adobe Photoshop? Well, it is.
In today’s post, I’d like to show you the process of doing so. I’ll use a demo video clip and an animated shape layer to explain how it’s possible to copy existing keyframes from one area and paste them in another. While this is a rather simple process, there are a few areas that need special care, so I’ll make you aware of those areas as well. After all, none of the copying and pasting will happen if the details aren’t hammered out.

For my tutorial, I think I’ll create two text layers. One that says “Heavy” and the other that says “Metal.” I’ll have both of them slide in from the left side and travel over to the right side. It actually makes no difference what type of video I show you here or what type of animation I choose to make. The process of copying and pasting remains the same across all types.
I’ll go ahead and type out the word “HEAVY” and then I’ll change the font size and the tracking of the word inside of the Character panel and I’ll be sure to make the color of the text black. When I’m finished with the first word. I’ll click out into another tool and then I’ll click back into the text tool to type our the word “METAL.” Since I already made the text changes in the Character panel, I shouldn’t need to make them again. Photoshop will remember from last time. I’ll then position these two words in the lower right portion of the video, just to see how they look.

Don’t worry, I’m going to add a layer style later on so the words are more visible.
Next, I’ll click just the HEAVY layer in the Layers panel, so only that layer is active. Then, I’ll head down to the Timeline panel and I’ll click on the small arrow that sits to the left of the layer name.
With the playhead at the beginning of the clip, I’ll click on the small stopwatch icon that sits just to the left of the Transform animation option. Then, I’ll move the playhead to the 4:00 second mark and then I’ll press and hold the Shift key on my keyboard again. Finally, I’ll drag the text across the screen until it’s in the final position. This is what’s necessary to create the basic movement.
For more information on how to create both transform and style animations in Adobe Photoshop, please take a look at these posts.
How to Use Keyframes For Animation with Video in Adobe Photoshop
How to Animate Layer Effects (Styles) with Video in Adobe Photoshop
The last thing I’m going to do to this layer is to apply a style animation so we can see the text a bit more clearly. As it stands, the text is black and almost invisible for part of the video. I’d like to add a stroke and a glow to the text.
I’ll move the playhead to the 4:00 second mark, right where the first animation left off. Then, I’ll click on the small stopwatch icon that sits just to the left of the Style animation option.
After the first style keyframe has been applied, I’ll push the playhead to the right until it reaches the 6:00 second mark. Then, I’ll double-click on the layer itself inside of the Layers panel and I’ll apply the styles I’m interested in. For more information on how to apply a layer style in Photoshop, please take a look at this post below.
Layer Effects & Styles in Adobe Photoshop
After applying the style, I’ll notice the second keyframe appear for this animation. You can see it in the above screenshot.
So basically, for the first four seconds of the video, the word HEAVY will move across the screen, from left to right. It will stop moving at the 4:00 second mark. Then, beginning at the 4:00 second mark and going through the 6:00 second mark, a glow and stroke will appear, making the text more visible. This is what the final text will look like.

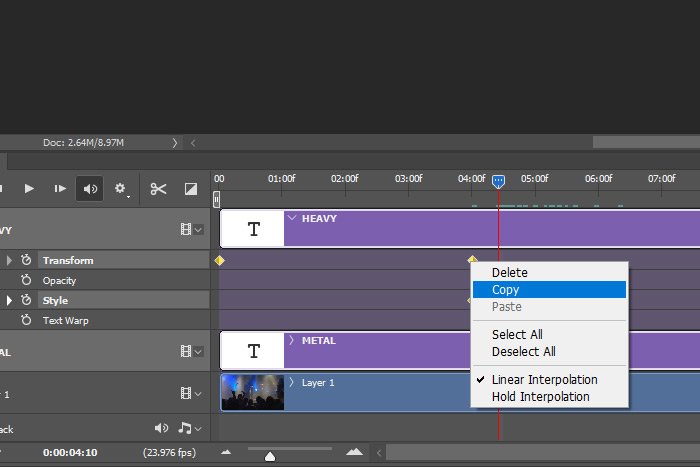
Copying keyframes is really easy to do. First, I’ll hold down the Ctrl key on my keyboard and then, one by one, I’ll click on each existing keyframe to select them. I’ll know they’re selected when they turn yellowish/gold. Unselected keyframes are hollow and white. Then, I’ll right-click on one of the keyframes and when the menu appears, I’ll choose Copy.
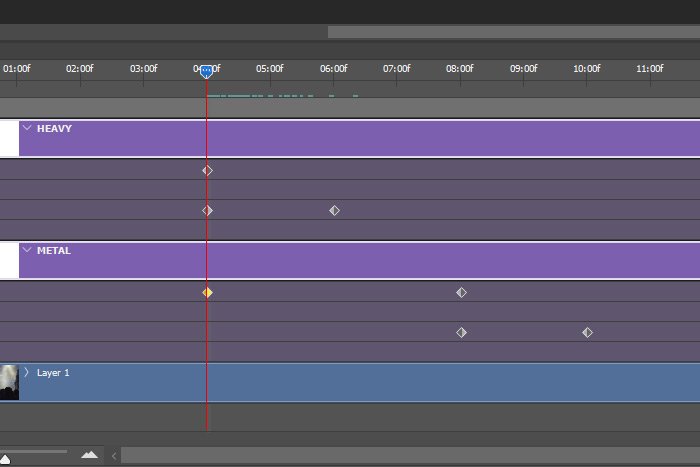
After that, I’ll click the small arrow that sits to the left of the word METAL in the Timeline panel to expose the animation controls. Then, I’ll move the playhead to the position where I’d like this next animation to begin. I think I’d like it to start at the 4:00 second mark. Since Photoshop won’t let me just paste the keyframes without one already existing, I’ll need to click the small stopwatch that’s to the left of the word Transform, just as I did earlier. Once the initial keyframe is there, I’ll right-click on it and select Paste from the menu that appears. Here are all the keyframes after they’ve been applied (well, almost all; you can’t see the very first one).
And if I move the playhead back and forth, I’ll see both text layers move and have the styles applied.

As you can see, the word HEAVY is on top of the word METAL. I obviously don’t want it like this. Once you get into working with animations more, you’ll see stuff like this happen all the time. In this case, I’ll supply an easy fix.
To correct this error, I’ll move the playhead to the location of the second Transform keyframe. Then, I’ll click on the keyframe itself. I’ll hold down the Shift key to lock the layer into the vertical plane and then I’ll slowly drag the work METAL into its correct position below. As I’m dragging, I’ll notice a small box appear near my mouse pointer that tells me the coordinates of the layer position. I’ll take note of the vertical position that’s marked with an up or down arrow. In this case, the final resting point reads 22.9.
Next, I’ll move the playhead to the beginning keyframe of the METAL layer and I’ll perform the same function. I’ll hold Shift and drag down, this time stopping once I get to the 22.9 location. I’ll let go and that’s that. All done. The copying of the keyframes has been completed, styles and all. Now just imagine how much time that would save if this animation was very complex. Tons of time, that’s how much.
Here’s the final video. I know it’s a bit dorky, but it serves its purpose. If you’re reading this post via email, you’ll need to click through to see the video.
I hope I clearly explained how to copy animation and video keyframes from one layer to another inside of Adobe Photoshop. If you have any questions regarding this post, please leave them for me in the comment section below. Thanks for reading!
COMMENT: These posts on doing video in PS are super helpful. Learning the basic mechanics is great, and I love that you’re also doing posts on cool effects you can do once you know the mechanics. Wanted to add that another way to select the keyframes is to click and drag, as if drawing a marquee, around all of the ones you wish to copy.
Anyway, knowing that setting keyframes takes so much time, I’d say it’s in our best interest to figure out a way to use those keyframe over and over again. And just as luck would have it, there is a way! Did you know that it’s possible to copy and paste a string of keyframes from one layer to another in Adobe Photoshop? Well, it is.
In today’s post, I’d like to show you the process of doing so. I’ll use a demo video clip and an animated shape layer to explain how it’s possible to copy existing keyframes from one area and paste them in another. While this is a rather simple process, there are a few areas that need special care, so I’ll make you aware of those areas as well. After all, none of the copying and pasting will happen if the details aren’t hammered out.
The Demo Video Clip
I think a good clip to use today would be one from a video taken during some sort of a heavy metal concert. The entire thing is from the vantage point of an audience member who is looking towards the stage.
For my tutorial, I think I’ll create two text layers. One that says “Heavy” and the other that says “Metal.” I’ll have both of them slide in from the left side and travel over to the right side. It actually makes no difference what type of video I show you here or what type of animation I choose to make. The process of copying and pasting remains the same across all types.
Adding Text Layers
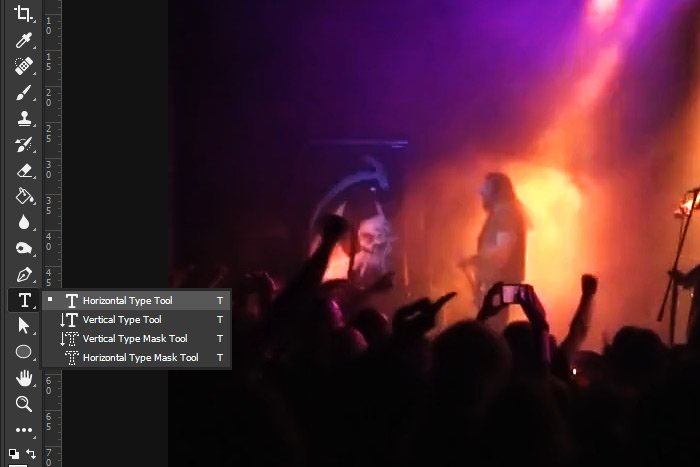
I’ve already got the video clip opened up in Photoshop. At this point, I’d like to add two new layers; one for each piece of text. If you’re familiar with adding text in Photoshop, you’ll know that just by typing with one of the type tools, a new layer will be created automatically. In this case, I’ll use the Horizontal Type Tool for the text.
I’ll go ahead and type out the word “HEAVY” and then I’ll change the font size and the tracking of the word inside of the Character panel and I’ll be sure to make the color of the text black. When I’m finished with the first word. I’ll click out into another tool and then I’ll click back into the text tool to type our the word “METAL.” Since I already made the text changes in the Character panel, I shouldn’t need to make them again. Photoshop will remember from last time. I’ll then position these two words in the lower right portion of the video, just to see how they look.

Don’t worry, I’m going to add a layer style later on so the words are more visible.
Creating the First Animation
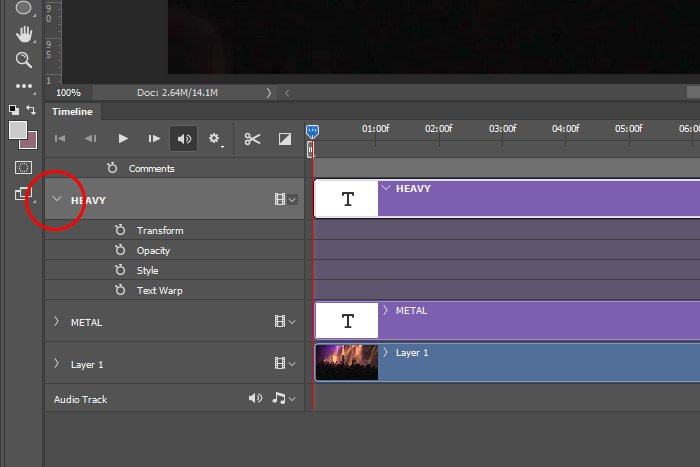
I’m at the point of creating the animation. To do so, I’ll hold down the Shift key on my keyboard and click to select both text layers in the Layers panel. Then, I’ll continue holding down the Shift key and I’ll drag both pieces of text to the left, until I can’t see them anymore. I want them both off screen. Just so you know, when you hold down Shift and drag something in Photoshop, whatever it is that you’re dragging will stay locked into its horizontal plane. Since I didn’t want these words to wander up or down, I locked them in.Next, I’ll click just the HEAVY layer in the Layers panel, so only that layer is active. Then, I’ll head down to the Timeline panel and I’ll click on the small arrow that sits to the left of the layer name.

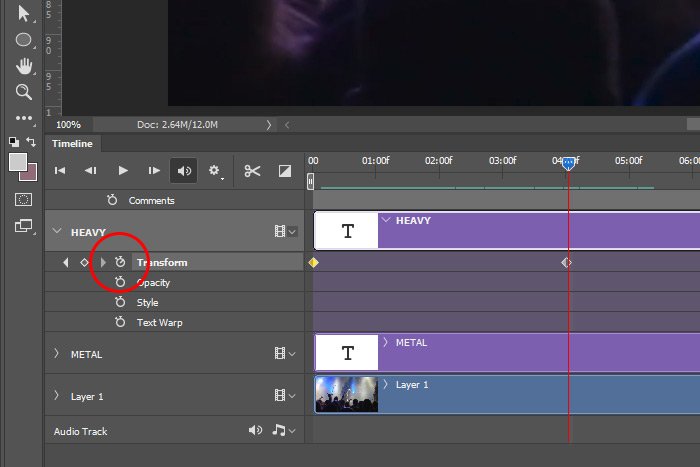
With the playhead at the beginning of the clip, I’ll click on the small stopwatch icon that sits just to the left of the Transform animation option. Then, I’ll move the playhead to the 4:00 second mark and then I’ll press and hold the Shift key on my keyboard again. Finally, I’ll drag the text across the screen until it’s in the final position. This is what’s necessary to create the basic movement.

For more information on how to create both transform and style animations in Adobe Photoshop, please take a look at these posts.
How to Use Keyframes For Animation with Video in Adobe Photoshop
How to Animate Layer Effects (Styles) with Video in Adobe Photoshop
The last thing I’m going to do to this layer is to apply a style animation so we can see the text a bit more clearly. As it stands, the text is black and almost invisible for part of the video. I’d like to add a stroke and a glow to the text.
I’ll move the playhead to the 4:00 second mark, right where the first animation left off. Then, I’ll click on the small stopwatch icon that sits just to the left of the Style animation option.

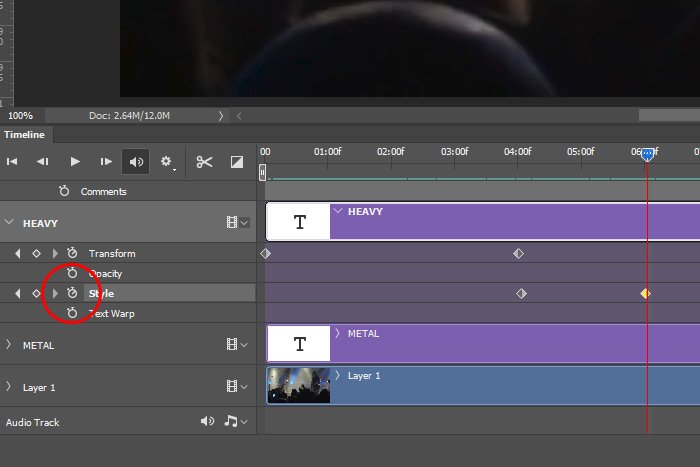
After the first style keyframe has been applied, I’ll push the playhead to the right until it reaches the 6:00 second mark. Then, I’ll double-click on the layer itself inside of the Layers panel and I’ll apply the styles I’m interested in. For more information on how to apply a layer style in Photoshop, please take a look at this post below.
Layer Effects & Styles in Adobe Photoshop
After applying the style, I’ll notice the second keyframe appear for this animation. You can see it in the above screenshot.
So basically, for the first four seconds of the video, the word HEAVY will move across the screen, from left to right. It will stop moving at the 4:00 second mark. Then, beginning at the 4:00 second mark and going through the 6:00 second mark, a glow and stroke will appear, making the text more visible. This is what the final text will look like.

Copying the Keyframes From One Layer to Another
Now we’re getting into the meat of this post. Since the next word (METAL) is almost identical to this first word, I’d like it have the same exact animation, but have it begin just a bit later in the clip and obviously have it slide in underneath the word HEAVY. In this section, I’ll explain how to copy keyframes.Copying keyframes is really easy to do. First, I’ll hold down the Ctrl key on my keyboard and then, one by one, I’ll click on each existing keyframe to select them. I’ll know they’re selected when they turn yellowish/gold. Unselected keyframes are hollow and white. Then, I’ll right-click on one of the keyframes and when the menu appears, I’ll choose Copy.

After that, I’ll click the small arrow that sits to the left of the word METAL in the Timeline panel to expose the animation controls. Then, I’ll move the playhead to the position where I’d like this next animation to begin. I think I’d like it to start at the 4:00 second mark. Since Photoshop won’t let me just paste the keyframes without one already existing, I’ll need to click the small stopwatch that’s to the left of the word Transform, just as I did earlier. Once the initial keyframe is there, I’ll right-click on it and select Paste from the menu that appears. Here are all the keyframes after they’ve been applied (well, almost all; you can’t see the very first one).

And if I move the playhead back and forth, I’ll see both text layers move and have the styles applied.
One Small Problem
While everything works exactly as it should, there’s a small problem. When copying keyframes from one layer to another, Photoshop likes to copy everything, even the beginning position as well as the ending one, as well as the applied styles. In this case, these copied keyframes cause both text layers to sit on the same plane and when they’re both in position, they’re on top of one another. Take a look.
As you can see, the word HEAVY is on top of the word METAL. I obviously don’t want it like this. Once you get into working with animations more, you’ll see stuff like this happen all the time. In this case, I’ll supply an easy fix.
To correct this error, I’ll move the playhead to the location of the second Transform keyframe. Then, I’ll click on the keyframe itself. I’ll hold down the Shift key to lock the layer into the vertical plane and then I’ll slowly drag the work METAL into its correct position below. As I’m dragging, I’ll notice a small box appear near my mouse pointer that tells me the coordinates of the layer position. I’ll take note of the vertical position that’s marked with an up or down arrow. In this case, the final resting point reads 22.9.
Next, I’ll move the playhead to the beginning keyframe of the METAL layer and I’ll perform the same function. I’ll hold Shift and drag down, this time stopping once I get to the 22.9 location. I’ll let go and that’s that. All done. The copying of the keyframes has been completed, styles and all. Now just imagine how much time that would save if this animation was very complex. Tons of time, that’s how much.
Here’s the final video. I know it’s a bit dorky, but it serves its purpose. If you’re reading this post via email, you’ll need to click through to see the video.
I hope I clearly explained how to copy animation and video keyframes from one layer to another inside of Adobe Photoshop. If you have any questions regarding this post, please leave them for me in the comment section below. Thanks for reading!
COMMENT: These posts on doing video in PS are super helpful. Learning the basic mechanics is great, and I love that you’re also doing posts on cool effects you can do once you know the mechanics. Wanted to add that another way to select the keyframes is to click and drag, as if drawing a marquee, around all of the ones you wish to copy.
