Phoenix1
Member
- Joined
- May 7, 2021
- Messages
- 135
- Reaction Score
- 0
- Points
- 23
- #1
This post is for all those graphic design folks out there. It has to do with custom shapes, patterns and paths in Adobe Photoshop. I know I’ve said this before, but I’ll say it again; Photoshop is a never ending rabbit hole. Just when you think you have a handle on what it has to offer, about a billion other things that you’ve never heard of pop up. I could probably write about this one application for the rest of my life. What’s interesting is that I most likely will.
In today’s post, I’d like to cover a few different areas of Photoshop you might not have a lot of experience with. I’m going to use the Custom Shape Tool to create a shape. Then, from that shape, I’ll create a custom pattern. After that, I’ll create a path and finally, I’ll apply the pattern to the path. Obviously each and every step I take today requires background (a separate post), but we can treat what I share below as a broad overview of what’s possible.
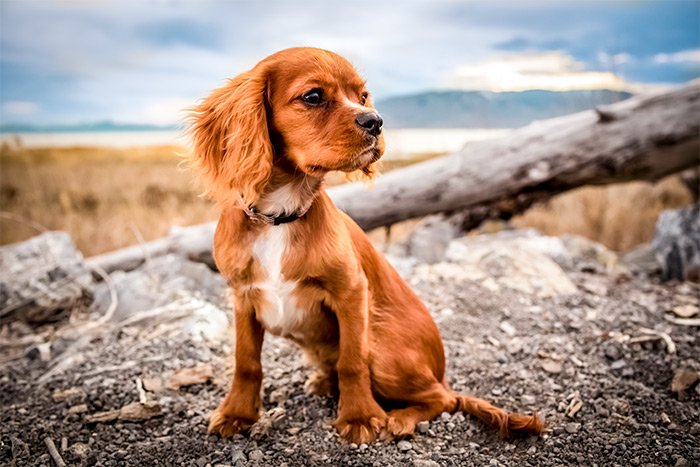
To be just a bit more specific regarding this project. I’m going to open a photograph into Adobe Photoshop. The photo is going to be of a cute dog and the goal for the project is to add paw prints to the bottom of the photo, in a row. I’ll use a blend mode to make sure the prints fit well with the overall image, but that’s just a finishing touch. Mostly, I’ll be discussing how to create those paw prints.
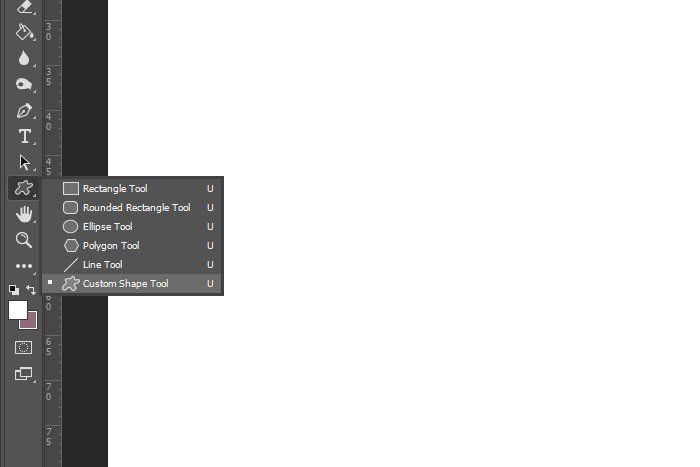
To draw out today’s paw print, I’ll head over to the Custom Shape Tool in the left toolbar.
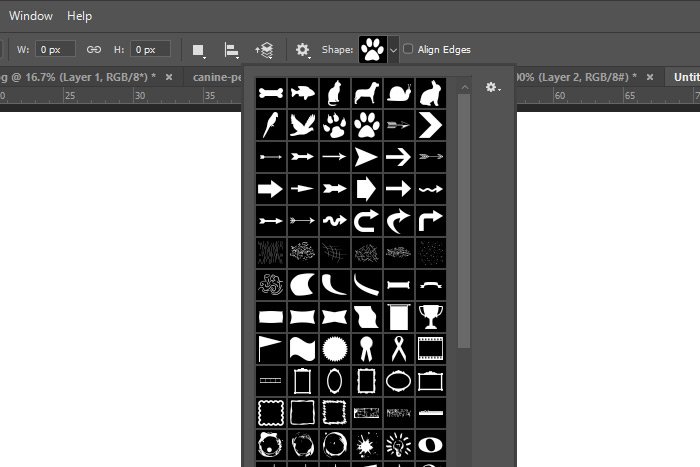
Once the tool is active, I’ll go to the options bar up top and select the paw print from the custom shape drop-down box.
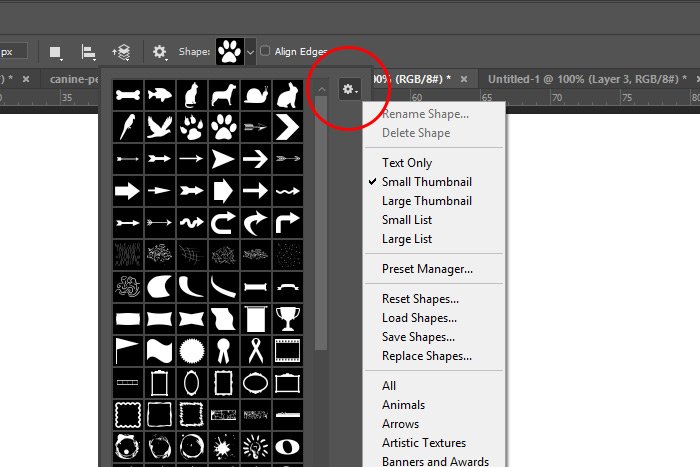
If you don’t have all these shapes available to you, you most likely need to add them to the drop-down. The way you do this is to click the small gear icon that sits in the upper right part of the drop-down and when the menu appears, click on All. The ones you don’t see are just hiding and you need to set them so they’re visible.
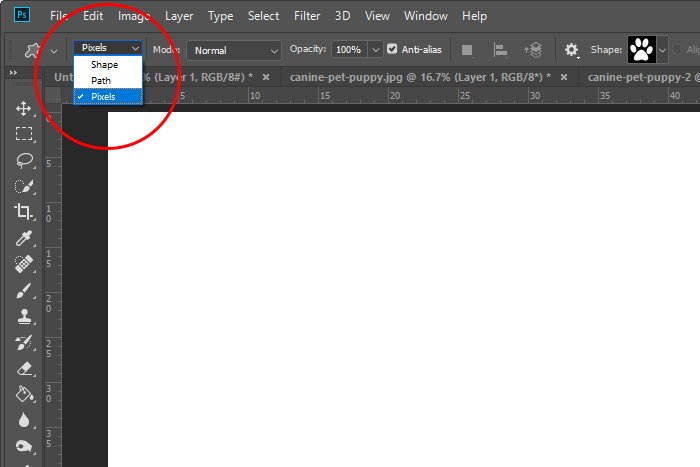
Once I have the paw print chosen, I’ll need to make sure the correct shape is drawn. For this instance, I’m looking to draw pixels as opposed to a shape or a path. Again, there’s a lot of background that goes with this topic and I’ll cover all of that later on.
To properly draw this shape, I’ll need to create a new empty layer in the Layers panel (so the shape doesn’t merge with the background layer) and make sure the foreground color in my color picker is something visible, such as black. So, I’ll go to the bottom of the Layers panel and I’ll click on the Create New Layer icon and after that, I’ll click on the foreground color over in the left toolbar and make sure the color is set to black.
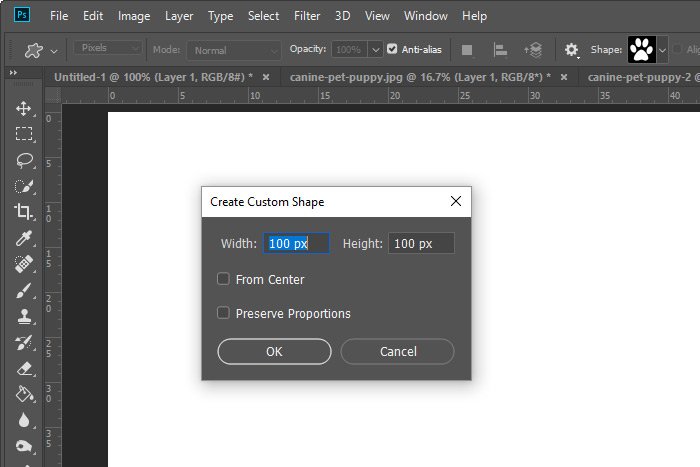
Finally, to draw the shape, I’ll click once inside of the new document and when the default values of 100px by 100px appear in the Create Custom Shape dialog box, I’ll simply click the OK button.
Doing this will give me a nice perfectly shaped paw print.
Just as a side note before I get into things further, I want to let you know that you can make lots of things part of a custom pattern. I just decided to use a paw print that was created from a custom shape today, but if you’re into creating patterns, get creative with what I’m about to show you below. I think you’ll be surprised at what can be use to make one of these things.
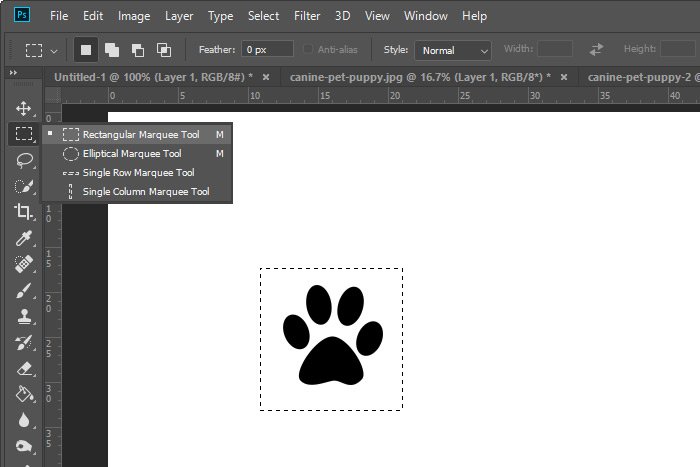
The first thing I’ll do is to make sure the shape layer is selected and active in the Layers panel. Then, I’ll use the Rectangular Marquee Tool to draw a square selection around the paw print.
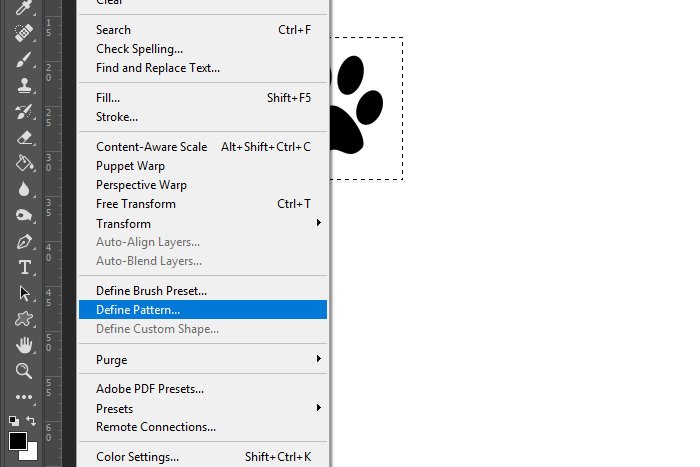
Once the shape is selected, I can define the pattern. I’ll head up to the Edit > Define Pattern menu item and click.
When the Pattern Name dialog box appears, I’ll type in a name for the pattern, which in this case will be Paw Print. I’ll then click the OK button to apply the new pattern to Photoshop.
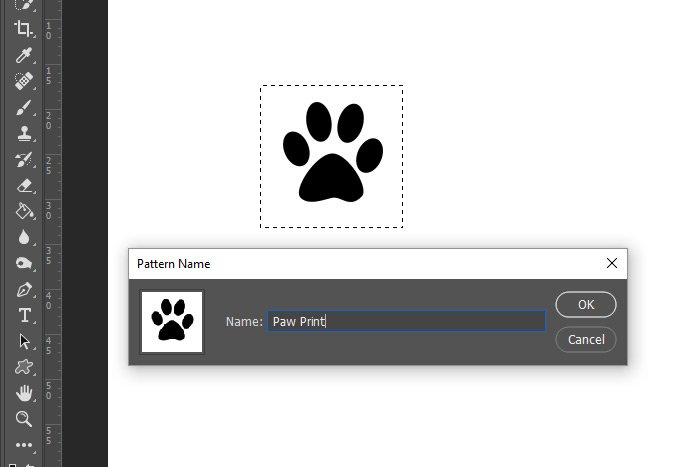
The custom pattern has now been created. If you’re reading this post to learn how to create one of these, these are the instructions. The remainder of this post will be about how to apply a pattern to a path in Photoshop.
To remove the selection I drew earlier, I’ll use the Select > Deselect menu item up up. Then, I’ll drag the layer with the paw print in it down to the trash can at the bottom of the Layers panel to delete it. Right after that, I’ll create another new layer. In essence, I’d like to get rid of the shape I created and start off with a clean slate. So what I’m left with is a white background layer and an empty layer on top of that. I’ll also make sure that empty layer is active by clicking on it in the Layers panel.
The next thing I’ll do is click on the Pen Tool in the left toolbar.
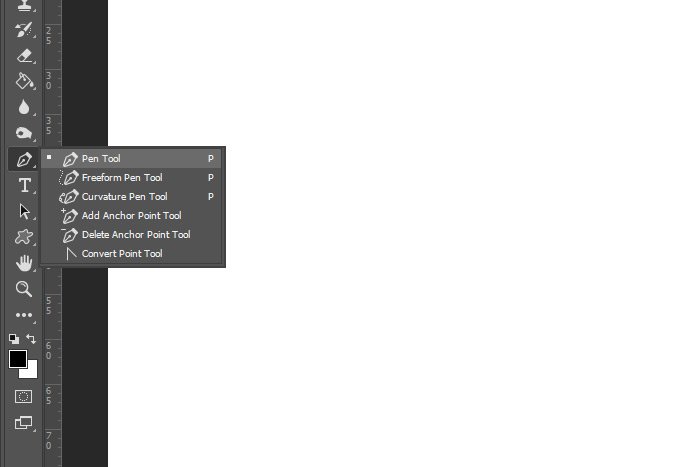
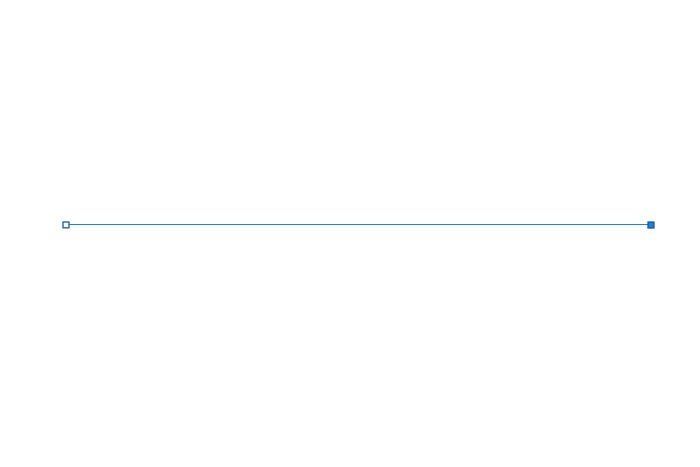
This is the tool I’ll be using to draw the path. There area few different items and tool I could use for this, but this one is really easy to work with. To draw the path, I’ll click on the left side of the workspace and then on the right. I’d like the path to be perfectly horizontal, so I’ll hold down the Shift key on my keyboard as I’m doing this. Using the Shift key locks paths either perfectly horizontal or perfectly vertical.
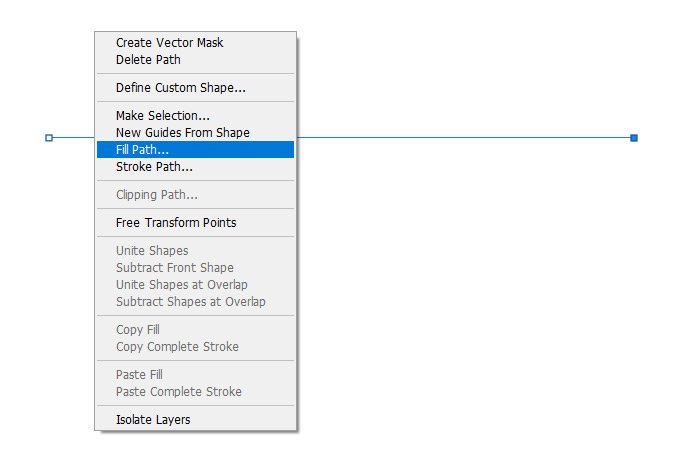
Next, with the Pen Tool still active, I’ll right-click in the workspace somewhere and when the menu appears, I’ll click on the Fill Path option. Alternately, I could use the Edit > Fill menu item if the preceding option doesn’t work.
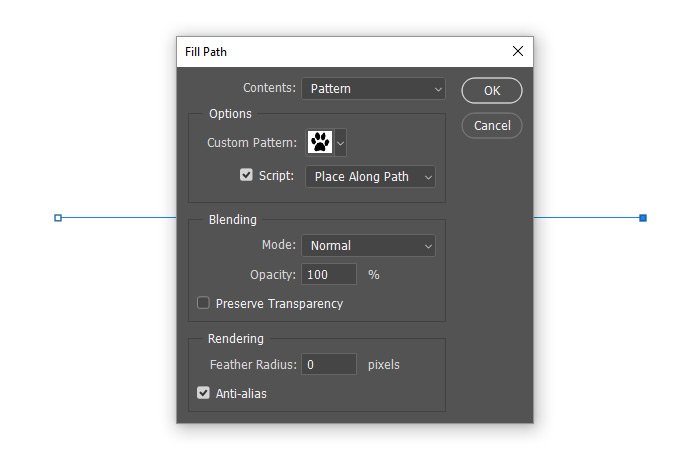
After I do that, the Fill Path dialog box will appear. Inside of that, I’ll choose Pattern from the Contents drop-down, the paw print from the Custom Pattern drop-down, I’ll check the Script box and then I’ll choose Place Along Path from the drop-down to the right of that.
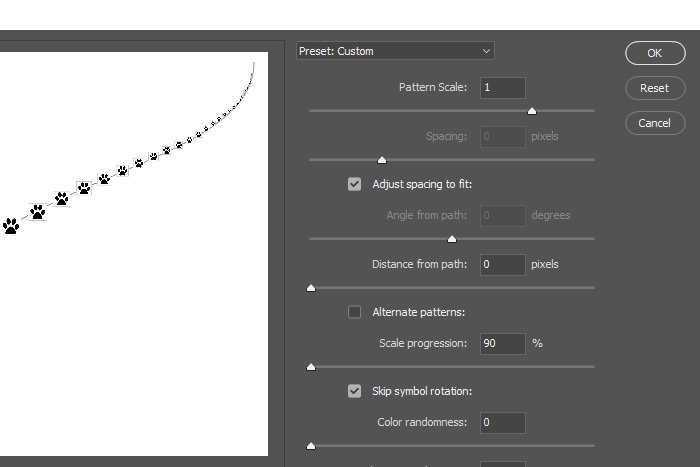
Finally, I’ll click the OK button. When I do this, the Place Along Path palette will appear. I’ll keep all the default values in this palette and just click the OK button. Again, this palette is going to require its own post to cover. For now, the default values should be fine.
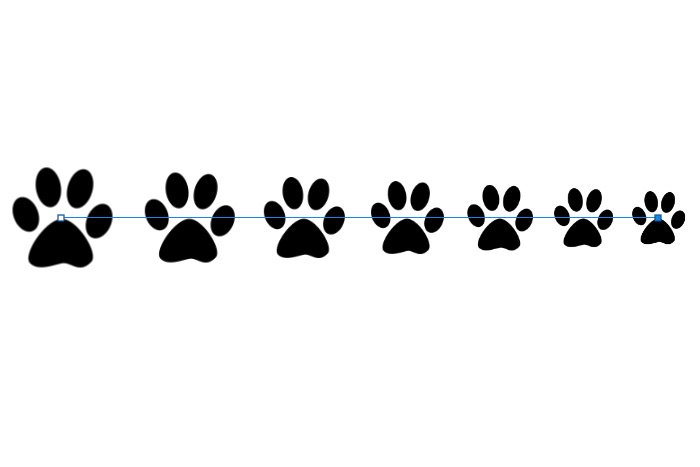
When I click OK this time, I’ll see the custom shape I made earlier appear along the path. How’s that for cool? Just imagine if the path I created earlier was curvy or square or round or whatever.
Paths are one of those things that are extremely helpful to understand. The graphic design side of Photoshop really opens up with them.
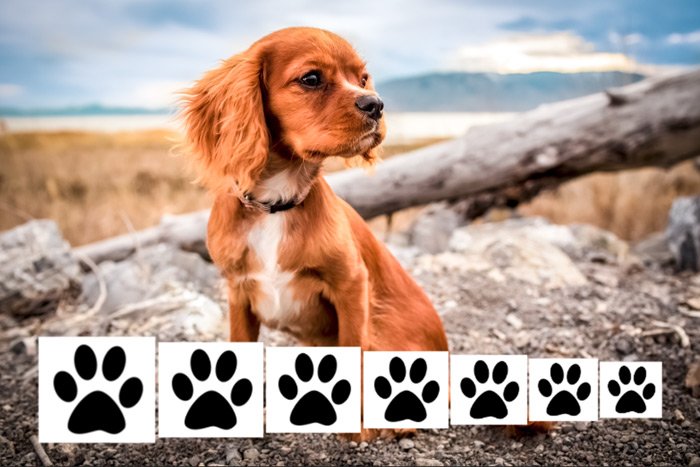
Okay, I obviously know they don’t look very good because of the white boxes around each shape. I’m going to deal with this by heading up to the Image > Adjustments > Invert menu item and clicking.
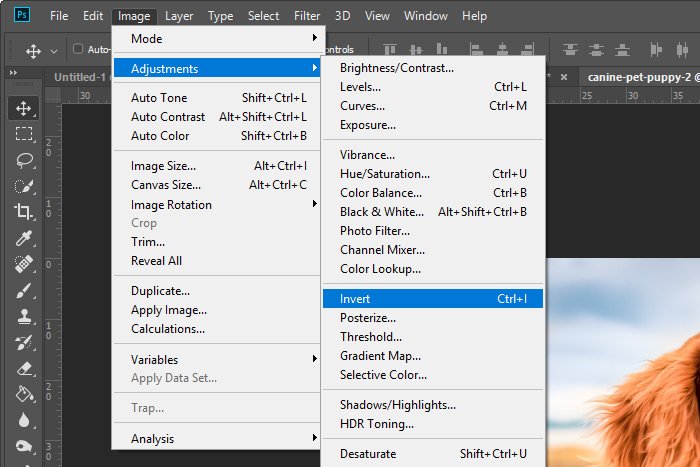
When I do this, the white backgrounds will turn black and the black paws will turn white. Next, I’ll move over to the blending modes drop-down box in the Layers panel and I’ll select Screen from the available options.
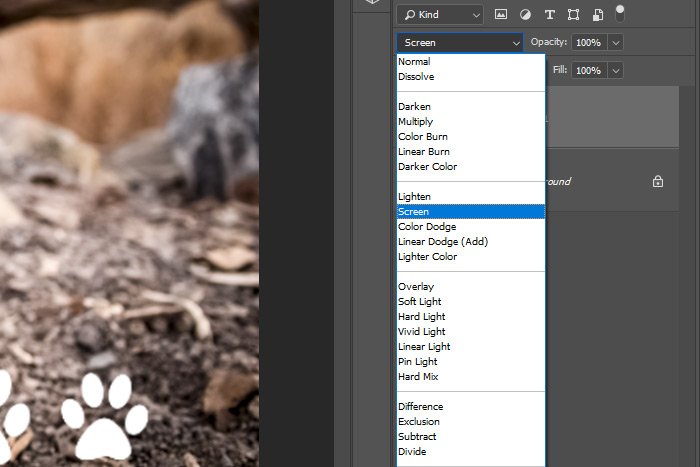
The Screen blending mode removes black, so the shape backgrounds disappear. As an alternative to having to deal with removing either white or black during the final step, I could have just as easily created the custom shape with no background at all. To accomplish this, all I would have had to do was to make the white background layer invisible when I was initially creating the custom shape itself. To do that, I would have clicked the “Eye” icon that sits to the left of the background layer in the Layers panel. Keep this in mind when creating custom shapes. It’ll save you a lot of time later on.
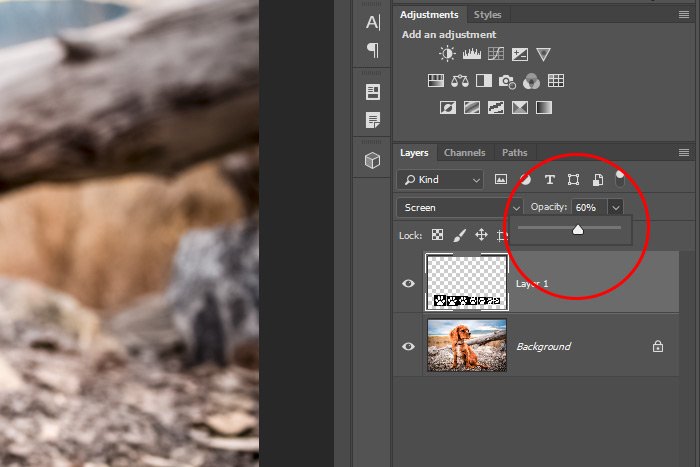
As a final step for this project, I’ll reduce the opacity of the paw prints, so they blend better with the image. To do this, I’ll push the Opacity slider that’s inside of the Layers panel to the left a bit. I think I’ll go to 60%.
Now, let’s take a look at the final image.
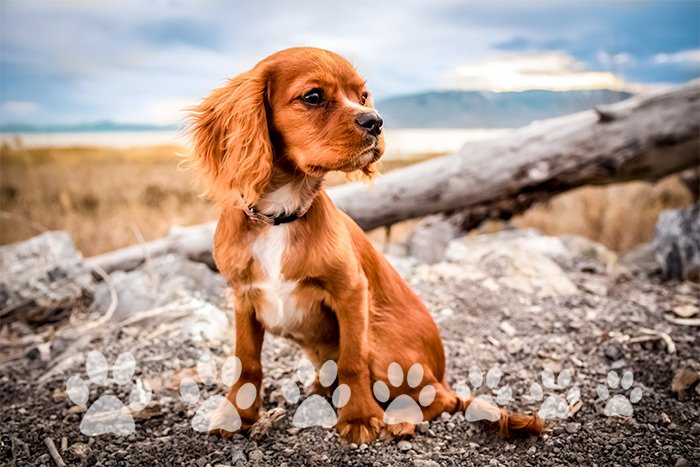
I know this seemed like a lot of work just to place some paw prints on a photograph, but if you think about it, the custom shape is now created. I can use that any time I want. And now that I know how to create shapes along a path, I can make all sorts of things, such as greeting cards, posters, postcards and so much more. If you run through this process once, it may take some time. The second time you run through it though should take just mere minutes.
——
I hope I clearly explained how to create a custom pattern, place patterns along a path and how to use those patterns creatively in a project file. If you have any questions regarding this post, please let me know in the comment section below. Thanks for reading!
In today’s post, I’d like to cover a few different areas of Photoshop you might not have a lot of experience with. I’m going to use the Custom Shape Tool to create a shape. Then, from that shape, I’ll create a custom pattern. After that, I’ll create a path and finally, I’ll apply the pattern to the path. Obviously each and every step I take today requires background (a separate post), but we can treat what I share below as a broad overview of what’s possible.
To be just a bit more specific regarding this project. I’m going to open a photograph into Adobe Photoshop. The photo is going to be of a cute dog and the goal for the project is to add paw prints to the bottom of the photo, in a row. I’ll use a blend mode to make sure the prints fit well with the overall image, but that’s just a finishing touch. Mostly, I’ll be discussing how to create those paw prints.
The Demo Photo
Because this isn’t only about graphics, I’ll be using a photo. It’s of my opinion that a great looking photograph goes quite far with these posts. Images make these things more fun to read. Here’s what I’ll be using today.
Creating the Custom Shape
Before I do anything, I’ll need to create a clean canvas. To do that, I’ll go to the File > New menu item and create a document that’s 1400×900 pixels. I’m randomly choosing these dimensions because they fit my monitor well. You can choose any that fit yours.To draw out today’s paw print, I’ll head over to the Custom Shape Tool in the left toolbar.

Once the tool is active, I’ll go to the options bar up top and select the paw print from the custom shape drop-down box.

If you don’t have all these shapes available to you, you most likely need to add them to the drop-down. The way you do this is to click the small gear icon that sits in the upper right part of the drop-down and when the menu appears, click on All. The ones you don’t see are just hiding and you need to set them so they’re visible.

Once I have the paw print chosen, I’ll need to make sure the correct shape is drawn. For this instance, I’m looking to draw pixels as opposed to a shape or a path. Again, there’s a lot of background that goes with this topic and I’ll cover all of that later on.

To properly draw this shape, I’ll need to create a new empty layer in the Layers panel (so the shape doesn’t merge with the background layer) and make sure the foreground color in my color picker is something visible, such as black. So, I’ll go to the bottom of the Layers panel and I’ll click on the Create New Layer icon and after that, I’ll click on the foreground color over in the left toolbar and make sure the color is set to black.
Finally, to draw the shape, I’ll click once inside of the new document and when the default values of 100px by 100px appear in the Create Custom Shape dialog box, I’ll simply click the OK button.

Doing this will give me a nice perfectly shaped paw print.
Creating the Custom Pattern
Okay, it is now time to create the custom pattern. I’ll be using the shape I just made as the primary element of said pattern.Just as a side note before I get into things further, I want to let you know that you can make lots of things part of a custom pattern. I just decided to use a paw print that was created from a custom shape today, but if you’re into creating patterns, get creative with what I’m about to show you below. I think you’ll be surprised at what can be use to make one of these things.
The first thing I’ll do is to make sure the shape layer is selected and active in the Layers panel. Then, I’ll use the Rectangular Marquee Tool to draw a square selection around the paw print.

Once the shape is selected, I can define the pattern. I’ll head up to the Edit > Define Pattern menu item and click.

When the Pattern Name dialog box appears, I’ll type in a name for the pattern, which in this case will be Paw Print. I’ll then click the OK button to apply the new pattern to Photoshop.

The custom pattern has now been created. If you’re reading this post to learn how to create one of these, these are the instructions. The remainder of this post will be about how to apply a pattern to a path in Photoshop.
Applying a Custom Pattern to a Path
Before I begin this section, I’ll tell you that I’m going to move quickly here. There are a few things that will require much more time if you’re to completely understand them. Especially the Place Along Path dialog box. There’s a lot to that one, but I’m only going to touch on it. I just wanted to warn you.To remove the selection I drew earlier, I’ll use the Select > Deselect menu item up up. Then, I’ll drag the layer with the paw print in it down to the trash can at the bottom of the Layers panel to delete it. Right after that, I’ll create another new layer. In essence, I’d like to get rid of the shape I created and start off with a clean slate. So what I’m left with is a white background layer and an empty layer on top of that. I’ll also make sure that empty layer is active by clicking on it in the Layers panel.
The next thing I’ll do is click on the Pen Tool in the left toolbar.

This is the tool I’ll be using to draw the path. There area few different items and tool I could use for this, but this one is really easy to work with. To draw the path, I’ll click on the left side of the workspace and then on the right. I’d like the path to be perfectly horizontal, so I’ll hold down the Shift key on my keyboard as I’m doing this. Using the Shift key locks paths either perfectly horizontal or perfectly vertical.

Next, with the Pen Tool still active, I’ll right-click in the workspace somewhere and when the menu appears, I’ll click on the Fill Path option. Alternately, I could use the Edit > Fill menu item if the preceding option doesn’t work.

After I do that, the Fill Path dialog box will appear. Inside of that, I’ll choose Pattern from the Contents drop-down, the paw print from the Custom Pattern drop-down, I’ll check the Script box and then I’ll choose Place Along Path from the drop-down to the right of that.

Finally, I’ll click the OK button. When I do this, the Place Along Path palette will appear. I’ll keep all the default values in this palette and just click the OK button. Again, this palette is going to require its own post to cover. For now, the default values should be fine.

When I click OK this time, I’ll see the custom shape I made earlier appear along the path. How’s that for cool? Just imagine if the path I created earlier was curvy or square or round or whatever.

Paths are one of those things that are extremely helpful to understand. The graphic design side of Photoshop really opens up with them.
Applying the Custom Shapes to the Photograph
Now that I’m finished with creating the shapes along the path, I can move them over to the tab that contains the photo of the dog. To do this, I’ll click on the shape layer and drag it up to the photo tab. Then, once the tab in the workspace changes over to the dog photo, I’ll continue to drag the shapes down until they’re on top of the image. Once they are, I’ll drop them. If the shapes need to be resized to make them either larger or smaller, I can do that with the Free Transform tool. The keyboard shortcut of Ctrl+T should handle that. In the case of this project today, I enlarged the shapes. Here’s what they look like on top of the image.
Okay, I obviously know they don’t look very good because of the white boxes around each shape. I’m going to deal with this by heading up to the Image > Adjustments > Invert menu item and clicking.

When I do this, the white backgrounds will turn black and the black paws will turn white. Next, I’ll move over to the blending modes drop-down box in the Layers panel and I’ll select Screen from the available options.

The Screen blending mode removes black, so the shape backgrounds disappear. As an alternative to having to deal with removing either white or black during the final step, I could have just as easily created the custom shape with no background at all. To accomplish this, all I would have had to do was to make the white background layer invisible when I was initially creating the custom shape itself. To do that, I would have clicked the “Eye” icon that sits to the left of the background layer in the Layers panel. Keep this in mind when creating custom shapes. It’ll save you a lot of time later on.
As a final step for this project, I’ll reduce the opacity of the paw prints, so they blend better with the image. To do this, I’ll push the Opacity slider that’s inside of the Layers panel to the left a bit. I think I’ll go to 60%.

Now, let’s take a look at the final image.

I know this seemed like a lot of work just to place some paw prints on a photograph, but if you think about it, the custom shape is now created. I can use that any time I want. And now that I know how to create shapes along a path, I can make all sorts of things, such as greeting cards, posters, postcards and so much more. If you run through this process once, it may take some time. The second time you run through it though should take just mere minutes.
——
I hope I clearly explained how to create a custom pattern, place patterns along a path and how to use those patterns creatively in a project file. If you have any questions regarding this post, please let me know in the comment section below. Thanks for reading!
