15Katey
Member
- Joined
- May 10, 2021
- Messages
- 130
- Reaction Score
- 0
- Points
- 23
- #1
One of the most oddly confusing tasks many of us undertake when working in Adobe Photoshop has to do with printing. We spend all sorts of time editing our photos and graphics, but when it comes time to output them to paper or another medium, so many of us play a guessing game. It’s understandable why we do this as the print setup process can be somewhat convoluted. While there are a lot of options and while they can seem overwhelming, there is a basic path to follow that’s much less complex. It’s that path I intend to share with you today.
In today’s post, I’ll work through the process of printing a photo via Adobe Photoshop, from start to finish. I’ll focus on the things that matter, such as image sizing, paper selection and printer selection, along with a few other important details. While there are many more options during this process that I won’t discuss, what I do cover should point you in the right direction and should assist you with printing out files in a straightforward manner.

For the purposes of this post, I’d like to print the image with a size of 6 inches by 4 inches.
To resize the file, since it isn’t sized the way I want it already, I’ll head up to the Image > Image Size menu item and click.
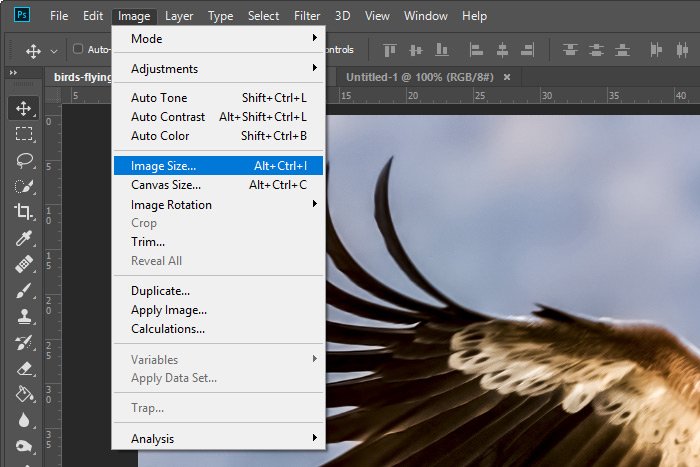
When I do this, the Image Size dialog box will appear.
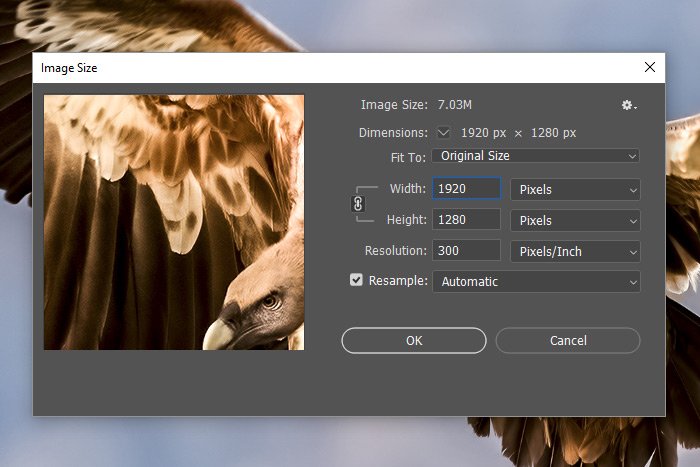
As things stand, the image is sized in pixels. Because I’m going to be printing it out to a certain specification (an actual physical size), I’d like it sized in inches. To do that, I’ll click on the drop-down box that’s value is currently pixels and I’ll change it to inches. Because both the width and the height dimensions are locked to one another, both values will change to inches. Also, since the width is currently 6.4 inches, I’d like to reduce that to 6. When I do that, since the dimensions are locked, the height of 4.267 will automatically change to 4.
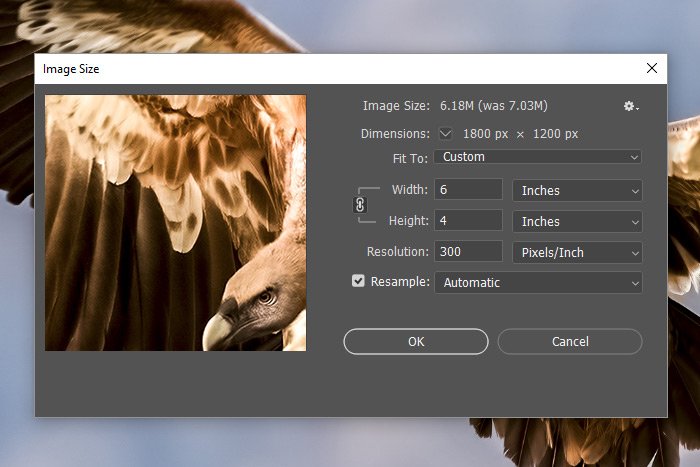
When I’m finished, I’ll click on the OK button and I’ll see the actual image size in Photoshop reduce slightly. This is normal, since I shrunk things a little.
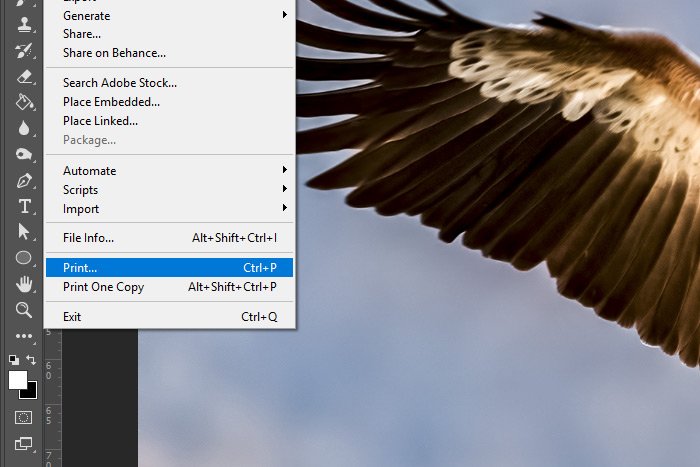
When I do that, the Photoshop Print Settings dialog box appears.
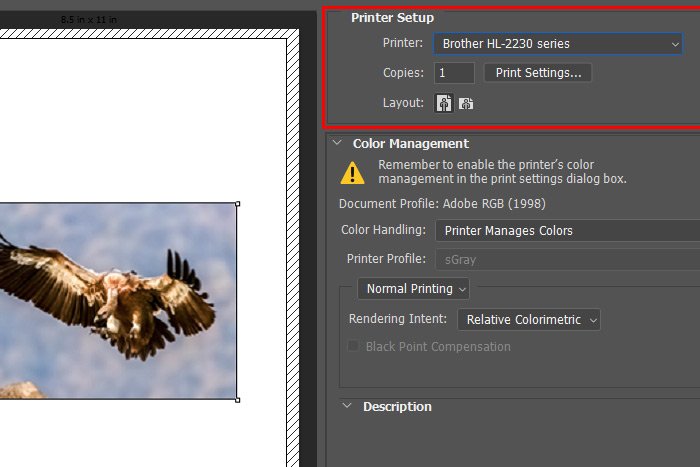
The area I’ll be working in first is the Printer Setup section and that’s in the upper right corner of the dialog box. I encapsulated it in red in the above screenshot. To choose which printer I’d like to use, I’ll click on the Printer drop-down box. In this case, I’ll be using my Brother HL-2230 series printer. This happens to be a black and white laser printer. If I were really printing this out for a legitimate purpose, I’d likely have a slick color printer that I’d choose.
The next thing that needs to get done is to choose how many copies of the print I’d like. In this case, one is fine. After that, I’ll choose the size of paper that I’d like the image to be printed to as well as the paper orientation. To access these controls, I’ll click the Print Settings button that sits directly below the drop-down. After I click that button, the Printer Properties dialog for the currently selected printer will appear.
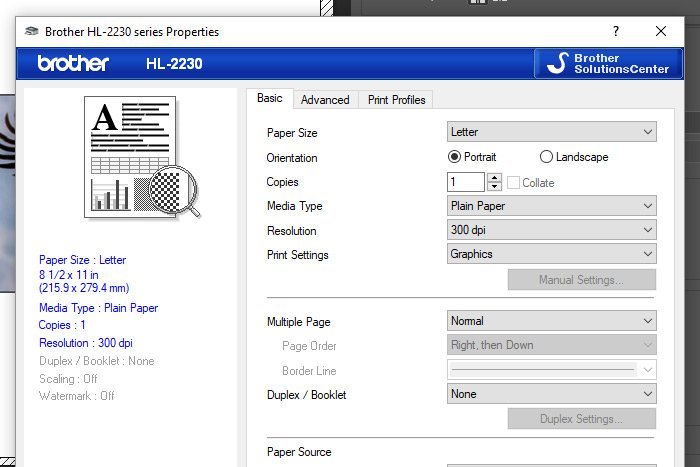
This is where things get interesting. The dialog that just opened pertains specifically to my installed printer. It also pertains to the printer I selected in the previous step. Unless you have the same printer that I do, you’ll see a different dialog with similar but different available settings. Since what I’m doing in this step is fairly straightforward, you shouldn’t have any problem following along and making the same settings in your own dialog box.
For Paper Size, I’ll choose Letter, which is 8 1/2 x 11 inches. Since the image is landscape in its orientation, I’ll choose Landscape for the print Orientation as well. The number of Copies has already been set to 1 in the previous step and since the file Resolution has already been set to 300dpi in Photoshop (under Image > Image Size), I’ll make sure this same resolution is set in this dialog box. Depending on what type of paper I’ll be printing to, I’ll make an appropriate selection for Media Type. In this case, I’ll keep this option set to Plain Paper. If I were to be printing out a high quality image to sell or hang on the wall, I’d likely print to glossy photo paper. If I wanted to see a preview of the changes I just made, I could click the OK button and it would show in Photoshop’s Print Settings dialog.
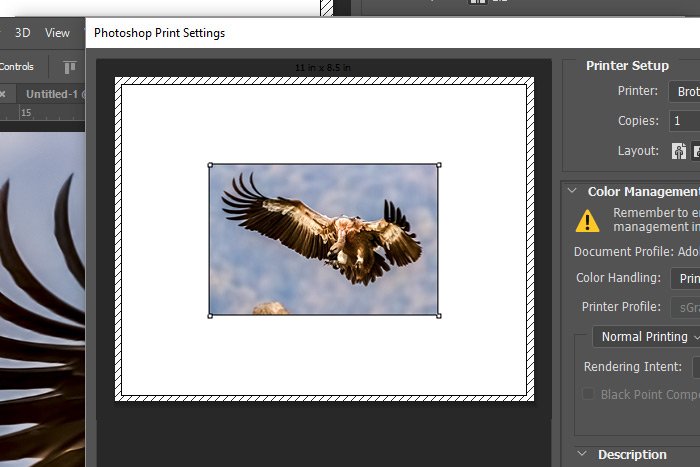
That’s looking good, although there are a few more areas that need attention.
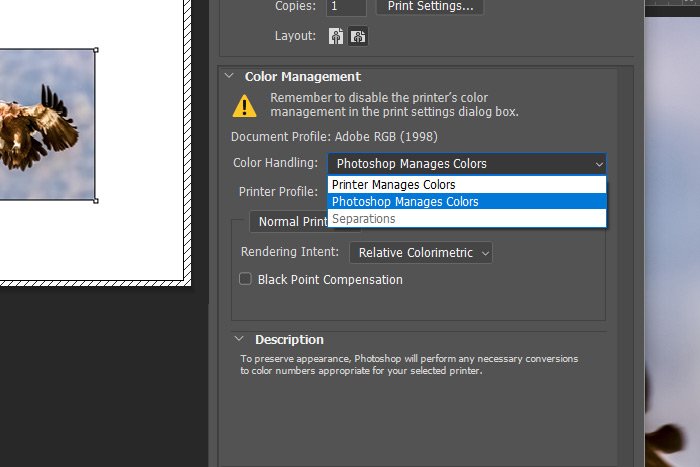
The Rendering Intent option is an important distinction to make as well. Please read below to learn about the options available regarding this. At this point in time, the options are Perceptual, Saturation, Relative Colorimetric and Absolute Colorimetric.
“For most images, Relative Colorimetric rendering produces superior results. For others, Perceptual will be far better. These cases include images with significant shadow details where a slight lightening of the print is acceptable to open up the shadows. Also images with areas of highly saturated color can benefit from Perceptual rendering. If you see color banding in the soft proof with Rel. Color. selected, try Perceptual. With experience you will get a feel for which images best pair with each rendering intent.”
If you hover over each option in the Rendering Intent drop-down, you’ll see some text offered by Photoshop in the Description box right below. If I hover over Relative Colorimetric, I’ll see this text:
Compares the white of the source color space to that of the destination color space and shifts all color accordingly. Out-of-gamut colors are shifted to the closest reproducible color in the destination color space. Relative colorimetric preserves more of the original colors in an image than Perceptual.
Depending on your printer, some trial and error may be called for. That’s the only way you’ll know which one of these options will give you the best result.
After I’m finished with the most critical options in this section, I’ll move onto the Position & Size section below.
I’d like this image to be centered in the print. So, I’ll click the checkbox that’s labeled Center. If you look to the right of this box, you’ll see more positioning options. If you have certain specifications, go ahead and fill those in there.
I’m going to ignore the Scaled Print Size section because I already sized the image earlier in Photoshop. Because of this earlier work, I don’t see the need to do any additional scaling at this time. Of course, if you’re working on something special and it requires scaling after the fact, go ahead and make use of this option.
One very helpful feature that can be found in this print setup area is called Printing Marks. Let’s say I wanted to print this image out and then cut it out so all the extra white paper is gone and all I’m left with is the image itself. Sort of like a postcard where all you see is the photograph or drawing. If I were to do that, I might need some guides to assist me. I can set these types of guides up right inside of Photoshop. Take a look at this section.
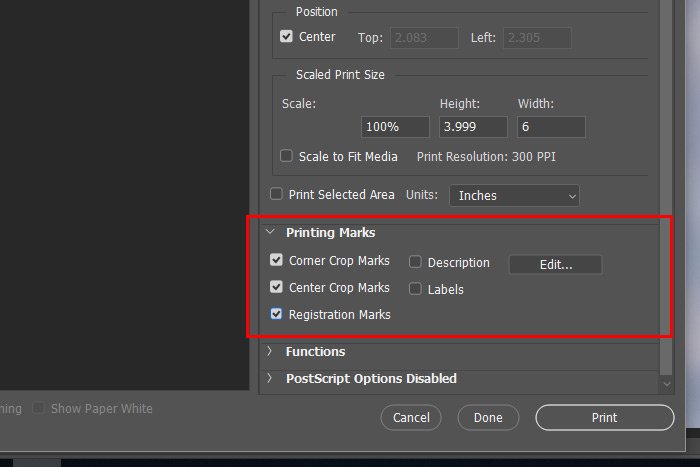
There are a few check boxes that control which marks can be added to the printout. They are currently Corner Crop Marks, Center Crop Marks, Registration Marks, Description and Labels. Obviously, not each of these options adds marks to help with trimming the paper from the image, but most of them do. The Description and Label options add text to the printout.
I’ll go ahead and check the Corner Crop Marks and the Center Crop Marks boxes so you can get an idea of what these things do. Take a look below.
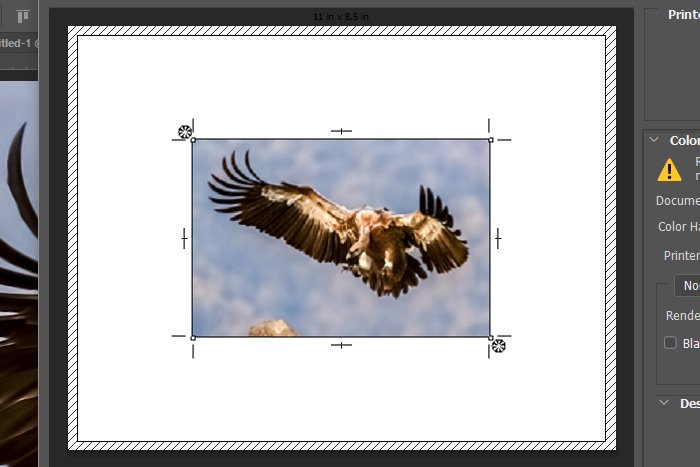
Do you see those lines around the image? Those are the crop marks.
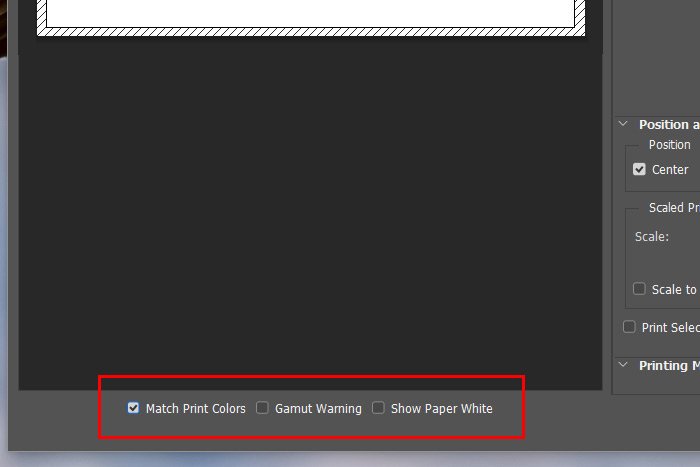
These three options are merely meant to give you an indication of what things will look like after they are printed. This is fairly advanced and is extremely helpful. If I check the Match Print Colors, in my case, I’ll see the preview image turn to gray. That’s because I’m using a black and white printer. If I were using a color printer, that preview would show what the color printout would look like. If I checked the Gamut Warning box, I’d see a gray overlay on top of any area that’s outside the capabilities of the printer being used.
“A gamut is the range of colors that a color device can display or print. A color that may be displayed on your monitor in RGB may not be printable in the gamut of your CMYK printer. For instance, the nice blue on your monitor that prints as purple.”
This option should be used every time you print and its advice should be heeded. There’s no sense in sending something to the printer that the printer can’t print.
Finally, Photoshop offers a preview based on the type of paper you intend to print to. If I check the Show Paper White option, the print preview will update its look depending on that specific type of paper. That’s pretty awesome.
Finally, after making all the settings changes and after looking at the previews, I’ll go ahead and click on the Print button that’s down in the lower right area of the dialog box. Once I do that, assuming my printer is turned on, the image will print out and I’ll be a very happy camper.
——
I hope I clearly explained how to set up and print an image using Adobe Photoshop. If you have any questions regarding this post, please leave them in the comment section down below. Thanks for reading!
In today’s post, I’ll work through the process of printing a photo via Adobe Photoshop, from start to finish. I’ll focus on the things that matter, such as image sizing, paper selection and printer selection, along with a few other important details. While there are many more options during this process that I won’t discuss, what I do cover should point you in the right direction and should assist you with printing out files in a straightforward manner.
The Demo Photo
I’m not sure if it’s important that I share exactly what the subject of the photo I’ll be using for this demonstration is, but I will anyway. The image below is of a bird landing. It has a default size of 6.4 inches by 4.267 inches and a resolution of 300dpi.
For the purposes of this post, I’d like to print the image with a size of 6 inches by 4 inches.
Resizing the Photograph
The first and probably most important thing I’m going to do is properly size the photo for printing. This is assuming that I’ve already gone ahead and completed any edits I’d like to make to it. Basically, I’m at the point of output, so editing things isn’t even a question anymore.To resize the file, since it isn’t sized the way I want it already, I’ll head up to the Image > Image Size menu item and click.

When I do this, the Image Size dialog box will appear.

As things stand, the image is sized in pixels. Because I’m going to be printing it out to a certain specification (an actual physical size), I’d like it sized in inches. To do that, I’ll click on the drop-down box that’s value is currently pixels and I’ll change it to inches. Because both the width and the height dimensions are locked to one another, both values will change to inches. Also, since the width is currently 6.4 inches, I’d like to reduce that to 6. When I do that, since the dimensions are locked, the height of 4.267 will automatically change to 4.

When I’m finished, I’ll click on the OK button and I’ll see the actual image size in Photoshop reduce slightly. This is normal, since I shrunk things a little.
Selecting the Printer & Printer Settings
The next thing I’m going to do is choose the printer that I’ll be using to print this image out. Since I only have one printer hooked up to this computer I’m using, that’s going to have to be it. To access the printer selection area, I’ll go up to the File > Print menu item and click.
When I do that, the Photoshop Print Settings dialog box appears.

The area I’ll be working in first is the Printer Setup section and that’s in the upper right corner of the dialog box. I encapsulated it in red in the above screenshot. To choose which printer I’d like to use, I’ll click on the Printer drop-down box. In this case, I’ll be using my Brother HL-2230 series printer. This happens to be a black and white laser printer. If I were really printing this out for a legitimate purpose, I’d likely have a slick color printer that I’d choose.
The next thing that needs to get done is to choose how many copies of the print I’d like. In this case, one is fine. After that, I’ll choose the size of paper that I’d like the image to be printed to as well as the paper orientation. To access these controls, I’ll click the Print Settings button that sits directly below the drop-down. After I click that button, the Printer Properties dialog for the currently selected printer will appear.

This is where things get interesting. The dialog that just opened pertains specifically to my installed printer. It also pertains to the printer I selected in the previous step. Unless you have the same printer that I do, you’ll see a different dialog with similar but different available settings. Since what I’m doing in this step is fairly straightforward, you shouldn’t have any problem following along and making the same settings in your own dialog box.
For Paper Size, I’ll choose Letter, which is 8 1/2 x 11 inches. Since the image is landscape in its orientation, I’ll choose Landscape for the print Orientation as well. The number of Copies has already been set to 1 in the previous step and since the file Resolution has already been set to 300dpi in Photoshop (under Image > Image Size), I’ll make sure this same resolution is set in this dialog box. Depending on what type of paper I’ll be printing to, I’ll make an appropriate selection for Media Type. In this case, I’ll keep this option set to Plain Paper. If I were to be printing out a high quality image to sell or hang on the wall, I’d likely print to glossy photo paper. If I wanted to see a preview of the changes I just made, I could click the OK button and it would show in Photoshop’s Print Settings dialog.

That’s looking good, although there are a few more areas that need attention.
Choosing Print Quality & Alignment
The next step in the print process has to do with the two sections below the Printer Setup section. These two sections are called Color Management and Position & Size. In the Color Management area, I want to be sure to set the Color Handling drop-down box to Photoshop Manages Colors. After all, I did all sorts of work in Photoshop and had all the related color setting decisions made. Why would I want to bypass them and have the printer manage the colors?
The Rendering Intent option is an important distinction to make as well. Please read below to learn about the options available regarding this. At this point in time, the options are Perceptual, Saturation, Relative Colorimetric and Absolute Colorimetric.
“For most images, Relative Colorimetric rendering produces superior results. For others, Perceptual will be far better. These cases include images with significant shadow details where a slight lightening of the print is acceptable to open up the shadows. Also images with areas of highly saturated color can benefit from Perceptual rendering. If you see color banding in the soft proof with Rel. Color. selected, try Perceptual. With experience you will get a feel for which images best pair with each rendering intent.”
If you hover over each option in the Rendering Intent drop-down, you’ll see some text offered by Photoshop in the Description box right below. If I hover over Relative Colorimetric, I’ll see this text:
Compares the white of the source color space to that of the destination color space and shifts all color accordingly. Out-of-gamut colors are shifted to the closest reproducible color in the destination color space. Relative colorimetric preserves more of the original colors in an image than Perceptual.
Depending on your printer, some trial and error may be called for. That’s the only way you’ll know which one of these options will give you the best result.
After I’m finished with the most critical options in this section, I’ll move onto the Position & Size section below.
I’d like this image to be centered in the print. So, I’ll click the checkbox that’s labeled Center. If you look to the right of this box, you’ll see more positioning options. If you have certain specifications, go ahead and fill those in there.
I’m going to ignore the Scaled Print Size section because I already sized the image earlier in Photoshop. Because of this earlier work, I don’t see the need to do any additional scaling at this time. Of course, if you’re working on something special and it requires scaling after the fact, go ahead and make use of this option.
One very helpful feature that can be found in this print setup area is called Printing Marks. Let’s say I wanted to print this image out and then cut it out so all the extra white paper is gone and all I’m left with is the image itself. Sort of like a postcard where all you see is the photograph or drawing. If I were to do that, I might need some guides to assist me. I can set these types of guides up right inside of Photoshop. Take a look at this section.

There are a few check boxes that control which marks can be added to the printout. They are currently Corner Crop Marks, Center Crop Marks, Registration Marks, Description and Labels. Obviously, not each of these options adds marks to help with trimming the paper from the image, but most of them do. The Description and Label options add text to the printout.
I’ll go ahead and check the Corner Crop Marks and the Center Crop Marks boxes so you can get an idea of what these things do. Take a look below.

Do you see those lines around the image? Those are the crop marks.
Previewing the Printout & Printing
Okay, moving on to the final set of options that I’ll discuss in this post. I basically want to talk about one more area that has to do with how this image might actually appear after it’s printed. If I take a look underneath the print preview (the large white box) area, I’ll see three check boxes. These boxes are labeled Match Print Colors, Gamut Warning and Show Paper White.
These three options are merely meant to give you an indication of what things will look like after they are printed. This is fairly advanced and is extremely helpful. If I check the Match Print Colors, in my case, I’ll see the preview image turn to gray. That’s because I’m using a black and white printer. If I were using a color printer, that preview would show what the color printout would look like. If I checked the Gamut Warning box, I’d see a gray overlay on top of any area that’s outside the capabilities of the printer being used.
“A gamut is the range of colors that a color device can display or print. A color that may be displayed on your monitor in RGB may not be printable in the gamut of your CMYK printer. For instance, the nice blue on your monitor that prints as purple.”
This option should be used every time you print and its advice should be heeded. There’s no sense in sending something to the printer that the printer can’t print.
Finally, Photoshop offers a preview based on the type of paper you intend to print to. If I check the Show Paper White option, the print preview will update its look depending on that specific type of paper. That’s pretty awesome.
Finally, after making all the settings changes and after looking at the previews, I’ll go ahead and click on the Print button that’s down in the lower right area of the dialog box. Once I do that, assuming my printer is turned on, the image will print out and I’ll be a very happy camper.
——
I hope I clearly explained how to set up and print an image using Adobe Photoshop. If you have any questions regarding this post, please leave them in the comment section down below. Thanks for reading!
