JodyBuchanan
Member
- Joined
- May 10, 2021
- Messages
- 138
- Reaction Score
- 0
- Points
- 21
- #1
In most videos, there’s audio. Unless you’re making a silent video for a specific purpose, there’s going to be some audio in it. Sometimes, video is taken and the audio is added to the file as it’s being worked on in an editor. This type of thing happens quite a bit when more than one clip is combined in the editor, which requires the audio be added after the fact. Think about television shows, commercials, compilations and almost any other type of video that transitions between clips. When adding audio that spans a good portion of the entire video and is played in the background, that audio is considered what’s called a “music bed.” This type of audio usually consists of bass, drums, piano, guitars or other types of musical effects.
There are occasions when more than one audio clip needs to be added to a project. At first glance, many editors shy away from this type of thing because audio isn’t worked on that often. I’m here to tell you that working with audio in Adobe Photoshop, while editing video, is a snap. There’s nothing to it. And actually, the list of possibilities is rather brief, so it doesn’t take very long at all for someone to wrap their head around the whole extent of things. Like video clips, audio clips can be faded in and out, split and moved to their own independent timelines and unlike video, audio clips can have their volume set, independent from other audio clips. If you’re familiar with working with video, working with audio should be second nature.
In today’s post, I’d like to launch a random silent video into Adobe Photoshop. From there, I’ll demonstrate how to pull in an audio file, split that file, move its pieces, adjust the volume of those pieces and add some volume fades at the beginning and the end of the timeline. All of this should only take a few minutes, so keep reading below.
To bring the audio file into the timeline, I’ll click the small music note that sits to the right of the words Audio Track in the Timeline panel. Doing this will open a menu that has an Add Audio option.
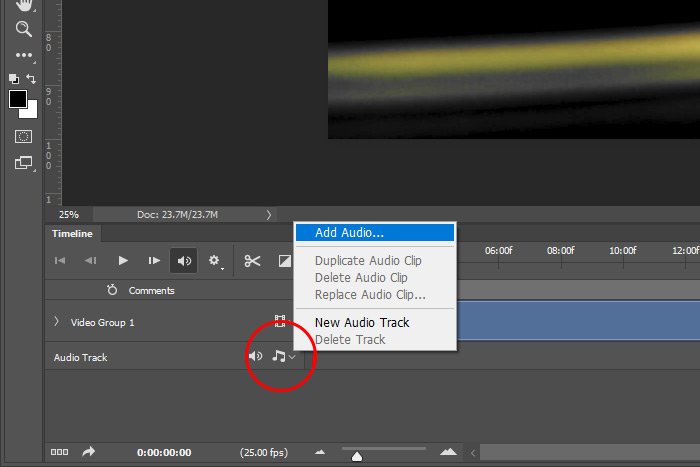
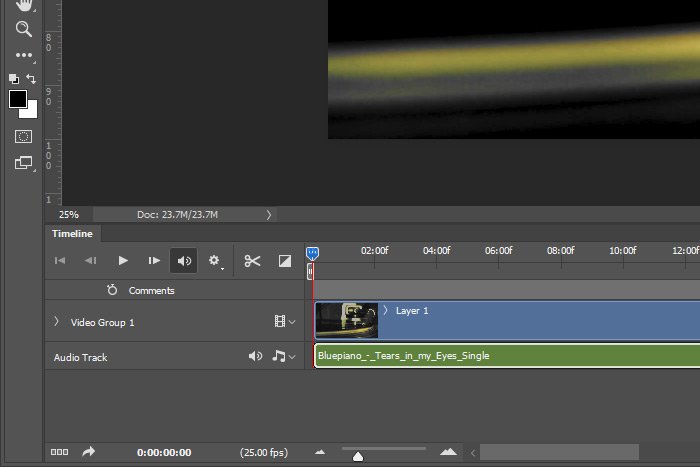
When I use that option, I’ll have the ability to search my computer for the audio file. When I find it, I’ll double-click it to add it to the workspace. I just added it and you can see the new audio track in green in the screenshot below.
I do need to let you know that when you shorten the audio like this, the part of the green bar that disappears also makes that part of the sound disappear. It actually gets cut right out. If I wanted to trim the music from the end, I could follow the same instructions, but I would pull the end of the track to the left, towards the beginning of the timeline.
Let’s say I wanted to split this audio file and then trim it the way I just explained, because it’s just too long. Or perhaps because there’s a part in it that I don’t like. Whatever the reason, I could easily cut a portion of the audio out by using the Split tool. This is the icon that looks like a pair of scissors in the Timeline panel.
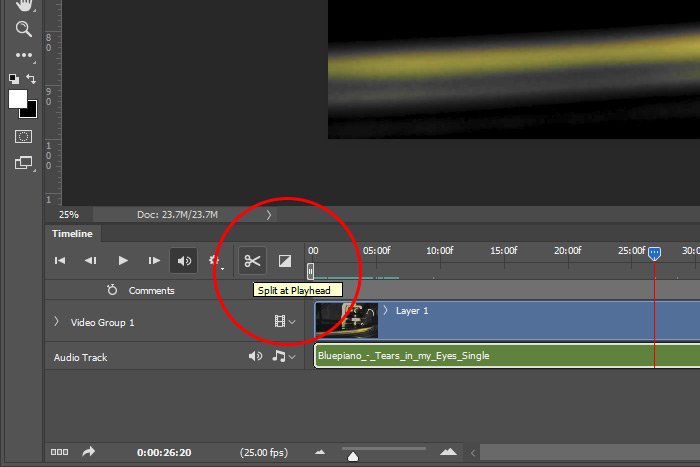
When I click that icon, the audio track will get cut wherever the playhead happens to be, so it’s important to move the playhead where I want the sound to get cut. In this case, I moved the playhead over to the right a bit and chopped it there.
At this point, I’ll need someplace to put the newly created second part of the audio track. As of right now, all I have available is the one audio track in the Timeline panel. To add a new audio track “layer,” I’ll click on the small music note icon again, but this time, I’ll select the New Audio Track option.
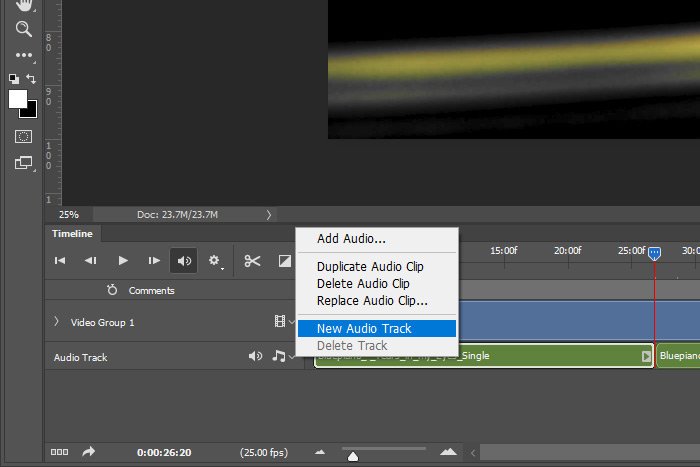
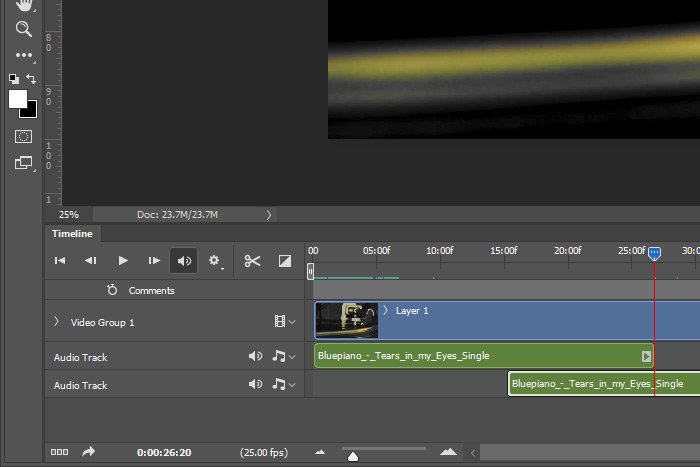
When I do this, a new audio track layer will appear below the existing one and I can click and drag the second part of the audio down into that new space.
Both of the sound fade controls and the volume control are located in the same small panel. To access that panel, simply click on the small arrow inside the very end of the track itself.
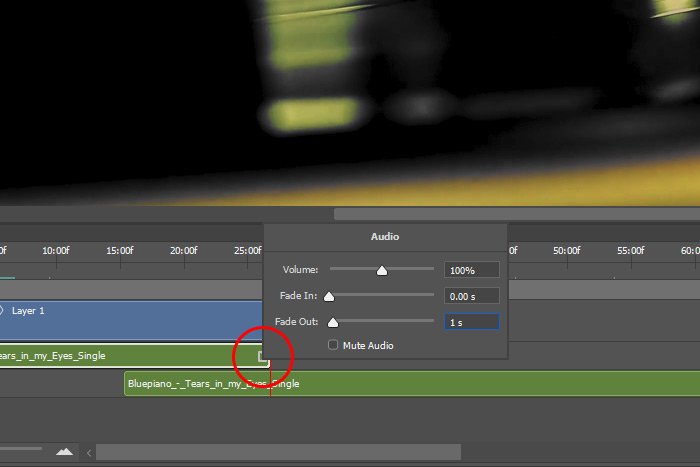
Typically, you’d want to fade out the end of the first track and fade in the second. Also, if the sound is too loud or not loud enough, you can control the volume of each track in the same panel. Each track has its own panel.
——
I hope I clearly explained how to manage audio (adding an audio file, adding a new track, splitting a track, fading in and out sound and adjusting volume) in the Timeline panel of Adobe Photoshop. If you have any questions regarding this post, please leave them in the comment section down below. Thanks for reading!
COMMENT: How do you save an audio only sound clip from Photoshop as an MP3 file? I see no options in “Save AS” for MP3 files.
There are occasions when more than one audio clip needs to be added to a project. At first glance, many editors shy away from this type of thing because audio isn’t worked on that often. I’m here to tell you that working with audio in Adobe Photoshop, while editing video, is a snap. There’s nothing to it. And actually, the list of possibilities is rather brief, so it doesn’t take very long at all for someone to wrap their head around the whole extent of things. Like video clips, audio clips can be faded in and out, split and moved to their own independent timelines and unlike video, audio clips can have their volume set, independent from other audio clips. If you’re familiar with working with video, working with audio should be second nature.
In today’s post, I’d like to launch a random silent video into Adobe Photoshop. From there, I’ll demonstrate how to pull in an audio file, split that file, move its pieces, adjust the volume of those pieces and add some volume fades at the beginning and the end of the timeline. All of this should only take a few minutes, so keep reading below.
Adding Audio to Workspace
Okay, I already went ahead and launched the video clip into Photoshop. To do this, I simply went to the File > Open menu item, found the video file in my computer and double-clicked it. At this point, I’d like to also include the audio track to the timeline to add some flavor. Appropriately, the video is of a record turning on a turntable and the audio is of some piano music. I think both files will work well together. You can consider what I’m adding to this workspace a music bed because I can easily lower the volume of it and add other audio later on. Perhaps a person talking or some other type of more prominent sound.To bring the audio file into the timeline, I’ll click the small music note that sits to the right of the words Audio Track in the Timeline panel. Doing this will open a menu that has an Add Audio option.

When I use that option, I’ll have the ability to search my computer for the audio file. When I find it, I’ll double-click it to add it to the workspace. I just added it and you can see the new audio track in green in the screenshot below.

Lengthening, Shortening & Splitting the Audio Track
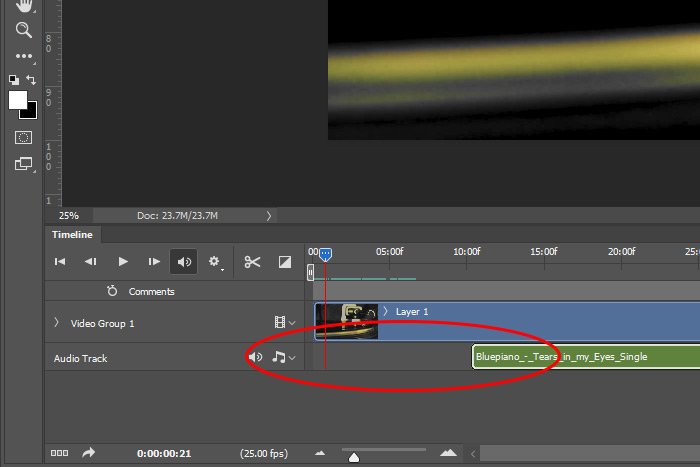
As you might well expect, audio tracks that are found online will most likely never be the perfect length for whatever video it is you’re attempting to align it with. Luckily, Photoshop has a few tools to assist us with this little problem. Within Photoshop, right in the timeline, I have the ability to shorten the audio from the beginning, the end or to split it. To shorten the audio from the beginning, all I need to do is hover my mouse pointer over the green bar at its beginning until the pointer changes into a line-like icon, click and drag to the right. I did that and as you can see in the screenshot below, the green bar now begins a bit later than it did earlier. If I wanted the audio to start when the video starts, I can click and drag the green bar back to the start point (the 0:00 mark).
I do need to let you know that when you shorten the audio like this, the part of the green bar that disappears also makes that part of the sound disappear. It actually gets cut right out. If I wanted to trim the music from the end, I could follow the same instructions, but I would pull the end of the track to the left, towards the beginning of the timeline.
Let’s say I wanted to split this audio file and then trim it the way I just explained, because it’s just too long. Or perhaps because there’s a part in it that I don’t like. Whatever the reason, I could easily cut a portion of the audio out by using the Split tool. This is the icon that looks like a pair of scissors in the Timeline panel.

When I click that icon, the audio track will get cut wherever the playhead happens to be, so it’s important to move the playhead where I want the sound to get cut. In this case, I moved the playhead over to the right a bit and chopped it there.
At this point, I’ll need someplace to put the newly created second part of the audio track. As of right now, all I have available is the one audio track in the Timeline panel. To add a new audio track “layer,” I’ll click on the small music note icon again, but this time, I’ll select the New Audio Track option.

When I do this, a new audio track layer will appear below the existing one and I can click and drag the second part of the audio down into that new space.

Adjusting Volume & Adding Audio Fades
In general, when splitting audio and moving one section of it to it’s own track, you’ll need to overlap both sections and fade them so they sound smooth. Unless you’re going for the abrupt and sharp sound, overlapping and fading it is. I’ll give you the instructions for how to take care of these tasks now.Both of the sound fade controls and the volume control are located in the same small panel. To access that panel, simply click on the small arrow inside the very end of the track itself.

Typically, you’d want to fade out the end of the first track and fade in the second. Also, if the sound is too loud or not loud enough, you can control the volume of each track in the same panel. Each track has its own panel.
——
I hope I clearly explained how to manage audio (adding an audio file, adding a new track, splitting a track, fading in and out sound and adjusting volume) in the Timeline panel of Adobe Photoshop. If you have any questions regarding this post, please leave them in the comment section down below. Thanks for reading!
COMMENT: How do you save an audio only sound clip from Photoshop as an MP3 file? I see no options in “Save AS” for MP3 files.
