WendyMay
Member
- Joined
- May 11, 2021
- Messages
- 142
- Reaction Score
- 0
- Points
- 21
- #1
There are many methods for selecting something in Adobe Photoshop, but only a few ways to modify a selection once it’s been made. While the more traditional tools are somewhat strict in their usage (but becoming less strict everyday), there are a few, not as frequently used, tools that really should be looked at more closely. One of these selection tools is the Color Range Command and it’s extremely easy to take advantage of. It’s also quite powerful, so let’s not forget about that.
One of the issues I see quite often has to do with having a selection gradually fade out from its origin point. I know that some of the selection tools try to take care of this in their own ways, such as altering the Tolerance values of the Magic Wand Tool and changing the Feather values of the Rectangular Marquee Tool and the like. While I’ll get into some of the limitations of using the Magic Wand Tool below, I do want to mention that we have a tool that’s much more capable in many instances and that’s the one I mentioned above; the Color Range Command. At least for having edges gradually fade out, if that’s the look you’re going for.
In today’s post, I’d like to offer you a few examples of how the Color Range Command can compare to the Magic Wand Tool while selecting some flames at night. For the Color Range Command, I’ll use the Fuzziness slider in an attempt to blend the flames into the background of a layer and for the Magic Wand Tool, I’ll use the Tolerance field. I think this post will give you a good idea of what the differences are between these two tools and will help you decide which one you should use for your projects that require certain outcomes.
Changing Colors with Color Range Selection in Adobe Photoshop
I’ll also use the Paint Bucket Tool to pour in the color black. You can see that I’ve done this already in the above screenshot.
I’m now going to head over to the left toolbar to activate the Magic Wand Tool.
After that, I’ll move to the options bar up above the image in the workspace and I’ll set the Tolerance value to 100. This tolerance should give the selection a nice spread. After all, I want to select a good portion of the flames. If the tolerance was too low, not enough flame would be selected and if it was too high, the entire image would be selected. Let’s see how 100 does. I’ll click on the center area of the flames now. I’ll also hold the Shift key down on my keyboard and select an unselected area if need to, just to expand the selection.
That looks pretty good. Now, I’ll click on the Add Layer Mask icon (after making sure the image layer in the Layers panel is active) at the bottom of the Layers panel to apply a mask. Doing this will keep the selected area visible while hiding anything that wasn’t selected in the image layer. The selected area will appear on the black background.
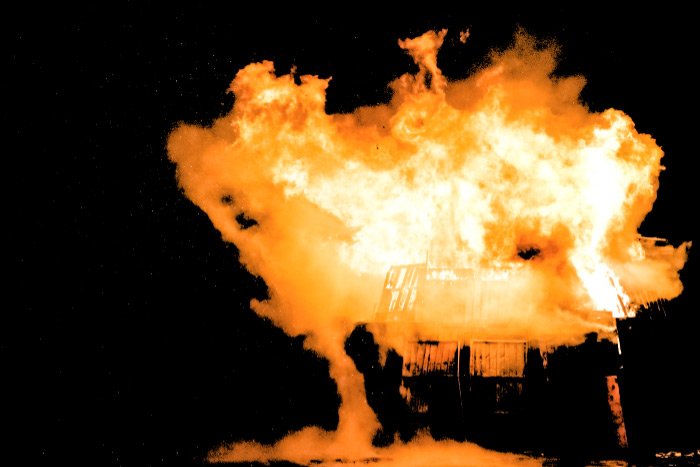
That doesn’t look terrible, but it could look better. And really, I could probably make it look a lot better with some tolerance adjustments and some expansion of the selection area. Truth be told, it looks fairly good because it’s on the same color background. What if I wanted to move those flames over to a white background? I’ll use the Paint Bucket Tool again to change black to white. Let’s see how the edges look now.
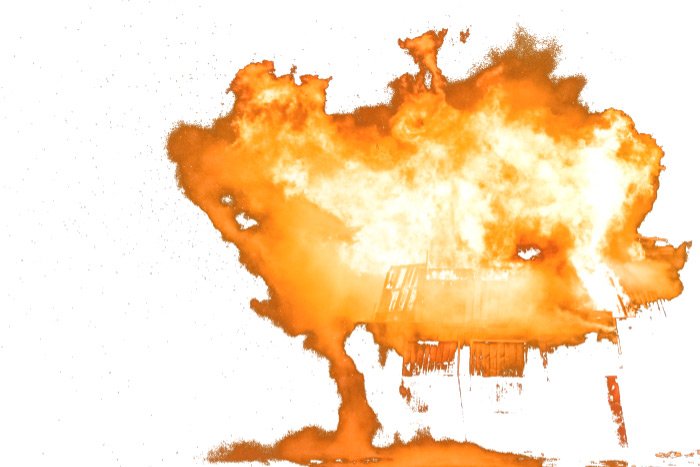
Yeah, that’s not looking so hot anymore. So if I did choose to expand the selection with this tool and while it does have the potential to look very good on the same background color, it’s only when I change the background color does the whole thing fall apart. It’s the edges I care about most. The Magic Wand Tool does a great job at selecting, but when it comes to transitioning that selection into the background, it doesn’t do the greatest job. There has to be a better way.
Changing Colors with Color Range Selection in Adobe Photoshop
I wanted to let you know about this because I’m not going to be covering this process in great detail. I’ll be focusing primarily on the Fuzziness slider below.
Okay, I’ll start this process off with a fresh image. It’s the same one as before, but there will be nothing done to this one. I’ll go ahead and unlock this image layer in the Layers panel and I’ll create a new layer and fill it with black, just as I did with the example above. Next, I’ll go up to the Select > Color Range menu item and click.
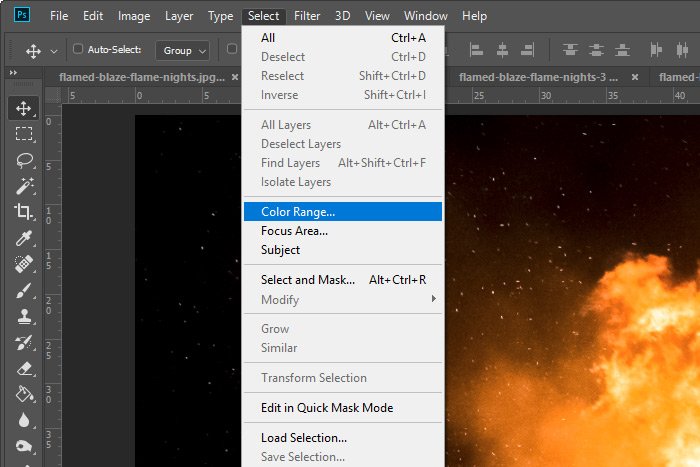
Once I do that, the Color Range dialog box will appear. I’ll keep an eye on the black and white image inside of this dialog while I click on the areas of the flame I’d like selected. If I want to expand my selection, I can again hold down the Shift key on my keyboard and click other areas. I can also click and drag my mouse pointer for even more of a selection.
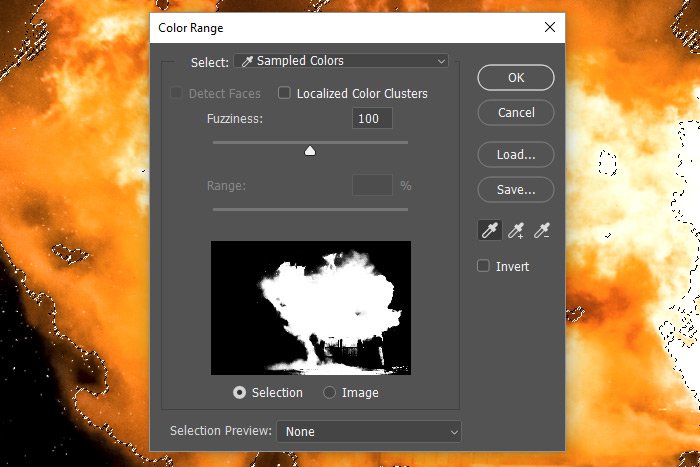
The Color Range Command is rather awesome. What’s really awesome about it though is that it can expand a selection based on luminance values. So, if I wanted to select the most orange flame, but I also wanted to expand that initial selection to some flame that’s not as bright, I could do that. By pushing the Fuzziness slider to the right, I can expand the initial selection to include whatever the value of the slider is in both directions. As you can see in the above screenshot, I pushed the slider to the right so the value reads 100. This means that I’ll have my initial area selected and I’ll also have any area of the image that’s both 100 luminance levels brighter than that area as well as darker than that area. This is what creates the fade I was talking about earlier. The best part of all of this is that Photoshop doesn’t apply a full selection to those additional luminance levels. Those area’s are only partially selected, which offers a blend into the background, towards the edges of the selection.
When I’m happy with the preview inside of the Color Range dialog, I’ll click on the OK button to apply the selection.
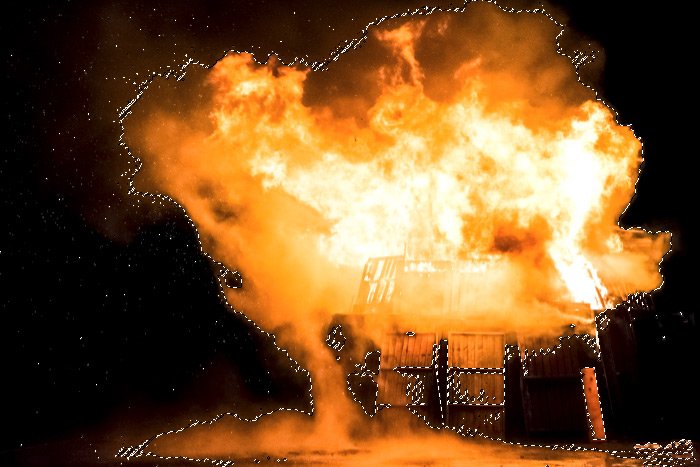
Finally, I’ll go ahead and click the Add Layer Mask icon at the bottom of the Layers panel again. This will mask out anything that’s not selected.
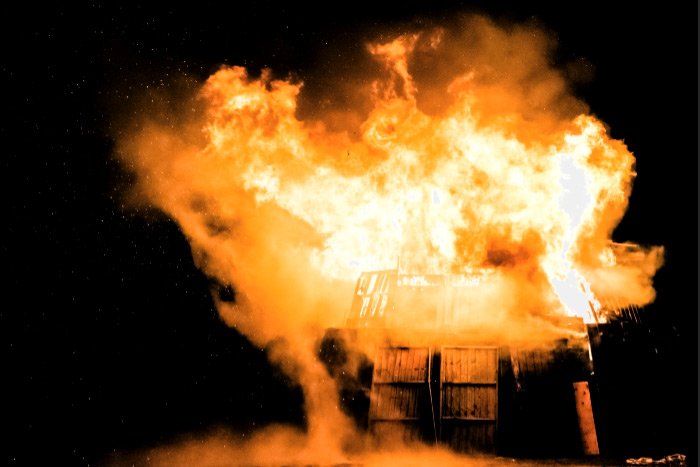
This is already looking much better than the example I created with the Magic Wand Tool. I’ll change the background from black to white, for the true test. Here goes.
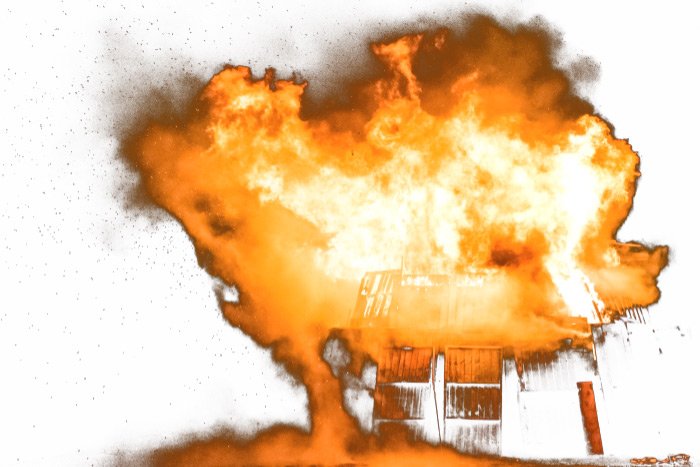
Yes, this one looks much better, especially up towards the top where the flames fade out into the night. I would never be able to get that transition with the other tool. This is what makes the Color Range Command so powerful. Also, I bet I could get an even better result if I sat here and played around a bit longer, but since this is a tutorial post, I think I’ll leave it at this. I’m sure you get the idea. If you want to experiment on your own, please do. I think you’ll be impressed with the results you can end up with.
——
I hope I clearly explained some of the differences between the Magic Wand Tool and the Color Range Command in Adobe Photoshop. What I covered in this post was only the tip of the iceberg, so be sure to stick around for more clarification on all these topics in future posts. If you have any questions regarding what I shared above, please let me know in the comment section down below. Thanks for reading!
One of the issues I see quite often has to do with having a selection gradually fade out from its origin point. I know that some of the selection tools try to take care of this in their own ways, such as altering the Tolerance values of the Magic Wand Tool and changing the Feather values of the Rectangular Marquee Tool and the like. While I’ll get into some of the limitations of using the Magic Wand Tool below, I do want to mention that we have a tool that’s much more capable in many instances and that’s the one I mentioned above; the Color Range Command. At least for having edges gradually fade out, if that’s the look you’re going for.
In today’s post, I’d like to offer you a few examples of how the Color Range Command can compare to the Magic Wand Tool while selecting some flames at night. For the Color Range Command, I’ll use the Fuzziness slider in an attempt to blend the flames into the background of a layer and for the Magic Wand Tool, I’ll use the Tolerance field. I think this post will give you a good idea of what the differences are between these two tools and will help you decide which one you should use for your projects that require certain outcomes.
Today’s Demo Photo
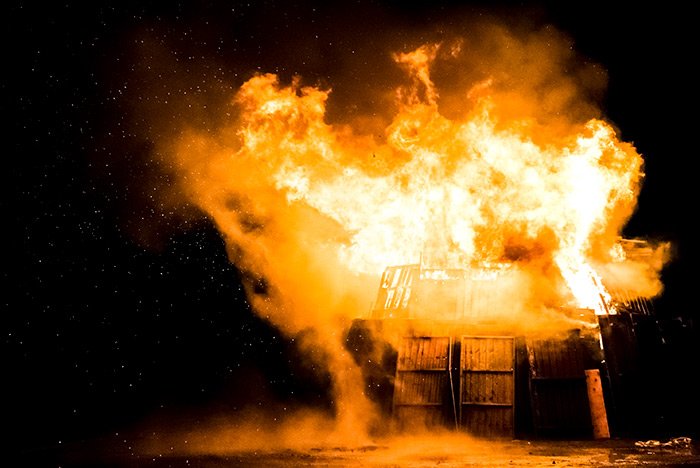
Here’s a photo of a fire at night. As you can see, there are tons of flames that blend effortlessly into the dark sky.
The Issue
Let me ask you something. If someone asked you to select those flames and copy them over to a black background so they looked realistic, do you think you’d be able to do it? I used to attempt things like this with the Magic Wand Tool and my results were, well, let’s just say that you could totally tell that they were copied from somewhere else. While I was able to capture the majority of the content, the edges looked horrible. I’d even try to apply an inner glow to compensate for the lousy gradient, but that didn’t work very well. I sure wish I had known about the Color Range Command.Changing Colors with Color Range Selection in Adobe Photoshop
Working With the Magic Wand Tool
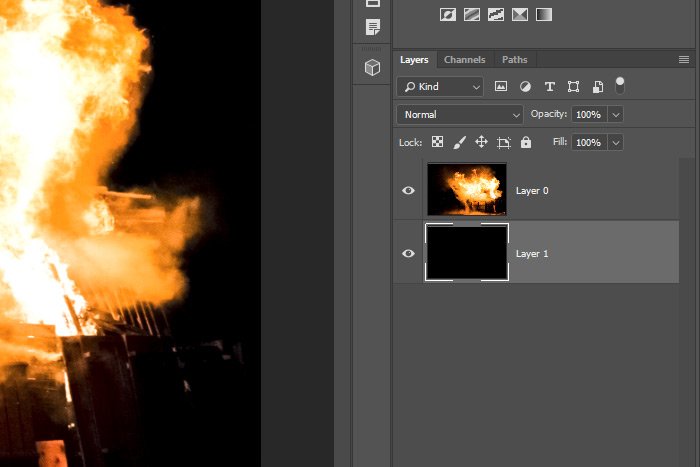
To kick things off, I think I’ll work with the Magic Wand Tool. Before that though, I’ll head over to the Layers panel and click on the small lock icon that’s in the image layer. Doing this will unlock the layer and will let me create a new layer that I can move underneath the image one. I’ll do that now.
I’ll also use the Paint Bucket Tool to pour in the color black. You can see that I’ve done this already in the above screenshot.
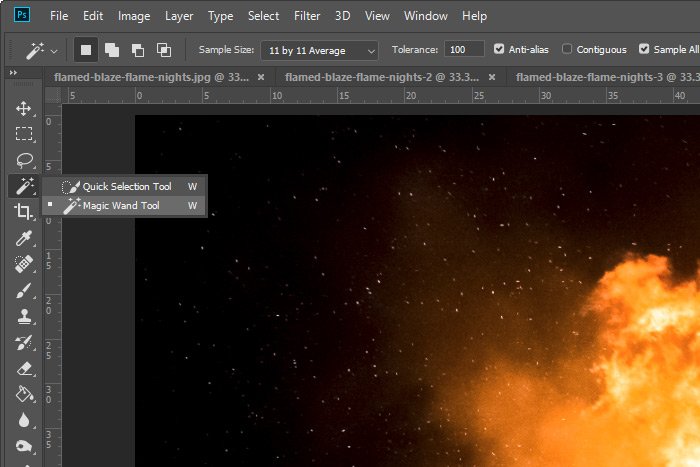
I’m now going to head over to the left toolbar to activate the Magic Wand Tool.

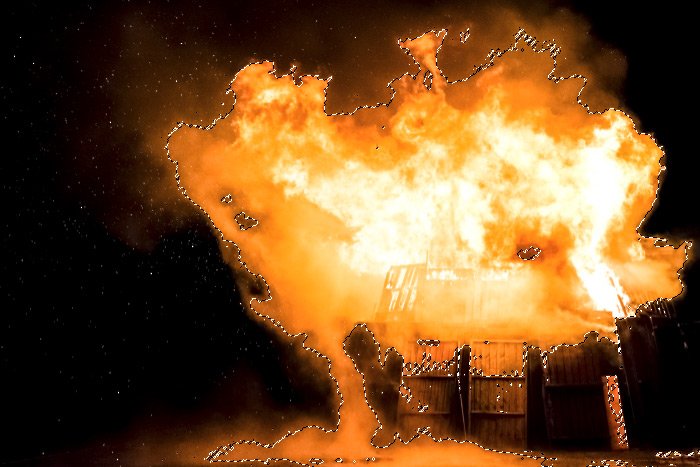
After that, I’ll move to the options bar up above the image in the workspace and I’ll set the Tolerance value to 100. This tolerance should give the selection a nice spread. After all, I want to select a good portion of the flames. If the tolerance was too low, not enough flame would be selected and if it was too high, the entire image would be selected. Let’s see how 100 does. I’ll click on the center area of the flames now. I’ll also hold the Shift key down on my keyboard and select an unselected area if need to, just to expand the selection.

That looks pretty good. Now, I’ll click on the Add Layer Mask icon (after making sure the image layer in the Layers panel is active) at the bottom of the Layers panel to apply a mask. Doing this will keep the selected area visible while hiding anything that wasn’t selected in the image layer. The selected area will appear on the black background.

That doesn’t look terrible, but it could look better. And really, I could probably make it look a lot better with some tolerance adjustments and some expansion of the selection area. Truth be told, it looks fairly good because it’s on the same color background. What if I wanted to move those flames over to a white background? I’ll use the Paint Bucket Tool again to change black to white. Let’s see how the edges look now.

Yeah, that’s not looking so hot anymore. So if I did choose to expand the selection with this tool and while it does have the potential to look very good on the same background color, it’s only when I change the background color does the whole thing fall apart. It’s the edges I care about most. The Magic Wand Tool does a great job at selecting, but when it comes to transitioning that selection into the background, it doesn’t do the greatest job. There has to be a better way.
Working with the Color Range Command
There is a better way and it’s by taking advantage of the Color Range Command. Before I get into things though, I do want to tell you that I already wrote a post that talked about the Color Range Command. You can read it by clicking through below.Changing Colors with Color Range Selection in Adobe Photoshop
I wanted to let you know about this because I’m not going to be covering this process in great detail. I’ll be focusing primarily on the Fuzziness slider below.
Okay, I’ll start this process off with a fresh image. It’s the same one as before, but there will be nothing done to this one. I’ll go ahead and unlock this image layer in the Layers panel and I’ll create a new layer and fill it with black, just as I did with the example above. Next, I’ll go up to the Select > Color Range menu item and click.

Once I do that, the Color Range dialog box will appear. I’ll keep an eye on the black and white image inside of this dialog while I click on the areas of the flame I’d like selected. If I want to expand my selection, I can again hold down the Shift key on my keyboard and click other areas. I can also click and drag my mouse pointer for even more of a selection.

The Color Range Command is rather awesome. What’s really awesome about it though is that it can expand a selection based on luminance values. So, if I wanted to select the most orange flame, but I also wanted to expand that initial selection to some flame that’s not as bright, I could do that. By pushing the Fuzziness slider to the right, I can expand the initial selection to include whatever the value of the slider is in both directions. As you can see in the above screenshot, I pushed the slider to the right so the value reads 100. This means that I’ll have my initial area selected and I’ll also have any area of the image that’s both 100 luminance levels brighter than that area as well as darker than that area. This is what creates the fade I was talking about earlier. The best part of all of this is that Photoshop doesn’t apply a full selection to those additional luminance levels. Those area’s are only partially selected, which offers a blend into the background, towards the edges of the selection.
When I’m happy with the preview inside of the Color Range dialog, I’ll click on the OK button to apply the selection.

Finally, I’ll go ahead and click the Add Layer Mask icon at the bottom of the Layers panel again. This will mask out anything that’s not selected.

This is already looking much better than the example I created with the Magic Wand Tool. I’ll change the background from black to white, for the true test. Here goes.

Yes, this one looks much better, especially up towards the top where the flames fade out into the night. I would never be able to get that transition with the other tool. This is what makes the Color Range Command so powerful. Also, I bet I could get an even better result if I sat here and played around a bit longer, but since this is a tutorial post, I think I’ll leave it at this. I’m sure you get the idea. If you want to experiment on your own, please do. I think you’ll be impressed with the results you can end up with.
——
I hope I clearly explained some of the differences between the Magic Wand Tool and the Color Range Command in Adobe Photoshop. What I covered in this post was only the tip of the iceberg, so be sure to stick around for more clarification on all these topics in future posts. If you have any questions regarding what I shared above, please let me know in the comment section down below. Thanks for reading!
