KristinaW
Member
- Joined
- May 7, 2021
- Messages
- 127
- Reaction Score
- 0
- Points
- 18
- #1
A while ago, I wrote a few posts that dealt with the creation of panoramic images in both Adobe Lightroom and Camera Raw. Creating these types of images has become incredibly easy though the years and Adobe makes the process painless. If you’ve got decent shots, there are only a few simple steps to take. If you want to straighten out the final image and fill any empty edges in, there are only a few more steps. The entire thing should take no longer than a minute or two and the results are tremendous.
How to Create a Panoramic Image in Adobe Lightroom
How to Create a Panoramic Photo in Adobe Camera Raw
In today’s post, I’d like to discuss how to make the same types of panoramas in Adobe Photoshop using a feature called Photomerge. Many folks don’t even know this is an option, but it’s been around since CS3. It wasn’t until CS5 that it became stable though. Today’s Photoshop version is better than ever, so if you’ve got JPEG photographs that you need to put together, read on because I’m going to show you how to do just that.
Also, there are many more available Photomerge options than the ones I’ll be covering in this post. In this post, I merely want to introduce you to the process and then later on, I’ll dive a lot deeper into the workings of it all.
What this will do is jump me over the images over to Photoshop and open up the Photomerge dialog box.
If I look towards the bottom, I’ll see some options. These options are Blend Images Together, Vignette Removal, Geometric Distortion Correction and Content Aware Fill Transparent Areas. I’ll go ahead and check each of these options and then explain what they do below.
Blend Images Together: This is what this post is about. Photoshop will look for similar edges to merge into one another among multiple images and will use its magic to make that merge as seamless as possible.
Vignette Removal: If there’s a darkened edge on any of the images, Photoshop will remove the vignette and lighten those areas so the edges look seamless when merged.
Geometric Distortion Correction: Most images have some distortion about them. When it comes to merging images together, that distortion gets in the way and needs to be adjusted. Photoshop will analyze each image, remove its distortion and continue on with the merge.
Content Aware Fill Transparent Areas: When any distortion is removed, transparent areas generally appear around the panorama’s edges. Photoshop deals with filling in these areas by using the Content Aware tool. It analyzes the empty areas and the areas around them and fills those areas in based on the surrounding content. If you’ve used Content Aware Fill before, you know how much of a quality of a result you can get.
Once I’m finished in this dialog box, I’ll click the OK button to continue on into Photoshop.
Also, to the right in the Layers panel, I’ll see all three images used for the merge as well as the merged image itself, each in their own layer. Take a look at the masks in the layers used for the merge.
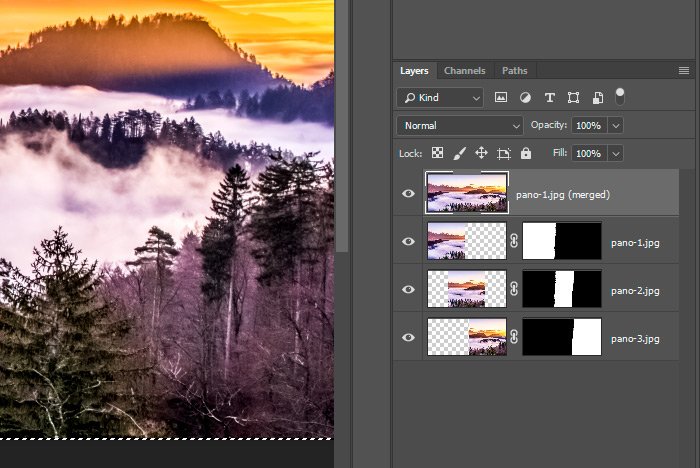
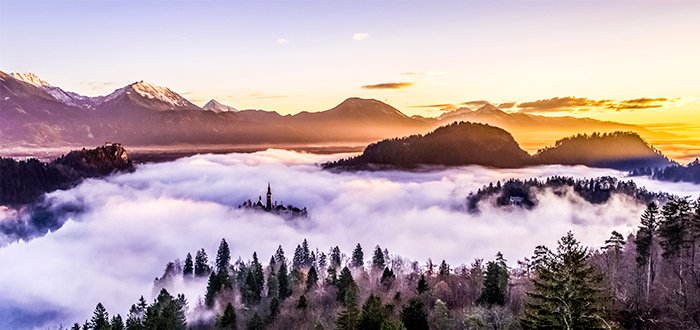
If I were to hide the top result layer, I’d see the individual images that were used, merged together, plus any transparent areas surrounding them. The top layer is the final photo, with those transparent areas filled in. Here’s the final image.
I hope I clearly explained how to use the Photomerge tool in Adobe Photoshop. If you have any questions regarding this post, please let me know in the comment section below. Thanks for reading!
How to Create a Panoramic Image in Adobe Lightroom
How to Create a Panoramic Photo in Adobe Camera Raw
In today’s post, I’d like to discuss how to make the same types of panoramas in Adobe Photoshop using a feature called Photomerge. Many folks don’t even know this is an option, but it’s been around since CS3. It wasn’t until CS5 that it became stable though. Today’s Photoshop version is better than ever, so if you’ve got JPEG photographs that you need to put together, read on because I’m going to show you how to do just that.
The Separate Photos
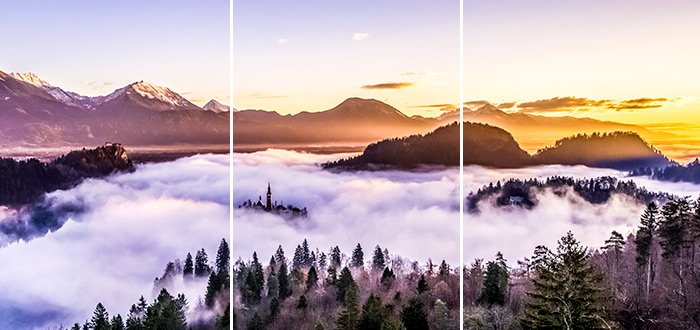
I’m going to have to do a bit of cheating today. Since I don’t have any good separate images on hand, I’ll need to use a panorama that’s already been created and pull it apart again. Basically, it’s going to be a wide shot that I cropped into three. This is what I’ll be working with. Don’t worry, the process is exactly the same as if I were using three images straight out of my camera, so focus on the process itself.
Also, there are many more available Photomerge options than the ones I’ll be covering in this post. In this post, I merely want to introduce you to the process and then later on, I’ll dive a lot deeper into the workings of it all.
Jumping From Bridge to Photoshop
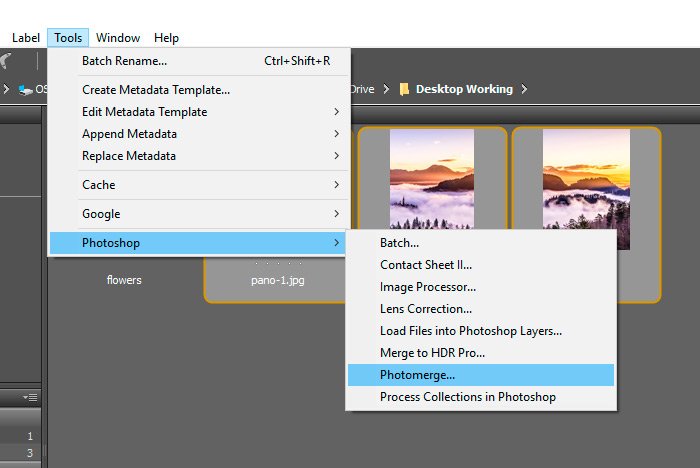
The first thing I’m going to do is select all three images in Adobe Bridge and move them into Photoshop. The way I’ll do this and have the images merge together in the meantime is to select the images, move up to the Tools > Photoshop > Photomerge menu item and click.
What this will do is jump me over the images over to Photoshop and open up the Photomerge dialog box.
The Photomerge Dialog
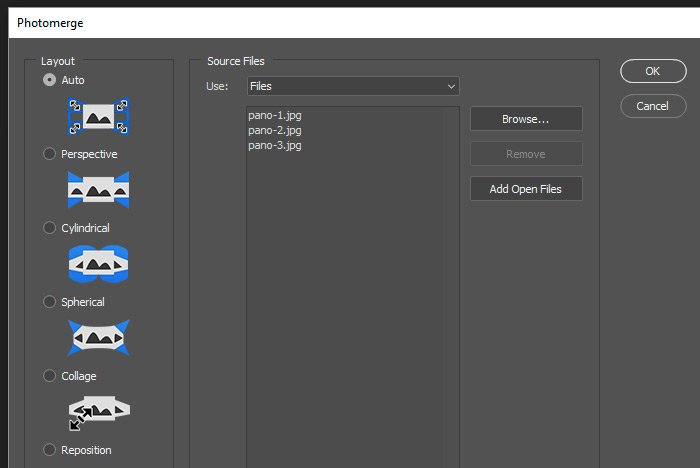
When the Photomerge dialog opens up, I’ll see a list of images that are to be connected with one another in the center box (the ones I selected). I’ll also see some Layout options to the left. For this post, I’ll leave the top option of Auto selected.
If I look towards the bottom, I’ll see some options. These options are Blend Images Together, Vignette Removal, Geometric Distortion Correction and Content Aware Fill Transparent Areas. I’ll go ahead and check each of these options and then explain what they do below.
Blend Images Together: This is what this post is about. Photoshop will look for similar edges to merge into one another among multiple images and will use its magic to make that merge as seamless as possible.
Vignette Removal: If there’s a darkened edge on any of the images, Photoshop will remove the vignette and lighten those areas so the edges look seamless when merged.
Geometric Distortion Correction: Most images have some distortion about them. When it comes to merging images together, that distortion gets in the way and needs to be adjusted. Photoshop will analyze each image, remove its distortion and continue on with the merge.
Content Aware Fill Transparent Areas: When any distortion is removed, transparent areas generally appear around the panorama’s edges. Photoshop deals with filling in these areas by using the Content Aware tool. It analyzes the empty areas and the areas around them and fills those areas in based on the surrounding content. If you’ve used Content Aware Fill before, you know how much of a quality of a result you can get.
Once I’m finished in this dialog box, I’ll click the OK button to continue on into Photoshop.
The Result
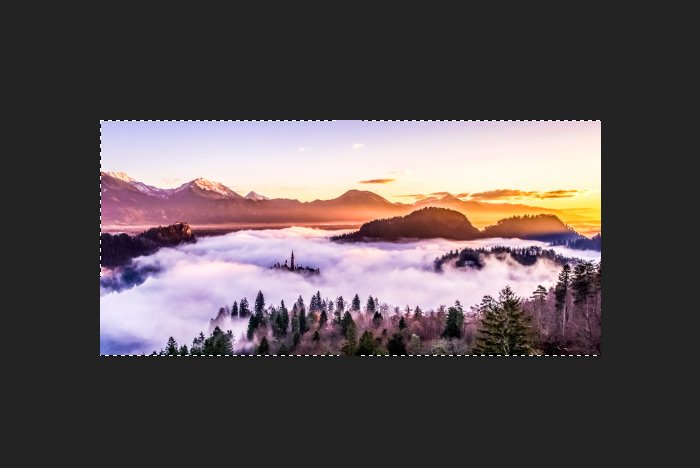
After running through the process, I’ll see the panorama image inside of Photoshop. Any transparent areas will be selected. With my version, there aren’t many transparent areas, so it just appears that the outline is selected.
Also, to the right in the Layers panel, I’ll see all three images used for the merge as well as the merged image itself, each in their own layer. Take a look at the masks in the layers used for the merge.

If I were to hide the top result layer, I’d see the individual images that were used, merged together, plus any transparent areas surrounding them. The top layer is the final photo, with those transparent areas filled in. Here’s the final image.

One Note
I do want to mention that most panoramic images come out warped (sort of like they were captured with a wide angle lens. That’s the nature of panoramas. These warps can be easily fixed though so the photo can look completely normal. Since fixing the warp requires another tool, I’ll save that for my next post. As a hint though, that tool is called the Adaptive Wide Angle filter. You’re going to love this filter so be sure to come back for that post.I hope I clearly explained how to use the Photomerge tool in Adobe Photoshop. If you have any questions regarding this post, please let me know in the comment section below. Thanks for reading!
