WendyMay
Member
- Joined
- May 11, 2021
- Messages
- 142
- Reaction Score
- 0
- Points
- 21
- #1
Forget about acquiring the know-how to edit photos to make them actually stand out and look wonderful, just learning and figuring out how to navigate around Adobe Photoshop can be a chore unto itself. I get that people need “an eye” to make images look awesome. They need to know some color theory, fundamentals of composition, lighting and all that, all of which can be enhanced in Photoshop, but they also need to know how to get from point A to point B in the application that’s going to help them meet their goals. And meet them efficiently, because as I’ve said before, no one wants to sit in front of a computer for far too long working on just one image. As much as it’s about making things look good, it’s also about making them look good fast.
In today’s post, I’d like to focus on one area of the Adobe Photoshop workspace – the Layers panel. This is a huge panel in that it’s probably the most widely used on in all of Photoshop. Personally, I’m in and out of this thing all day long. If there’s a way to shave off a few micro-seconds each time I use it, I’m all about learning how to take advantage of that way. Combined over time, I’m sure all those micro-seconds add up.
Basically, I’d like to show you a few tips to make things go faster when you work. From hiding and making layers visible, grouping layers, adjusting layer thumbnail size all the way to collapsing the panel itself to save space, there’s a lot to learn about working with panels and the Layers panel in particular.
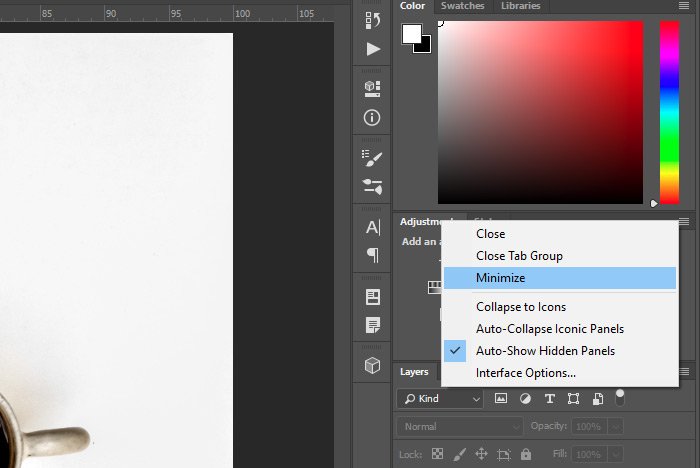
Another method for doing the same thing is to right-click on the panel tab. When the menu appears, choose Minimize.
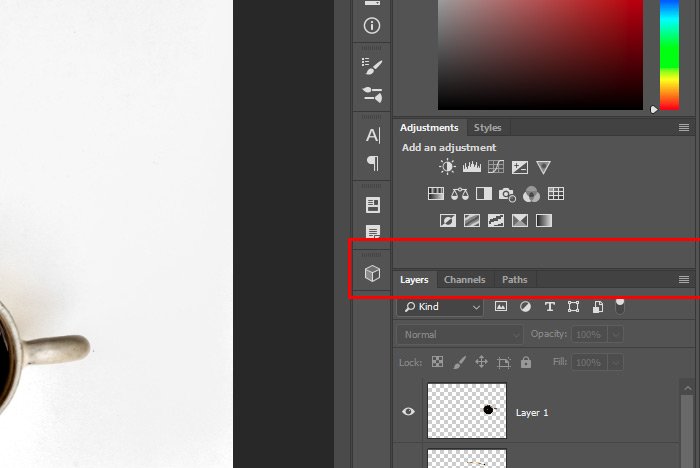
If I wanted to keep the panel open, but just reduce its size, I could click on either the top or bottom edge of the panel and drag either up or down. It’s that simple.
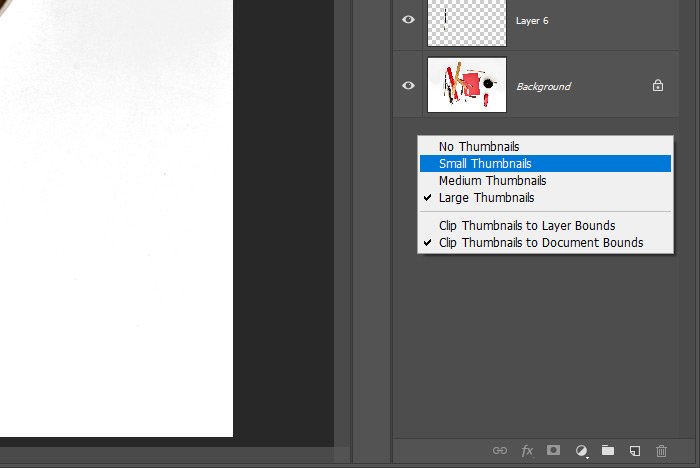
There are two easy methods for altering the size of thumbnails in the Layers panel. The first and fastest is to right-click on an area where the thumbnails aren’t, such as the area below the layers. When the menu appears, choose Small Thumbnails or whatever you would like the size to be.
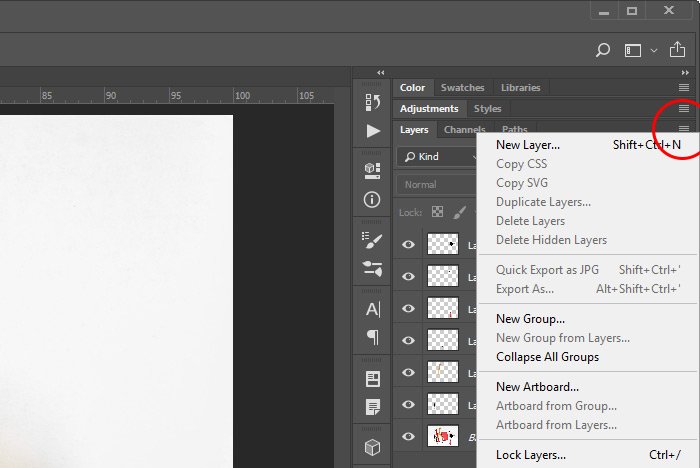
Another method for accomplishing the same thing is to head up to the Layers panel menu and click.
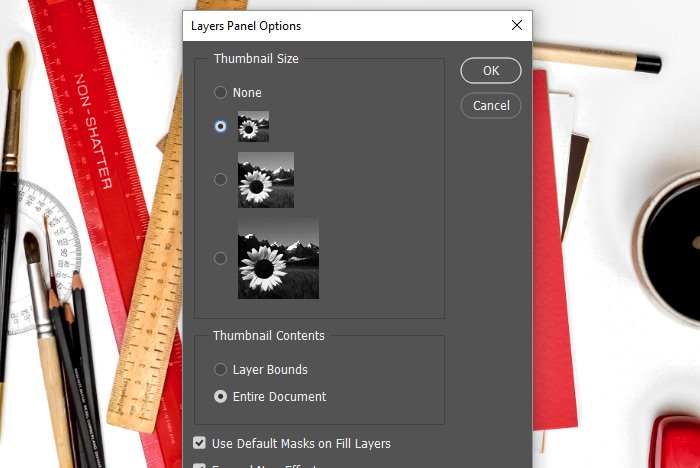
Down towards the bottom is a choice called Panel Options. Click that too. Then, when the Layer Panel Options dialog bow appears, choose which size thumbnail you’d like to see and then click OK to accept the change.
The contents of those layers won’t be showing in the work area. The question is, what if I have tons of layers and I don’t want to show or hide every single one individually? To hide multiple layers very quickly, all you need to do is click on the bottom layer eye icon, hold the mouse pointer down and then drag the mouse pointer up, over the other eye icons. It’s sort of like you’re wiping the eye icons away and you’ll be shutting off the visibility from those layers.
If you’d like to view the contents of just one layer, but not of the others, a great way to turn off all the eye icons, except for the one you want to see is to hold down the Alt key on your keyboard and then click the layer you want to keep visible with your mouse. This will hide every eye icon except for the one you click on.
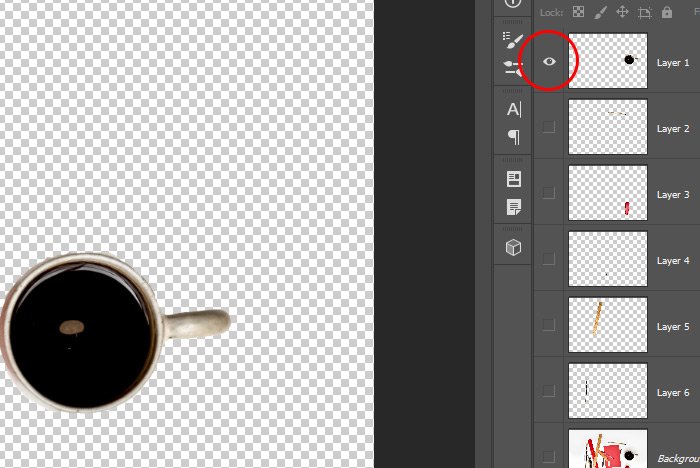
To turn the visibility for all those layers back on, simply repeat the steps I just gave you. Hold down the Alt key again and click that same layer. You’ll reverse things that way.
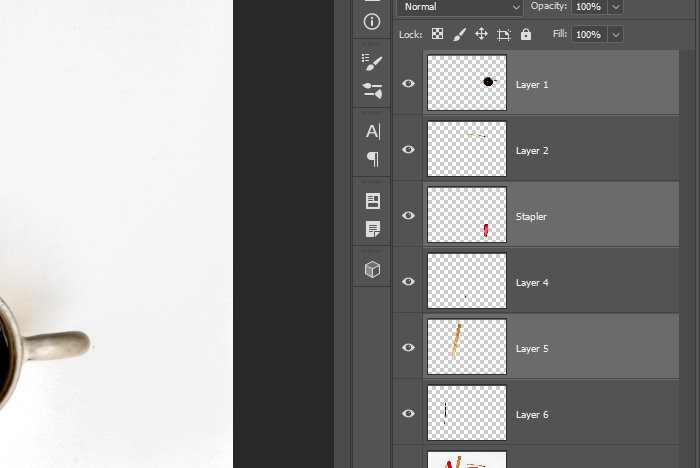
To group layers, you can either click the bottom layer of the group, hold down the Shift key on your keyboard and then click the top layer in the group. This will select and highlight the layers you’d like grouped. If the layers aren’t adjacent to one another, you can click each layer individually while holding down the Ctrl key on your keyboard.
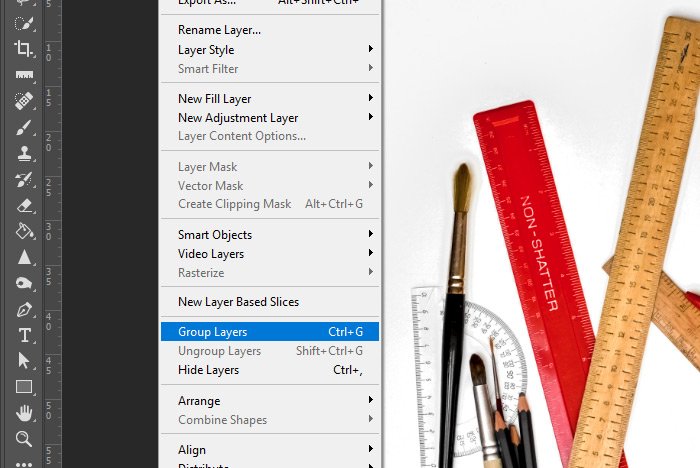
Once you have the layers selected, you can visit the Layer > Group Layers menu item and click.
This will place those selected layers nicely into their own folder in the Layers panel.
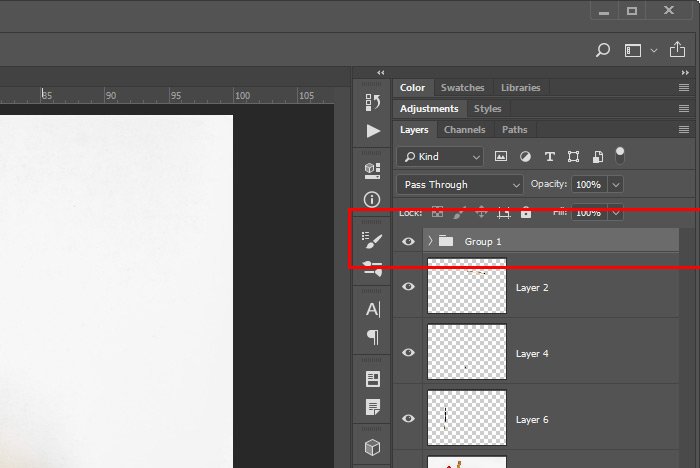
To view the layers in the group, click the small sideways facing arrow to the left of the folder icon. The keyboard shortcut to group layers is Ctrl+G. To ungroup the layers, follow those same instructions I just gave you. In the menu though, you’ll see Ungroup Layers as opposed to Group Layers. Click that. If you’re into keyboard shortcuts, you can use Shift+Ctrl+G to ungroup just as easily.
——
I hope I clearly explained how to add some room to the workspace in Adobe Photoshop by collapsing, resizing and grouping layers in the Layers panel. If you have any questions regarding this post, please let me know in the comment section down below. Thanks for reading!
In today’s post, I’d like to focus on one area of the Adobe Photoshop workspace – the Layers panel. This is a huge panel in that it’s probably the most widely used on in all of Photoshop. Personally, I’m in and out of this thing all day long. If there’s a way to shave off a few micro-seconds each time I use it, I’m all about learning how to take advantage of that way. Combined over time, I’m sure all those micro-seconds add up.
Basically, I’d like to show you a few tips to make things go faster when you work. From hiding and making layers visible, grouping layers, adjusting layer thumbnail size all the way to collapsing the panel itself to save space, there’s a lot to learn about working with panels and the Layers panel in particular.
Today’s Demo Image
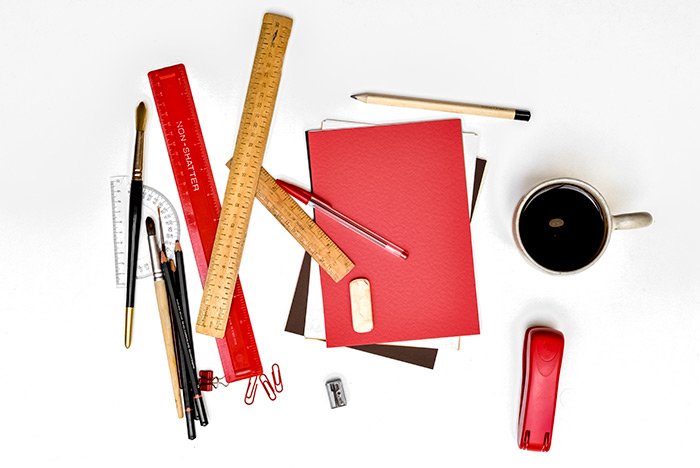
Because I’ll need multiple layers to demonstrate the tips I have for you, I thought this would be the perfect image to use. I went ahead and very quickly selected some of the utensils, or tools, whatever you want to call them, and placed those copies on their own layers. At this point, I have a file with seven layers in it, including the original image layer.
Resizing & Collapsing Panels
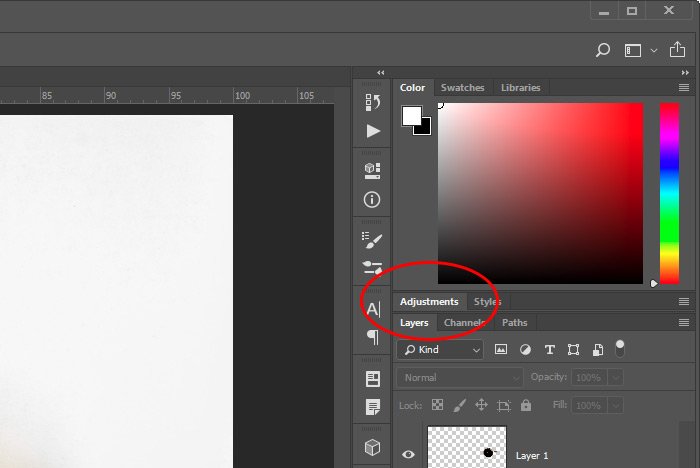
This one is really easy, but many people don’t know about it. If you have tons of layers you’re working with or any other type of situation that would require more space in the right column that’s full of panels, you can easily collapse any of those groups of panels by simply double-clicking on the panel tab. In this next screenshot, I collapsed the Adjustments panel. As you can see, this panel is nested with the Styles panel and is now taking up very little room.
Another method for doing the same thing is to right-click on the panel tab. When the menu appears, choose Minimize.

If I wanted to keep the panel open, but just reduce its size, I could click on either the top or bottom edge of the panel and drag either up or down. It’s that simple.

Changing Layer Thumbnail Size
This is another good one. I usually keep layer thumbnails large when I’m writing posts like this, because they’re more visible in the screenshots. When I’m not writing posts though and when I’m just working, I’ll shrink the thumbnail size down as small as they’ll go. Doing this take up a lot less room and I just like it better this way.There are two easy methods for altering the size of thumbnails in the Layers panel. The first and fastest is to right-click on an area where the thumbnails aren’t, such as the area below the layers. When the menu appears, choose Small Thumbnails or whatever you would like the size to be.

Another method for accomplishing the same thing is to head up to the Layers panel menu and click.

Down towards the bottom is a choice called Panel Options. Click that too. Then, when the Layer Panel Options dialog bow appears, choose which size thumbnail you’d like to see and then click OK to accept the change.

Showing & Hiding Layers
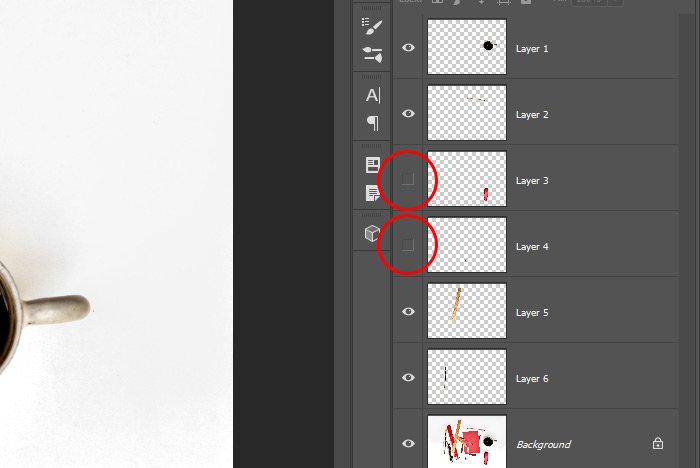
Almost everyone out there knows how to hide a layer. If you don’t know how to do this, please allow me to show you. All you need to do is click the little eye icon that sits to the left of the layer thumbnail. In this next screenshot, I’ve gone ahead and hid layer 3 and 4 from view.
The contents of those layers won’t be showing in the work area. The question is, what if I have tons of layers and I don’t want to show or hide every single one individually? To hide multiple layers very quickly, all you need to do is click on the bottom layer eye icon, hold the mouse pointer down and then drag the mouse pointer up, over the other eye icons. It’s sort of like you’re wiping the eye icons away and you’ll be shutting off the visibility from those layers.
If you’d like to view the contents of just one layer, but not of the others, a great way to turn off all the eye icons, except for the one you want to see is to hold down the Alt key on your keyboard and then click the layer you want to keep visible with your mouse. This will hide every eye icon except for the one you click on.

To turn the visibility for all those layers back on, simply repeat the steps I just gave you. Hold down the Alt key again and click that same layer. You’ll reverse things that way.
Renaming Layers
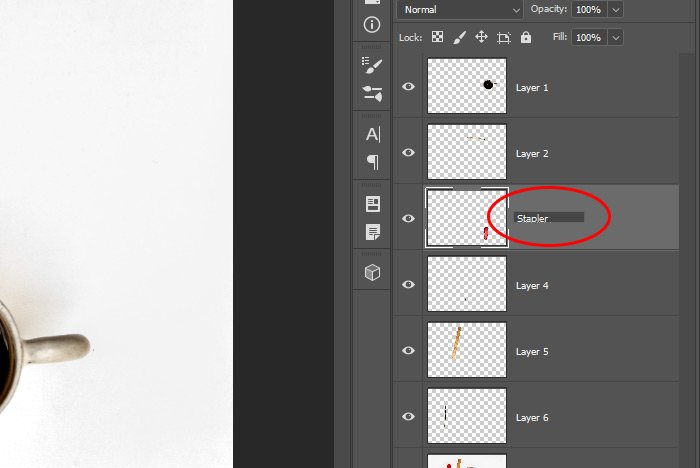
This is a fast one. To rename a layer from the default Photoshop assigned name to something that’s more helpful and descriptive to you, all you need to do is double-click on the layer name and type what you want. When you’re finished, hit the Enter key on your keyboard to save the change.
Grouping & Ungrouping Layers
In this final section, I’ll show you how you can quickly group and ungroup layers. Grouping layers is so helpful that it should really be one of the very first things you ever learn about Photoshop. It gets all those pesky layers that you’re not using at the moment out of the way. It’s so nice to tuck them into their own folder so you have some breathing room.To group layers, you can either click the bottom layer of the group, hold down the Shift key on your keyboard and then click the top layer in the group. This will select and highlight the layers you’d like grouped. If the layers aren’t adjacent to one another, you can click each layer individually while holding down the Ctrl key on your keyboard.

Once you have the layers selected, you can visit the Layer > Group Layers menu item and click.

This will place those selected layers nicely into their own folder in the Layers panel.

To view the layers in the group, click the small sideways facing arrow to the left of the folder icon. The keyboard shortcut to group layers is Ctrl+G. To ungroup the layers, follow those same instructions I just gave you. In the menu though, you’ll see Ungroup Layers as opposed to Group Layers. Click that. If you’re into keyboard shortcuts, you can use Shift+Ctrl+G to ungroup just as easily.
——
I hope I clearly explained how to add some room to the workspace in Adobe Photoshop by collapsing, resizing and grouping layers in the Layers panel. If you have any questions regarding this post, please let me know in the comment section down below. Thanks for reading!
