15Katey
Member
- Joined
- May 10, 2021
- Messages
- 130
- Reaction Score
- 0
- Points
- 23
- #1
Did you know that there’s another way to make selections in Adobe Photoshop, other than with the traditional selection tools? Well there is. It’s possible to create and modify existing selections with the push of just one button and the use of a painting tool. It’s actually really cool and the system is so easy to work with. The tool is called a Quick Mask and it’s one of those under-talked about areas inside of Photoshop that really should see more daylight.
In today’s post, I’d like to work through a quick project. I’ll use a random photo of some elephants. I’ll first add a gradient to the image and then apply a blend mode to that gradient so the colors change a bit. I’ll make a few more tweaks as well and in the process, I’ll show you a few tricks that have to do with gradients in general. Then, I’ll select the elephants using the Quick Selection Tool and finally, I’ll use Quick Mask Mode to refine those selections with the Brush Tool. My ultimate goal is to have the gradient apply only to the area around the elephants and not the elephants themselves. That’s what all the masking is about.
I’m hoping this workflow will teach you something you don’t already know. There are a few different elements to it, so I have my fingers crossed that you’ll get something out of it.

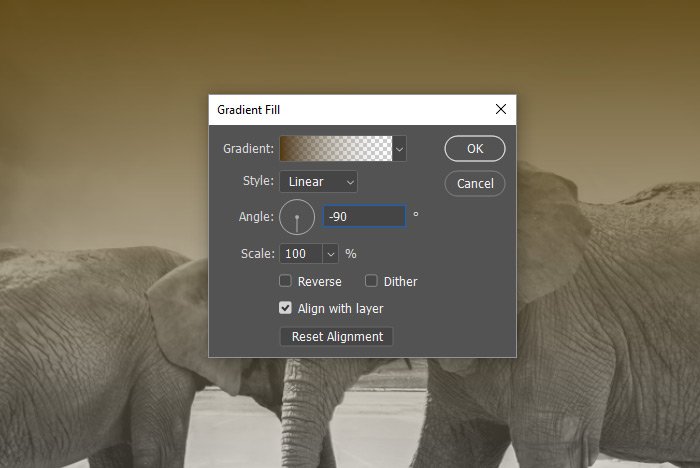
When I do this, the Gradient Fill dialog box will appear. In this box, I’ll first change the 90 degree Angle setting to -90 degrees. That merely flips the gradient upside down. After that, I’ll click on the Gradient colors drop-down box and I’ll change the original gray to a yellowish orange.
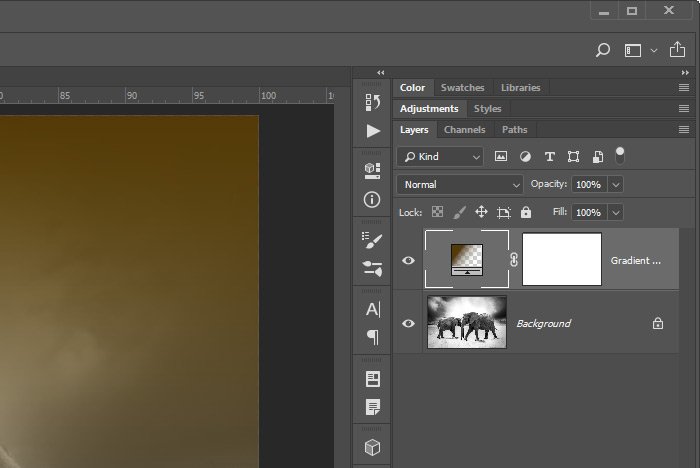
When I’m finished, I’ll click the OK button to apply the gradient and create a new gradient layer.
This is the output of this work so far.

HINT: To adjust the amount of gradient that’s being applied (move the gradient) or to change the ratio between the colors in the gradient, you can click and drag right on the photograph while the Gradient Fill dialog box is open. This is one of the little tricks I mentioned above that I’d offer.
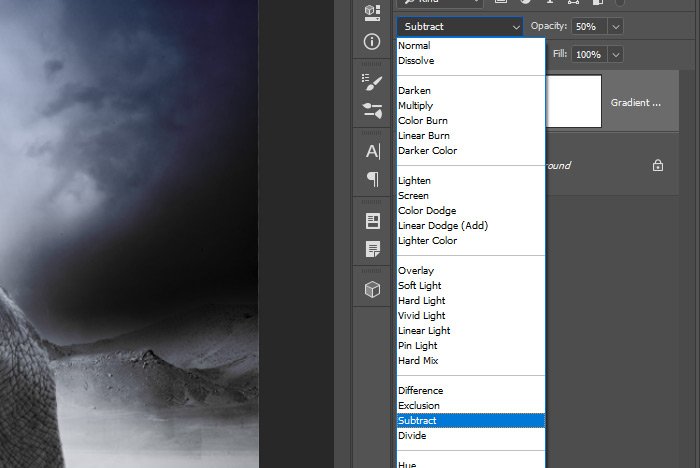
At this point, I’d like to spice things up, so I’m going to apply a blend mode to the gradient layer. I think I’ll go with the Subtract blend mode and then reduce the opacity of this layer to 50%. That’ll add some flair.
Now the image looks like this.

Pretty cool, right? Now, I could have done anything for this demonstration, but I decided to go with this. No matter what I applied to this photo, the concepts I want to convey would remain the same.
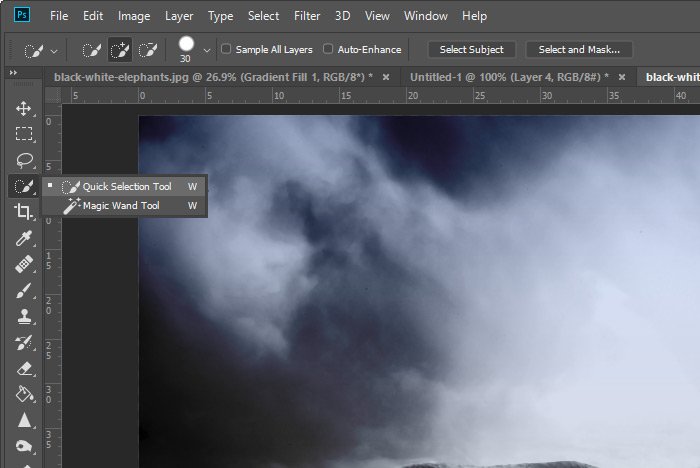
First, I’ll click on the elephant image layer in the Layers panel and then I’ll head over to the left toolbar and choose the Quick Selection Tool. Then, I’ll begin selecting the elephants.
And here are the selected elephants after I’m finished.

At first glance, my selection doesn’t look half bad. Upon close examination though, you can see that I missed some hard-to-get edges and accidentally included some areas that shouldn’t have been. The Quick Selection Tool isn’t always perfect, especially in tight areas, so I’d now like to take advantage of the Quick Mask tool to really get down and refine my selection.
To start things off, I’ll head over to the left toolbar again and I’ll locate the Quick Mask Mode button. It’s right below the color chips.
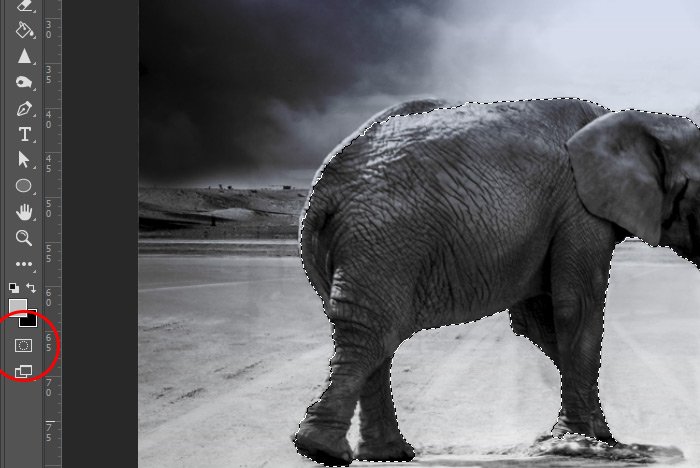
If I click this button once, every area of the photo that isn’t currently selected will turn the default red.

If I double-click the button, the Quick Mask Options dialog box will appear.
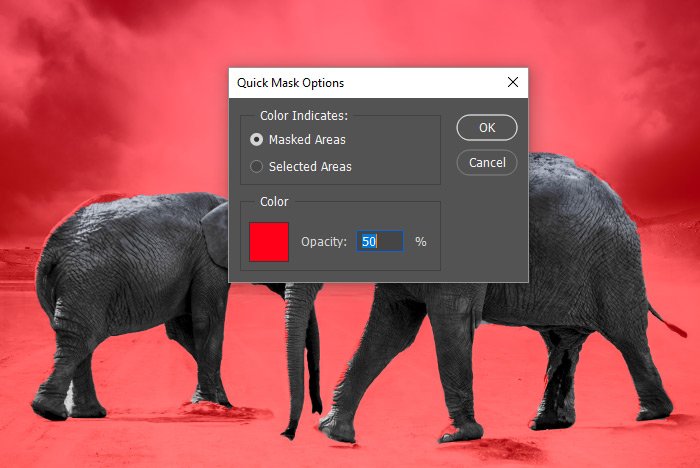
Also, when I activate this tool, the color chips will automatically change to black and white, no matter what colors are currently selected in the Color Picker.
Inside of this dialog box, there are a few things we can set. First off, we can choose what’s going to be colored. In the screen shots above, the area outside the selected areas is colored. I could easily change that to have the selected areas colored instead. Also, I can change the actual color of the mask itself to anything I want and I can even change the opacity. Currently, the opacity is set to 50% because I’d like to see through the red so I can see what I’ll be painting next. If the settings look good, I can click the OK button to exit out. Also, if you don’t see a colored overlay, that means the quick mask isn’t active. You’ll need to click that button again.
Working in Quick Mask mode is just like working in any other mask mode. White reveals and black conceals. With this in mind, I’ll enlarge the image and start painting with the Brush Tool set to black to remove any areas I earlier selected that shouldn’t have been selected. I’ll also paint with white to include any areas that should have been included.

I’ll move around all the edges and paint where I would like to see the edge of the selection. When I’m finished, I’ll see something much more accurate like this.

When I want to exit Quick Mask mode, I’ll simply press the button beneath the color chips again. I could also just as easily use the keyboard shortcut of Q to return to regular mode. This is my new and more more refined selection.

Perfect!
Then, I’ll head up to the Edit > Fill menu item and click.
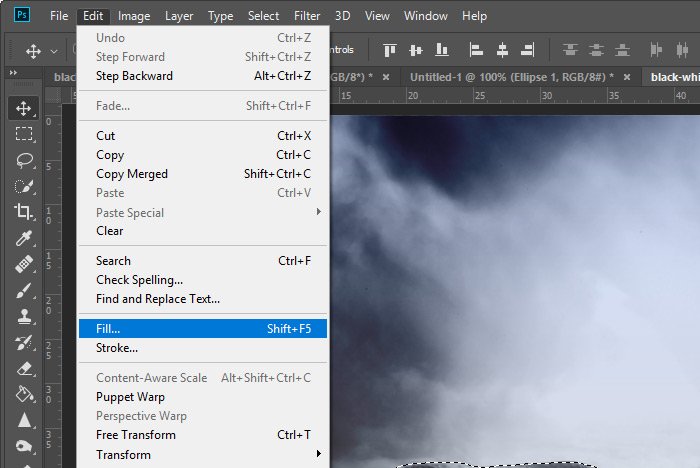
Inside of the Fill dialog box, I’ll make sure Black is selected from the Contents drop-down and then I’ll click OK to apply the fill.
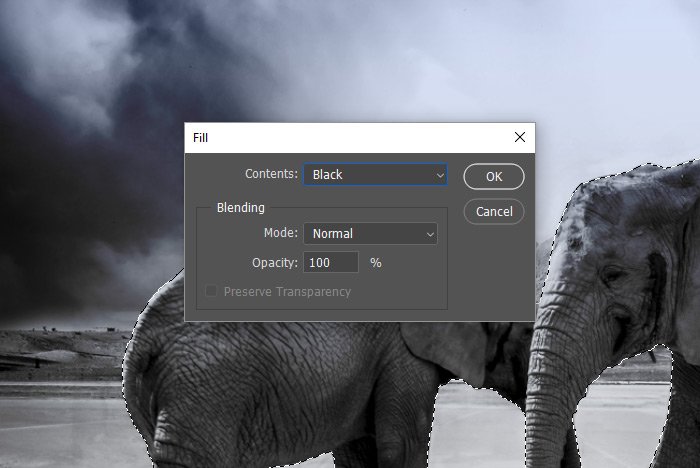
Once I do this, I’ll see the color disappear from my selected areas. Basically, what’s happening here is that I’m using the color black to conceal the gradient in the mask of the gradient layer. I could have done all this by hand, but using the selection tool and the quick mask mode certainly helped me speed things up. These tools also gave me a much better and more accurate result.
To deselect the elephants, I’ll use the Select > Deselect menu item and that’s it. The project is finished. Here’s the final image.

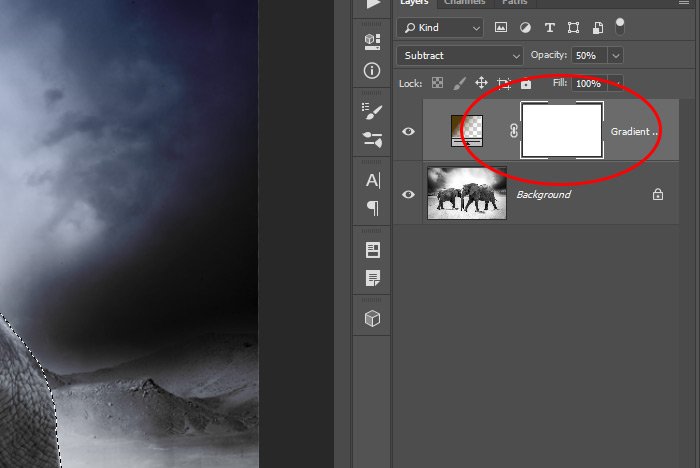
Now I have an applied gradient that’s covering the background of the image with the foreground not being touched. If you’re interested in seeing what the gradient mask looks like, check out the thumbnail in the Layers panel.
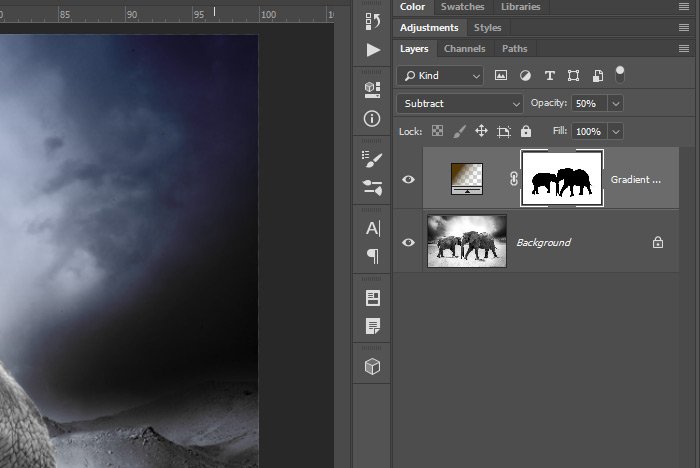
And what’s even better, things are completely editable if I keep that mask thumbnail selected. I’ll be able to paint with white or black to adjust the gradient even more if I wanted to.
——
I hope I clearly explained the value of using Quick Mask mode in Adobe Photoshop to add efficiency to a project and refinement to a selection. If you have any questions regarding this post, please let me know in the comment section down below. Thanks for reading!
In today’s post, I’d like to work through a quick project. I’ll use a random photo of some elephants. I’ll first add a gradient to the image and then apply a blend mode to that gradient so the colors change a bit. I’ll make a few more tweaks as well and in the process, I’ll show you a few tricks that have to do with gradients in general. Then, I’ll select the elephants using the Quick Selection Tool and finally, I’ll use Quick Mask Mode to refine those selections with the Brush Tool. My ultimate goal is to have the gradient apply only to the area around the elephants and not the elephants themselves. That’s what all the masking is about.
I’m hoping this workflow will teach you something you don’t already know. There are a few different elements to it, so I have my fingers crossed that you’ll get something out of it.
The Demo Image
This is the photo I’ll be working with. The reason I chose this one is because there’s some nice definition between the elephants and the background. That should make for some relatively accurate selecting.
Adding a Gradient
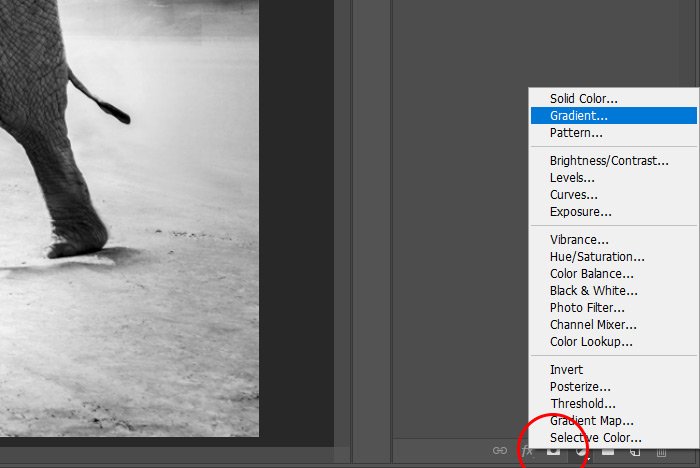
As I mentioned above, I’m going to start things off with adding a gradient layer to this file. To do so, I’ll head down to the bottom of the Layers panel and I’ll click the Create New Fill or Adjustment Layer button. When the menu appears, I’ll select Gradient.
When I do this, the Gradient Fill dialog box will appear. In this box, I’ll first change the 90 degree Angle setting to -90 degrees. That merely flips the gradient upside down. After that, I’ll click on the Gradient colors drop-down box and I’ll change the original gray to a yellowish orange.

When I’m finished, I’ll click the OK button to apply the gradient and create a new gradient layer.

This is the output of this work so far.

HINT: To adjust the amount of gradient that’s being applied (move the gradient) or to change the ratio between the colors in the gradient, you can click and drag right on the photograph while the Gradient Fill dialog box is open. This is one of the little tricks I mentioned above that I’d offer.
At this point, I’d like to spice things up, so I’m going to apply a blend mode to the gradient layer. I think I’ll go with the Subtract blend mode and then reduce the opacity of this layer to 50%. That’ll add some flair.

Now the image looks like this.

Pretty cool, right? Now, I could have done anything for this demonstration, but I decided to go with this. No matter what I applied to this photo, the concepts I want to convey would remain the same.
Selecting the Elephants
Here’s the deal; I don’t want the gradient to cover up any parts of the elephants. As you may have noticed from the output above, there’s a blueish hue that’s overlaying the entire image. In this next section, I’ll use the Quick Selection Tool to begin removing that hue.First, I’ll click on the elephant image layer in the Layers panel and then I’ll head over to the left toolbar and choose the Quick Selection Tool. Then, I’ll begin selecting the elephants.

And here are the selected elephants after I’m finished.

At first glance, my selection doesn’t look half bad. Upon close examination though, you can see that I missed some hard-to-get edges and accidentally included some areas that shouldn’t have been. The Quick Selection Tool isn’t always perfect, especially in tight areas, so I’d now like to take advantage of the Quick Mask tool to really get down and refine my selection.
Editing in Quick Mask Mode
Quick Mask mode is a very cool area of Photoshop that allows us to make selections using the Brush Tool. It basically creates a colored overlay of any opacity. Once we activate the Brush Tool, we can paint over any area to include it into the selection or exclude it from the selection. This is extremely helpful because in the tighter areas, it’s oftentimes easier to paint (do and undo) than it is to select with one of the selection tools. Those tools tend to snap to edges, while painting is more up to the editor (us).To start things off, I’ll head over to the left toolbar again and I’ll locate the Quick Mask Mode button. It’s right below the color chips.

If I click this button once, every area of the photo that isn’t currently selected will turn the default red.

If I double-click the button, the Quick Mask Options dialog box will appear.

Also, when I activate this tool, the color chips will automatically change to black and white, no matter what colors are currently selected in the Color Picker.
Inside of this dialog box, there are a few things we can set. First off, we can choose what’s going to be colored. In the screen shots above, the area outside the selected areas is colored. I could easily change that to have the selected areas colored instead. Also, I can change the actual color of the mask itself to anything I want and I can even change the opacity. Currently, the opacity is set to 50% because I’d like to see through the red so I can see what I’ll be painting next. If the settings look good, I can click the OK button to exit out. Also, if you don’t see a colored overlay, that means the quick mask isn’t active. You’ll need to click that button again.
Working in Quick Mask mode is just like working in any other mask mode. White reveals and black conceals. With this in mind, I’ll enlarge the image and start painting with the Brush Tool set to black to remove any areas I earlier selected that shouldn’t have been selected. I’ll also paint with white to include any areas that should have been included.

I’ll move around all the edges and paint where I would like to see the edge of the selection. When I’m finished, I’ll see something much more accurate like this.

When I want to exit Quick Mask mode, I’ll simply press the button beneath the color chips again. I could also just as easily use the keyboard shortcut of Q to return to regular mode. This is my new and more more refined selection.

Perfect!
Removing the Color From the Elephants
Now that my selections is perfected, I can use it to easily remove any of the gradient that’s covering the elephants. To do this, I’ll first click on the mask thumbnail of the gradient layer in the Layers panel to activate it.
Then, I’ll head up to the Edit > Fill menu item and click.

Inside of the Fill dialog box, I’ll make sure Black is selected from the Contents drop-down and then I’ll click OK to apply the fill.

Once I do this, I’ll see the color disappear from my selected areas. Basically, what’s happening here is that I’m using the color black to conceal the gradient in the mask of the gradient layer. I could have done all this by hand, but using the selection tool and the quick mask mode certainly helped me speed things up. These tools also gave me a much better and more accurate result.
To deselect the elephants, I’ll use the Select > Deselect menu item and that’s it. The project is finished. Here’s the final image.

Now I have an applied gradient that’s covering the background of the image with the foreground not being touched. If you’re interested in seeing what the gradient mask looks like, check out the thumbnail in the Layers panel.

And what’s even better, things are completely editable if I keep that mask thumbnail selected. I’ll be able to paint with white or black to adjust the gradient even more if I wanted to.
——
I hope I clearly explained the value of using Quick Mask mode in Adobe Photoshop to add efficiency to a project and refinement to a selection. If you have any questions regarding this post, please let me know in the comment section down below. Thanks for reading!
