Search

How to Brighten or Darken a Video in Adobe Photoshop

  • Thread starter KodyWallice
  • Start date
KodyWallice

KodyWallice

Member
Joined
May 7, 2021
Messages
123
Reaction Score
1
Points
23
  • #1
As I mentioned in my previous post about editing video in Adobe Photoshop, many of the actions an editor can take to correct the color or exposure for photos can be taken when working with video as well. The process is exactly the same for both, which makes the transition from photo editing to video editing rather seamless.

One common area of correction when it comes to video editing has to do with exposure. Oftentimes with video, as is true with photos, the exposure simply isn’t bright enough. Some clips look dark, dull and drab. The good thing is, this type of deficiency is so easy to correct. If you’ve ever worked with adjustment layers in Photoshop, you likely already know what to do.

How to Brighten a Dark Video in Adobe Photoshop​

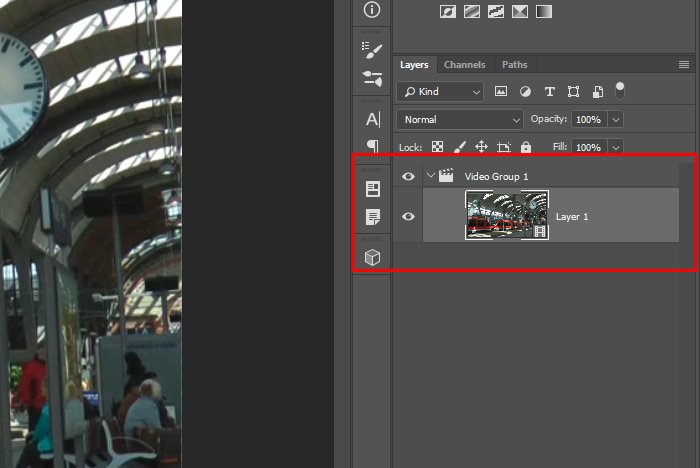
In today’s post, I’d like to discuss how to correct a video clip that’s too dull for anyone’s liking. The clip I’ll use isn’t bright enough and there’s not enough contrast in it. To make this correction, I’ll use the Levels adjustment. I do want you to be aware of something before I begin though. Each adjustment layer that’s applied to a layer in a group while editing video in Photoshop gets applied to the layer directly below it. Oftentimes, when putting together many video clips for edit in Photoshop, layers get stacked on top of one another in the Layers panel. If these layers weren’t in groups and an adjustment layer was applied to one of them, that adjustment layer will have an effect on all layers beneath it. When layers are in groups though and an adjustment is applied to a layer, that adjustment will only have an effect on that layer directly below, not all the others as well. This is something to keep in mind. I wanted to mention it here because in today’s example, I’ll be using only one layer in its own group. This is the default that Photoshop offers when a video file is initially opened. If you look closely, you can see a small arrow in the adjustment layer that points to the layer directly below.

Today’s Demo Video Clip​

For this example, I needed to find a video clip that wasn’t too dark. Although I want to demonstrate how to brighten exposure, I needed the exposure histogram curve to be somewhat centered so the actions I take are easy to see. I think I located a good video. It’s got a decent curve that’ll lend itself well to some brightening and some sweet contrast. Here’s a screenshot. Mind you, this is a screenshot of the train station after it’s been corrected.

train.jpg

Applying the Levels Adjustment Layer​

Okay, I’ve gone ahead and opened up the video clip into Adobe Photoshop. The clip’s layer is in a group as can be seen in the screenshot below.

video-group-1.jpg

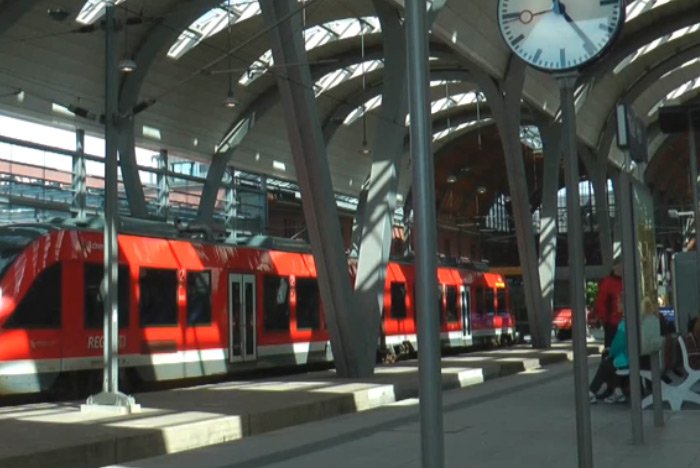
And here’s a screenshot of how dark and dull this clip really is. Very uninspiring.
dull-image.jpg

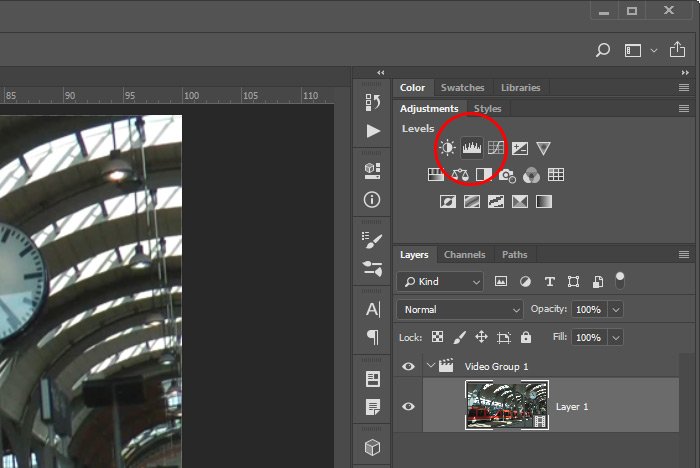
To brighten this video clip up and to add some contrast, I’m going to apply the Levels adjustment from the Adjustments panel. To do this, I’ll head up there and click on the Levels icon.
levels-icon.jpg

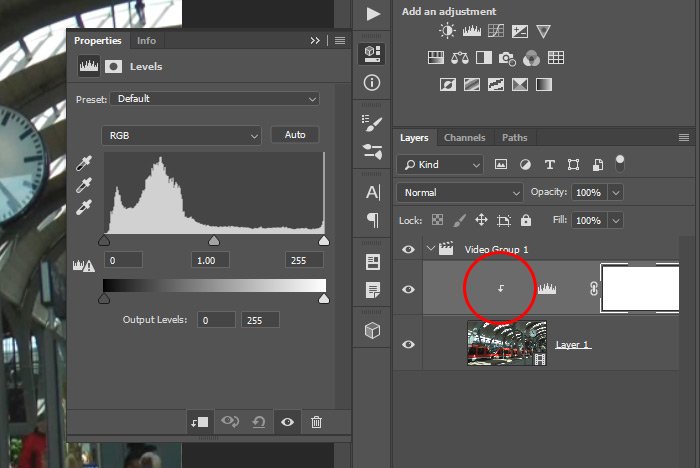
After I apply that adjustment layer, I’ll see it sitting right on top of the video clip layer, with that down facing arrow I spoke up earlier.
adjustment-layer.jpg

Remember, that arrow indicates that the adjustment layer will be applied only to the layer directly below.
Correcting the Exposure​

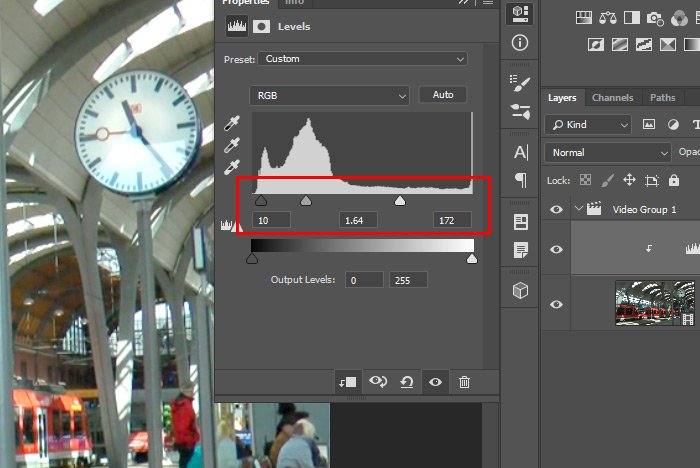
In one of the above screenshots, you saw the Properties panel for the Levels adjustment. The trick with making adjustments in this panel is that the center point needs to find a new home under the peak of the curve, or thereabouts. So, if I move the center point to the left, that will brighten up the midtones in the video. Then, to add some contrast to the clip, I’ll push the white point to the left and the black point to the right. This squeezes the dynamic range and makes for a very nice image. After moving those two outer points, I’ll need to adjust the center gray point again, because that one moves on its own when the others are pushed. Here’s the resulting positions.

levels-adjustment.jpg

The final result will be something like the leading image in this post. A clip that offers nice exposure with some good contrast.

So, the loose rule for making levels adjustments is to center the midpoint under the peak of the curve and then push the black and white points to they sit at the bottoms of the left and right curves. You want these points to hug the bell shape.

——

I hope I clearly explained how to apply a Levels adjustment layer to correct an underexposed video clip in Adobe Photoshop. If you have any questions regarding this post, please let me know in the comment section below. Thanks for reading!
 
KodyWallice

KodyWallice

Member
Joined
May 7, 2021
Messages
123
Reaction Score
1
Points
23
  • #2

Fixing Video That’s Too Bright or Too Dark in Adobe Photoshop​

When you get into the heavier side of video editing in Adobe Photoshop, there may be times when you need to use multiple video clips, as opposed to just one, inside of your overall project. During those times, it’s important for all of the clips to be consistent with their lighting. You wouldn’t want any one of them to stand out as awkwardly different from the others. Unless, of course, that’s the look you’re going for. Some clips may need exposure correction while others don’t. Bringing each one in line with the others is an important part of working with video.

In today’s post, I’m going to work through the process of correcting a slightly over-exposed video clip in Adobe Photoshop. I’ll be using an adjustment layer to accomplish this alongside the histogram. In these cases, the histogram is an indispensable tool that can aid with not only the entire spectrum of colors, but the separate reds, blues and greens as well. Don’t worry, this process is very straightforward and if you’ve ever worked with adjustment layers before, this shouldn’t be a problem at all.

Today’s Demo Video​

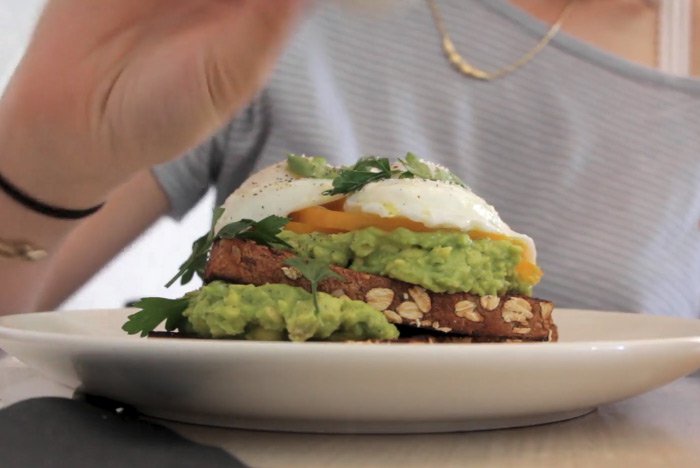
I took a quick screenshot of the video I’ll be using. It’s a clip of someone sitting at a table eating a sandwich. If you take a look at this screenshot, you’ll see that it is somewhat over-exposed and a little brighter than it should be. I’d like to see some more contrast in there with a bit less brightness.

open-sandwich.jpg

Viewing the Histogram​

Histograms are often overlooked pieces of information that are usually available in DSLR cameras as well as many photo and video editing applications. They tell us how light is distributed across a photo or video. Some of them even tell us how the reds, blues and greens are separately distributed. This is very helpful if one of these colors is out of whack. It might not be obvious that there’s too much blue or red in a video, but by looking at the histogram, it can be plainly obvious.

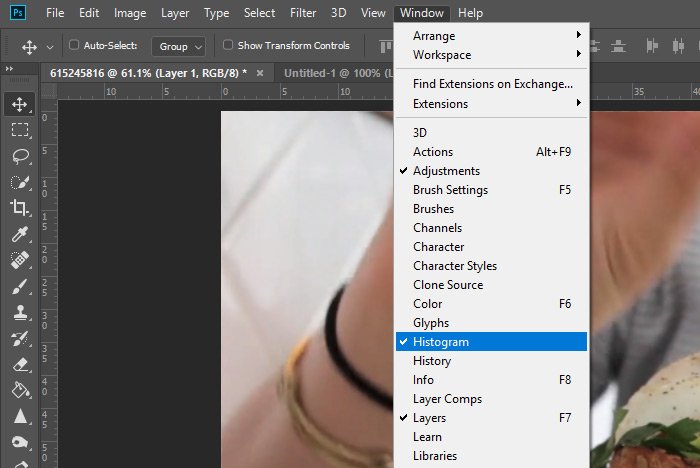
We have a histogram panel available in Photoshop. It’s probably not visible by default, so we’ll need to open it up by visiting the Window > Histogram menu item and clicking.

window-histogram-menu-item.jpg

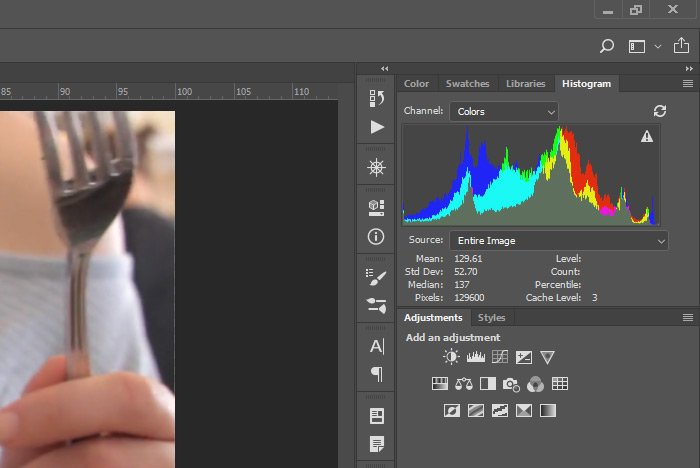
When the panel appears in the workspace, we can drag it into another cluster of panels, so it’s more off to the side. I dragged mine into the Colors, Swatches and Libraries cluster of panels. Let’s take a look.

histogram-panel.jpg

If you’ll notice, the histogram is showing the overall RGB spectrum as well as a few individual colors. Let’s see how we can adjust each of these.

The Levels Adjustment Layer​

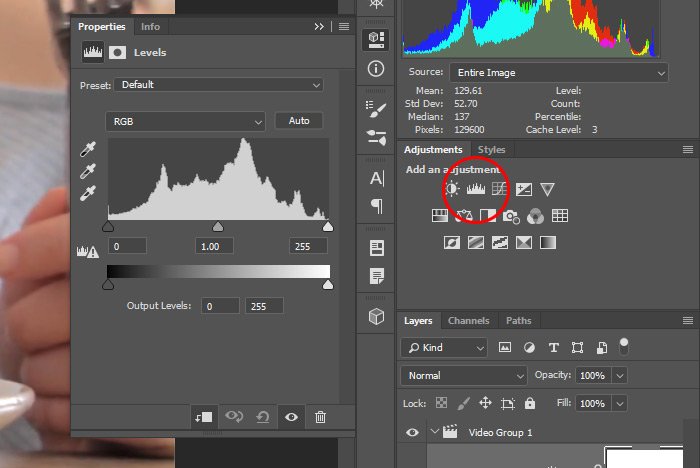
To make my adjustments today, I’ll be using the Levels adjustment. To apply this adjustment layer, I’ll simply click its icon inside of the Adjustments panel.

levels-adjustment.jpg

When I click this icon, a few things will happen. First, a new layer will appear inside of the Layers panel. This is the adjustment layer and since it’s been applied above a video layer, it’ll be clipped, meaning it’ll only apply to the layer directly beneath it. So if I had additional layers beneath the video layer, those layers wouldn’t be affected by any changes I make here.

Also, the Properties panel will pop open for the Levels adjustment layer. It’s inside of this Properties panel that I’ll be doing most of my work today.

At this point, I’d like to let you know that we could easily adjust the exposure by pushing the sliders in the Properties panel. It wouldn’t take more than a few seconds to correct this video and move onto something else. I’ll do that layer in this post, but right now, I’d like to point out that we can adjust the individual colors if we wanted to. If you’ve ever taken photos or video of flowers, for example, you most likely know that just the specific reds or yellows can get blown out (too intense), while the rest of the image is fine. The technique I cover next will help you deal with situations such as these.

Playing With the Reds​

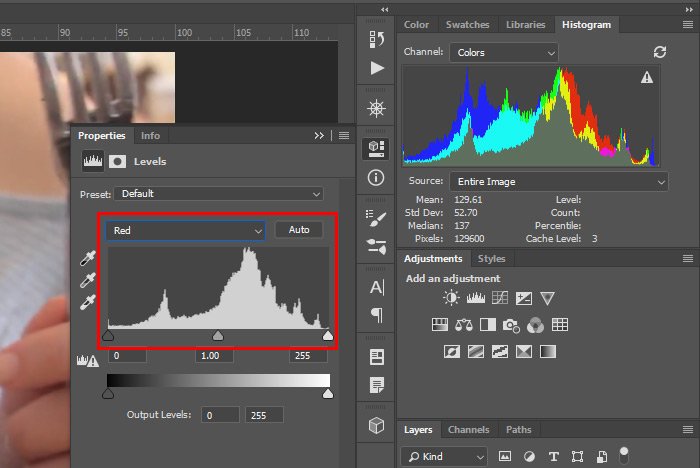
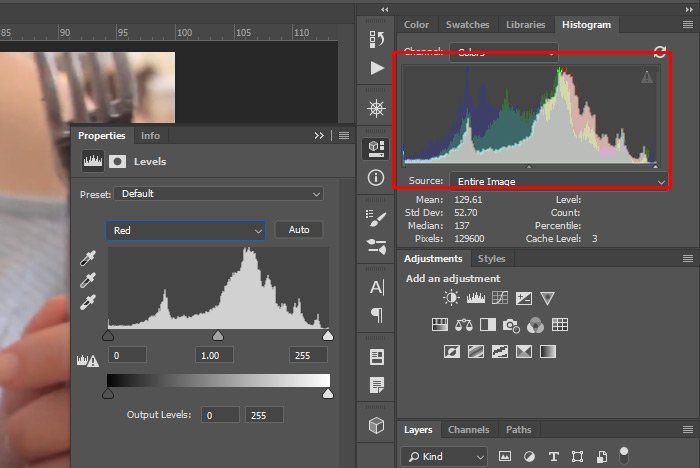
Let’s take a look at the reds in the histogram for a moment. Notice how they’re separate from the other colors. Actually many colors are separate, but we’re only focusing on the reds right now. Now, if I click the drop-down in the Properties panel that currently says RGB and choose Red, I’ll see a new histogram appear in that panel. This new one strips out all the other colors and shows only the distribution of reds in the video. I’ve outlined the Red histogram in the screenshot below.

red-histogram.jpg

If you look closely, you’ll see that this new histogram in the Properties panel matches almost exactly with the one that’s in the Histogram panel If I cut and paste these histograms on top of one another, you’ll have a clearer view.

red-overlay.jpg

My point by showing you this is that we can adjust the histogram in the Properties panel and as we do that, we can see how those changes result in the overall spectrum of light with the other colors. Because the histogram in the Histogram panel includes the other colors, it’s easy to see how our changes fit in with them. I know this is sort of convoluted, but I can’t think of a better way to explain it.

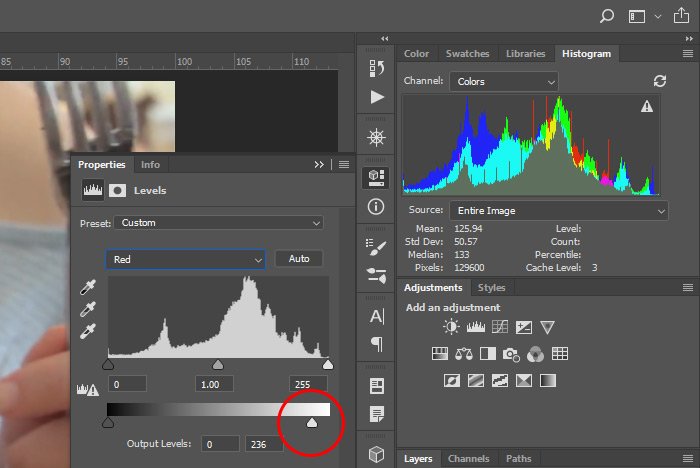
Perhaps a quick example will help. If I’d like to alter how the reds appear in the overall video, I can adjust the output value of that color specifically. Below the histogram in the Properties panel is a horizontal bar that goes from black to white. If I click and drag the white slider to the left, I can effectively reduce the level of reds in the video. In this next screenshot, you’ll see that I circled this output slider. Also notice how the reds in the Histogram panel have been reduced.

lower-output-value.jpg

If you’d like to experiment with your own images or videos, be sure to adjust each color and the RGB setting, along with this output slider. You’ll quickly get a feel of how things work. Just be careful when adjusting the individual colors though. If you go too far with any of them, you’ll end up altering the color of the entire clip. This is great if there’s an unwanted color cast, but not so great if the colors are already the way you’d like them to be.

Reducing the Overall Exposure​

Since the individual colors are okay in this video, I won’t touch them. I will, however, complete the process of adding contrast and reducing exposure. Doing these things is very simple with the Levels adjustment layer.

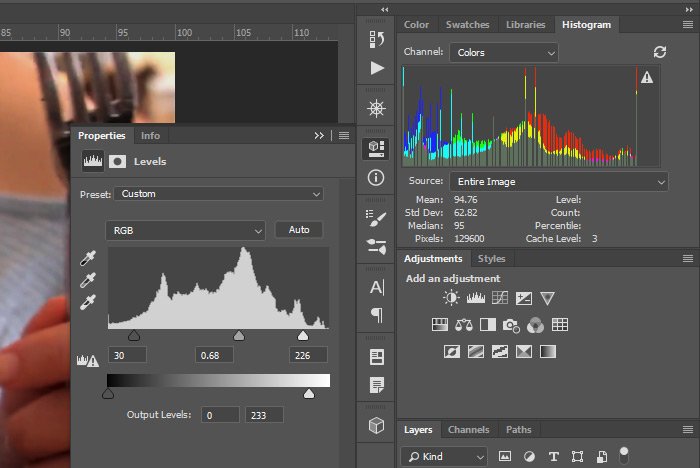
In the Properties panel, I’ve changed the drop-down value back to RGB. From there, I’ll push the Output slider to the left a bit, just as I did in the example above. This will reduce the highs somewhat. After that, I’ll nudge the blacks slider to the right, so the darks in the video get darker and then I’ll push the whites slider to the left a bit, just to add some brightness to the existing whites. Since I want an overall less exposed video though, I’ll push the center gray midtones slider to the right, which will darken things overall. Here’s what the values in the Properties panel look like now.

new-values.jpg

Notice how the histogram had been altered. It looks completely different.

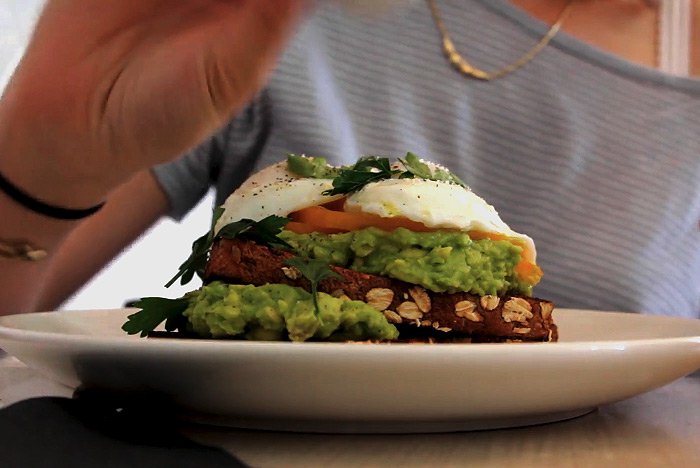
Here’s the final screenshot of the video.

lower-exposure.jpg

I want you to understand that the example I used today was to match this clip with other hypothetical clips I was using for a project. The output may have warranted some more brightness or darkness, depending on how the others appeared. Either way, this post should show you the process of how things can get done. If you have any questions regarding this post, please leave them in the comment section below. Thanks for reading!
 
Top