LukeLewis
Member
- Joined
- May 7, 2021
- Messages
- 134
- Reaction Score
- 0
- Points
- 21
- #1
You are going to absolutely love this post. I’m about to share an awesome tip with you. If you’ve ever had to deal with trying to remove phone lines, power lines or anything else that’s similar to those two with the Spot Healing Brush Tool in Adobe Photoshop, you know how much of a pain this type of task can be. Rarely do hands stay steady long enough to not make a mess of the removal. And on top of that, removing these types of objects from a photo can be tough. The outcome isn’t that great by hand. Things get sloppy and oftentimes, it’s not that difficult to see where the line was before it was removed.
This is where you’re going to love this post – guess what? The people over at Adobe must have read somebody’s mind because they have devised a way for us to use the Pen Tool in conjunction with the Spot Healing Brush Tool in conjunction with the Paths panel to get rid of those ugly power lines once and for all. And the best part is that the process is extremely simple and quite accurate. It takes no effort at all, so please read on below to learn more!
In today’s post, I’m going to remove a phone line using a really great technique. The lines in the photo I chose are plain and obvious, but I have used this technique in much more cluttered and confusing areas as well. Also, what I’ll show you below is perfect for any other type of wire or cable, such as those on suspension bridges or in cities. You can just as easily trace a variety of objects with the Pen Tool and remove them, as long as they’re thin enough to create a path on top of. You’ll see what I’m talking about below.


I’ll be sure the tool is set to Path from the drop-down in the options bar up top.

Because of the way the Spot Healing Brush Tool works, I decided to begin the path outside of the actual photo. If I began the path inside the photo, there would be a chance of some blurry black from the wire remaining. Take a look at the blue path that now sits on top of the wire.

Also, if there was a sag in the wire itself causing a bend, I could always use the Pen Tool to add another anchor point that I could drag to follow the bend. I’d click the Pen Tool right on the path and then use the Direct Selection Tool to select the anchor point and pull it in any direction I wish. I’ll go ahead and do that right now to show you what I’m talking about. Of course, the path won’t be lined up with today’s wire anymore; you’ll just have to pretend that the wire has a sag in it, like most wires do.

You’ll need to look for the blue path closely in the above screenshot because it blends well with the blue sky.
Okay, the next step is to select the Spot Healing Brush Tool from the left vertical toolbar and to size it accordingly. I’ll need to enlarge the view of the image and then size the brush so it’s just slightly larger than the fattest part of the wire. I’ll also want to make the edges of the brush firm.
Here’s the Spot Healing Brush Tool in the toolbar.

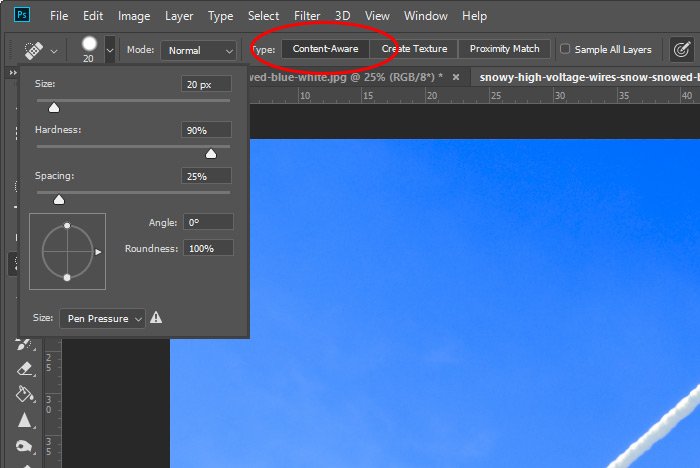
And here are the brush sizing and hardness values. Again, I’m using a size that’s just larger than the wire and that’s not too soft. I don’t want any of the black from the wire or, if the photo was much more busy with other items, any adjacent information being pulled into the correction. While the size and hardness isn’t critical for the image I’m using today, it is for more complex images.

Also notice how I chose Content Aware from those three options in the options bar up top. That setting will use any surrounding areas to fill the wire area in with blue.

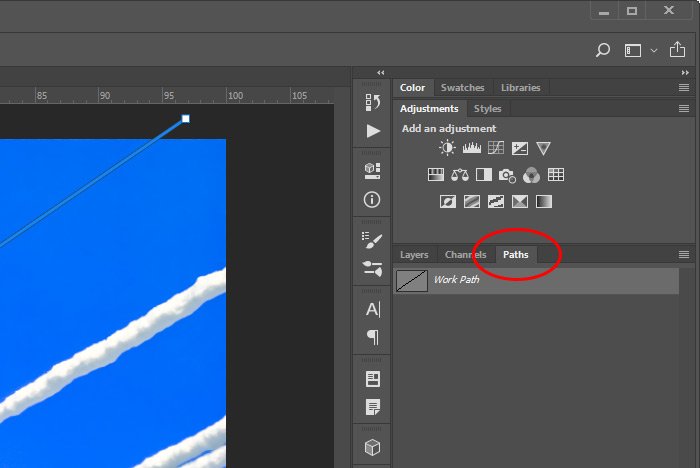
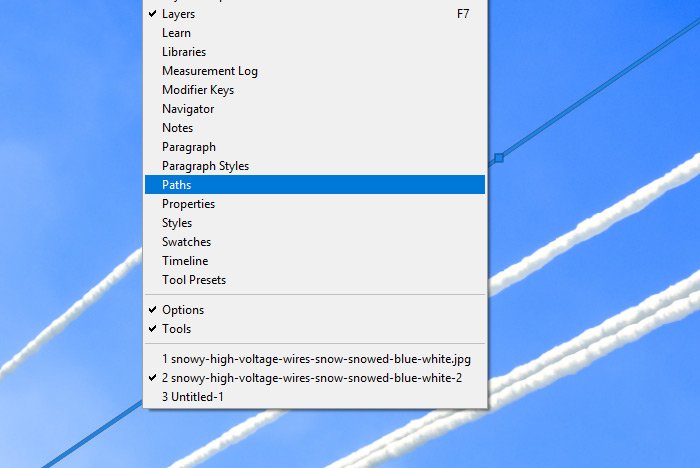
If you don’t see this panel to the right of the Layers panel, using the Window > Paths menu item to display the panel.

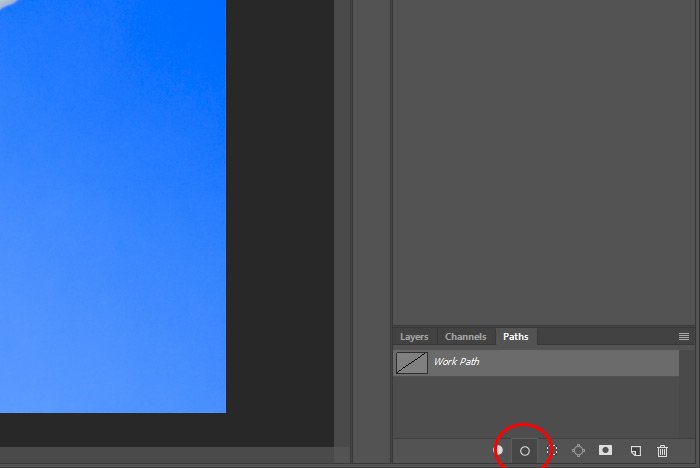
And finally, all I need to do now is to head down to the bottom of the Paths panel and click the Stroke Path with Brush button.

When I click that button, I’ll see the path get larger for just a second or two and then I’ll see the wire disappear. And then, if I click and drag that path layer down to the trash can at the bottom of the Paths panel, the path itself will disappear, leaving only an empty area where the wire was. Check this out.

How’s that for cool? Can you think of an easier and more accurate way for removing a wire like this? I can’t. This is the beauty of the Spot Healing Brush Tool at work.
I hope I clearly explained how to remove power lines by using the Pen Tool and a path in Adobe Photoshop. If you have any questions regarding this post, please leave them in the comment section below. Thanks for reading!
This is where you’re going to love this post – guess what? The people over at Adobe must have read somebody’s mind because they have devised a way for us to use the Pen Tool in conjunction with the Spot Healing Brush Tool in conjunction with the Paths panel to get rid of those ugly power lines once and for all. And the best part is that the process is extremely simple and quite accurate. It takes no effort at all, so please read on below to learn more!
In today’s post, I’m going to remove a phone line using a really great technique. The lines in the photo I chose are plain and obvious, but I have used this technique in much more cluttered and confusing areas as well. Also, what I’ll show you below is perfect for any other type of wire or cable, such as those on suspension bridges or in cities. You can just as easily trace a variety of objects with the Pen Tool and remove them, as long as they’re thin enough to create a path on top of. You’ll see what I’m talking about below.
The Demo Photo
The only thing I wish there was more of in this photo is curves. The lines I’ll demonstrate on are somewhat straight, but the tip I’ll show you below can be used on curved, or sagging, lines as well. I’ll show you how to bend a path though, so it’s not a big deal. Here’s the image.
Using the Pen Tool to Draw a Path
Okay, the very first thing I’m going to do is use the Pen Tool to draw a path right on top of the wire I’d like to remove. In this case, I’ll get rid of the black wire that the snow already fell off of. Here’s the Pen Tool over in the left vertical toolbar.
I’ll be sure the tool is set to Path from the drop-down in the options bar up top.

Because of the way the Spot Healing Brush Tool works, I decided to begin the path outside of the actual photo. If I began the path inside the photo, there would be a chance of some blurry black from the wire remaining. Take a look at the blue path that now sits on top of the wire.

Also, if there was a sag in the wire itself causing a bend, I could always use the Pen Tool to add another anchor point that I could drag to follow the bend. I’d click the Pen Tool right on the path and then use the Direct Selection Tool to select the anchor point and pull it in any direction I wish. I’ll go ahead and do that right now to show you what I’m talking about. Of course, the path won’t be lined up with today’s wire anymore; you’ll just have to pretend that the wire has a sag in it, like most wires do.

You’ll need to look for the blue path closely in the above screenshot because it blends well with the blue sky.
Sizing the Spot Healing Brush Tool
That first step was pretty easy, right? All I did so far was create a simple path with the Pen Tool. Remember, if what I was trying to move was more complex, I could have clicked with the Pen tool many more times to trace whatever it was that I was dealing with. In today’s post, all I need is two anchor points.Okay, the next step is to select the Spot Healing Brush Tool from the left vertical toolbar and to size it accordingly. I’ll need to enlarge the view of the image and then size the brush so it’s just slightly larger than the fattest part of the wire. I’ll also want to make the edges of the brush firm.
Here’s the Spot Healing Brush Tool in the toolbar.

And here are the brush sizing and hardness values. Again, I’m using a size that’s just larger than the wire and that’s not too soft. I don’t want any of the black from the wire or, if the photo was much more busy with other items, any adjacent information being pulled into the correction. While the size and hardness isn’t critical for the image I’m using today, it is for more complex images.

Also notice how I chose Content Aware from those three options in the options bar up top. That setting will use any surrounding areas to fill the wire area in with blue.
Stroke Path with Brush
Now that I have the brush sized correctly and have it still active, I’ll head over to the Paths panel.
If you don’t see this panel to the right of the Layers panel, using the Window > Paths menu item to display the panel.

And finally, all I need to do now is to head down to the bottom of the Paths panel and click the Stroke Path with Brush button.

When I click that button, I’ll see the path get larger for just a second or two and then I’ll see the wire disappear. And then, if I click and drag that path layer down to the trash can at the bottom of the Paths panel, the path itself will disappear, leaving only an empty area where the wire was. Check this out.

How’s that for cool? Can you think of an easier and more accurate way for removing a wire like this? I can’t. This is the beauty of the Spot Healing Brush Tool at work.
I hope I clearly explained how to remove power lines by using the Pen Tool and a path in Adobe Photoshop. If you have any questions regarding this post, please leave them in the comment section below. Thanks for reading!
