EmeraldHike
Member
- Joined
- May 10, 2021
- Messages
- 133
- Reaction Score
- 0
- Points
- 21
- #1
In previous posts, I’ve talked about the many options we have when it comes to transforming an image. We can skew, distort, shrink, grow and alter the perspective of a graphic with ease, right inside of Adobe Photoshop. You can take a look at some of these options here. While much of what I’ve written about is super cool, it needs to be more than that to be useful. We need to know what to do with these transform tools for them to be effective and worth our while.
In today’s post, I’d like to show you one very simple example of how a free transform can help with changing the perspective, or camera angle, of a photo of a lighthouse. I’d like to pretend that the original photo was taken with the wrong lens or, perhaps, at the wrong camera height. Whatever the issue, the shot isn’t what I’d like it to be and I’d like to change it up a bit.
After I’m finished transforming the image, I’ll show you how to fill in any empty areas around the edges using Content-Aware Fill. This feature is the closest thing to magic that Photoshop has to offer. It does all the thinking for us and it seamlessly fills in gaps that result from reshaping an image.
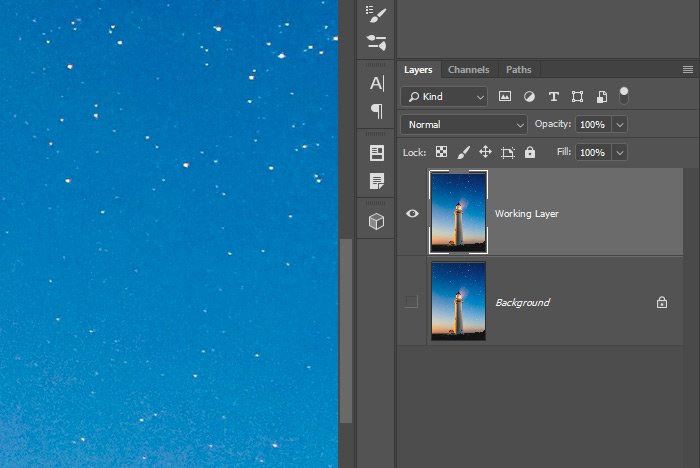
To kick this process off, I’ll first duplicate the layer, so I have a backup copy of what I’m about to work with. To duplicate the layer, I’ll simply click and drag the existing layer down to the Create a New Layer icon at the bottom of the Layers panel. After I’m finished with that, I’ll have two identical layers. I’ll hide the visibility of the bottom one.
Next, with the top layer selected, I’ll use the keyboard shortcut of Ctrl+T (Command for Mac) to activate the Free Transform command. Then, I’ll hold down the Ctrl key on my keyboard and drag each top corner towards the center a bit. I’ll stop when I get the look I’m going for.
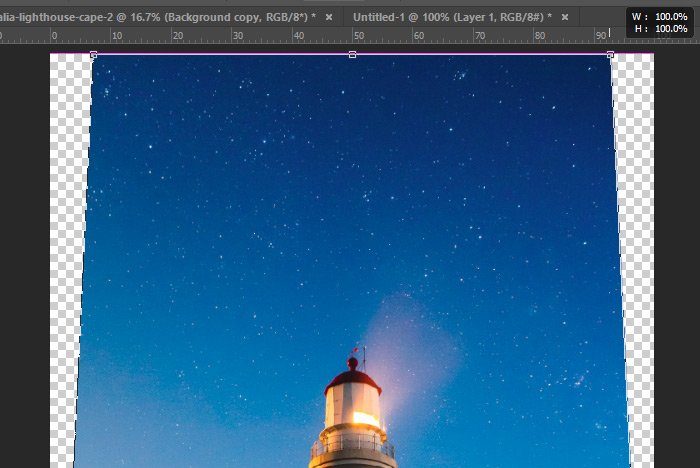
When I’m done, I’ll press the Enter key on my keyboard to accept the changes.
Let’s take a look at the lighthouse now.
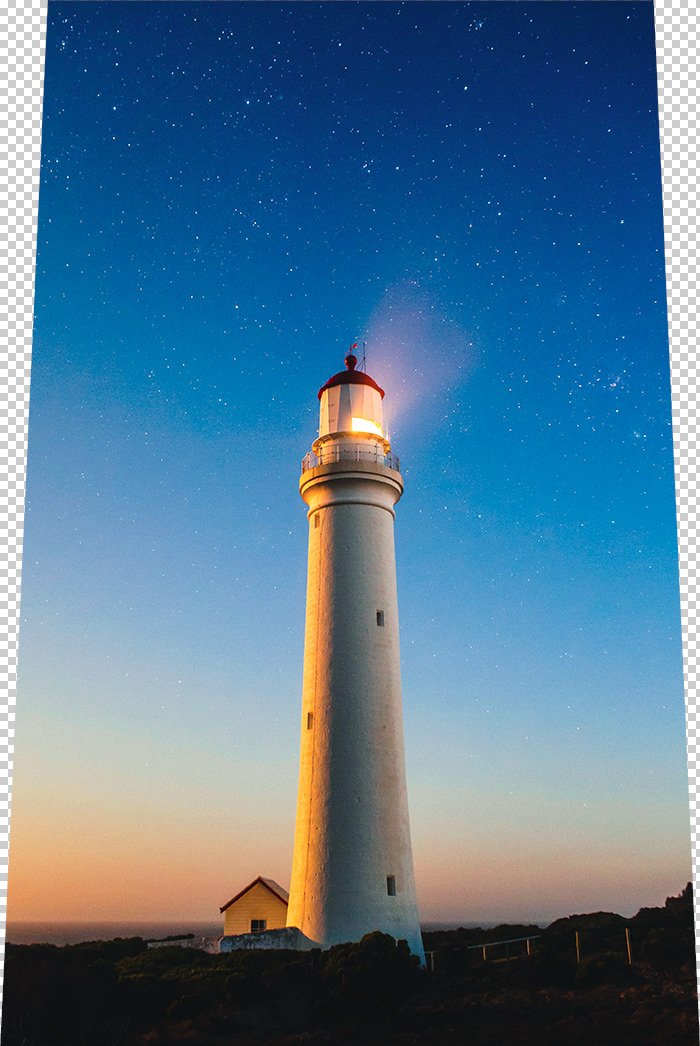
I’ve got the lighthouse looking exactly how I want it, but as you can see, I have a small issue. There are missing parts on both sides. How can I correct this? Well, I suppose I could crop the photo so it’s thinner, but I really don’t want to do that. I think I’ll fill in those gaps instead.
At this point, I can click inside either empty area and all empty areas should be selected. After that, I’ll need to expand the selection by a few pixels, just to make sure the Content-Aware Fill feature doesn’t leave any hairline gaps that are empty. To grow the selection, I’ll head up to the Select > Modify > Expand menu item and type in the number of pixels by which I’d like to grow the selection.
The amount you’ll expand your selection will depend on your image size. The larger the image, the more pixels you’ll want to expand by. If the image I am using was 1000 pixels wide, I would probably go with a 5 pixel expansion. Since the image is larger than that, I’ll go with 10.
Now that I have everything set up, all I need to do is fill the area in. To do this, I’ll go to the Edit > Fill menu item and inside of the Fill dialog, I’ll select Content-Aware from the Contents drop-down.
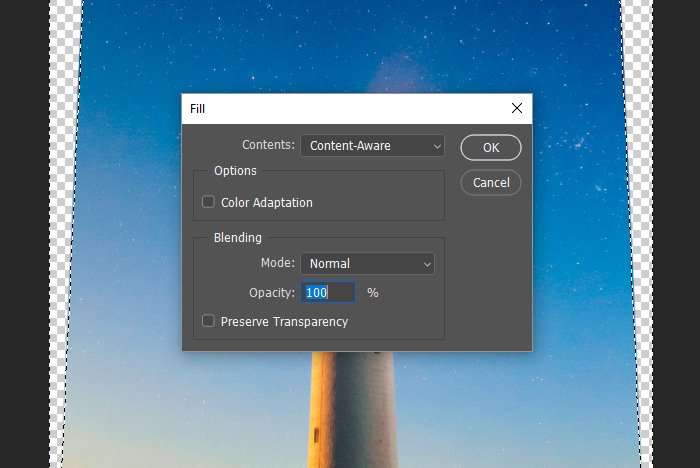
After that, I’ll click the OK button and watch as the empty areas are magically filled in. Let’s take a look.

To deselect, I’ll go to the Select > Deselect menu item and click. Then, if there are any areas I would like to improve upon in the photo, I could use the Spot Healing Brush Tool to do so. I actually did that with a few stars. Let’s take a look at the final image now.

You have to admit, that looks pretty good.
I hope I clearly explained how to alter the perspective of a photo by using the transform tools and then how to fill in any empty areas by using the Content-Aware Fill tool. If you have any questions regarding this post, please let me know in the comment section down below. Thanks for reading!

In today’s post, I’d like to show you one very simple example of how a free transform can help with changing the perspective, or camera angle, of a photo of a lighthouse. I’d like to pretend that the original photo was taken with the wrong lens or, perhaps, at the wrong camera height. Whatever the issue, the shot isn’t what I’d like it to be and I’d like to change it up a bit.
After I’m finished transforming the image, I’ll show you how to fill in any empty areas around the edges using Content-Aware Fill. This feature is the closest thing to magic that Photoshop has to offer. It does all the thinking for us and it seamlessly fills in gaps that result from reshaping an image.
Today’s Demo Photo
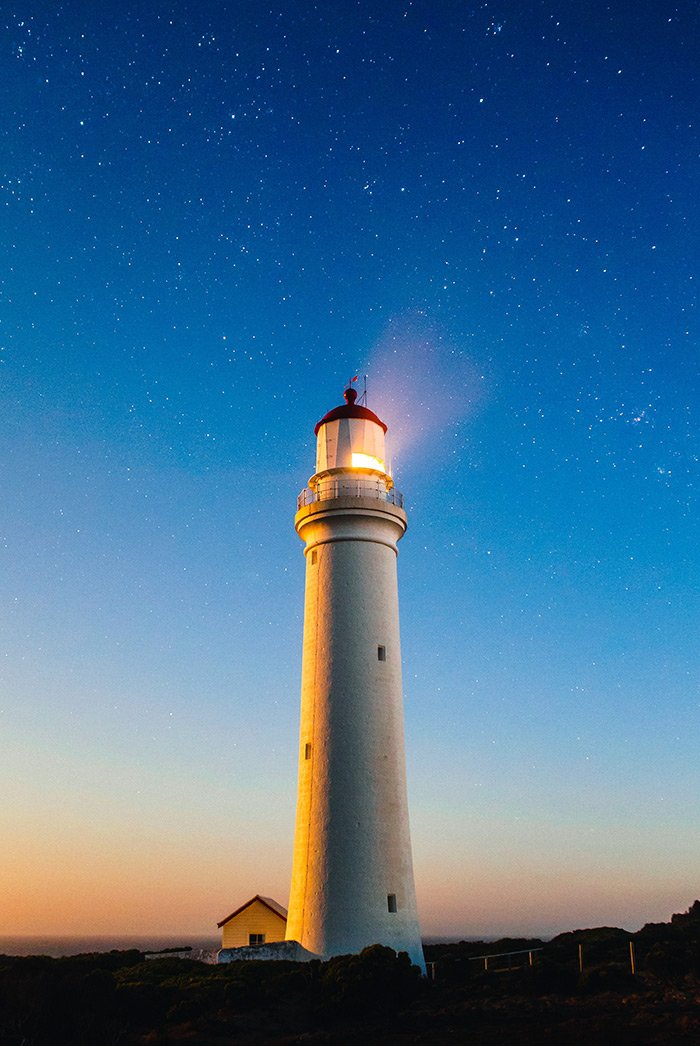
Here’s the photo of the lighthouse. As you can see, it’s sort of squat. It’s not as tall and dramatic as I’d like it to be. I’ll fix that by transforming it, but that will leave a few gaps that need to be filled. Not to worry. I have just the solution for that.
Changing Camera Height
It appears that this photo was taken while standing on a ladder. I’d like it much more if it were taken while lying on the ground. If the camera were on the ground, the top of the lighthouse would appear as though it were farther away. I like that idea, so I’m going to squeeze the two top corners in, towards themselves.To kick this process off, I’ll first duplicate the layer, so I have a backup copy of what I’m about to work with. To duplicate the layer, I’ll simply click and drag the existing layer down to the Create a New Layer icon at the bottom of the Layers panel. After I’m finished with that, I’ll have two identical layers. I’ll hide the visibility of the bottom one.

Next, with the top layer selected, I’ll use the keyboard shortcut of Ctrl+T (Command for Mac) to activate the Free Transform command. Then, I’ll hold down the Ctrl key on my keyboard and drag each top corner towards the center a bit. I’ll stop when I get the look I’m going for.

When I’m done, I’ll press the Enter key on my keyboard to accept the changes.
Let’s take a look at the lighthouse now.

I’ve got the lighthouse looking exactly how I want it, but as you can see, I have a small issue. There are missing parts on both sides. How can I correct this? Well, I suppose I could crop the photo so it’s thinner, but I really don’t want to do that. I think I’ll fill in those gaps instead.
Using Content-Aware Fill to Fill in Gaps
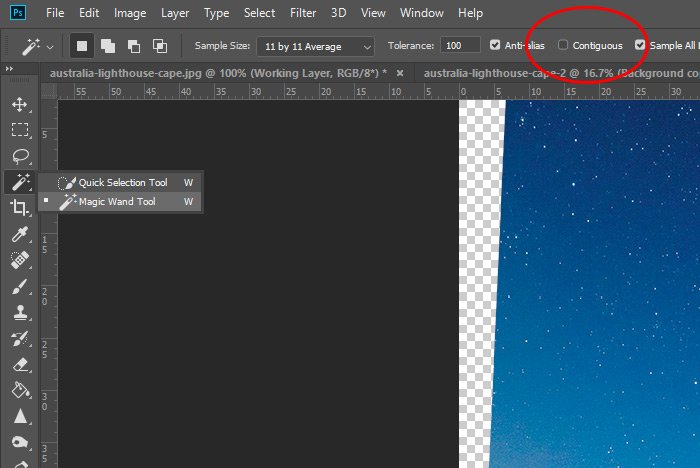
The first thing I’ve got to do is select the empty areas. To do this, I’ll use the Magic Wand Tool. With this tool, there is one setting I need to make sure is deactivated. Since I want to make one selection of an empty area and have both sides selected, I’ll make sure Contiguous is deselected, or unchecked, up in the options bar.
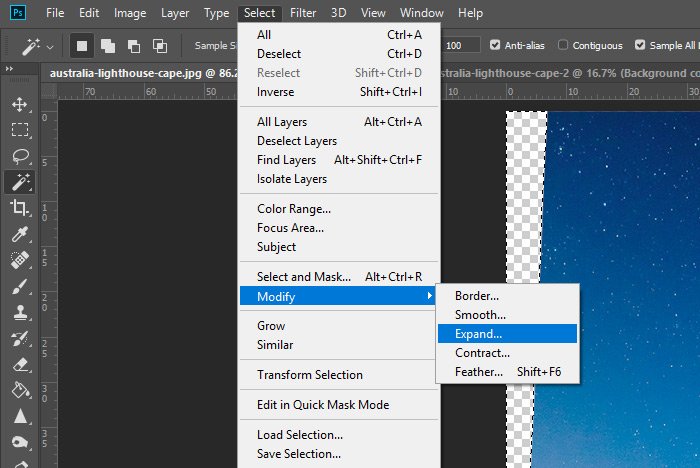
At this point, I can click inside either empty area and all empty areas should be selected. After that, I’ll need to expand the selection by a few pixels, just to make sure the Content-Aware Fill feature doesn’t leave any hairline gaps that are empty. To grow the selection, I’ll head up to the Select > Modify > Expand menu item and type in the number of pixels by which I’d like to grow the selection.

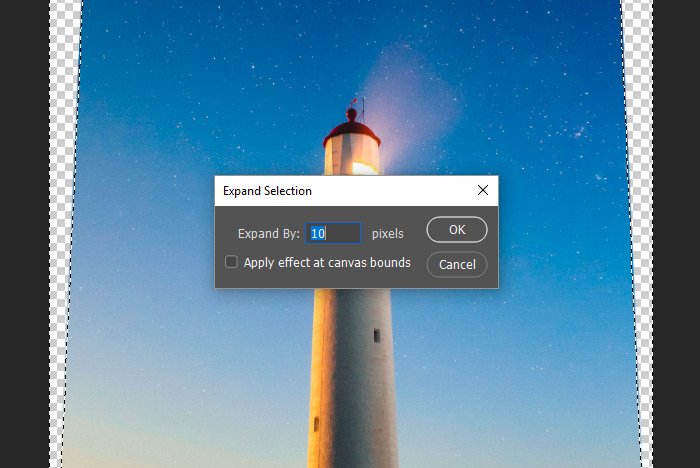
The amount you’ll expand your selection will depend on your image size. The larger the image, the more pixels you’ll want to expand by. If the image I am using was 1000 pixels wide, I would probably go with a 5 pixel expansion. Since the image is larger than that, I’ll go with 10.

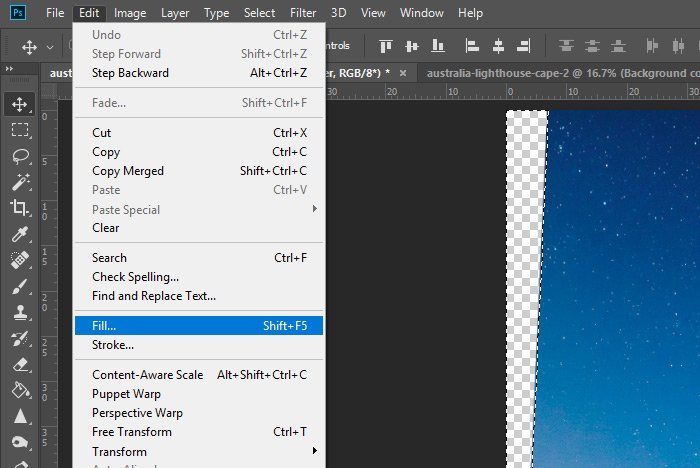
Now that I have everything set up, all I need to do is fill the area in. To do this, I’ll go to the Edit > Fill menu item and inside of the Fill dialog, I’ll select Content-Aware from the Contents drop-down.


After that, I’ll click the OK button and watch as the empty areas are magically filled in. Let’s take a look.

To deselect, I’ll go to the Select > Deselect menu item and click. Then, if there are any areas I would like to improve upon in the photo, I could use the Spot Healing Brush Tool to do so. I actually did that with a few stars. Let’s take a look at the final image now.

You have to admit, that looks pretty good.
I hope I clearly explained how to alter the perspective of a photo by using the transform tools and then how to fill in any empty areas by using the Content-Aware Fill tool. If you have any questions regarding this post, please let me know in the comment section down below. Thanks for reading!

