Cameron
Member
- Joined
- May 10, 2021
- Messages
- 108
- Reaction Score
- 3
- Points
- 23
- #1
This is very cool. Do you remember back in the day, before adjustment layers in Adobe Photoshop were around, when we had to visit the Image menu item and then use the items in the Adjustments section? If you’ve used Photoshop for a decent length of time, you surely remember this. If not, let me show you the area I’m referring to. It’s still there.
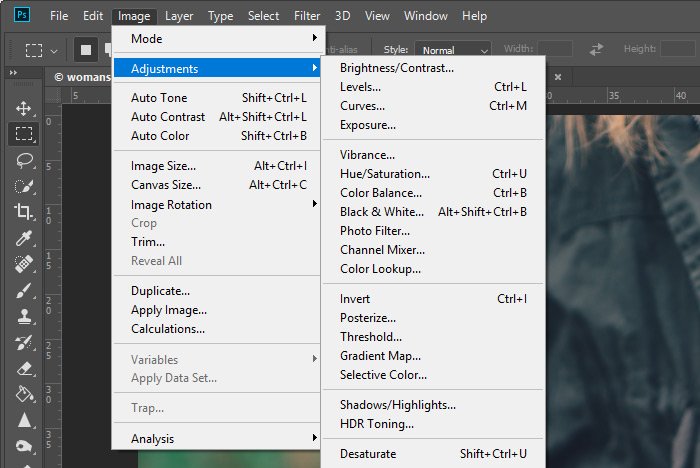
Inside this Adjustments area are some really great tools. I loved using them because, well, that’s what we did. We’ve got Brightness, Contrast, Levels, Curves and just about everything else. I haven’t used these features in years because of the adjustment layers that replaced them.
Well, I’m about to show you something really neat. I know there’s a huge population out there that has yet to get used to using adjustment layers. They have the latest software, but they simply like what they’ve been using forever, whether it be because of the easy to use menu area or because of the floating palettes. What I share below might help out tremendously because up until recently, any correcting or other adjustment made through these menu items was permanent, meaning destructive. If you edit a photo using these tools, the photo is forever altered. I’ve said this many times; this isn’t a good thing. Of course, there are workaround such as creating back up layers and the such, but that’s not practical all the time. That’s why Adobe came out with non-destructive adjustment layers for these types of edits.
In today’s post, I’m going to demonstrate how to go about using the old style Adjustments menu in a non-destructive fashion. It’s so simple, it’s going to really wow you. These adjustments will be treated like Smart Filters, so everything you do will be re-editable, which is what we want.

When I click that, I’ll notice something happen. The Brightness/Contrast dialog box will appear and I’ll be able to make my edits. When I’m finished, I’ll click the OK button. In this case, I added some contrast to make the image stand out more and to give it some definition.
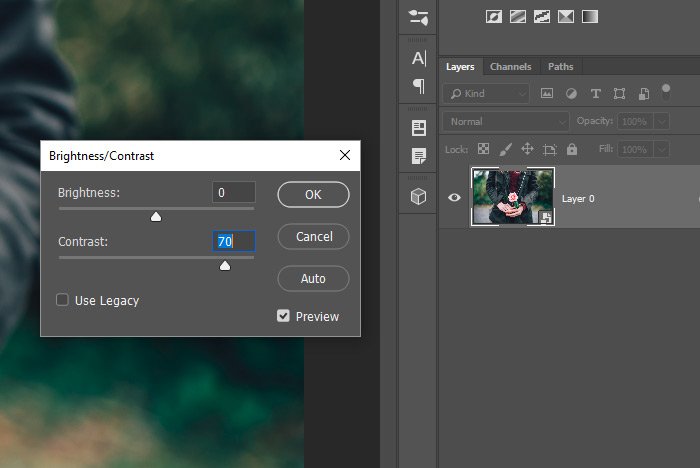
Now, just to be clear, when I add the contrast through this dialog, Photoshop is doing the same exact thing it would do if I were doing this through an adjustment layer. I’m seeing the same effect.
After I click on the OK button, I’ll notice that I’ve got a new filter under my layer in the Layers panel.
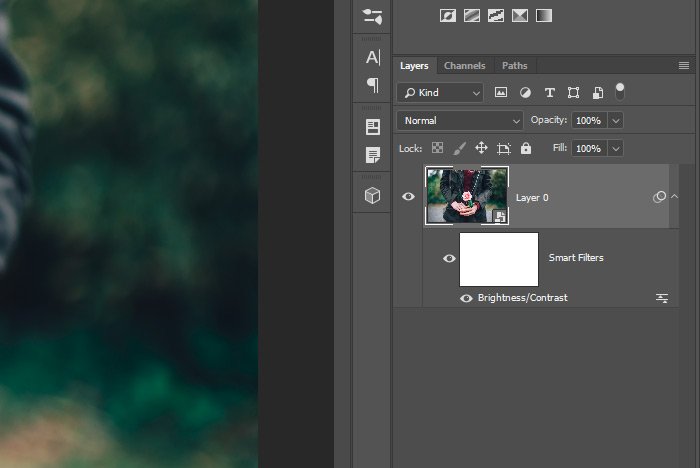
And just as with any other Smart Filter, I can double-click on the adjustment part of it and the dialog box will appear again, where I can change things up. If I want to add or remove brightness or contrast, I can.
So, what’s different between this method and the adjustment layer method we’ve gotten so used to? Well, for one, I don’t have individual layer masks. I do have an overall mask that can be applied, but that’s going to affect any and all of these types of adjustments I add. With the adjustment layer approach, I can edit those masks independently, which gives me a lot of flexibility.
I do get this though; if I double-click the Smart Object thumbnail, the original image will open in a new tab. So, if I wanted to, I could change that somehow and then save the file out, return to the original project and the change will show there. That’s pretty handy. Also, if I ever want to remove this adjustment, all I need to do is drag it down to the trash can located at the bottom of the Layers panel.
Also, if I apply one of these “autos,” it will become oddly unapplied the more I add and play with other adjustments. So I would need to continuously reapply whatever it was I did initially.
I hope you get the idea here. It may take some experimentation to get used to, but I think it’s worth it. And since this is pretty new, there’s a good chance that Adobe will keep it around for a while.

I hope I clearly explained how to create a Smart Object and then how to apply an adjustment from the menu items as opposed to from the Adjustments panel. This is the old way to do things that a lot of people still enjoy and now that it’s protected, it’s even better. If you have any questions regarding this post, please let me know in the comment section below or in the discussion forum. Thanks for reading!

Inside this Adjustments area are some really great tools. I loved using them because, well, that’s what we did. We’ve got Brightness, Contrast, Levels, Curves and just about everything else. I haven’t used these features in years because of the adjustment layers that replaced them.
Well, I’m about to show you something really neat. I know there’s a huge population out there that has yet to get used to using adjustment layers. They have the latest software, but they simply like what they’ve been using forever, whether it be because of the easy to use menu area or because of the floating palettes. What I share below might help out tremendously because up until recently, any correcting or other adjustment made through these menu items was permanent, meaning destructive. If you edit a photo using these tools, the photo is forever altered. I’ve said this many times; this isn’t a good thing. Of course, there are workaround such as creating back up layers and the such, but that’s not practical all the time. That’s why Adobe came out with non-destructive adjustment layers for these types of edits.
In today’s post, I’m going to demonstrate how to go about using the old style Adjustments menu in a non-destructive fashion. It’s so simple, it’s going to really wow you. These adjustments will be treated like Smart Filters, so everything you do will be re-editable, which is what we want.
Today’s Demo Image
I don’t know if I used this photo yet or not, but I thought it was pretty good for this topic. Since the image isn’t overly saturated in any way, it’ll be obvious when I apply an adjustment. Take a look.
Converting Layer to Smart Object
Yes, I’m sure you knew I was going to say this. Of course the first step, after opening the photo into Photoshop, is to convert the background layer into a Smart Object. This is actually the secret sauce of this post. To make these adjustments non-destructive, all that needs to happen is this conversion. I’m sure you know how to do this by now too. Simply right-click on the layer and choose Convert to Smart Object from the menu that appears.Applying the Adjustment
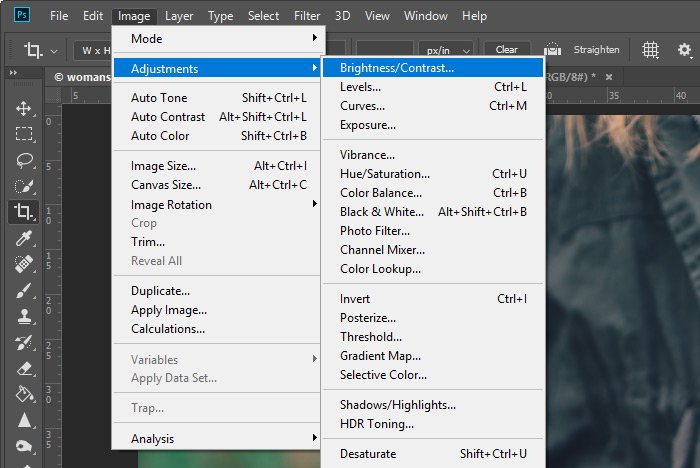
I’ll keep this simple and apply the first available adjustment. That would be the Brightness/Contrast one. So, I’ll head up to the Image > Adjustments > Brightness/Contrast menu item and click.
When I click that, I’ll notice something happen. The Brightness/Contrast dialog box will appear and I’ll be able to make my edits. When I’m finished, I’ll click the OK button. In this case, I added some contrast to make the image stand out more and to give it some definition.

Now, just to be clear, when I add the contrast through this dialog, Photoshop is doing the same exact thing it would do if I were doing this through an adjustment layer. I’m seeing the same effect.
After I click on the OK button, I’ll notice that I’ve got a new filter under my layer in the Layers panel.

And just as with any other Smart Filter, I can double-click on the adjustment part of it and the dialog box will appear again, where I can change things up. If I want to add or remove brightness or contrast, I can.
So, what’s different between this method and the adjustment layer method we’ve gotten so used to? Well, for one, I don’t have individual layer masks. I do have an overall mask that can be applied, but that’s going to affect any and all of these types of adjustments I add. With the adjustment layer approach, I can edit those masks independently, which gives me a lot of flexibility.
I do get this though; if I double-click the Smart Object thumbnail, the original image will open in a new tab. So, if I wanted to, I could change that somehow and then save the file out, return to the original project and the change will show there. That’s pretty handy. Also, if I ever want to remove this adjustment, all I need to do is drag it down to the trash can located at the bottom of the Layers panel.
Auto Tone, Auto Contrast & Auto Color
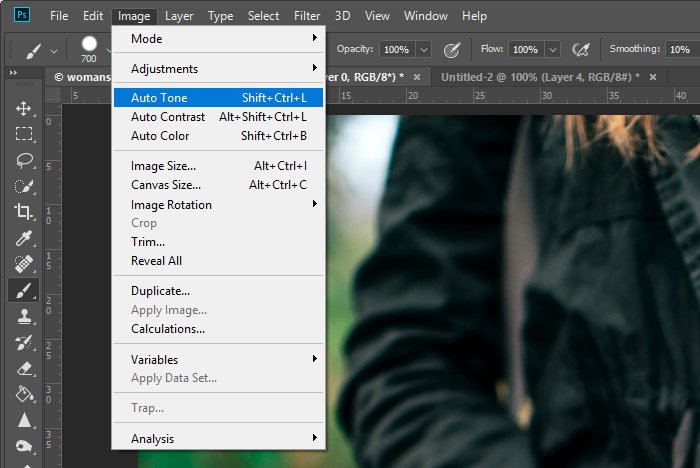
You may have noticed a few additional adjustments that can be made inside of the Image menu area. These are the Auto Tone, Auto Contrast and Auto Color adjustments. I guess Adobe hasn’t gotten around to these yet because if I go ahead and click on one of these options, the adjustment will be applied and it won’t touch the original file because of the Smart Object wrapper, but it also won’t create a Smart Filter element. It will simply be applied and that’s it. If I do that and then double-click the Smart Object thumbnail, I’ll see the original, untouched, image.
Also, if I apply one of these “autos,” it will become oddly unapplied the more I add and play with other adjustments. So I would need to continuously reapply whatever it was I did initially.
I hope you get the idea here. It may take some experimentation to get used to, but I think it’s worth it. And since this is pretty new, there’s a good chance that Adobe will keep it around for a while.

I hope I clearly explained how to create a Smart Object and then how to apply an adjustment from the menu items as opposed to from the Adjustments panel. This is the old way to do things that a lot of people still enjoy and now that it’s protected, it’s even better. If you have any questions regarding this post, please let me know in the comment section below or in the discussion forum. Thanks for reading!
