Cameron
Member
- Joined
- May 10, 2021
- Messages
- 108
- Reaction Score
- 3
- Points
- 23
- #1
Animating text in Adobe Photoshop is just like animating anything else in Photoshop. It takes some placement, creativity and keyframes to get the job done. So if you know how to animate other objects in this application, you can take care of text without issue.
In today’s post, I’ll walk through a quick project where I’ll have a piece of text that’s located in the lower portion of a video clip fade in, grow slightly and then fade out. As you’ll see below, the process is relatively simple when compared to so much of what Photoshop is capable of. If you can get the hang of working with keyframes in easy projects like this, you’ll have no problem applying the same concept to more complex projects where there are multiple clips and many, many layers.
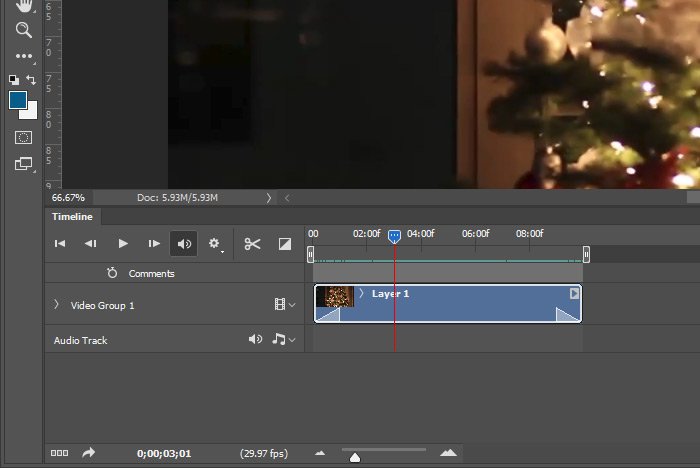
This is what I have so far in the Timeline panel. Notice the video clip itself as well as the fades along the timeline.
To accomplish this goal, I’ll move the playhead in the Timeline panel to the beginning of the clip. I’ll click on the small arrow that’s to the left of the layer name in the panel and I’ll immediately see the controls that manage animations. In this particular case, since I want a fade, I’ll click once on the small icon that’s to the left of the word Opacity. Doing this will create the first keyframe on the timeline. After the keyframe has been created, I’ll head over to the Layers panel and adjust the Opacity slider so it’s set to 0%. Then, I’ll move the playhead to the two second mark (or thereabouts) on the timeline and I’ll head back to the Layers panel, where I’ll adjust the Opacity slider so it’s set to 100%. When I make this second adjustment, the next keyframe will appear automatically. This will conclude the fade in I wanted.
To create the fade out, I’ll follow the same exact steps as above, but in this case, I’ll reverse the Opacity slider values. This time, I’ll go from 100% to 0% instead of the other way around. Take a look at the final product in the Timeline panel.
In the above screenshot, notice the Opacity keyframes along the timeline.
This is what the Timeline panel will look like when I’m finished.
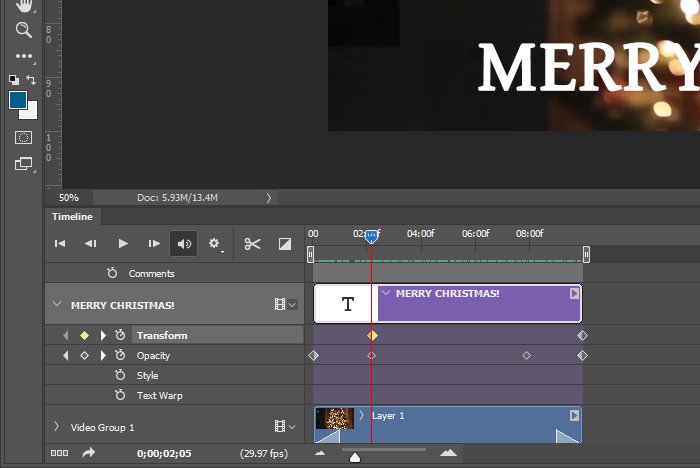
In all, there are six keyframes. The Opacity ones fade the text in and then fade it back out again and the Transform ones grow the text slightly as the video progresses. This growling is barely noticeable.
Let’s take a look at the final video.
I hope I clearly explained how to use opacity and transform keyframes to animate text in Adobe Photoshop. If you have any questions about this post, please let me know down in the comment section below. You can also ask any question you’d like in the photoshop forum. Thanks for reading!

In today’s post, I’ll walk through a quick project where I’ll have a piece of text that’s located in the lower portion of a video clip fade in, grow slightly and then fade out. As you’ll see below, the process is relatively simple when compared to so much of what Photoshop is capable of. If you can get the hang of working with keyframes in easy projects like this, you’ll have no problem applying the same concept to more complex projects where there are multiple clips and many, many layers.
Starting Things Off
For this project, I thought a video that included a nice Christmas tree was in order. You know, since Christmas is right around the corner and all. I’ve gone ahead and opened up the file inside of Photoshop and then I added a Fade With Black to the beginning of the clip and then the ending as well. So now, when the video plays, it’ll start off black, fade into the video, play the video and then fade out to black at the end. Very smooth.This is what I have so far in the Timeline panel. Notice the video clip itself as well as the fades along the timeline.

Adding the Text
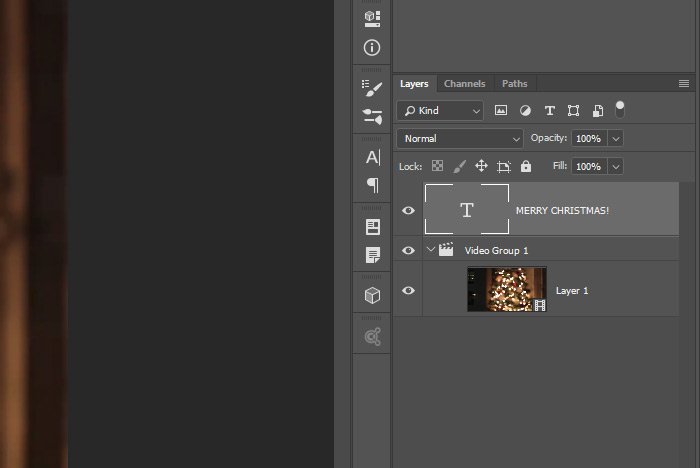
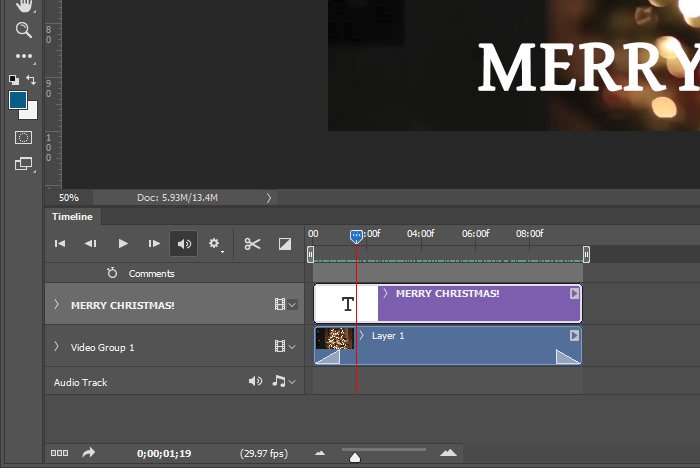
Okay, now that the video is set up, I’ll need to add the text. To keep things simple, I’ll just type out “MERRY CHRISTMAS!” To do this, I’ll head down to the bottom of the Layers panel and I’ll click on the Create a New Layer button. Then, when the layer is created, I’ll drag it out of the video group, into it’s own area. And finally, I’ll use the Horizontal Type Tool to write the text. Of course, I’ll choose a nice font and I’ll size the text accordingly. Below is what the Layers panel looks like and then what the Timeline panel looks like.

Animating the Opacity
For this video, I’d like the text to fade in from a 0% opacity value to a 100% opacity value over the first two seconds of the clip. Then, towards the end, for the final two seconds, I’d like the opacity values to change from a 100% value to a 0% value. So again, it’s a fade in, play and then fade out.To accomplish this goal, I’ll move the playhead in the Timeline panel to the beginning of the clip. I’ll click on the small arrow that’s to the left of the layer name in the panel and I’ll immediately see the controls that manage animations. In this particular case, since I want a fade, I’ll click once on the small icon that’s to the left of the word Opacity. Doing this will create the first keyframe on the timeline. After the keyframe has been created, I’ll head over to the Layers panel and adjust the Opacity slider so it’s set to 0%. Then, I’ll move the playhead to the two second mark (or thereabouts) on the timeline and I’ll head back to the Layers panel, where I’ll adjust the Opacity slider so it’s set to 100%. When I make this second adjustment, the next keyframe will appear automatically. This will conclude the fade in I wanted.
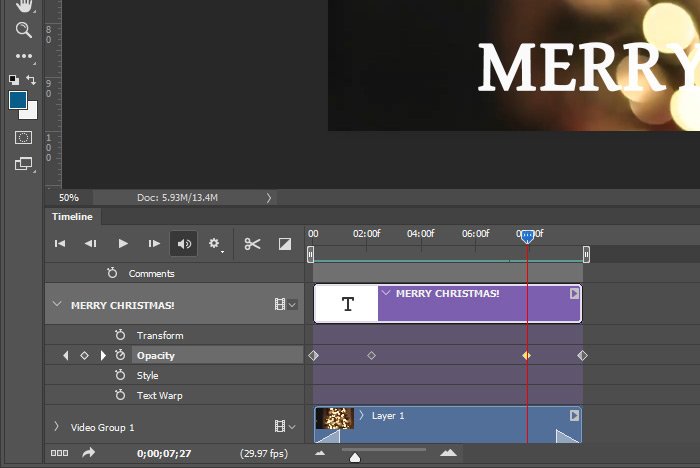
To create the fade out, I’ll follow the same exact steps as above, but in this case, I’ll reverse the Opacity slider values. This time, I’ll go from 100% to 0% instead of the other way around. Take a look at the final product in the Timeline panel.

In the above screenshot, notice the Opacity keyframes along the timeline.
Animating the Text Size
Scaling text automatically is just as easy to accomplish as changing the opacity is. To do this, I’ll need to follow similar steps as I did above. To start off, I’ll move the playhead back to the beginning of the timeline. Actually, since I want the scaling to begin when the text is faded into 100%, I’ll move the playhead to the two second mark on the timeline. Then, I’ll click on the Transform icon that’s over to the left, right above Opacity. Once I click that, the first transformation keyframe will be placed on the timeline. When this is complete, I’ll move the playhead all the way to the end of the clip and then I’ll use the keyboard shortcut of Ctrl+T to begin scaling the text larger. To scale from the center, I’ll hold down both the Alt and the Shift key at the same time and I’ll drag one of the corners of the bounding box outward slightly. I don’t want to go too large, so I’ll merely drag the corner a half inch or so. To accept this change and to remove the bounding box, I’ll press the Enter key on my keyboard.This is what the Timeline panel will look like when I’m finished.

In all, there are six keyframes. The Opacity ones fade the text in and then fade it back out again and the Transform ones grow the text slightly as the video progresses. This growling is barely noticeable.
Let’s take a look at the final video.
I hope I clearly explained how to use opacity and transform keyframes to animate text in Adobe Photoshop. If you have any questions about this post, please let me know down in the comment section below. You can also ask any question you’d like in the photoshop forum. Thanks for reading!

