15Katey
Member
- Joined
- May 10, 2021
- Messages
- 130
- Reaction Score
- 0
- Points
- 23
- #1
I’ll be continuing on with the “How To Make a Slideshow” theme for a few more posts. If you haven’t read my first installment, please do so here. It discusses how to take advantage of Adobe Bridge to organize and sequence the photographs you’d like to use. It’s actually a simple process once you get used to it. I think you’ll enjoy it.
In today’s post, I’d like to move one step further and talk about how to actually import the organized photos into Adobe Photoshop. Now that I have my eleven photos edited, organized and sequenced in a folder, I can work through the process of importing them into Photoshop for the ultimate slideshow. By the end of this post, I should have all the images visible in the Timeline panel and ready for some effects that will make them wow anyone who views the show.
Once I’m finished with that, I’ll click on the Create button. My file will be created and I’ll see something that looks like this.
I could have chosen any pixel dimension, but I wanted to go with this one for a few reasons. First, it’s a common video size and second, I want to show you what you can do when your photo doesn’t exactly cover the entire background of the file. Sometimes images are horizontally oriented and sometimes they’re oriented vertically. It’s important to deal with the empty spaces in the slideshow. I’ll discuss this in a bit.
After the timeline has been created, I’ll head over to the small menu that sits in the upper right corner of the same panel and I’ll select the Set Timeline Frame Rate option.
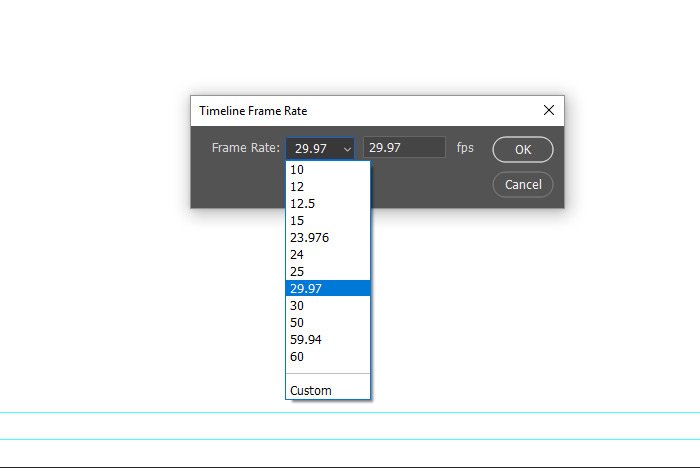
When the Timeline Frame Rate dialog appears, I’ll choose 29.97 from the drop-down because that’s a common frame rate for videos being displayed on the internet.
I’ll click the OK button to finish up there.
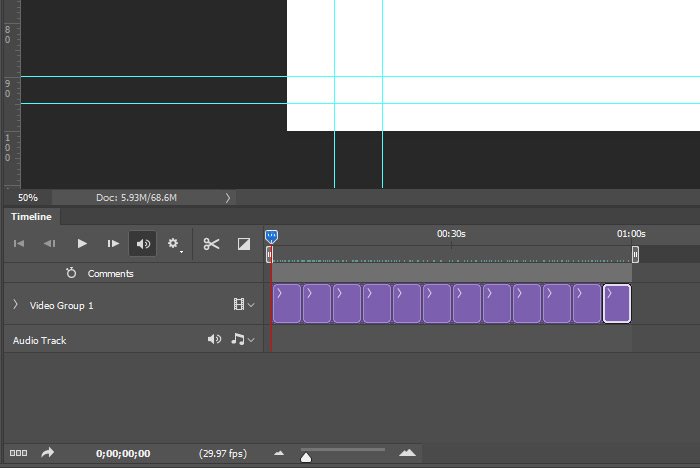
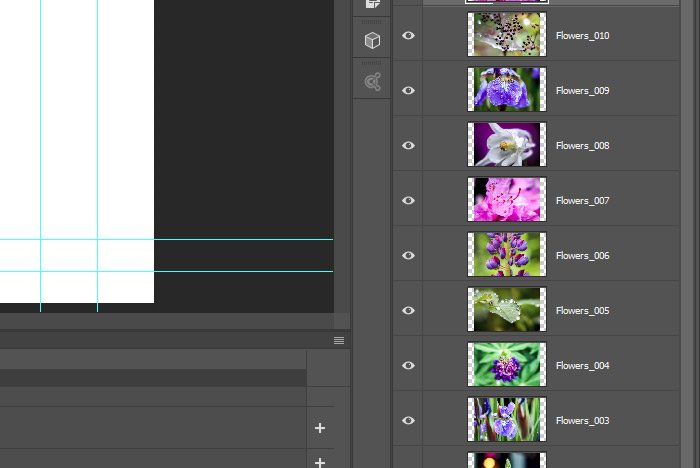
When I do that, a window will appear that I’ll use to browse to the folder where my photos reside. I’ll select those photos and click the Open button to import them to Photoshop. After they’re imported, I’ll notice two things. First, I’ll see that the timeline is now full of photos and second, I’ll see all the photos as new layers in the Layers panel.
Let’s see what we have going on here. Check out the first slide.
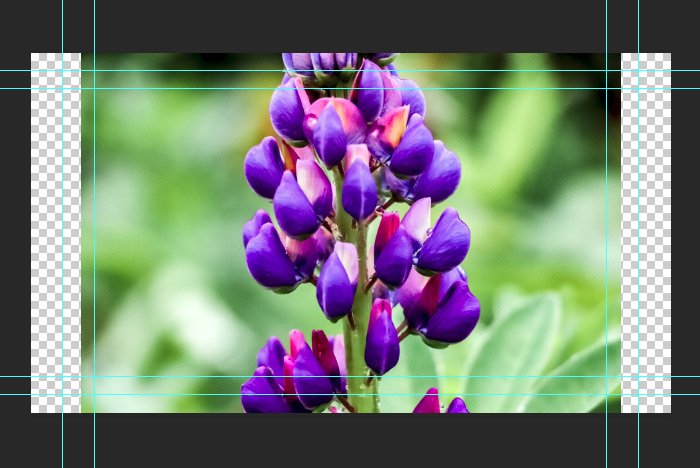
Do you see what I was referring to with what I mentioned above? Sometimes the photo doesn’t cover the entire background of the file that’s created for the slideshow. In cases such as these, it’s important to add a background so you can control the color that’s displayed as the video is playing through. Now, if all of your photos are horizontally oriented, you can just as easily crop them so they fit perfectly inside the video file. That’s good to know. Today though, I’ll add a a background layer.
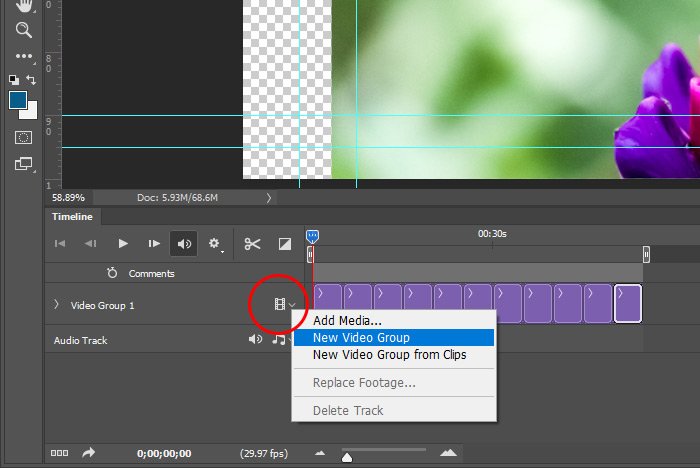
To create a new video group for which the background layer to live, I’ll click the small film strip icon that’s inside the current video group. From the menu that appears, I’ll select the New Video Group option.
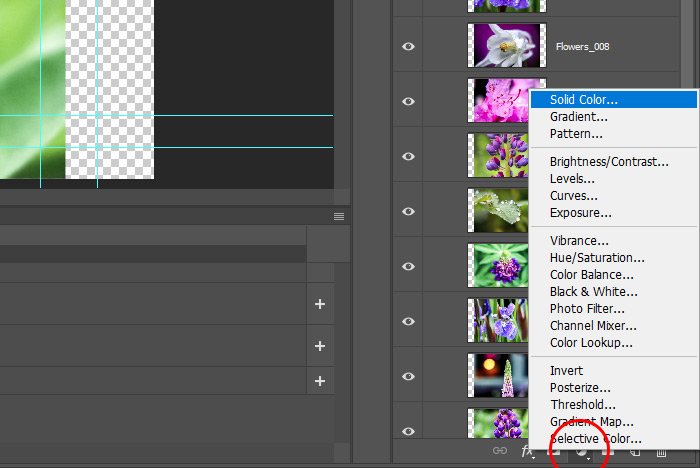
When I see the new video group appear, I’ll head over to the bottom of the Layers panel and I’ll click on the Create New Fill or Adjustment Layer button. From there, I’ll select Solid Color and when the Color Picker appears, I’ll choose the color I would like to see as the background.
Finally, I’ll extend the background layer on the timeline so it’s the same length as that of all the photos and then I’ll arrange the video groups so the black background is at the bottom. This is what the timeline should look like when I’m finished.
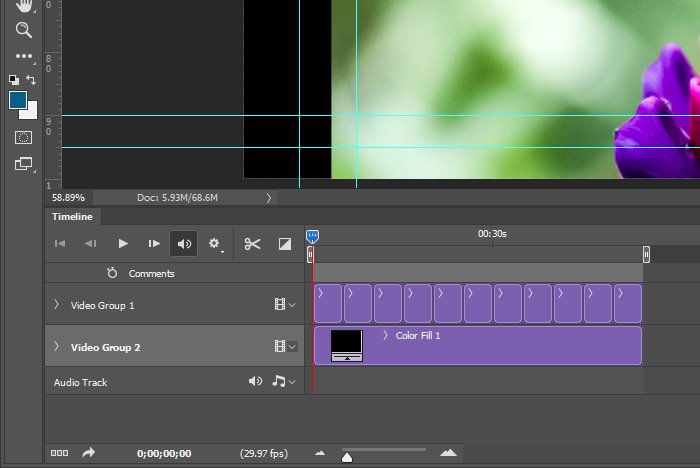
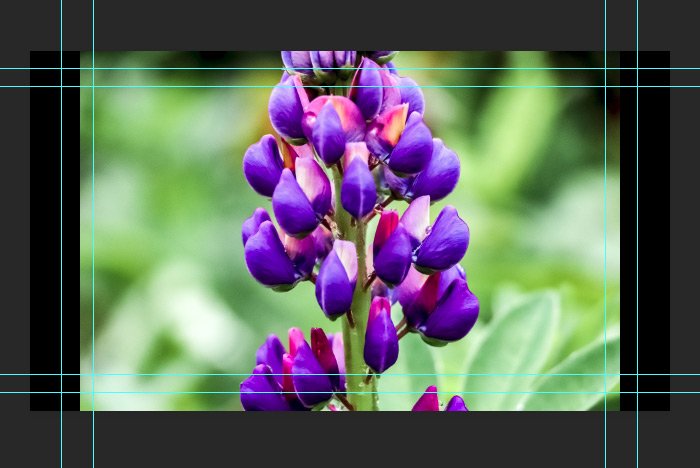
Now if I play through the slideshow, I’ll see black on either side of the photos, which is what I wanted.
I think that’s definitely enough for today. This was a lot of information to share. I hope I clearly explained how to import photographs into the Timeline panel in Adobe Photoshop for the purposes of making a slideshow. If you have any questions regarding this, please ask in the comment section down below. Also, you may ask any question you wish in the Photoshop question and answer forum at any time. Thanks for reading!
Next up, let’s add some movement and fades to these photos!
In today’s post, I’d like to move one step further and talk about how to actually import the organized photos into Adobe Photoshop. Now that I have my eleven photos edited, organized and sequenced in a folder, I can work through the process of importing them into Photoshop for the ultimate slideshow. By the end of this post, I should have all the images visible in the Timeline panel and ready for some effects that will make them wow anyone who views the show.
Creating a New File
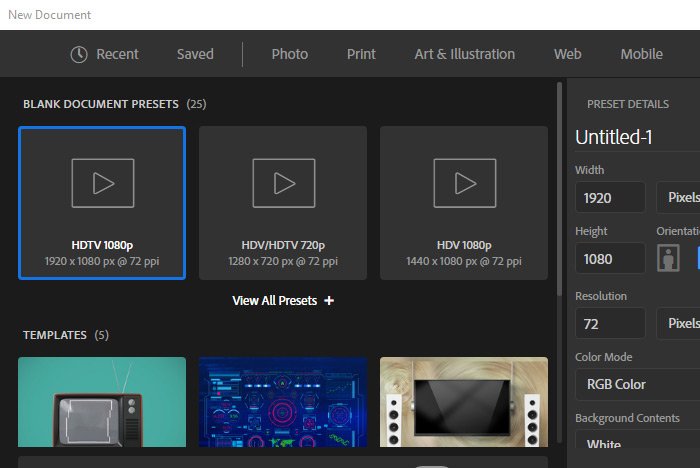
The very first thing I’ll do is open Adobe Photoshop. Once opened, I’ll visit the File > New menu item and click. When the New Document dialog box appears, I’ll select the Film & Video option from the top right. Then, I’ll choose the HGTV 1080p option from the center box.
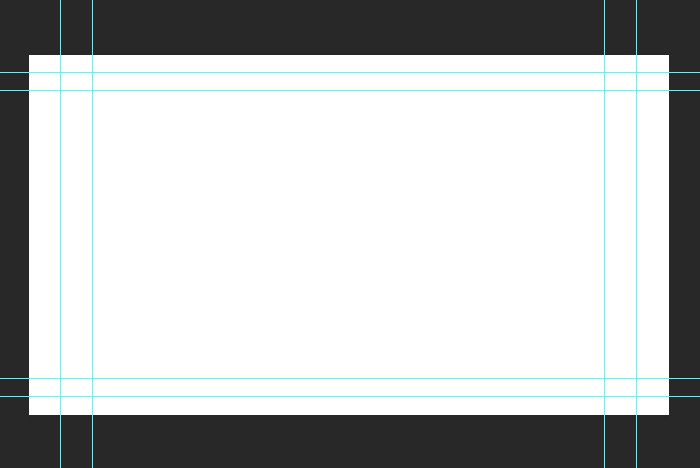
Once I’m finished with that, I’ll click on the Create button. My file will be created and I’ll see something that looks like this.

I could have chosen any pixel dimension, but I wanted to go with this one for a few reasons. First, it’s a common video size and second, I want to show you what you can do when your photo doesn’t exactly cover the entire background of the file. Sometimes images are horizontally oriented and sometimes they’re oriented vertically. It’s important to deal with the empty spaces in the slideshow. I’ll discuss this in a bit.
Creating the Timeline & Setting the Frame Rate
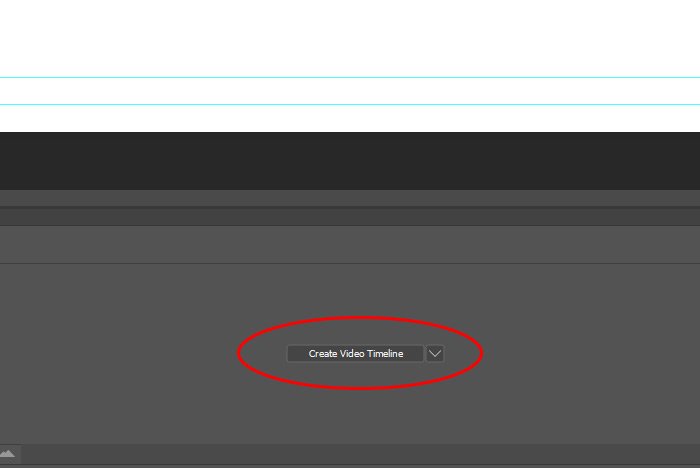
The next step I’ll take is to create the video timeline. This is easy. All I have to do is click on the Create Video Timeline button that’s down in the Timeline panel. If the Timeline panel isn’t open, simply visit the Window > Timeline menu item and click to open it.
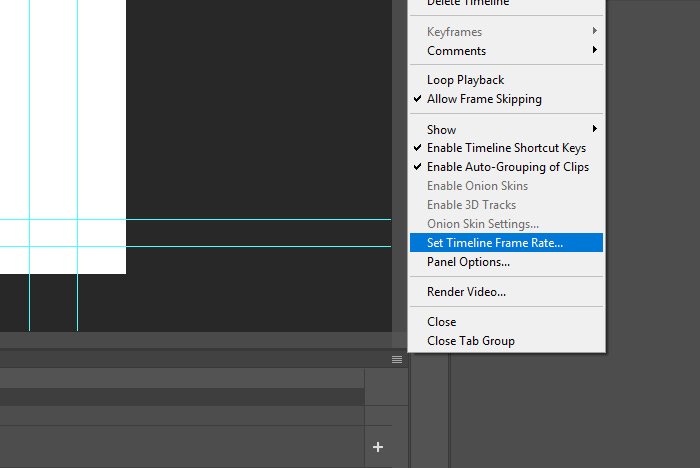
After the timeline has been created, I’ll head over to the small menu that sits in the upper right corner of the same panel and I’ll select the Set Timeline Frame Rate option.

When the Timeline Frame Rate dialog appears, I’ll choose 29.97 from the drop-down because that’s a common frame rate for videos being displayed on the internet.

I’ll click the OK button to finish up there.
Importing the Photographs
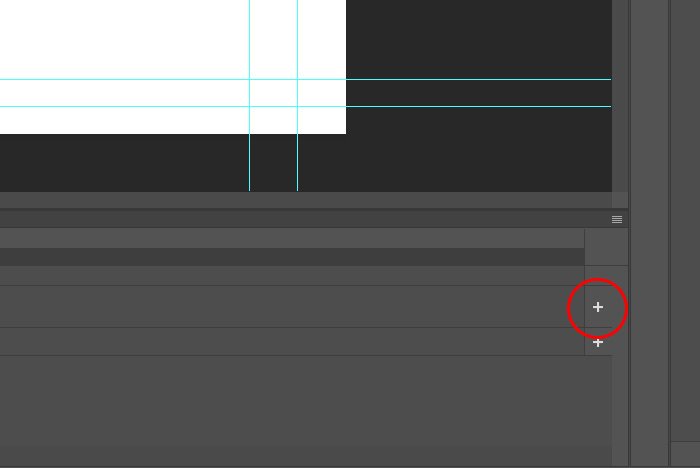
Okay, this is getting exciting. The next thing I’m going to tackle has to do with actually moving the photos into Photoshop to sit on the timeline. To accomplish this, I’ll click the small + (plus) sign that’s all the way to the right of Layer 0 in the Timeline panel.
When I do that, a window will appear that I’ll use to browse to the folder where my photos reside. I’ll select those photos and click the Open button to import them to Photoshop. After they’re imported, I’ll notice two things. First, I’ll see that the timeline is now full of photos and second, I’ll see all the photos as new layers in the Layers panel.


Adding a Video Group as a Background
If you’re following along with your own file, you’ll notice that when you click on the Play button in the Timeline panel, the newly formed (and very basic) slideshow starts out with a white screen. That’s just the layer background that was put there when the file was created. To remove that, simply drag that layer down to the garbage can that’s located at the bottom of the Layers panel. If you would like to keep that and place some informative text on it, that’s not a bad idea either. You could always alter the color to get creative. For this demonstration, I’ll remove it.Let’s see what we have going on here. Check out the first slide.

Do you see what I was referring to with what I mentioned above? Sometimes the photo doesn’t cover the entire background of the file that’s created for the slideshow. In cases such as these, it’s important to add a background so you can control the color that’s displayed as the video is playing through. Now, if all of your photos are horizontally oriented, you can just as easily crop them so they fit perfectly inside the video file. That’s good to know. Today though, I’ll add a a background layer.
To create a new video group for which the background layer to live, I’ll click the small film strip icon that’s inside the current video group. From the menu that appears, I’ll select the New Video Group option.

When I see the new video group appear, I’ll head over to the bottom of the Layers panel and I’ll click on the Create New Fill or Adjustment Layer button. From there, I’ll select Solid Color and when the Color Picker appears, I’ll choose the color I would like to see as the background.

Finally, I’ll extend the background layer on the timeline so it’s the same length as that of all the photos and then I’ll arrange the video groups so the black background is at the bottom. This is what the timeline should look like when I’m finished.

Now if I play through the slideshow, I’ll see black on either side of the photos, which is what I wanted.

I think that’s definitely enough for today. This was a lot of information to share. I hope I clearly explained how to import photographs into the Timeline panel in Adobe Photoshop for the purposes of making a slideshow. If you have any questions regarding this, please ask in the comment section down below. Also, you may ask any question you wish in the Photoshop question and answer forum at any time. Thanks for reading!
Next up, let’s add some movement and fades to these photos!
