15Katey
Member
- Joined
- May 10, 2021
- Messages
- 130
- Reaction Score
- 0
- Points
- 23
- #1
For this final installment of my four part “How to Create a Photo Slideshow in Adobe Photoshop” series, I’ll add some fades and transitions between photos to smooth things out. As the slideshow stands currently, I’ve got all the slides on the timeline and there’s some movement, but things are a bit choppy at the beginning, end and between photos. I’d like to fix that below.
If you haven’t read my previous posts on this topic yet, I encourage you to do so. They can be found through the following links.
Organizing & Sequencing Photos in Adobe Bridge For a Slideshow
Importing Slideshow Photos into Adobe Photoshop
How to Add Motion to Slideshow Photos in Adobe Photoshop
In today’s post, I’d like to add a fade at the beginning and the end of the slideshow as well as cross fades in between each slide otherwise. Since fades and cross fades use up some of the time each slide is viewable, I’ll need to also adjust the length of each one. This is all extremely simple stuff, so you should have no problem with following along.

If I right-click on the fade itself in the timeline, I’ll see that it has a duration of one second. That means that the fade just took up one second of the amount of time the slide was originally viewed. Since I want that one second back, I’ll click and drag the end of the slide in the Timeline panel so it extends for that amount of time.

As for the end of the slideshow, I’ll follow the exact same instructions I just gave you, but instead of dragging the end of the slide to the right, I’ll drag the beginning of the slide to the left to get that second back. And that will settle that.
To add the cross fades, I’ll again click on the transitions icon, but this time, when it opens up, I’ll click on the Cross Fade option and drag it down to the spot in between the first and second slide. In the screenshot below, you’ll see the black box that appears in this area. I’ll just drop it there.

I’ll continue following these steps for each slide.
As I add each cross fade, I’ll notice that, like the other fades, they consume some duration of each slide. Since my cross fades are set to one second, they take a half second from the slides themselves. I can either just accept this or I can click on the ends of and the beginnings of each slide and drag in the appropriate directions. Since this is just a demo, I’ll leave it like it is. The slide show is fine the way it stands.
With that, the slide show is completed. That’s all I needed to do today. I’ll export it and upload it to Youtube right now. Take a look.
I hope I clearly explained how to create a slideshow using Adobe Photoshop. If you have any questions about this process, please let me know in the comment section down below. You can also ask questions in the discussion forum as well. Thanks for reading!
If you haven’t read my previous posts on this topic yet, I encourage you to do so. They can be found through the following links.
Organizing & Sequencing Photos in Adobe Bridge For a Slideshow
Importing Slideshow Photos into Adobe Photoshop
How to Add Motion to Slideshow Photos in Adobe Photoshop
In today’s post, I’d like to add a fade at the beginning and the end of the slideshow as well as cross fades in between each slide otherwise. Since fades and cross fades use up some of the time each slide is viewable, I’ll need to also adjust the length of each one. This is all extremely simple stuff, so you should have no problem with following along.
Fading with Black
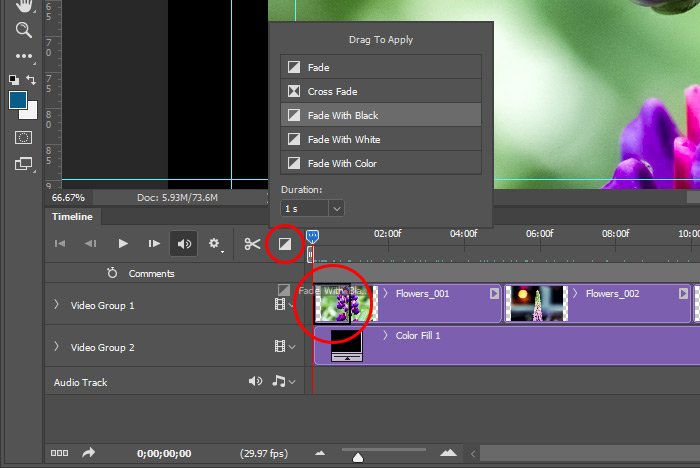
Since I already have a black background for this slideshow, I thought adding a nice fade from black at the beginning and a fade to black at the end would be appropriate. This is simple enough to achieve. To add the first fade, I’ll click on the transitions icon in the Timeline panel. From there, I’ll click and the Fade With Black option and drag that down to the very beginning of the first slide. As I reach the point at the beginning of the slide, I’ll see a black box appear. I’ll simply drop into that black box. In the following screenshot, I circled the transition icon and the black box I just referred to in red.
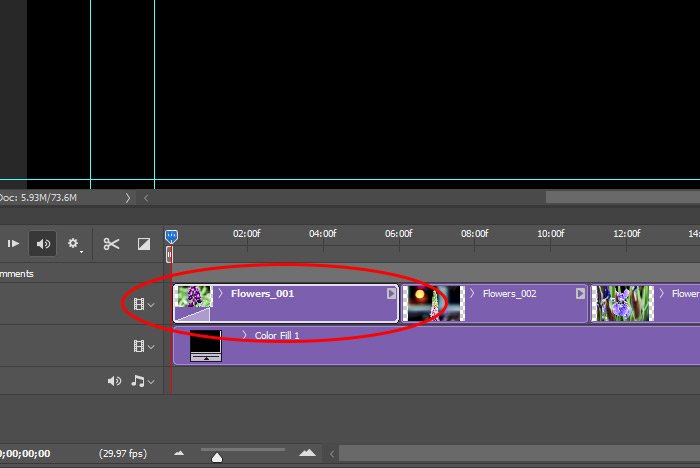
If I right-click on the fade itself in the timeline, I’ll see that it has a duration of one second. That means that the fade just took up one second of the amount of time the slide was originally viewed. Since I want that one second back, I’ll click and drag the end of the slide in the Timeline panel so it extends for that amount of time.

As for the end of the slideshow, I’ll follow the exact same instructions I just gave you, but instead of dragging the end of the slide to the right, I’ll drag the beginning of the slide to the left to get that second back. And that will settle that.
Adding Cross Fades
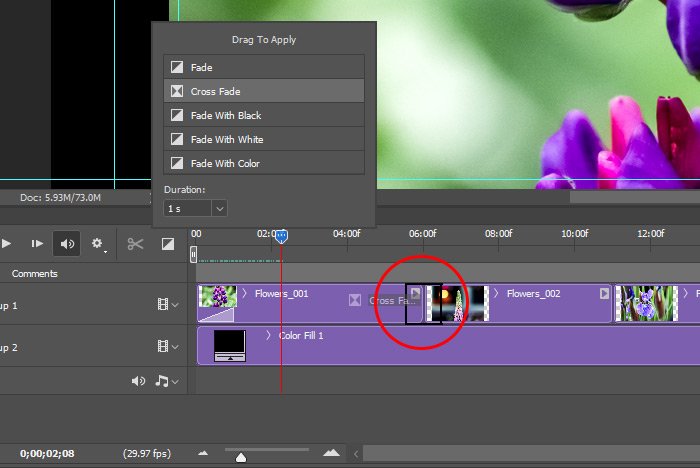
The process of adding cross fades is nearly identical to the one used for adding fades with black. In my case, I’ll need to add a cross fade in between every slide in the slideshow. These fades, together with the ones I previously added should smooth the show out so it’s like butter. So smooth. You’re going to love it.To add the cross fades, I’ll again click on the transitions icon, but this time, when it opens up, I’ll click on the Cross Fade option and drag it down to the spot in between the first and second slide. In the screenshot below, you’ll see the black box that appears in this area. I’ll just drop it there.

I’ll continue following these steps for each slide.
As I add each cross fade, I’ll notice that, like the other fades, they consume some duration of each slide. Since my cross fades are set to one second, they take a half second from the slides themselves. I can either just accept this or I can click on the ends of and the beginnings of each slide and drag in the appropriate directions. Since this is just a demo, I’ll leave it like it is. The slide show is fine the way it stands.
With that, the slide show is completed. That’s all I needed to do today. I’ll export it and upload it to Youtube right now. Take a look.
I hope I clearly explained how to create a slideshow using Adobe Photoshop. If you have any questions about this process, please let me know in the comment section down below. You can also ask questions in the discussion forum as well. Thanks for reading!
