Search

The Complete Guide to Digital Photography

  • Thread starter JodyBuchanan
  • Start date
JodyBuchanan

JodyBuchanan

Member
Joined
May 10, 2021
Messages
138
Reaction Score
0
Points
21
  • #1
I recently purchased a few books on digital photography and photography in general. One is called Digital Photography Complete Course: Learn Everything You Need to Know in 20 Weeks. While I'm already a fairly skilled and avid photographer, there is always something new to learn, especially when it comes to operating digital cameras. Although this type of camera has been around for decades, it's striking how few people truly know how theirs works. Part of the problem lies with the fact that simply setting the camera to auto has the potential for taking absolutely incredible photos. Many cameras these days are sold as kits, which include the camera and lens as well as a few other parts. All too often the buyer attaches the lens to the camera after purchase, sets the camera so it'll do all the work by itself, and then goes out to enjoy themselves while snapping away at scenes. I've known more people than I'd like to admit who have never moved past this stage. Why would they? If an electronic device is offering wonderful results, why in the world would anyone change that? I'll tell you why. Because by taking control of your equipment, the scene, the camera's settings, and how shots are taken, you're opening up an entirely new world of photographic exploration. Auto can never give a person what I like to call purposeful photography. Say you want to take night shots. Can auto do that? How about shots with heavy bokeh in the background? Where's auto for that? Car tail light trails? Auto? Where is it? There are a million different angles you can take when you learn about the power of your camera as well as all that's involved in setting a scene and utilizing your equipment to its fullest. And the best part is, everything you need to learn is so easy. Yes, it's intimidating. I'll grant you that. But that intimidation isn't justified in the least. Pretty much everything you need to learn about cameras, gear, and photography can be taken one small step at a time.

In this forum, I'll share everything I learn in the books I just purchased as well as everything I already know. If there's something you'd like more information on, please don't hesitate to ask. Simply register for an account and jump into the fray. You are very welcome here.

PS - I write daily, so this thread will be growing at a steady rate. If you don't see something you're interested in right now, there's a good chance you'll see it in the future. To receive notifications that tell you this forum has been updated, all you need to do is click the Watch button above.
 
JodyBuchanan

JodyBuchanan

Member
Joined
May 10, 2021
Messages
138
Reaction Score
0
Points
21
  • #2

What Are the Different Types of Cameras?​

This is actually a very good question and it's one that I have rarely thought of. I mean, I know I've owned a few of the various types of cameras, but I don't think I've given much thought or consideration to the functions or best uses of each. Well, that all ends today because what I'd like to do right now is explore the four most common types of cameras we see on the market today. Granted, this all may change in a few years due to the rapid nature of technological advancement, but for now, this is what we've got. The four types of cameras we'll explore in this section are cameraphones, compact cameras, prosumer/bridge cameras, and system cameras. And under the system camera heading, we'll look at both DSLR and mirrorless. This ought to keep us busy for at least a few minutes.

Cameraphone: We all know what this is. Smart phones have offered rather impressive cameras for years now and the internet is chock full of photos that have been taken by these things. And surprisingly enough, many photos taken by this type of camera are rather awesome. I actually just printed out a high resolution 8"x11" photo captured by an iPhone 11. The image file was around 6MB and the print came out very sharp. Just realize that whatever I write today may not be accurate in a year or two. The camera features contained in smart phones are getting better by the day. I recently ordered an inexpensive entry level smart phone for $59.99 which includes a 13MP camera. That's insane.

Let's take a look at the most glaring pros and cons of cameraphones.

Pros: First and foremost, the ease of which we carry these phones around is beyond compare. That's part of the reason we all love these things so much. That and the fact that the phone itself is multi-functional. But really, since you have the phone on you practically at all times anyway, it's exceptionally easy to take photos of pretty much anything and everything. So that's first. Accessibility. Second has to do with what you can do with the photos once you capture them. All of the various available apps allow you to send the photos and share them almost immediately. And today, there are many newer apps that are coming on the market that allow for editing and printing, right from the phone. Again, that's incredible.

Cons: One of the greatest cons of the cameraphone is that it's got a fixed focal length. You can zoom in, but only digitally. Not optically. If you've ever owned a camera that offered digital zoom, you understand the limitations. Also, with some of the lesser quality phone, the cameras are horrible. If you want a good camera that takes stellar photos, you'll certainly need to pay for it.

Compact Camera: If you're into photography at all and if you're over the age of 30, you've most likely owned your share of compact cameras. I can remember my first of this type of camera. I was a kid and it used film. I hated paying for both the film and the processing, so I was happy for the onset of the digital era. No complaints here. Although these cameras have grown up a lot in recent years, they are still rather limited. You wouldn't want to go on a safari with a compact. But for birthday parties in the backyard, anything more might be overkill.

Let's take a look at the pros and cons of the compact camera.

Pros: One of the best features of compact cameras is that they're...yes...compact. This makes them almost as easy to carry around as a smart phone. Also, many of these types of cameras won't set you back very much financially. Of course, if you want to buy yourself the top of the line compact, you'll need to spend much more, but in general, this type of camera is quite affordable. And finally, believe it or not, this type of camera offers some decent optical zoom. My most recent of this type gave me both optical and digital zoom, so as you can imagine, it was quite versatile.

Cons: Unfortunately, there are more cons than pros when it comes to this style of camera. The first is, for the amount of money you sometimes have to pay for one, they're severely lacking in controls. You'd almost want to upgrade to a DSLR or mirrorless. Second, many compact cameras don't offer the entire breadth of shooting modes that DSLRs do. Third, because of their fixed lenses and small maximum aperture sizes, shooting in low light can end up very challenging and finally, most compact cameras don't offer RAW file format. If you're into serious photography and photo printing, this is a problem.

Prosumer/Bridge Camera: This type of camera offers a happy medium between the compact and the DSLR/mirrorless. It's got some decent control, yet doesn't offer nearly the options that the more expensive versions do. This is perfect for those who don't want to spend the big bucks but who want to alter and customize their exposure settings.

Let's take a look at the pros and cons of the prosumer/bridge style of camera.

Pros: As stated above, this type of camera won't set you back nearly as much as a full-fledged DSLR would. This is great for those who might just be starting out as budding photographers. If someone isn't sure about their interest or intentions as they pertain to picture taking, it's best to ease them into the hobby or profession with a beginner style camera. This is where this type shines. These guys offer many exposure settings to allow the owner to learn and enjoy and when compared to the prices you'll find for the more expensive big brothers, you'll come to love them.

Cons: That said, prosumer cameras don't offer the exceptional quality that DLSRs can offer. Yes, they can take great shots, but when it comes to high end shooting, you'll need to upgrade. Also, a huge pitfall with bridge cameras is that their lenses are fixed to the cameras, so you'll be severely limited when it comes time to zoom in or upgrade lenses for creative reasons.

System Camera: Did you know that DSLR and mirrorless cameras are called system cameras? I didn't. Live and learn. The system camera is the big boy of the bunch. It's the camera that the pros use. They can range from inexpensive to more than you or I can afford. This is good and bad because while we can get in there and learn all there is to learn about wonderful picture taking, we'll likely never get the chance to use those incredibly awesome cameras. I guess that's not too bad. We should be thankful for what there is.

Let's take a look at a sampling of the pros and cons of the system camera.

Pros: Hands down, you won't find better potential quality images coming from any other type of camera than the DSLR or the mirrorless. These are the ones we all strive to own if we're serious about photography. As far as customizing the camera's display and functionality goes, these cameras are spot on as well. While there may be limited customization opportunity with the less expensive styles of camera, this type of thing is much more available here. And on top of that, we can add pretty much any size data card to hold our photos. The greatest and most valuable feature of these camera is though the fact that we can do so much with them. We can change lenses, add equipment, get creative with how we attach things to the camera and so on. The options are nearly limitless and so is the market for them. All types of gear and equipment for this style of camera is available everywhere. Saying this style of camera is versatile is an understatement.

Cons: While I do love my DSLR camera, I will say three negative things about it. First, it can be tough to learn how to use. There are a lot of options available, and all of them can be overwhelming. Especially for the beginner. Next, the more features and gear your camera can accommodate, the larger and heavier it becomes. This might not seem like a big deal until you carry yours around all day. Finally, the cost of some of these camera can be prohibitive for some. Yes, they can get pricey.

In this thread, I'll be focusing primarily on two types of camera and leaning heavily on one. The two types are both system cameras. They're DSLR and mirrorless. If you've been scouring Amazon or other camera sellers for your next camera, I'm sure you've bumped into both of these. And I'm sure you've also come across some wild debate regarding which is better in the photography forums. If you haven't yet, you likely will. While I'm not here to argue which type of camera is better, I am here to discuss just a few pros and cons of each. But first, let's talk about what the primary difference between a DSLR and a mirrorless camera is.

Simply put, a DSLR camera contains an internal mirror and a mirrorless camera doesn't. When it comes to DSLR cameras, the internal mirror takes the scene that's showing through the lens and bounces that scene up to the viewfinder so the photographer can see what's going on. With mirrorless cameras, there is no mirror. The scene is viewed digitally and that image, what the sensor sees, is projected to the viewfinder. Many photographers have tended to stick with the optical version in their DSLR, but as technology progresses, the electronic version is catching up in quality and features. As a matter of fact, the technology has gotten so good, some very famous photographers have shelved their DSLR for its mirrorless counterpart.

DSLR Camera

Let's talk about some of the pros and cons of the DSLR camera.

Pros: First off, if you're a decades long photographer and if you've got tons of gear from your film camera days, you'll love DSLR shooting. There's a good chance many of your lenses will fit your new digital camera. On top of that, you'll experience faster focusing than with a mirrorless camera and a longer battery life to boot. Because the scene through the viewfinder is optically produced, there's no need for an additional draw on the battery.

Cons: You'll pay a price for these things though and that price will come in the form of a larger, heavier camera. Both the bodies and lenses of DSLR cameras tend to be larger and heavier than the mirrorless versions. Also, if you'd like to see what the camera's sensor sees (exposure, aperture, etc...), you'll need to switch over to live view mode to view the scene on the back of your camera.

Mirrorless Camera

Now, let's take a look at some of the pros and cons of mirrorless cameras.

Pros: Mirrorless cameras have committed themselves entirely to digital photography. Because of this, the lenses you'll find available have been engineered and optimized specifically for digital cameras. There's no optical anywhere in the picture. No pun intended. On top of that, you'll find that the equipment you'll use is much more compact and lightweight. That, coupled with a faster frame rate (the number of pictures you can potentially take per second), you might just want to do your research on the latest in availability of mirrorless cameras. People are talking about these things.

Cons: As of right now, there are only two primary drawbacks of mirrorless cameras and they're likely to disappear soon. The first is that batteries for these types of cameras don't last very long. I'm sure that'll change with technology though. The second is that not nearly as many lenses are available for mirrorless cameras than are available for DSLRs. We need to take the secondary market into account here as well. Again, with time and popularity, this will change as well, so take these cons with a grain of salt.

Okay, well, that's about it for this post. I hope I covered many of the differences, pros, and cons of a few different types of cameras for you. If you've got any questions, please don't hesitate to ask. Thanks!
 
JodyBuchanan

JodyBuchanan

Member
Joined
May 10, 2021
Messages
138
Reaction Score
0
Points
21
  • #3

DSLR vs. Mirrorless Cameras​

I've been doing a bit of reading on the differences between these two types of cameras and I thought I'd discuss them just a tad bit more here. I don't want to beat a dead horse because this type of information is available plentifully on the internet, but I do want to be as thorough as possible.

What I've found in regards to the pros and cons of these two cameras somewhat coincide with what I shared above, but a few new factors have been introduced. Take a read below to learn more.

DSLR Camera Advantages

- Longer running battery time.
- Even when the camera is off, you can still see through the viewfinder. And what you see is exactly what the lens sees.
- The brightness you see through the viewfinder corresponds with the brightness in your actual surroundings.
- A huge selection of lenses for both cropped and full sensor DSLRs.

Mirrorless Camera Advantages

- Mechanically speaking, these cameras are far less complex than their DSLR counterparts.
- These camera are much lighter than DSLRs, which might actually become a hindrance due to the possibility of slightly shaking the camera when trying to keep it steady.
- What you see through the viewfinder is actually what will be recorded on the memory card.
- While taking a photo, you can continue to see your scene through the viewfinder.

There's got to be more, but these are the biggies. So really, it all depends on what matters to you. Personally, I don't need to see a scene through an optical viewfinder as I'd much more prefer to see what's going to be the recorded picture. I don't think I've ever looked through my optical viewfinder when my camera was off. Also, I take a lot of photos using live view, so a mirrorless camera would make sense for me. I've actually been looking at mirrorless alternatives for my DSLR, so when it comes time to buy my next body, I may go in that direction.
 
JodyBuchanan

JodyBuchanan

Member
Joined
May 10, 2021
Messages
138
Reaction Score
0
Points
21
  • #4

How Photographs are Recorded​

With most photography books comes a bunch of technical information at the beginning that most of us usually page right past. What's the sense of reading any of it? The diagrams are tough to make out and sometimes what we're looking at doesn't even apply to the type of camera we own. I mean, really. In one of the books I just purchased, there's a section called, How a Camera Sees. When I first glanced at it, I pretty much figured I'd skip it here on the forum. But then, as I read things a bit more closely, I realized how important the information actually was. In fact, what I read described the very basis of photography itself. Because of this, I've decided to leap in head first and make a go at it. Of course, I'll spice things up here so you don't fall asleep. And, as always, if you have any questions, please don't hesitate to ask. I eat this kind of thing for breakfast.

What's a Sensor?

Inside of every digital camera is a small flat piece of material that collects light. This little piece of equipment is what the entire camera is built around. It you ever open your camera up so you can see inside, perhaps by removing the lens and flipping the mirror up, you'll see the sensor. It looks like a blue/green piece of glass. You can sort of think about the sensor as the brain of the camera. It's the thing that all the effort of exposing your images goes into. To be hyper specific, contained within the sensor of a digital camera are millions and millions of tiny little dimples called photosites. These photosites act like a CD or a cassette tape do. They record things and in this case, they record light. Photons to be exact. So basically, inside of your camera is a sensor. The sensor consists of millions of photosites that collect the amount and type of light that are allowed into the camera to land on it. Once the light lands on the sensor, the camera's processor processes it and almost by magic, creates a photograph from it. This is the technical part that most of us don't really need to know. What we do need to know comes next.

How Does Exposure Work?

Now that we know how light is transformed into a photo, let's talk about how to get the right light onto the sensor. For a moment, let's pretend that it's possible to hold a functional camera sensor in your hand, right out in the open. If you aimed that sensor at a scene, do you think it would capture that scene and transform it into a wonderful photo? Probably not. The question is, why not? Well, for one, sensors are pretty sensitive things. Just by holding it out in the daylight for more than a split second, you're likely to expose it to too much light. That would make all of your resulting images nearly pure white. That's not good at all.

Let's think about how a camera works. To take a photo, you (or the camera) set the shutter speed, aperture, and ISO. Why do you do these things? Well, first things first. The shutter speed limits the amount of light that comes through the lens and lands on the sensor. You can control how long the shutter stays open. The longer it stays open, the more exposed an image will be. A long shutter speed will give you two things; first, it'll give you lots of light and second, it'll give you blur if the camera isn't perfectly still. If you set a very fast shutter speed, you'll get much less light and very little blur, if any at all. So that's the shutter speed part of the exposure equation.

Next, we'll discuss aperture. The aperture is basically the hole that's contained within your lens. By making settings on your camera, you can shrink and expand the size of the hole. Obviously, the larger the aperture, the more light that will come through and will hit the sensor. The smaller the hole, the less light. Aperture also controls something else. Something called depth of field. This is the blur that you see in the foreground and background of pictures.

Finally, we have the ISO. This is basically how sensitive your camera's sensor is. You can change this sensitivity very easily. By increasing the ISO number in your camera's settings, you make the sensor more sensitive to light. By lowering the number, you're making is less sensitive.

So really, the fact that light merely hits a sensor is only a small part of the story of how a photo is created. What's much more practical to understand is how you get the right light for your situation on that sensor.

I'll be discussing all of this in much more depth in later posts, but I'm glad I got some of it out. You can use this as a primer.
 
JodyBuchanan

JodyBuchanan

Member
Joined
May 10, 2021
Messages
138
Reaction Score
0
Points
21
  • #5

Parts of a DSLR Camera​

While some sides have very little to offer, such as the left side, others are chock full of goodies, such as the rear of the physical camera itself as well as what's displayed on the LCD screen. So, if you're interested in learning what all those little buttons, mirrors, and other little doodads do, read on!

Camera Front

Okay, let's get going. I'll start with the front of my Canon Rebel T6i because that's a very important part of the camera. There are 10 parts of the front that I'd like to bring to your attention. Some of them are obvious, while others may make you say, "Oh, that's what that's for?" Take a look at the following photo. I've numbered what I'll discuss below.
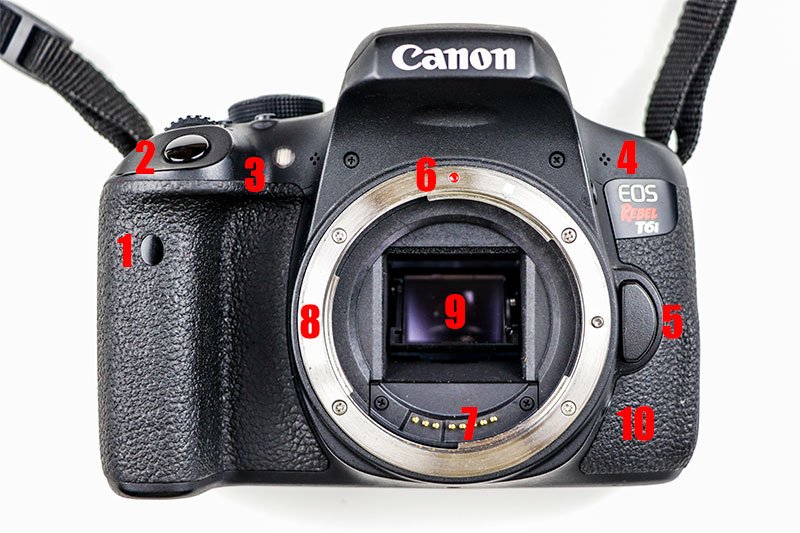
canon-rebel-t6i-front.jpg

1. Infrared Shutter Release Sensor: This is the "eye" that allows you to use a remote device to take a photograph. It's sort of like what's in a VCR or something else that you can access with a remote control.

2. Shutter Button: Press this to take your photo. This button actually serves two purposes; push it half way down and you can focus your scene with your camera's autofocus function and push it all the way down to activate your camera's shutter so you can capture your image.

3. Self Timer Light/Red Eye Reduction: If you set your camera's timer, this light will blink, indicating how much time you've got left before the photo is taken. If you have your red eye reduction function set, this light will illuminate when you're using your camera's flash.

4. Microphone: These little holes are your camera's microphone. On the T6i, they're on both sides of the lens. Oftentimes, they're only on one side. Depending on what type of camera you own, your microphone may be either monaural or stereo.

5. Lens Release Button: When you attach your lens to your camera and turn it, you'll hear a click that indicates that the lens is fully secured to the camera's body. That click is the lens lock pin. To disengage the lens from the camera, that pin needs to be pushed out of the way. That's what this button does. To remove your lens from your camera, simply push this button in and then twist the lens.

6. Lens Mount Index: When attaching your lens to your camera body, you'll need to align the colored index on both parts. If you've got an EF lens, align the red indexes and twist and if you've got an EF-S lens, align the white indexes and twist.

7. Lens Electronic Contacts: When you want to use your camera's auto-focus or aperture settings, you'll need electric current to flow from the body of the camera to the lens. These contacts make that possible.

8. Lens Mount: This aluminum ring is what you place your lens up against and twist. Before doing that though, be sure to align the indexes correctly.

9. Reflex Mirror: When you remove the lens from a mirrorless camera, you won't see this part. This is what makes a DSLR a DSLR. Basically, this mirror takes the light that travels through the lens and bounces it up into the optical viewfinder so you can see what the camera sees. This mirror sits right in front of the shutter and the camera's sensor and when you push the shutter button, the mirror flips up out of the way so you can capture your image.

10. Depth of Field Preview Button: When you press this button while looking through the optical viewfinder, the lens' aperture will close to the position you have it set to. This will allow you to view the scene with the same lighting and blur that will ultimately result in your photograph.

Camera Back

The back of the camera is where things begin to get interesting. It contains lots of buttons and other goodies. You can consider this the central hub of the camera, with the top coming in a strong second.

Take a look at the nice photo I took of the Canon T6i. Not bad, if I don't say so myself.
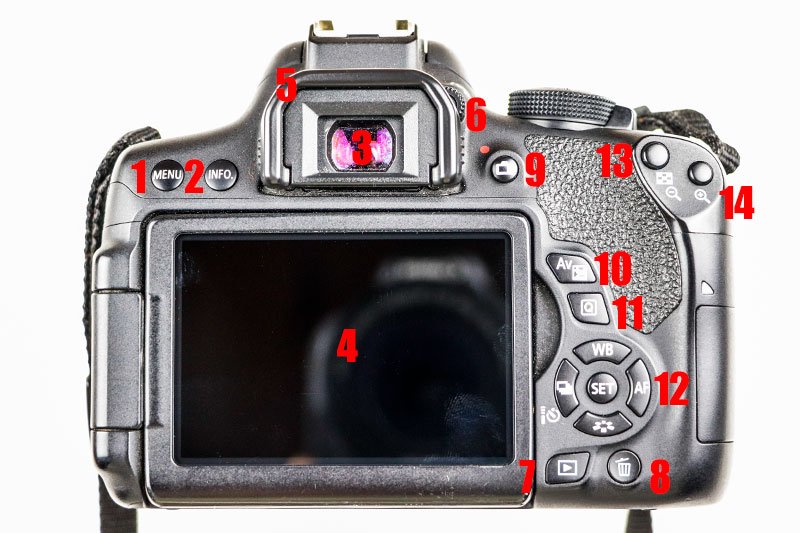
canon-rebel-t6i-back.jpg

1. Menu Button: Press this button to access many of the options and settings available to your camera.

2. Info Button: Press this button to display either the electronic level (if equipped) if in viewfinder mode or the rear LCD options if in live view mode.

3. Optical Viewfinder Eyepiece: Look through this tiny window while in viewfinder mode. The viewfinder sees what's in reality, not what the camera's sensor sees. This is a wonderful option for tracking subjects because it keeps the scene as bright as possible, not matter the camera's settings. The light and scene that travels through the lens and that bounces off the internal mirror is what you'll see when looking through the viewfinder.

4. LCD Monitor: When activated, you may view your scene on this screen. It's also responsible for displaying many settings and playback of both photos and video. When in video mode, this is the screen you'll be looking at.

5. Eyecup: This piece is oftentimes constructed of soft rubber and it intended to shield the photographer's eye from external light.

6. Dioptric Adjustment Knob: Some people call this the diopter. This is the device that adjusts the clarify of the scene when someone looks through the viewfinder. If you wear glasses and can't seem to focus your camera in this mode, you may want to try adjusting the diopter.

7. Playback Button: Press this button to review any photos or video you've taken.

8. Delete Button (Trash Can): While reviewing your images or videos, you may press this button to delete any you don't want.

9. Live View/Movie Shooting Mode: When you turn on your camera, it'll most likely be in viewfinder mode. To change to live view shooting mode, press this button. If you press it again, your camera will switch back to viewfinder mode. If you're in movie mode, pressing this button will begin recording. Press it again to stop recording.

10. Av +/- Button: This button controls the exposure compensation feature. On the T6i, press and hold this button while turning the top dial to make your scene either brighter or darker.

11. Q Button: The real name of this button is Quick Control. When pressed, it allows you to quickly access many of the camera's functions and settings right on the rear LCD screen. This works in both viewfinder mode and live view mode.

12. Multi-Controller/Set Buttons: These buttons control many of the camera's functions as well as aid in navigating the camera's menus.

13. Focus Point Selection Button: Press this to switch between auto-focus modes. This button also serves as a custom back button auto-focus control. And finally, it also returns the camera to normal view after zooming into a scene and while reviewing photos (next).

14. Zoom Button: When focusing on a scene in live view mode, you may press this button to enlarge, or zoom, into the scene. Also, when reviewing photographs after they've been taken, you may press this button to enlarge them to view them more closely.

Camera Top

The top of the camera is the second home base. This is where many different functions, knobs, dials, and buttons live. You can't do much with a camera without learning what the top of it is in charge of, so let's dive right in.
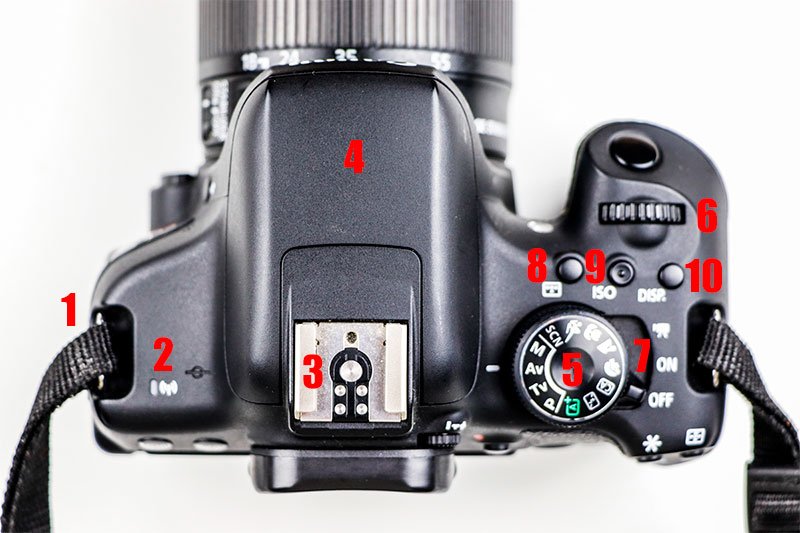
canon-t6i-camera-top.jpg

1. Strap Mount: This is a secure metal mount that you can slide the end of your camera strap through. You'll need the remaining parts of your strap to make it functional, but this (and the same on the other side of the camera) is where you attach your strap.

2. Wi-fi Lamp: When you're using your camera's built in wi-fi feature, this light will illuminate.

3. Hot Shoe: This serves a few different purposes. Basically, this is a mount for accessories you may want to use with your camera. Many photographers use the hot shoe to hold an external flash, but I primarily use it to mount my external microphone.

4. Built-In Flash: If you use flash, this is a handy built-in option. This flash also helps when trying to auto-focus in the dark. They call it the auto-focus beam.

5. Mode Dial: By turning this dial, you may select which mode you'd like to shoot in.

6. Main Dial: This dial serves a few purposes as well. If you're in full manual mode or a semi-manual mode, you can use this dial to adjust your settings. You may also use this dial to flip through your images during playback. It's used frequently to adjust various other settings as well.

7. On/Off/Movie Mode Switch: Use this switch to select whether you want the camera on or off or in movie mode.

8. AF Area Button: Press this button to switch through the various AF (auto-focus) options available to you.

9. ISO Speed Selection Button: Press this button and then use the main dial to choose your desired ISO speed.

10: DISP (Display) Button: When in viewfinder mode, you may press this button to turn off the camera's display on the rear LCD screen. This is handy when shooting in dark environments where the light from the back of the camera is disturbing.

Camera Bottom

The bottom of the camera is pretty boring, but important nonetheless. There are two primary attributes to the bottom. I'll describe them both down below.
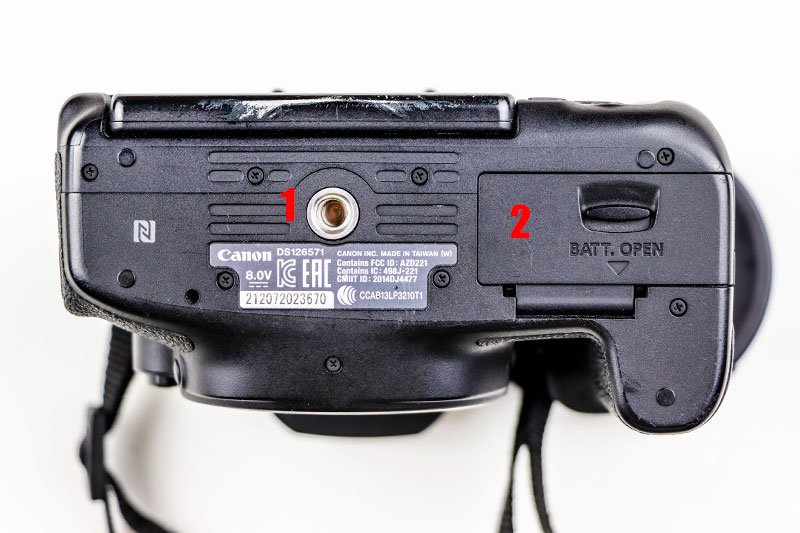
canon-t6i-camera-bottom.jpg

1. Tripod Socket: This is where you screw your tripod screw in. I'll discuss tripods more later. Essentially, a tripod is used to reduce camera shake and to allow the photographer to position the camera while being free to do other things.

2. Battery Compartment: Slide this switch to open the compartment. You may take the battery out or put one in.

Camera Sides

I'll cover both sides of the camera in this post, as they aren't very involved. As you can see though, a common DSLR camera can offer quite the array of features and attributes you need to concern yourself with. The nice thing is that all of these areas are very easy to learn about. There's nothing that a few days of reading and experimentation can't cure. When it comes to photography, there's no area that's just too difficult for someone to become familiar with. There are no multi-level lessons that need to be taught. Everything you need to know is only one or two levels deep.

Let's start with the left side first.
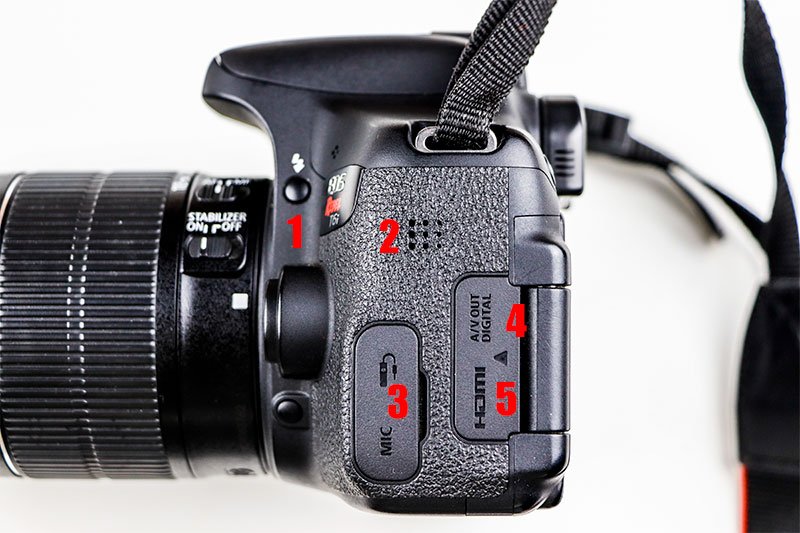
canon-t6i-camera-left-side.jpg

1. Flash Button: Press this and the built in camera flash will pop up on top of the camera.

2. Speaker: This is where the audio will come out as you review movies you've taken.

3. External Microphone Jack: If using an external mic, flip this cover open and plug it into the jack.

4. A/V Out Digital Jack: Use this jack to play the contents of your camera on a device capable of playing it. On later cameras, this is usually a USB connector.

5. HDMI Jack: The same as above. It allows you to connect the camera to a device (TV, home theater system) that is capable of displaying the contents of the camera.

Now let's move on to the right side of the camera.
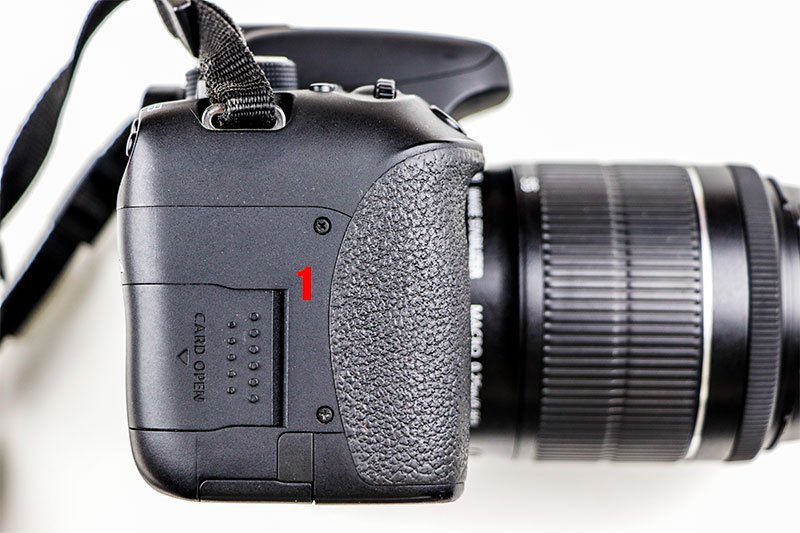
canon-t6i-camera-right-side.jpg

1. Memory Card Cover: Slide this cover over to the side and either add or remove a memory card.
 
JodyBuchanan

JodyBuchanan

Member
Joined
May 10, 2021
Messages
138
Reaction Score
0
Points
21
  • #6

Tips for Shooting with a DSLR or Mirrorless Camera​

The longer you take photos, the better you'll get at it. That's pretty obvious. It's really like anything else. In the beginning, you need to be cognizant of all you do, from how you choose your scene to which settings you use on your camera to how you take your photos. All of these things may be overwhelming in the beginning, but trust me, the more you've got your camera in your hands, the less you'll think about what you're doing. You'll just do it and you'll certainly become better at it.

In this post, I'd like to discuss two things. First, I'll talk about some dos and don'ts when it comes to holding your camera. After that, I'll talk about the differences, goods, and bads of both viewfinders and the rear LCD screen. While all of this may be common sense to many of you, this information can be invaluable for the beginner.

Tips for Holding Your Camera

I'm going to go to the extreme here. Let's say you hold your camera perfectly still and snap a photo. Chances are, if your settings are correct, the result will be a good one. Now let's say you swing your camera around by a rope and somehow press the shutter button. Chances are, no matter your settings, your image won't come out good at all. The camera will be moving too much to resist capturing tons of blur. Also, the position of the camera surely can't be good. After all, it'll be swinging from a rope. Who knows what it'll take a picture of. The reason I wanted to go to extremes was to demonstrate that while some practices are good, some are very bad. Realistically, most are in between. We rarely hold our camera completely still, but we can strive to. We rarely swing our camera from a rope resulting in extreme movement, but we can strive to avoid that movement. It's all about learning some tried and true practices that have aided talented photographers for generations.

One of the things we as photographers try to avoid is inadvertent camera shake. Camera shake has the tendency to negatively affect the quality of a resulting image. Simply put, it causes blur and it can ruin a photo. So in this section, I'll cover some good practices as well as bad.

How to Avoid Camera Shake

1. Some people hold their camera with only one hand. Some people hold their camera body with both hands. If you've got a heavy camera body and a big ol' lens, you want to spread out the support as wide as possible. This can take the form of holding the right side of your camera (shutter button side) with your right hand (you're going to need that hand over there to press the shutter button) and using your left hand as a support underneath your lens. Many times photographers forget about supporting the lens, but it can be a great approach for keeping a camera steady.

2. When you photograph something, be sure to hold your camera firmly. Don't willy nilly hold it up and expect to take a great shot.

3. The closer your camera is to your face, the more steady it will be, so if given the chance, view your scene through your viewfinder as opposed to the rear LCD screen.

4. Use your elbows as supports. While peering through your viewfinder, keep both elbows on your chest and stomach area.

5. Your stance and form is just as important as anything else. Keep your feet shoulder width apart and stand strong. Keep your body stable and relaxed. You don't want to become tired from any one position. That tiredness will end up creating shake.

6. Press your shutter button between breaths. Take a big breath, release it, and then take your shot when all the air is exhaled. Just don't forget to breath again.

Things That Cause Camera Shake

1. Have you ever tried to take a photo while lugging around a big swinging bag or backpack? If so, you know what it can do to the quality of an image. To take a great photo, free yourself of things that might drag you down.

2. If you lift your elbows so they move freely, it's going to be tough to hold a camera steady. Don't keep your elbows out like chicken wings. Keep them tucked in tight.

3. Try this: hold your camera six inches away from your face to get a feel for how steady it is. Then, bring the camera to your face so it's touching your skin and notice the difference. You'll find it's steadier next to your face. So don't hold the camera so far away. Bring it in close. Your body is much more steady than a floating camera is.

4. When pressing the shutter button, if you bang down on it with your finger, you may move your camera slightly, causing shake and blur. When pressing the shutter button, be careful. Do it gently.

5. I mentioned this above, but I'll do so again. A lonely lens is a shaky lens. Don't leave your camera's lens unsupported.

6. The more off your footing you are, the more likely camera shake will enter your scene. Don't lean or hang over something when trying to get your shot. Besides being potentially dangerous, that unsteadiness is just no good.

A Discussion on Viewfinders & LCD Screens

There are a few great benefits to viewing your scene through your camera's viewfinder. First, as mentioned above, having your camera so close to your face can keep the camera steady. Beyond that, viewing your scene through that little hole can keep distractions way down and your focus way up. And when I say focus, I mean your attention to the scene. The thing is, there are also advantages to using your camera's live view mode. First, you can zoom way in to make sure you're lens is focusing properly on the LCD screen. Also, you can easily see your camera's white balance on that screen as well. If you're using a mirrorless camera, you can see your white balance through the viewfinder, so ignore that one if you're in that camp. What I like to do if I'm taking landscape or still shots is to use a tripod to get the best of both worlds. Steadiness, attention to detail, zoomed in focus, and an accurate white balance. I'll use the rear LCD screen for this.

Taking advantage of the big LCD screen for snapping awesome photos is very tempting. The screen is right there and everything you need is on it. That's why these screen have become so popular. If you do decide to use yours, just be sure to follow a few simple rules. First, take the live view in as a whole. Don't just look at the middle of it and snap away. Turn off all the distracting settings that show on it if need be. if the brightness needs to be set, then do that when you're not in the field. Check over your camera's settings while relaxing at home. That way, you'll focus your attention where it's needed in the field.

When it comes to taking your photograph, don't rely on what you see exposure-wise on the screen. Trust your settings over your visuals. There are all different types of lighting in the various settings you'll find yourself in. They can be deceiving. And when it comes to focusing, if taking still shots, use that zoom feature to make absolutely certain that you're focusing on the correct object or area. And most of all, if you want to avoid draining your camera's battery, keep that display dark as much as possible. It likes to use a lot of energy. On Canon cameras, the DISP button on the back is used just for this.

Well, that's all I've got for today. I hope this has helped you and if you've got any tips of your own, please feel free to share them here.
 
JodyBuchanan

JodyBuchanan

Member
Joined
May 10, 2021
Messages
138
Reaction Score
0
Points
21
  • #7

Common & Very Helpful Photography Accessories​

Obviously, getting hold of a nice camera and lens are the very first things you'll need for your budding photography career, but beyond that, there are a few items that may make your world a brighter place. The thing is, you'll only need these accessories if you find that they may help with the quality of your photos or the ease of your image capturing. Far too often we find ourselves browsing around Amazon, B&H Photo, or some other photography website, credit card in hand, getting sucked into the latest and greatest gadgets that we may or may not need. When it comes to accessories, my advice is this: if you're very active in the field and are finding that one additional tool would help you substantially, then go for it. Don't just buy something and hope that you'll use it one day. Chances are, you won't. Camera accessories are a need to own kind of thing.

Okay, with that said, let's get to the top three most popular accessories out there. I'll first tell you what they are and then I'll tell you how they can benefit you while taking photos.

Tripod: This is likely the very first thing anyone thinks of when they ponder photography. Well, besides the camera itself. Tripods come to mind for good reason; they're critical in some instances. I can think of two right off the top of my head. First, if you want to do any sort of self video or get yourself in a picture when you're alone, it's a heck of a lot easier to do this with a tripod then without. Second, tripods are instrumental when attempting to keep camera shake at bay. And this includes using one while doing long exposure shots, such as those popular silky smooth waterfall photos.

When purchasing a tripod, be sure to size it properly to your camera. For a regular DSLR camera, a normal tripod should cost around $70-$140. I recently purchase an excellent Vanguard Alta tripod (https://amzn.to/3q51MAf) on Amazon for around $125. It's the nicest tripod I've ever owned and it works perfectly with my Canon Rebel T7i. Of course, these pieces of equipment can come a lot cheaper and a lot more expensive, but keep your eye towards the middle of the pack. There's lot of good stuff out there.

We all know that tripods come with extendible legs and neck, but one area we might not be too familiar with are the two different types of heads. The two primary styles of tripod heads are the three-way and the ball. Like every other thing that has to do with photography, there are pros and cons to each style. As for the three-way head, they're great because you can limit your camera's movement to one axis at a time. And on top of that, they're very stable. There's little chance your camera will swing around and crash into the tripod neck. Also, these are the less expensive of the two types of heads. The downside of these are that they're sort of bulky. The one I used to own came with two large twisting handles that got in the way of everything, especially the bag I used to store it in. I still loved it though.

When it comes to ball heads, this is what the pros typically use. You'll see them raving about them online. They're fairly compact, light, and they've got a great strength to weight ratio, meaning, they can securely hold up some pretty heavy cameras. The downside to them is if you're not careful when you're adjusting them, your camera can quickly flop down and crash into a tripod leg. It's also a challenge to make fine adjustments. Otherwise, they're great. Actually, both options are great. Try before you buy is my motto. Go to a real life camera store and play around with the different types to see which one you like better.

Remote Shutter Release: This is probably the second most popular camera accessory on the market. The best part about this one is that it only cost a few dollars. Remote releases are simply shutter buttons that are on the end of a cord. The reason most people buy these things is to keep their fingers and hands from touching the camera. Again, touching the camera while taking a photo can cause shake, which results in blurry images. The last one of these released I've owned was called a SMDV Remote Shutter Release Cable (https://amzn.to/2K16yQ7) and it only cost me around $10. These are great items to have around, especially when taking those crystal clear waterfall photos.

Lens Filters: The final accessory I'd like to discuss is the lens filter. These are basically semi-clear glass or plastic pieces that you place over the end of your lens to change the look of the photo you're taking or the video you're capturing. Lens filters are used for many reasons: some reduce the amount of light that's allowed through the lens, some polarize that light, some warm or cool the light. All sorts of things. The big decision you need to make when buying a lens filter kit is whether you want the screw in type or the slide in type. I used to own the screw in type and they were good. The only problem was, I needed an entirely new kit for every sized lens I owned. That got annoying after a while. With the flat plate filter holder style though, the kit comes with many adapters that fit just about every size lens there is. And strangely enough, both of these types of kits are relatively inexpensive. I recently purchased the Neewer Square Lens Filter and Accessory Kit (https://amzn.to/38u7BkU) for under $25. It's the slide in flat plate type and it's pretty great. I'll tell you though, the primary filter I add to my camera's lens is the neutral density filter. It's been said that these filters are like sunglasses for your camera. They reduce the amount of light that travels through the lens. When I take long exposure shots, it's easy to over expose my photos. That's what this type of filter is mean to fix.

So there you have it. After photographing for a while, start taking an interest in the various accessories that you have available. One just might make your life easier.
 
JodyBuchanan

JodyBuchanan

Member
Joined
May 10, 2021
Messages
138
Reaction Score
0
Points
21
  • #8

Beginning to Use Your Camera​

The time has come to finally pick your camera up for some real life photography. Enough reading and learning. Let's get to it. Oh yeah, but before we do, let's talk about some important topics. I'll break them down below to make everything easier to get through. Basically, I'd like to discuss how to go about shooting in different environments and different subjects. There's a lot to know here. You'd eventually figure this all out through experience, but we can certainly hasten the process.

How Often to Use Your Camera

First, I'd like to talk about the frequency of using your camera. For many of us, buying a DSLR or mirrorless is a big investment. The last thing we want to do is to damage what we just spent so much money on. I can remember my very first DSLR. It was a Canon T3i and I loved it. I had my favorite kit lens in the world attached to it - the Canon 18-135mm. The thing was, back in the beginning, I was terrified to bring the camera out of the house, lest it get dirty and damaged. Over time though, I realized that these types of cameras are actually tougher than I had ever imagined and by following some common sense practices, it was entirely possible to keep the camera clean and safe. Through the years, I've become much less terrified and I now bring my camera almost everywhere I go. So, my point is, if you're a new photographer and if you own an expensive camera, go outside and start using it. Don't worry about damaging it. Simply keep it firmly in your grasp and keep it clean and you should be fine. One of the things that's very important is to turn your investment into an extension of yourself. You want to become extremely comfortable bringing your camera with you almost everywhere you go.

Photographing Animals

One of the primary drivers of people purchasing new cameras and getting into the hobby is to go wildlife shooting. We've all seen the photos online and there's nothing more we want than to join the ranks of those who have gotten tremendous shots of soaring eagles and galloping deer. Those types of photographs are truly inspirational. The thing is, that type of photography is challenging. Wild animals don't just stand around waiting for people to take pictures of them. Unless...

Here's a tip for you. To gain the practice you need, begin with taking photos of household pets. Doing this will get you used to learning how your camera operates and which settings work best under which conditions. Try taking photos of your dog or cat at night, during the day, and everything in between. An even better tip though is to visit your local zoo. Remember when I said that animals don't just stand around waiting to be photographed? Well, at the zoo they do. You'd be surprised at how many professional photographers have gotten their "wildlife" photos from some zoo they've visited. So while we're all sitting here looking at their incredible shots wondering how they did what the did, they merely went to the zoo and pulled off some excellent shots of the closest giraffe. Sort of like cheating, but that's what zoos are for.

When you do venture outdoors for some real wildlife photography, there are a few rules to follow. First, you want to keep a very low profile. Make sure you're not out there in the woods during hunting season though. You may get shot, but not by a camera. Wear clothing that blends in with your environment and walk around very quietly. Be prepared to spend a good amount of time sitting very still. Sometimes you can't find an animal. It needs to find you. If you've got a blind, use it. A piece of plywood with a hole cut in it? Hide behind it. A small cabin? Try sitting inside and waiting. It might be worth the wait.

The primary rule with photographing wild animals is that you should always remember their welfare. No photo is worth placing an animal in harm's way. You don't want to set up situations where you'll stress the animal in any way either. That's a mean spirited and selfish thing to do, besides being flat out stupid. And beyond that, you want to watch out for your own safety too. Don't try hanging over cliffs to grab a shot of an eagle's nest to chasing a deer down a slippery hill. Not only will you likely fall down that cliff, you'll end up damaging your camera in the process.

Photographing Landscapes

The number one issue folks face when heading out to do landscape photography is that they don't dress for the occasion. What the temperature is down on the ground might not be what it is up in the mountains. So make sure to study the weather forecast very carefully. Also, while the skies may be clear down on the ground, they may be cloudy and either snowing or raining up in those hills. Don't waste a trip if that's not what you're after. Again, check the weather.

Another issue is that people oftentimes don't bring enough (or any) food and water with them when they head out on excursions such as this. Pack a lunch, stick a few protein bars in your bag, and bring along a bottle of water. Photography outings can certainly last longer than one expects and one needs to be prepared.

If you plan on hiking through the woods to make your way to a scenic spot, make sure the land you're hiking through is open to the public. If it isn't, you'll be trespassing and you may get yourself arrested. There are many apps these days that can tell you exactly who owns the land, so take advantage of them. It's easy enough to get landowner's permission and many of them are fairly good natured, so just ask.

I really shouldn't have to say this again, but don't go hanging over a cliff to get that "shot." There are far too many stories of people plummeting to their deaths doing exactly that. Stand back and take your photos. Enjoy yourself, but by all means, don't go anywhere near the edge of that cliff. Gravity is strong and tough to fight.

And finally, respect the land upon which you walk or hike. Don't break branches, mess with stone walls, or leave a mess. If you were to do any of these things, there's a good chance you'll be met with a "NO TRESPASSING" sign the next time you show up.

Dealing With Extreme Weather

I mentioned above that cameras are pretty tough and that you should plan on getting used to having yours with you. That's true, but I'll also tell you that these little devices certainly have their limitations. If you want your camera to last, learn what they can handle and what they can't. And realize that many times, it's not something blunt that can do a camera in. Oftentimes, it's facing the same detrimental conditions repeatedly. I'll discuss some of them below.

Heat & Dry Conditions: Don't ever let your camera sit out in the hot sun. That's a surefire way to warp or bend some important piece of it. Always keep it in the shade and a relatively normal temperature. Treat it like the small computer it is. Also, if you're in dry heat and it's windy, be very careful when changing your lens. When the lens is off your camera, the face is wide open, meaning that dirt and dust that's flying around can easily find its way into and on the mirror and sensor, not to mention the countless tiny little crevices that are also on the inside.

Freezing Conditions: Did you know that the colder a camera battery is, the faster it loses its charge? It's true, so when photographing in the cold weather, make sure you bring along a spare battery. Also, I can tell you this from experience - the first thing to freeze on your body while taking pictures in freezing weather is the tips of your fingers. If you've never experienced this, I can tell you it's no fun. Do some research on mittens and gloves for photographers. You'll save yourself a lot of pain.

Humidity & Temperature Changes: I remember one time when I stored my camera out in my cold car while waiting for an event to take place. When the time came for me to fetch my camera to record the occasion, I was met with a lens that simply wouldn't stop fogging up. Apparently, the room I was in was very humid and since my camera and lens were cold, that humidity condensed on the glass. And probably on the mirror and sensor inside. What's the moral of the story? If you're expecting to capture wonderful photos of a momentous occasion, be sure to acclimate your camera to the conditions in which you'll be photographing. Otherwise, you'll probably end up like me. Stuck with a foggy lens.

Rainy Conditions: Cameras don't like rain, no matter what they say. Water seeps into the camera through tiny cracks and crevices and when the raindrops dry, they leave stains on both the camera and the glass in the lens. So, if you're heading out into the rain, be sure to shield your camera and keep it dry. Use a shelter or an umbrella to take care of this.

Photographing People

Taking pictures of random people is one of the most fun things you can do as a photographer. Besides the fact that you'll get out there to meet some new friends, you'll also potentially take the photos of your life. I can assure you that the effort you make to get candid shots and more composed ones will be worth it. But, before you head out, there are a few considerations you'll need to keep in mind.

First, start off taking pictures of people you know. There's a comfort level that needs to be on both sides of the lens and since those you know are going to fit into this category, it'll make your job easier. On your side of the lens though, surprisingly, you need to feel at ease as well. The first few times you take photos of someone might not go as smoothly as you'd think. You need to get used to the fact that you're dealing with a living being who might offer pushback at times. Get your practice in with friends and family while you can.

Never take photos of someone who doesn't want their picture taken. Always ask before you shoot. You get much further in life by being polite and if a person you meet on the street is on board with what you're doing, that's all the better. Also, if you only follow one rule today, let it be this: never take a picture of a child without the parent's permission. You know why. It's creepy and everyone knows it. Make friends out there on the streets, not enemies. And while you're asking, be sure to say please and thank you. Again, being polite is an adult thing to do. It's important.

If you think about it, asking someone if you can take their photo is really a sales job. You'd like them to be comfortable and to act a certain way. If you've got no personality, everyone involved is going to feel awkward. Be sure to smile and use your charm. You'd be surprised at how far a smile can go. But beyond your smile, make sure you're not the only one with a camera in hand, meaning, if you notice that no other photos are being taken in the area, you may be in a culturally sensitive area. Check with local customs before photographing anything.

If there's one thing you'll learn when engaging in human photography, it's that almost everyone wants to see their photos after they've been taken. Be ready to show them. They may even want you to send some of the pictures to them via email. Write down their email address and make sure you send them after they've been processed. They'll love you for it.

Well, that's it for today. I hope these helpful tips come in handy for you. If you've got any additional tips, please be sure to add them to this thread.
 
JodyBuchanan

JodyBuchanan

Member
Joined
May 10, 2021
Messages
138
Reaction Score
0
Points
21
  • #9

Working with Camera Image Files & Folders​

I've seen it a thousand times. Since the idea of buying and processing film has fallen by the wayside, taking tons and tons of digital photos has become very common. Especially for beginners. Well, I suppose advanced photographers do this as well, but I've seen it occur mostly with beginners. The reason for this is because beginners are learning and because taking as many photos as possible is essentially free after the purchase of the camera. Let me be clear - there's absolutely nothing wrong with filling up your data cards with pictures of anything and everything. Before you do that though, you should learn what's happening behind the scenes and how you can organize your files so they're easy to locate and navigate. That's what I'll be discussing in this post.

JPEG vs. RAW

If you visit the Image Quality settings panel in the Menu area of your camera, you'll find that you've got quite a few options to choose from. You can choose to capture JPEG images of a certain quality, RAW images, or both. Personally, I don't think there's any JPEG photo quality that's worth capturing besides the highest one (large). As for the medium and small options, I don't even know why they're there. Those options are available though, so if you'd like to use them, it's up to you.

The big questions is, should I shoot in JPEG or RAW mode? Well, to answer that question, you'll need to explore your goals. Will you be publishing your photos strictly on the web? Then JPEG is a good option. Will you be printing no larger than 8 1/2" x 11" prints? Then JPEG is a good option. Do you have a RAW conversion piece of software? If not, then JPEG is a good option. Can you even view RAW files on your computer? If not, then JPEG is a good option. Basically, for most situations out there, shooting in the highest quality JPEG option is a great idea. The files are going to generally range from 5MB to 10MB in size, which is great because they won't take up too much room on your data card. Also, when it comes to JPEGs, the camera does a lot of compression and editing work for you. It applies the white balance and color saturation and you won't really need to do a lot after that. Yes, you'll need to edit your images in Adobe Camera Raw, Lightroom, and/or Photoshop, but that's only if they're for something special. Many photos in JPEG mode are great right out of the camera.

I was hooked on RAW images for a long while. For professionals, they're the only option. They're of the highest quality, they've got the most post-processing potential, and they can print very large prints. The problem is, the file sizes if these things are huge. The last I looked, I had a very RAW files that were between 30MB and 50MB sitting in a folder on my computer. For me, a person who prints sporadically and takes photos mainly for the web, that was a waste of hard drive space.

When trying to choose between JPEG and RAW files, just remember this: yes, JPEGS are of a lower quality and data is lost during the compression process that goes on inside the camera. But, most people will likely never see that lower quality because so many of us publish in the web. And I have to say, today's JPEGs look rather marvelous. Also, to edit RAW files, you'll need Adobe Camera Raw, Lightroom, Photoshop, or a similarly capable application. If you're just starting out, this may be problematic. So really, save some space and stick with JPEG files if you're new. As you get more seriously into photography, you may decide to move into RAW mode to take advantage of its superior editing and printing options

File Names & Folders

I'd like to take a quick second here to talk about file names (pictures) and how folders on your camera's data card work. These things can be kind of confusing in the beginning.

When it comes to how your camera names each photo you take, it generally goes like this: there will be up to a four digit prefix followed by a consecutive number. My Canon T7i names my images like this: _MG_1234, but I've seen other cameras name their files something like this: IMGP_1234. No matter the convention, it'll be logical. Each image will have a number attached to it and those number will go in order. They'll start at 0001 and go all the way to 9999 and then those numbers will start over again. Just be aware, once you download the files from your camera to your computer, you can name them anything you want. You don't need to stick with your camera's naming convention.

Every photo you take will be stored inside of a folder that's held on your data card. Generally, this folder will have a name with a prefix and then normal characters. As for my T7i, when I attach my camera to my computer and then access the data card, I'll see two primary folders. One is named DCIM and the other MISC. The photos I take are held inside the DCIM folder. When I access that folder, I see another one called 100CANON. If I click into that folder, I'll see the photos I've taken, no matter if they're JPEG or RAW. The images that are held inside this file go from, again, 0001 to 9999. Once that top limit is reached, the camera will automatically create a new folder. In my case, that will be named 101CANON. That will continue as long as I let it. Also be aware that you can create your own folders on your memory card, but you'll need to follow the convention for your own camera.

Storing Photos on Your Computer

The topic of storage is pretty huge, so I'll discuss that in more detail later on. For now, let me say that how you store and organize all of your photos on your computer is of the utmost importance. I suggest you use a file organization application such as Adobe Bridge to keep things in check. Programs like this are instrumental for staying sane while attempting to locate images from long ago.

If you recall from directly above, I said that your camera will name your images with numbers from 0001 to 9999. If you were to transfer all of those images to one folder on your computer, you'd have a big messy pile of files. And once your camera began repeating names, you'd have an even bigger mess because you'd have many duplicates that want to write over one another. A better way is to create a bunch of descriptive folders on your computer by either date or topic and then transfer your images into them. Also, give these downloaded files naming conventions of their own. Adobe Bridge handles all of this with ease. You can even add keywords to each image if you wish. These keywords are used in the internal search of Bridge. And by all means, don't keep every single shot you've ever taken. As soon as you transfer them to your computer, keep the good ones and delete the bad. Keeping too many files will drive you nuts.

Okay, that's all I've got for today. Again, if you have any questions, please ask.
 
JodyBuchanan

JodyBuchanan

Member
Joined
May 10, 2021
Messages
138
Reaction Score
0
Points
21
  • #10

Photo Editing for Photographers​

There will be dozens and dozens of how-to posts in this forum coming up shortly, but for now, I'd like to touch upon some generalities when it comes to touching up photos in post-production software. What I'll discuss below will be the primary areas you'll need to look at in your photos. While it's critical that you take every measure to make sure your photo is taken correctly with your camera, there may be times when fixing a few flaws later on may be necessary. This isn't uncommon. Actually, every single photo I post online or use for print has been edited by me in some way, shape, or form. I've never seen a perfect photo come straight from my camera. Something always needs adjusting. If you've been active with photography for any stretch of time, I'm sure you know what I mean.

If you're brand new to photography, let me just tell you that the application you want to use for your editing is Adobe Photoshop. With their bundle (at least the one I have) comes Bridge, Camera Raw, Photoshop, and Lightroom. I prefer to use the Bridge, Camera Raw, Photoshop workflow, but those who use Lightroom as an all around application seem happy enough. Obviously, there are tons of other programs that handle image editing out there on the market and many of them are excellent choices, but Photoshop is the industry standard. It's what the pros use, so if you're planning on getting serious with your photography, it might make sense to get used to and learn the gold standard application for photo editing. Also, when editing your photos, it's a heck of a lot easier to get things done on a computer. I know there are many mobile app versions of these editing tools, but it's really not practical to be editing an image on a phone or a tablet.

Down below, I'll discuss a few different ailments that you'll likely see regarding your photographs. If you suspect that some or all of your photos are affected by some of these things, don't worry. It's likely not your fault. Seasoned and professional photographers edit their images all day long. It's just what's necessary. While getting out there and capturing stellar photos is one thing, sitting down behind a computer and making what already looks great even better is another. Get used to the process because it comes with the job.

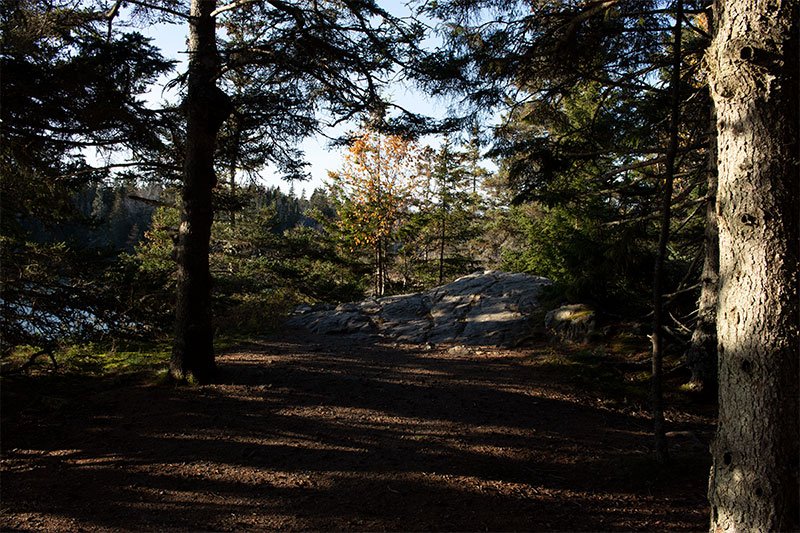
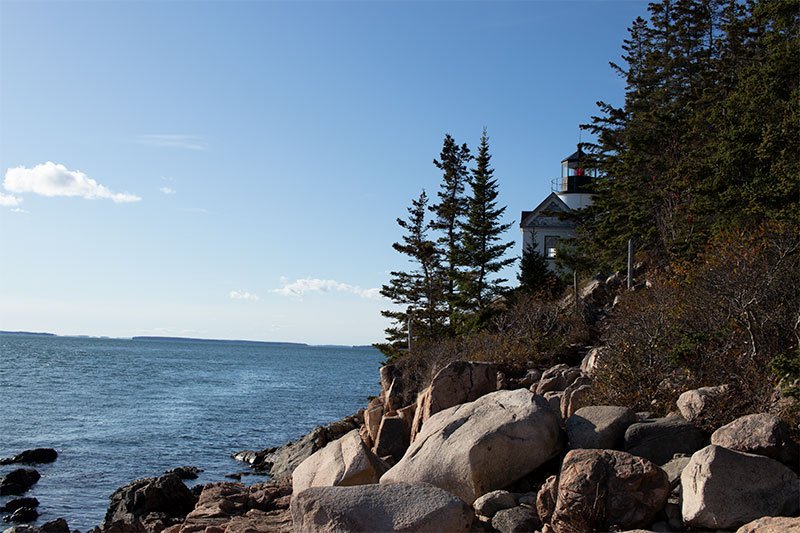
Before I begin, let me give you an example of what I'm referring to when I say that some already good looking images need touching up. Take a look at this picture that's straight out of my camera.

maine-hiking-trail-before.jpg

That's pretty decent, but unfortunately, my camera's dynamic range (range of lighting that can be seen and recorded by the camera) isn't as wide as my eye's. This is why we oftentimes see a scene in person that looks really great, but not so great when we later review the photo we've taken of it.

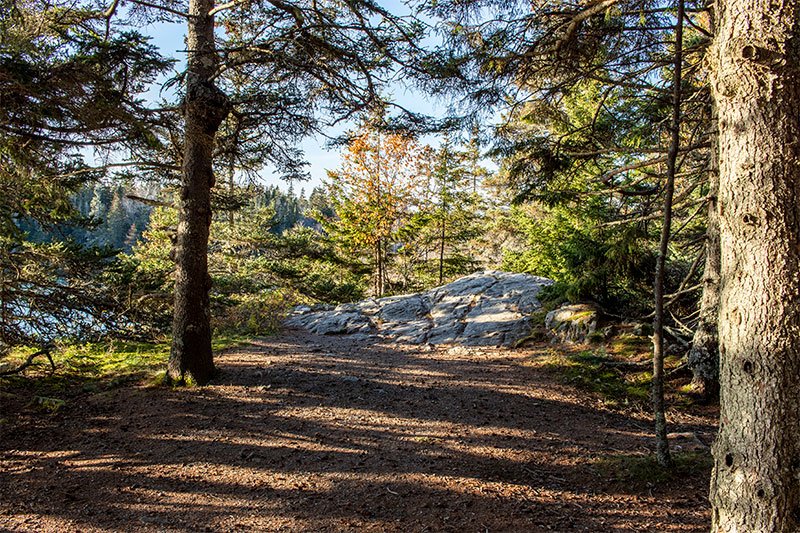
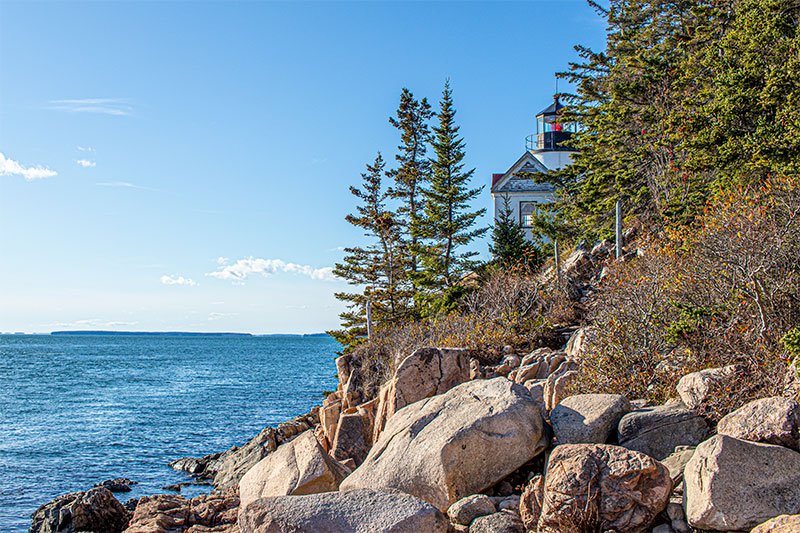
Let's take a look at the same photo after about 30 seconds of editing in Camera Raw and Photoshop.

maine-hiking-trail-after.jpg

Not bad, right?

Okay, let's take a look at what may have been affecting this image.

Flat Colors: If a photo looks lifeless or washed out, two primary factors are affecting it. First is a lack of color saturation. This is an easy fix in pretty much any editing program. All you need to do is increase the photograph's saturation by a marginal amount. In Camera Raw and Lightroom, there's a setting called Vibrance that's really great to use. This is lighter version of Saturation that many editors enjoy because oftentimes using the Saturation slider is too much. I actually can't remember the last time I adjusted the saturation. It's always the vibrance I'm after.

The second adjustment that can be made to bring out some vivid colors is to increase the contrast. In all editing programs there's a Contrast slider. Simply push this to the right to accentuate the different between the light and dark pixels in your image.

Noise/Grain: There are a few different reasons your camera will create noise and I'll get into them later. Let's just say for now that some light noise can be corrected rather easily, but heavy noise gets difficult to correct. It's best to learn how your camera works and about the photography triangle and light before you even take your photos. the better your photos start out, the easier and better looking they end up after post-processing.

Chromatic Aberration/Color Fringing/Dispersion: The more expensive and quality your lens is, the less you'll be affected by this. Basically, you'll see aberration as very fine green, blue, and red edges around objects in your photographs. These are very common, yet many people never notice them. It's not until they zoom way into an image that these edges come to light. Most post-processing applications have an area to edit these fringed edges out, but you'll need to learn how to do that. For now, just be aware that they exist.

Color Balance: I think this used to be much more prevalent in the past, but has been dealt with very effectively in today's cameras. I've only seen a dramatic color balance that's been off in a few of my photos. In general, almost every photo taken has some sort of screwed color balance, but not every situation needs to be corrected. If you're a photography purist, then by all means, correct the color balance in every single one of your images, but for the rest of us, it may not be necessary.

Basically, color balance is determined by your camera. Every lighting situation has a light temperature. Cameras generally know what temperature the light in the scene is and adjust their internal settings accordingly. Sometimes though, when it's shady or in mixed light situations, the camera gets it wrong. That's when we as photographers need to fix this. It's an easy correction in both Camera Raw and Lightroom and I'll cover all that later on.

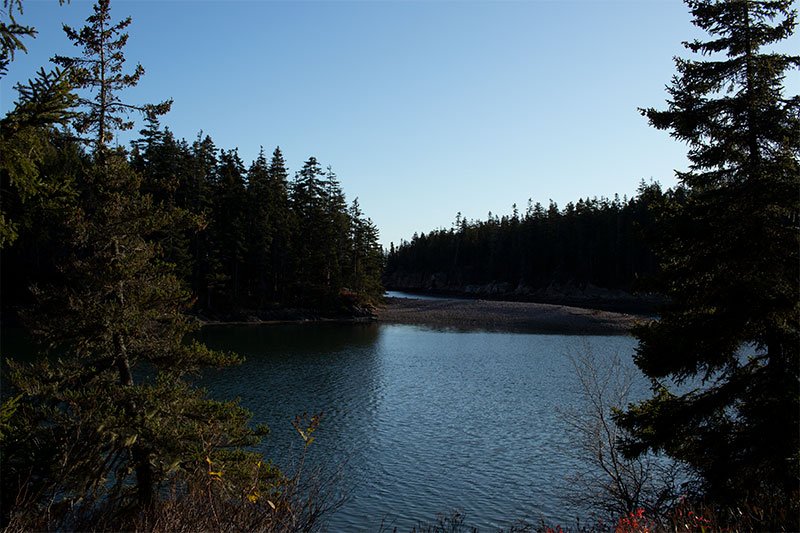
Shadows/Highlights: Because of the limited dynamic range in many cameras and high contrasts in scenes we photograph, we'll see dark darks and light lights in our photographs. Actually, if you look at the before photo above, you'll notice some of this. Because my camera had to adjust for the bright sky, the shadows of and on the trees had to be darkened. This is also very common in many situations. You see how easily I corrected this though, so don't despair. Generally, enough data is captured in a photograph that the post-processing application can easily adjust both the highs and lows.

Dust/Dirt/Imperfections: How many times have you reviewed one of your images and noticed a smudge or piece of dirt where it shouldn't be? I'm sure we've all faced this situation many more times than we care to admit. Pretty much all photo editing applications have healing and correction brushes to deal specifically with this type of situation, so sit tight and read my later posts.

I'll be covering other aspects of photo editing later on too, such as cropping, fixing contrast, sharpening, adding blur, and fixing and enhancing color. If you'd like, you can go to this forum and click the Watch button at the top to receive an email every time someone writes about photography and post-processing.
 
JodyBuchanan

JodyBuchanan

Member
Joined
May 10, 2021
Messages
138
Reaction Score
0
Points
21
  • #11

What Kind of Computer is Best for Photo Editing?​

There are a few things we need to discuss when it comes to transferring to and storing your photos on your computer. We also need to talk about what kind of computer you'll need and how powerful that computer needs to be to edit your photos. I've been doing this a long time and I will tell you that there are many myths floating around online about storing and editing images. I get crazy about all this because of the misinformation, but I'll try to stay sane and tell you what I know.

To transfer your photo files, no matter whether they're JPEG or RAW, to your computer, all you'll need to do is plug a USB cable into your computer and into your camera. Hopefully, you have a computer that's younger than a few years old and that comes equipped with at least USB 3.0. When you plug your camera into your computer, open up a folder and you should see your camera recognized as a drive. It doesn't matter if you own a Windows machine or a Mac. The camera will still be recognized as a drive. Open that drive and click into your camera's folders and you should see your images.

The reason I say that it's best to own a newer computer is because everything you do on it is going to consume resources. The more resources you have, the faster everything is going to be. Sure, you can try to use an older computer, but be prepared to sit around for a while as your images transfer from your camera to it. Especially if you have a bunch of RAW files that need to be transferred.

If you're going to be doing a lot of image editing, I strongly encourage you to work on a desktop. Laptops are great for storing and reviewing your photos, but as far as having the screen space you'll need to edit, it's just not there. Also, to get any amount of power out of a laptop is going to cost you a lot of money. Desktops are less expensive and by and large more powerful.

Okay, let's talk about what you're going to have to look at on your desktop computer. Or laptop if you own one. There are three things; processor speed, RAM, and storage space. We'll go with storage space first, since that's the easiest to understand and the least expensive. If you were to browse Amazon right now, you'd be able to find a huge external hard drive for next to nothing. Don't even worry around what size your internal hard drive is because it doesn't matter. All serious photographers work from external drives. This is why I say you need a fast USB transfer speed - because you'll be transferring data from an external drive to your computer quite a bit. And you don't want that transfer to be slow.

I just looked on Amazon and found a 2TB portable external hard drive put out by Western Digital for $59. That's insanely cheap. Check it out here: https://amzn.to/35KmMo6. Also, here's a portable 4TB drive for around $95: https://amzn.to/2LFDZZ4. I've never seen these things cost so little. And finally (there are many more though), here's a desktop external drive that holds 12TB for around $219: https://amzn.to/35L5yqT. So really, there's no reason you shouldn't be able to store hundreds of thousands of images. No reason at all. Even RAW files. Just be prepared to buy a sweet external drive and not to worry about your internal drive.

One of the best reasons to get yourself a desktop computer is because many of them allow you to upgrade your RAM quite a bit. People out there say that 8GB and 16GB is enough to run Adobe Photoshop smoothly. I disagree with these people. If you want your copy of Photoshop to be as fast as you'd like it to be, I encourage you to upgrade your RAM to 32GB. I did this recently and it's like I'm working on a brand new computer. I upgraded my RAM from 16GB to 32GB for around $89 and everything runs much more smoothly and quickly. Also, rendering video in Photoshop is a breeze now. Doing that used to make my power supply fan sound like it was going to blow up. Not anymore. So my advice is for you to upgrade your RAM as far as it'll go. And if you're purchasing a brand new computer for photo and video editing, either buy one that's already got 32GB of RAM installed or capable of being upgraded to that amount. You can buy some more on Amazon, Crucial, or another RAM supplier later on. It's cheap these days, so don't sweat it.

Finally, we get to the CPU of the computer. My recommendation is to stick with an Intel Core i7. Any one of them. This will give you enough processing power to handle image editing. There's a lot to know about CPU speed that I won't get into here, but rest assured that if your computer has 32GB of RAM with an i7 CPU and over a terabyte of storage, you'll be just fine. The best part is, you can get all of this for under $1,000. So if you're serious, start looking.

When it comes to monitors, the bigger, the better. I've been working on at least a 27" monitor for over a decade. I love the big ones. You really can't work in Photoshop easily with anything less. Things get tight very quickly. And if you're trying to do serious video or photo editing on a laptop, you're going to get frustrated quickly. I honestly don't know how people do it. Granted, I'm on my computer all day, every day, so I need things set up so I can work effectively and efficiently. As far as quality goes, if you were going to buy a monitor today, you can't screw up. They're all good. I dare you to find a monitor that you won't be delighted with. A monitor today that costs $150 is as good as a $300 from five years ago. I remember back when I was in college, a 17" flat panel monitor cost $900. Needless to say, quality has gone up and prices have come down. My most recent monitor was purchased in 2015 and I paid $199 for it. I love it. It's a 27" ViewSonic and it's great, so these things don't need to cost a lot of money.

So there you have it. Focus on monitor size, computer RAM, CPU, and storage space and you'll be rocking and rolling ready for some serious image and video editing. In future posts I'll be writing about how to edit those photos in Photoshop, so stay tuned.
 
JodyBuchanan

JodyBuchanan

Member
Joined
May 10, 2021
Messages
138
Reaction Score
0
Points
21
  • #12

Handy Photography Settings Advice​

In today's post, I'm going to offer you a few different photography scenarios and then I'll discuss each one. I'll focus primarily on how you might want to set your camera if you were to find yourself in these situations. I won't go crazy with intricate details/settings or anything like that. I'll stick with perhaps some modes and lens adjustments. Then, after that, I'll give you some very general tips as they pertain to photography best practices. Keep them in mind the next time you head out with a camera in hand.

I want you to remember three things that have a huge impact on how effective your photos will be. If you consider these three elements for every photo you capture, you'll find that your quality is going to go way up. The first is composition. How you compose your scene and what you choose to be included in your scene matters. If you were to willy-nilly take a picture of a house, you may inadvertently include telephone wires, bicycles in the front lawn, and a garbage can left outside of the garage. Compose carefully and be sure to include only what needs to be included. There's a lot more that has to do with composition, but I'll leave it there for now. The second element has to do with framing. Say you're taking a picture of a flower. Will you include the entire flower in your photo? From what angle will the image be captured? The side? Straight on? Will you capture just the corner? You get the idea. The third has to do with timing. This is probably the most challenging of all because it's not an easy thing to time a shot. If you have to, that means you're dealing with some sort of movement. The faster the movement, the more experienced you'll need to be with many different factors of photography. In later posts, I'll be discussing all of these things. For now, let's get into those different scenarios.

Different Types of Photography

Studio Portrait: If I were a portrait photographer photographing subjects in the same setting all the time, I'd certainly keep my camera set to full manual mode. The reason for this is because I wouldn't want the camera doing any thinking for me. Why not? Because if the camera thinks, that means settings may change, altering the output of my shots, making my results inconsistent with one another. Once the lighting has been determined in a studio, you can easily set your white balance to that lighting. And because the scene is fixed, you can creatively assess the scene only once and set your aperture the way you want. If you left the aperture setting to your camera, you'd likely have varying depths of fields among photos. Also, since this is a studio, you most likely won't have much movement in your subjects. Set your shutter speed once and leave it alone. Shutter speed affects exposure (so does aperture), so you'd want to keep that consistent. Lastly, Depending on everything else, I'd set my ISO the way I want too. This will allow me to control how sensitive my sensor is and how much grain will result in my shots. As far as lenses go, I'd likely use a 50mm prime or something like that, depending on how large my subject was. For humans and pets, this seems reasonable. And I'd definitely have that lens set to manual focus.

Landscape: When I think of landscape photography, I think of standing on a cliff, taking pictures of mountains or canyons around me. For these types of situations, I would set my camera to aperture priority mode. I'll be writing posts in the future that cover how to set the proper aperture and what to focus on, but for now, just know that I'd use aperture priority mode and would leave everything else automatic, including ISO. Also, for typical landscape shots, I'd take advantage of a wide angle lens, such as a 10mm-20mm and I'd either keep it on auto focus or manual, leaning towards manual because I'd have the time and I'd like to make sure I'm focusing on the proper thing.

Street: This is a tough one. Because there's the possibility of such a wide range of circumstances, I may choose a wide range of settings. Let's say I was photographing during the golden hour, which in the summer would be around 8pm-9pm. If there was movement, which I suspect there would be, I'd definitely have to concern myself with shutter speed. And because of the limited lighting in my scenes along with the faster shutter speeds I'd have already set to deal with the movement, I'd have to keep my aperture open fairly wide. As for ISO, I'd leave that on auto because there's not a lot of alternative there. I'd also leave my white balance on auto, even if I were in a mixed lighting situation with natural sunlight and partial streetlights. I'd shoot in RAW mode so I could easily adjust the white balance later on. Also, because I'd need more light hitting my sensor, I'd opt for a prime lens with a larger f/1.2-f/1.8 aperture. As for lenses, I'd go with something like Canon's nifty fifty. That's a very inexpensive, but popular 50mm prime lens that's got a relatively large aperture. Depending on how close I'd want to get to my subjects, I may choose something like a 24mm with a larger aperture as an alternative. I wouldn't go with anything wider than that because I'd lose the focus of my subjects (the people), unless I were going for something artistic that called for that. And I wouldn't use a zoom lens because the more you zoom, the smaller your aperture gets. As the sun fell, these settings would still work well in the dark. I may have to increase my aperture setting and ISO settings though to allow more light in.

Sports/Action: This is definitely the most challenging style of photography because it requires the most skill. If you don't have experience with full manual mode and panning, you'll need to practice those quite a bit. For action shots, I'd take control of both my shutter speed and set that very fast as well as my aperture size and set that large. The reason for the fast shutter speed would be to avoid motion blur. The reason for the large aperture would be to compensate for the lack of light coming through due to the fast shutter speed. I'd also want a blurred background to keep the focus on my subjects, so that's a twofer. For ISO, I'd leave that on auto and the same is true for white balance, unless I was in consistent light that I was familiar with. I'd use a zoom lens of perhaps 50-200mm. The larger the aperture, the better, which would dramatically increase the price of the lens. I'd also use auto focus, definitely.

Close-up/Macro: For this type of photography, I'd definitely use a tripod due to the proximity to my subjects. Any movement can introduce blur. I'd firstly focus on what type of lens I'd use and that would surely be a macro lens or another type of lens with a magnifying filter attached to it. I'd keep it set to manual focus, lest it hunt for focus far too long. I'd set the camera to aperture photography because I'd want to control the depth of field primarily. I wouldn't care about shutter speed or ISO. Well, if the ISO were above 800, I'd stop it there. I wouldn't want any grain in my shots. Allowing a slower shutter speed to compensate for that would be fine, as my subject would likely be still.

For nature photography, I'd follow what I said for landscape, for fashion, I'd follow what I said for street, and for architecture, I'd follow what I studio portrait and possibly landscape. Of course, all of these things would depend on the actual scene and lighting, but they're in the ballpark of how I feel.

Some General Tips

Change Your Angle: So many pictures we see out there have been taken at shoulder height. We see them so frequently that we've almost become numb to them. Imagine walking down the road and capturing an image of someone while you're lying on your belly down on the sidewalk. Of from above them while standing on a ladder. Can you imagine how your images would stand out? The same is true for so many different types of shots. Landscape, nature, macro. So the next time you head out to take some pictures, think about where you'd like to place yourself before snapping away.

Position: Think about perspective here. Let me give you an example. Instead of taking a photo of someone walking out of a doorway, how about walking directly behind them as they walk through that doorway and snapping a photo then? Or, instead of photographing someone reading a newspaper, why not stand above them and shoot from there? You'd get their entire person, yet you'd also include what they're reading. Things like this can really liven up your photography and move you out of the realm of boring and into the realm of interesting.

Lighting: Ask any photographer what the most critical aspect of their photography is and they'll tell you it's light. Early morning and late afternoon/dusk are great times to add drama. The blue hour is excellent and night photography can be stellar. Don't think you need full sun and high noon to get wonderful shots. You don't. Actually, that's a terrible time to engage in photography. Think about your lighting before you think about anything else.

Shoot Away: You own a digital camera. You're only limited by your battery life and the size of your data card. While practicing all of what I've mentioned above, don't think you're limited by anything other than those two things. Take as many photos as you want. Explore many angles and different types of lighting. Play with your aperture and shutter speed settings. Get used to your camera and learn what each setting does. Play with different lenses to learn what works for which situation. Don't restrict yourself. This isn't the time to be conservative.

Well, I hope I shared something of value above. If you have anything to add or if you have any questions, please let me know down below. Thanks!
 
JodyBuchanan

JodyBuchanan

Member
Joined
May 10, 2021
Messages
138
Reaction Score
0
Points
21
  • #13

Basic DSLR & Mirrorless Camera Settings​

There's no doubt about it, you can take incredible photos with your camera's auto modes. After all, your camera chooses from the same exact possible settings that you would if you were shooting in full manual mode. The only difference is who or what's doing the deciding for which setting to choose. For everyday shots that capture everyday scenes, it's perfectly normal to take advantage of auto mode. The challenge arises when you develop a particular creative goal for your shots. For instance, if you'd like to add some additional blur in the background of your subject or if you'd like to take some silky waterfall shots. Perhaps you're taking pictures of hummingbirds in flight and want to freeze them with their wings perfectly still. If you left it up to your camera's auto mode for these types of photos, it would have no idea of your intentions. It would simply go ahead with what it always does, which is set the camera for a proper exposure and that's pretty much it. You'd take the picture and it wouldn't look anything like you wanted it to.

In today's post, I'd like to talk about a few different features of your camera. I'll do my best at explaining what these features do so you can better decide when they're appropriate. I won't go into detail for each of these, meaning, I won't offer explicit instructions that explain how to set each of these features for your particular camera. I'll do that in later posts. For now, I'll simply introduce you to the features so you can get a better handle on what they are and when you may want to use them.

Aperture: You can find the aperture in your lens. It's made up of some plastic fins that move to open and close the hole that allows light into your camera body. The aperture size is controlled by settings made on your camera. As you change those settings, electronic signals are sent to the lens that give it instructions for what to do. So when discussing aperture, we're partly discussing your lens as well as your camera. It's really what the lens does to affect what's going on in the camera.

Smaller aperture holes are designated by higher f-stop numbers. So if you have an f/1.2, you've got a really large aperture opening. If you have an f/22, you've got a small opening. Large openings create shallow depths of fields and small openings create deeper depths of fields. Shallow depths of fields create more blur in the foreground and background of your shots and deep depths of field create sharper foregrounds and backgrounds. For creative shots where you would like to incorporate blur, such as with photos of close up flowers, you might want to use larger aperture settings. For landscape and real estate shots, where you want more detail and focus throughout your entire photos, you'd want to go with a smaller aperture.

It's also important to note that larger apertures allow more light through your lens, so that will have an impact on the other settings you choose for your camera. Remember, each part of the photography triangle comes in two pieces. For aperture, the two pieces are light volume and blur (bokeh - out of focus blur).

Shutter Speed: This is the second part of the photography triangle. The two parts of shutter speed are light and motion blur, which is a different type of blur than I discussed above. If you were to set a very slow shutter speed, it would mean that your shutter would open inside of your camera, exposing your sensor for that amount of time you set. If you set a fast shutter speed, the shutter would move out of the way of the sensor for a much shorter length of time. Slower shutter speeds equal more light and faster shutter speeds equal less light. Slower shutter speeds also have the potential to introduce motion blur if you were to move your camera while the shutter is open. Or, if you were to point your camera and take a picture of a fast moving object. This is how people get those silky waterfall shots. They set their cameras on tripods and set slow shutter speeds. As the water is falling, the camera records that movement. Conversely, if you wanted to avoid motion blur in your photos, you'd set a fast shutter speed. In cases like these, you'd be able to take pictures of sports and moving animals without much blur at all. Just remember, the faster the shutter speed, the larger your aperture is going to need to be. Your camera is going to need light from somewhere and if it can't get it from the shutter speed, it'll want to get it from a larger aperture. Or a higher ISO, which I'll discuss next.

ISO: Your camera uses an ISO measurement to control how sensitive its sensor is. It's sort of like how an amplifier amplifies sound. The higher the ISO number, the more sensitive the sensor is, which sort of equals more light. For example, if you were to keep your aperture and shutter speed settings exactly the same, but change your ISO from 100 to 800, the picture that used the 800 setting would be a lot brighter than the one that used the 100 setting. Having an adjustable ISO value compensates for other settings that might be limited. So if you're in a bright setting, you'd probably want to lower your ISO setting and if you're in a dark setting, you'd probably want to raise it. My advice is to keep this feature set to auto.

The only caveat has to do with very high ISO settings. As you raise this value, you'll find that grain, or noise, is introduced to your images. You really want to be careful how high you go with this because grain isn't the easiest thing to remove during post-processing. Once it's there, it's pretty much there forever. You can remove some of it, but not all, without ruining your image.

Viewfinder: I want you to run a small experiment for me. Look at something in front of you and see if you can clearly see what's in your peripheral vision. You can't. Those things can't be seen clearly with the human eye. The problem with this that when you take a picture of something, everything in the frame is clear, not only what's right in front of it. So while you're looking at a scene with your naked eyes, you're missing all the weird stuff that might be at its edges. And if you were to take a photo of that scene based on only what you see, that picture might not be so great.

A quick trick to deal with this is to turn your camera both horizontal and vertical before you take your photo. This will allow your eye to wander a bit to explore the scene more. It's not an insanely helpful trick, but it has its uses.

Flash: Many people overuse their camera's flash. Some of the worst photos I've ever seen have been made the worst because of dark shadows created by flash. I can tell you that I've never used my camera's flash since I've owned it. Actually, I've never used a flash in my life. If I've needed lighting, I'd set that lighting up in my scene before I took the photo. I've heard that the camera's flash can be helpful in filling in dark shadows on a bright day. I don't know if this is true. I do know that flashes are helpful with studio photography and very specific instances, but if you're doing that type of photography, you're not reading this post. My advice is to stay away from your camera's flash unless you need it for something specific.

Preset Modes: If you're taking photos on the fly and you don't have a lot of time to think, go ahead and use your camera's built in presets. There's nothing wrong with doing this. There are oftentimes landscape, portrait, sports, and others to choose from. You can take some great photos by using these presets. One of the most valuable aspects of these presets that I've found in past years is to analyze the resulting image after taking it with one. With applications such as Adobe Bridge, you have the ability to see exactly what settings the camera chose for a specific photo. So if you're a beginner and you aren't quite sure what the set your camera to while in aperture or shutter speed priority or in full manual mode, go ahead and take some pictures with a preset and then inspect the settings that the camera chose. This way, you can work backwards and learn.

Manual/Auto Focus: Most cameras and lenses come equipped with auto focus. When we're beginners, most of us think that we should keep the focus set to auto because the camera is really smart and it knows what it's doing. While camera's are smart, they can sometimes focus on the wrong thing at the wrong time. The way I think of it is like this: if I'm in a fast moving situation, I'll take advantage of autofocus. There is no way I'll be able to do the focusing while I'm moving or while the thing I'm trying to take a picture of is moving. But if I'm in a situation where everything is still, I like to use manual focus. This way, I'll know exactly what the camera is focusing on and that it won't change. Now, there are some tricks you can use to lock in a focal point while using autofocus, but I'll get to them later on. For now, this bit of advice is what I'll offer.

I hope these quick explanations and tips helped you out in some way. If you have specific questions about any of this, I'm here to help. Just ask down below.
 
JodyBuchanan

JodyBuchanan

Member
Joined
May 10, 2021
Messages
138
Reaction Score
0
Points
21
  • #14

Typical Photo Importing & Editing Workflow​

If you're brand new to photography, you might not be familiar with the typical workflow that takes the process from capturing your scene all the way through saving out your photos. While many folks don't really think past the taking of the picture itself, there are actually quite a few important steps that after that, that you'd benefit by learning. Nothing here is earth shattering or anything, but by incorporating a process early on, you'll be starting off on the right foot. Organization is key when it comes to photography, so plan to get organized.

In today's post, I think I'll walk through a condensed version of the save a picture, edit that picture, and save that picture workflow. This is all very straightforward stuff, so if you've got a camera, a computer, and photo editing software, read on. What I'll do is name a step and then offer a short description of it. What I'd like to do is simply familiarize you with what you might expect on a daily basis as an amateur photographer.

Choose Your Resolution: Before you ever take any photos, you'll need to dive into your camera's menu area and choose your resolution setting. I mentioned this topic in a previous post, so if you're interested in JPEG and RAW files, I welcome you to read that one. In case you're not interested in doing that, I'll tell you here that JPEGs are smaller files, but they're compressed to save space. RAW files are very large, but are much more versatile when it comes time to edit. Most cameras give you the option of choosing to photograph in both JPEG and RAW file formats. This can be handy if you aren't sure of what you ultimately want. When you take a picture with this setting activated, your camera will save both file types. If you take one money shot out of dozens, you can save just that one RAW image, while discarding all the other RAW images. Then, you'd simply keep the good JPEG files that you want. Keep in mind though that if you do choose to save in both formats that it'll take quite a bit longer for you to transfer these images from your camera to your computer, so you'll want to make sure you're using a fast memory card in your camera with a computer that's equipped with a fast USB port.

Transfer Images to Your Computer: After setting your resolution and taking your photos, you'll need to transfer those photos from your memory card to your computer for processing. To do this, you can physically remove your memory card from your camera and insert it into either your computer's memory card reading feature or an external memory card reader. I prefer to plug my camera directly into my computer using a USB cable. Once the two are connected, you can transfer your files.

Select & Discard Your Photos: I suggest you take full advantage of Adobe Bridge for this step. It's a photo organizing application that comes with the Photographer's package over at adobe.com. With this program, you'll have the opportunity to view all of your images, rank them, organize them, add search tags to them, put them into separate folders, and delete them if you wish. I highly encourage you to promptly scan through your images after a shoot and delete the ones you know you'll never use. Chances are, you've taken far too many photographs. It's best to keep only those you'll end up needing in the future.

Edit Your Images: After organizing your images in Adobe Bridge, I advise that you edit the important ones in Adobe Camera Raw and then Photoshop. This is a typical workflow for photographers and these are the industry standard editing and organizing programs. Camera Raw will edit both your RAW and JPEG files. It's perfect for editing photographs. Actually, that's its job. After Camera Raw, you can easily import your photos to Photoshop to finish up anything Raw couldn't do.

Add a Copyright: If you want to, you can take advantage of the File Info menu item inside of Photoshop. This is a place where you can add all sorts of information about your image, including a description and copyright.

Save Your Image: Once you're finished editing, you can save your image straight from Photoshop. There are many different quality settings and formats available to you. If the quality was there from the beginning, you'll be able to save for print or for use on the web.

Back Up Your Photos: This is a step most people miss and then they're sorry that they did. It can cost more to back your photos up, but if you do and if you lose your computer or if your hard drive crashes, you won't shed a tear. Think about what most people say they miss the most after tragedy strikes. It's the photos. Would you like to have every single picture you've ever taken be deleted in the blink of an eye? It can happen if you don't back them up. Your computer's hard drive isn't good enough. Yes, save your pictures to that, but also save them to an external drive you keep safe or save them to the cloud.

I'd like to mention a quick something about memory cards. The kind you can use in your camera. I recently purchased a 128GB card in Wal Mart for $15. That's huge and it'll hold more photos than I'll ever be able to take during one shoot or vacation. There's absolutely no reason to struggle with changing your card or filling it up. These things are cheap now, so head out and buy one or buy one online. Don't mess with little 2GB, 4GB, or even 16GB. Go big or go home.

That's about it for this post. I know there's an enormous amount of information to be found in the cracks of this post, so if you'd like answers, just ask the questions down below. Thanks!
 
JodyBuchanan

JodyBuchanan

Member
Joined
May 10, 2021
Messages
138
Reaction Score
0
Points
21
  • #15

Stock Photography Tips​

I had originally intended to write this post and target it toward photography in general, but I think I'll focus more on photographing for stock photography instead. Stock photography is huge on the internet - it has been for years. Every single day, thousands and thousands of photographs are purchased by individuals, creative departments, and media companies alike. These photos are used for all types of things, be it offline in print, billboards, magazines, online in advertisements, to go along with various types of blog posts, and other types of articles. Whatever the case, good stock photographers have been in demand for a long time. So if you're interested in getting into a hobby or money making profession, you may want to look into this area.

To start off, I'd like to give you a quick tip. I mentioned this in one of my previous posts, but it's worth repeating. When you take a photo with your camera, that camera records its specs and stores them in the meta data of the photo file. At any time, you can check these specs. They include aperture and shutter speed settings, ISO value, type of lens used, lens focal length, white balance, and a whole slew of other things. If you were to use Adobe Bridge to organize your photos, these settings are plainly visible in one of the panels. The reason I mention this is because as you look through your images, you can see which ones look good under which circumstances and which ones don't. For every photo, you can compare what works and what doesn't with the camera's settings. For instance, if you see a photo that's got lots of grain in it, you can take a look at the ISO setting to see what it was set at when you captured the scene. If it's very high, the next time you go out shooting under those same conditions, you might want to lock your ISO value at a given high point so it doesn't go over it. If you've got your camera set to auto or one of the priority modes, it'll chose another method for getting light into the camera. Perhaps it'll extend the shutter speed or open up the aperture a bit more. And if you keep comparing the photos you take with the settings the camera used, you'll quickly get used to proper settings and improper ones. This really is a great learning tool.

Okay, let's move onto the potential stock photography scenarios. I've got three popular ones for you that I'll discuss below.

Street Photography

When it comes to stock photography that describes every day living, street scenes can't be beat. We've all seen these types of shots in magazines, newspapers, etc... There really is no shortage of articles about society. To take good street photography though, you'll need to focus on a few different aspects. Your goal is to capture interesting scenes that captivate the viewer. That's the only way you'll sell anything. Really, you're not trying to sell your photos to the person buying them. You're trying to sell them to who the person buying them is writing for. So that buyer is sort of like a middleman. It's his or her opinion about their readers that counts.

To start off, find a good spot to hang out for a while. At this point, focus mostly on the backdrop of the scene. You don't want something boring that you hope will fill up with people. You want a location that can stand on its own. Think about a great looking cafe or a wall mural or something. Once you've found your spot, simply hang around and wait. What you're waiting for is a confluence of events to take place. You're waiting for something interesting to happen. And when it does, you'll begin snapping away.

When people do arrive, you should easily get a real sense of life being lived. Pretend your standing at the edge of a marketplace in Italy. Imagine seeing two men discussing something. Watch their hands move in the air. That's the type of thing you want to capture with your camera. It's simple interactions like this that will easily sell. Also, look for situations that contrast others. If two men are speaking with one another in a vivid fashion, perhaps they're standing right next to a teen who's quietly leaning up against a wall. Look for messages being sent with people's eyes. The eyes are like candy for creative directors. They can't get enough of them.

Finally, lighting can make or break an image. Lighting sets the mood. If the day is overcast, there's one message that might be sent. If you're shooting at dusk, there's another message. High noon with full sun? You might want to avoid that. When it comes to street photography and telling the story of a person or people, you want drama. Sun that comes from directly above doesn't add drama. Sun from the golden hour does.

Working Folk

Another type of photography that's popular with advertising is when it shows a variety of people doing their jobs. Or maybe hobbies. Anything where someone is doing something that the rest of us might not see on a regular basis. Think about an electrical utilities worker leaning against a shovel in the hot sun. Think about an artist painting a scene. Think about a chef preparing food. With situations like this, you want to photograph fairly closely and from as many angles as possible. Each angle will tell a different story and you want to get them all. Don't worry, you can discard all the lousy photos later on. For now, snap away.

Also, while taking all these photos, be sure to not disturb the person who is working. You want candid shots, not ones that are set up. Say the electrical utilities worker is exhausted and decides to sit on a curb in the sun. He removes his helmet and runs his hand through his sweaty hair. That's gold in the stock photography world. If you caught the man's attention and asked him to smile, you likely wouldn't sell one shot.

And finally, when taking photos of people working, think about how the person relates to the job they're doing. If the job is delicate and careful and if it requires concentration and focus, that's what you want to capture with your camera. Take close up shots of the person's eyes focusing on their work. Perhaps their hands and fingers delicately maneuvering around the sewing machine or circuit board. These are the types of things people want to see.

The Portrait

Portraits are hot and I have to tell you, people love them. Just visit any stock photography website and search for "person" or "portrait." You'll see a wide variety of pictures of people doing any number of things. You can easily take these types of photos yourself if you simply remember a few key details. First, remember that each and every human face is unique, so don't think that one person is more interesting than another. If a buyer is looking for a plain faced teenage female, that 80 year old Australian guy isn't going to help much. Sometimes though, buyers are looking for a dramatic shot of an 80 year old African, so be sure to take many shots of all different types of people.

Next, always remember to ask your subject before you begin taking photos of him or her. If given permission, you can ask them to act naturally or to do a certain post. Perhaps just a simple smile is all you need. Whatever the case, once you've obtained your subject's blessing, you'll have the liberty to shoot from down below or up above. Smile or no smile. Whatever you want, you've got your model.

And finally, again, always remember your angles and lighting, especially when it comes to portraits. Taking photos of someone standing between you and the sun, such as a silhouette, is always a good idea. There's a lot of drama right there. Kids smiling and laughing in the park can be great. A professor teaching. All good stuff. Just remember to capture these people at different angles and use your lighting to accentuate your goal.

Whatever you decide, just be sure that you don't get in the way of your shot. People can act strangely when they think you're being too obtrusive. So stay out of the way and let them do their things.

Landscape

There is no shortage of landscape shots out there, but if you set yourself up correctly in the right spot, you can make yours better than everyone else's. To start, you obviously need to find the right spot. Scout around or follow tips you find online that lead you to that mountain top, cliff, or other secret spot that'll give you your money shot. One of the most important considerations is where the sun will be during your photography session, so figure out in which direction you'll be shooting and what will look best. Again, avoid direct sunlight from above. Choose to photograph your scene either in the early morning or just before the sun goes down. Also, be prepared to use a tripod and some wide angle lenses. I'll be writing more about how to focus and how to choose your proper depth of field for landscape photography in later posts. As far as where to situate the horizon, choose either the top third or the bottom third. Avoid the direct center as that's not a very interesting area. Be aware that most good landscape photos come alive during post-processing. Don't be discouraged if you review your shots on your camera and they don't look as good as you thought they'd look. Camera Raw and Photoshop can do wonders for these kinds of pictures. Take a look at this quick example. The first shot is straight out of the camera and the second shot took me about 30 seconds to edit.

ship-harbor-maine-hiking-trail.jpg

ship-harbor-maine.jpg

Remember, nobody's photos look good straight out of the camera.

Still Life

You'd be surprised at how many still life photographs sell on stock photography websites. Some of my most popular photos are of door locks, bicycle tires, lawnmower wheels, and other odd objects. The trick with taking still life photos is to capture the unknown or overlooked aspects of everyday things. If you were to, say, take a photo of some shower curtain rings, you wouldn't want to take the photo head on. Think about interesting angles. Perhaps you could line the rings up close to one another and shoot down the middle. Angles matter. Lighting matters. Arrangement matters. Don't think you'll get away with boring. You need to make your photos stand out.

When taking your photos, be prepared to shoot from all different angles and at as many distances as possible. Upon review, you'll quickly discover what worked and what didn't. So first, move yourself and your camera. When you're finished with that, try to move the object you're shooting. If the object is mobile, move it so you can capture its different sides. And finally, alter the lighting on the object to give it different appearances. A padlock that's got light shining directly at it will look markedly different than a padlock that's got light emanating from behind it. And above all else, remember those details. That's what people look for in still life photos.

Action

Action shots are big sellers on stock sites too. When it comes to this type of photography, you need to focus on the pivotal piece of action that's occurring at the moment. If you're photographing a soccer game, don't bring a wide angle lens that captures the entire field. You want to bring a zoom lens that will capture the sweat that's flying off a player's forehead as he headbutts the ball. It's those close up pictures that people will want to buy. Be sure to fill the entire frame with action. To do so, you'll need to find a place on the field or in the sidelines that will allow you do take such photos. Trust me, you'll need to practice this style to get better at it. It won't happen overnight. Action photography can be one of the toughest styles to engage in, but the rewards are worth it. Many photographers are excluded from selling these types of photos because if the skill it takes. Learn and move past the others with your success.
 
JodyBuchanan

JodyBuchanan

Member
Joined
May 10, 2021
Messages
138
Reaction Score
0
Points
21
  • #16

Tips for Reviewing Your Photos After a Shoot​

We can take as many photo as we want, but after we do so, we need to develop a system for reviewing what we've captured. After all, if we're screwing up shot after shot, there's no sense in continuing on. Also, it's a great idea to review photos to see where we succeeded and where we failed. And finally, it's really a necessity to review our photos to keep the good and weed out the bad. After shooting for a while, we'll likely have quite a few images stored on our data cards. There's no reason to keep duplicates and those that weren't taken with our specific intentions in mind. What might some of those intentions be? I'll discuss them below.

In this post, I'd like to discuss a few different areas of inspection we might consider at as we review our photographs. This can either be done right via the LCD viewscreen on the back of the camera or on a computer later on. Reviewing photos can be a big learning tool, so take this part of educating yourself about photography seriously.

Proximity: Was your goal to feature a specific subject in your photograph? Were you after clarity? Detail? Did you want to show your audience how a specific item looked up close? If so, you'd need to fill your frame with that subject. If you were to merely capture your subject from a distance with the hope of either enlarging or cropping the photo during post-processing later on, you wouldn't capture nearly the same detail you would if you were to shoot up close. Close up shots reveal all the goodies you want to display, while far away shots include defects like blur, grain, and chromatic aberration.

Composition: While you can crop your images during post-processing to obtain the composition you want, by cropping, you lose pixels and every pixel you lose, you lose size and detail. It's much better to compose your scenes before you take the pictures. So before you set up your shot, ask yourself what you'd like to see as a final result. Will you follow the rule of thirds? The golden ratio? Where will that person be located in the ultimate image? What about that tree? The horizon? The sun? Think before you shoot. Granted, this will get much easier after you've been photographing for a while, but in the beginning, it's much more beneficial to plan things out.

Focus: This is an easy one to see when it's not correct, but not so easy to fix what you did wrong. Focus is a huge topic that I'll be writing future posts on, but for now, ask yourself if the correct item in your photograph is crisp and clear. If it isn't, you may need to learn about the different auto-focus options available to you through your camera and you may need to practice using them. Panning, zooming, and moving while keeping things in focus can be tricky at times. It really does need practice.

Exposure: This is another huge area that entire books have been written about. I'll get to all this in subsequent posts. For now, look at your photos. Are they too dark. Too light? Are the shadows pure black (clipped) and the highlights pure white (clipped)? If so, recognize the problem and decide to study up on why your errors may have occurred. I will tell you though that sometimes over and under exposed photos were the goal. If this is the case, you most likely already understand how exposure works. All you need to do is review your shot to see if you got what you were after.

Cropping: I see it all the time. Real estate agents taking pictures of houses with phone lines in the scene. Moving slightly closer to the home would have eliminated the eye sore. Taking photos of kids at Disney World with the creepy dude in the background who's scratching his belly. I mean, really. Taking a picture of your freshly painted hot rod with an overloaded garbage can sitting off to the side. When taking photos, make sure you use your position and zoom to crop out the undesirables. No one wants to see the power lines, creepy dude, or garbage can. Get closer to your subject. Move to a different position for a better angle. Review your images often to make sure you haven't made any of these types of mistakes.

Lighting: You'll know it when you have it. Getting the most out of your lighting can take patience and experience. Oftentimes, the light in your scene is less than cooperative. You need to know what to expect, how to manipulate it, and when the best times to shoot are. Review your shots to see how the lighting looks. While you can somewhat compensate for this in post-processing, there's nothing like the real thing.

Depth-of-Field: If you meant to take a portrait that includes a subject whose head is in focus from front to back and only the front is sharp, you've got a big problem. This type of error will need immediate correction so you don't end up with a wasted shoot. Review your images to see how deep or shallow your depth of field is. If it's too shallow, either adjust your distance from your subject or close down your lens' aperture. If your depth of field is too deep and there are objects in your scene that you'd rather be blurred out, you'll need to either get closer to your subject or open up your aperture.

Prioritization: This one goes hand in hand with cropping and composition. Basically, when reviewing your action photos, ask yourself if you actually captured the piece of action you wanted. Did you zoom in on the quarterback handing off the football? The player's foot kicking the soccer ball? The skates spraying off ice as the skater leaps from the rink? If those types of things aren't readily apparent after review, make your adjustments and continue shooting.

It's good practice to review your shots often while you're in the field. If you're merely using your review as a learning tool, sure, it's fine if you do it at the comfort of your desk at home, but if your photographs matter, then you better take care of things while you're doing them. You certainly would want to discover that all of your wedding shots had grave errors in them after the wedding was over.

How do you feel about the areas I chose to write about in regards to reviewing your photographs? Do you have any further suggestions that might help budding photographers? If so, please share them down below.
 
JodyBuchanan

JodyBuchanan

Member
Joined
May 10, 2021
Messages
138
Reaction Score
0
Points
21
  • #17

Most Common Post-Production Photo Fixes​

After you've been editing photos for a while, you'll find that you make the same fixes time and time again. I've got this down to a science and can almost edit my photos with my eyes closed. Granted, I edit most of my images so they're presentable as opposed to perfect, but still, once you get used to the routine, it becomes, well, routine.

In today's post, I'll discuss a few of the most common edits photographers make to their images and explain how and why you might want to make them. I'll even show you an untouched photograph up top with the touched one down below. That'll give this post some perspective.

To start off, here's the photo I took a few autumns ago. It's right out of my camera. I haven't done a thing to this.

acadia-lighthouse-original.jpg

Also, to make these edits, I'll be using Adobe Camera Raw. After I make the changes there, I'll import the photo into Photoshop for size reduction and export. Let's begin.

Review Image: The very first thing you'll want to do when you open your photo in your post-processing application is to review it. Merely starting off by pushing sliders around isn't going to cut it and will actually confuse you if you aren't well versed with that program. In reviewing my image above, I can quickly see that it needs to be leveled out. Perhaps I'd want to crop it to remove items and objects I don't want to see in the final photo. I notice that there's a lack of contrast as well as some darks that are darker than I'd like. I'd also like to add some color saturation to the image overall if I could. And finally, I want to see some more crispness in the entire image. It looks sort of blah as it stands.

Adjust Exposure: In Camera Raw, there's a Basic panel that can handle a lot of what I just mentioned above. This panel includes the Exposure, Contrast, Highlights, Shadows, Whites, and Blacks sliders. Believe it or not, all of these sliders have to do with an image's exposure. While the Exposure slider will handle brightening or darkening a image in its entirety, the remaining sliders are able to target specific element of the photo. When using these sliders think about what the problems in your image are. A great tip would be to work on each slider one at a time. Slide each one to the left and the right to see the effect it has on the picture. By doing this, you should see the image become better and worse looking. This is the best way to learn.

Adjust Saturation: Almost every single image needs a saturation adjustment directly out of the camera. So once you take care of the exposure, move down to the Vibrance and Saturation sliders. Here's a tip: you can be much more liberal with the Vibrance slider than the Saturation one. This slider adds color to only the areas needing it most. The Saturation slider adds color very bluntly. Be cautious with that tool. Most of the time you'll want to push these sliders to the right. Very rarely and usually only when you want to do something creative will you push them to the left.

Level the Image: Both Camera Raw and Photoshop have tools to level out images. Sometimes they can do it with the click of a button, but most of the time you'll need to do it by hand. When you use the Crop tool, you'll see this opportunity present itself. When leveling an image, look for a structure with a vertical or horizontal wall or a horizon from which you can work. Be careful when leveling from a horizon though because they're not always supposed to be level, especially if there's land involved.

Crop the Photo: Oftentimes you'll also want to crop unnecessary elements out of your photos. To do this, use your Crop tool. This is a simple tool to get used to, but I'll give you a word of warning about it. Keep your proportions constrained, meaning, don't go off making your photo some odd shape. If your photo came out of your camera 1000x800px and you wanted to reduce its width to 500px, make sure that it ends up 500x400px. Don't go resizing it willy nilly, unless you know what you're doing. People are used to certain proportions when it comes to photography and if you deviate from those proportions too much, your image may end up looking weird.

Save the Photo: Once you're done with all of your edits, you can go ahead and save it out. In Photoshop, you have the option to save the working image as a PSD file, the final image as a JPEG file (among other formats), or both. If you save the final image and then close out of Photoshop, your changes will be lost forever, meaning, you won't be able to open the image again and tweak a previous edit. If you save the working file, you will be able to, but you can't use that working file for anything else. By saving in both formats, you'll be able to open the image again to work on it and you'll also be able to post the photo online or wherever else you'd like.

Regarding Other Tools: There are dozens of other tools and hundreds of potential edits you can make to any given image. Above, I merely wanted to introduce you to a few of them. For first time editors, working through what I explained would be an excellent choice to make. In later posts, I'll be delving into all different types of changes you can make to a photograph using these applications.

Okay, let's take a look at the final image. I edited this as I wrote this post.

bass-harbor-lighthouse.jpg
 
JodyBuchanan

JodyBuchanan

Member
Joined
May 10, 2021
Messages
138
Reaction Score
0
Points
21
  • #18

Beginner Photography Questions & Answers​

Well, I just finished the first section of Digital Photography Complete Course. All of my posts on this section are contained in this forum. At the end of the section are a bunch of multiple choice questions that I thought I'd ask and answer here in this post. While the answer key in the book and the question answer choices do offer the short answers, in my typical style, I'll go ahead and offer up some more in depth information for you to work with. If you have any concerns with any of this, please let me know down below.

Q. Stopping the action is useful in what type of photography?

A. Sports photography. In general, with this type of photography, you don't want any motion blur. It's all about taking a crisp and clear snapshot of what's going on. The way to achieve this is to use a very fast shutter speed. Of course, this setting will reduce the amount of light that's allowed to touch your camera's sensor, but you can compensate for that by using a larger aperture and a higher ISO value. If your lens doesn't come with a large enough aperture to compensate, you may need to look into a more expensive lens. Generally, the larger the apertures, the more a lens costs.

Q. When should you decide on the size of your images?

A. This is actually a trick question. The answer in the book says that you should decide before your shoot, which is absolutely true. The thing is, many people reduce the sizes of their images after editing, depending on what they use those images for. So, literally speaking, you can take very large images and then, later on, decide that you'd like to reduce that size to something smaller. What the book meant was that you can't make small pictures bigger later on, so make sure your settings are accurate before you begin.

Q. The Crop Tool allows you to do what to a photo?

A. The book says that this tool allows you to remove any unwanted parts of the image, which is true. It can also resize an image as well and can even change the proportions of an image. It's a multifunctional tool.

Q. While taking photos of someone at work, you should do what?

A. You should try not to disturb them. If you do disturb them or ask them to act a certain way, they may appear unnatural. The entire reason you're photographing someone while they're working is to get candid shots.

Q. How many legs are there on a tripod.

A. C'mon. Tri means three.

Q. Lines in a photo, such as the horizon, should do what to the viewer?

A. Lines in photographs are oftentimes helpful for guiding the viewer's eyes to important areas. These lines are sometimes referred to as leading lines.

Q. What does the aperture do?

A. The aperture is meant to do one thing. That's allow a certain amount of light through the lens into the camera to touch the sensor. A side effect of this purpose is the adding or removing of foreground and background blur, sometimes referred to as bokeh. This blur is outside of the lens's depth of field.

Q. Underexposing an image does what to subjects that are lit from behind?

A. If you underexpose an image that's lit from behind, any object that's blocking the light will become a silhouette. As you brighten the image, the detail in the subjects will be revealed. You can simulate under and over exposure in post-processing.

Q. A high ISO setting allows you to shoot in what type of light?

A. Low light. The higher the ISO setting, the more sensitive the camera's sensor becomes. The more sensitive the sensor, the more light it will pick up in a scene.

Q. Which shooting mode allows you to apply the exact settings you want to use.

A. If you'd like full control with your photography, you should use full manual mode. If you use one of the priority modes, yes, you'll have control over that priority, but not the others. For example, if you choose to shoot in shutter priority, you'll have control over the shutter speed, but not the aperture.

Q. What can you see when you look through the viewfinder?

A. You can see what the lens sees. After light passes through the lens, it hits a mirror which flips the scene upside down. Then it hits another mirror which flips it back and makes it visible to you, the viewer.

Q. Shutter priority mode controls what aspect of the camera?

A. This priority mode allows the camera operator to choose his or her own shutter speed. The shutter speed defines how long the shutter stays open, allowing light through to the camera's sensor.

Q. Which part of a model should you focus on when taking a portrait shot?

A. The eyes. It's always the eyes. The same is true when taking wildlife shots, including birds. The eyes are the windows to the soul and they can be very revealing in photographs.

Q. A slow shutter speed will produce which effect?

A. The slower the shutter speed, the more opportunity for motion blur to introduce itself into the photograph. If you have your camera on a tripod though and there is no movement in your scene, there should be no blur. But, if you've got a slow shutter speed and you move the camera or something in your scene moves, you'll see blur. How much blur? That depends on how fast the movement is and how fast you move your camera. It also depends on how slow the shutter speed is.

Q. What size aperture produces a deep depth of field?

A. The smaller the aperture, the deeper the depth of field, everything else being equal. Depth of field also depends on how far the camera is from the subject, but in general, smaller apertures produce less blur in the foreground and background of a scene.
 
JodyBuchanan

JodyBuchanan

Member
Joined
May 10, 2021
Messages
138
Reaction Score
0
Points
21
  • #19

What to Focus On​

Focus is undoubtedly one of the most important aspects you need to consider while photographing any type of subject. The focus contained within a photograph has the ability to dictate how the viewer perceives the image and what they deem important. In short, focus adds focus to a picture. It isolates and bends and directs the viewer's eyes to what the photographer wants them to see. It's actually one of the most fun aspects of photography as well.

Before I begin the discussion on focus, I'd like to take a moment to clarify a few common issues folks usually have when it comes to understanding what remains sharp and crisp in an image and what doesn't. There are different factors that play different roles. They can become confusing at times.

Autofocus: If you're new to all this, you'll find that your camera's autofocus is pretty awesome at finding and figuring out what you want to focus on. But as you become more proficient and creative, you'll also discover how frustrating the autofocus can be. There are ways around this frustration and I'll discuss all of them in later posts.

Focus Point: The point at which you focus is called the focus point. Easy enough. The area before and after (in front of and behind) that point is called the depth of field. The range of this depth of field depends on what type of lens you're using, the aperture setting, and how close you are to your subject.

Aperture: All other things being equal, the larger your lens's aperture, the shallower the depth of field will be. This is great for accentuating something you'd like to highlight. Shallow depth of fields are great at drawing the eye towards something. The smaller your lens's aperture, the deeper the depth of field will be, meaning, more things will be in focus in your scene. This is good for capturing more objects, such as trees in a forest.

Creativity: In the beginning, we tend to focus on what's at the center of our scene, but as we become more experienced, we'll push that focus point all over the place, from front to back to side to side. The stranger the focus point, the more creative a shot can become.

Now that we have those things out of the way, let's discuss some different types of focus. I'll talk about what kinds of focus there are and where we can specifically focus to create interest in our shots.

Telephoto Focus: If you've ever seen those really great nature shots in National Geographic magazine that were taken by some of the world's best photographers, you may have noticed how shallow the depth of field was in some of them. As you zoom in with your lens, you essentially become closer to your subject, which reduces the depth of field. Also, as you zoom in, the tube of your lens becomes longer, allowing less light to make it through. To compensate for this lack of light, it's common to open up the aperture as far as possible. It's for these reasons that telephoto photos commonly have very shallow depths of field.

Moving Focus/Panning: This is a tricky one. As you get better and more familiar with what your camera and lens are capable of, you'll try different types of photography. One type is where you keep your moving subject in focus, yet blur the background. This is definitely an interesting style of photography. The reason it's tricky is become you can't set your shutter speed too fast. If you do, you won't blur the background. The problem is, if you set it too slowly, there's a good change that your subject will show motion blur as well. There's a sweet spot that needs to be found.

Portrait Focus: In this style of photography, your subject is still. The focus you want to pay attention to is where on the face is sharp. If you've got a deep depth of field, there's no problem at all, but if your depth of field is shallow, then you'll need to take great care to focus on your subject's eyes. Use your magnifying option to verify this.

Landscape Focus: With landscape shots, creativity isn't as big a concern as it is with other types of photography. You'll want as much of your image to be in focus as possible, so distance and a smaller aperture are necessary. Deep depth of field is a name of the game this time.

Side Focus: Here's a challenge for you. Head outside into the woods and find some moss on a log to take some pictures of. Try to get as close to the moss as possible. You'll find that the more you zoom in, the shallower the depth of field will be. You'll also discover that your focus point wanders around where it wants. Try positioning it over to one side. You'll see how that particular area of focus draws your eye in the final photos. You can use this method for just about anything. Train tracks, fences, dirt roads, anything that goes off into the distance.

Foreground Focus: Here's another challenge for you. Try taking some photos of a plate of food. Get down low and take your shots head on. Be sure to focus on the foreground of the plate and keep your aperture large. You'll notice how all of your viewer's attention will be on the portion of the plate that's closest and that attention will diminish the farther back the plate goes. This is called foreground focus and it's a creative trick for drawing attention to something important.

Background Focus: This one's all about creativity. If you've ever taken a picture through a window or a fence, you've already done this one. The reason it's creative is because while the foreground of the scene is completely out of focus, it's still visible, which adds interest.

Center Focus: If you've ever taken a photo down an alleyway, you've likely taken a center focus shot without even knowing it. Another trick for calling attention to something is to frame your area of interest and allow the sides to become blurred.

Well, that's about it. If you've got more to add to this discussion on focus, please be sure to chime in down below. Thanks!
 
JodyBuchanan

JodyBuchanan

Member
Joined
May 10, 2021
Messages
138
Reaction Score
0
Points
21
  • #20

Manual vs. Autofocus​

As you probably already know, there are two methods for focusing your lens; manual and autofocus. With manual focus, you physically use your hand to turn the focus ring on your lens. With autofocus, your camera makes the decision where to focus. To do this, your camera makes some calculations based on distance and contrast between pixels to determine what to focus on. While using your camera's autofocus feature can be tricky at times, it can also be a huge time saver.

In today's post, I'll write about both manual focus and autofocus. I'll do a bit of explaining about each one and then I'll compare them, as to allow you to make better decisions when you're deciding which to use. None of this is particularly difficult to understand, but it will require some note taking. Because methods aren't switched between very often, it's easy to forget which feature does what.

What are Autofocus Points?

I'm sure you've seen these before. If you're looking through your viewfinder, they appear as small boxes that somehow hover on the glass. If you're looking at your live view screen, they can appear as a larger box or smaller individual boxes. On my Canon T7i, when I look through the viewfinder, I see either one small black box or multiple even smaller black boxes, depending on which mode I'm in. When I look at the larger LCD screen on the back of the camera, I see a large white box and then when I focus the lens, I see smaller green boxes inside of that white box. Again, depending on which autofocus mode I'm using.

No matter what type of camera you're using, some boxes should appear as you focus your lens. These boxes can take the shape of a diamond or a rectangle grid. That's what the Canon T7i has - a grid. When using the rear LCD screen, I can use my finger to move my focal point around anywhere I want. I can also use the arrow buttons to accomplish the same thing.

Focus Point & Plane

This is a concept you should really learn early on, as it'll help you immensely throughout your photography career. When you hear the phrase "focus point," think about the sharpest area your camera sees in your scene. So if you're taking a photo of someone's face and you focus on something in particular, that thing is the focus point. Now that you know the focus point, pretend that someone walks over to the person's face and holds up a piece of glass that, when you look at it, is flat to you, meaning, it's perpendicular, as if you're looking out a window. If the person held that piece of glass up at exactly the distance of your focus point, you'd know your focal plane. When you focus your camera, all it's really doing is making something at a specific distance sharp. So in the case of above, even though you're focusing on someone's face, anything else in the scene that's exactly the same distance away from you will be in focus as well. And as you change your focus to something else, that focal plane will change as well. It'll either move closer or farther away from you.

Many lenses also have the ability to focus on infinity. Actually, you're not focusing on a point in infinity, you're focusing on everything in the universe after a certain point. The way the lens does this is complex and it's the subject of another post, but just know that if your lens has a small window on it that shows the infinity symbol when you move your focus dial all the way in one direction, you've got that option.

When it comes to both manual and autofocus (AF), there are a few advantages and disadvantages to both. I'll cover them below.

Manual Focus

Pros: You've got total control over your focus. You can use the magnifier tool on your camera to zoom your focus in and fine tune it from there. Also, once you set your focus, it stays that way until you change it manually.

Cons: This type of focus is usable only when both the photographer and the subject are still. So it's really great for use on a tripod taking still life shots. Also, when you're trying to use manual focus while looking through the viewfinder, it's difficult to see what's actually in focus in your scene. The window is too small for that type of thing.

Autofocus

Pros: This is the easiest type of focus to use. Anybody can use it because the camera does all the work. Also, when set correctly, it's extraordinarily accurate.

Cons: Sometimes, the autofocus mechanism doesn't know what to focus on. This can occur if your scene is dark or if you've got layers of objects, where some things are closer and some farther away from the camera. While the camera can certainly choose something to focus on, it may not be the correct thing. Also, the closer you zoom into your subjects, the less accurate the focus becomes. Macro photography can be problematic for AF. This was mentioned above, but when using AF through your viewfinder, that grid of boxes remains centers on the glass. You can't move them, so if you'd like to focus on something off to the side, you're out of luck. And finally, it uses up battery power.

Two Kinds of AF Modes

This is probably the most confusing part of using your camera's autofocus, so if you can get through this, you'll be fine. If you've ever tried to focus on an object and found that once it's in focus, but the camera continued to hunt for something to focus on, this will help you out tremendously. No more frustration. Essentially, there are two different styles of autofocus on your camera. The first style allows you to focus on something, and once that thing is focused upon, the focusing will stop. You can move your camera in any direction you want, or your subject can move anywhere it wants, but if your finger is still pressed half way on that shutter button, that focus won't change at all. It'll be locked in. This type of focus is called One Shot, Single Shot, or AF-S. So if you'd like this type of focus on your camera, look for those phrases in your settings.

If you'd like your camera to continue to focus on your subject though, you can set that option as well. Think about sports games where you're taking photos of a specific player or when you're taking photos of dogs running around. It wouldn't help very much to focus once and have your camera locked that way. Continuous, AI-Servo, or AF-C continuously updates your lens's focus point, depending on what you point it at. This is super helpful for wildlife and action photography.

So there you have it. I bit of background on your camera's focal options. If you know more than I just shared, don't hesitate to share down below. I love reading what others have to say. Thanks!
 
JodyBuchanan

JodyBuchanan

Member
Joined
May 10, 2021
Messages
138
Reaction Score
0
Points
21
  • #21

How to Select Autofocus Points​

Using autofocus on your camera is a no-brainer. It's what most of us do, unless we're in a very specific type of situation where we need to focus in on something in particular. And even then, we tend to lean toward autofocus because of its exacting measurements. Believe it or not, when a camera focuses on something, it's doing a better job of distinguishing the contrast in pixels than we'll ever be able to. So it's worth it to learn how to use autofocus to the best of our ability, which is what I hope to convey here.

In today's post, I'll walk through a common scenario of first using camera chosen autofocus points and then using manually chosen autofocus points. Using the camera chosen points is super easy. Using the manually chosen ones is just as easy, but will require an extra step or two.

Using Camera Selected Autofocus

1. Choose Your Mode: For this exercise, I'll choose Program mode with work within. I'll actually be writing an entire post on what exactly Program mode is in the future, but for now, just set your camera to P if that's what you have or the Program mode equivalent.

2. Compose Your Image: At this point, go ahead and set your camera up. a tripod is preferred so you can use both hands. In the field and after you know what to do, you can skip the tripod, but for now, use one. Point your camera toward a multi-object scene where the objects are of varying distances. Then, push your camera's shutter button down half way to focus.

3. Notice Your Focus Point: As you're looking through your camera's viewfinder, notice which boxes are either illuminated or are larger than the others. These boxes will be what your camera has chosen to focus on. Typically, your camera will focus on the foremost object, but not always. What your camera has focused on may or may not be what you would like it to focus on.

4. Take Your Photo: Go ahead and push the shutter button all the way down to capture your image.

Using Manually Selected Autofocus

1. Follow Previous Steps: To use the manual mode of autofocus in your camera, please follow the previous three steps. Basically, you want to set up your shot, focus, and then notice your focus point.

2. Move Your Focus Point: After focusing on your scene, you can choose to override the camera's chosen focus point and choose your own. Camera's vary with how to do this, so I'll explain how I do it on my Canon T7i. After I focus on my scene, I'll press the small button that's situated in the upper right hand corner of the rear of my camera. It's the one with the small magnifying glass with the + symbol inside of it. When I press that button and continue to look through the viewfinder, I'll notice a whole bunch of red boxes appear in the glass. Those are the optional focus points. If I roll the dial that's on the top of the camera back and forth or use the four arrow keys on the back of the camera, I can choose my own red box location, essentially telling the camera which part of the scene I'd like it to focus on.

Another option is to press the Q button on the rear of the camera while in viewfinder mode and then touch the Manual Select: Zone AF button. When I do that, I can use the four arrow buttons on the rear of the camera to change the AF zone manually. Either options is good, but the first is faster.

3. Take Your Shot: Once the focus is set, go ahead and press the shutter button down all the way. On my T7i, after the photo has been taken, the red focus point boxes will remain as I review the photos. Those boxes won't appear in the downloaded images. Where those boxes reside, the objects in the image should be sharper than everywhere else.

As you can see, letting your camera choose your autofocus point is easy. And almost just as easy is choosing your own autofocus point. Give it a try and let me know how it goes. Also, if you have anything to add, please do so below.
 
JodyBuchanan

JodyBuchanan

Member
Joined
May 10, 2021
Messages
138
Reaction Score
0
Points
21
  • #22

Lens Focus Questions & Answers​

I just finished reading the chapter of my photography book that covers lens focus. At the end of it was a page that held many questions on the topic. While the multiple choice answers were given, I always have a lot more to say about things. I thought I'd share the questions below with my answers underneath each one. If you've got any concerns or if you'd like to know more about something, please ask in a post here. Enjoy.

Q. Which autofocus mode constantly updates the focus distance to track a moving subject?

A. To start off, I'd like you to notice something in the question. Do you see how the phrase "focus distance" was used? When focusing a lens, what you're actually doing is moving what's called the focal plane nearer or farther away from you. The focal plane is like a pane of glass that's perpendicular to you. I just wanted you to understand that. Regarding the question, there are three options. They are Single, Continuous, and Program. Single focus is when you press your shutter button down half way and lock the focus in. You can move the camera and your subject can completely walk out of the frame. It's no matter; the focus will stay where it originally was. Continuous, on the other hand, updates as things move. It'll automatically update the focal plane as the situation changes. So if your subject moves farther away from you, the lens will take that into account. Finally, Program is a camera shooting mode that allows certain types of focusing. It doesn't describe how the lens itself focuses. so the answer is Continuous.

Q. The farthest distance a lens can focus on is known as what?

A. When you focus on infinity, you are focusing on forever. Some lenses come with an infinity symbol that makes life a lot easier. For those less expensive lenses, it's up to the photographer to locate infinity. A good trick is to find something very far away and focus on that. It's essentially the same thing as infinity. Also, if you're engaging in nighttime astrophotography, a handy trick is to set your lens to focus on infinity during the daytime and the tape the lens focus ring so it doesn't move. That way, you'll be ready to go when the stars come out.

Q. How would you lock focus in Single AF mode?

A. Single AF mode has different names for different camera makes. For Nikon, it's called Single Area AF and for Canon, it's called One-Shot AF. They're basically the same thing. Essentially, when shooting in this mode, you'll choose one point in your scene on which to focus and when your camera determines where the greatest contrast between pixels is, it'll lock the focus there. That is, after you press your shutter button (or otherwise dedicated focusing button) down half way. After pressing this button, the camera will lock focus there and not change it until you let go of the button to repress it later on.

Q. Which symbol represents infinity on a lens?

A. It's a sideways eight. It looks like this: .

Q. Which part of someone's face should always be in focus and sharpest?

A. The eyes are windows to the soul and therefore should be in focus.

Q. What is the closest distance a lens can focus?

A. There is no universally set distance. It depends on which lens you're using. Some have closer minimum focus distances and some have farther ones. The answer to this question, though, is minimum focusing distance.

Q. In automatic AF point selection, where to cameras usually focus?

A. If you aren't familiar with this mode, you'll know you're in it when you see multiple small boxes on your LCD screen or through your viewfinder when focusing, as opposed to only one. But to answer the question, cameras will generally focus on the closes object in the scene while in this mode.

Q. A skylight filter reduces the effects of what type of light?

A. This type of filter is no longer popular, due to the onset of digital cameras. Neither are UV filters. Some folks still use them for protection on the ends of their lenses though. Back when skylight filters were popular, photographers used these them to reduce the effects of ultraviolet light, which sometimes caused colder bluish casting in some sky shots as well as shadowed areas of snow. The filter is slightly magenta colored, which corrects for an altered color balance. Today's cameras can correct for this automatically.

Q. What is Continuous AF sometimes called?

A. It's sometimes called predictive because the camera predicts where the focus should be.

Q. Which camera control can be used to change the AF point?

A. This is a trick question. There are multiple methods for changing the autofocus point. It's commonly done with the arrow keys on the back of the camera, which are also called the multi-controller (multi-selector). You can also change the focus point by using the dial on the top of the camera.

Q. What secondary use to UV filters have?

A. As I mentioned above, many photographers swear by using these inexpensive filters to protect the ends of their lenses. Breaking or scratching a UV filter is a lot better than breaking or scratching the glass in a lens.

Q. What name is Single AF mode sometimes referred to?

A. Again, as I mentioned above, Canon uses the phrase One-Shot and Nikon uses the phrase Single-Area.

Q. At a sporting event, what kind of knowledge helps you anticipate fast moving action?

A. Since you'll always want to know what's to come next while photographing sports, it's helpful to know the rules of the game.

Q. If you over-sharpen a photo, what visual effects do you see?

A. In general, when sharpening an image in Adobe Camera Raw or Photoshop, you increase the amount of contrast that is between pixels or groups of pixels. If you over-sharpen though, halos can form around these same areas.

Q. Skylight filters are which color?

A. This type of filter is a very light pink or magenta.
 
JodyBuchanan

JodyBuchanan

Member
Joined
May 10, 2021
Messages
138
Reaction Score
0
Points
21
  • #23

Camera Shooting Modes Questions & Answers​

I just finished the third section of the book titled Digital Photography Complete Course and made it to the review questions and answers page. I thought I'd ask the questions here and then give my own answers to them. The book's answers consist of one word, so I'll elaborate much more down below. If you'd like further explanation on anything you see here, please ask. I'd be happy to help.

Q. What does Av stand for?

A. Aperture priority. You will find the Av letters on Canon cameras and just A on Nikon cameras, with different variations for different makes and models. This mode is usually set by turning dial on the top of the camera.

Q. What does exposure compensation give you?

A. It gives you the ability to increase or decrease your camera's exposure with the turn of a dial. While you can't choose which point in the exposure triangle (aperture, shutter speed, ISO) will be altered to achieve your goal, it will give you a fast and flexible method for responding to various situations. Remember, this feature is available in automatic shooting modes.

Q. Can you control the depth of field when using Program mode?

A. Yes you can. Program mode offers the ability to change aperture size, shutter speed, and ISO.

Q. If you want to control the depth of field in your pictures, which mode is the best?

A. Aperture Priority mode controls depth of field. Remember though, while increasing and decreasing the size of your lens's aperture does add or remove blur from the foreground and background of your photos, so does distance between your camera and the subject itself. The closer you are to the subject, the more blur will be introduced (shallow depth of field). The farther you are away, the less blur (deep depth of field). All other things being equal, a smaller aperture will result in a deeper depth of field (less blur) and a larger aperture will result in a more shallow depth of field (more blur).

Q. What mode should you use to capture an athlete in action?

A. You should use Sports Mode because it's geared to increase the shutter speed, which will restrict motion blur in your photos.

Q. What does the flower symbol mean?

A. Close-up or Macro mode. With these modes, the camera sets itself to slow down the shutter speed and open up the aperture. The result will be a photo with a more shallow depth of field, but exposed well due to more light coming through the lens because of a larger aperture.

Q. What mode is best to photograph someone at night?

A. Using Night mode is best for night photography, although, only select cameras offer this mode. Night mode opens the aperture wide and fills the area with light by using the flash. If you know your settings, you can also use Program mode.

Q. What will you gain from using the various modes on your camera?

A. You'll gain more creative control than using Auto mode alone. Each mode is geared towards allowing you to make more or fewer setting adjustments on your own. By using the various modes, you can tell the camera what type of situation you're currently in and allow it to help you by making various adjustments.

Q. In Sports mode, what will the camera give priority to?

A. Sports mode is all about capturing a scene and reducing motion blur, so the priority will be on making the shutter speed faster, while compensating for the reduction of light by enlarging the aperture and increasing the ISO value.

Q. Using Shutter Priority mode will give you control of what?

A. Shutter Priority mode allows the user to adjust the speed of the shutter. On Canon cameras, Shutter Priority mode is marked with Tv.

Q. Which mode should you select if you want a shallow depth of field for a portrait?

A. You should use Aperture Priority mode to control the depth of field in a portrait. If you'd like the depth of field to be shallow, increase the size of the aperture (smaller number, such as f/1.2 and f/2 as opposed to f/16 and f/22).

Q. How would you stop a subject from being silhouetted against a brightly lit background?

A. In cases like these, the camera will want to reduce its exposure due to so much light in the scene, which will result in your subject appearing as a silhouette. To correct the exposure problem, use your exposure compensation feature to increase the exposure.

Q. An exposure setting of 1/1000th second with an aperture of f/4 is the equivalent of what?

A. The answer is 1/125th second at f/11. For each "stop" of an exposure setting, you either half or double the amount of light the camera sensor absorbs, so by moving 1/1000th of a second for shutter speed to 1/125th of a second, you're slowing the shutter speed by three stops. To compensate for this, you'd need to close (reduce the size of) the aperture by three stops as well, which equals f/11. Mind you, these settings depend on your camera and lens. There may be more or fewer options available to you and your camera. Please see graphic down below.

Q. What kind of shutter speed would you choose if you wanted to freeze the action?

A. A fast one, depending on how fast the action is. The faster the action, the faster the necessary shutter speed. Think of a shutter as an eyelid. The faster you blink, the less movement you see.

Q. In the automatic and semi-automatic modes, what is the feature that gives you extra control over your exposure?

A. This would be the exposure compensation feature. This feature overrides your camera's initial settings, giving you want you need to properly expose your images.

f-stops-shutter-speed.jpg
 
Top