EmeraldHike
Member
- Joined
- May 10, 2021
- Messages
- 133
- Reaction Score
- 0
- Points
- 21
- #1
Before participating in any type of photo shoot, it’s important to decide what kind of quality is necessary in your photographs. If you’re being paid, such as portrait, wedding and sport photographers oftentimes are, you’ll want to be sure to set your Canon Rebel to the highest quality output possible. Conversely, if you’re shooting to email your mom a picture of a flower on the sidewalk outside your apartment, you’ll likely want to choose something that offers much less quality.
Another important consideration is whether or not you plan on printing or cropping the photos you take. If you’re merely taking shots for digital use, such as for presentation on a blog or website, smaller sized images usually work well. But, if you’re planning on printing a photo or cropping a small section of one, you’ll definitely want to increase the quality as much as possible.
In today’s post, I’ll walk you through the steps necessary to locate, select and save your camera’s photo quality. We’ll look at both RAW and JPEG outputs and talk about why you might want to choose one over another. Once in the settings area, I’ll explain what each setting means. For this post, I’ll be using my trusted Canon Rebel T3i as the demo camera and I’ll be shooting with a Canon Rebel T2i. Really though, so many aspects of the cameras in the Canon Rebel line are similar, so you may be able to use what I share below with the other models, such as the T4i, T5i, T6i and the latest (at the time of this writing) T7i.
Quality comes from the number of pixels that are utilized in a photo. A pixel is a physical point in an image. It’s the smallest addressable element. It’s the smallest controllable element of a picture represented on the screen.
If you are taking photos that use a very high number of pixels, that photo will most likely be of high quality (assuming the conditions are good and your camera is capable). Conversely, if you’re using a low number of pixels in your photos, those photos aren’t going to exhibit nearly the same quality as the previous ones.
When it comes to resolution, things get a bit more complex. There are many types, such as pixel resolution, spacial resolution, spectral resolution, temporal resolution and radiometric resolution. Luckily, most of these type are far beyond the scope of this post, but if you’re interested in learning about all the differences image resolution has to offer, simply search this forum.
Think of it this way. Every photograph has a dimension. Let’s say every photo is square, so the height and width are the same values. High quality photos might be 100 x 100 pixels, offering a resolution of 10,000. Medium quality photos might be 75 x 75 pixels, offering a resolution of 5,625 and low quality photos might be 50 x 50 pixels, offering a resolution of 2,500.
Now, if I take that total photo resolution and divide it by one million, I get what’s called a megapixel. The number of megapixels a camera offers usually represents the quality. See? It’s a big circle.
Just to finish up this section with a real world example – I’ll do a quick calculation using one of the quality settings that my T3i offers. On my camera, one of the Medium settings uses a pixel dimension of 3456 x 2304. So, if I multiply those two numbers together, I’ll get a value of 7,962,624. If I divide that number by 1,000,000, I’ll end up with 7.962624. Rounded up, we’ve got 8 megapixels.
So, next time you go shopping for a camera, look at the number of megapixels the camera offers. That is a quick indication of photo quality, among other things (features, dynamic range, etc…).
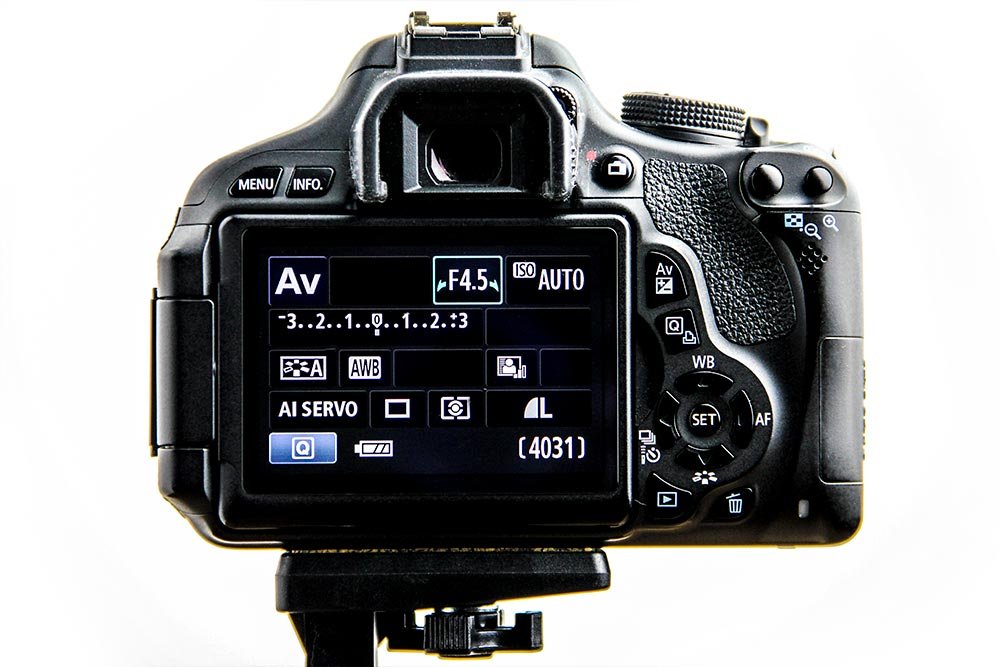
To find the Quality settings, turn the camera on. Something like this should be showing on the LCD screen:

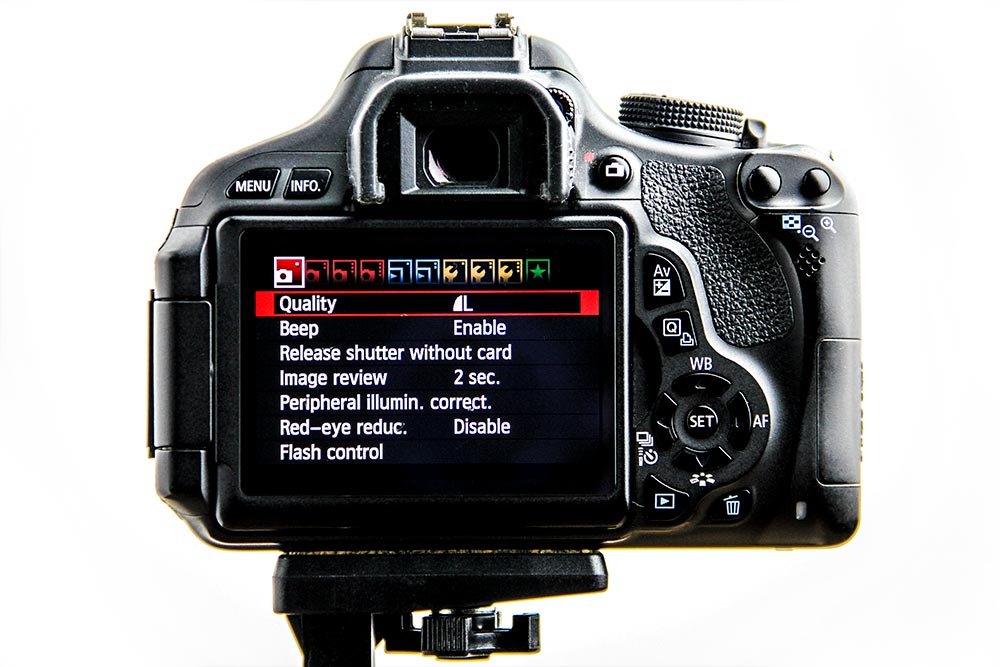
Next, press the Menu button that’s located to the top left of the screen. This is what you’ll be looking at next:

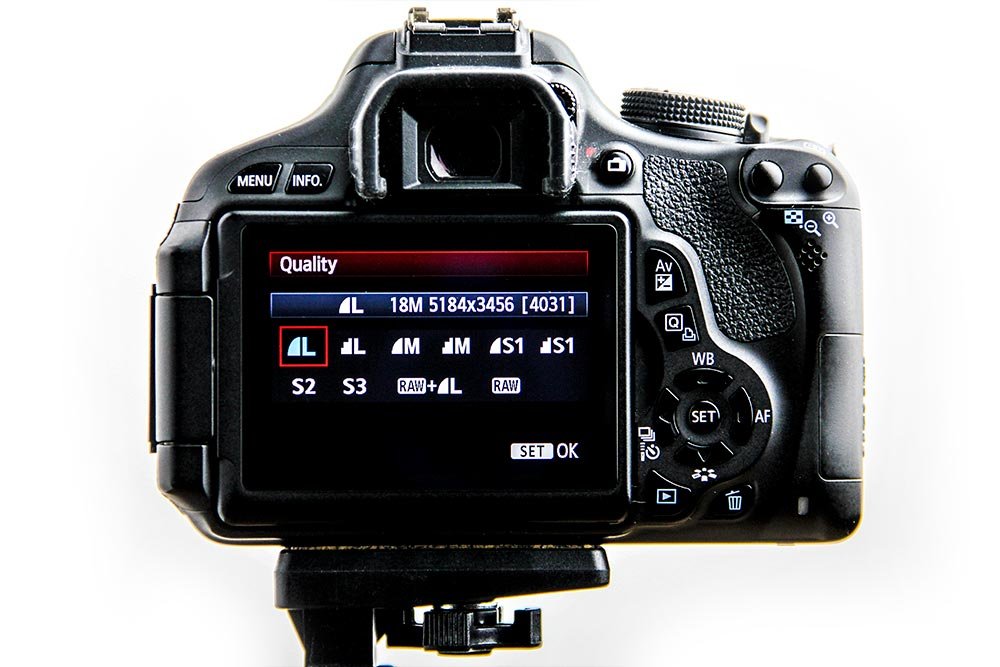
After that, use the left and right arrows that are located to the right of the LCD screen to navigate to the screen that holds the Quality section. Once there, select that section by pressing the Set button that’s located in between the left and right arrows. This is the Quality screen:

To browse and select a particular quality setting, simply use the arrows again to flip through each one of them and when you make a choice, press Set again. That will lock that setting in and you’ll be ready to begin shooting.
To make things easier, I created a table to clearly display the pixel dimensions and corresponding megapixels for each available setting. If you take a look below, you’ll see what I’m referring to.
L – Large 5184 x 3456 (18 MP)
M – Medium – 3456 x 2304 (8 MP)
S1 – Small – 2592 x 1728 (4.5 MP)
S2 – Small 2 – 1920 x 1280 (2.5 MP)
S3 – Small 3 – 720 x 480 (0.35 MP)
RAW + L – Large 5184 x 3456 (18 MP)
RAW – 5184 x 3456 (18 MP)
If you’re photographing for print, use either the Large JPEG setting or the RAW one. This will give you the greatest resolution. If you’re printing an 8″x10″ card or photo, you can most likely get away with a Medium setting, but I would still use Large. If you’re shooting for the web, you can use either Small 1 or Small 2, but I would still use Large. I crop and wouldn’t want to be limited by physical image size.
The reason I say to use Large all the time is because the file size isn’t that different (in the grand scheme of things). Personally, I use a huge data card in my cameras and generally keep them clean of images. I’ve yet to run out of space. I have, however, taken photos that were too small and have regretted it.
If you look at the available settings above, you’ll notice the options for RAW down towards the bottom. This RAW designation differentiates those two settings from all the others. The top five settings all produce JPEG images, which are altered and compressed versions of a RAW image. I’ll talk about both of these formats below.
Before I do that, I want to mention that you can choose JPEG + RAW and your camera will capture the photo and process it into both file types. This is great if you need to use one type (JPEG) immediately and would like to edit the RAW when you have time later on.
In the most basic sense, when shooting RAW, you are taking advantage of flexibility and a much larger dynamic range than you would be if you were shooting JPEG. If you’re outside, this makes a huge difference. Believe it or not, I’ve found that with my type of indoor food photography, JPEG images actually produce better photographs. It requires experimentation on your end to weigh the pros and cons of each format.
The highest quality JPEG setting says L and has an efficient quality compression. This is the one with the smooth triangle to the left of it. It’s the first one in the list and is described as 18M 5184 x 3456 [4031]. Translated, this means that the resolution is 18 megapixels with the dimensions of 5184 x 3456 and I can fit 4031 photos, at this setting, on my current memory card.
If I move one spot to the right and select the Large setting with the staggered staircase to the left of it, things slightly change. The staircase means that the compression is of a lower quality, resulting in a smaller file size. A lower quality compression is a lower quality photo. With this setting chosen, I see that while the resolution stays the same as the previous setting, I’m now able to fit 8115 photos on the memory card. This is nearly double, which is an indication of image quality.
I hope I’ve given you some background on camera quality settings. I could go on all day about this, but really, I need to stop at some point. If you have any questions, please leave them below. I’m always happy to help. Thanks!
Another important consideration is whether or not you plan on printing or cropping the photos you take. If you’re merely taking shots for digital use, such as for presentation on a blog or website, smaller sized images usually work well. But, if you’re planning on printing a photo or cropping a small section of one, you’ll definitely want to increase the quality as much as possible.
In today’s post, I’ll walk you through the steps necessary to locate, select and save your camera’s photo quality. We’ll look at both RAW and JPEG outputs and talk about why you might want to choose one over another. Once in the settings area, I’ll explain what each setting means. For this post, I’ll be using my trusted Canon Rebel T3i as the demo camera and I’ll be shooting with a Canon Rebel T2i. Really though, so many aspects of the cameras in the Canon Rebel line are similar, so you may be able to use what I share below with the other models, such as the T4i, T5i, T6i and the latest (at the time of this writing) T7i.
Pixels & Resolution
Above, I mentioned the word “quality.” I think I made an assumption that everyone knows what I mean when I say that. I really shouldn’t. For example, let’s pretend that I was speaking to someone who has never had an interest in photography and I said to them, “Be sure you use the highest quality for this photo.” Would they know what I was talking about? Probably not. I should clarify.Quality comes from the number of pixels that are utilized in a photo. A pixel is a physical point in an image. It’s the smallest addressable element. It’s the smallest controllable element of a picture represented on the screen.
If you are taking photos that use a very high number of pixels, that photo will most likely be of high quality (assuming the conditions are good and your camera is capable). Conversely, if you’re using a low number of pixels in your photos, those photos aren’t going to exhibit nearly the same quality as the previous ones.
When it comes to resolution, things get a bit more complex. There are many types, such as pixel resolution, spacial resolution, spectral resolution, temporal resolution and radiometric resolution. Luckily, most of these type are far beyond the scope of this post, but if you’re interested in learning about all the differences image resolution has to offer, simply search this forum.
Think of it this way. Every photograph has a dimension. Let’s say every photo is square, so the height and width are the same values. High quality photos might be 100 x 100 pixels, offering a resolution of 10,000. Medium quality photos might be 75 x 75 pixels, offering a resolution of 5,625 and low quality photos might be 50 x 50 pixels, offering a resolution of 2,500.
Now, if I take that total photo resolution and divide it by one million, I get what’s called a megapixel. The number of megapixels a camera offers usually represents the quality. See? It’s a big circle.
Just to finish up this section with a real world example – I’ll do a quick calculation using one of the quality settings that my T3i offers. On my camera, one of the Medium settings uses a pixel dimension of 3456 x 2304. So, if I multiply those two numbers together, I’ll get a value of 7,962,624. If I divide that number by 1,000,000, I’ll end up with 7.962624. Rounded up, we’ve got 8 megapixels.
So, next time you go shopping for a camera, look at the number of megapixels the camera offers. That is a quick indication of photo quality, among other things (features, dynamic range, etc…).
Finding the Quality Settings on a Canon Rebel T3i
In this section, I’ll show you how to navigate to the Rebel’s quality settings. I’ll take a few photos of the camera and then talk about what’s going on.To find the Quality settings, turn the camera on. Something like this should be showing on the LCD screen:

Next, press the Menu button that’s located to the top left of the screen. This is what you’ll be looking at next:

After that, use the left and right arrows that are located to the right of the LCD screen to navigate to the screen that holds the Quality section. Once there, select that section by pressing the Set button that’s located in between the left and right arrows. This is the Quality screen:

To browse and select a particular quality setting, simply use the arrows again to flip through each one of them and when you make a choice, press Set again. That will lock that setting in and you’ll be ready to begin shooting.
Choosing a Resolution Setting
In this section, I’ll discuss what each of the quality settings in the Canon Rebel T3i mean. Now, even if you don’t own a Canon Rebel, these settings are somewhat universal, so just follow along. You’ll likely have the opportunity to make similar adjustments on your own camera.To make things easier, I created a table to clearly display the pixel dimensions and corresponding megapixels for each available setting. If you take a look below, you’ll see what I’m referring to.
L – Large 5184 x 3456 (18 MP)
M – Medium – 3456 x 2304 (8 MP)
S1 – Small – 2592 x 1728 (4.5 MP)
S2 – Small 2 – 1920 x 1280 (2.5 MP)
S3 – Small 3 – 720 x 480 (0.35 MP)
RAW + L – Large 5184 x 3456 (18 MP)
RAW – 5184 x 3456 (18 MP)
If you’re photographing for print, use either the Large JPEG setting or the RAW one. This will give you the greatest resolution. If you’re printing an 8″x10″ card or photo, you can most likely get away with a Medium setting, but I would still use Large. If you’re shooting for the web, you can use either Small 1 or Small 2, but I would still use Large. I crop and wouldn’t want to be limited by physical image size.
The reason I say to use Large all the time is because the file size isn’t that different (in the grand scheme of things). Personally, I use a huge data card in my cameras and generally keep them clean of images. I’ve yet to run out of space. I have, however, taken photos that were too small and have regretted it.
If you look at the available settings above, you’ll notice the options for RAW down towards the bottom. This RAW designation differentiates those two settings from all the others. The top five settings all produce JPEG images, which are altered and compressed versions of a RAW image. I’ll talk about both of these formats below.
Before I do that, I want to mention that you can choose JPEG + RAW and your camera will capture the photo and process it into both file types. This is great if you need to use one type (JPEG) immediately and would like to edit the RAW when you have time later on.
The Difference Between JPEG & Raw
Since this is sort of a deep topic that I haven’t covered yet, I decided to link to a few different outside posts that do a pretty good job of explaining what’s going on. Rest assured though, I’ll soon be writing and sharing my own interpretation of the issue.In the most basic sense, when shooting RAW, you are taking advantage of flexibility and a much larger dynamic range than you would be if you were shooting JPEG. If you’re outside, this makes a huge difference. Believe it or not, I’ve found that with my type of indoor food photography, JPEG images actually produce better photographs. It requires experimentation on your end to weigh the pros and cons of each format.
Quality of Compression
If you look at the last photo above – the one that shows the Quality screen – take notice of the small icons to the left of some of the JPEG settings. These icons either look like a smooth ramp or a staggered staircase. For the longest time, I wondered what these meant.The highest quality JPEG setting says L and has an efficient quality compression. This is the one with the smooth triangle to the left of it. It’s the first one in the list and is described as 18M 5184 x 3456 [4031]. Translated, this means that the resolution is 18 megapixels with the dimensions of 5184 x 3456 and I can fit 4031 photos, at this setting, on my current memory card.
If I move one spot to the right and select the Large setting with the staggered staircase to the left of it, things slightly change. The staircase means that the compression is of a lower quality, resulting in a smaller file size. A lower quality compression is a lower quality photo. With this setting chosen, I see that while the resolution stays the same as the previous setting, I’m now able to fit 8115 photos on the memory card. This is nearly double, which is an indication of image quality.
I hope I’ve given you some background on camera quality settings. I could go on all day about this, but really, I need to stop at some point. If you have any questions, please leave them below. I’m always happy to help. Thanks!
