Search

Filtering Photos in Adobe Bridge

  • Thread starter LukeLewis
  • Start date
LukeLewis

LukeLewis

Member
Joined
May 7, 2021
Messages
134
Reaction Score
0
Points
21
  • #1
filtering-photos-adobe-bridge.jpg

The true power behind labeling and rating photographs in Adobe Bridge is having the ability to filter specific attributes out from the rest. Without filters, any sort of difference that’s either inherent or created is lost in the abyss. Especially if you’ve got tons and tons of photos.

If the term filter doesn’t mean much to you, think of it this way: search. If you have 100 photos and rated 5 of them with 1 star, you can use Bridge to search all your photos and return only those with that 1 star rating. The idea of filtering and searching are sometimes interchangeable in cases such as these.

In this post, I’ll use the Filter panel to demonstrate exactly how to go about filtering photos via their existing values, such as Date Created, Aspect Ratio and Color Profile. I’ll also talk about how to filter photos via values we create ourselves, such as by Ratings, Labels and Keywords.

My Photos​

My folder of sample photography has been growing by leaps and bounds. I’ve been writing quite a few posts on IndustryEats and the sheer number of photos I’ve been saving from those posts is evidence of that. Here, take a look at what I’ve got.
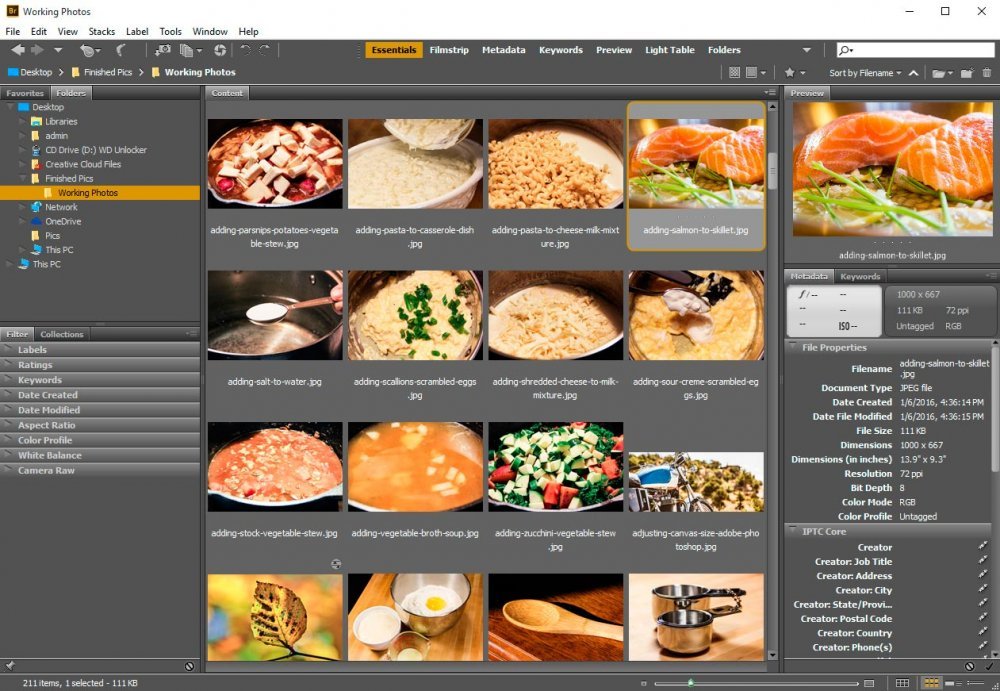
food-photography.jpg

As you can see, I’ve now got 211 items. I’d say that 95% of those items are related to food.

Anyway, these are the photos I’ll be working with to demonstrate the topics I cover in this post.

Introducing the “Filter” Panel​

If you take a look at the screenshot above, you’ll notice a panel located in the lower portion of the left column. It’s titled Filter. If you don’t see this panel there or anywhere else in your install of Bridge, you can launch the panel by going up to the Window > Filter Panel menu and clicking. That should open the panel in your workspace.
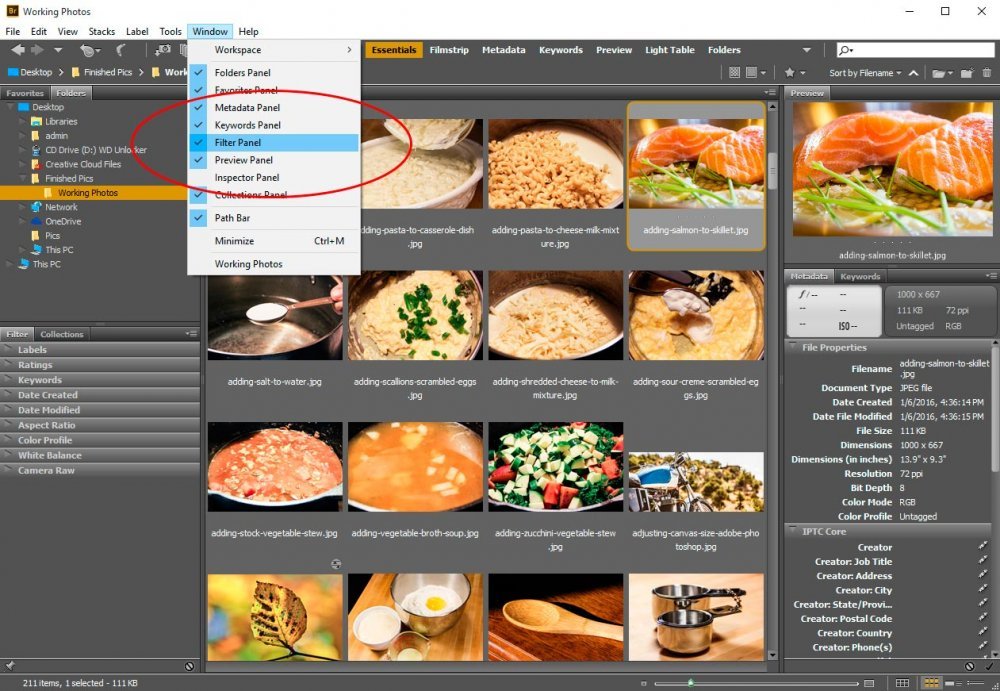
window-filter-panel-adobe-bridge.jpg

It’s inside this panel that I’ll be demonstrating the power of filters.

Inherent Filters​

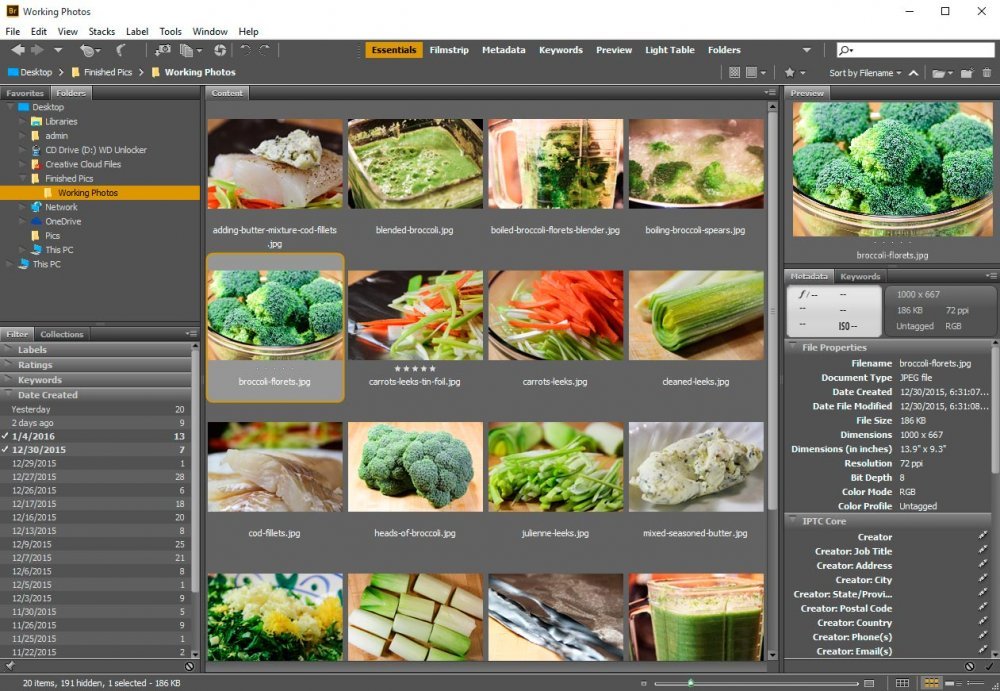
I’m not sure if this type of filter is actually called an inherent filter or not, but that name sure makes sense for me. This is the type of filter that can be used to separate out photographs by the values your camera gives them. An example of this might be Date Created. As far as this type of value goes, there’s nothing I need to do to create it or alter it. It’s simply the date when I took the pictures. Let me show you can example of this.
date-created-filter-adobe-bridge.jpg

If you look at the above screenshot (to enlarge, right click on the image and choose to open image in a new tab), you’ll see that I expanded the Date Created filter area by clicking on the small white arrow to the left of the name. Inside this filter area, I can see the dates taken of all the photos in the folder I’m browsing. As an example, I clicked on two dates – 12/30/2015 and 01/04/2016. Now, in the center Content panel, every photo that wasn’t taken on those two dates disappears.

To remove a filter, simply click on whatever it was you clicked on once more. That’s what I’ll do here, so I can continue on showing you examples.

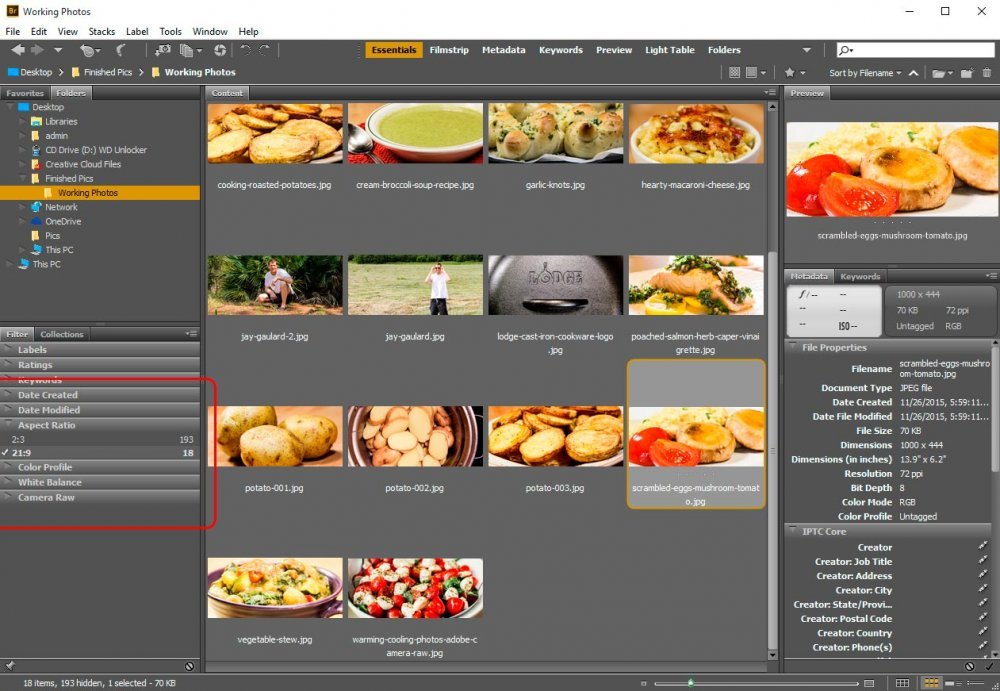
Let’s take a look at the Aspect Ratio filter. This is a fun one that I actually use every so often.
aspect-ratio-filter-adobe-bridge.jpg

If you’ll notice above, I clicked on the aspect ratio of 21:9. This is actually an aspect ratio of 9 wide to 4 high that I use in Photoshop to create the leading photos for this blog and a few others. As you can see, by clicking on this particular ratio, all the other photos (the 2:3 ratio ones) don’t show any longer. This is helpful because I oftentimes need to locate these few photos and sifting through 211 items can be tiresome.

Created Filters​

I described created filters above. Labels, ratings and keywords fall into this category. Basically, anything we added to the Metadata and Keyword panels in Bridge. And let’s not forget the labels and ratings we applied to the photos as well.

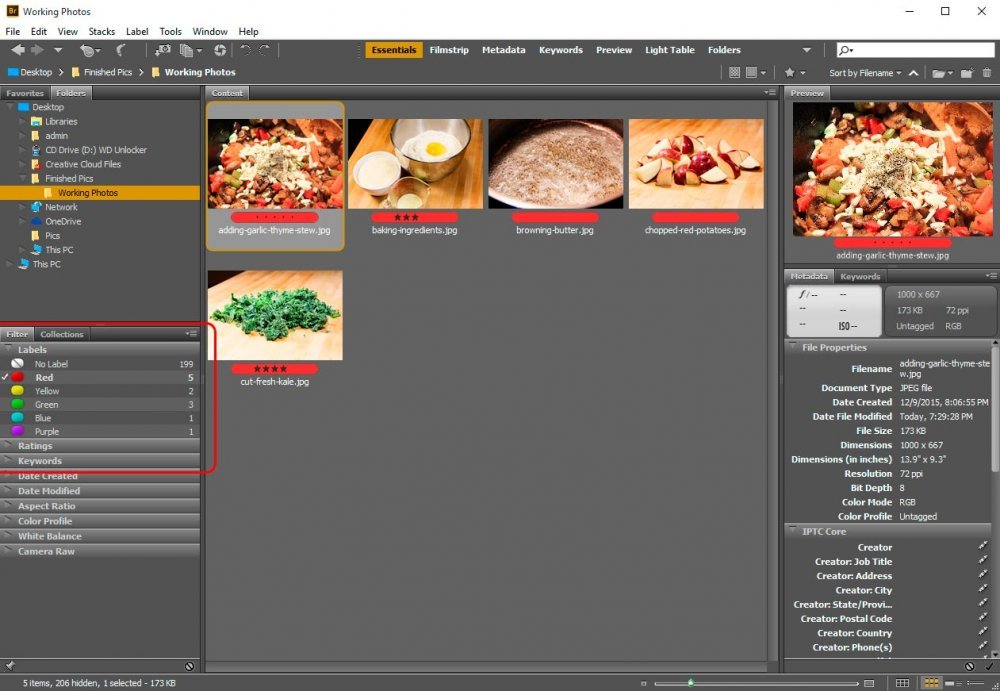
For my next example, I’ll take a look at the Labels area in the Filter panel by, again, clicking the small white arrow. And once I’m inside that area, I’ll click on the Red label to see what I’ve got labeled under that name.
red-label-filter-panel-adobe-bridge.jpg

If I wanted to display all the photos I’ve labeled with any colors, I can simply click on all of them.
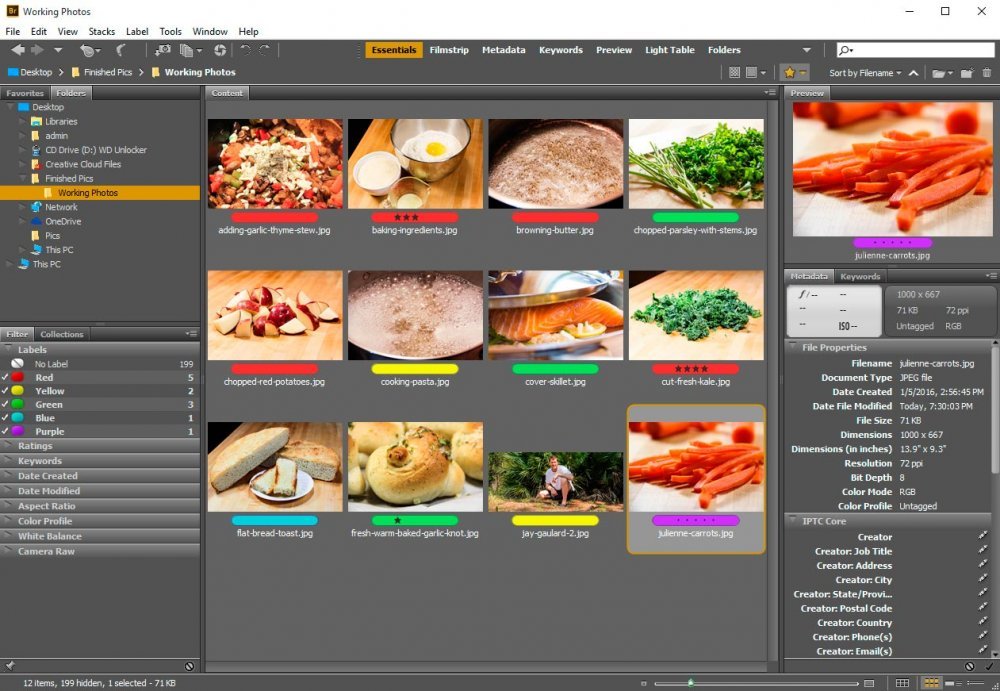
all-labels-filtered-adobe-bridge.jpg

FYI – to filter by star ratings, you would perform the exact same operation, but you’d do it inside the Ratings area of the Filter panel.

Finally, I’d like to show you how to filter by keyword. This is essentially the same thing as any other filter. Once you click on the Keyword arrow inside the Filter panel, you’ll see all of the keywords that you’ve applied to your photos listed out. In my case, I have the following keywords available to filter by:

Chopped Vegetables
Mac & Cheese
Poached Salmon


If I go ahead and click on the Chopped Vegetables selection, everything other than the photos with that keyword applied to it will disappear.
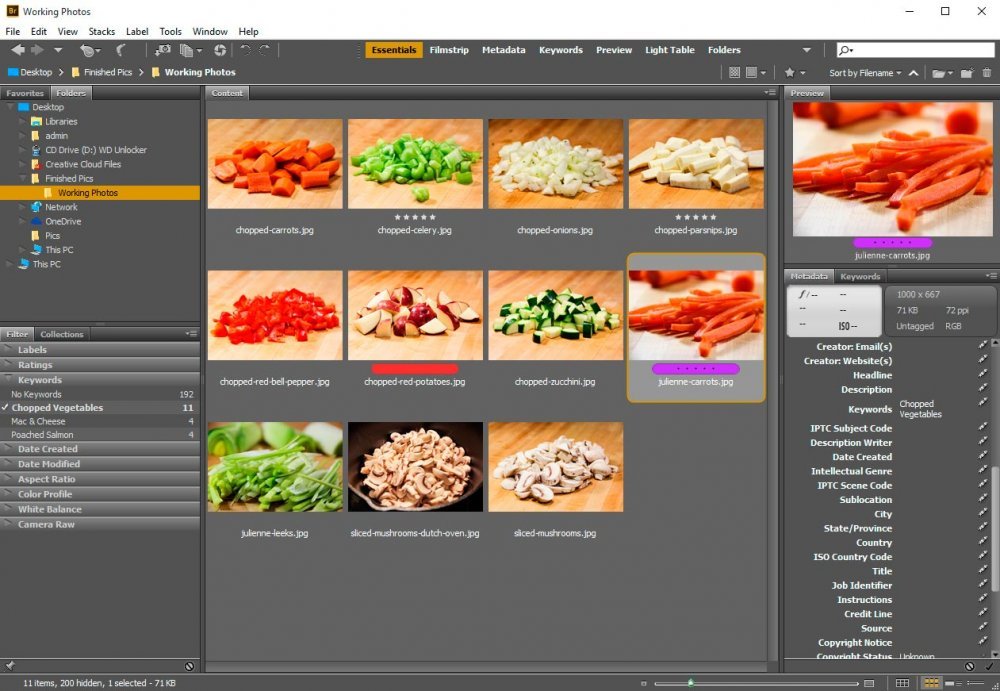
keywords-filter-adobe-bridge.jpg

If I wanted to add another keyword, I’d click on that additional selection. It’s that easy.
 
KristinaW

KristinaW

Member
Joined
May 7, 2021
Messages
127
Reaction Score
0
Points
18
  • #2
The thing that is drastically missing from your discussion is that Bridge Filtering is not additive or subtractive. If I want to see all images of color (keyword Blue) and all images that are (keyword Fabric) you cannot do that in the checkbox filter area. You have to waste a ton of time using the find dialog box and selecting keywords and ensuring you type them correctly and ensuring it works. If I check the Blue keyword and the Fabric keyword, I just want to see all the images that have BOTH of the keywords attached, not all the photos that are Blue AND all the images that are Fabric. This is such a major part of finding photos, I find it hard to believe Adobe makes is so hard after we send countless hours applying the keywords.
 
LukeLewis

LukeLewis

Member
Joined
May 7, 2021
Messages
134
Reaction Score
0
Points
21
  • #3
Thank you so much for the comment! It will doubtlessly help those who use Adobe Bridge on a regular basis. I guess all we can do is wait for an update from Adobe that solves this issue.
 
LukeLewis

LukeLewis

Member
Joined
May 7, 2021
Messages
134
Reaction Score
0
Points
21
  • #4

How to Filter & Reject Files in Adobe Bridge​

When you have a high number of files to sift through after shooting a lot of video or photography, the last thing you want to do is confuse the heck out of yourself when it comes time to organize your work. Wouldn’t it be nice if you could place all your assets in a folder and have everything in plain view? Wouldn’t it also be nice if you could hit a button when you review a photo or video clip that you don’t want to use that would make that file disappear? Wouldn’t it be the best if, while the file disappeared, it wasn’t actually deleted? It was just hidden?

Well, I’ve got a surprise for you. Our favorite file organizing application (and more) offers exactly these features. Adobe Bridge is a master at getting files organized and streamlining workflow. What I just fantasized about above – no problem. Just a few pushes of a few buttons or a couple of simple mouse clicks. You’ll be able to reduce the number of files staring you in the face to the smaller number of quality shots you want to keep. Without ever deleting a single thing. I’m not sure about you, but I certainly have experienced “delete regret.” You know, when you delete that file you thought you’d never use and then want it back later on.

In today’s post, I’ll be working with some sample shots in an effort to explain how they can be easily organized. I’ll, what they call, “reject” the ones I don’t want and keep the ones I do. Then, I’ll show you how you can hide the rejected assets so they’re not in view anymore. Hiding files is perfect for making your work area super efficient. Finally, I’ll show you how to unhide the rejected files and even unreject them. All right inside of Adobe Bridge.

The Content Panel​

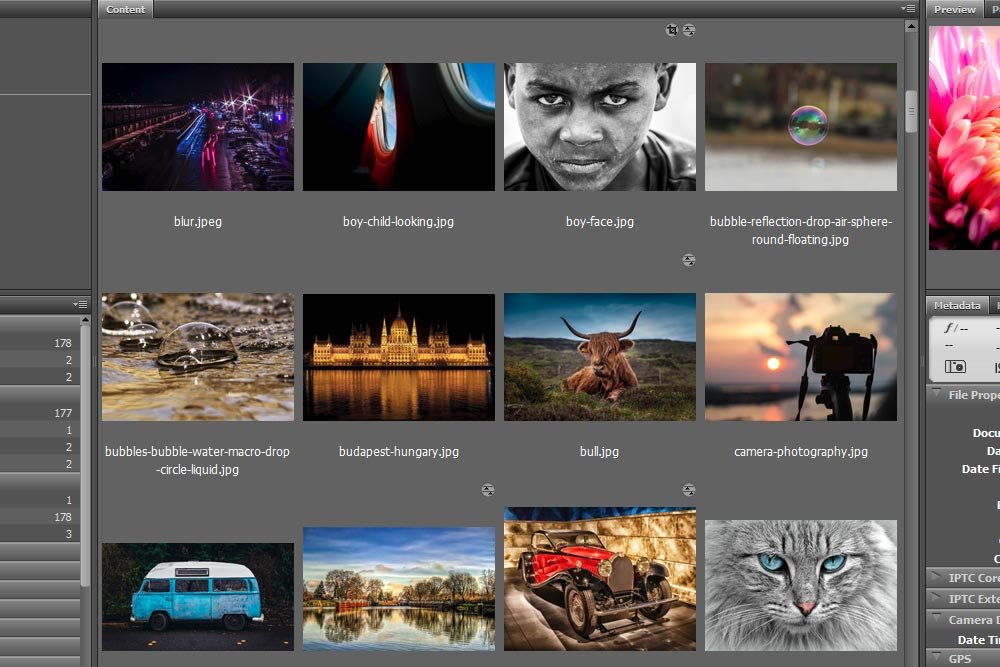
I’ve gone ahead and launched Bridge and browsed to the folder I’d like to work in. Here’s a screenshot of all the visible thumbnails.

bridge-content-panel.jpg

For this post, I’ll pretend that these visible thumbnails are the one’s I’ll be using for a project. Out of the twelve showing, I’d like to use only eight of them.

Rejecting Files​

Now, before I go any further, I want you to know that while I’m using photos in this post, you can do the same thing for any file type. This technique isn’t limited to certain types.

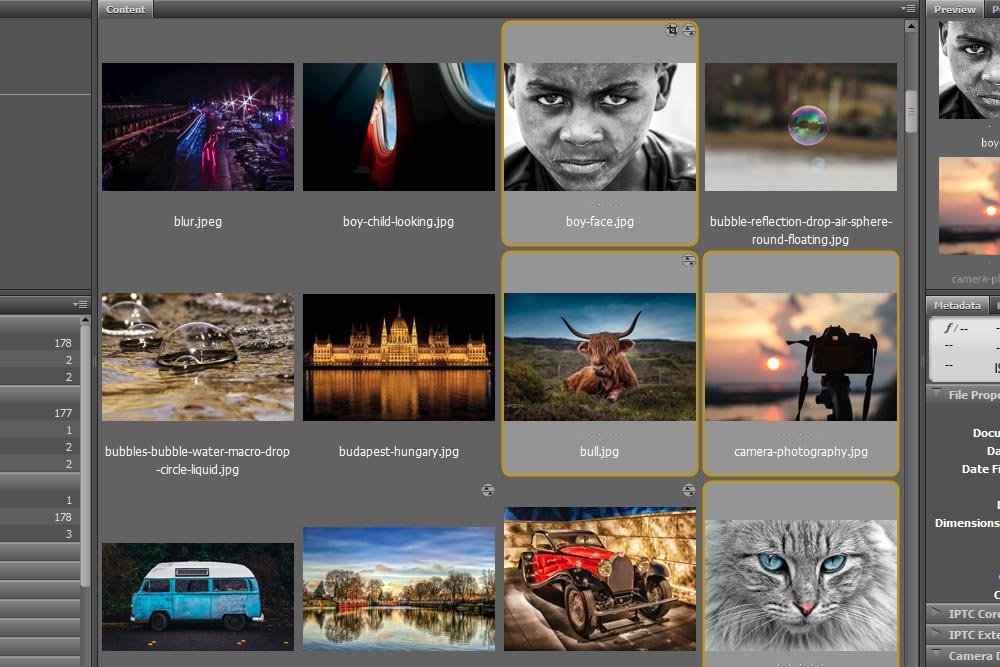
Since my project calls for specific photos, I’m going to reject the boy’s face, the bull, the cat and the camera. To do this, I’ll hold down the Ctrl key on my keyboard and click each one of those thumbnails. They should become highlighted once I do that.

highlighting-thumbnails.jpg

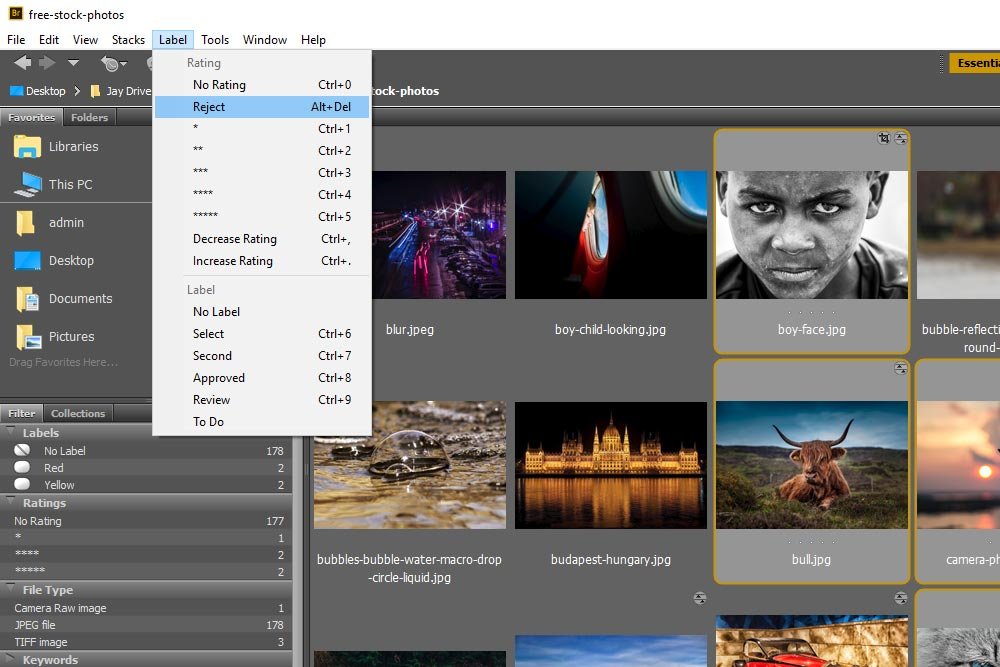
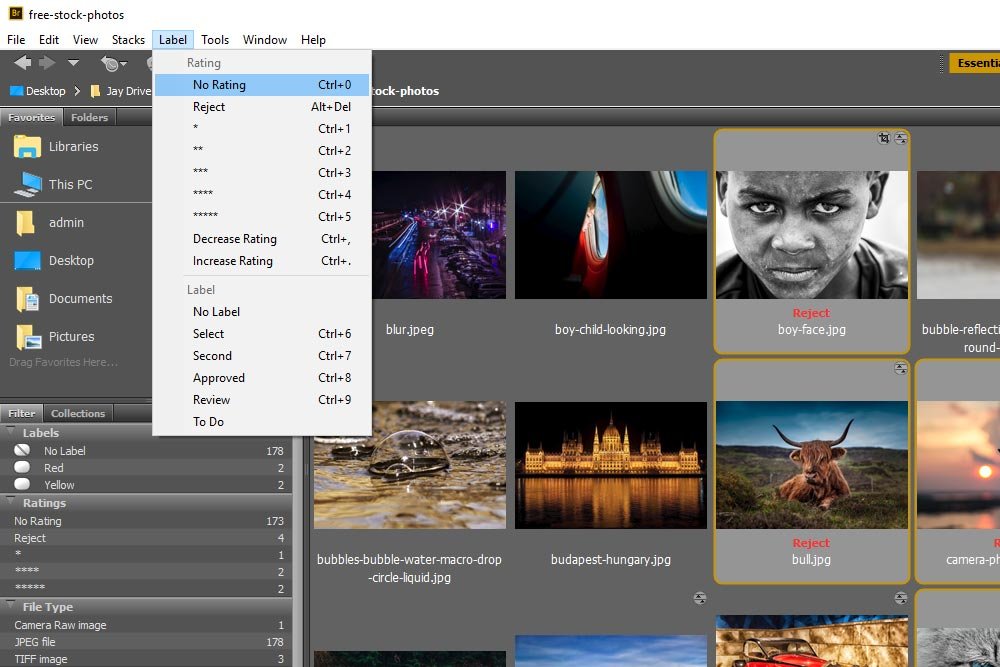
In order to reject these selected files, I can do two things. I can either head up to the Label > Reject menu item and click.

label-reject-menu-item.jpg

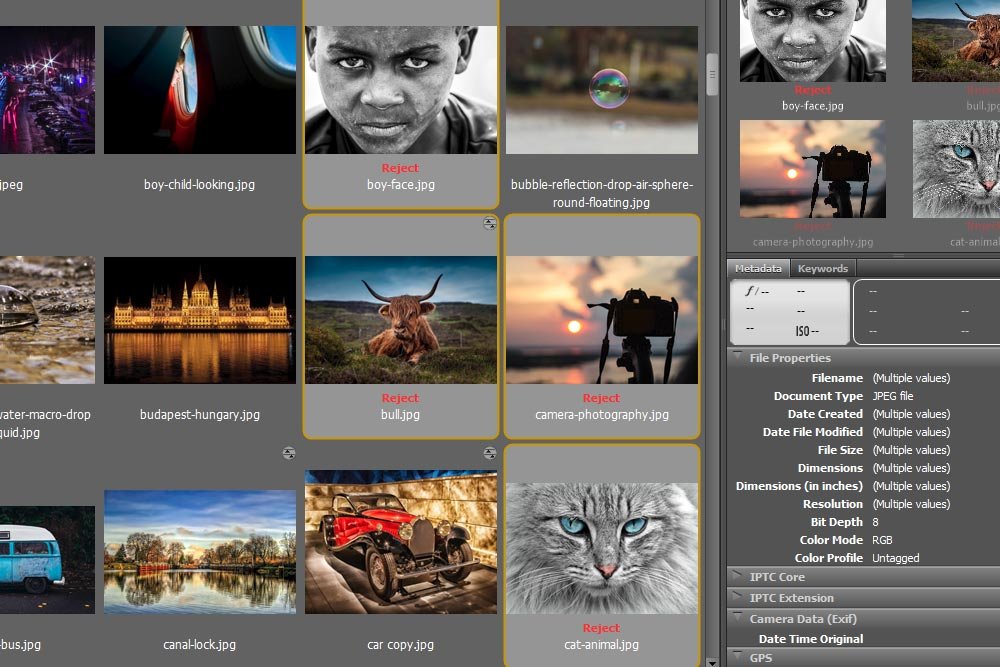
Or, as you can see in the menu, I can use Alt+Del as the keyboard shortcut. Let’s see what the thumbnails look like after I reject them.

rejected-files.jpg

A Reject label has been added to each of these thumbnails.

Hiding Rejected Files​

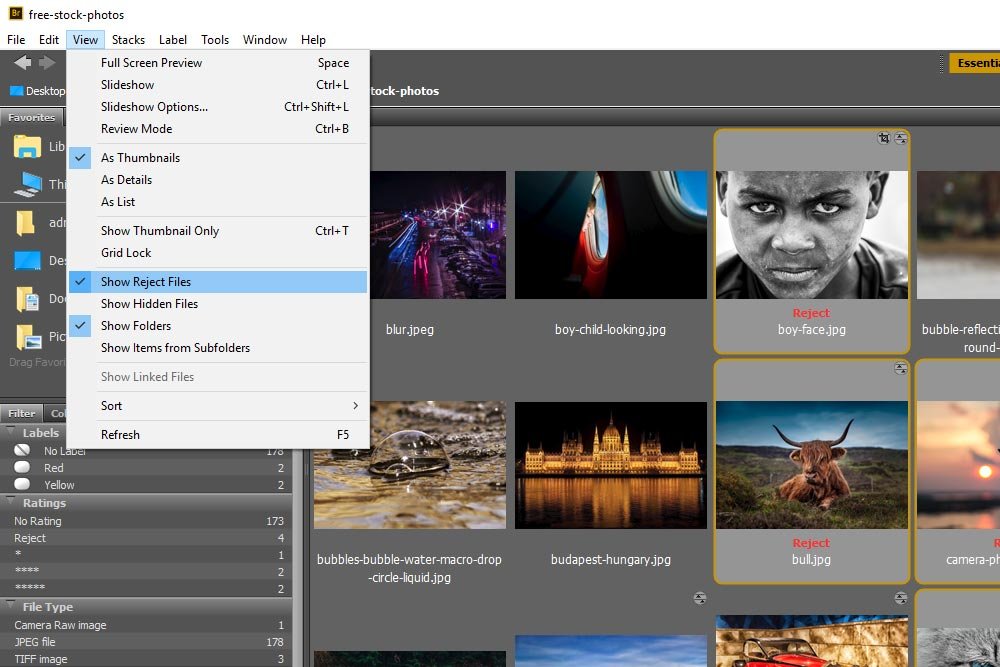
While rejecting files is fun, it doesn’t really help if they are still visible in the Content panel. It’s only after they’re hidden that we experience the magic of cleaning things up.

To hide a rejected file, head up to the View > Show Rejected Files menu item and make sure it’s not checked. If it is, the files will be visible and if it’s not, they won’t be.

show-rejected-files.jpg

I’ll click this menu item now.

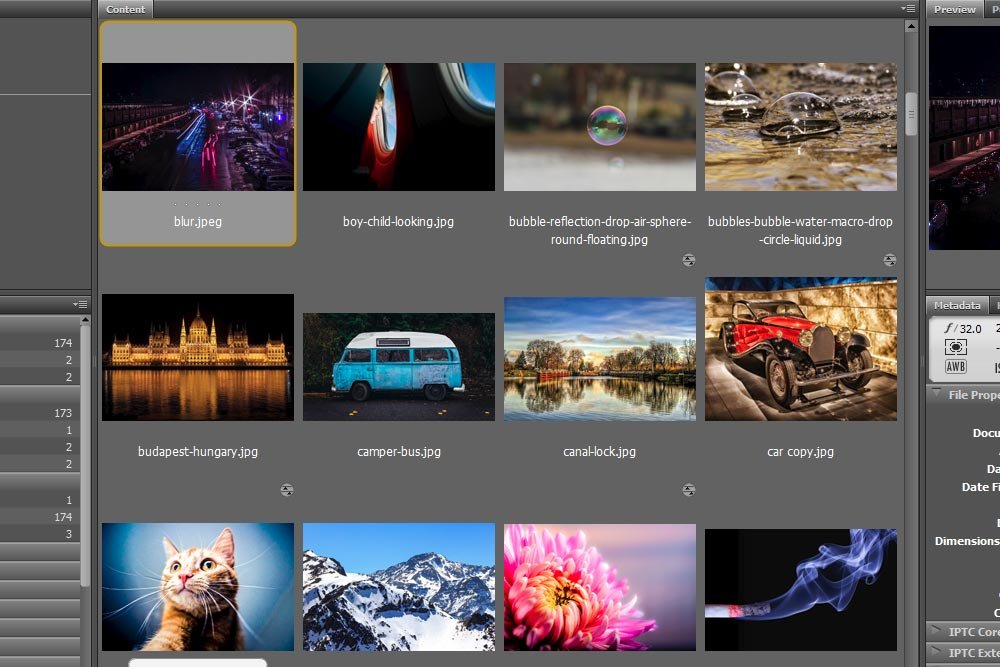
hidden-rejected-files.jpg

As you can see from the above screenshot, the rejected files are no longer visible. They haven’t been deleted, so they’re safe if you even want to use them again. They also haven’t moved anywhere and if you browse their origin folder on your computer, they’ll be perfectly workable. It’s only in Bridge that they’ve been hidden.

To unhide the hidden files, simply visit the View > Show Rejected Files menu again and check it. That will bring the thumbnails back in all their glory.

Unrejecting Files​

You would think there’s a menu item to unreject files. I mean, it’s only fitting that if you reject something that you could reverse course. Apparently not. I had to play around a while to discover exactly how to do this.

To unreject the files I initially rejected, I’ll once again select each of the thumbnails. When they’re highlighted, I’ll visit the Label > No Rating menu item and click.

label-no-rating.jpg

Doing this will clear out the Reject label and bring the files back to their original state. It’s that easy.

——

I hope this post helps you with organizing your workspace in Adobe Bridge. I know it can make a huge difference in cases where the photographer takes many shots of similar items where only a few are kept. Oftentimes, it’s not the intention of the photographer to delete anything – the only thing they want is for the bad ones to disappear. In these types of cases, Bridge’s Reject feature is perfect.

If you have any questions or concerns regarding this post, please leave them below. Thanks for reading!
 
Phoenix1

Phoenix1

Member
Joined
May 7, 2021
Messages
135
Reaction Score
0
Points
23
  • #5
Hi. Thanks for the tip on hiding files in Bridge.

Here is a way to permanently remove multiple files from the catalogue.

1) Create a special keyword. I used remove.
2) Tag the files to be removed with that keyword.
3) Open the catalogue and filter by the remove keyword. This selects all the files to be taken off the catalogue.
4) Select all the visible files.
5) Right click one of the selected files.
6) In the drop down menu select Remove from collection.

The selected files are no longer part of the Bridge catalogue and are safely tucked away in their original folder for later use.
 
WendyMay

WendyMay

Member
Joined
May 11, 2021
Messages
142
Reaction Score
0
Points
21
  • #6
Thanks for the clear explanation! I have a question:

I know Ctrl-Del is for deleting and Alt-Del is for rejecting. However, the first time I hit “Del”, Bridge asked me if I wanted to delete or reject the file. I chose “delete”, since back then I had a slightly different workflow, and selected “don’t ask me again”. In all honesty, I simply hadn’t discovered the ease of using the “reject” label and used to place either a red label or a one star rating on files I didn’t want, then round them up at the end and delete them, once I was sure I wasn’t going to use them.

Obviously that’s precisely the function of the reject label! So now that I’ve repented and want to be able to use *just* the “Del” key to REJECT files, I can’t find any settings option to turn it back to “reject”!

So, to sum it up, Alt+Del rejects, Ctrl+Del deletes, and Del deletes, but I really really want to be able to use “Del” to reject again. Is there any way to do this??

Thanks!!

UPDATE

Eventually I figured it out on my own, and I wanted to post the answer for anyone from the future who might be searching for the same answer lol…

Just reset all warnings. In Bridge, go to Edit -> Preferences, then under “General” click on “Reset” – Reset All Warning Dialogs. The next time you hit “delete” for a file you’ll be asked again and you’ll have your chance to redeem yourself.

Cheers!
 
Top